Citroen JUMPY 2016 2.G Owner's Manual
Manufacturer: CITROEN, Model Year: 2016, Model line: JUMPY, Model: Citroen JUMPY 2016 2.GPages: 595, PDF Size: 12.47 MB
Page 471 of 595

469
5
6
7
3
4
2
Jumpy_en_Chap10c_RCC-1_ed01-2016
Level 1Level 2 Comments
Settings
Audio settings Ambience
Select the sound ambience.
Distribution Sound distribution by the Arkamys
© system.
Sound Adjust the volume or activate volume linked to
speed.
Voice Adjust the voice volume.
Ringtone Adjust the ringtone volume.
Confirm Save the settings.
Settings
Turn off screen Function allowing the display to be switched off.
Pressing the screen reactivates it.
Settings
Profile (1, 2, 3) Activate the profile selected.
.
Audio and Telematics
Page 472 of 595

470
1
89
89
111012
13141516
Jumpy_en_Chap10c_RCC-1_ed01-2016
Level 1Level 2Level 3
Settings and tools Screen configuration
System settings Information
Languages Screen configuration
Audio and Telematics
Page 473 of 595

471
1
8
9
1
1
13
14
15
16
11
10
12
Jumpy_en_Chap10c_RCC-1_ed01-2016
Level 1Level 2 Level 3 Comments
Settings
Secondary page Screen
configuration Animation
Activate or deactivate settings.
Brightness Adjust the level of brightness.
Confirm Save the settings.
Settings
Secondary page System
settings Units
Distance and fuel
consumption
Set the units used for distance, fuel consumption
and temperature.
Temperature
Factory settings ReinitializeReturn to the factory settings.
System info ViewView the versions of the different modules
(system, mapping, risk areas) installed in the
system as well as the updates available.
Confirm Save the settings.
Settings
Secondary page Languages All
Select the language then confirm.
Europe
Asia
America
Confirm
Having selected the language, save the setting.
.
Audio and Telematics
Page 474 of 595

472
1
1718
19202122
Jumpy_en_Chap10c_RCC-1_ed01-2016
Level 1Level 2
Settings and tools Setting the time- date
Setting of the profiles Level 3
Audio and Telematics
Page 475 of 595

473
1
1
17
18
20
19
21
22
Jumpy_en_Chap10c_RCC-1_ed01-2016
Level 1Level 2 Level 3 Comments
Settings
Secondary page Setting the time-date Date
Date
Enter the date and select the date format.
Date format:
Time Time
Set the time.
Time Zone Define the time zone.
Time format: Select the time format: 12h / 24h.
Synchronisation with
GPS (UTC): Activate or deactivate synchronisation with GPS.
Confirm Save the settings.
Settings
Secondary page Setting of the profiles Profile 1
Enter settings for the profiles.
Profile 2
Profile 3
Common profile
Confirm
Save the settings.
.
Audio and Telematics
Page 476 of 595

474
3
4
5
6
7
1
19
Jumpy_en_Chap10c_RCC-1_ed01-2016
Press Settings to display the primary
page.
Profile settings
Audio settings
Press Settings to display the primary
page.
Select " Audio settings ".
Select " Ambience ".
Or "Position "
Or "Sound "
Or "Voice "
Or "Ringtone ".
On-board audio: Arkamys
© Sound
Staging optimises the distribution of
sound in the passenger compartment. The settings for " Position" (All
passengers, Driver and Front only) are
common to all sources.
Activate or Deactivate " Touch tones",
" Volume linked to speed " and
" Auxiliary input ".
The sound distribution (or spatialisation
with the Arkamys
© system) is audio
processing that allows the quality of the
sound to be adapted according to the
number of passengers in the vehicle.
Available only with the 6 -speaker
configuration.
The audio Ambience settings
(6
ambiences available) as well as the
Bass , Medium and Tr e b l e settings
are different and independent for each
sound source.
Activate or Deactivate " Loudness".
Press " Confirm " to save the settings. Press "
Confirm ".
Press the "
OPTIONS" button to go to
the secondary page.
Select " Profile 1 ", "Profile 2 ",
" Profile 3 " or "Common profile ".
Select "
Setting of the profiles ".
Press this button to enter a name for
the profile using the virtual keypad
As a safety measure and because it
requires the sustained attention of the
driver, changes to settings must only be
done with the vehicle stationary
.
Audio and Telematics
Page 477 of 595

475
3
2
4
5
6
7
Jumpy_en_Chap10c_RCC-1_ed01-2016
Select a "Profile" (1 or 2 or 3) to
associate the " Audio settings "
with
it.
Select " Audio settings ".
Select " Ambience ".
Or "Distribution ".
Or "Sound ".
Or "Voice ".
Or "Ringtone ".
The location for the photograph is
square; the system deforms the original
photograph if in another format. Initialisation of the profile selected
activates the English language by default.
Press "Confirm " to save the settings.
Press "
Confirm " to accept the
transfer of the photograph.
Press " Confirm " again to save the
settings. Press this button to add a photograph
to the profile.
Insert a USB memory stick containing
the photograph in the USB port.
Select the photograph. Press this button to initialise the
profile selected.
.
Audio and Telematics
Page 478 of 595

476
111
10
11
12
8
91
Jumpy_en_Chap10c_RCC-1_ed01-2016
Press Settings to display the primary
page. Press Settings
to display the primary
page.
Press Settings
to display the primary
page.
Press the "OPTIONS" button to go to
the secondary page. Press the "
OPTIONS" button to go to
the secondary page.
Press the "
OPTIONS" button to go to
the secondary page.
Select "System settings ".
Select " Screen configuration ".
Select "Units" to change the units
for distance, fuel consumption and
temperature. Select "
Languages " to change the
language.
Activate or deactivatre " Automatic
scrolling ".
Adjust the brightness of the screen. Select "
Factory settings " to return
to the initial settings.
Select " System info " to display the
versions of the different modules
installed in the system.
Modifying system settings
Returning the system to factory settings
activates the English language by
default.
Select "
Animation ".
Select " Brightness ".
Select the language
Press Settings to display the primary
page.
Press the " OPTIONS" button to go to
the secondary page.
Select " Setting the time- date ".
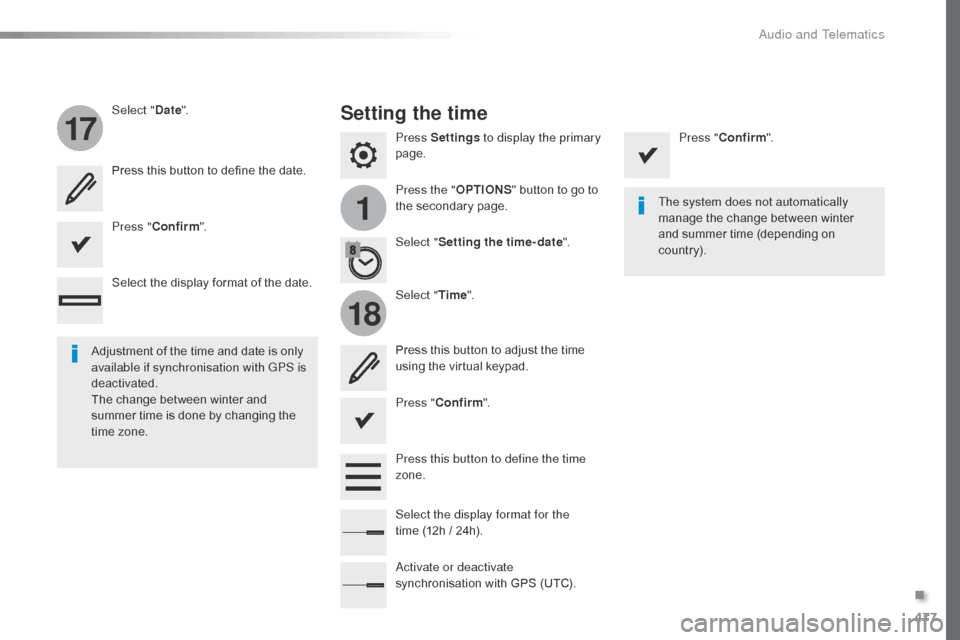
Setting the date
Audio and Telematics
Page 479 of 595

477
1
17
18
Jumpy_en_Chap10c_RCC-1_ed01-2016
Press Settings to display the primary
page.
Press the " OPTIONS" button to go to
the secondary page.
Select "
Date".
Select "Time".
Select "
Setting the time- date ".
Adjustment of the time and date is only
available if synchronisation with GPS is
deactivated.
The change between winter and
summer time is done by changing the
time zone. The system does not automatically
manage the change between winter
and summer time (depending on
c ountr y).
Setting the time
Press this button to define the date.
Press this button to adjust the time
using the virtual keypad.
Press "
Confirm ". Press "
Confirm ".
Press " Confirm ".
Press this button to define the time
zone.
Select the display format of the date.
Select the display format for the
time
(12h / 24h).
Activate or deactivate
synchronisation with GPS (UTC).
.
Audio and Telematics
Page 480 of 595

478
Jumpy_en_Chap10c_RCC-1_ed01-2016
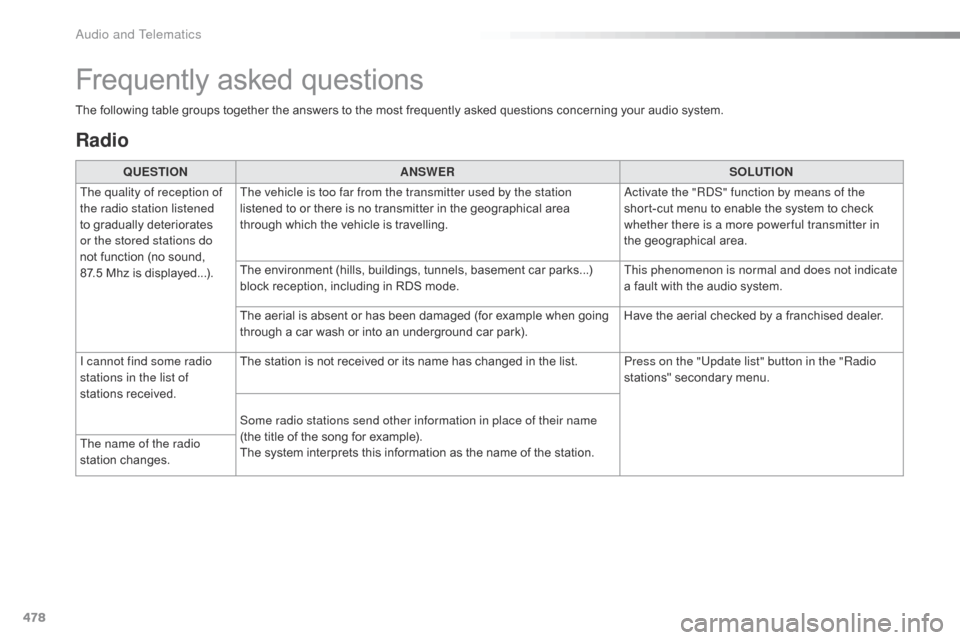
Radio
QUESTIONANSWER SOLUTION
The quality of reception of
the radio station listened
to gradually deteriorates
or the stored stations do
not function (no sound,
87.5
Mhz is displayed...). The vehicle is too far from the transmitter used by the station
listened to or there is no transmitter in the geographical area
through which the vehicle is travelling.
Activate the "RDS" function by means of the
short-cut menu to enable the system to check
whether there is a more power ful transmitter in
the geographical area.
The environment (hills, buildings, tunnels, basement car parks...)
block reception, including in RDS mode. This phenomenon is normal and does not indicate
a fault with the audio system.
The aerial is absent or has been damaged (for example when going
through a car wash or into an underground car park). Have the aerial checked by a franchised dealer.
I cannot find some radio
stations in the list of
stations received. The station is not received or its name has changed in the list.
Press on the "Update list" button in the "Radio
stations" secondary menu.
Some radio stations send other information in place of their name
(the title of the song for example).
The system interprets this information as the name of the station.
The name of the radio
station changes.
Frequently asked questions
The following table groups together the answers to the most frequently asked questions concerning your audio system.
Audio and Telematics