Citroen JUMPY 2016 2.G Owner's Manual
Manufacturer: CITROEN, Model Year: 2016, Model line: JUMPY, Model: Citroen JUMPY 2016 2.GPages: 595, PDF Size: 12.47 MB
Page 461 of 595

459
1
1
1
19
20
21
22
15
16
17
18
Jumpy_en_Chap10c_RCC-1_ed01-2016
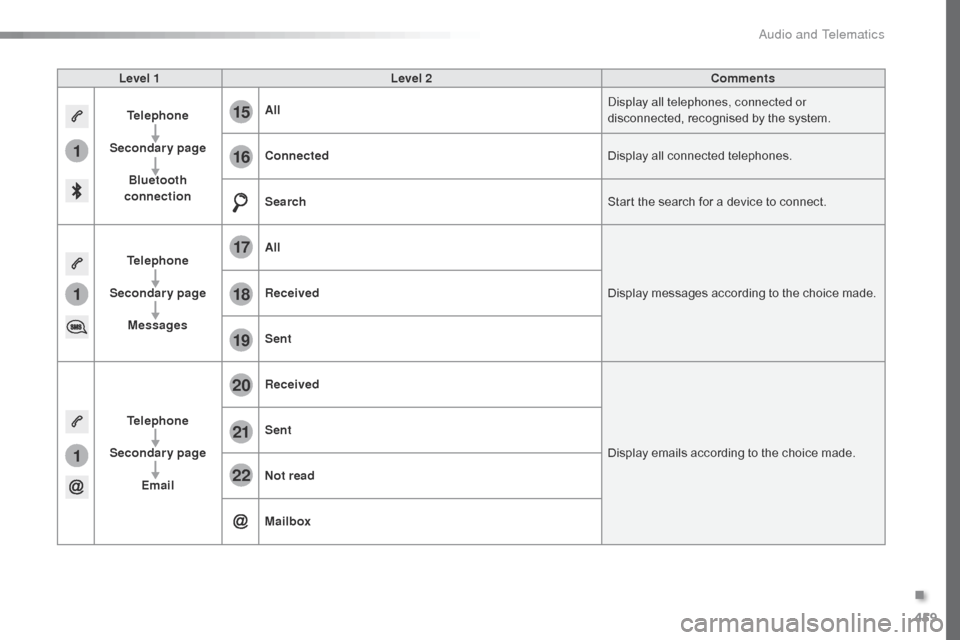
Level 1Level 2 Comments
Telephone
Secondary page Bluetooth
connection All
Display all telephones, connected or
disconnected, recognised by the system.
Connected Display all connected telephones.
Search Start the search for a device to connect.
Telephone
Secondary page Messages All
Display messages according to the choice made.
Received
Sent
Telephone
Secondary page Email Received
Display emails according to the choice made.
Sent
Not read
Mailbox
.
Audio and Telematics
Page 462 of 595

460
23
27
24
28
25
29
26
30
1
23242526
Jumpy_en_Chap10c_RCC-1_ed01-2016
Level 1Level 2
Settings - Bluetooth Options
Options
Quick messages
Audio and Telematics
Page 463 of 595

461
1
1
27
28
29
30
23
24
25
26
Jumpy_en_Chap10c_RCC-1_ed01-2016
Level 1Level 2 Comments
Telephone
Secondary page Options Security
Make driving safe.
Voicemail Enter and save the number for the telephone
voicemail.
Ringtone Adjust the ringtone volume.
Statistics Display data for the telephone connected.
Confirm Save the options.
Telephone
Secondary page
Quick messages Delayed
Select a quick message from the categories, as
required.
My arrival
Not available
Other
Create
Create a quick message.
.
Audio and Telematics
Page 464 of 595

462
Jumpy_en_Chap10c_RCC-1_ed01-2016
Pairing a Bluetooth® telephone
As a safety measure and because it
requires sustained attention by the
driver, the pairing of a Bluetooth mobile
telephone with the Bluetooth hands-
free system of your audio system must
be done with the vehicle stationary
and the ignition on.
Procedure from the telephone
Select the system name in the list of
devices detected.
In the system, accept the connection request
from the telephone.
Procedure from the system
Press Telephone to display the
primary page.
Press Connect telephone .
Select " Search".
The list of telephones detected is
displayed.
If the pairing procedure fails, it is recommended
that you deactivate and then reactivate the
"Bluetooth" function in your telephone.
The system offers to connect the telephone
with 3 profiles:
-
T
elephone (hands-free kit, telephone
only),
-
S
treaming (wireless play of audio files on
the telephone),
-
M
obile internet data .
Depending on the type of telephone,
you may be asked to accept or not
the transfer of your contacts and
messages.
Select the name of the chosen
telephone in the list. Press "
Confirm ".
Select one or more profiles.
Or
Activate the Bluetooth function on the
telephone and ensure that it is "visible
to all" (telephone configuration).
To complete the pairing, whichever
procedure used (from the telephone or
from the system), ensure that the code
is the same in the system and in the
telephone.
Connection sharing
Audio and Telematics
Page 465 of 595

463
1
Jumpy_en_Chap10c_RCC-1_ed01-2016
Press Telephone to display the
primary page.
Select " Bluetooth connection " to
display the list of paired devices.
On return to the vehicle, if the last
telephone connected is present again,
it is automatically recognised and
within about 30 seconds of switching
on the ignition, the connection is
established without any action on your
part (Bluetooth activated).
The services available depend on
the network, the SIM card and the
compatibility of the Bluetooth devices
used. Check in your telephone's
manual and with your service provider
for the services available to you. The ability of the system to connect
with just one profile depends on the
telephone.
All three profiles may connect by
default.
Go to the brand's website for more information
(compatibility, additional help, ...).
To modify the connection profile
:
Automatic reconnection
Press the "details" button. Press the "OPTIONS" button to go to
the secondary page.
Press on " Confirm".
Select one or more profiles.
The profiles compatible with the system
are HFP, OPP, PBAP, A2DP, AVRCP,
MAP and PAN.
.
Audio and Telematics
Page 466 of 595

464
1
Jumpy_en_Chap10c_RCC-1_ed01-2016
Receiving a call
An incoming call is announced by a ring and a
superimposed display in the screen.Make a short press on the steering
mounted TEL button to accept an
incoming call.
Make a long press
on the steering mounted TEL button
to reject the call.
Or And
Select "End call".
Press on the name of the telephone
chosen in the list to disconnect it.
Press again to connect it. Select the basket at top right of the
screen to display a basket alongside
the telephone chosen.
Press the basket alongside the
telephone chosen to delete it.
Managing paired telephones
This function allows the connection or
disconnection of a peripheral device as
well as the deletion of a pairing.
Press Telephone to display the
primary page.
Press the " OPTIONS" button to go to
the secondary page.
Select " Bluetooth connection " to
display the list of paired peripheral
devices.
Deleting a telephone
Audio and Telematics
Page 467 of 595

465
2
3
Jumpy_en_Chap10c_RCC-1_ed01-2016
on the steering mounted button.
Using the telephone is not
recommended while driving.
Park the vehicle.
Make the call using the steering
mounted controls.
Making a call
Calling a new number
Press Telephone
to display the
primary page.
Enter the phone number using the
digital keypad.
Press " Call" to start the call.
Calling a contact
Press Telephone to display the
primary page.
Or make a long press
on the steering mounted TEL button.
Select " Contact ".
Select the desired contact from the list offered. Select "Call".
Calling a recently used number
Press Telephone to display the
primary page.
Make a long press
Select " Calls".
Select the desired contact from the list offered. It is always possible to make a call
directly from the telephone; as a safety
measure, first park the vehicle.
Or
.
Audio and Telematics
Page 468 of 595

466
2
12
13
14
1
Jumpy_en_Chap10c_RCC-1_ed01-2016
The access to "Messages" depends on
the compatibility of the smartphone and
the integral system.
Depending on the smartphone, access
to your messages or email may be
slow.
Managing messages
The " Email " function allows email
addresses to be entered for a contact,
but the system is not able to send
emails.
Managing contacts / entries
Press Telephone to display the
primary page.
Select " Contact ".
Select " Create" to add a new contact.
In the " Telephone " tab, enter the
telephone numbers for the contact.
In the " Address " tab, enter the
addresses for the contact.
In the " Email" tab, enter the email
addresses for the contact. Press "
Answer " to send a quick
message stored in the system. Press Telephone to display the
primary page.
Press the " OPTIONS" button to go to
the secondary page.
Select " Messages " to display the list
of messages.
Select the " All" or " Received " or
" Sent " tab.
Select the detail of the message
chosen in one of the lists
Press " Call" to start the call.
Press " Play" to hear the message. The services available depend on
the network, the SIM card and the
compatibility of the Bluetooth devices
used.
Check in the manual for your telephone
and with your service provider for the
services available to you.
Audio and Telematics
Page 469 of 595

467
11
Jumpy_en_Chap10c_RCC-1_ed01-2016
Managing email
Press this button to "Modify" the new
quick message(s) created. Press Telephone
to display the
primary page.
Press the " OPTIONS" button to go to
the secondary page.
Select " Email" to display the list of
messages.
Select the " Received" or "Sent " or
" Not read " tab.
Select the email chosen in the list. Press "Play" to hear the email.
The "
Modify " function does not apply
to quick messages already present in
the system.
Access to "Email" depends on the
compatibility of the smartphone and the
integral system.
Managing quick messages
Press Telephone to display the
primary page.
Press on the " OPTIONS" button to
go to the secondary page.
Select " Messages " to display the list
of messages.
Select the " Delayed" or "My arrival "
or " Not available" or " Other" tab
with the possibility of creating new
messages.
Select the message chosen in one of
the lists. Press " Create" to write a new
message.
Press " Transfer " to select the
addressee(s).
Press " Play" to play the message.
.
Audio and Telematics
Page 470 of 595

468
12:13
23 °C
3
3
4
4
5
5
6
6
7
7
34567
12
Jumpy_en_Chap10c_RCC-1_ed01-2016
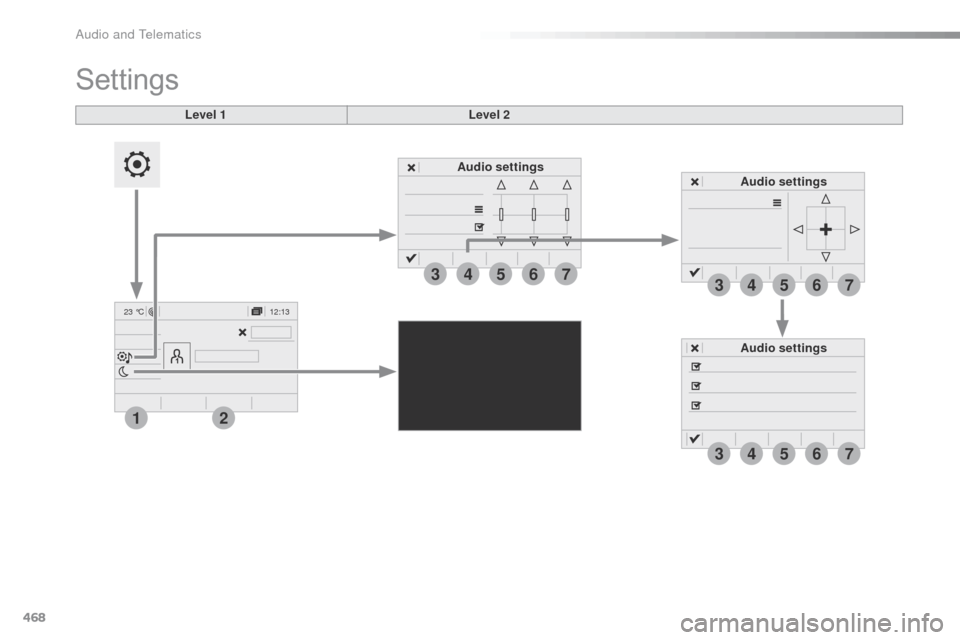
Audio settings Audio settings
Level 1
Settings
Level 2
Audio settings
Audio and Telematics