check engine DACIA DUSTER 2010 1.G User Guide
[x] Cancel search | Manufacturer: DACIA, Model Year: 2010, Model line: DUSTER, Model: DACIA DUSTER 2010 1.GPages: 200, PDF Size: 7.12 MB
Page 117 of 200

JauneNoirNoir texte
4.3
ENG_UD22440_4
Capot moteur (H79 - Dacia)
ENG_NU_898-5_H79_Dacia_4
BONNET (2/2)
Closing the bonnet
Check that nothing has been left in the
engine compartment.
To close the bonnet again, hold the
bonnet in the middle and lower it to
30 cm above the closed position, then
release it. It will latch automatically
under its own weight.
Ensure that the bonnet is
properly locked. Check that
nothing is preventing the
catch from locking (gravel,
cloth, etc.).
Make sure nothing is left
in the engine compartment
(cloth, tools, etc.).
Otherwise, this may lead to
engine damage or cause a fire.
Page 118 of 200
capacity of mechanical components......................(current page)
engine oil .............................................. (up to the end of the DU)
dipstick.................................................. (up to the end of the DU)
levels .................................................... (up to the end of the DU)
maintenance: mechanical ...................................... (up to the end of the DU)
4.4
ENG_UD20645_2
Niveau huile moteur : généralités (H79 - Dacia)
ENG_NU_898-5_H79_Dacia_4
It is normal for an engine to use oil for
lubrication and cooling of moving parts
and it is sometimes necessary to top up
the level between oil changes.
However, contact an approved dealer if
more than 0.5 litres is being consumed
every 600 miles (1,000 km) after the
running in period.
Oil change frequency: check the oil
level from time to time and certainly
before any long journey to avoid the
risk of damaging your engine.
The vehicle must be parked on level
ground and the engine should have
been switched off for some time before-
hand to obtain an accurate reading.
Engine oil level: general information
ENGINE OIL LEVEL: general information
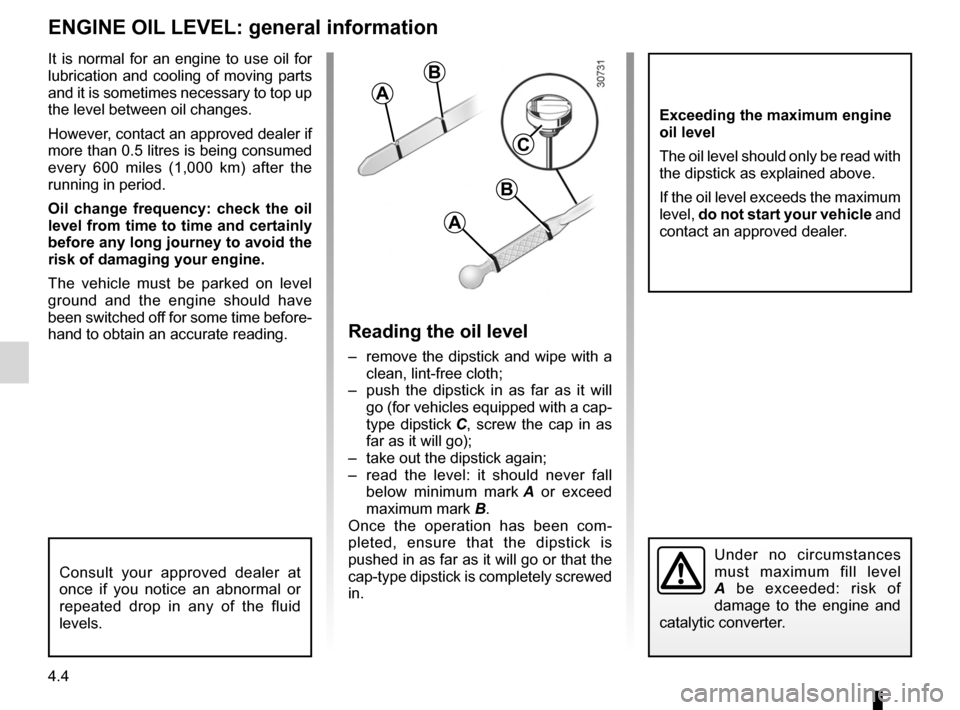
Reading the oil level
– remove the dipstick and wipe with a
clean, lint-free cloth;
– push the dipstick in as far as it will
go (for vehicles equipped with a cap-
type dipstick C, screw the cap in as
far as it will go);
– take out the dipstick again;
– read the level: it should never fall
below minimum mark A or exceed
maximum mark B.
Once the operation has been com -
pleted, ensure that the dipstick is
pushed in as far as it will go or that the
cap-type dipstick is completely screwed
in.
Under no circumstances
must maximum fill level
A be exceeded: risk of
damage to the engine and
catalytic converter.
Consult your approved dealer at
once if you notice an abnormal or
repeated drop in any of the fluid
levels.
Exceeding the maximum engine
oil level
The oil level should only be read with
the dipstick as explained above.
If the oil level exceeds the maximum
level, do not start your vehicle and
contact an approved dealer.
A
B
A
B
C
Page 119 of 200
engine oil grade .................................... (up to the end of the DU)
oil change .............................................................. (current page)
engine oil level ....................................................... (current page)
4.5
ENG_UD22463_5
Niveau huile moteur : appoint / remplissage (H79 - Dacia)
ENG_NU_898-5_H79_Dacia_4
Engine oil level: topping up, filling
ENGINE OIL LEVEL: topping up/filling (1/2)
Topping up/filling
The vehicle must be parked on level
ground and the engine should be cold
(for instance, before the engine is
started up for the first time in the day).
Engine oil grade
Refer to the Maintenance Service
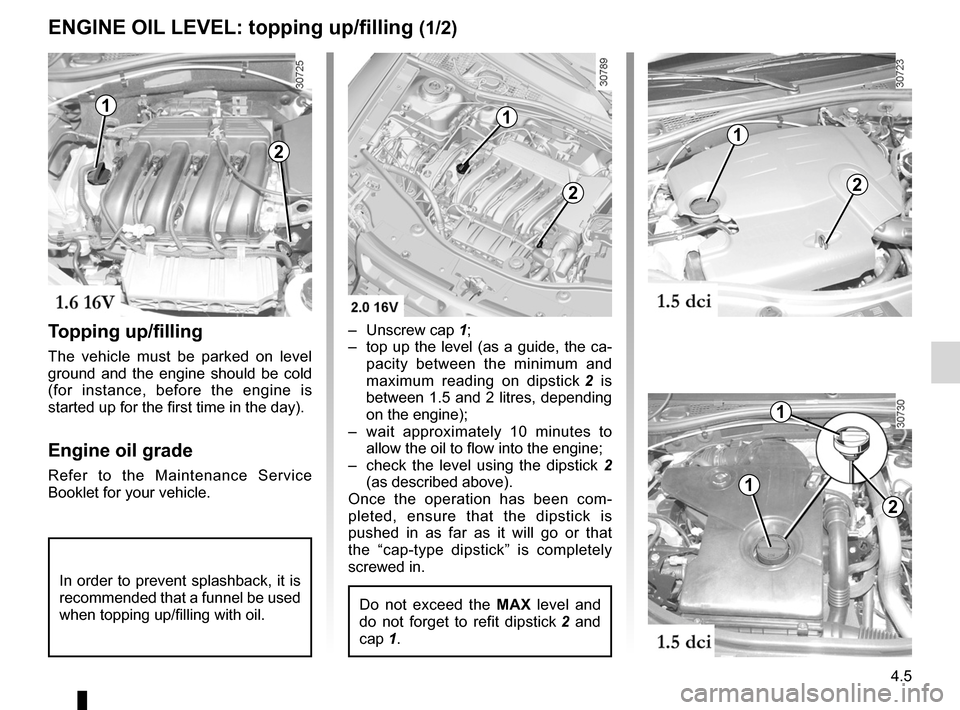
Booklet for your vehicle. –
Unscrew cap 1;
– top up the level (as a guide, the ca-
pacity between the minimum and
maximum reading on dipstick 2 is
between 1.5 and 2 litres, depending
on the engine);
– wait approximately 10 minutes to
allow the oil to flow into the engine;
– check the level using the dipstick 2
(as described above).
Once the operation has been com -
pleted, ensure that the dipstick is
pushed in as far as it will go or that
the “cap-type dipstick” is completely
screwed in.
Do not exceed the MAX level and
do not forget to refit dipstick 2 and
cap 1.
In order to prevent splashback, it is
recommended that a funnel be used
when topping up/filling with oil.
1
2
1
1
2
1
2
1
2
Page 121 of 200
levels .................................................... (up to the end of the DU)
brake fluid .............................................................. (current page)
maintenance: mechanical ....................................................... (current page)
tanks and reservoirs brake fluid ........................................................ (current page)
4.7
ENG_UD20646_2
Niveaux (H79 - Dacia)
ENG_NU_898-5_H79_Dacia_4
Levels:
Brake fluid
LEVELS (1/3)
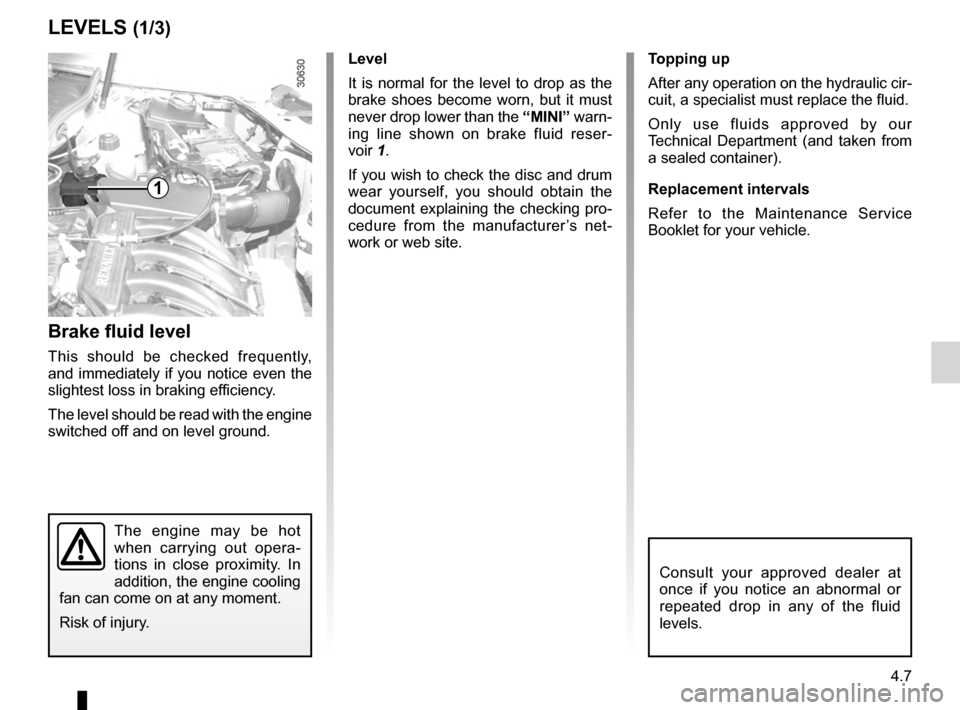
Brake fluid level
This should be checked frequently,
and immediately if you notice even the
slightest loss in braking efficiency.
The level should be read with the engine
switched off and on level ground. Level
It is normal for the level to drop as the
brake shoes become worn, but it must
never drop lower than the
“MINI” warn-
ing line shown on brake fluid reser -
voir 1.
If you wish to check the disc and drum
wear yourself, you should obtain the
document explaining the checking pro-
cedure from the manufacturer ’s net -
work or web site. Topping up
After any operation on the hydraulic cir-
cuit, a specialist must replace the fluid.
Only use fluids approved by our
Technical Department (and taken from
a sealed container).
Replacement intervals
Refer to the Maintenance Service
Booklet for your vehicle.
The engine may be hot
when carrying out opera
-
tions in close proximity. In
addition, the engine cooling
fan can come on at any moment.
Risk of injury.
Consult your approved dealer at
once if you notice an abnormal or
repeated drop in any of the fluid
levels.
1
Page 122 of 200
levels:coolant ............................................................. (current page)
engine coolant ....................................................... (current page)
tanks and reservoirs coolant ............................................................. (current page)
4.8
ENG_UD20646_2
Niveaux (H79 - Dacia)
ENG_NU_898-5_H79_Dacia_4
Jaune NoirNoir texte
Engine coolant
LEVELS (2/3)
Coolant level checking frequency
Check the coolant level regularly
(very severe damage is likely to be
caused to the engine if it runs out of
coolant).
If the level needs to be topped up, only
use products approved by our Technical
Department which ensure:
– protection against freezing;
– anticorrosion protection of the cool -
ing system.
Replacement intervals
Refer to the Maintenance Service
Booklet for your vehicle.
No operations should be
carried out on the cooling
circuit when the engine is
hot.
Risk of burns.
Consult your approved dealer at
once if you notice an abnormal or
repeated drop in any of the fluid
levels.
The engine may be hot
when carrying out opera -
tions in close proximity. In
addition, the engine cooling
fan can come on at any moment.
Risk of injury.
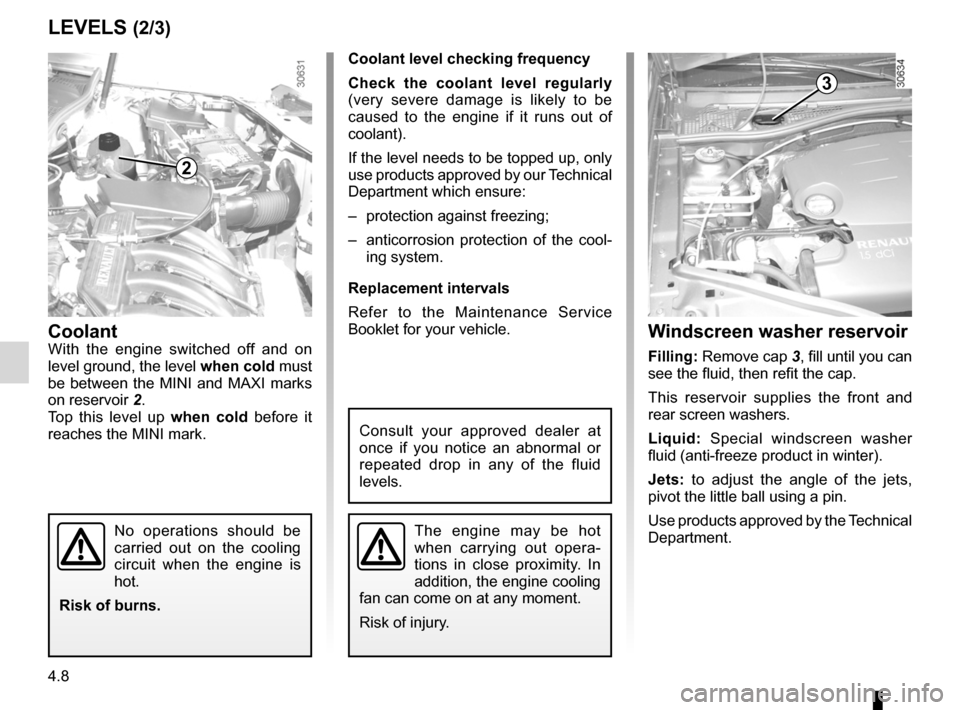
Windscreen washer reservoir
Filling: Remove cap 3, fill until you can
see the fluid, then refit the cap.
This reservoir supplies the front and
rear screen washers.
Liquid: Special windscreen washer
fluid (anti-freeze product in winter).
Jets: to adjust the angle of the jets,
pivot the little ball using a pin.
Use products approved by the Technical
Department.
CoolantWith the engine switched off and on
level ground, the level when cold must
be between the MINI and MAXI marks
on reservoir 2.
Top this level up when cold before it
reaches the MINI mark.
2
3
Page 124 of 200
filterair filter ............................................................. (current page)
filter diesel filter ........................................................ (current page)
filter ........................................................................\
(current page)
filter passenger compartment filter .......................... (current page)
4.10
ENG_UD20151_3
Filtres (B90 - U90 - L90 Ph2 - F90 Ph2 - R90 Ph2 - H79 - Dacia)
ENG_NU_898-5_H79_Dacia_4
Filters
FILTERS
The replacement of filter elements (air
filter, passenger compartment filter,
diesel filter, etc.) is scheduled in the
maintenance operations for your vehi -
cle.
Replacement intervals for filter el -
ements: refer to the Maintenance
Service Booklet for your vehicle.
Passenger compartment filter
If your vehicle is not originally fitted with
a passenger compartment filter, it is
possible to have one retrofitted.
Contact an approved dealer.
The engine may be hot
when carrying out opera -
tions in close proximity. In
addition, the engine cooling
fan can come on at any moment.
Risk of injury.
Air filter
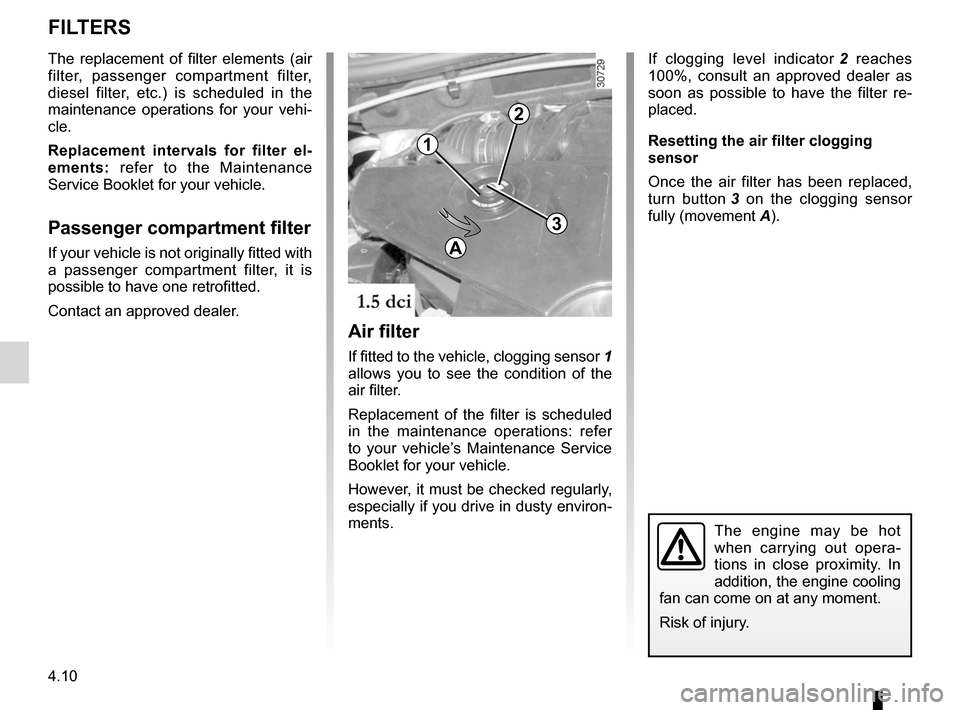
If fitted to the vehicle, clogging sensor 1
allows you to see the condition of the
air filter.
Replacement of the filter is scheduled
in the maintenance operations: refer
to your vehicle’s Maintenance Service
Booklet for your vehicle.
However, it must be checked regularly,
especially if you drive in dusty environ -
ments.
If clogging level indicator 2 reaches
100%, consult an approved dealer as
soon as possible to have the filter re -
placed.
Resetting the air filter clogging
sensor
Once the air filter has been replaced,
turn button 3 on the clogging sensor
fully (movement A).
1
2
3
A
Page 128 of 200
4.14
ENG_UD20966_2
Entretien de la carrosserie / compartiment moteur (H79 - Dacia)
ENG_NU_898-5_H79_Dacia_4
Jaune NoirNoir texte
BODyWORK MAINTENANCE, ENGINE COMPARTMENT (2/3)
y ou should
–
Respect local regulations about
washing vehicles (e.g. do not wash
your vehicle on a public highway).
– Always follow the recommenda -
tions supplied with the high-pressure
cleaning equipment (jet distance and
pressure).
– Before going through a roller type
car wash, return the windscreen
wiper stalk to park position (refer
to the information on “Windscreen
wash/wipe” in Section 1), check the
mounting of external accessories,
additional lights and door mirrors
and be sure to hold the wiper blades
and radio aerial in place with adhe -
sive tape. Remove the radio aerial
mast if your vehicle is fitted with this
equipment.
Remember to remove the tape and
refit the antenna after washing. –
After driving off-road (eg. on muddy,
dusty or sandy terrain) quickly clean
the radiator from the outside of the
vehicle through the openings in the
bumper, to prevent it from becoming
blocked or clogged (risk of engine
overheating).
– Wash your vehicle frequently with
the engine off , using shampoo ap -
proved by our Technical Department
(never use abrasive products) and
rinse thoroughly using a warm or
cold water jet (never hot):
– spots of tree resin and industrial
grime;
– the layer of dust or mud and any
insects;
– bird droppings , which contain
chemicals that rapidly discolour
paintwork and may even cause
the paint to peel off ;
Wash the vehicle immediately to
remove these marks since it is im-
possible to remove them by pol -
ishing; –
salt deposited in the wheel arches
and underneath the body after
driving in areas where the roads
are chemically treated;
– mud in the wheel arches and un-
derneath the body which form
damp patches.
– Clean mud and sand from the
wheels, in particular the inside of the
wheels and the brakes, as this can:
– reduce the braking efficiency and
damage the components of the
braking system;
– cause vibrations in the bodywork
and steering column.
We have selected special products
to care for your vehicle and you can
obtain these from the manufactur -
er’s accessory outlets.
Page 129 of 200
JauneNoirNoir texte
4.15
ENG_UD20966_2
Entretien de la carrosserie / compartiment moteur (H79 - Dacia)
ENG_NU_898-5_H79_Dacia_4
BODyWORK MAINTENANCE, ENGINE COMPARTMENT (3/3)
– After cleaning your vehicle, check
the brakes while driving at low speed
to ensure that the braking efficiency
has not been reduced by the water.
If it has, depress the brake pedal
gently while driving to dry the brakes.
– Check the drain holes at the bottom
of the doors to make sure they are
not blocked.
– Inspect the wheels regularly to check
for any traces of impacts or corro -
sion. These can damage the tyre or
cause it to lose pressure.
– Keep well away from the vehicle in
front when driving on gravelled sur -
faces to prevent paint damage.
– Repair, or have repaired quickly,
patches where the paint has been
damaged to prevent corrosion
spreading. –
Remember to visit the body shop pe-
riodically in order to maintain your
anticorrosion warranty. Refer to the
Maintenance Service Booklet.
– Spray mechanical components,
hinges, etc. with products approved
by the Technical Department to
protect them after they have been
cleaned.
Page 138 of 200
5.6
ENG_UD22629_3
Kit de gonflage des pneumatiques (H79 - Dacia)
ENG_NU_898-5_H79_Dacia_5
Jaune NoirNoir texte
TYRE INFLATION KIT (2/3)
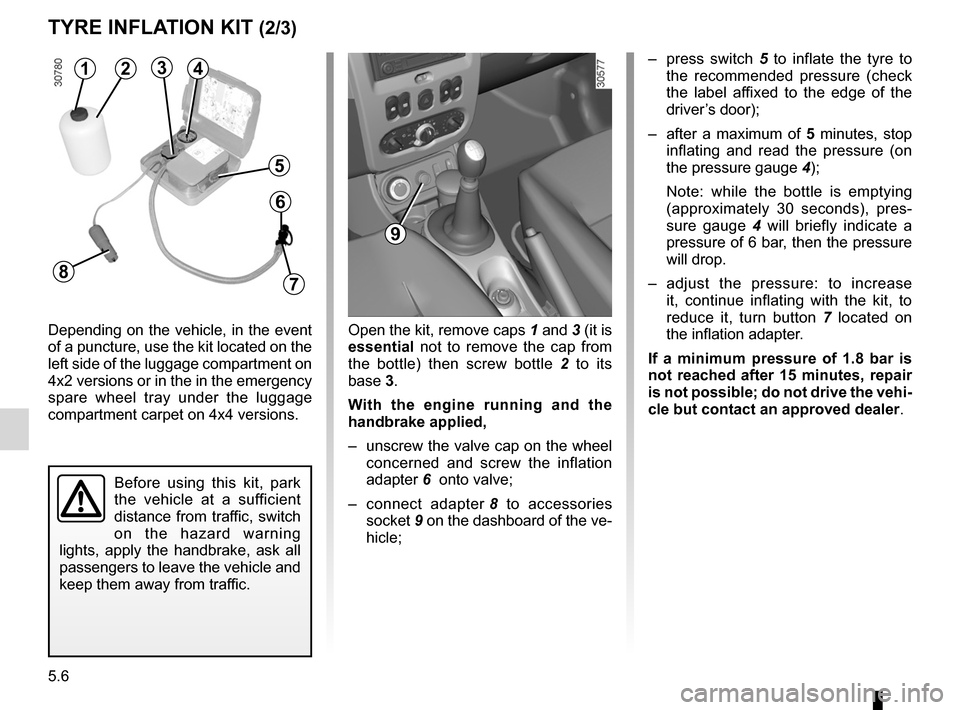
Depending on the vehicle, in the event
of a puncture, use the kit located on the
left side of the luggage compartment on
4x2 versions or in the in the emergency
spare wheel tray under the luggage
compartment carpet on 4x4 versions. –
press switch 5 to inflate the tyre to
the recommended pressure (check
the label affixed to the edge of the
driver’s door);
– after a maximum of 5 minutes, stop
inflating and read the pressure (on
the pressure gauge 4);
Note: while the bottle is emptying
(approximately 30 seconds), pres -
sure gauge 4 will briefly indicate a
pressure of 6 bar, then the pressure
will drop.
– adjust the pressure: to increase
it, continue inflating with the kit, to
reduce it, turn button 7 located on
the inflation adapter.
If a minimum pressure of 1.8 bar is
not reached after 15 minutes, repair
is not possible; do not drive the vehi-
cle but contact an approved dealer .
Before using this kit, park
the vehicle at a sufficient
distance from traffic, switch
on the hazard warning
lights, apply the handbrake, ask all
passengers to leave the vehicle and
keep them away from traffic.
Open the kit, remove caps 1 and 3 (it is
essential not to remove the cap from
the bottle) then screw bottle 2 to its
base 3.
With the engine running and the
handbrake applied,
– unscrew the valve cap on the wheel
concerned and screw the inflation
adapter 6 onto valve;
– connect adapter 8 to accessories
socket 9 on the dashboard of the ve-
hicle;
9
1234
5
6
78
Page 157 of 200
fuses ..................................................... (up to the end of the DU)
advice on antipollution .......................... (up to the end of the DU)
practical advice ..................................... (up to the end of the DU)
5.25
ENG_UD22381_3
Fusibles (H79 - Dacia)
ENG_NU_898-5_H79_Dacia_5
Fuses
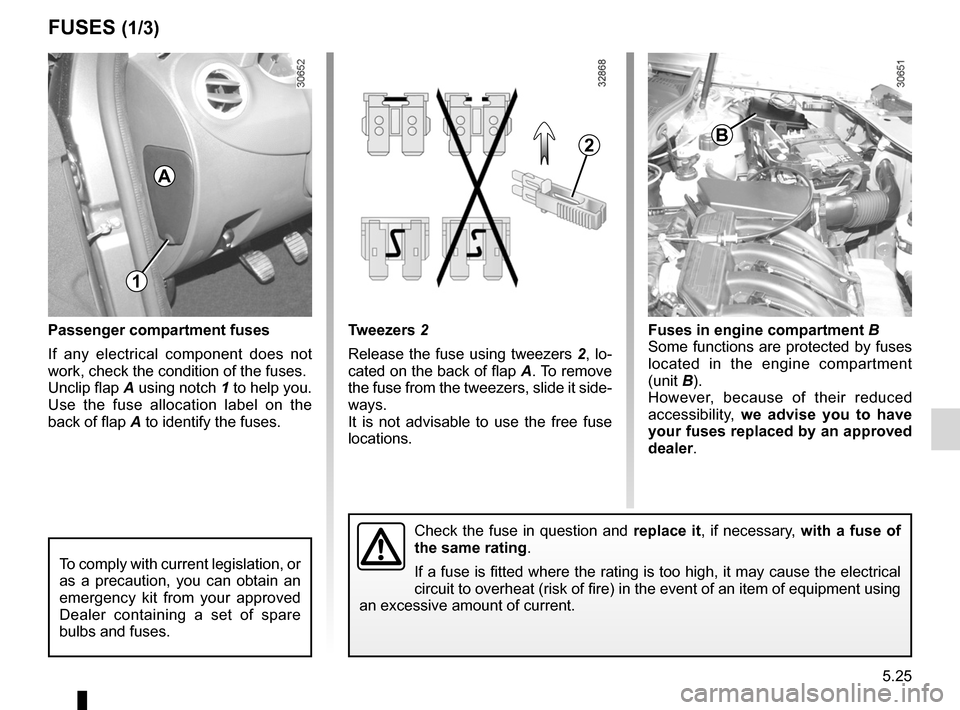
Passenger compartment fuses
If any electrical component does not
work, check the condition of the fuses.
Unclip flap A using notch 1 to help you.
Use the fuse allocation label on the
back of flap A to identify the fuses.
Check the fuse in question and replace it, if necessary, with a fuse of
the same rating.
If a fuse is fitted where the rating is too high, it may cause the electrical
circuit to overheat (risk of fire) in the event of an item of equipment using
an excessive amount of current.
To comply with current legislation, or
as a precaution, you can obtain an
emergency kit from your approved
Dealer containing a set of spare
bulbs and fuses.
FUSES (1/3)
Tweezers 2
Release the fuse using tweezers 2, lo-
cated on the back of flap A. To remove
the fuse from the tweezers, slide it side-
ways.
It is not advisable to use the free fuse
locations. Fuses in engine compartment
B
Some functions are protected by fuses
located in the engine compartment
(unit B).
However, because of their reduced
accessibility, we advise you to have
your fuses replaced by an approved
dealer.
1
A
B2