Engine light DACIA DUSTER 2010 1.G Owner's Guide
[x] Cancel search | Manufacturer: DACIA, Model Year: 2010, Model line: DUSTER, Model: DACIA DUSTER 2010 1.GPages: 200, PDF Size: 7.12 MB
Page 127 of 200
bodywork (maintenance) ...................... (up to the end of the DU)
maintenance: bodywork ........................................ (up to the end of the DU)
washing ................................................ (up to the end of the DU)
paintwork maintenance .................................................... (current page)
4.13
ENG_UD20966_2
Entretien de la carrosserie / compartiment moteur (H79 - Dacia)
ENG_NU_898-5_H79_Dacia_4
Bodywork maintenance, engine compartment
BODyWORK MAINTENANCE, ENGINE COMPARTMENT (1/3)
A well-maintained vehicle has a longer
service life. It is therefore recom -
mended that attention is paid to the out-
side of the vehicle on a regular basis.
Protection against the effects
of corrosive agents
Although your vehicle has been treated
with very effective anti-corrosion prod -
ucts, it nevertheless remains subject to
the effects of:
– corrosives in the atmosphere
– atmospheric pollution (urban and in-
dustrial areas);
– saline atmosphere (near the sea,
particularly in hot weather);
– seasonal and damp climatic condi -
tions, (e.g.: road salt in winter, water
from road cleaners, etc.).
– abrasives
Wind-borne dust and sand, mud, road grit thrown up by other vehicles, etc.
– minor impacts
You should take a minimum number of
precautions in order to safeguard your
vehicle against such risks and not to
lose the benefit of your vehicle’s anti -
corrosion protection.
y ou should not:
– Degrease or clean mechanical com-
ponents, underneath the body, parts
with hinges (eg. fuel filler cap, inside
the fuel flap) and painted plastic ex-
ternal fittings (eg. bumpers) using
high-pressure cleaning equipment
or by spraying on products not ap -
proved by our Technical Department.
If adequate precautions are not
taken, this could cause corrosion or
lead to operational faults.
– Aim a high pressure water jet directly
onto damaged parts of the vehicle
(eg. painted bumpers, lights, etc.).
Wash these parts carefully by hand.
– Wash the vehicle in bright sunlight or
freezing temperatures. –
Use hard brushes to clean alloy
wheels. These can scratch or
damage the wheel’s protective coat-
ing.
– Scrape off mud or dirt without
prewetting.
– Allow dirt to accumulate.
– Allow rust to form following minor im-
pacts.
– Use solvents not approved by the
Technical Department to remove
stains as this could damage the
paintwork.
– Drive when the vehicle is muddy or
covered in snow (the wheel arches,
underneath the body, radiator, etc.
must always be free from mud or
snow).
It is forbidden to wash the engine compartment using a high-pressure
water jet: this risks damaging the electrical/electronic components in the
engine compartment.
A label affixed in the engine compartment reminds you of this.
Page 128 of 200
4.14
ENG_UD20966_2
Entretien de la carrosserie / compartiment moteur (H79 - Dacia)
ENG_NU_898-5_H79_Dacia_4
Jaune NoirNoir texte
BODyWORK MAINTENANCE, ENGINE COMPARTMENT (2/3)
y ou should
–
Respect local regulations about
washing vehicles (e.g. do not wash
your vehicle on a public highway).
– Always follow the recommenda -
tions supplied with the high-pressure
cleaning equipment (jet distance and
pressure).
– Before going through a roller type
car wash, return the windscreen
wiper stalk to park position (refer
to the information on “Windscreen
wash/wipe” in Section 1), check the
mounting of external accessories,
additional lights and door mirrors
and be sure to hold the wiper blades
and radio aerial in place with adhe -
sive tape. Remove the radio aerial
mast if your vehicle is fitted with this
equipment.
Remember to remove the tape and
refit the antenna after washing. –
After driving off-road (eg. on muddy,
dusty or sandy terrain) quickly clean
the radiator from the outside of the
vehicle through the openings in the
bumper, to prevent it from becoming
blocked or clogged (risk of engine
overheating).
– Wash your vehicle frequently with
the engine off , using shampoo ap -
proved by our Technical Department
(never use abrasive products) and
rinse thoroughly using a warm or
cold water jet (never hot):
– spots of tree resin and industrial
grime;
– the layer of dust or mud and any
insects;
– bird droppings , which contain
chemicals that rapidly discolour
paintwork and may even cause
the paint to peel off ;
Wash the vehicle immediately to
remove these marks since it is im-
possible to remove them by pol -
ishing; –
salt deposited in the wheel arches
and underneath the body after
driving in areas where the roads
are chemically treated;
– mud in the wheel arches and un-
derneath the body which form
damp patches.
– Clean mud and sand from the
wheels, in particular the inside of the
wheels and the brakes, as this can:
– reduce the braking efficiency and
damage the components of the
braking system;
– cause vibrations in the bodywork
and steering column.
We have selected special products
to care for your vehicle and you can
obtain these from the manufactur -
er’s accessory outlets.
Page 138 of 200
5.6
ENG_UD22629_3
Kit de gonflage des pneumatiques (H79 - Dacia)
ENG_NU_898-5_H79_Dacia_5
Jaune NoirNoir texte
TYRE INFLATION KIT (2/3)
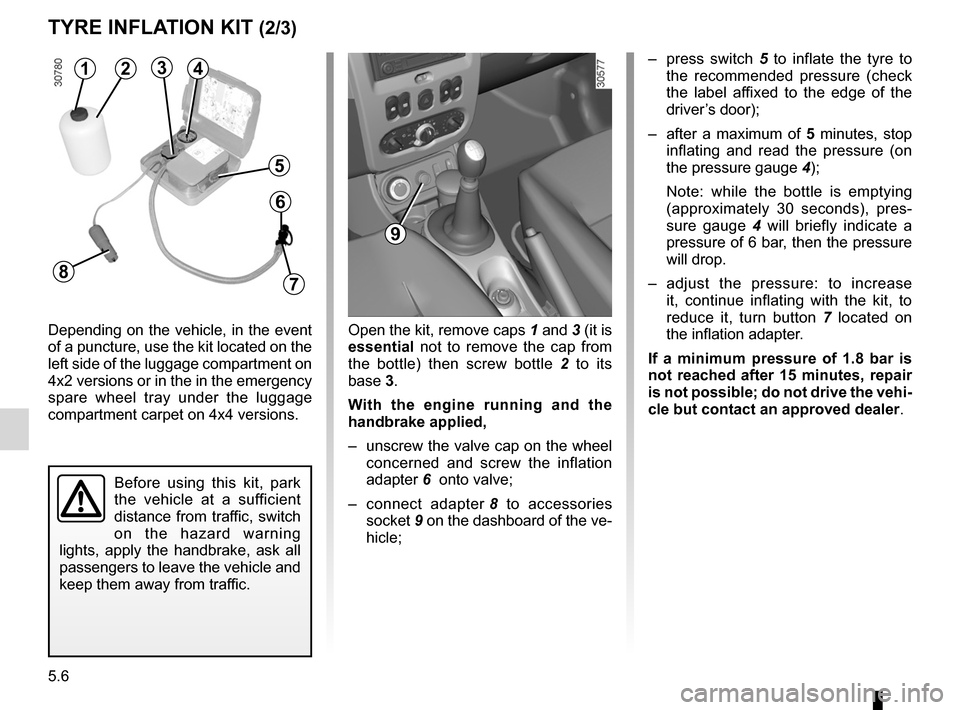
Depending on the vehicle, in the event
of a puncture, use the kit located on the
left side of the luggage compartment on
4x2 versions or in the in the emergency
spare wheel tray under the luggage
compartment carpet on 4x4 versions. –
press switch 5 to inflate the tyre to
the recommended pressure (check
the label affixed to the edge of the
driver’s door);
– after a maximum of 5 minutes, stop
inflating and read the pressure (on
the pressure gauge 4);
Note: while the bottle is emptying
(approximately 30 seconds), pres -
sure gauge 4 will briefly indicate a
pressure of 6 bar, then the pressure
will drop.
– adjust the pressure: to increase
it, continue inflating with the kit, to
reduce it, turn button 7 located on
the inflation adapter.
If a minimum pressure of 1.8 bar is
not reached after 15 minutes, repair
is not possible; do not drive the vehi-
cle but contact an approved dealer .
Before using this kit, park
the vehicle at a sufficient
distance from traffic, switch
on the hazard warning
lights, apply the handbrake, ask all
passengers to leave the vehicle and
keep them away from traffic.
Open the kit, remove caps 1 and 3 (it is
essential not to remove the cap from
the bottle) then screw bottle 2 to its
base 3.
With the engine running and the
handbrake applied,
– unscrew the valve cap on the wheel
concerned and screw the inflation
adapter 6 onto valve;
– connect adapter 8 to accessories
socket 9 on the dashboard of the ve-
hicle;
9
1234
5
6
78
Page 147 of 200
JauneNoirNoir texte
5.15
ENG_UD20700_2
Feux avant : remplacement des lampes (H79 - Dacia)
ENG_NU_898-5_H79_Dacia_5
FRONT LIGHTS: changing bulbs (2/3)
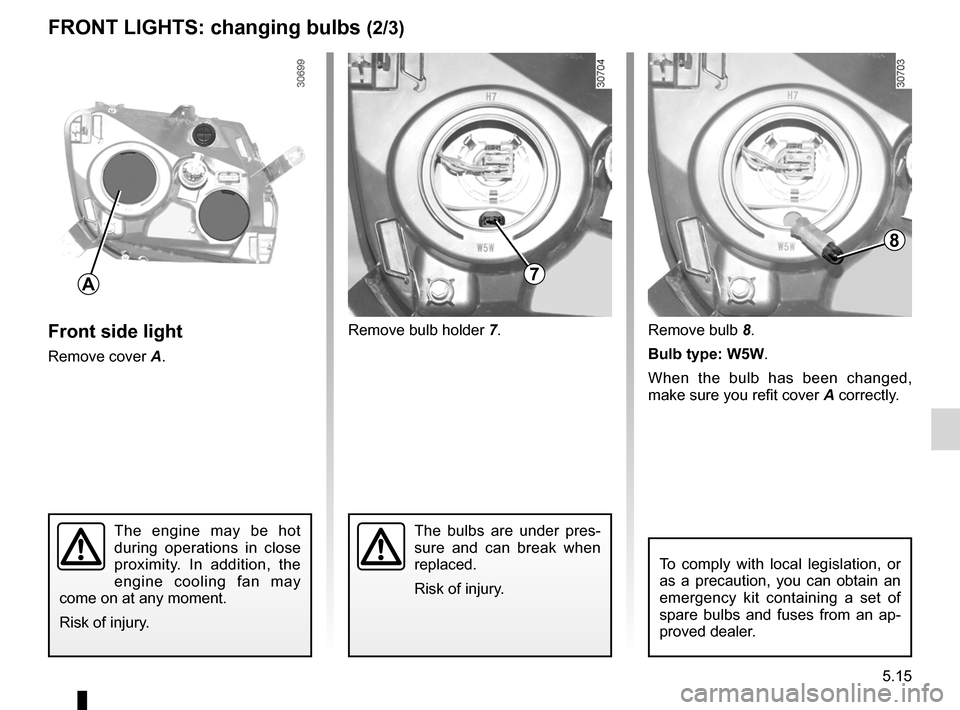
Front side light
Remove cover A.
To comply with local legislation, or
as a precaution, you can obtain an
emergency kit containing a set of
spare bulbs and fuses from an ap -
proved dealer.
The bulbs are under pres -
sure and can break when
replaced.
Risk of injury.
Remove bulb holder 7. Remove bulb 8.
Bulb type: W5W.
When the bulb has been changed,
make sure you refit cover A correctly.
The engine may be hot
during operations in close
proximity. In addition, the
engine cooling fan may
come on at any moment.
Risk of injury.
A7
8
Page 149 of 200
bulbschanging ......................................... (up to the end of the DU)
changing a bulb .................................... (up to the end of the DU)
practical advice ..................................... (up to the end of the DU)
lighting: exterior ............................................ (up to the end of the DU)
lights: fog lights ......................................... (up to the end of the DU)
bulbs changing ......................................... (up to the end of the DU)
lights additional ........................................ (up to the end of the DU)
5.17
ENG_UD20701_2
Projecteurs antibrouillard : remplacement des lampes (H79 - Dacia)
ENG_NU_898-5_H79_Dacia_5
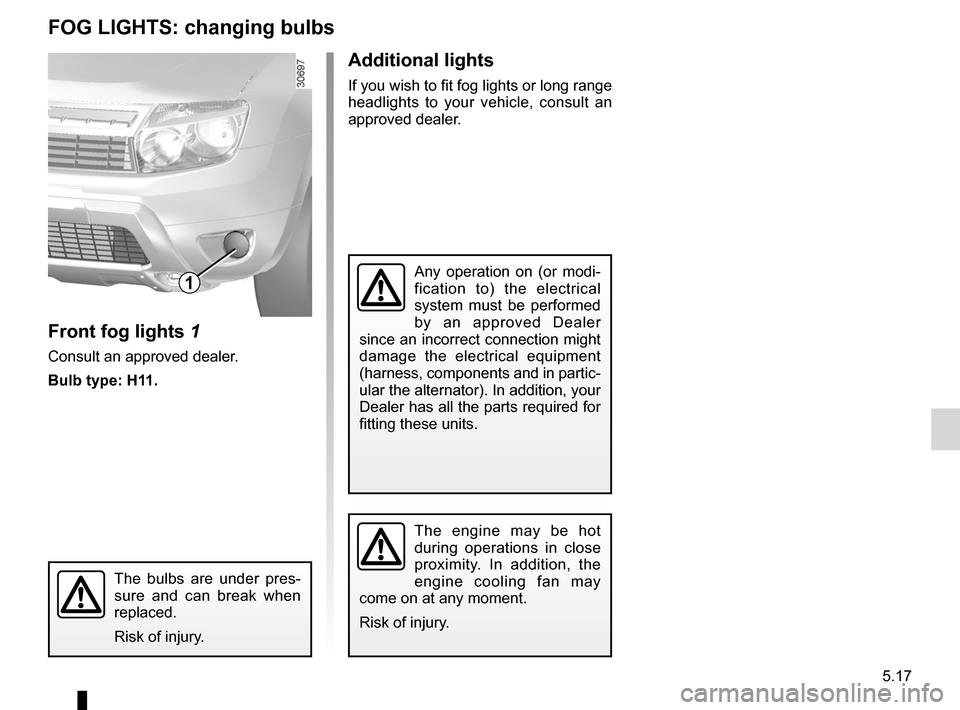
Additional lights
If you wish to fit fog lights or long range
headlights to your vehicle, consult an
approved dealer.
Fog lights
FOG LIGHTS: changing bulbs
Front fog lights 1
Consult an approved dealer.
Bulb type: H11.
Any operation on (or modi -
fication to) the electrical
system must be performed
by an approved Dealer
since an incorrect connection might
damage the electrical equipment
(harness, components and in partic-
ular the alternator). In addition, your
Dealer has all the parts required for
fitting these units.
The engine may be hot
during operations in close
proximity. In addition, the
engine cooling fan may
come on at any moment.
Risk of injury.
The bulbs are under pres -
sure and can break when
replaced.
Risk of injury.
1
Page 159 of 200
JauneNoirNoir texte
5.27
ENG_UD22381_3
Fusibles (H79 - Dacia)
ENG_NU_898-5_H79_Dacia_5
FUSES (3/3)
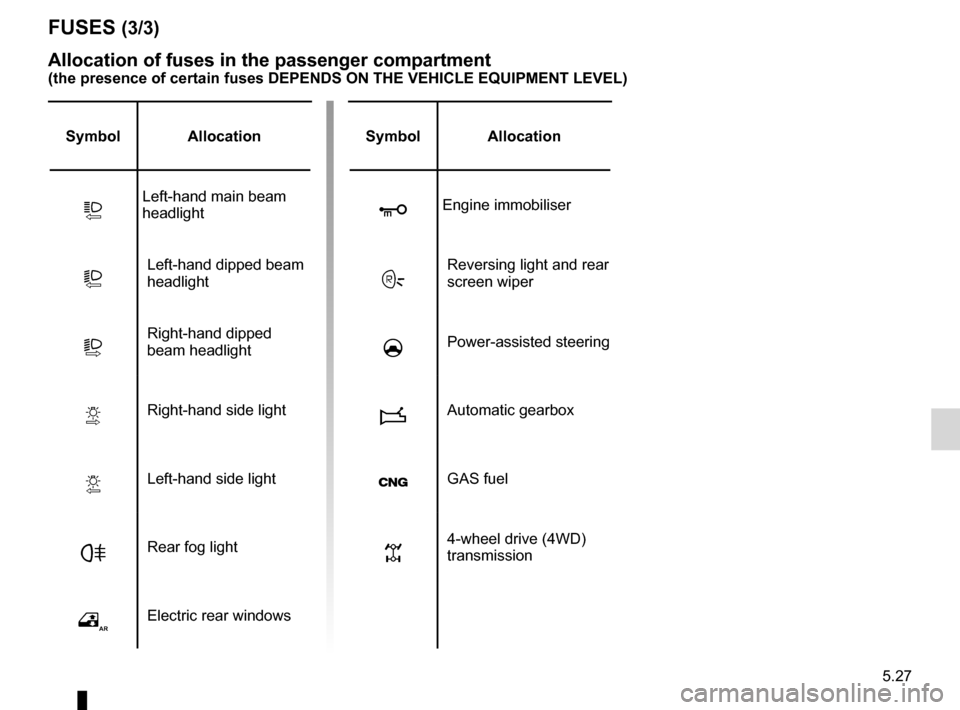
Allocation of fuses in the passenger compartment
(the presence of certain fuses DEPENDS ON THE VEHICLE EQUIPMENT LEVEL)\
Symbol Allocation
QLeft-hand main beam
headlight
LLeft-hand dipped beam
headlight
TRight-hand dipped
beam headlight
VRight-hand side light
YLeft-hand side light
FRear fog light
ḼElectric rear windows
SymbolAllocation
qEngine immobiliser
ËReversing light and rear
screen wiper
uPower-assisted steering
iAutomatic gearbox
GAS fuel
ḻ4-wheel drive (4WD)
transmission
Page 160 of 200
batterytroubleshooting ............................... (up to the end of the DU)
practical advice ..................................... (up to the end of the DU)
5.28
ENG_UD24505_3
Batterie : dépannage (H79 - Dacia)
ENG_NU_898-5_H79_Dacia_5
Jaune NoirNoir texte
Battery: troubleshooting
BATTERY: troubleshooting (1/2)
To avoid all risk of sparks:
– Ensure that any consumers (cour -
tesy lights, etc.) are switched off
before disconnecting or reconnect -
ing the battery;
– when charging, stop the charger
before connecting or disconnecting
the battery;
– to avoid creating a short circuit be -
tween the terminals, do not place
metal objects on the battery;
– always wait at least one minute after
the engine has been switched off
before disconnecting a battery;
– make sure that you reconnect the
battery terminals after refitting.
Handle the battery with care
as it contains sulphuric acid,
which must not come into
contact with eyes or skin. If
it does, wash the affected area with
plenty of cold water and consult a
doctor, if necessary.
Ensure that naked flames, red hot
objects and sparks do not come into
contact with the battery as there is a
risk of explosion.
The engine may be hot when car -
rying out operations in close prox -
imity. In addition, the engine cooling
fan can come on at any moment.
Risk of serious injury.
Special procedures may be
required to charge some
batteries. Contact your ap -
proved dealer.
Avoid all risk of sparks which may
cause an immediate explosion, and
charge the battery in a well-venti -
lated area.
Risk of serious injury.
Connecting a battery charger
The battery charger must be com -
patible with a battery with nominal
voltage of 12 volts.
Do not disconnect the battery when the
engine is running. Follow the instruc-
tions given by the manufacturer of
the battery charger you are using.
When many accessories are fitted to
the vehicle, have them connected to
the + after ignition feed.
Page 171 of 200
operating faults ..................................... (up to the end of the DU)
practical advice ..................................... (up to the end of the DU)
faults operating faults ............................... (up to the end of the DU)
5.39
ENG_UD20968_2
Anomalies de fonctionnement (H79 - Dacia)
ENG_NU_898-5_H79_Dacia_5
Operating faults
OPERATING FAULTS (1/5)
The following advice will enable you to carry out quick, temporary repairs. For safety reasons you should always contact
an approved dealer as soon as possible.
The starter is activated POSSIBLE CAUSESWHAT TO DO
Warning lights dim or fail to come on;
the starter does not run. Battery terminals disconnected,
oxidised or incorrectly secured.Retighten them, reconnect them or clean
them if they are oxidised.
Battery discharged or worn. Connect another battery to the faulty bat -
tery. Refer to the information on “Battery:
troubleshooting” in Section 5 or replace the
battery if necessary.
Do not push the vehicle if the steering
column is locked.
The engine will not start. Starting conditions are not fulfilled.Refer to the information on “Starting/stop -
ping the engine in Section 2.
The steering column remains locked. Steering wheel locked.To unlock, gently move the key and the
steering wheel (refer to the information on
the “Ignition switch” in Section 2).
Page 172 of 200
5.40
ENG_UD20968_2
Anomalies de fonctionnement (H79 - Dacia)
ENG_NU_898-5_H79_Dacia_5
Jaune NoirNoir texte
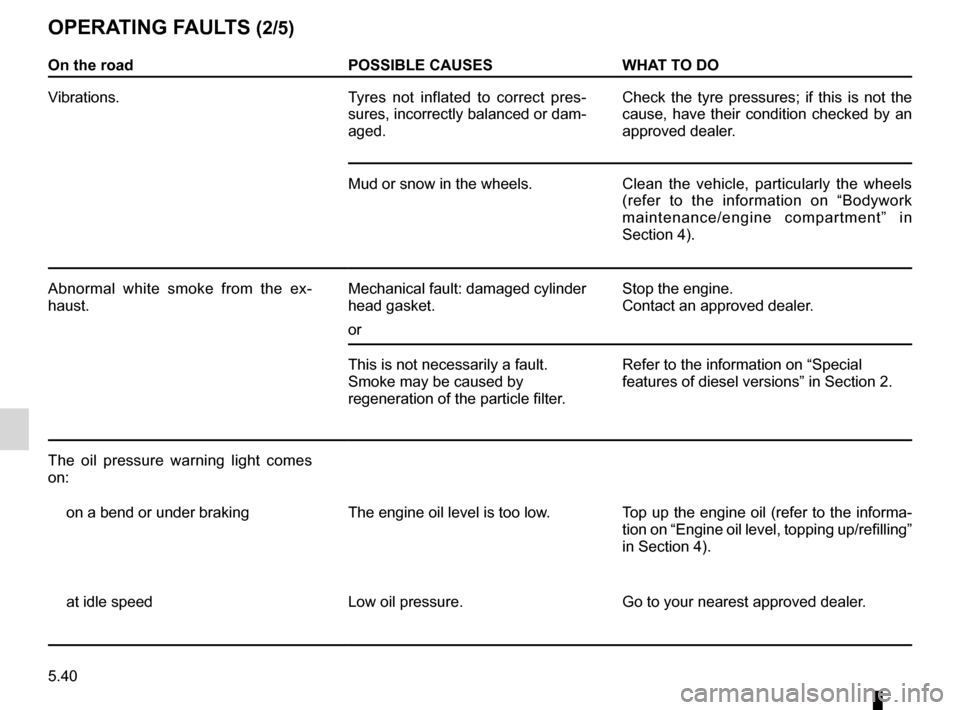
OPERATING FAULTS (2/5)
On the road POSSIBLE CAUSESWHAT TO DO
Vibrations. Tyres not inflated to correct pres-
sures, incorrectly balanced or dam-
aged. Check the tyre pressures; if this is not the
cause, have their condition checked by an
approved dealer.
Mud or snow in the wheels. Clean the vehicle, particularly the wheels
(refer to the information on “Bodywork
maintenance/engine compartment” in
Section 4).
Abnormal white smoke from the ex -
haust. Mechanical fault: damaged cylinder
head gasket.
orStop the engine.
Contact an approved dealer.
This is not necessarily a fault.
Smoke may be caused by
regeneration of the particle filter. Refer to the information on “Special
features of diesel versions” in Section 2.
The oil pressure warning light comes
on: on a bend or under braking The engine oil level is too low.Top up the engine oil (refer to the informa-
tion on “Engine oil level, topping up/refilling”
in Section 4).
at idle speed Low oil pressure.Go to your nearest approved dealer.
Page 173 of 200
JauneNoirNoir texte
5.41
ENG_UD20968_2
Anomalies de fonctionnement (H79 - Dacia)
ENG_NU_898-5_H79_Dacia_5
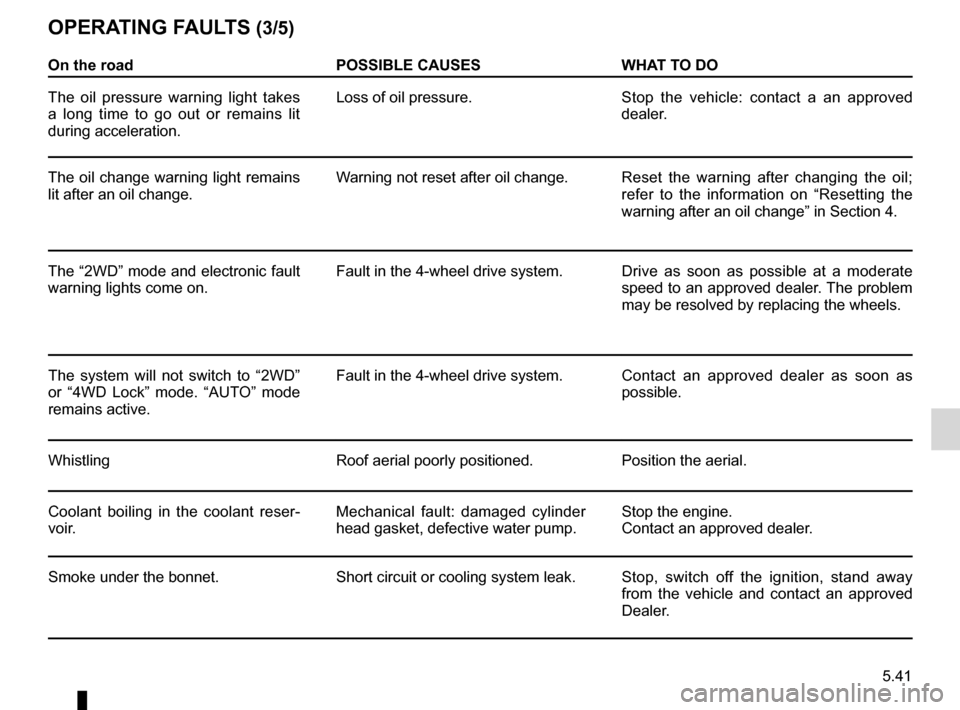
OPERATING FAULTS (3/5)
On the road POSSIBLE CAUSESWHAT TO DO
The oil pressure warning light takes
a long time to go out or remains lit
during acceleration. Loss of oil pressure.
Stop the vehicle: contact a an approved
dealer.
The oil change warning light remains
lit after an oil change. Warning not reset after oil change.
Reset the warning after changing the oil;
refer to the information on “Resetting the
warning after an oil change” in Section 4.
The “2WD” mode and electronic fault
warning lights come on. Fault in the 4-wheel drive system.
Drive as soon as possible at a moderate
speed to an approved dealer. The problem
may be resolved by replacing the wheels.
The system will not switch to “2WD”
or “4WD Lock” mode. “AUTO” mode
remains active. Fault in the 4-wheel drive system.
Contact an approved dealer as soon as
possible.
Whistling Roof aerial poorly positioned.Position the aerial.
Coolant boiling in the coolant reser -
voir. Mechanical fault: damaged cylinder
head gasket, defective water pump.Stop the engine.
Contact an approved dealer.
Smoke under the bonnet. Short circuit or cooling system leak.Stop, switch off the ignition, stand away
from the vehicle and contact an approved
Dealer.