dashboard DACIA DUSTER 2010 1.G Owners Manual
[x] Cancel search | Manufacturer: DACIA, Model Year: 2010, Model line: DUSTER, Model: DACIA DUSTER 2010 1.GPages: 200, PDF Size: 7.12 MB
Page 23 of 200
JauneNoirNoir texte
1.17
ENG_UD20682_3
Dispositifs complémentaires aux ceintures avant (H79 - Dacia)
ENG_NU_898-5_H79_Dacia_1
METHODS OF RESTRAINT IN ADDITION TO THE FRONT SEAT BELTS (2/3)
Driver’s and passenger air
bags
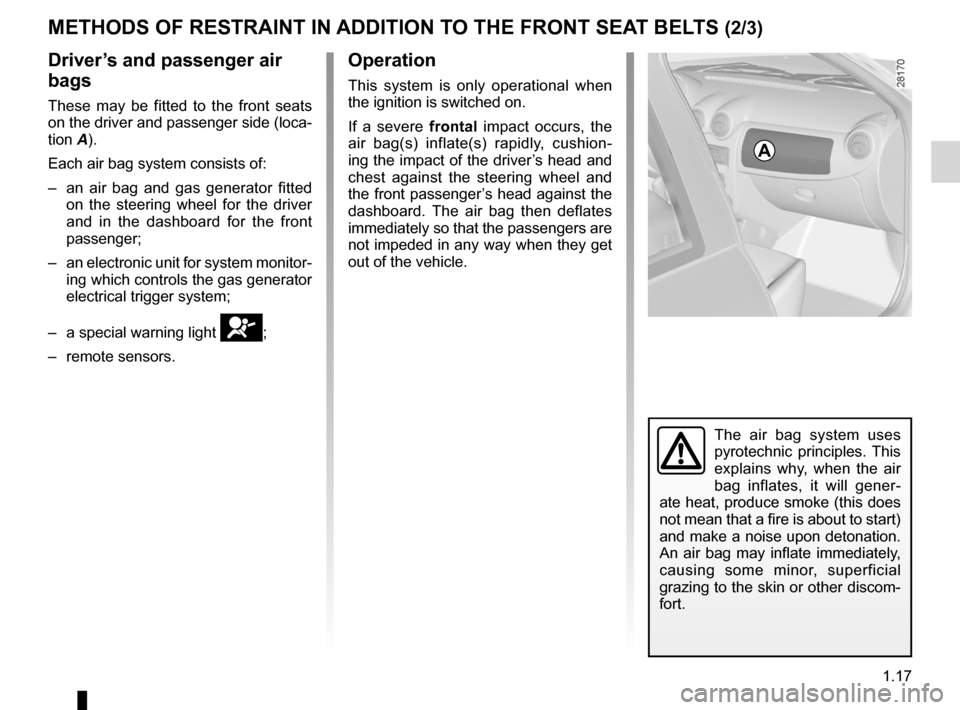
These may be fitted to the front seats
on the driver and passenger side (loca-
tion A).
Each air bag system consists of:
– an air bag and gas generator fitted
on the steering wheel for the driver
and in the dashboard for the front
passenger;
– an electronic unit for system monitor-
ing which controls the gas generator
electrical trigger system;
– a special warning light
å;
– remote sensors.
The air bag system uses
pyrotechnic principles. This
explains why, when the air
bag inflates, it will gener -
ate heat, produce smoke (this does
not mean that a fire is about to start)
and make a noise upon detonation.
An air bag may inflate immediately,
causing some minor, superficial
grazing to the skin or other discom-
fort.
Operation
This system is only operational when
the ignition is switched on.
If a severe frontal impact occurs, the
air bag(s) inflate(s) rapidly, cushion -
ing the impact of the driver’s head and
chest against the steering wheel and
the front passenger’s head against the
dashboard. The air bag then deflates
immediately so that the passengers are
not impeded in any way when they get
out of the vehicle.
A
Page 24 of 200
1.18
ENG_UD20682_3
Dispositifs complémentaires aux ceintures avant (H79 - Dacia)
ENG_NU_898-5_H79_Dacia_1
METHODS OF RESTRAINT IN ADDITION TO THE FRONT SEAT BELTS (3/3)
Warnings concerning the driver’s air bag
– Do not modify the steering wheel or the steering wheel boss.
– Do not cover the steering wheel boss under any circumstances.
– Do not attach any objects (badge, logo, clock, telephone holder, etc.) to the steering wheel boss.
– You must not remove the steering wheel (such work must only be performed by trained personnel from our Network).
– When driving, do not sit too close to the steering wheel. Sit with your arms slightly bent (see the information on “Adjusting
your driving position” in Section 1). This will allow sufficient space for the air bag to inflate properly and be fully effective.
Warnings concerning the passenger air bag
– Do not attach or glue any objects (badge, logo, clock, telephone holder, etc.) to the dashboard in the proximity of the air bag
housing.
– Do not place anything between the dashboard and the passenger (pet, umbrella, walking stick, parcels, etc.).
– The passenger must not put his or her feet on the dashboard or seat as there is a risk that serious injuries may occur. In
general, all parts of the body should be kept away from the dashboard (\
knees, hands, head etc.).
– You should reactivate the passenger air bag as soon as you remove the child seat to ensure the protection of the front pas-
senger in the event of an impact.
A REAR-FACING CHILD SEAT MUST NOT BE FITTED TO THE FRONT PASSENGER SEAT UNLESS THE RESTRAINT SYSTEMS IN ADDITION TO THE SEAT BELT, I.E. AIR BAG, ARE DEACTIVATED.
(refer to the information on “Child safety: deactivating/activating \
the front passenger air bag” in Section 1)
All of the warnings below are given so that the air bag is not obstructed in any way when it is deployed and also to pre-
vent the risk of serious injuries caused by items which may be dislodged\
when the air bag deploys.
Page 39 of 200
JauneNoirNoir texte
1.33
ENG_UD24342_3
Sécurité enfants : désactivation/activation airbag passager ava\
nt (H79 - Dacia)
ENG_NU_898-5_H79_Dacia_1
DANGER
Since front passenger air
bag triggering and the po -
sition of a rear-facing child
seat are incompatible, it is not per -
mitted to fit such a seat in this posi -
tion unless the vehicle is fitted with an
air bag deactivation device. The child
may suffer very serious injuries if the
air bag inflates.
The markings on the dashboard and
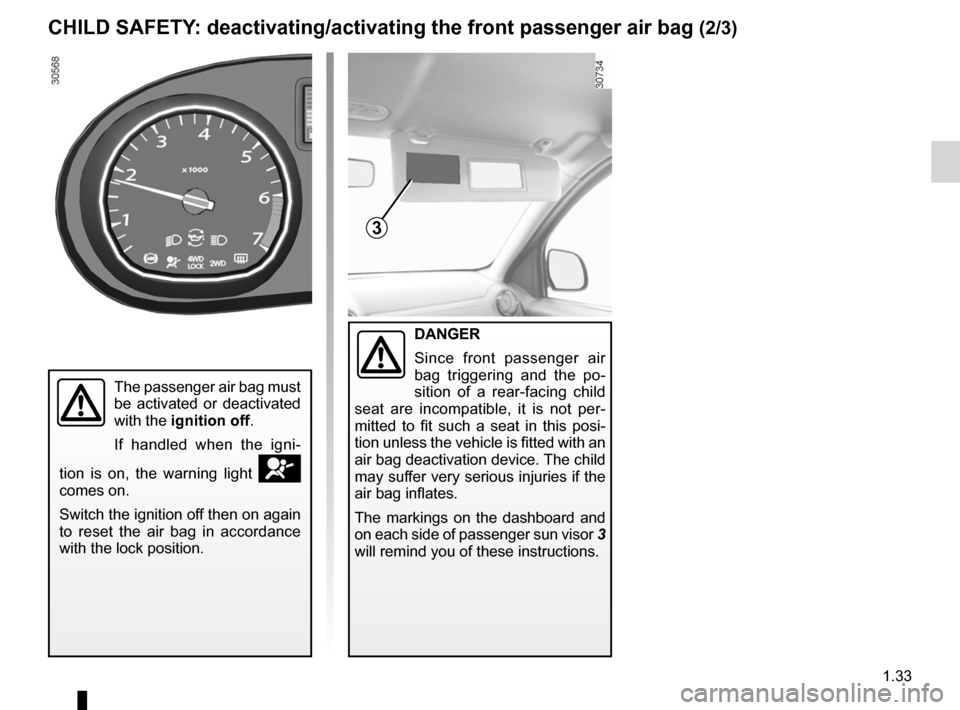
on each side of passenger sun visor 3
will remind you of these instructions.
3
The passenger air bag must
be activated or deactivated
with the ignition off .
If handled when the igni -
tion is on, the warning light
å
comes on.
Switch the ignition off then on again
to reset the air bag in accordance
with the lock position.
CHILD SAFETY : deactivating/activating the front passenger air bag (2/3)
Page 42 of 200
controls ................................................. (up to the end of the DU)
driver’s position .................................... (up to the end of the DU)
dashboard ............................................. (up to the end of the DU)
1.36
ENG_UD24352_3
Poste de conduite direction à gauche (H79 - Dacia)
ENG_NU_898-5_H79_Dacia_1
Jaune NoirNoir texte
Driving position
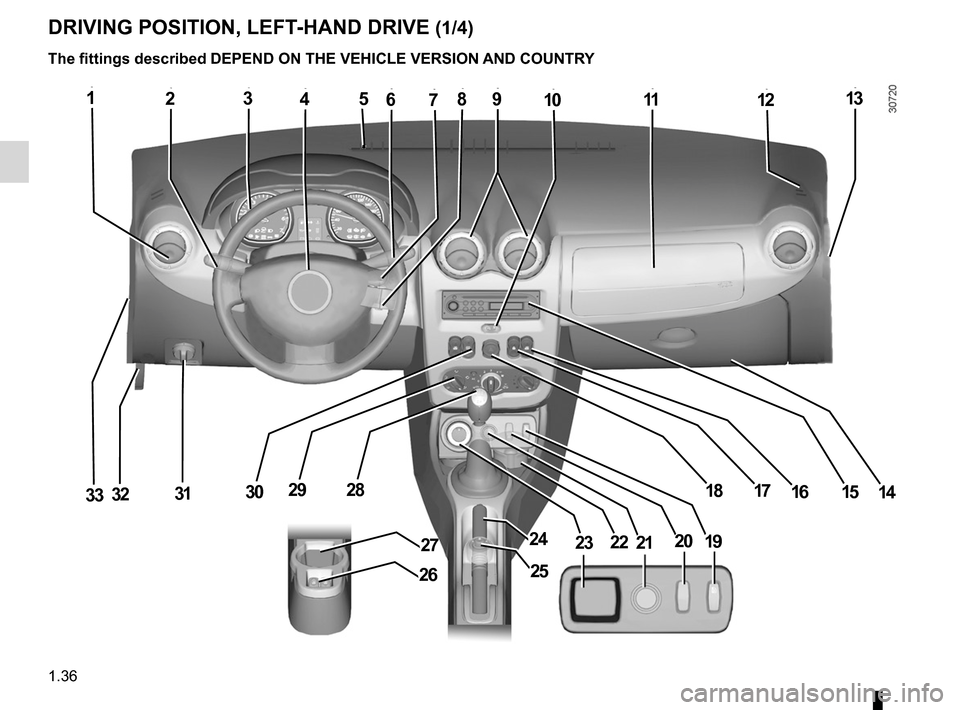
DRIVING POSITION, LEFT-HAND DRIVE (1/4)
The fittings described DEPEND ON THE VEHICLE VERSION AND COUNTRY
12345678910111213
3332311415161718282930
27
26
24
25
2322212019
Page 94 of 200
air conditioning ..................................... (up to the end of the DU)
heating and air conditioning system ..... (up to the end of the DU)
heating system ..................................... (up to the end of the DU)
air conditioning ..................................... (up to the end of the DU)
rear screen de-icing/demisting ............. (up to the end of the DU)
ventilation heating and air conditioning system (up to the end of the DU)
3.4
ENG_UD25124_1
Chauffage - Ventilation - Air conditionné (H79 - Dacia)
ENG_NU_898-5_H79_Dacia_3
Jaune NoirNoir texte
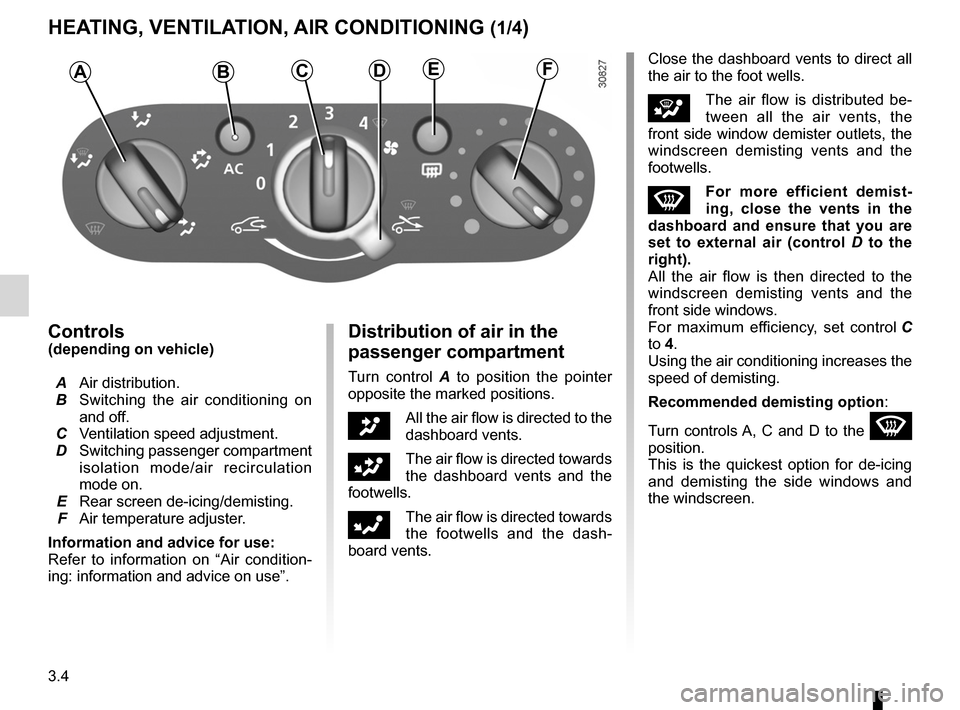
Controls(depending on vehicle)
A Air distribution.
B Switching the air conditioning on
and off.
C Ventilation speed adjustment.
D Switching passenger compartment
isolation mode/air recirculation
mode on.
E Rear screen de-icing/demisting.
F Air temperature adjuster.
Information and advice for use:
Refer to information on “Air condition -
ing: information and advice on use”.Distribution of air in the
passenger compartment
Turn control A to position the pointer
opposite the marked positions.
JAll the air flow is directed to the
dashboard vents.
GThe air flow is directed towards
the dashboard vents and the
footwells.
FThe air flow is directed towards
the footwells and the dash -
board vents. Close the dashboard vents to direct all
the air to the foot wells.
iThe air flow is distributed be
-
tween all the air vents, the
front side window demister outlets, the
windscreen demisting vents and the
footwells.
WFor more efficient demist -
ing, close the vents in the
dashboard and ensure that you are
set to external air (control D to the
right).
All the air flow is then directed to the
windscreen demisting vents and the
front side windows.
For maximum efficiency, set control C
to 4.
Using the air conditioning increases the
speed of demisting.
Recommended demisting option :
Turn controls A, C and D to the
W
position.
This is the quickest option for de-icing
and demisting the side windows and
the windscreen.
HEATING, VENTILATION, AIR CONDITIONING (1/4)
ABCDEF
Page 107 of 200
JauneNoirNoir texte
3.17
ENG_UD24511_4
Rangements / aménagements habitacle (H79 - Dacia)
ENG_NU_898-5_H79_Dacia_3
P ASSENGER COMPARTMENT STORAGE SPACE AND FITTINGS (3/4)
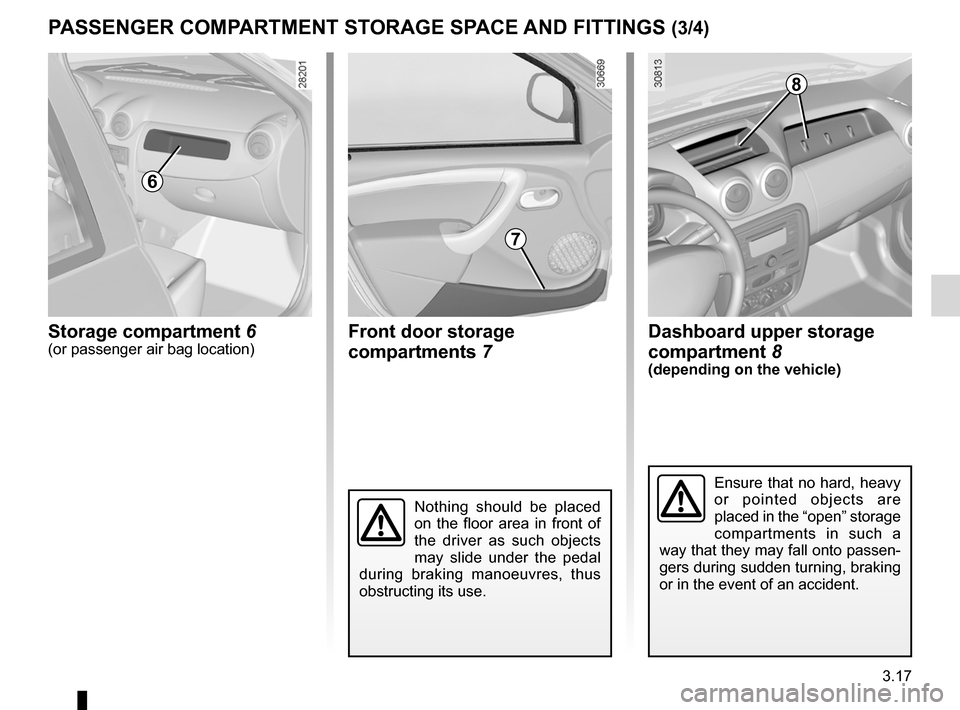
Front door storage
compartments 7
Ensure that no hard, heavy
or pointed objects are
placed in the “open” storage
compartments in such a
way that they may fall onto passen-
gers during sudden turning, braking
or in the event of an accident.
Dashboard upper storage
compartment 8
(depending on the vehicle)
Nothing should be placed
on the floor area in front of
the driver as such objects
may slide under the pedal
during braking manoeuvres, thus
obstructing its use.
7
Storage compartment 6(or passenger air bag location)
6
8
Page 131 of 200
JauneNoirNoir texte
4.17
ENG_UD22288_6
Entretien des garnitures intérieures (B90 - U90 - L90 Ph2 - F90 Ph2 \
- R90 Ph2 - H79 - Dacia)
ENG_NU_898-5_H79_Dacia_4
Removing/refitting factory
fitted removable equipment
in the vehicle
If you need to remove equipment to
clean the passenger compartment (e.g.
mats), always make you refit it properly
and on the correct side (driver’s side
mats must be fitted on the driver’s side,
etc.), using retaining components sup-
plied with the equipment (e.g. the driv-
er’s side mat must always be secured
using prefitted retaining devices).
In all cases, with the vehicle stationary,
ensure that nothing can hinder driving
(obstacle underneath the pedals, heel
trapped by the mat, etc.).
What you should not do
You are strongly advised not to place
items such as air fresheners, perfume
etc. near the air vents as these could
damage the dashboard fittings.
INTERIOR TRIM MAINTENANCE (2/2)
You are strongly recom -
mended not to use high -
pressure or spray cleaning
equipment inside the pas -
senger compartment: this equip -
ment could impair the correct func-
tioning of the electrical or electronic
components in the vehicle, or have
other detrimental effects.
Page 138 of 200
5.6
ENG_UD22629_3
Kit de gonflage des pneumatiques (H79 - Dacia)
ENG_NU_898-5_H79_Dacia_5
Jaune NoirNoir texte
TYRE INFLATION KIT (2/3)
Depending on the vehicle, in the event
of a puncture, use the kit located on the
left side of the luggage compartment on
4x2 versions or in the in the emergency
spare wheel tray under the luggage
compartment carpet on 4x4 versions. –
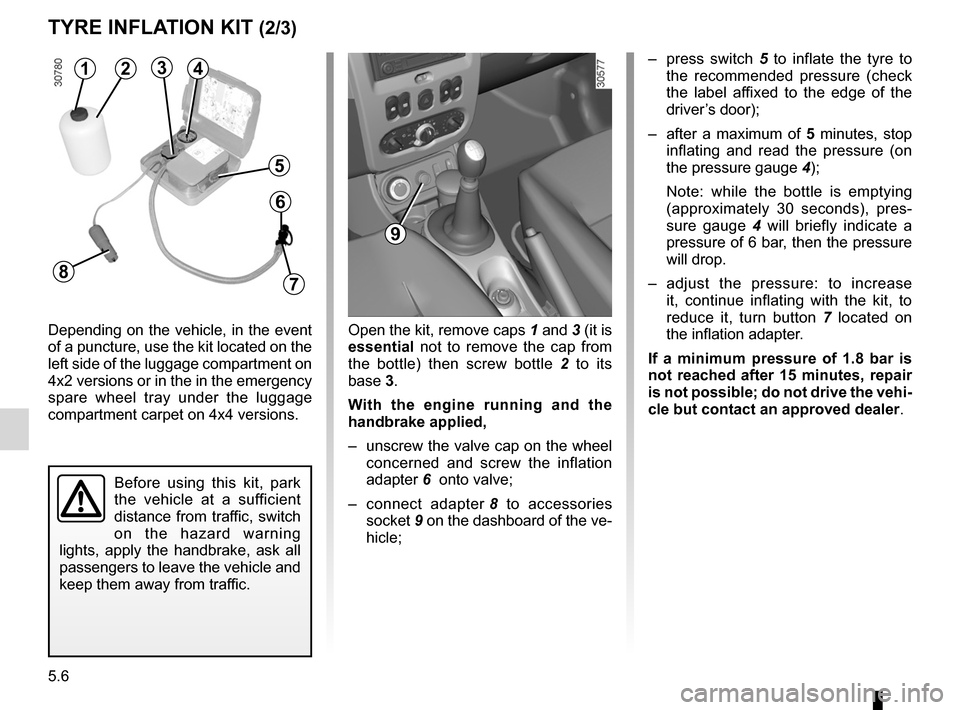
press switch 5 to inflate the tyre to
the recommended pressure (check
the label affixed to the edge of the
driver’s door);
– after a maximum of 5 minutes, stop
inflating and read the pressure (on
the pressure gauge 4);
Note: while the bottle is emptying
(approximately 30 seconds), pres -
sure gauge 4 will briefly indicate a
pressure of 6 bar, then the pressure
will drop.
– adjust the pressure: to increase
it, continue inflating with the kit, to
reduce it, turn button 7 located on
the inflation adapter.
If a minimum pressure of 1.8 bar is
not reached after 15 minutes, repair
is not possible; do not drive the vehi-
cle but contact an approved dealer .
Before using this kit, park
the vehicle at a sufficient
distance from traffic, switch
on the hazard warning
lights, apply the handbrake, ask all
passengers to leave the vehicle and
keep them away from traffic.
Open the kit, remove caps 1 and 3 (it is
essential not to remove the cap from
the bottle) then screw bottle 2 to its
base 3.
With the engine running and the
handbrake applied,
– unscrew the valve cap on the wheel
concerned and screw the inflation
adapter 6 onto valve;
– connect adapter 8 to accessories
socket 9 on the dashboard of the ve-
hicle;
9
1234
5
6
78
Page 139 of 200
JauneNoirNoir texte
5.7
ENG_UD22629_3
Kit de gonflage des pneumatiques (H79 - Dacia)
ENG_NU_898-5_H79_Dacia_5
TYRE INFLATION KIT (3/3)
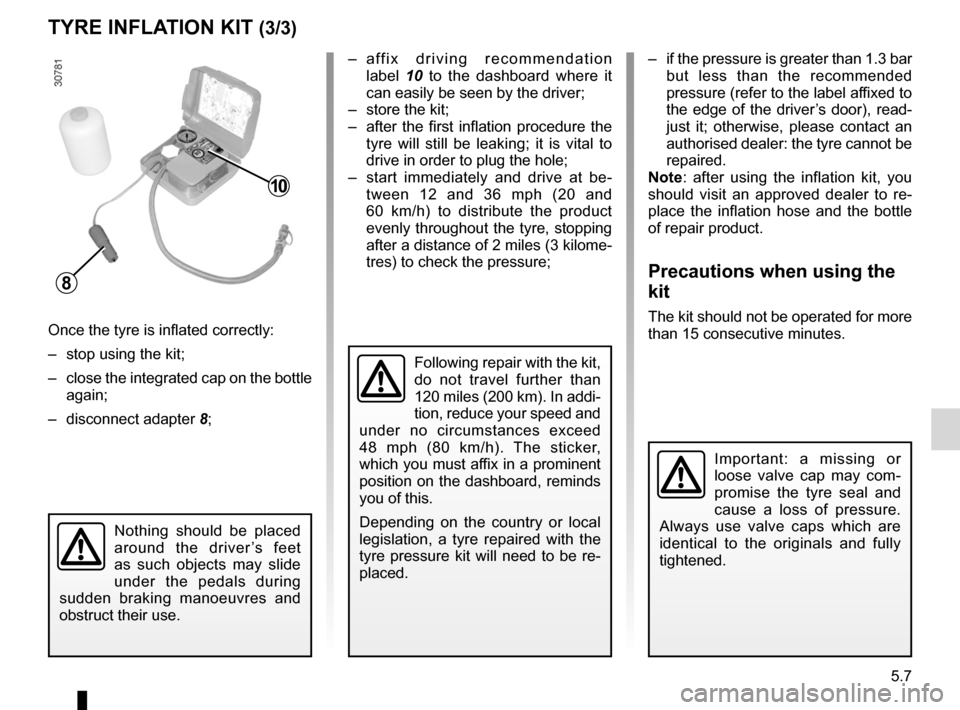
Once the tyre is inflated correctly:
– stop using the kit;
– close the integrated cap on the bottle
again;
– disconnect adapter 8; –
a ff i x d r i v i n g r e c o m m e n d a t i o n
label 10 to the dashboard where it
can easily be seen by the driver;
– store the kit;
– after the first inflation procedure the
tyre will still be leaking; it is vital to
drive in order to plug the hole;
– start immediately and drive at be -
tween 12 and 36 mph (20 and
60 km/h) to distribute the product
evenly throughout the tyre, stopping
after a distance of 2 miles (3 kilome-
tres) to check the pressure; –
if the pressure is greater than 1.3 bar
but less than the recommended
pressure (refer to the label affixed to
the edge of the driver’s door), read-
just it; otherwise, please contact an
authorised dealer: the tyre cannot be
repaired.
Note : after using the inflation kit, you
should visit an approved dealer to re -
place the inflation hose and the bottle
of repair product.
Precautions when using the
kit
The kit should not be operated for more
than 15 consecutive minutes.
Important: a missing or
loose valve cap may com -
promise the tyre seal and
cause a loss of pressure.
Always use valve caps which are
identical to the originals and fully
tightened.
Following repair with the kit,
do not travel further than
120 miles (200 km). In addi -
tion, reduce your speed and
under no circumstances exceed
48 mph (80 km/h). The sticker,
which you must affix in a prominent
position on the dashboard, reminds
you of this.
Depending on the country or local
legislation, a tyre repaired with the
tyre pressure kit will need to be re-
placed.
Nothing should be placed
around the driver ’s feet
as such objects may slide
under the pedals during
sudden braking manoeuvres and
obstruct their use.
10
8
Page 195 of 200
7.1
FRA_UD25066_7
Index (H79 - Dacia)
ENG_NU_898-5_H79_Dacia_7
AlphAbeticAl index (1/4)
A
ABS ....................................................................... 2.15 → 2.18
accessories........................................................................\
5.38
accessories - installation ................................................... 5.38
accessories socket ............................................................ 3.14
adjusting your driving position ...................... 1.10, 1.12 → 1.15
advice on antipollution ........................................... 5.25 → 5.27
air bag .................................................................... 1.16 → 1.20
deactivating the front passenger air bags .................... 1.32
air conditioning .......................................................... 3.2 → 3.8
air vents ...................................................................... 3.2 – 3.3
anti-corrosion check .............................................. 6.14 → 6.18
anti-lock braking system: ABS ...............................2.15 → 2.18
antipollution advice .................................................................. 2.6 → 2.8
ashtrays ........................................................................\
..... 3.14
automatic gearbox (use) ........................................ 2.19 → 2.21
automatic gearbox selector lever ...........................2.19 → 2.21
b
battery ........................................................................\
........ 4.12
troubleshooting ................................................. 5.28 – 5.29
battery (remote control) ..................................................... 5.30
bodywork (maintenance) ....................................... 4.13 → 4.15
bonnet ........................................................................\
. 4.2 – 4.3
brake fluid ........................................................................\
.... 4.7
bulbs changing .......................................................... 5.14 → 5.24
c
capacity of mechanical components ...........................4.4, 4.12
catalytic converter ................................................................ 2.4
central door locking .................................................... 1.5 – 1.6
changing a bulb ..................................................... 5.14 → 5.24
changing a wheel ...................................................... 5.9 – 5.10
changing gear ........................................................ 2.19 → 2.21child booster seat
.................................................. 1.21 → 1.23
child restraint/seat ................................................. 1.21 → 1.31
child safety ...................................................... 1.7, 1.21 → 1.31
child seats .............................................................. 1.21 → 1.31
children ...................................................................... 1.5 → 1.7
cigar lighter ........................................................................\
3.14
clock ........................................................................\
.......... 1.51
closing the doors ................................................................. 1.7
control instruments ............................ 1.40 → 1.49, 1.54 – 1.55
controls .................................................................. 1.36 → 1.39
courtesy light ..................................................................... 3.12
d
dashboard .............................................................. 1.36 → 1.39
de-icing rear screen ................................................................... 1.59
dipstick........................................................................\
......... 4.4
doors ........................................................................\
.. 1.5 → 1.7
driver’s position ..................................................... 1.36 → 1.39
driving ...................................................................... 2.2 → 2.21
e
electric door locking .................................................... 1.5 – 1.6
electric windows ...................................................... 3.9 → 3.11
emergency brake assist ......................................... 2.16 → 2.18
emergency spare wheel ........................ 5.3 – 5.4, 5.11 → 5.13
engine technical specifications .................................................. 6.5
engine coolant ..................................................................... 4.8
engine immobiliser............................................................... 1.8
engine immobiliser (switch) ................................................. 2.2
engine oil ........................................................................\
..... 4.4
engine oil grade .......................................................... 4.5 – 4.6
engine oil level ..................................................................... 4.5
engine specifications ........................................................... 6.5
environment ........................................................................\
. 2.9