DAEWOO NUBIRA 2004 Service Repair Manual
NUBIRA 2004
DAEWOO
DAEWOO
https://www.carmanualsonline.info/img/54/56879/w960_56879-0.png
DAEWOO NUBIRA 2004 Service Repair Manual
Trending: key, battery replacement, tow bar, checking oil, fuel, clutch, automatic transmission fluid
Page 1731 of 2643
AISIN AUTOMATIC TRANSAXLE 5A2 – 141
DAEWOO V–121 BL4
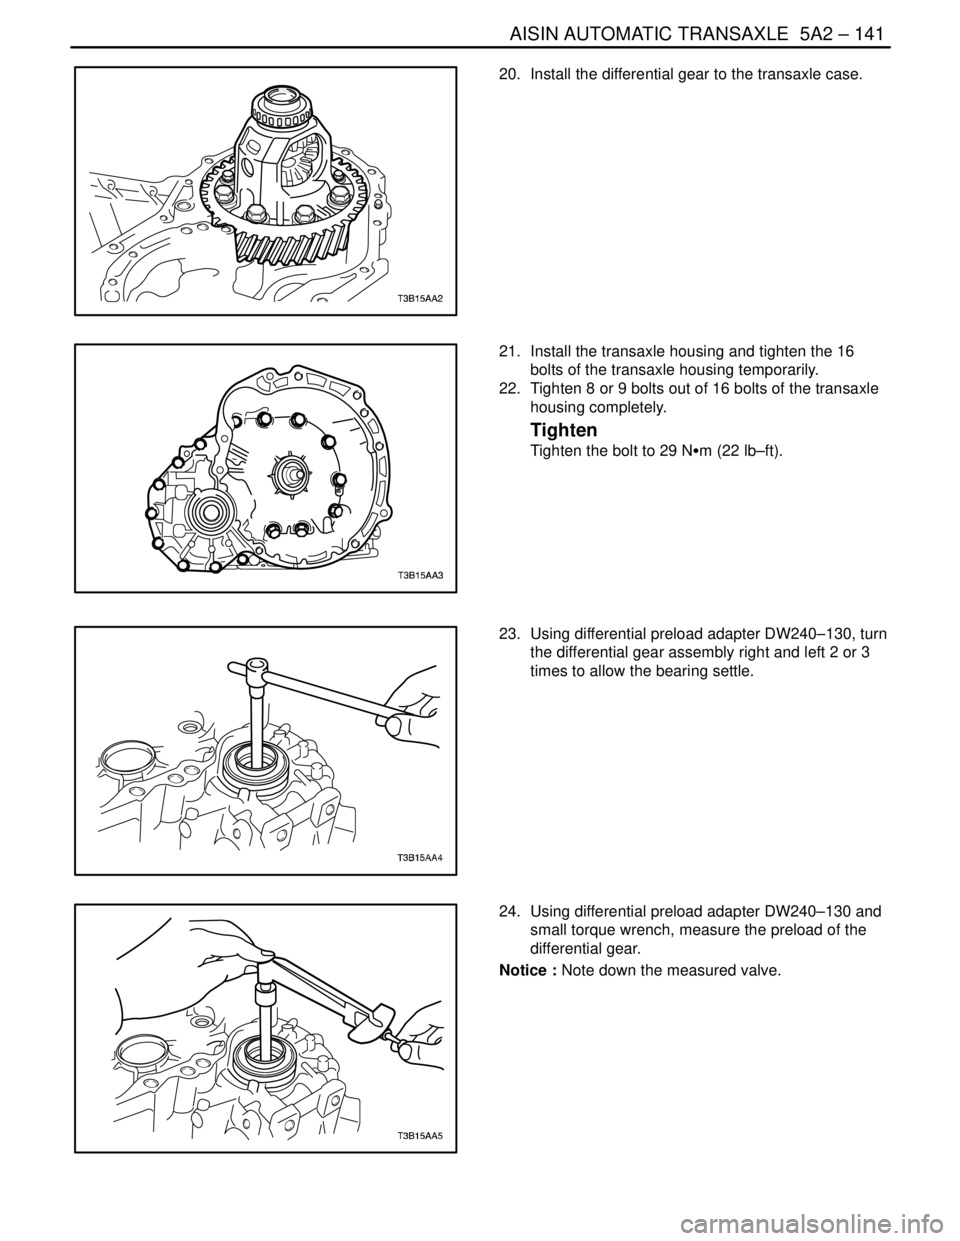
20. Install the differential gear to the transaxle case.
21. Install the transaxle housing and tighten the 16
bolts of the transaxle housing temporarily.
22. Tighten 8 or 9 bolts out of 16 bolts of the transaxle
housing completely.
Tighten
Tighten the bolt to 29 NSm (22 lb–ft).
23. Using differential preload adapter DW240–130, turn
the differential gear assembly right and left 2 or 3
times to allow the bearing settle.
24. Using differential preload adapter DW240–130 and
small torque wrench, measure the preload of the
differential gear.
Notice : Note down the measured valve.
Page 1732 of 2643
5A2 – 142IAISIN AUTOMATIC TRANSAXLE
DAEWOO V–121 BL4
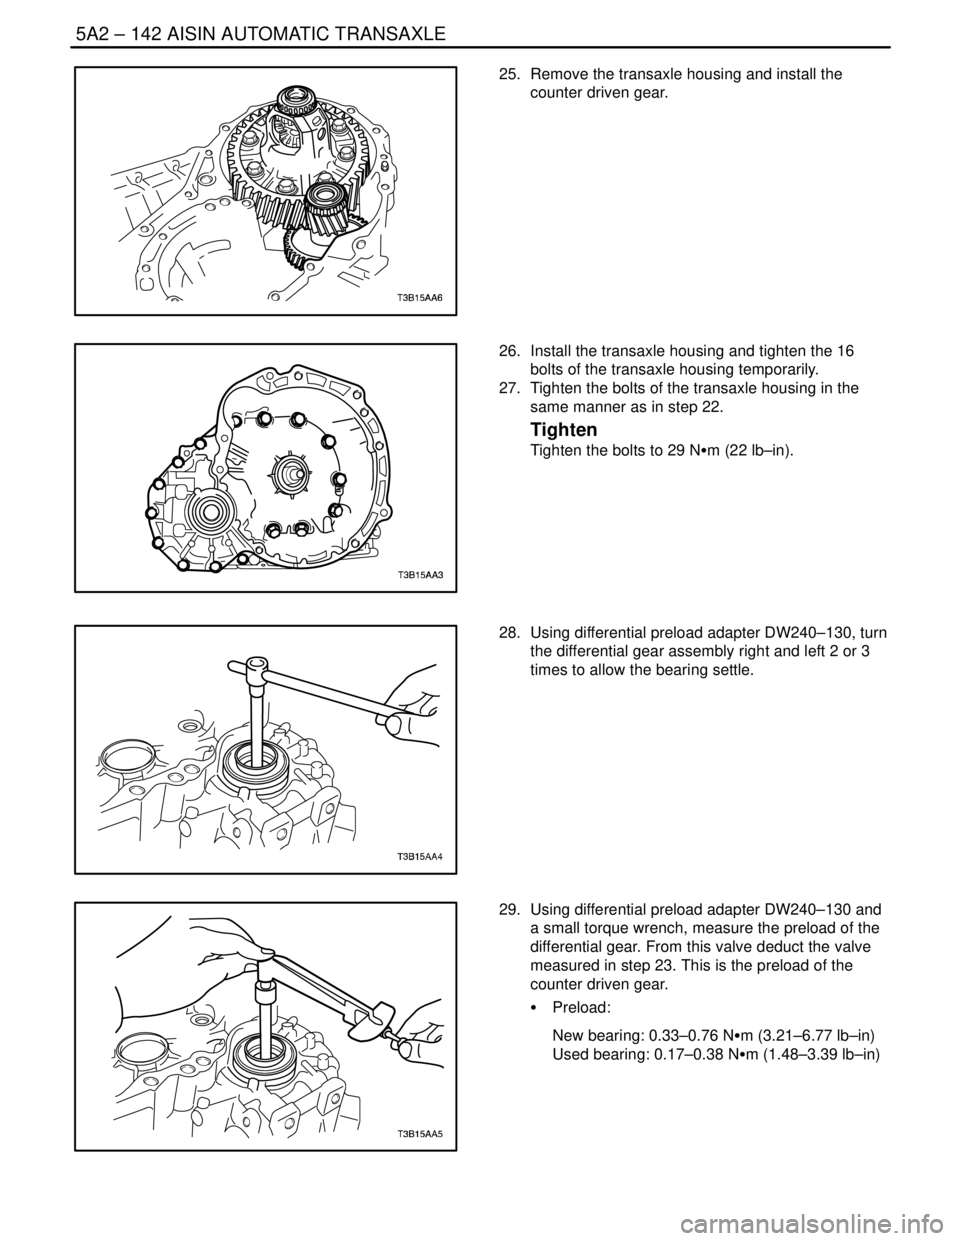
25. Remove the transaxle housing and install the
counter driven gear.
26. Install the transaxle housing and tighten the 16
bolts of the transaxle housing temporarily.
27. Tighten the bolts of the transaxle housing in the
same manner as in step 22.
Tighten
Tighten the bolts to 29 NSm (22 lb–in).
28. Using differential preload adapter DW240–130, turn
the differential gear assembly right and left 2 or 3
times to allow the bearing settle.
29. Using differential preload adapter DW240–130 and
a small torque wrench, measure the preload of the
differential gear. From this valve deduct the valve
measured in step 23. This is the preload of the
counter driven gear.
S Preload:
New bearing: 0.33–0.76 NSm (3.21–6.77 lb–in)
Used bearing: 0.17–0.38 NSm (1.48–3.39 lb–in)
Page 1733 of 2643
AISIN AUTOMATIC TRANSAXLE 5A2 – 143
DAEWOO V–121 BL4
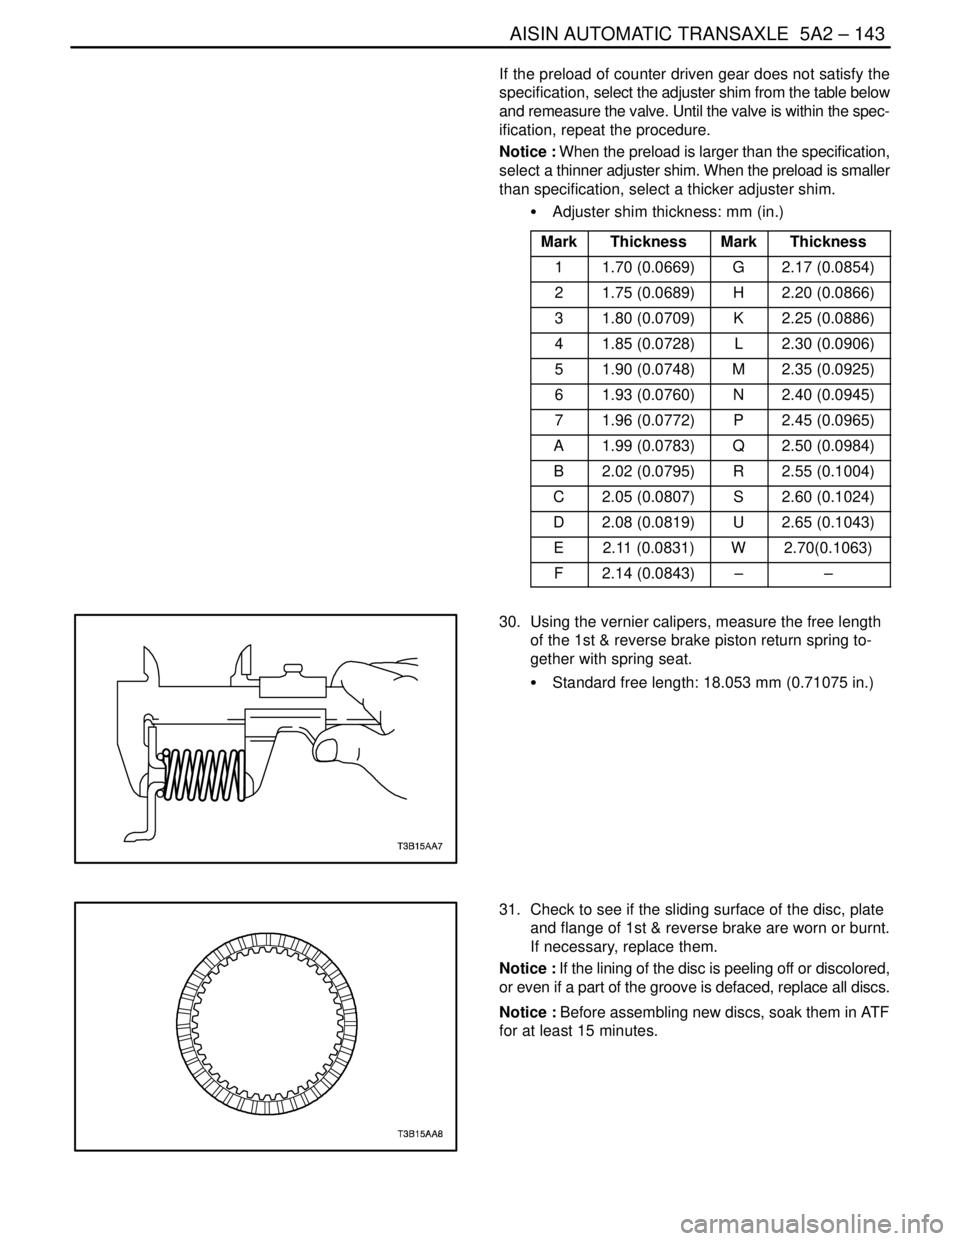
If the preload of counter driven gear does not satisfy the
specification, select the adjuster shim from the table below
and remeasure the valve. Until the valve is within the spec-
ification, repeat the procedure.
Notice : When the preload is larger than the specification,
select a thinner adjuster shim. When the preload is smaller
than specification, select a thicker adjuster shim.
S Adjuster shim thickness: mm (in.)
Mark
ThicknessMarkThickness
11.70 (0.0669)G2.17 (0.0854)
21.75 (0.0689)H2.20 (0.0866)
31.80 (0.0709)K2.25 (0.0886)
41.85 (0.0728)L2.30 (0.0906)
51.90 (0.0748)M2.35 (0.0925)
61.93 (0.0760)N2.40 (0.0945)
71.96 (0.0772)P2.45 (0.0965)
A1.99 (0.0783)Q2.50 (0.0984)
B2.02 (0.0795)R2.55 (0.1004)
C2.05 (0.0807)S2.60 (0.1024)
D2.08 (0.0819)U2.65 (0.1043)
E2.11 (0.0831)W2.70(0.1063)
F2.14 (0.0843)––
30. Using the vernier calipers, measure the free length
of the 1st & reverse brake piston return spring to-
gether with spring seat.
S Standard free length: 18.053 mm (0.71075 in.)
31. Check to see if the sliding surface of the disc, plate
and flange of 1st & reverse brake are worn or burnt.
If necessary, replace them.
Notice : If the lining of the disc is peeling off or discolored,
or even if a part of the groove is defaced, replace all discs.
Notice : Before assembling new discs, soak them in ATF
for at least 15 minutes.
Page 1734 of 2643
5A2 – 144IAISIN AUTOMATIC TRANSAXLE
DAEWOO V–121 BL4
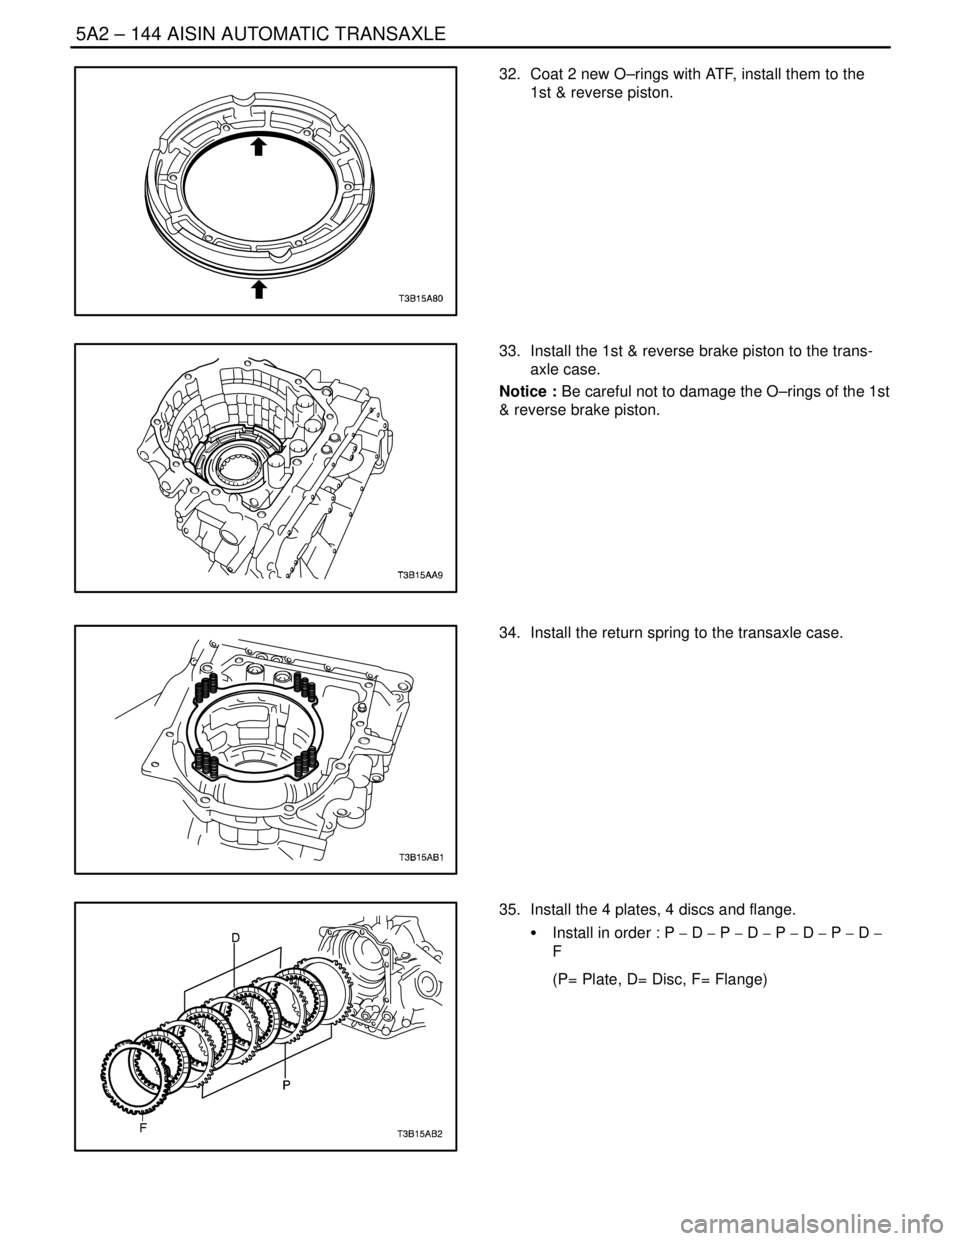
32. Coat 2 new O–rings with ATF, install them to the
1st & reverse piston.
33. Install the 1st & reverse brake piston to the trans-
axle case.
Notice : Be careful not to damage the O–rings of the 1st
& reverse brake piston.
34. Install the return spring to the transaxle case.
35. Install the 4 plates, 4 discs and flange.
S Install in order : P � D � P � D � P � D � P � D �
F
(P= Plate, D= Disc, F= Flange)
Page 1735 of 2643
AISIN AUTOMATIC TRANSAXLE 5A2 – 145
DAEWOO V–121 BL4
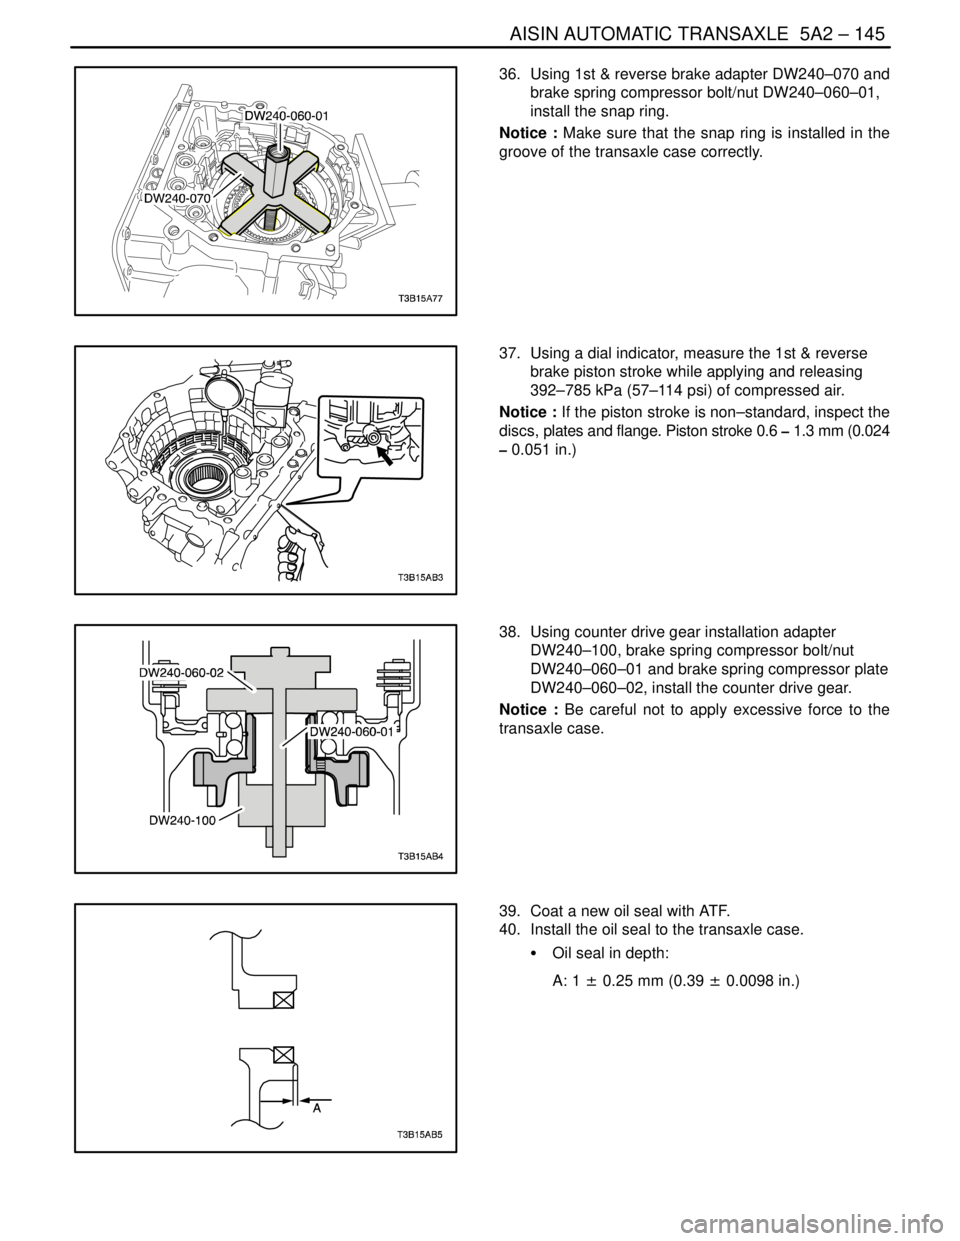
36. Using 1st & reverse brake adapter DW240–070 and
brake spring compressor bolt/nut DW240–060–01,
install the snap ring.
Notice : Make sure that the snap ring is installed in the
groove of the transaxle case correctly.
37. Using a dial indicator, measure the 1st & reverse
brake piston stroke while applying and releasing
392–785 kPa (57–114 psi) of compressed air.
Notice : If the piston stroke is non–standard, inspect the
discs, plates and flange. Piston stroke 0.6 � 1.3 mm (0.024
� 0.051 in.)
38. Using counter drive gear installation adapter
DW240–100, brake spring compressor bolt/nut
DW240–060–01 and brake spring compressor plate
DW240–060–02, install the counter drive gear.
Notice : Be careful not to apply excessive force to the
transaxle case.
39. Coat a new oil seal with ATF.
40. Install the oil seal to the transaxle case.
S Oil seal in depth:
A: 1 ± 0.25 mm (0.39 ± 0.0098 in.)
Page 1736 of 2643
5A2 – 146IAISIN AUTOMATIC TRANSAXLE
DAEWOO V–121 BL4
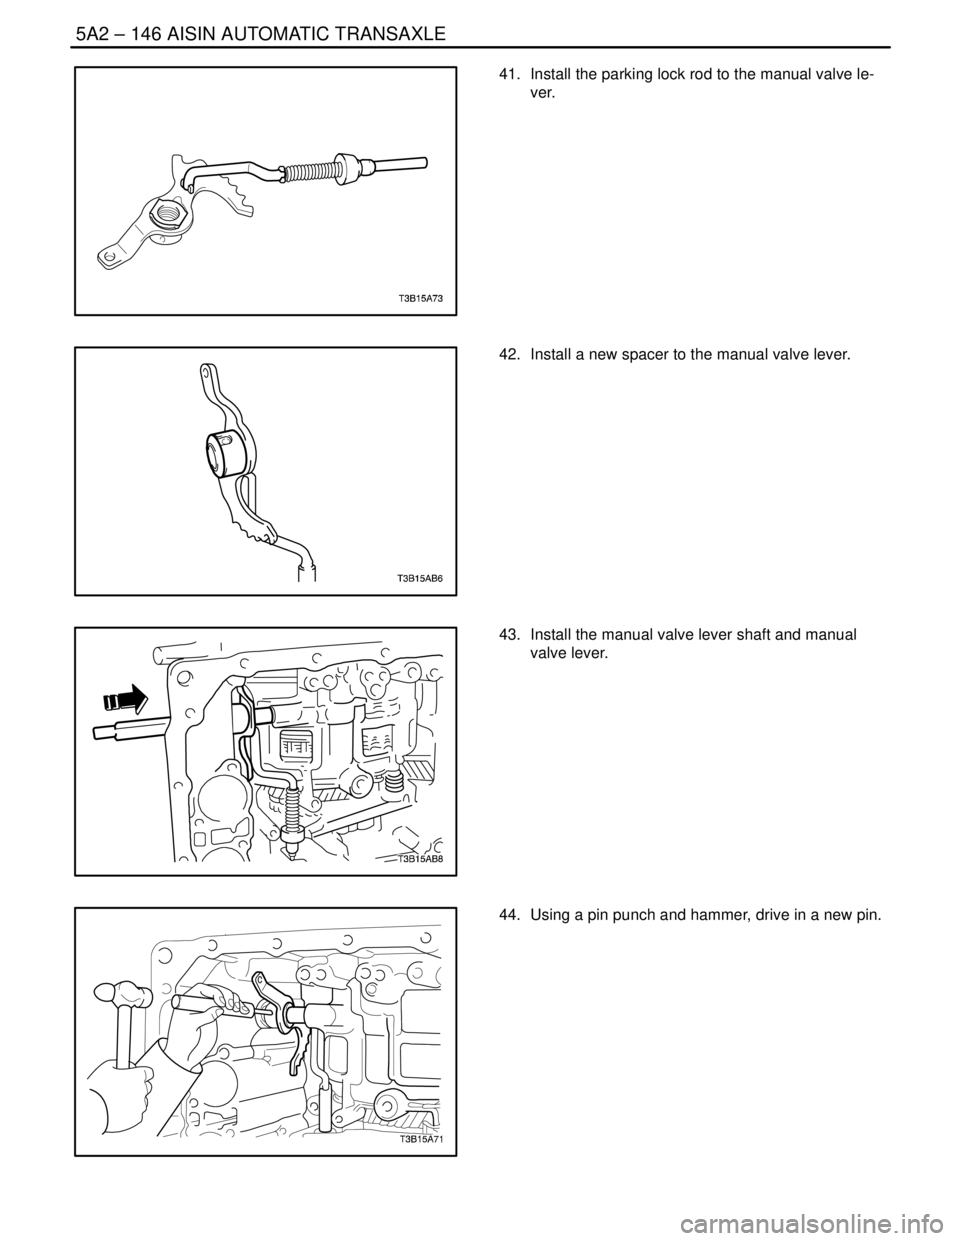
41. Install the parking lock rod to the manual valve le-
ver.
42. Install a new spacer to the manual valve lever.
43. Install the manual valve lever shaft and manual
valve lever.
44. Using a pin punch and hammer, drive in a new pin.
Page 1737 of 2643
AISIN AUTOMATIC TRANSAXLE 5A2 – 147
DAEWOO V–121 BL4
45. Turn the spacer and lever shaft to align the small
hole for locating the staking position in the spacer
with the staking position mark on the lever shaft.
46. Using a pin punch, stake the spacer through the
small hole.
47. Check that the spacer does not turn.
48. Install the manual detent spring with the bolt.
Tighten
Tighten the bolts to 9.8 NSm (87 lb–in).
49. Install the parking lock shaft, torsion spring and
parking lock pawl.
Notice : Check that the edge of torsion spring fits into the
groove securely.
Page 1738 of 2643
5A2 – 148IAISIN AUTOMATIC TRANSAXLE
DAEWOO V–121 BL4
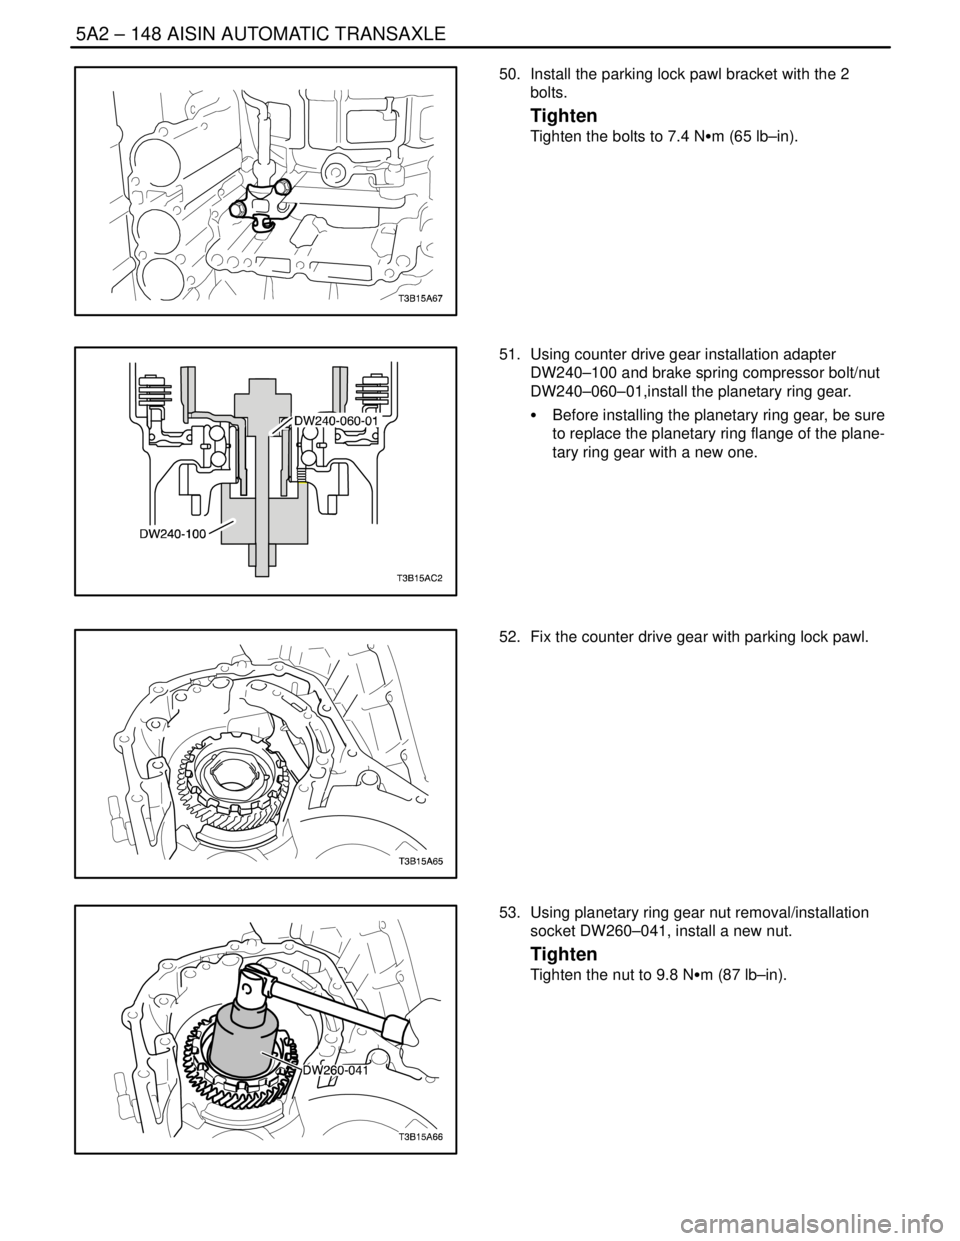
50. Install the parking lock pawl bracket with the 2
bolts.
Tighten
Tighten the bolts to 7.4 NSm (65 lb–in).
51. Using counter drive gear installation adapter
DW240–100 and brake spring compressor bolt/nut
DW240–060–01,install the planetary ring gear.
S Before installing the planetary ring gear, be sure
to replace the planetary ring flange of the plane-
tary ring gear with a new one.
52. Fix the counter drive gear with parking lock pawl.
53. Using planetary ring gear nut removal/installation
socket DW260–041, install a new nut.
Tighten
Tighten the nut to 9.8 NSm (87 lb–in).
Page 1739 of 2643
AISIN AUTOMATIC TRANSAXLE 5A2 – 149
DAEWOO V–121 BL4
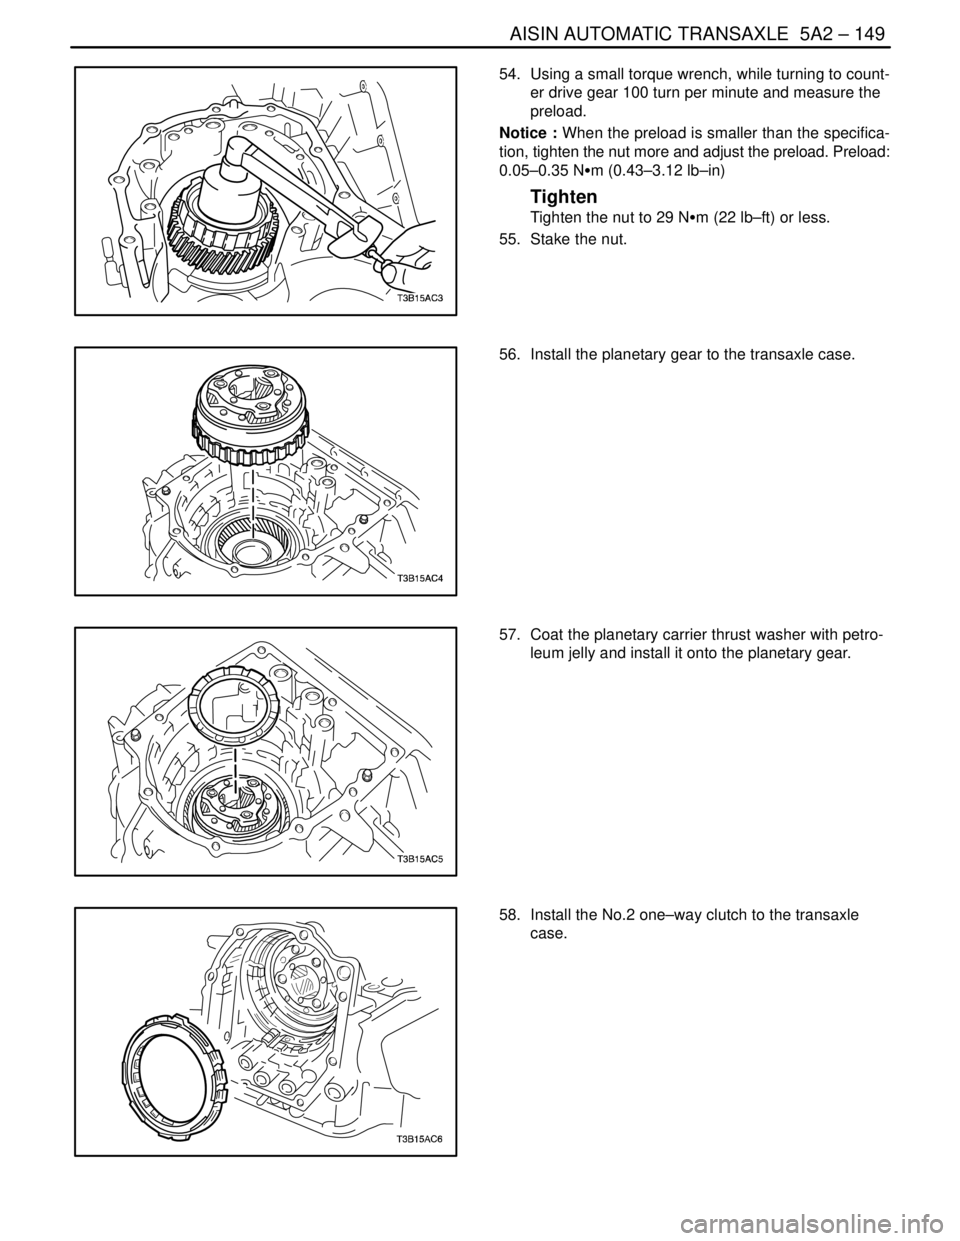
54. Using a small torque wrench, while turning to count-
er drive gear 100 turn per minute and measure the
preload.
Notice : When the preload is smaller than the specifica-
tion, tighten the nut more and adjust the preload. Preload:
0.05–0.35 NSm (0.43–3.12 lb–in)
Tighten
Tighten the nut to 29 NSm (22 lb–ft) or less.
55. Stake the nut.
56. Install the planetary gear to the transaxle case.
57. Coat the planetary carrier thrust washer with petro-
leum jelly and install it onto the planetary gear.
58. Install the No.2 one–way clutch to the transaxle
case.
Page 1740 of 2643
5A2 – 150IAISIN AUTOMATIC TRANSAXLE
DAEWOO V–121 BL4
59. Check that the planetary gear turns freely counter-
clockwise and locks clockwise.
60. Install the anti–rattle clip in the place shown in the
illustration (the space between the No.2 one–way
clutch outer race and transaxle case), push the
anti–rattle clip in until you hear the ”click”.
61. Using vernier calipers, measure the free length of
the 2nd brake piston return spring together with
spring seat.
S Standard free length: 15.85 mm (0.6240 in.).
62. Check to see if the sliding surface of the disc, plate
and flange of 2nd brake are worn or burnt. If neces-
sary, replace them.
Notice : If the lining of the disc is peeling off or discolored,
or even if a part of the groove is defaced, replace all discs.
Notice : Before assembling new discs, soak them in ATF
for at least 15 minutes.
Trending: engine oil, service indicator, high idle speed, jacking, glove box, overheating, adding oil
