ECU DATSUN 210 1979 Service Manual
[x] Cancel search | Manufacturer: DATSUN, Model Year: 1979, Model line: 210, Model: DATSUN 210 1979Pages: 548, PDF Size: 28.66 MB
Page 422 of 548

HOOD
ADJUSTMENT
Hood
can
be
adjusted
with
bolts
attaching
hood
to
hood
hinges
hood
lock
mechanism
and
hood
bumpers
Adjust
hood
for
an
even
fit
between
front
fenders
Adjust
hood
according
to
the
following
procedures
I
Adjust
hood
fore
and
aft
by
loosening
bolts
attaching
hood
to
hinge
and
repositioning
hood
2
Loosen
hood
bumper
lock
nuts
and
lower
bumpers
until
they
do
not
contact
front
of
hood
when
hood
is
closed
3
Set
striker
at
center
of
hood
lock
and
tighten
hood
lock
securing
bolts
temporarily
4
Raise
two
hood
bumpers
until
hood
is
flush
with
fenders
5
Tighten
hood
lock
securing
bolts
after
the
proper
adjustment
has
been
obtained
REMOVAL
AND
INSTALLATION
I
Open
hood
and
protect
body
with
covers
to
prevent
scratching
painted
surface
2
Mark
hood
hinge
locations
on
hood
for
proper
reinstallation
3
Holding
both
sides
of
hood
unscrew
bolts
securing
hinge
to
hood
and
remove
hood
This
operation
re
quires
two
men
4
Installation
is
in
the
reverse
order
of
removal
HOOD
LOCK
CONTROL
REMOVAL
AND
INSTALLATION
1
Disconnect
control
cable
from
hood
lock
2
Remove
hood
lock
3
Remove
control
cable
retaining
clamp
from
engine
compartment
4
Remove
hood
lock
release
handle
attaching
bolts
and
remove
hood
lock
release
handle
and
control
cable
from
dash
side
panel
5
Installation
is
in
the
reverse
order
of
removal
referring
to
Hood
Adjust
Body
@
C
ZiIfii
1
Striker
2
Hinge
3
Hood
bumper
4
Hood
lock
BF526B
Fig
BF
16
Adju
ting
Hood
1
Cable
bracket
2
Cable
clip
3
Hood
lock
4
Safety
catth
lever
5
Striker
3
II
5
1
LeS5
than
rJ
3
5
mm
O
l
BF746B
Fig
BF
17
Hood
Lock
Control
ment
6
Open
and
close
hood
several
times
to
check
operation
7
Make
sure
safety
catch
lever
re
tains
hood
properly
when
hood
lock
is
disengaged
Note
a
Lubricate
pivot
safety
catch
lever
and
return
spring
b
Inspect
safety
catch
lever
and
re
turn
spring
for
defonnation
fatigue
or
rusting
BF
ll
Page 428 of 548
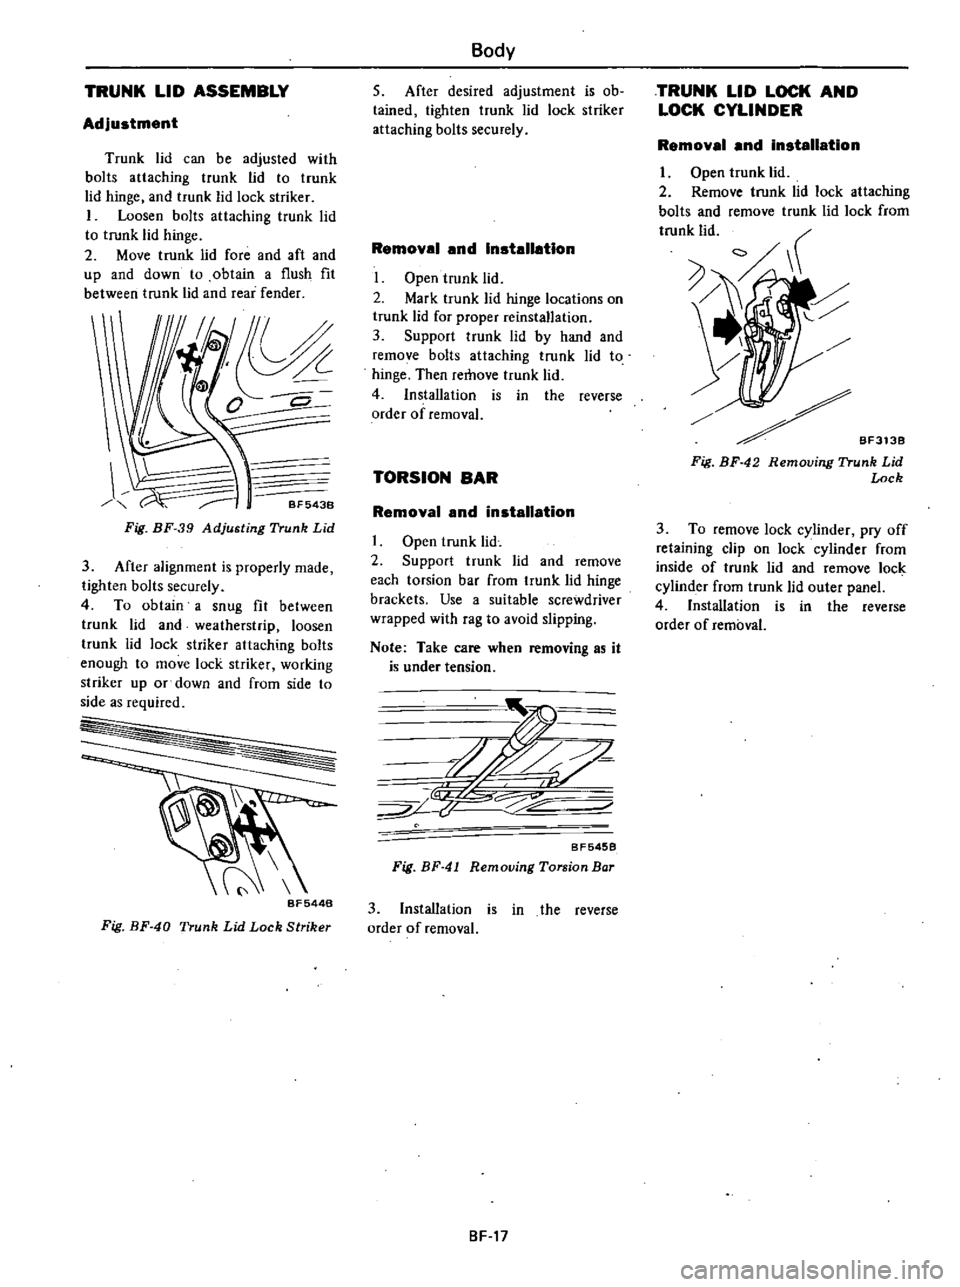
Adjustment
TRUNK
LID
ASSEMBLY
Trunk
lid
can
be
adjusted
with
bolts
attaching
trunk
lid
to
trunk
lid
hinge
and
trunk
lid
lock
striker
I
Loosen
bolts
attaching
trunk
lid
to
trunk
lid
hinge
2
Move
trunk
lid
fore
and
aft
and
up
and
down
to
obtain
a
flush
fit
between
trunk
lid
and
rear
fender
L
BF543B
Fig
BF
39
Adjusting
Trunk
Lid
3
After
alignment
is
properly
made
tighten
bolts
securely
4
To
obtain
a
snug
fit
between
trunk
lid
and
weatherstrip
loosen
trunk
lid
lock
striker
attaching
bolts
enough
to
move
lock
striker
working
striker
up
or
down
and
from
side
to
side
as
required
I
Fig
BF
40
Trunk
Lid
Lock
Striker
Body
5
After
desired
adjustment
is
ob
tained
tighten
trunk
lid
lock
striker
attaching
bolts
securely
Removal
and
Inatallatlon
Open
trunk
lid
2
Mark
trunk
lid
hinge
locations
on
trunk
lid
for
proper
reinstallation
3
Support
trunk
lid
by
hand
and
remove
bolts
attaching
trunk
lid
to
hinge
Then
remove
trunk
lid
4
Installation
is
in
the
reverse
order
of
removal
TORSION
BAR
Removal
and
installation
Open
trunk
lid
2
Support
trunk
lid
and
remove
each
torsion
bar
from
trunk
lid
hinge
brackets
Use
a
suitable
screwdriver
wrapped
with
rag
to
avoid
slipping
Note
Take
care
when
removing
as
it
is
under
tension
n
J
7
YZ
BF545B
Fig
BF
41
Removing
Torsion
Bar
3
Installation
is
in
the
reverse
order
of
removal
BF
17
TRUNK
LID
LOCK
AND
LOCK
CYLINDER
Removal
and
installation
Open
trunk
lid
2
Remove
trunk
lid
lock
attaching
bolts
and
remove
trunk
lid
lock
from
trunk
lid
8F3138
Fig
BF
42
Removing
Trunk
Lid
Lock
3
To
remove
lock
cylinder
pry
off
retaining
clip
on
lock
cylinder
from
inside
of
trunk
lid
and
remove
lock
cylinder
from
trunk
lid
outer
panel
4
Installation
is
in
the
reverse
order
of
removal
Page 429 of 548

CV
j
r
J
j
J
BACK
DOOR
Hatchback
BACK
DOOR
ASSEMBLY
Adjustment
Back
door
can
be
adjusted
with
bolts
attaching
back
door
to
back
door
hinge
and
back
door
lock
I
Loosen
bolts
attaching
back
door
to
back
door
hinge
2
To
make
side
to
ide
adjustment
move
back
door
to
left
or
right
as
required
to
obtain
an
equal
clearance
between
back
door
and
rear
fender
on
both
sides
3
To
make
fore
and
aft
adjustment
move
back
door
in
fore
and
aft
direc
lion
as
required
to
obtain
an
equal
clearance
between
back
door
and
roof
Body
@
1
Back
door
hinge
2
Side
stopper
striker
3
Back
door
4
Striker
S
Back
door
stay
6
Side
stopper
7
Lock
cylinder
8
Back
door
lock
6
BF547B
Fig
BF
43
Back
Door
5
To
obtain
a
snug
fit
between
back
door
and
weatherstrip
loosen
back
door
striker
attaching
bolts
enough
to
move
striker
working
it
up
or
down
and
from
side
to
side
as
required
Af
0
l
SF
596B
g@VJ
Fig
BF
44
Adjusting
Back
Door
4
After
alignment
is
properly
made
tighten
bolts
securely
BF548B
Fig
BF
45
Adjusting
Back
Door
Striker
BF
18
Page 430 of 548

6
After
desired
adjustment
is
ob
tained
tighten
back
door
lock
attach
ing
bolts
securely
Removal
and
installation
I
Open
back
door
2
Mark
back
door
hinge
location
on
back
door
for
proper
reinstallation
3
Disconnect
rear
defogger
harness
connector
4
Support
back
door
and
remove
back
door
to
back
door
stay
bolts
and
back
door
to
back
door
hinge
attaching
bolts
Then
remove
back
door
This
operation
requires
two
men
CAUTION
Place
rags
between
roof
and
upper
end
of
back
door
to
avoid
damaging
paint
ed
surfaces
BF549B
Fig
BF
46
Removing
Bac
Door
Body
5
Installation
is
in
the
reverse
order
of
removal
Note
Before
securing
back
door
stay
to
car
body
with
bolts
make
sure
component
parts
are
properly
as
sembled
CAUTION
Be
careful
not
to
scratch
back
door
stay
when
installing
A
scratched
stay
may
cause
gas
leakage
BACK
DOOR
LOCK
AND
LOCK
CYLINDER
Removal
and
Installation
I
Open
back
door
and
keep
it
in
the
open
position
2
Remove
back
door
finisher
3
Loosen
bolts
attaching
back
door
lock
to
back
door
and
remove
lock
assembly
I
I
d
1
o
BF161A
Fig
BF
47
Removing
Back
Door
Lock
BF
19
4
To
remove
lock
cylinder
pry
off
lock
plate
between
lock
cylinder
and
back
door
panel
and
take
out
lock
cylinder
O
J6
J
II
Fig
BF
4
Removing
Lock
Cylinder
BF550B
5
Installation
is
in
the
reverse
order
of
removal
Adjust
back
door
lock
referring
to
Back
Door
Adjustment
Page 431 of 548
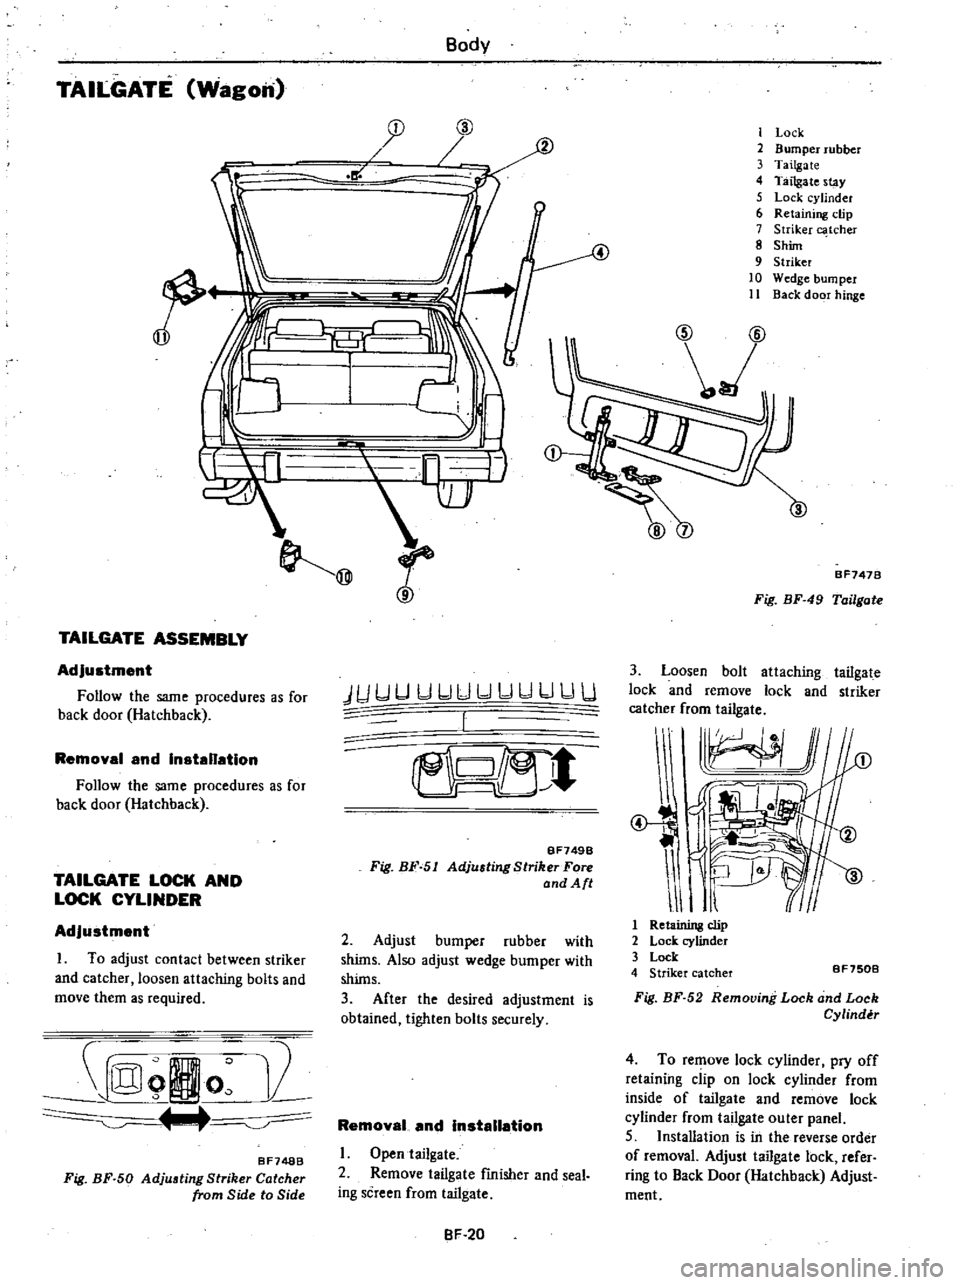
TAILGATE
Wagon
Body
J
L
il
@
2
TAILGATE
ASSEMBLY
Adjustment
Follow
the
same
procedures
as
for
back
door
Hatchback
Removal
and
Installation
Follow
the
same
procedures
as
for
back
door
Hatchback
TAILGATE
LOCK
AND
LOCK
CYLINDER
Adjustment
1
To
adjust
contact
between
striker
and
catcher
loosen
attaching
bolts
and
move
them
as
required
Io
iL
BF748B
Fig
BF
50
Adjusting
Striker
Catcher
rom
Side
to
Side
4
1
Lock
2
Bumper
rubber
3
Tailgate
4
Tailgate
stay
5
Lock
cylinder
6
Retaining
clip
7
Striker
C
tcher
8
Shim
9
Striker
10
Wedge
bumper
11
Back
door
hinge
JUUUbJUlIbJUULJUU
I
t
BF749B
Fig
BF
51
Adjusting
Striker
Fore
and
Aft
2
Adjust
bumper
rubber
with
shilns
Also
adjust
wedge
bumper
with
shilns
3
After
the
desired
adjustment
is
obtained
tighten
bolts
securely
Removal
and
Installation
Open
tailgate
2
Remove
tailgate
fmisher
and
seal
ing
screen
from
tailgate
BF
20
BF1478
Fig
BF
49
Tai
gote
3
Loosen
bolt
attaching
tailgate
lock
and
remove
lock
and
striker
catcher
from
tailgate
III
J
1l
d
l
I
1
p
1
RetBinin8
clip
2
Lock
cylinder
3
Lock
4
Striker
catcher
BF750B
Fig
BF
52
Removing
Lock
and
Lock
Cylindir
4
To
remove
lock
cylinder
pry
off
retaining
clip
on
lock
cylinder
from
inside
of
tailgate
and
remove
lock
cylinder
from
tailgate
outer
panel
5
Installation
is
in
the
reverse
order
of
removal
Adjust
tailgate
lock
refer
ring
to
Back
Door
Hatchback
Adjust
ment
Page 435 of 548
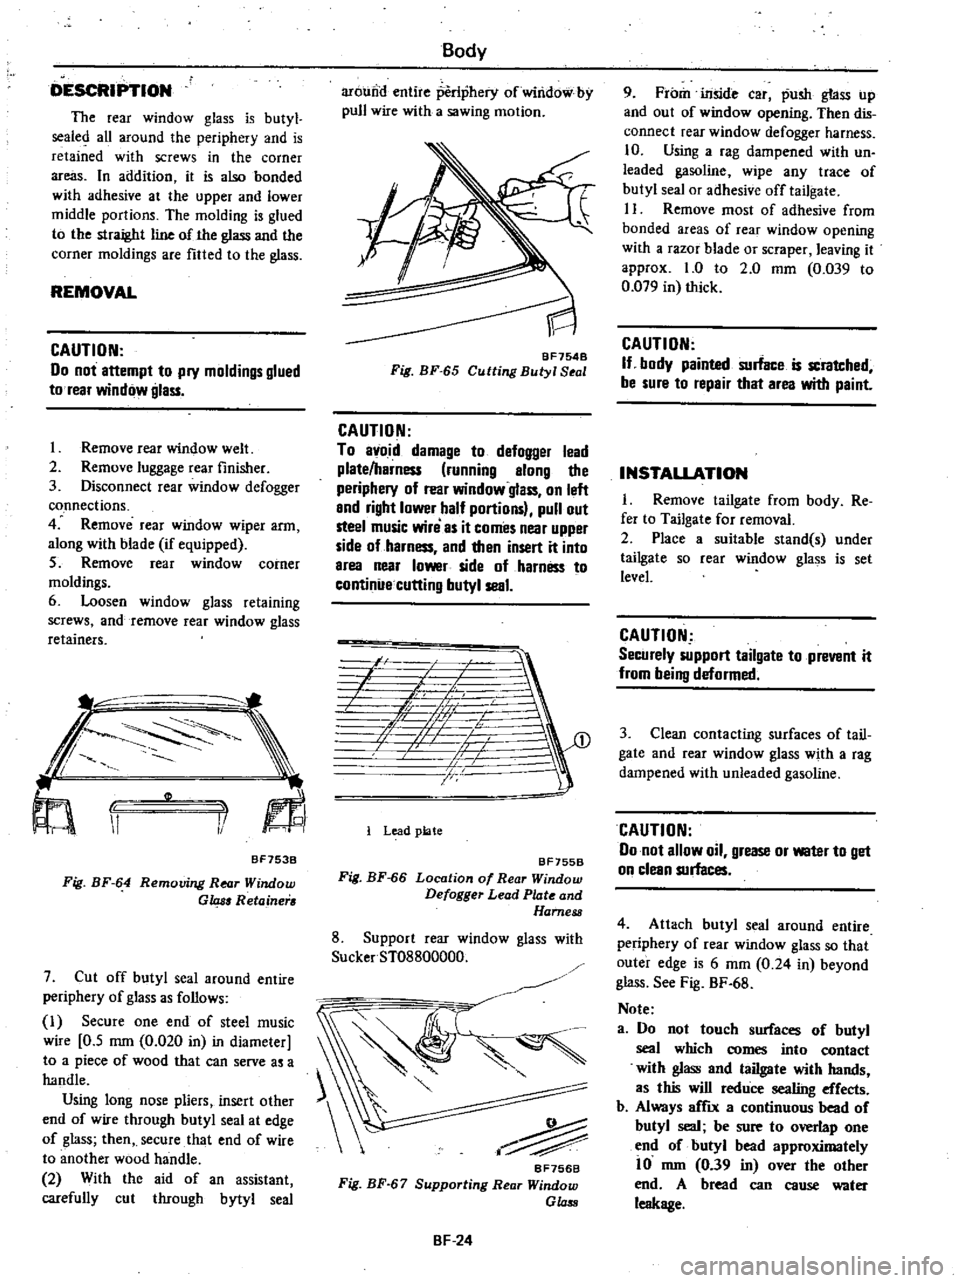
DESCRIPTION
The
rear
window
glass
is
butyl
sealed
aU
around
the
periphery
and
is
retained
with
screws
in
the
corner
areas
In
addition
it
is
also
bonded
with
adhesive
at
the
upper
and
lower
middle
portions
The
molding
is
glued
to
the
straight
line
of
the
glass
and
the
corner
moldings
are
fitted
to
the
glass
REMOVAL
CAUTION
00
not
attempt
to
pry
moldings
glued
to
rear
window
glass
1
Remove
rear
window
welt
2
Remove
luggage
rear
finisher
3
Disconnect
rear
window
defogger
connections
4
Remove
rear
window
wiper
arm
along
with
blade
if
equipped
5
Remove
rear
window
comer
moldings
6
Loosen
window
glass
retaining
screws
and
remove
rear
window
glass
retainers
II
1
BF753B
Fig
BF
64
Removing
RNr
Window
G
Retainer
7
Cut
off
butyl
seal
around
entire
periphery
of
glass
as
follows
I
Secure
one
end
of
steel
music
wire
0
5
mm
0
020
in
in
diameter
to
a
piece
of
wood
that
can
serve
as
a
handle
Using
long
nose
pliers
insert
other
end
of
wire
through
butyl
seal
at
edge
of
glass
then
secure
that
end
of
wire
to
another
wood
handle
2
With
the
aid
of
an
assistant
carefully
cut
through
bytyl
seal
Body
arDUna
entire
periphery
ofwirid6
by
pull
wire
with
a
sawing
motion
BF754B
Fig
BF
65
Cutting
Butyl
S
I
CAUTION
To
avoid
damage
to
defogger
lead
plate
harness
running
along
the
periphery
of
rear
window
glass
on
left
and
right
lower
half
portions
pull
out
steel
music
willi
as
it
comes
near
upper
side
of
harness
and
then
insert
it
into
area
near
lower
side
of
harness
to
continue
cutting
butyl
seal
71
A
L
0
fr
f
1
Lead
plate
BF755B
Fig
BF
66
Location
of
Rear
Window
Defogger
Lead
Plate
and
Harness
8
Support
rear
window
glass
with
SuckerST08800000
BF756B
Fig
BF
67
Supporting
Rear
Window
GLus
BF
24
9
From
inside
car
push
glass
up
and
out
of
window
opening
Then
dis
connect
rear
window
defogger
harness
10
Using
a
rag
dampened
with
un
leaded
gasoline
wipe
any
trace
of
butyl
seal
or
adhesive
off
tailgate
II
Remove
most
of
adhesive
from
bonded
areas
of
rear
window
opening
with
a
razor
blade
or
scraper
leaving
it
approx
1
0
to
2
0
mm
0
039
to
0
079
in
thick
CAUTION
If
body
painted
surtin
e
is
scratched
be
sure
to
repair
that
area
with
paint
INSTALLATION
I
Remove
tailgate
from
body
Re
fer
to
Tailgate
for
removal
2
Place
a
suitable
stand
s
under
tailgate
so
rear
window
gla
s
is
set
level
CAUTION
Securely
support
tailgate
to
prevent
it
from
being
deformed
3
Clean
contacting
surfaces
of
tail
gate
and
rear
window
glass
with
a
rag
dampened
with
unleaded
gasoline
CAUTION
00
not
allow
oil
grease
or
water
to
get
on
clean
surfaces
4
Attach
butyl
seal
around
entire
periphery
of
rear
window
glass
so
that
outer
edge
is
6
mm
0
24
in
beyond
glass
See
Fig
BF
68
Note
a
Do
not
touch
surfaces
of
butyl
seal
which
comes
into
contact
with
glass
and
tailgate
with
hands
as
this
will
reduce
sealing
effects
b
Always
amx
a
continuous
bead
of
butyl
seal
be
sure
to
overlap
one
end
of
butyl
bead
approximately
i
0
mm
0
39
in
over
the
other
end
A
bread
can
cause
water
leakage
Page 438 of 548
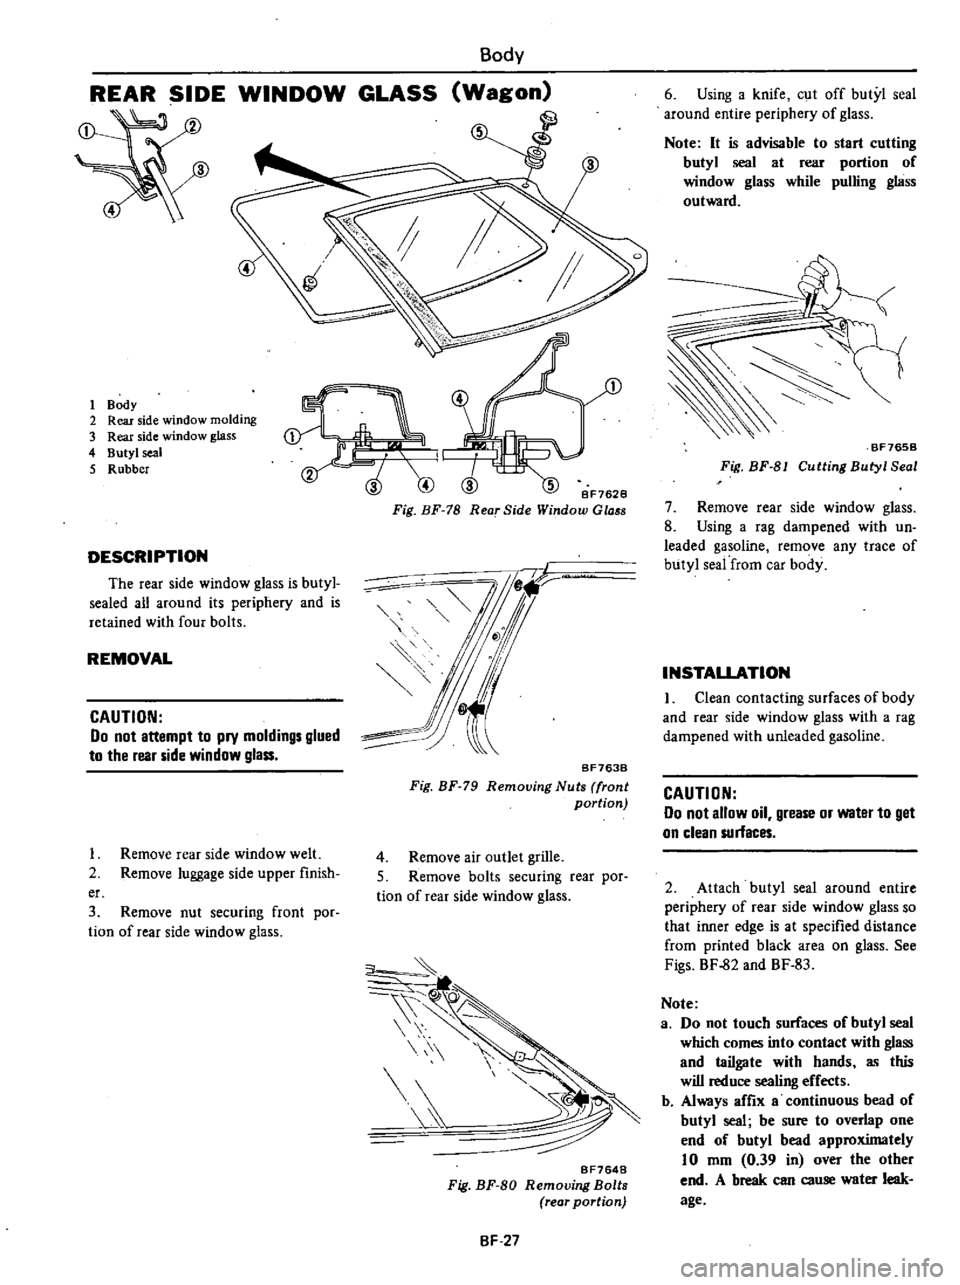
Body
REAR
SIDE
WINDOW
GLASS
Wagon
4
1
Body
2
Rear
side
window
molding
3
Rear
side
window
glass
4
Butyl
seal
5
Rubber
Bf7628
Fig
BF
78
Rear
Side
Window
Glo
8
DESCRIPTION
The
rear
side
window
glass
is
butyl
sealed
all
around
its
periphery
and
is
retained
with
four
bolts
REMOVAL
CAUTION
Do
not
attempt
to
pry
moldings
glued
to
the
rear
side
window
glass
BF763B
Fig
BF
79
Removing
Nuts
front
portion
1
Remove
rear
side
window
welt
2
Remove
luggage
side
upper
finish
4
Remove
air
outlet
grille
S
Remove
bolts
securing
rear
por
tion
of
rear
side
window
glass
er
3
Remove
nut
securing
front
por
tion
of
rear
side
window
glass
lt
BF7648
Fig
BF
80
Removing
Bolts
rear
portion
BF
27
6
Using
a
knife
cut
off
butyl
seal
around
entire
periphery
of
glass
Note
It
is
advisable
to
start
cutting
butyl
seal
at
rear
portion
of
window
glass
while
pulling
glass
outward
BF765B
Fig
BF
81
Cutting
Butyl
Seal
7
Remove
rear
side
window
glass
8
Using
a
rag
dampened
with
un
leaded
gasoline
remove
any
trace
of
butyl
seai
from
car
body
INSTALLATION
I
Clean
contacting
surfaces
of
body
and
rear
side
window
glass
with
a
rag
dampened
with
unleaded
gasoline
CAUTION
Do
not
allow
oil
grease
or
water
to
get
on
clean
surfaces
2
Attach
butyl
seal
around
entire
periphery
of
rear
side
window
glass
so
that
inner
edge
is
at
specified
distance
from
printed
black
area
on
glass
See
Figs
BF
82
and
BF
83
Note
a
Do
not
touch
surfaces
of
butyl
seal
which
comes
into
contact
with
glass
and
tailgate
with
hands
as
this
will
reduce
sealing
effects
b
Always
affix
a
continuous
bead
of
butyl
seal
be
sure
to
overlap
one
end
of
butyl
bead
approximately
10
mm
0
39
in
over
the
other
end
A
break
can
cause
water
leak
age
Page 439 of 548

More
than
5
0
20
More
than
5
0
20
j
0
31
I
I
I
Oi6
I
Glass
yi
Yl
Prin
ed
portion
Unit
mm
in
Sectional
view
or
butyl
seal
BF766B
Fig
BF
82
Attaching
Butyl
Seal
3
Position
rear
side
window
glass
in
opening
flange
of
rear
side
window
Body
More
than
5
0
20
Note
Make
sure
that
clearances
be
tween
rear
side
window
molding
BF
28
and
CaibOdy
molding
are
ilithe
specified
value
5
0
20
I
1
O
I
I
ri
04
Unit
rom
in
BF767B
Fig
BF
83
Clearance
between
Rear
Side
Window
and
Car
Body
4
Using
a
heat
gun
heat
butyl
seal
on
inner
side
of
rear
side
window
to
approxilnately
800C
1760F
and
apply
hand
pressure
to
glass
5
Tighten
bolts
and
nuts
securing
rear
side
window
glass
6
Install
all
previously
removed
parts
in
the
reverse
order
of
removal
Page 441 of 548
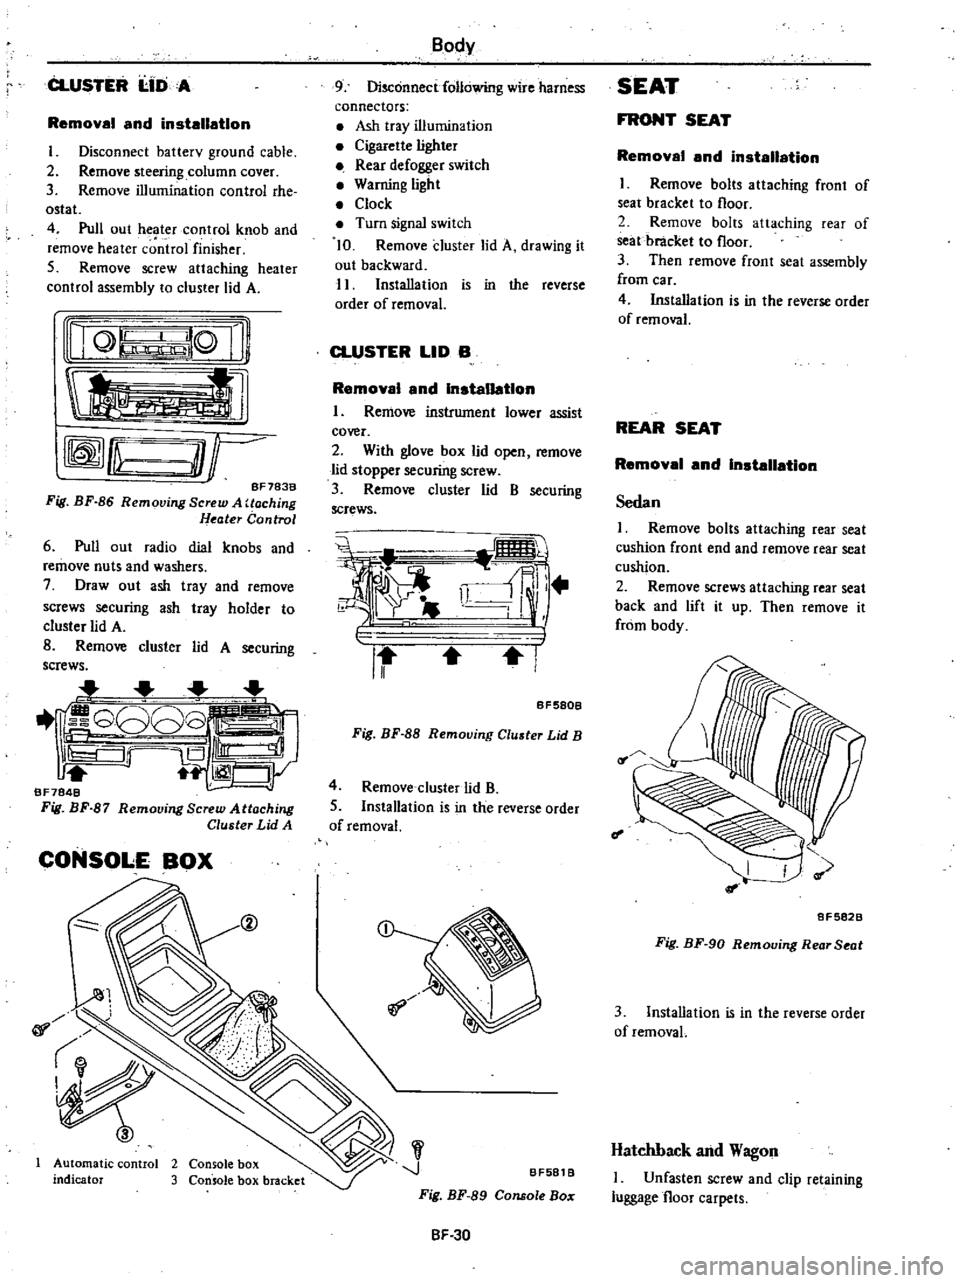
CLUSTER
I
IDA
Removal
and
installation
I
Disconnect
batterv
ground
cable
2
Remove
steering
column
cover
3
Remove
illumination
control
rhe
ostat
4
Pull
out
heater
control
knob
and
remove
heater
c
ntrol
finisher
5
Remove
screw
attaching
heater
control
assembly
to
cluster
lid
A
nQ
lQ
Ii
tl
rffmfLu
O
r
BF783B
Fig
BF
86
Removing
Screw
A
Uoching
Heater
Control
6
Pull
out
radio
dial
knobs
and
remove
nuts
and
washers
7
Draw
out
ash
tray
and
remove
screws
securing
ash
tray
holder
to
cluster
lid
A
B
Remove
cluster
lid
A
securing
screws
1
G808
iS
Ill
1
CJy
BF7848
Fig
BF
87
Remooing
Screw
Attaching
Cluster
Lid
A
CONSOLE
BOX
@
01
Automatic
control
2
Console
box
indicator
3
Console
box
bracket
Body
9
Disconnect
following
wire
harness
connectors
Ash
tray
illumination
Cigarette
lighter
Rear
defogger
switch
Warning
light
Clock
Turn
signal
switch
10
Remove
cluster
lid
A
drawing
it
out
backward
11
Installation
is
in
the
reverse
order
of
removal
CLUSTER
LID
B
Removal
and
Installation
I
Remove
instrument
lower
assist
cover
2
With
glove
box
lid
open
remove
lid
stopper
securing
screw
3
Remove
cluster
lid
B
securing
screws
i
i
ll
r
II
I
BF580B
Fig
BF
88
Removing
Cluster
Lid
B
4
Remove
cluster
lid
B
5
Installation
is
in
the
reverse
order
of
removal
J
BF581
B
Fig
BF
89
Console
Bo
SF
30
SEAT
FRONT
SEAT
Removal
and
installation
I
Remove
bolts
attaching
front
of
seat
bracket
to
floor
2
Remove
bolts
attaching
rear
of
seat
bracket
to
floor
3
Then
remove
front
seat
assembly
from
car
4
Installation
is
in
the
reverse
order
of
removal
REAR
SEAT
Removal
and
Installation
Sedan
I
Remove
bolts
attaching
rear
seat
cushion
front
end
and
remove
rear
seat
cushion
2
Remove
screws
attaching
rear
seat
back
and
lift
it
up
Then
remove
it
from
body
f
I
8F5828
Fig
BF
90
Removing
Rear
Seat
3
Installation
is
in
the
reverse
order
of
removaL
Hatchback
and
Wagon
I
Unfasten
screw
and
clip
retaining
luggage
floor
carpets
Page 442 of 548
Z
jJ
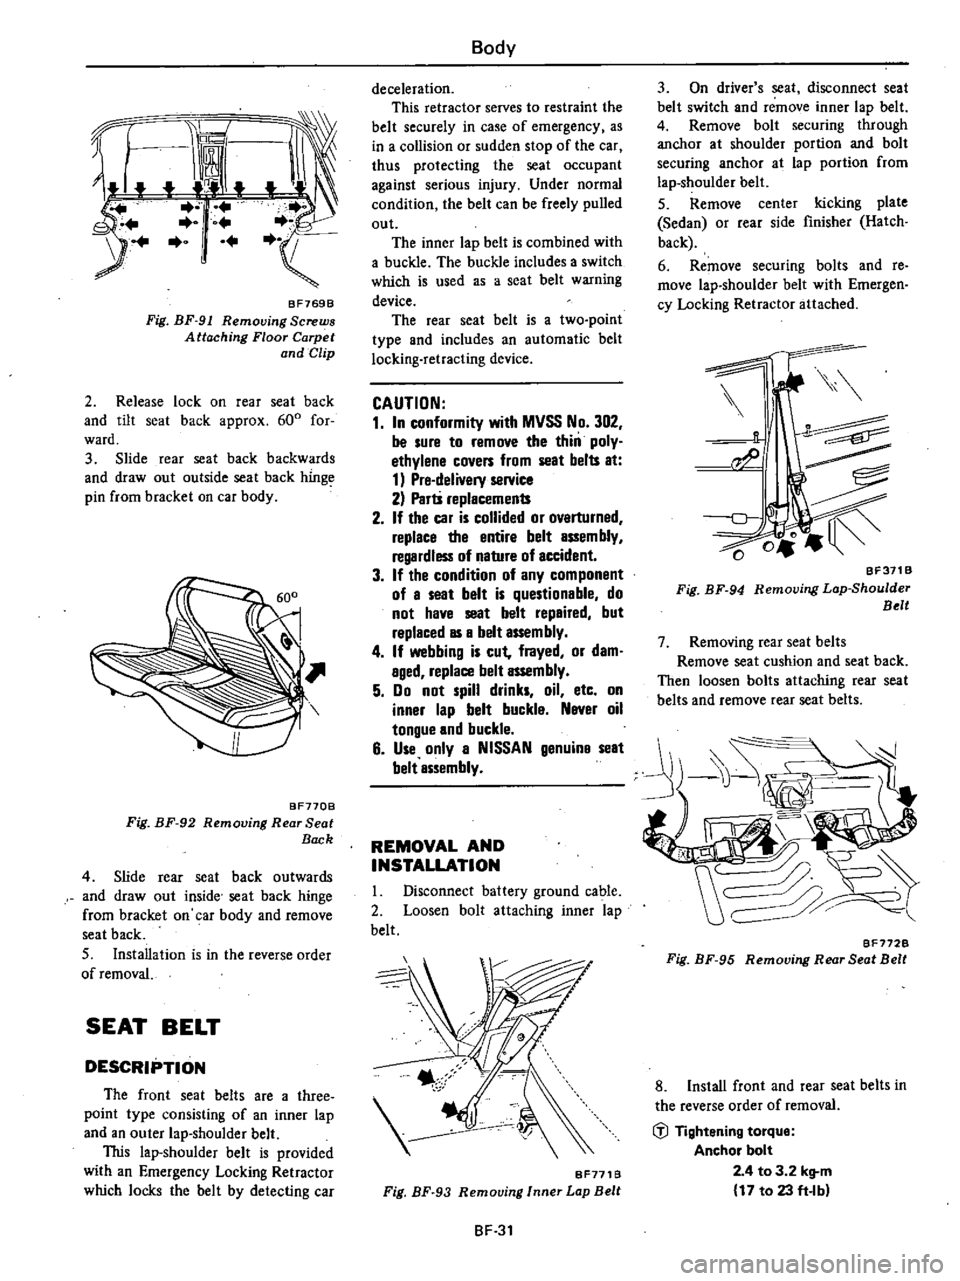
BF769B
Fig
BF
91
Removing
Screws
Attaching
Floor
Carpet
and
Clip
2
Release
lock
on
rear
seat
back
and
tilt
seat
back
approx
600
for
ward
3
Slide
rear
seat
back
backwards
and
draw
out
outside
seat
back
hinge
pin
from
bracket
on
car
body
BF770B
Fig
BF
92
Removing
Rear
Seat
Back
4
Slide
rear
seat
back
outwards
and
draw
out
inside
seat
back
hinge
from
bracket
on
car
body
and
remove
seat
back
S
Installation
is
in
the
reverse
order
of
removal
SEAT
BELT
DESCRIPTION
The
front
seat
belts
are
a
three
point
type
consisting
of
an
inner
lap
and
an
outer
lap
shoulder
belt
This
lap
shoulder
belt
is
provided
with
an
Emergency
Locking
Retractor
which
locks
the
belt
by
detecting
car
Body
deceleration
This
retractor
serves
to
restraint
the
belt
securely
in
case
of
emergency
as
in
a
collision
or
sudden
stop
of
the
car
thus
protecting
the
seat
occupant
against
serious
injury
Under
normal
condition
the
belt
can
be
freely
pulled
out
The
inner
lap
belt
is
combined
with
a
buckle
The
buckle
includes
a
switch
which
is
used
as
a
seat
belt
warning
device
The
rear
seat
belt
is
a
two
point
type
and
includes
an
automatic
belt
locking
retracting
device
CAUTION
1
In
conformity
with
MVSS
No
302
be
sure
to
remove
the
thin
poly
ethylene
covers
from
seat
belts
at
1
Pre
delivery
service
2
Parti
replacements
2
If
the
car
is
collided
or
ovarturned
replace
the
entire
belt
assembly
regardless
of
nature
of
accident
3
If
the
condition
of
any
component
of
a
seat
belt
is
questionable
do
not
have
seat
belt
repaired
but
raplaced
as
a
belt
assembly
4
If
webbing
is
cut
frayed
or
dam
aged
replace
belt
assembly
5
Do
not
spill
drinks
oil
etc
on
inner
lap
belt
buckla
Naver
oil
tongue
and
buckle
6
Use
only
a
NISSAN
genuina
seat
belt
assembly
REMOVAL
AND
INSTALLATION
I
Disconnect
battery
ground
cable
2
Loosen
bolt
attaching
inner
lap
belt
BF771B
Fig
BF
93
Removing
Inner
Lap
Belt
BF
31
3
On
driver
s
seat
disconnect
seat
belt
switch
and
remove
inner
lap
belt
4
Remove
bolt
securing
through
anchor
at
shoulder
portion
and
bolt
securing
anchor
at
lap
portion
from
lap
shoulder
belt
5
Remove
center
kicking
plate
Sedan
or
rear
side
finisher
Hatch
back
6
Remove
securing
bolts
and
re
move
lap
shoulder
belt
with
Emergen
cy
Locking
Retractor
attached
BF311B
Fig
BF
94
Removing
Lop
Shoulder
Belt
7
Removing
rear
seat
belts
Remove
seat
cushion
and
seat
back
Then
loosen
bolts
attaching
rear
seat
belts
and
remove
rear
seat
belts
BF772B
Fig
BF
95
Removing
Rear
Seat
Belt
8
Install
front
and
rear
seat
belts
in
the
reverse
order
of
removal
iil
Tightening
torque
Anchor
bolt
2
4
to
3
2
kg
m
17
to
23
ft
Ibl