fuel type DATSUN 210 1979 User Guide
[x] Cancel search | Manufacturer: DATSUN, Model Year: 1979, Model line: 210, Model: DATSUN 210 1979Pages: 548, PDF Size: 28.66 MB
Page 117 of 548

Engine
Fuel
SERVICE
DATA
AND
SPECIFICATIONS
GENERAL
SPECIFICATIONS
CARBURETOR
California
models
Non
caJ
ifornia
model
Manual
tranlDlWion
Automatic
transmission
Manual
transmission
FU
model
utomatic
transmission
Type
DCH306
6t
DCH306
63
DCH306
60E
DCH306
67
DCH306
68
3
DCH306
69
1
DCH306
60
2
DCH306
12
4
Primary
Secondary
Primary
Secondary
Primuy
Secondary
Primary
Secondary
Primary
Secondary
Outer
diameter
26
1
02
30
1
18
26
1
02
30
1
18
26
1
02
30
1
18
26
1
02
30
1
18
26
1
02
30
1
18
mm
in
Venturi
diameter
23
0
9t
27
1
06
23
0
91
27
1
06
23
0
91
27
1
06
22
0
87
27
1
06
23
0
91
27
1
06
mm
in
Main
jet
107
145
107
1145
106
145
1107
145
105
1145
104
2
t04
4
Main
air
bleed
95
180
95
180
1110
80
65
1M
195
80
Slow
jet
1145
150
145
150
145
150
146
150
45
150
Powerjet
143
43
140
148
2
48
138
140
4
1
With
A15
engine
2
4
For
Canada
models
3
Common
to
models
with
A14
and
AlS
engines
except
Canada
INSPECTION
AND
ADJUSTMENT
A
T
C
AIR
CLEANER
Air
con
trol
valve
partially
opens
Air
control
valve
fully
opens
Oc
OF
Oc
F
38
to
54
100
to
129
Above
55
131
IDLE
COMPENSATOR
Idle
compensator
partially
opens
Bi
metal
No
I
Bi
metal
No
2
Idle
compensator
fully
opens
Bi
metal
No
I
Bi
metal
No
2
Oc
OF
60
to
70
140
to
158
70
to
80
158
to
176
Oc
OF
Above
70
158
Above
80
176
FUEL
PUMP
Fuel
pressure
Fuel
pump
capacity
kgfcm2
psi
cc
cu
in
min
at
rpm
0
27
3
8
450
27
46
1
000
EF
32
Page 126 of 548
Emission
Control
System
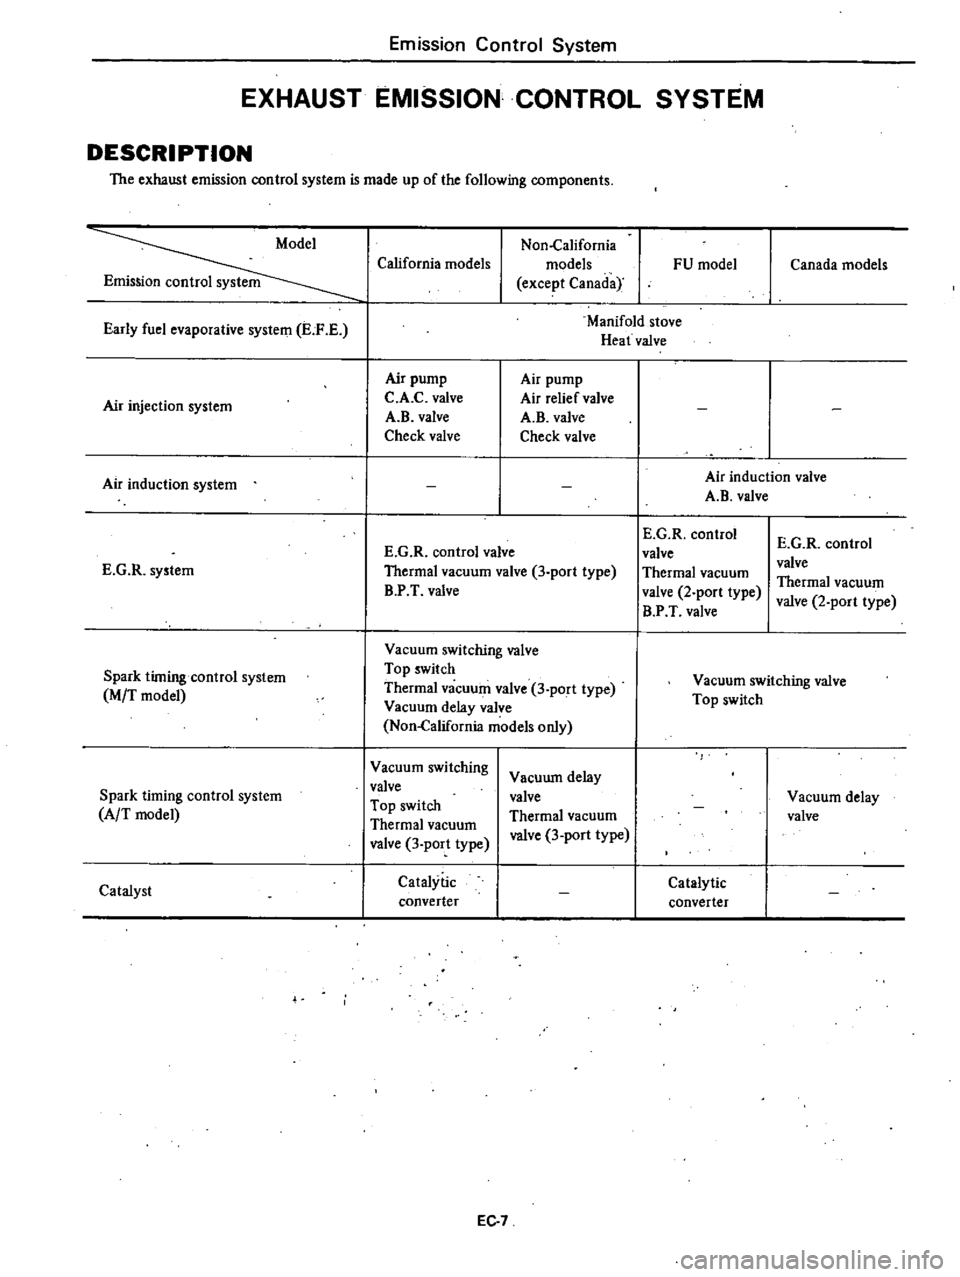
EXHAUST
EMISSION
CONTROL
SYSTEM
DESCRIPTION
The
exhaust
emission
control
system
is
made
up
of
the
following
components
Early
fuel
evaporative
system
E
F
E
Air
injection
system
Air
induction
system
E
G
R
system
Spark
tirningcontrol
system
M
T
model
Spark
timing
control
system
A
T
model
Catalyst
Non
California
California
models
models
except
CanadaY
FU
model
Manifold
stove
Heat
valve
Air
pump
C
A
C
valve
A
B
valve
Check
valve
Air
pump
Air
relief
valve
A
B
valve
Check
valve
E
G
R
control
valve
Thermal
vacuum
valve
3
port
type
B
P
T
valve
Vacuum
switching
valve
Top
switch
Thermal
vacuum
valve
3
port
type
Vacuum
delay
valve
Non
California
models
only
Vacuum
switching
valve
Top
switch
Thermal
vacuum
valve
3
port
type
Vacuum
delay
valve
Thermal
vacuum
valve
3
port
type
Catalytic
converter
EC
7
Canada
models
Air
induction
valve
A
B
valve
E
G
R
control
valve
Thermal
vacuum
valve
2
port
type
B
P
T
valve
E
G
R
control
valve
Thermal
vacuum
valve
2
port
type
Vacuum
switching
valve
Top
switch
Catalytic
converter
Vacuum
delay
valve
Page 187 of 548
INSPECTION
I
Disconnect
high
tension
cables
from
spark
plugs
by
pulling
on
boot
not
on
cable
itself
2
Remove
spark
plugs
3
Check
electrodes
and
inner
and
outer
porcelains
of
plugs
noting
the
type
of
deposits
and
the
degree
of
electrode
erosion
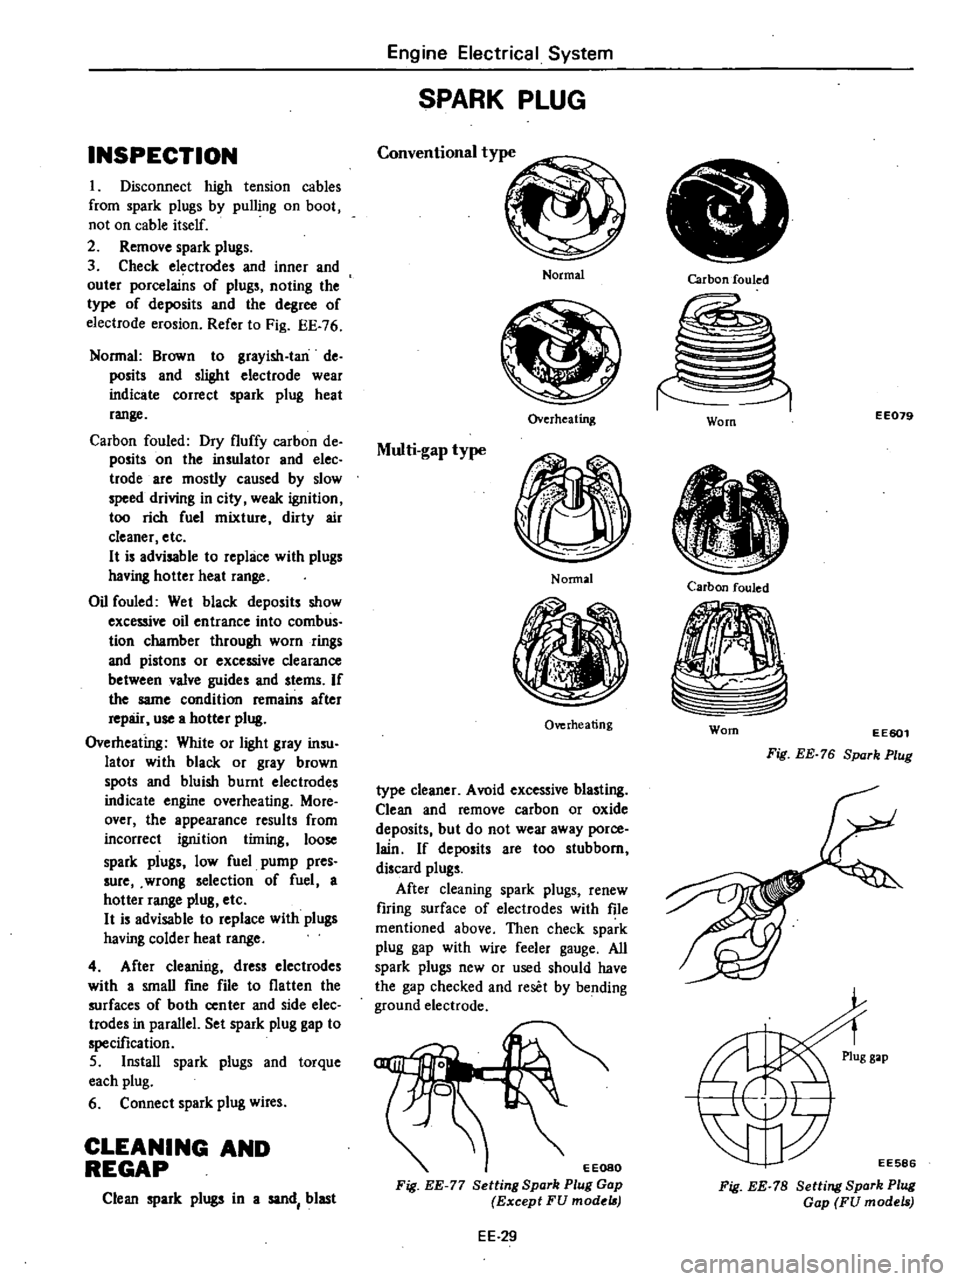
Refer
to
Fig
EE
76
Normal
Brown
to
grayish
Ian
de
posits
and
slighl
electrode
wear
indicate
correct
spark
plug
heat
range
Carbon
fouled
Dry
fluffy
carbon
de
posits
on
the
insulator
and
elec
trode
are
mostly
caused
by
slow
speed
driving
in
city
weak
ignition
too
rich
fuel
mixture
dirty
air
cleaner
etc
H
is
advisable
to
replace
with
plugs
having
hotter
heat
range
Oil
fouled
Wet
black
deposits
show
excessive
oil
entrance
into
comb
us
tion
chamber
through
worn
rings
and
pistons
or
excessive
clearance
between
valve
guides
and
stems
If
the
same
condition
remains
after
repair
use
a
hotter
plug
Overheating
White
or
light
gray
insu
lator
with
black
or
gray
brown
spots
and
bluish
burnt
electrodes
indicate
engine
overheating
More
over
the
appearance
results
from
incorrect
ignition
timing
loose
spark
plugs
low
fuel
pump
pres
sure
wrong
selection
of
fuel
a
hotter
range
plug
etc
H
is
advisable
to
replace
with
plugs
having
colder
heat
range
4
After
cleaning
dress
electrodes
with
a
smaU
fme
file
to
flatten
the
surfaces
of
both
center
and
side
elec
trodes
in
parallel
Set
spark
plug
gap
to
specification
5
Install
spark
plugs
and
torque
each
plug
6
Connect
spark
plug
wires
CLEANING
AND
REGAP
Clean
spark
plugs
in
a
sand
blast
Engine
Electrical
System
SPARK
PLUG
Conventional
type
Normal
Overheating
Multi
gap
type
Nonnal
Overheating
type
cleaner
Avoid
excessive
blasting
Clean
and
remove
carbon
or
oxide
deposits
but
do
not
wear
away
porce
lain
If
deposits
are
too
stubborn
discard
plugs
After
cleaning
spark
plugs
renew
firing
surface
of
electrodes
with
file
mentioned
above
Then
check
spark
plug
gap
with
wire
feeler
gauge
All
spark
plugs
new
or
used
should
have
the
gap
checked
and
reset
by
bending
ground
electrode
EEOSO
Fig
EE
77
Setting
Spark
Plug
Gap
Except
FU
model
EE
29
Carbon
fouled
EE079
Worn
Carbon
fouled
Worn
EE601
Fig
EE
76
Spark
Plug
EE586
Fig
EE
78
Setting
Spark
Plug
Gap
FU
models
Page 335 of 548
Front
Axle
Front
Suspension
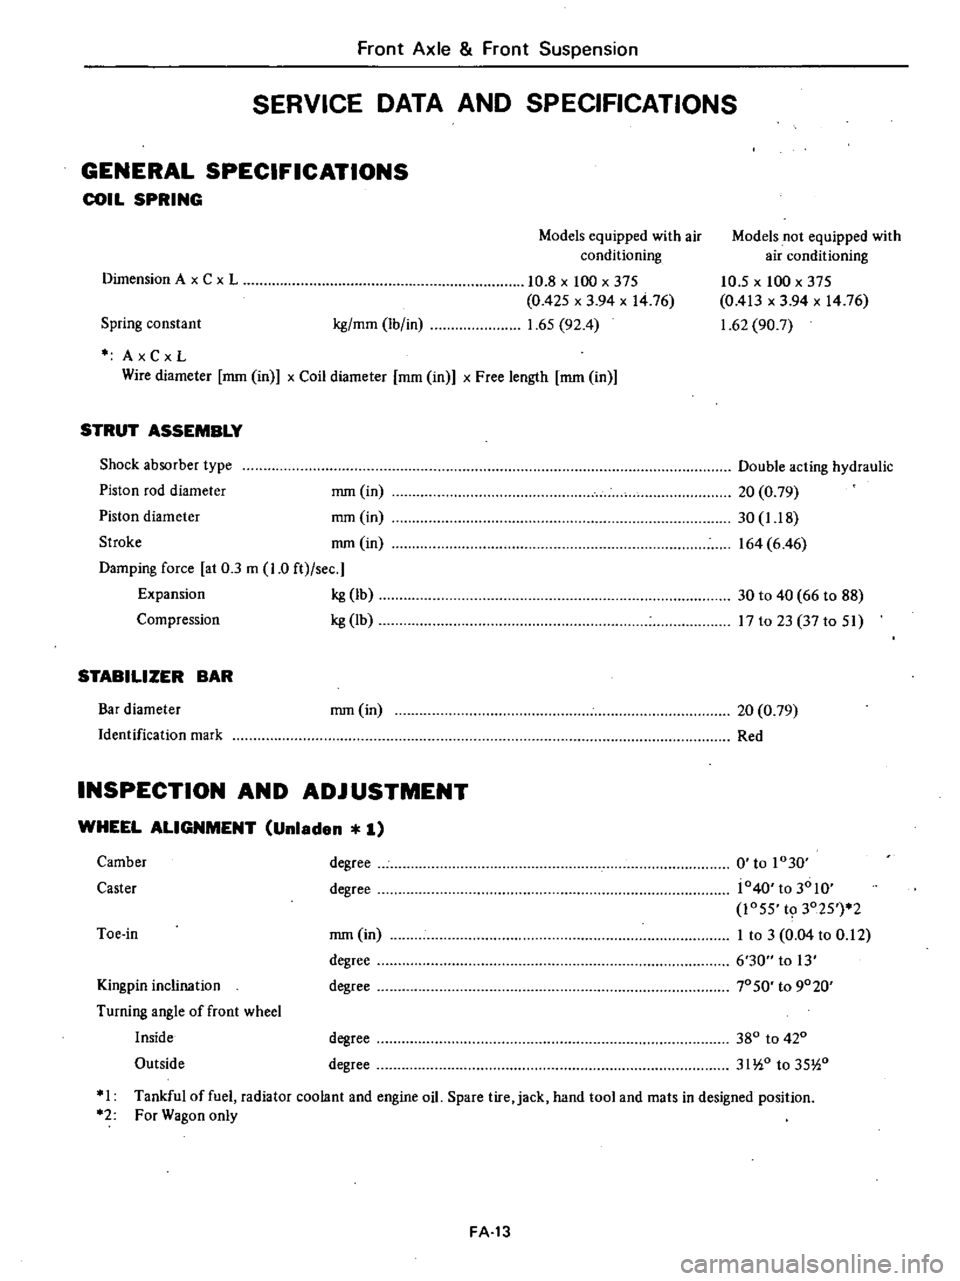
SERVICE
DATA
AND
SPECIFICATIONS
GENERAL
SPECIFICATIONS
COIL
SPRING
Models
equipped
with
air
conditioning
Models
not
equipped
with
air
conditioning
10
5
x
100
x
375
0
413
x
3
94
x
1476
1
62
90
7
Spring
constant
kg
mm
Ib
in
10
8
x
100
x
375
0
425
x
3
94
x
1476
1
65
92
4
Dimension
A
x
C
x
L
AxCxL
Wire
diameter
mm
in
x
Coil
diameter
mm
in
x
Free
length
mm
in
STRUT
ASSEMBLY
Shock
absorber
type
Piston
rod
diameter
mm
in
Piston
diameter
mm
in
Stroke
nun
in
Damping
force
at
0
3
m
1
0
ft
sec
Expansion
kg
Ib
Compression
kg
Ib
Double
acting
hydraulic
20
0
79
30
1
18
164
6
46
30
to
40
66
to
88
17
to
23
37
to
51
STABILIZER
BAR
Bar
diameter
Identification
mark
mm
in
20
0
79
Red
INSPECTION
AND
ADJUSTMENT
WHEEL
ALIGNMENT
Unladen
1
Kingpin
inclination
Turning
angle
of
front
wheel
Inside
Outside
mm
in
degree
degree
0
to
1030
j040
to
3010
1055
t9
3025
2
I
to
3
0
04
to
0
12
6
30
to
13
70
SO
to
9020
Camber
Caster
degree
degree
Toe
in
degree
degree
380
to
420
31
io
to
35
i0
I
Tankful
of
fuel
radiator
coolant
and
engine
oil
Spare
tire
jack
hand
tool
and
mats
in
designed
position
2
For
Wagon
only
FA
13
Page 403 of 548
Engine
Control
Fuel
Exhaust
Systems
REMOVAL
WARNING
When
replacing
fuel
line
parts
be
sure
to
observe
the
following
a
Put
a
CAUTION
INFLAM
MABLE
sign
in
workshop
b
Be
sure
to
furnish
workshop
with
In
asphyxiator
c
Be
sure
to
disconnect
battery
ground
cable
before
conducting
operations
d
Put
drained
fuel
in
an
explosion
proof
container
and
put
on
lid
securely
FUEL
TANK
Sedan
I
Disconnect
battery
ground
cable
2
Drain
fuel
from
fuel
tank
then
disconnect
fuel
hose
3
Remove
filler
hose
protector
and
inspection
cover
in
luggage
com
i
tl
f
I
Filler
hose
protector
2
Inspection
cover
FE561
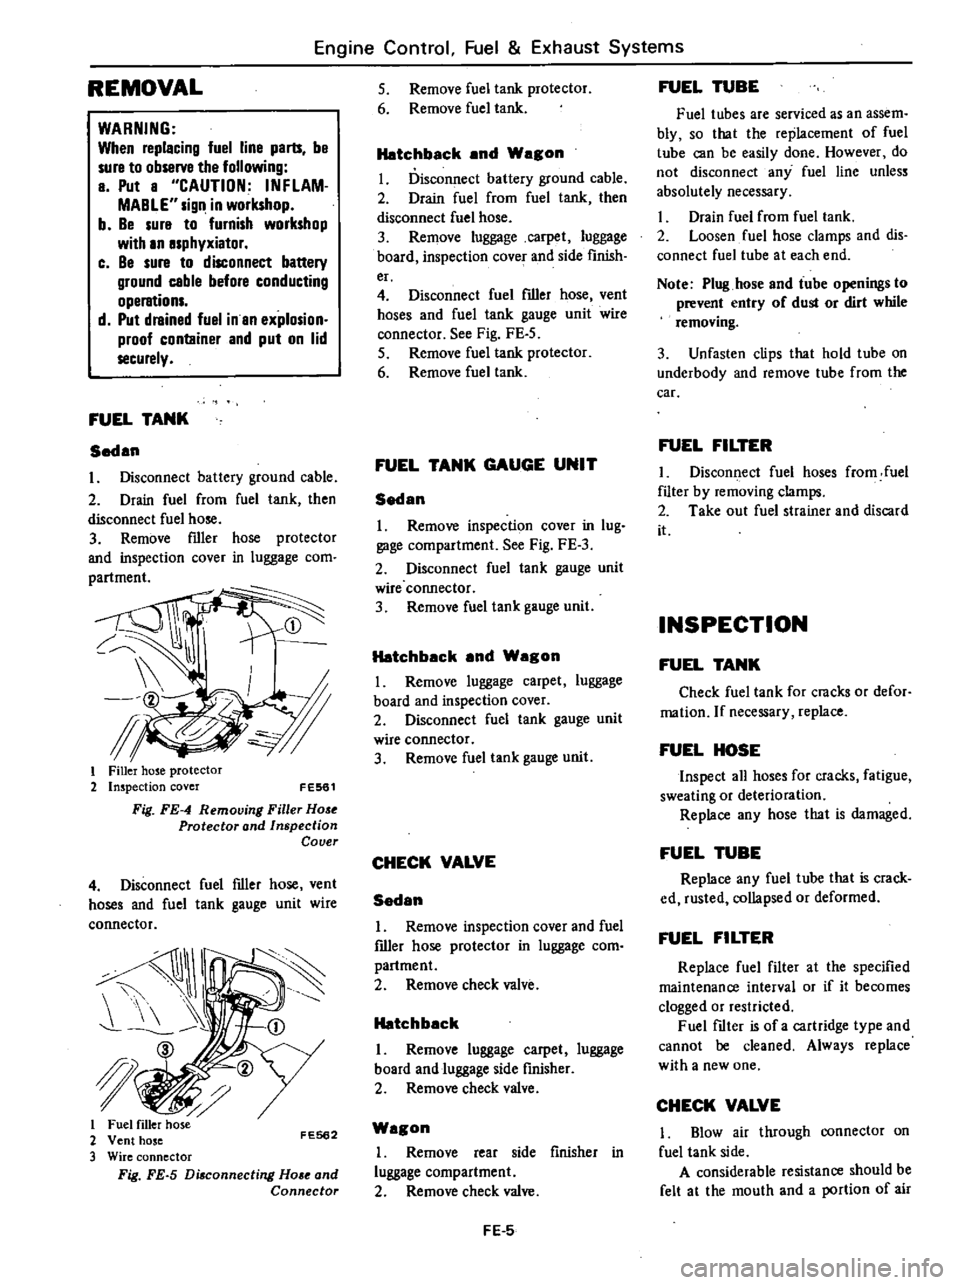
Fig
FE
4
Removing
Filler
Hose
Protector
and
Inspection
Cover
4
Disconnect
fuel
filler
hose
vent
hoses
and
fuel
tank
gauge
unit
wire
connector
I
JI
I
2
FE562
3
Fig
FE
5
Di
connecting
Ho
e
and
Connector
5
Remove
fuel
tank
protector
6
Remove
fuel
tank
Hatchback
and
Wagon
I
Disconnect
battery
ground
cable
2
Drain
fuel
from
fuel
tank
then
disconnect
fuel
hose
3
Remove
luggage
carpet
luggage
board
inspection
covef
and
side
finish
er
4
Disconnect
fuel
filler
hose
vent
hoses
and
fuel
tank
gauge
unit
wire
connector
See
Fig
FE
5
5
Remove
fuel
tank
protector
6
Remove
fuel
tank
FUEL
TANK
GAUGE
UNIT
Sedan
1
Remove
inspection
cover
in
lug
gage
compartment
See
Fig
FE
3
2
Disconnect
fuel
tank
gauge
unit
wire
connector
3
Remove
fuel
tank
gauge
unit
Hatchback
and
Wagon
I
Remove
luggage
carpet
luggage
board
and
inspection
cover
2
Disconnect
fuel
tank
gauge
unit
wire
connector
3
Remove
fuel
tank
gauge
unit
CHECK
VALVE
Sedan
I
Remove
inspection
cover
and
fuel
filler
hose
protector
in
luggage
com
partment
2
Remove
check
valve
Hatchback
I
Remove
luggage
carpet
luggage
board
and
luggage
side
finisher
2
Remove
check
valve
Wagon
I
Remove
rear
side
finisher
in
luggage
compartment
2
Remove
check
valve
FE
5
FUEL
TUBE
Fuel
tubes
are
serviced
as
an
assem
bly
so
that
the
replacement
of
fuel
tube
can
be
easily
done
However
do
not
disconnect
any
fuel
line
unless
absolutely
necessary
Drain
fuel
from
fuel
tank
2
Loosen
fuel
hose
clamps
and
dis
connect
fuel
tube
at
each
end
Note
Plug
hose
and
tube
openings
to
prevent
entry
of
dust
or
dirt
while
removing
3
Unfasten
clips
that
hold
tube
on
underbody
and
remove
tube
from
the
car
FUEL
FILTER
I
Disconnect
fuel
hoses
from
fuel
filter
by
removing
clamps
2
Take
out
fuel
strainer
and
discard
it
INSPECTION
FUEL
TANK
Check
fuel
tank
for
cracks
or
defor
mation
If
necessary
replace
FUEL
HOSE
Inspect
all
hoses
for
cracks
fatigue
sweating
or
deterioration
Replace
any
hose
that
is
damaged
FUEL
TUBE
Replace
any
fuel
tube
that
is
crack
ed
rusted
collapsed
or
deformed
FUEL
FILTER
Replace
fuel
filter
at
the
specified
maintenance
interval
or
if
it
becomes
clogged
or
restricted
Fuel
filter
is
of
a
cartridge
type
and
cannot
be
cleaned
Always
replace
with
a
new
one
CHECK
VALVE
1
Blow
air
through
connector
on
fuel
tank
side
A
considerable
resistance
should
be
felt
at
the
mouth
and
a
portion
of
air
Page 547 of 548
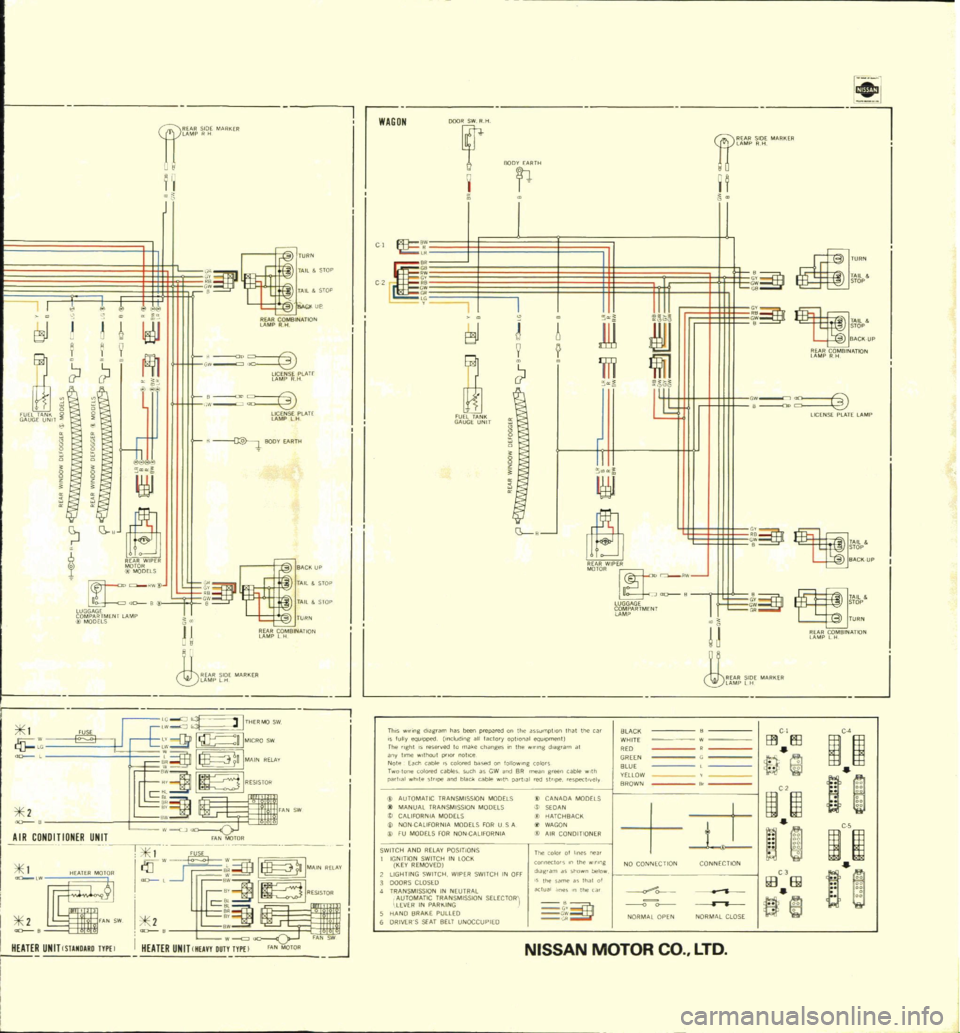
C
E3J
i
I
u
r
o
alNATIO
1
9
fl
l
w
tif
S
lATr
u
N
T
i
0
lf
5f
lAH
8
g
llOOY
AIITI
0
BI
b
RWIPER
IoOODELS
a
RW
LUGGAGf
aD
B
iO
b
n
rNr
lAMP
1
FUSE
1
AIR
CONDnION
R
UNIT
1
lii
I
I
N
UNITCSlAMD
UOTYPEl
I
LAMP
lH
ARKER
Th
ng
diagram
ha
been
fullyeqU1pped
nclod
p
wredontheas
The
ght
IS
e
erv
l
og
all
factory
optIonal
SUmQtron
tllat
the
car
BLACK
any
tme
II
1aut
to
make
chang
s
In
the
eQU
Omefll
Note
EaCh
cao
ro
notICe
l
d
g
am
at
WHITE
D
CI
r
olon
colO
E
d
Ca
Iore
l
ba
ed
on
1011010
ffi
El3
C4
pa
l
a
wh
te
Sl
l
bles
Suel
as
GW
n
8R
g
colors
GREEN
1m
o11Id
blaCk
cao
th
pa
l
I
n
5
at
l@
Il
BLUE
C
AUTOMATIC
fRAN
pe
l
tely
YlilOW
I
MANUAL
TRAN
M
MISSION
MODUS
BROWN
1
CALIFORNIA
MOD
ION
MODELS
A
MODELS
w
w
B
j
NONCAUroRNIA
I
HATCHBACK
It
it
FU
MODEtS
FOR
tS
FOR
USA
WAGON
AllFORN
A
t
AIR
CONDITIONER
SWITCH
AND
RE
J
IGNITION
SWI
Y
POSITIONS
KEY
REMOVEO
IN
lOCII
n
co
o
011
@
1
1
LIGHTING
SWITCH
W
P
con
10
lhe
w
n
g
DOORS
CtoSlO
ER
SWITCH
IN
OFF
TRANSMISSION
m
hown
be
w
NO
CONNECTION
CONNECTION
AUtOMATIC
T
EUTRAl
I
me
th
of
lEVER
IN
PAIU
IN
SSIDN
SlLECfORi
oKlualhne
nthec
HANOBRAIIEPUllEO
t
ffi
III
fi
ORIVEWS
SEAT
BELT
UNOCCUPIED
@
C
JiOR
lOPEN
NORMAL
CLOSE
NISSAN
MOTOR
tl
J
w
iJ
j
II
C
TA
l
SfOP
t
o
L
SlOP
fUPN
lj
ro
elNA
TI
N
JbtJ
1
G
J
W
1
J
ITHERMO
sw
B
H
IMICRO
sw
1
l
n
MA
IN
RELA
V
c
1W231
rAN
SW
I
A
NMOTOR
of
l
I
rr
I
I
I
c
1m231
i
11
II
i
HEATER
UNIT
Mun
DUT
FA
N
J
WAGON
t
o
a
ijE
c
r
g
E3J
FUEl
Tjl
NII
GA
LJGE
UNIT
JL
OODfi
11
tl
DJ
H
t
ow
J
TA
l
BA
CII
UP
rI
O
BlNjl
TIOf
l
J
9
111
fi
l
JID
l
6
o
o
c
II
LICENSE
PLA
TE
LAMP
ijf
I
LUGGAGE
R
r2
ARTMENI
C
ow
Tjl
ll
STOP
IIA
CIIUP
t
C
co
STOP
fURN
n
ro
fBINA
TION
I
J
CO
LTD