length DATSUN 210 1979 User Guide
[x] Cancel search | Manufacturer: DATSUN, Model Year: 1979, Model line: 210, Model: DATSUN 210 1979Pages: 548, PDF Size: 28.66 MB
Page 204 of 548
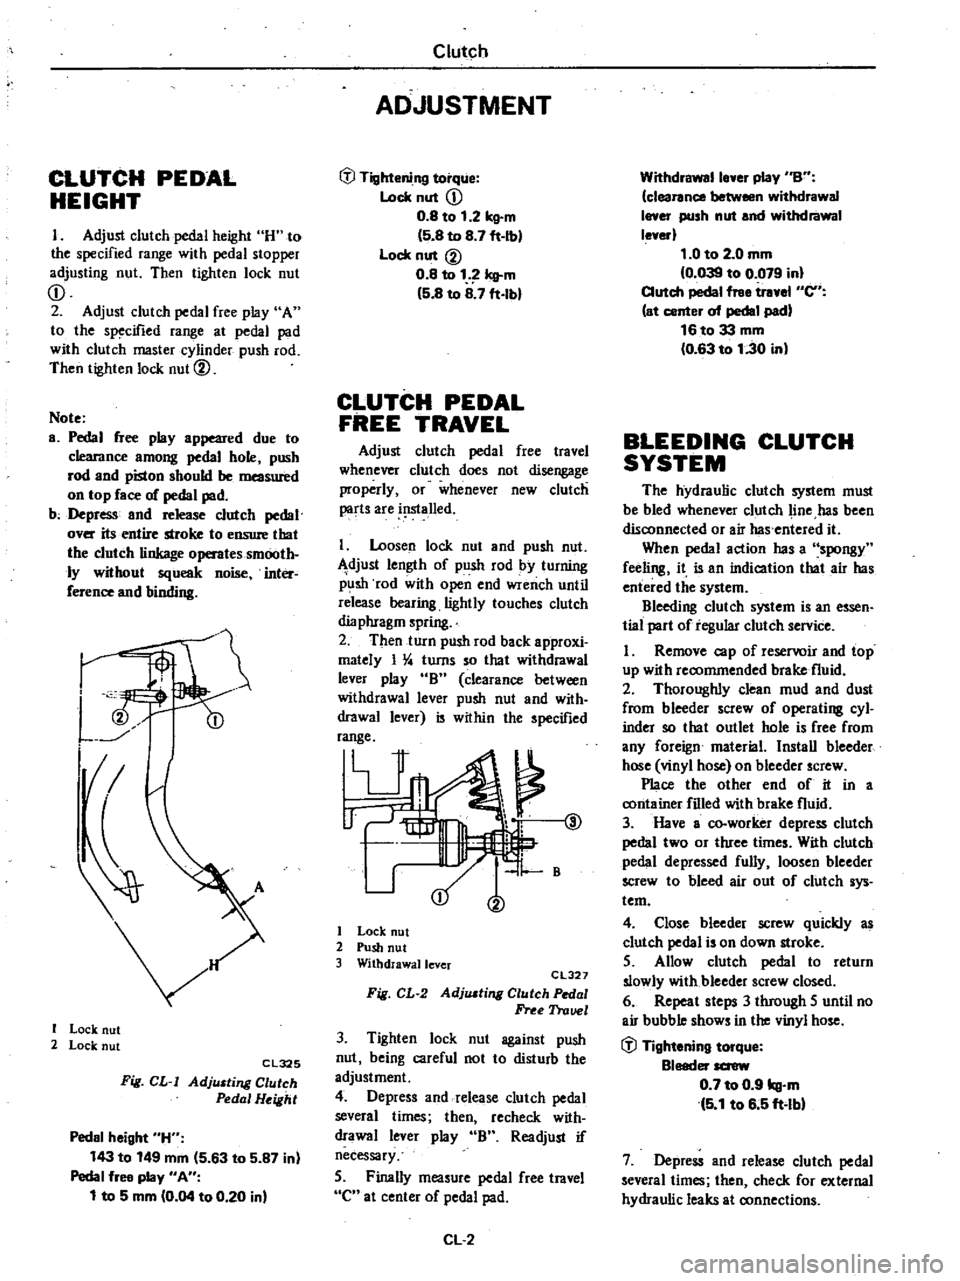
CLUTCH
PEDAL
HEIGHT
I
Adjust
clutch
pedal
height
H
to
the
specified
range
with
pedal
stopper
adjusting
nut
Then
tighten
lock
nut
CD
2
Adjust
clutch
pedal
free
play
A
to
the
specified
range
at
pedal
pad
with
clutch
master
cylinder
push
rod
Then
tighten
lock
nut
@
Note
a
Pedal
free
play
appeared
due
to
clearance
among
pedal
hole
push
rod
and
piston
should
be
measured
on
top
face
of
pedal
pad
b
Depress
and
release
clutch
pedal
over
its
entire
stroke
to
ensure
that
the
clutch
linkage
operates
smooth
ly
without
squeak
noise
inter
ference
and
binding
I
I
Lock
nut
2
Lock
nut
Cl325
Fig
CL
I
AdjlUting
Clutch
Pedal
Height
Pedal
height
H
143
to
149
mm
5
63
to
5
87
in
Pedal
free
play
An
1
to
5
mm
0
04
to
0
20
in
Clutch
ADJUSTMENT
tfl
Tightening
torque
Lock
nut
CD
0
8
to
1
2
kg
m
5
8
to
8
7
ft
Ib
Lock
nut
@
0
8
to
1
Icll
m
5
8
to
8
7
ft
lbl
CLUTCH
PEDAL
FREE
TRAVEL
Adjust
clutch
pedal
free
travel
whenever
clutch
does
not
disengage
properly
or
whenever
new
clutch
parts
are
i
lslalled
I
Loosen
lock
nut
and
push
nut
djust
length
of
push
rod
by
turning
p
lsh
rod
with
open
end
wrench
until
release
bearing
lightly
touches
clutch
dia
phragm
spring
2
Then
turn
push
rod
back
approxi
mately
I
4
turns
so
that
withdrawal
lever
play
B
clearance
between
withdrawal
lever
push
nut
and
with
drawal
lever
is
within
the
specified
range
V
@
1
B
I
Lock
nut
2
Push
nut
3
Withdrawallcver
CL327
Fig
CL
2
AdjlUting
Clutch
Pedal
Free
Trauel
3
Tighten
lock
nut
against
push
nut
being
careful
not
to
disturb
the
adjustment
4
Depress
and
release
clutch
pedal
several
times
then
recheck
with
drawal
lever
play
B
Readjust
if
necessary
5
Finally
measure
pedal
free
travel
C
at
center
of
pedal
pad
CL
2
Withdrawalle
er
play
nBn
clearance
between
withdrawal
I
er
push
nut
and
withdrawal
le
erl
1
0
to
2
0
mm
0
039
to
0
079
in
Clutch
pedal
free
tr
el
en
at
center
of
pedal
pad
16to33
mm
0
63
to
1
30
in
BLEEDING
CLUTCH
SYSTEM
The
hydraulic
clutch
system
must
be
bled
whenever
clutch
line
has
been
disconnected
or
air
has
entered
it
When
pedal
action
has
a
spongy
feeling
it
is
an
indication
that
air
has
entered
the
system
Bleeding
clutch
system
is
an
essen
tial
part
of
regular
clutch
service
I
Remove
cap
of
reservoir
and
top
up
with
recommended
brake
fluid
2
Thoroughly
clean
mud
and
dust
from
bleeder
screw
of
operating
cyl
inder
so
that
outlet
hole
is
free
from
any
foreign
material
Install
bleeder
hose
vinyl
hose
on
bleeder
screw
Place
the
other
end
of
it
in
a
container
filled
with
brake
fluid
3
Have
a
co
worker
depress
clutch
pedal
two
or
three
times
With
clutch
pedal
depressed
fully
loosen
bleeder
screw
to
bleed
air
out
of
clutch
sys
tem
4
Close
bleeder
screw
quickly
as
clutch
pedal
is
on
down
stroke
5
Allow
clutch
pedal
to
return
slowly
with
bleeder
screw
closed
6
Repeat
steps
3
through
5
until
no
air
bubble
shows
in
the
vinyl
hose
tfl
Tightening
torque
Bleeder
screw
0
7
to
0
9
kg
m
5
1
to
6
5
ft
lbl
7
Depress
and
release
clutch
pedal
several
times
then
check
for
external
hydraulic
leaks
at
connections
Page 243 of 548

Note
Make
sure
smp
ring
fits
in
groove
5
Install
bearing
retainer
on
adapter
plate
Torque
screws
and
stake
each
screw
at
two
points
with
a
punch
@
Tightening
tOrque
Mainshaft
bearing
retainer
screw
0
8
to
3
kll
m
15
8
to
9
4
ft
lbl
TM246A
Fig
MT
117
Staking
Bearing
Retainer
Screws
6
Press
Ist
counter
gear
onto
counter
sltaft
using
Drift
ST22360002
TM583
Fig
MT
118
Installing
I
t
Counter
Gear
7
Fit
a
new
suitable
retaining
ring
in
place
so
th
t
there
exists
a
mininum
clearance
between
end
face
of
counter
gear
and
ring
Note
Make
sure
retaining
ring
f
It
in
groove
Available
retaining
rings
No
Thickness
mm
in
2
1
25
to
1
35
0
0492
to
0
0531
1
35
to
I
45
0
0531
to
0
0571
0
d
Converted
tor
q
e
j
Iim
ttine
7
7
7
Manua
Transmission
TM247
A
Fig
MT
119
Installing
Retaining
Ring
8
Install
thrust
washer
to
rear
of
mainshaft
and
idler
shaft
9
Install
synchro
hub
with
reverse
gear
I
st
gear
together
with
needle
bearing
and
bushing
and
idler
gear
together
with
needle
bearing
simulta
neously
OTT
o
1st
gear
side
Ui
Front
Fl
J
I
TM263A
Fig
MT
I20
In
talling
Ist
Reverse
Synchronizer
10
Install
mainshaft
nut
and
tighten
it
temporarily
E
S
f2
80
t1
o
c
v
0
S
v
5
c
o
o
u
10
70
9
60
50
II
With
I
st
and
2nd
gears
doubly
engaged
tighten
mainshaft
nut
to
con
verted
torque
en
See
Fig
MT
123
using
Wrench
ST22520000
Stake
mainshaft
nut
to
groove
of
mainshaft
with
a
punch
ST22520000
TM248A
Fig
MT
I2I
Tightening
Mainshaft
Nut
TM249A
Fig
MT
I22
Staking
Mainshaft
Nut
I
I
Upper
limit
line
40
0
2
0
3
0
4
0
5
0
6
0
7
0
8
m
1
0
1
5
2
0
2
5
ft
L
Effective
length
of
torque
wrench
MT
27
TM258A
Fig
MT
123
Converted
Torque
Page 244 of 548

J
xplanation
of
convet
ted
torque
Mainshaft
nut
should
be
tightened
to
10
to
11
kg
m
72
to
80
ft
Ib
torque
with
the
aid
of
Wrench
ST22520000
When
doing
w
the
amount
of
torque
to
be
read
on
wrench
needle
should
be
modified
according
to
the
following
formula
L
C
kg
m
10
x
L
O
I
to
11
L
x
L
O
I
or
C
ft
Ib
n
x
L
O
33
to
L
80
x
L
0
33
Where
C
Value
read
on
the
torque
wrench
kg
m
ft
Ib
L
Effective
length
of
torque
wrench
m
ft
ST22520000
Torque
wrench
r
Lm
ft
0
1
m
0
3
ft
TM587
Fig
MT
124
Setting
Wrench
Example
When
a
0
4
m
Iong
torque
wrench
is
used
the
C
in
Fig
MT
123
will
be
8
0
to
8
8
kg
m
58
to
64
ft
Ib
12
Measure
gear
end
play
Make
sure
that
they
are
held
within
the
specified
values
For
details
refer
to
Page
MT
23
for
Inspection
13
Fit
1
0
IDm
0
039
in
thick
snap
ring
10
the
front
side
of
main
shaft
end
bearing
14
Install
mainshaft
end
bearing
using
Bearing
Drift
ST22350000
Fit
thick
snap
ring
to
the
rear
side
of
bearing
to
eliminate
end
play
Manual
Transmission
Available
Sllap
ring
No
Thickness
IDm
in
1
1
0
0
039
2
1
2
0
047
on
LST22350000
TM250A
Fig
MT
125
In
talling
Main
haft
End
Bearing
Shift
forks
and
fork
rods
1
Insert
1st
reverse
fork
rod
into
its
shift
fork
and
adapter
plate
2
With
1st
reverse
fork
rod
set
at
Neutral
insert
interlock
plunger
into
adapter
plate
3
Insert
2nd
3rd
fork
rod
into
adapter
plate
2nd
3rd
and
4th
5th
shift
forks
4
With
2nd
3rd
fork
rod
set
at
Neutral
insert
interlock
plunger
into
adapter
plate
5
Insert
4th
5th
fork
rod
into
adapter
plate
and
its
s
Uft
fork
6
Secureshift
forks
and
fork
rOd
s
with
new
retaining
pins
Note
a
Be
sure
to
install
interlock
plunger
when
installing
any
adjacent
fork
rods
to
adapter
plate
Properly
align
the
groove
in
assem
bleMork
rod
with
inle
rlQck
plung
er
See
Fig
MT
SO
b
Be
su
to
align
4th
5th
shift
fork
with
the
groove
in
their
coupling
sleeve
befo
instalting
c
Also
align
2nd
3rd
shift
fork
with
their
coupling
sleeve
properly
be
fore
instalting
7
Install
check
balls
and
check
ball
springs
Applying
locking
sealer
to
check
ball
plug
and
install
in
place
Align
center
notch
in
each
fork
rod
with
check
ball
Note
a
Check
ball
plug
for
1st
reverse
fork
rod
is
longer
than
those
for
2nd
3rd
fork
rod
and
4th
5th
fork
rod
b
To
insure
that
interlock
plunger
i
installed
properly
slide
2nd
3rd
fork
rnd
andoperate
the
other
fork
rod
Make
sure
thaI
gear
except
20d
or
3rd
gear
doe
not
mesh
8
Apply
gear
oil
to
all
sliding
sur
faces
and
check
to
see
that
shift
rods
operate
correctly
and
gears
engage
smoothly
L
1
u
Revene
TM251A
Fig
MT
126
In
talling
Shift
Forks
and
Fork
Roth
MT
28
Page 283 of 548
Note
L
C
llTect
thid
ness
of
bearing
race
end
thrust
washer
is
always
the
one
which
is
nearest
the
calculated
one
b
InsteJled
thid
noss
of
oil
pump
gasket
is
0
4
mm
0
016
in
10
Check
to
b
sure
that
brake
servo
piston
moves
freely
For
detailed
procedure
refer
to
page
AT
33
for
Servo
Piston
Use
care
to
prevent
piston
from
coming
out
of
place
dur
ing
testing
since
servo
retainer
is
not
tightened
at
this
point
of
assembly
II
Make
sure
that
brake
band
strut
is
correctly
installed
Tighten
piston
stem
Back
off
two
full
turns
end
secure
with
lock
nul
l
l
Tightening
torqUl
Piston
stem
1
2
to
1
5
kg
m
9
to
11
ft
lbl
Piston
tem
lock
nut
1
5
to
4
0
kg
m
11
to
29
ft
lbl
Available
diaphragm
rod
Distance
measured
L
mm
in
Under
25
55
1
0059
25
65
to
26
05
1
0098
to
1
0256
26
15
to
26
55
1
0295
to
1
0453
26
65
to
27
05
1
0492
to
1
0650
Over
27
15
1
0689
COMPONENT
PARTS
The
transmission
consists
of
many
all
parts
that
are
quite
alike
in
oonstruction
yet
machined
to
very
close
tolerances
When
disassembling
parts
be
sure
to
place
them
in
order
in
part
rack
so
they
can
be
restored
in
the
unit
in
their
proper
positions
It
is
also
very
important
to
perform
func
lional
test
whenever
it
is
designated
Automatic
Transmission
12
After
inhibitor
switch
is
in
stalled
check
to
be
sure
that
it
op
erates
properly
in
each
range
For
detailed
procedure
refer
to
page
AT
40
for
Checking
and
Adjusting
lnhibi
tor
Switch
13
Check
the
length
L
between
case
end
to
rod
end
of
vacuum
throttle
valve
fully
pushed
in
Then
select
adequate
diaphragm
rod
of
corre
sponding
measured
length
1
11f1
n
1
11
1
1
f
c
dllidf
i
L
AT145
Fig
A
T
51
M
asuring
the
Dutance
L
Diaphragm
rod
length
mm
in
29
0
1
142
295
1
161
30
0
I
181
30
5
1
201
31
0
1
220
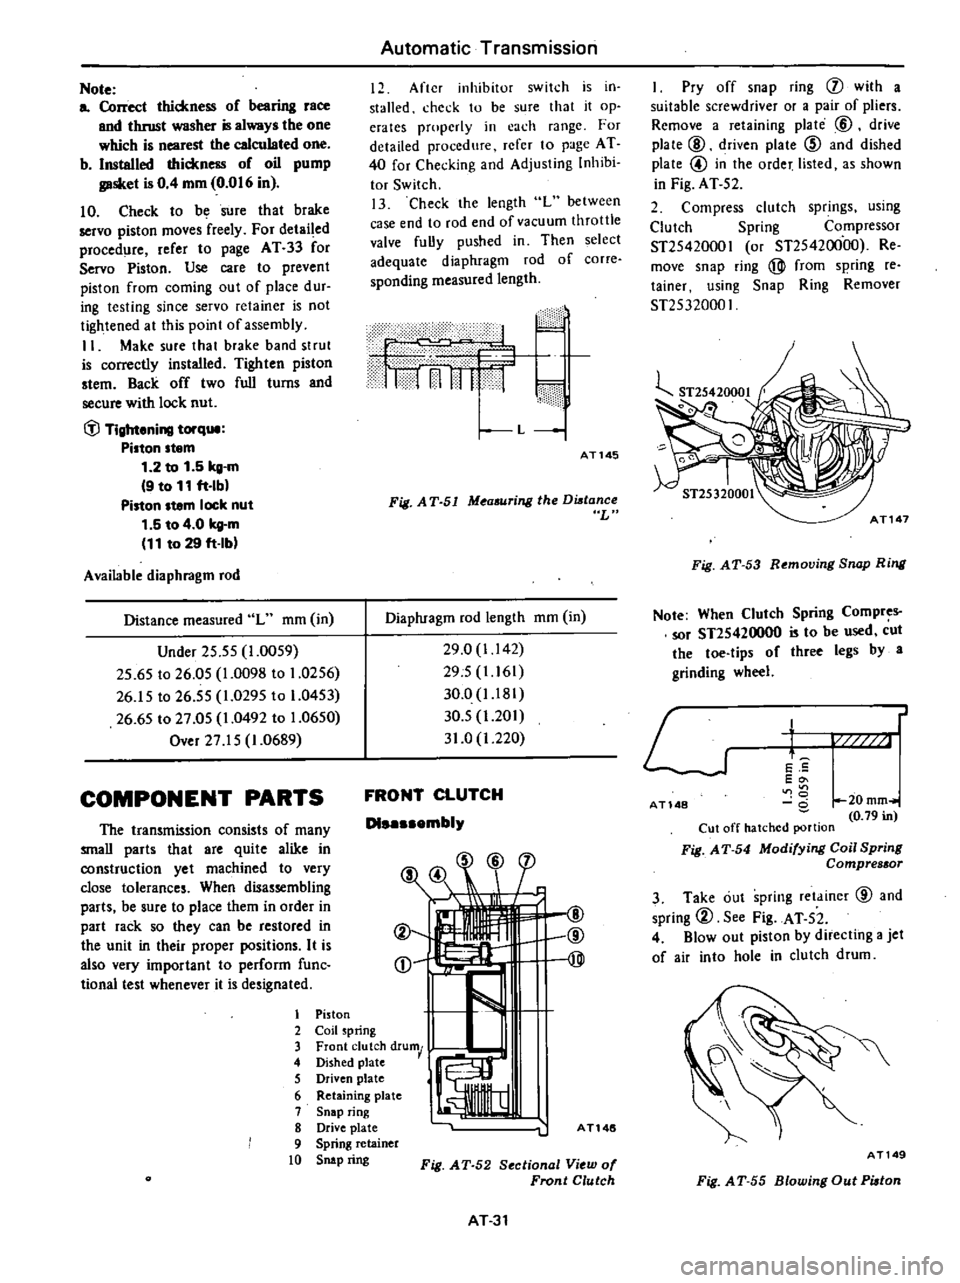
FRONT
CLUTCH
Dl
mbly
@
@
@
I
Piston
2
Coil
spring
3
Front
clutch
drum
4
Dished
plate
5
Driven
plate
I
6
R
I
etammg
plate
7
Snap
ring
8
Drive
plate
A
T146
9
Spring
retainer
10
Snip
ring
Fig
AT
52
Section
1
View
of
Fronl
Clulch
AT31
I
Pry
off
snap
ring
j
with
a
suitable
screwdriver
or
a
pair
of
pliers
Remove
a
retaining
plate
@
drive
plate
@
driven
plate
@
and
dished
plate
@
in
the
order
listed
as
shown
in
Fig
AT
52
2
Compress
clutch
springs
using
Clutch
Spring
Compressor
ST25420001
or
ST25420000
Re
move
snap
ring
@
from
spring
reo
tainer
using
Snap
Ring
Remover
ST25320001
Fig
AT
53
Removing
Snap
Ring
Note
When
Clutch
Spring
Compres
sor
ST2S420000
is
to
be
used
cut
the
toe
tips
of
three
legs
by
a
grinding
wheel
L
J
t
E
5
Eo
U
0
20mm
0
79
in
Cut
off
hatched
portion
Fig
A
T
54
Modifying
Coil
Spring
Compressor
AT
148
3
Take
out
spring
retainer
@
and
spring
2
See
Fig
AT
52
4
Blowout
piston
by
directing
a
jet
of
air
into
hole
in
clutch
drum
AT149
Fig
A
T
55
Blowing
Out
Piolon
Page 289 of 548
Automatic
Transmission
Inspection
I
Check
valves
for
sign
of
burning
tension
if
necessary
replace
5
Check
oil
passages
in
valve
body
and
if
necessary
replace
4
Examine
for
any
sign
of
damage
for
sign
of
damage
and
other
condi
2
Check
to
be
certain
that
oil
or
score
marks
on
separate
plate
If
tions
which
might
interfere
with
prop
strainer
is
in
good
condition
If
found
left
unheerlcd
oil
will
bypass
correct
er
valve
operation
damaged
in
any
manner
discard
oil
passages
causing
many
types
of
6
Check
bolts
for
stripped
threads
3
Test
valve
springs
for
weakened
abnormalities
in
the
system
Replace
as
required
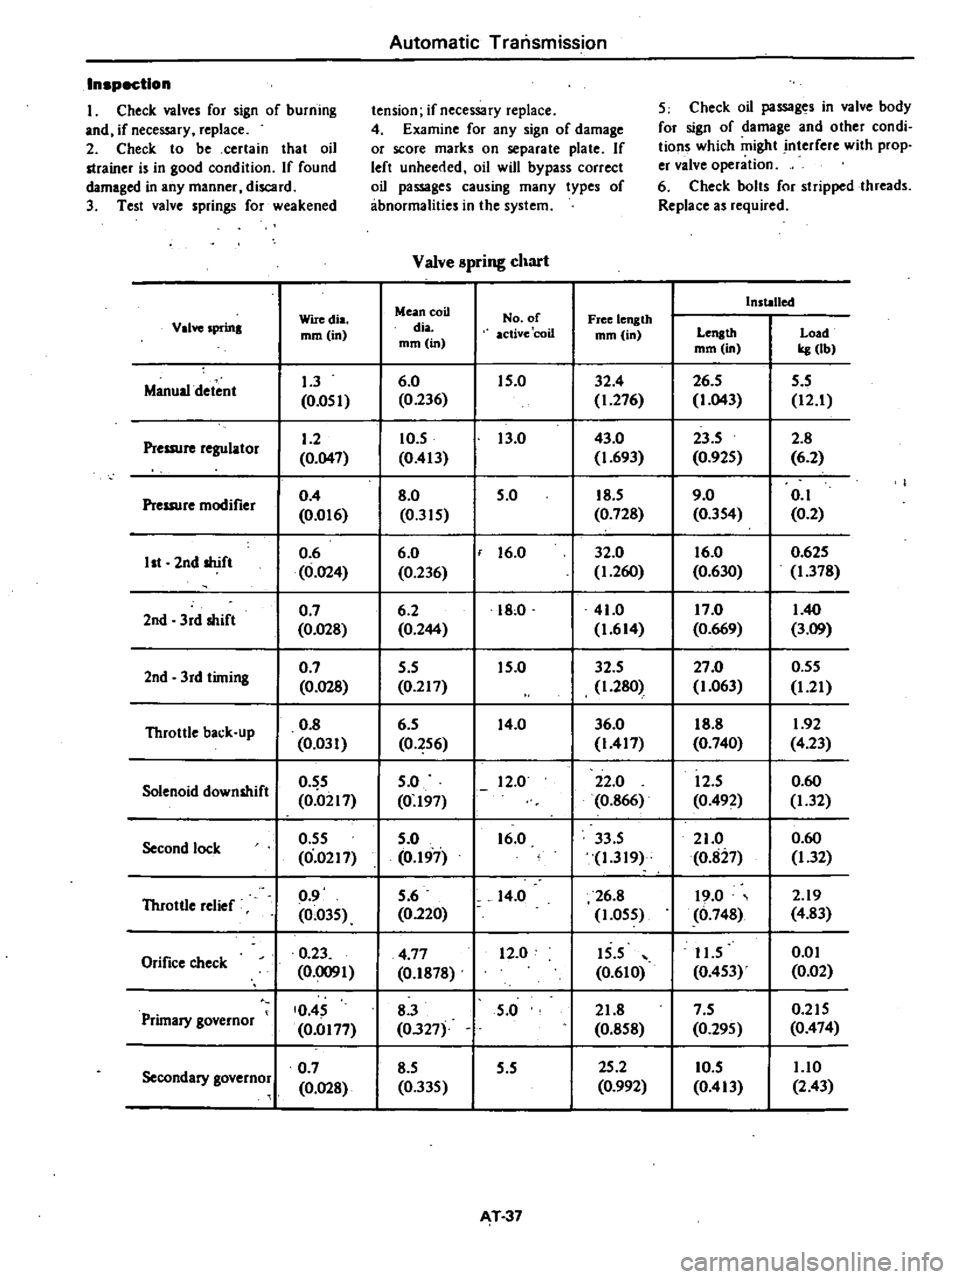
Valve
spring
chart
Mean
coil
Installed
Wiredia
No
of
Free
length
Valve
sprma
mm
in
dia
active
coil
mm
in
Length
Load
mm
in
mm
in
kg
lbl
Manual
detent
1
3
6
0
15
0
32
4
26
5
5
5
0
051
0
236
1
276
1
043
12
1
Pressure
regulator
1
2
10
5
13
0
43
0
23
5
2
8
0
047
0
413
1
693
0
925
6
2
Pressure
modifier
0
4
8
0
5
0
18
5
9
0
0
1
0
01
6
0
315
0
728
0
354
0
2
2nd
shift
0
6
6
0
f
16
0
32
0
16
0
0
625
1st
0
024
0
236
1
260
0
630
1
378
2nd
3rd
shift
0
7
6
2
18
0
41
0
17
0
1
40
0
028
0
244
1
614
0
669
3
09
2nd
3rd
timing
0
7
5
5
15
0
32
5
27
0
0
55
0
028
0
217
1
280
1
063
1
21
Throttle
back
up
0
8
6
5
14
0
36
0
18
8
1
92
0
031
0
256
1417
0
740
4
23
Solenoid
downshift
0
5
5
0
12
0
22
0
12
5
0
60
0
0217
0
197
0
866
0
492
1
32
Second
lock
0
55
5
0
16
0
33
5
21
0
0
60
0
0217
0
197
1
319
0
827
1
32
Throttle
relief
0
9
5
6
14
0
26
8
19
0
2
19
0
035
0
220
1
055
0
74g
4
83
Orifice
check
0
23
4
77
12
0
15
5
11
5
om
0
0091
0
lg78
0
610
0
453
0
02
Primary
governor
0
45
8
3
5
0
21
8
7
5
0
215
0
0177
0327
0
858
0
295
0
474
Secondary
governor
0
7
8
5
5
5
25
2
10
5
1
10
0
028
0
335
0
992
0
413
2
43
T
37
Page 316 of 548
Propeller
Shaft
Diffe
ntial
Carrier
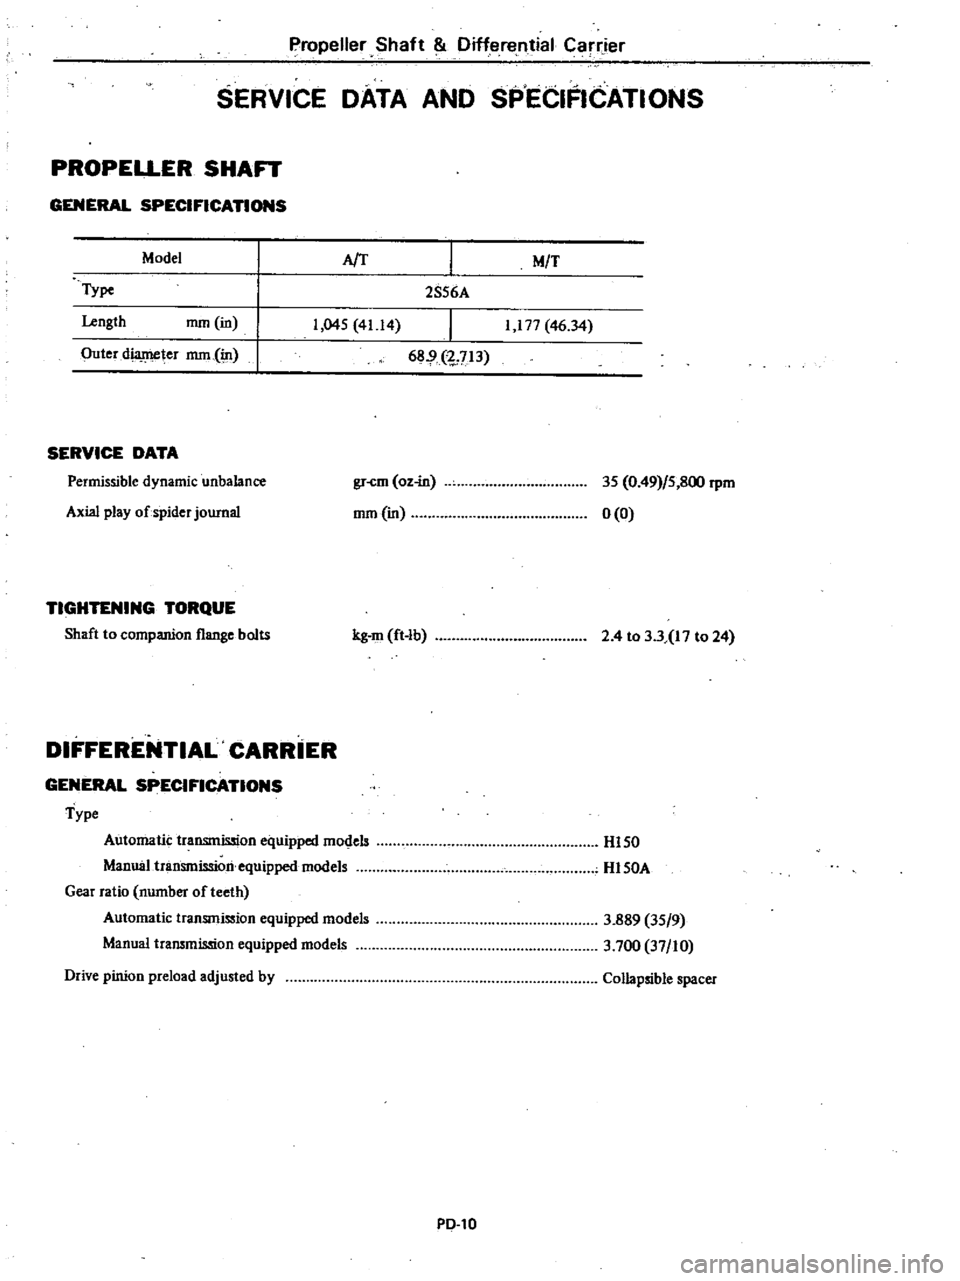
SERVICE
DATA
AND
SPECIFICATIONS
PROPEL1
ER
SHAFT
GENERAL
SPECIRCATIONS
Model
A
T
M
T
Type
Length
rnrn
in
2856A
1
045
4Ll4
1
177
46
34
68
1
713
Outer
dil
lluJ
er
rnrn
jn
SERVICE
DATA
Permissible
dynamic
unbalance
gr
cm
oz
in
rnrn
in
Axial
play
of
spider
journal
TIGHTENING
TORQUE
Shaft
to
companion
flange
bollS
kg
fil
ft
lb
DIFFERENTIAL
CARRiER
GENERAL
SPECIFICATIONS
Type
Automatic
transmission
equipped
models
Manual
transmission
equipped
models
Gear
ratio
number
of
teeth
Automatic
transmission
equipped
models
Manual
transmission
equipped
models
Drive
pinion
preload
adjusted
by
PO
tO
35
0
49
5
800
rpm
0
0
2
4
to
3
3l17
to
24
HI50
HI50A
3
889
35
9
3
700
37
10
Collapsible
spacer
Page 325 of 548
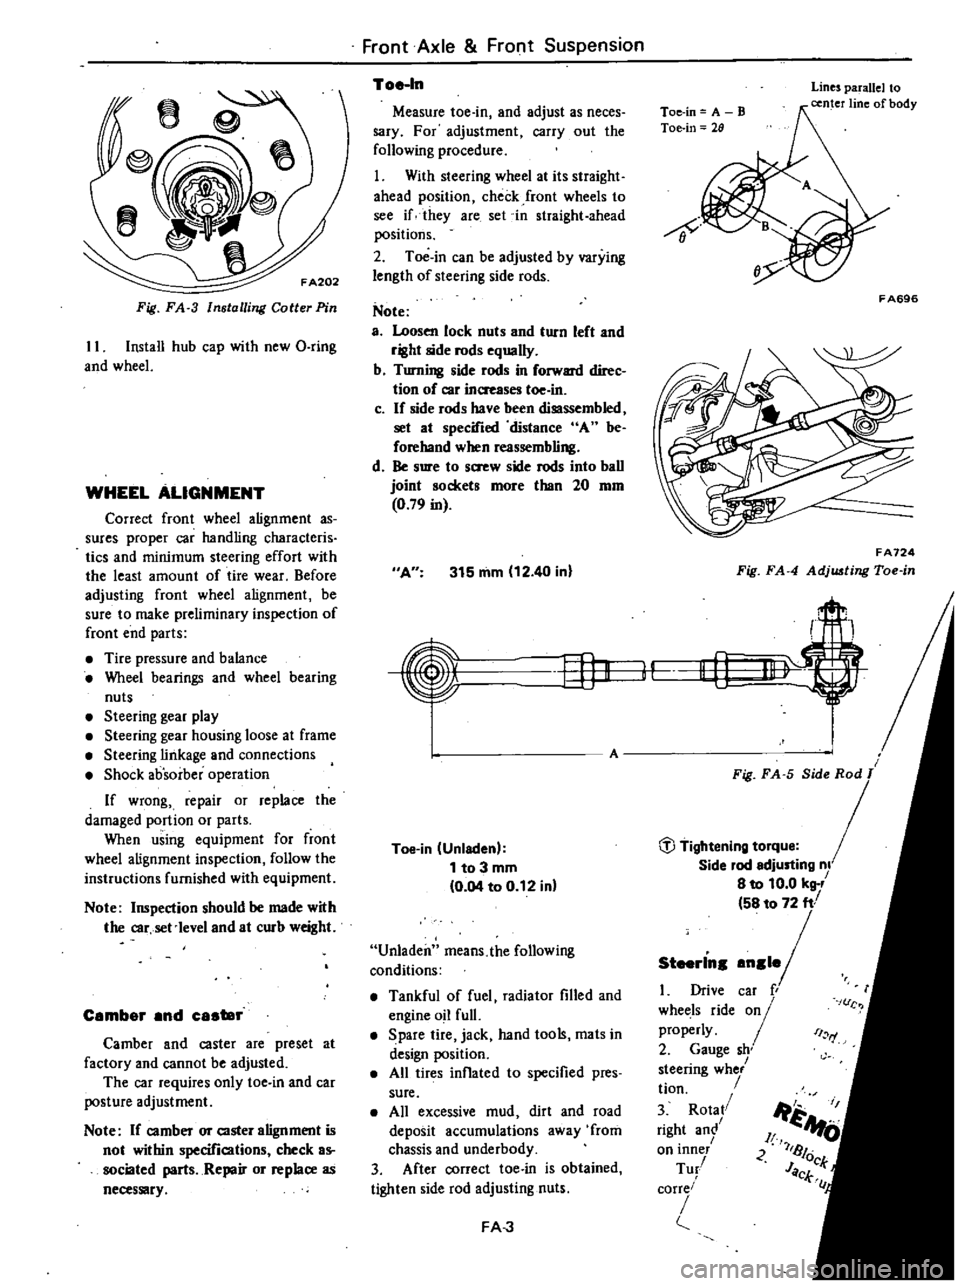
Fig
FA
3
Installing
Coller
Pin
II
Install
hub
cap
with
new
Q
ring
and
wheel
WHEEL
ALIGNMENT
Correct
front
wheel
alignment
as
sures
proper
car
handling
characteris
tics
and
minimum
steering
effort
with
the
least
amount
of
tire
wear
Before
adjusting
front
wheel
alignment
be
sure
to
make
preliminary
inspection
of
front
end
parts
Tire
pressure
and
balance
Wheel
bearings
and
wheel
bearing
nuts
Steering
gear
play
Steering
gear
housing
loose
at
frame
Steering
linkage
and
connections
Shock
absorber
operation
If
wrong
repair
or
replace
the
damaged
portion
or
parts
When
using
equipment
for
front
wheel
alignment
inspection
follow
the
instructions
furnished
with
equipment
Note
Inspection
should
be
made
with
the
car
set
Ievel
and
at
curb
weight
Cember
end
caster
Camber
and
caster
are
preset
at
factory
and
cannot
be
adjusted
The
car
requires
only
toe
in
and
car
posture
adjustment
Note
If
camber
or
caster
alignment
is
not
within
specifications
check
as
sociated
parts
Repair
or
replace
as
necessary
Front
Axle
Front
Suspension
Toe
In
Measure
toe
in
and
adjust
as
neces
sary
For
adjustment
carry
out
the
following
procedure
1
With
steering
wheel
at
its
straight
ahead
position
check
front
wheels
to
see
if
they
are
set
in
straight
ahead
positions
2
Toe
in
can
be
adjusted
by
varying
length
of
steering
side
rods
Note
a
Loosen
lock
nuts
and
turn
left
and
right
side
rods
equally
b
Turning
side
rods
in
forward
direc
tion
of
car
inaeases
toe
in
c
If
side
rods
have
been
disassembled
set
at
specified
distance
A
be
forehand
when
reassembling
d
Be
sure
to
s
w
side
rods
into
ball
joint
sockets
more
than
20
mm
0
79
in
A
315
mm
12
40
in
EfJK
Toe
in
Unladen
1
to
3
mm
0
04
to
0
12
in
Unladen
means
the
following
conditions
Tankful
of
fuel
radiator
filled
and
engine
oil
full
Spare
tire
jack
hand
tools
mats
in
design
position
All
tires
inflated
to
specified
pres
sure
All
excessive
mud
dirt
and
road
deposit
accumulations
away
from
chassis
and
underbody
3
After
correct
toe
in
is
obtained
tighten
side
rod
adjusting
nuts
FA
J
Toe
in
A
B
Toe
in
28
Lines
parallel
to
center
line
of
body
8
F
A696
FA724
Fig
FA
4
Adj
ting
Toe
in
r
II
Li
1
t
Fig
FA
5
Side
Rod
T
Side
lod
edjusting
nl
8
to
10
0
kg
58
to
72
ft
1
Drive
caf
r
whet
ls
ride
01
properly
2
Gauge
sh
steenng
whe
tion
3
Rota
right
an
on
lOner
Tu
corre
i
I
rf
c
Ji
1
A
JI
U
2
7181
JOck
CL
C
Page 330 of 548

Note
CbedI
dust
seal
forsaatcbes
or
aacb
on
lips
end
replace
if
neces
sary
ASSEMBLY
When
assembling
strut
be
careful
not
to
drop
or
scratch
parts
since
they
are
precisely
machined
to
very
close
tolerances
Before
assembly
clean
away
all
dirt
to
prevent
any
possible
entry
of
dirt
into
strut
Note
If
replacement
of
any
strut
compooent
parts
is
found
to
be
neoesaery
make
sure
tlllt
parta
ere
the
same
brand
as
thoee
used
in
the
strot
essemhly
I
Install
strut
outer
casing
on
Strut
Steering
Gear
Housing
Attachment
KV48
100300
See
Fig
FA
20
2
Install
cylinder
and
piston
rod
assembly
shock
absorber
kit
in
outer
casing
3
Remove
pistoo
rod
guide
from
cylinder
and
Pour
correct
amount
of
new
fluid
into
ylinder
and
strut
outer
casing
Amount
of
oil
325
cc
19
83
cu
in
1
FA065
Fig
FA
22
FillingShoelt
Absorber
Fluid
Note
e
It
i
important
that
correct
emount
of
fluid
be
poured
into
strut
to
assure
correct
damping
force
of
Front
Axle
Front
Suspension
mock
absorber
b
U
GENUINE
NISSAN
STRUT
OIL
or
equivalent
every
after
over
11101
4
Securely
install
piston
rod
guide
in
cylinder
Note
Be
c
aref
1l
t
to
damage
gujde
with
thread
portion
of
pistoo
rod
5
Install
new
O
ring
over
rod
guide
6
Lubricate
sealing
lips
of
gland
packing
uterisked
in
Fig
F
A
23
with
lithium
base
grease
containing
molyb
denum
disulphide
and
install
gland
packing
with
Gland
Packing
Guide
KV40101900
FA659
Grease
V
1
1
0
I
FA464
Fig
FA
23
Grea
ing
Point
of
Gland
lbelting
KV40101900
F
A276
Fig
F
A
24
t
lung
Gland
lbelting
FA
8
7
Tighten
gland
packing
fl
Tightening
torque
8
0
to
11
0
kg
m
58
to
80
ft
lb
Note
a
When
tightening
gland
packing
it
i
POrl
t
J
It
d
he
ttJI
teoded
epproximately
120
IDID
4
72
in
from
upper
surfece
of
gland
packing
to
faclli18te
spring
iosteIlatioo
b
Gland
packing
should
be
tighteoed
to
specified
torque
with
the
aid
of
Gland
Packing
Wreoch
ST35500001
When
doing
so
the
amouot
of
torque
to
be
read
be
neath
wrench
oeedle
should
be
modified
eccording
to
the
following
formula
L
Ckg
m
8x
L
O
IO
or
L
Cft
Ib
58x
L
0
33
where
C
Value
to
he
reed
on
the
torque
wrench
kg
m
ft
Ib
L
Effective
length
of
torque
wrench
m
ft
Gland
packing
WIcoch
Torque
C
Lm
ft
I
0
1
m
0
33
ft
FA278
Fig
FA
25
Gland
lbeltill
l
Wrench
8
Bleed
air
out
of
shock
absorber
as
follows
I
Holding
strut
by
hand
with
its
spindle
side
facing
down
pull
out
piston
f
d
completely
Then
turn
strut
upside
down
so
that
spindle
side
is
now
facing
up
Under
this
condition
retract
piston
rod
all
the
way
in
2
Repeat
the
above
procedure
several
times
so
that
air
will
be
bled
out
from
strut
th
oroughiy
3
If
during
the
above
step
en
equal
pressure
is
felt
through
the
hand
grippitig
piston
rod
on
both
strokes
it
is
an
indication
that
air
is
expelled
from
strut
thoroughly
Page 335 of 548
Front
Axle
Front
Suspension
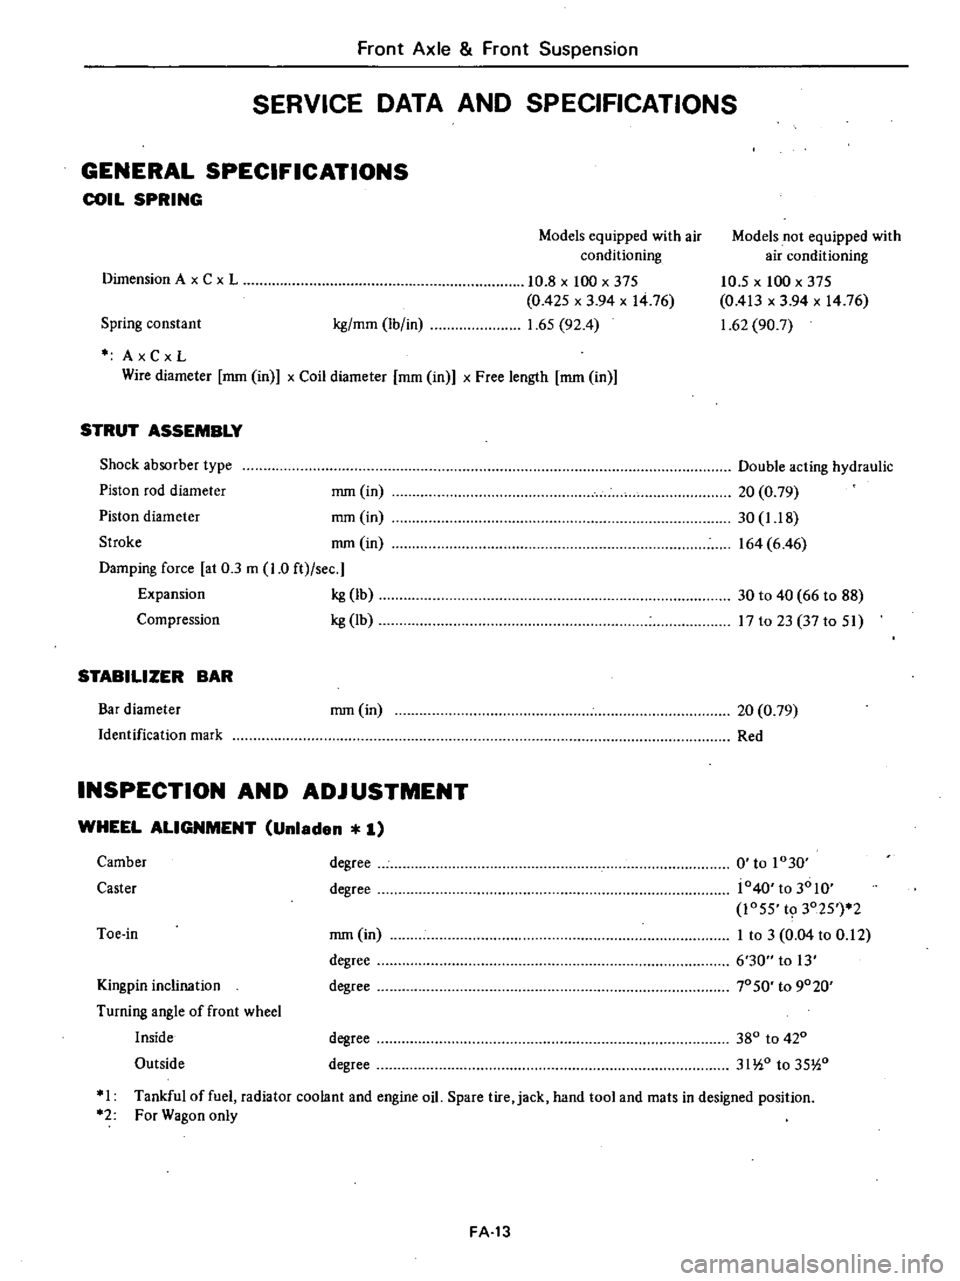
SERVICE
DATA
AND
SPECIFICATIONS
GENERAL
SPECIFICATIONS
COIL
SPRING
Models
equipped
with
air
conditioning
Models
not
equipped
with
air
conditioning
10
5
x
100
x
375
0
413
x
3
94
x
1476
1
62
90
7
Spring
constant
kg
mm
Ib
in
10
8
x
100
x
375
0
425
x
3
94
x
1476
1
65
92
4
Dimension
A
x
C
x
L
AxCxL
Wire
diameter
mm
in
x
Coil
diameter
mm
in
x
Free
length
mm
in
STRUT
ASSEMBLY
Shock
absorber
type
Piston
rod
diameter
mm
in
Piston
diameter
mm
in
Stroke
nun
in
Damping
force
at
0
3
m
1
0
ft
sec
Expansion
kg
Ib
Compression
kg
Ib
Double
acting
hydraulic
20
0
79
30
1
18
164
6
46
30
to
40
66
to
88
17
to
23
37
to
51
STABILIZER
BAR
Bar
diameter
Identification
mark
mm
in
20
0
79
Red
INSPECTION
AND
ADJUSTMENT
WHEEL
ALIGNMENT
Unladen
1
Kingpin
inclination
Turning
angle
of
front
wheel
Inside
Outside
mm
in
degree
degree
0
to
1030
j040
to
3010
1055
t9
3025
2
I
to
3
0
04
to
0
12
6
30
to
13
70
SO
to
9020
Camber
Caster
degree
degree
Toe
in
degree
degree
380
to
420
31
io
to
35
i0
I
Tankful
of
fuel
radiator
coolant
and
engine
oil
Spare
tire
jack
hand
tool
and
mats
in
designed
position
2
For
Wagon
only
FA
13
Page 348 of 548

Rear
Axle
Rear
Suspension
Inspection
I
Check
for
signs
of
cracks
distor
tion
or
other
damage
Replace
if
beyond
repair
2
If
rubber
bushing
shows
evidence
of
cracks
replace
it
using
Link
Rubber
Bushing
Drift
KV4010l6S0
See
Fig
RA
24
to
rubber
bushing
inserting
surface
oflink
CAUTION
a
00
not
tap
end
face
of
bushing
directly
with
a
hammer
as
deforma
tion
may
result
in
loose
bolt
b
When
installing
rubber
bushing
on
link
never
apply
mineral
oil
Note
Before
instelling
rubber
bushing
on
link
apply
an
ample
amount
of
soapsuds
to
link
bushing
guide
and
Removal
1
1
KV401016S0
1
1
j
KV40101610
Lower
link
upper
KV40101440
I
link
KV40101430
14
t4
l
Installation
KV401016S0
KV4010161O
KV40101620
KV40101630
r
KV40101440
upper
link
KV40101430
I
h
r
RA572
Fig
RA
24
Replacing
Link
Rubber
B
hing
RA
7
Instellation
Install
upper
or
lower
link
assembly
in
reverse
order
of
removal
Note
3
Securing
bolts
for
use
with
lower
link
differ
in
length
from
those
for
upper
link
If
used
wrong
securing
bolts
cannot
be
tightened
securely
b
Before
tightening
link
bushing
bolts
and
nuts
temporarily
attach
both
ends
of
upper
and
lower
links
to
axle
case
and
body
After
jacking
up
center
of
differential
carrier
until
upper
and
lower
links
are
almost
horizontal
securely
tighten
link
bushing
bolts
a
d
nuts
c
When
supporting
car
weight
at
center
of
differential
carrier
do
not
put
a
load
in
car
j
Tightening
torque
Upper
link
fixing
bolt
and
nut
7
0
to
8
0
kg
m
5t
0
58
ft
lbl
Lower
link
fixing
nut
7
0
to
8
0
kg
m
51
to
58
ft
lbl