length DATSUN 210 1979 Owner's Manual
[x] Cancel search | Manufacturer: DATSUN, Model Year: 1979, Model line: 210, Model: DATSUN 210 1979Pages: 548, PDF Size: 28.66 MB
Page 349 of 548

ear
Axl
Re
r
Suspen
sion
SERVICE
DATA
AND
SPECIFICATIONS
GENERAL
SPECIFICATIONS
Model
I
Sedan
Hatchback
Wagon
Item
Type
Link
Coil
spring
Wire
diameter
mm
in
r
102
OA02
10
5
OA
13
Coil
diameter
nun
in
I
90
3
54
Free
length
nun
in
I
365
14
37
379
14
92
Effective
turns
I
8
75
Spring
constant
kg
mm
Ib
in
I
1
71
95
8
L91
I07
0
Identification
color
I
Yellow
Shock
absorber
Maximum
length
L
mm
in
I
540
2126
Stroke
nun
in
I
187
5
738
I
nDU
AA504
Shock
absorber
maximum
length
L
INSPECTION
AND
ADJUSTMENT
SHOCK
ABSORBER
Damping
force
at
0
3
m
LO
ft
s
Expansion
Compression
kg
lb
kg
lb
48
to
68
I
06
to
150
19
to
33
42
to
73
REAR
AXLE
End
play
Thickness
of
rear
axle
case
end
shim
mm
in
mm
in
0
10
to
0
45
0
0039
to
Om77
0
Q75
0
0030
0
150
0
0059
0
225
0
0089
0300
0
0118
RA
B
Page 354 of 548
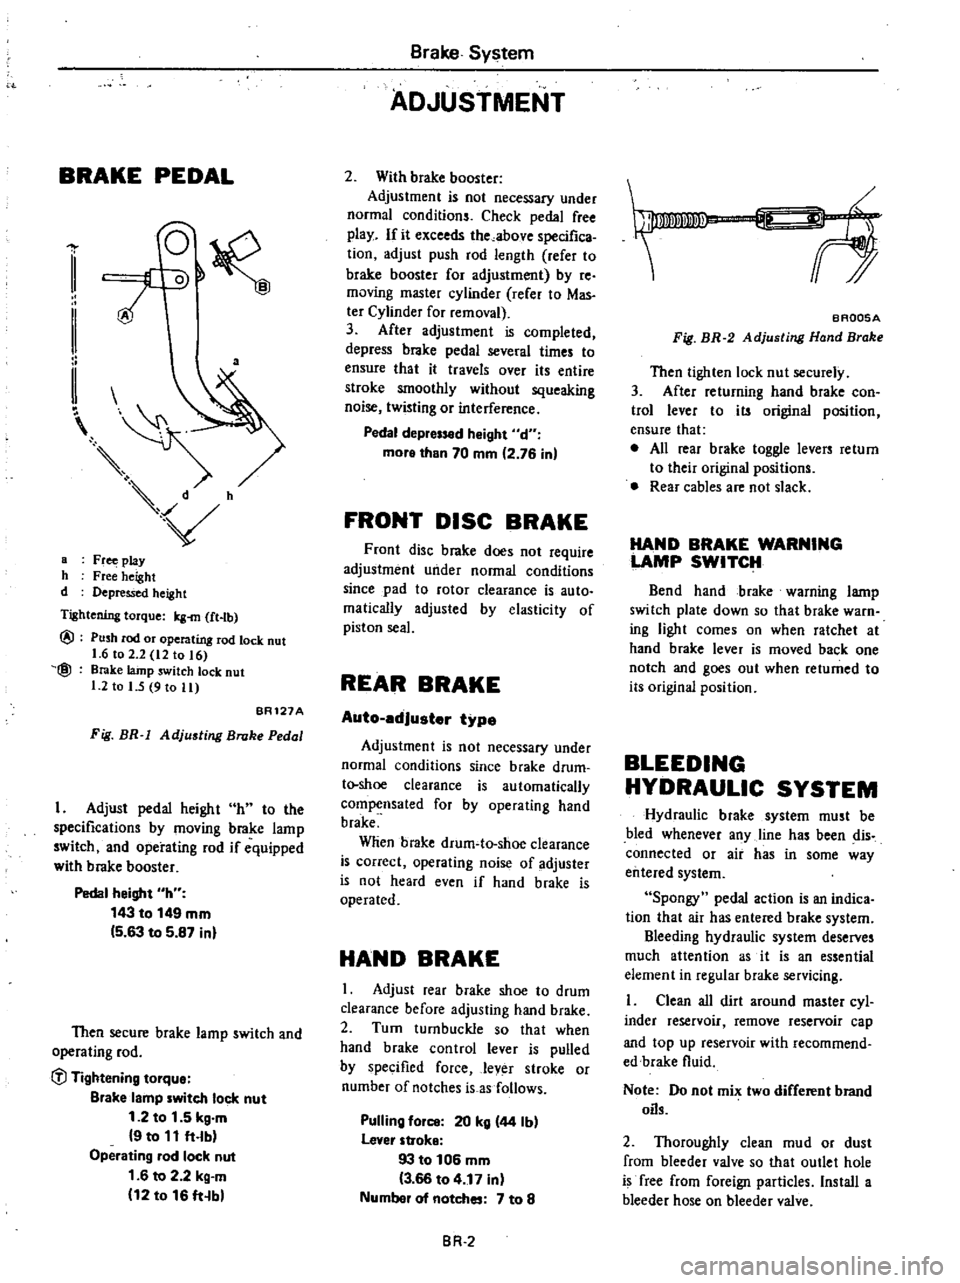
BRAKE
PEDAL
a
a
Fr
play
h
Free
height
d
Depressed
height
Tightening
torque
Icg
m
ft
tb
@
@
Push
rod
or
operating
rod
lock
nut
1
6
to
2
2
12
to
16
Brake
lainp
switch
lock
nut
1
2
to
I
5
9
to
11
BR121A
Fig
BR
1
Adjusting
Broke
Pedal
I
Adjust
pedal
height
h
to
the
specifications
by
moving
brake
lamp
switch
and
operating
rod
if
equipped
with
brake
booster
Pedal
height
h
143
to
149
mm
5
63
to
5
87
inl
Then
secure
brake
lamp
switch
and
operating
rod
C
l
Tightening
tOlque
Blake
lamp
witch
lock
nut
1
2
to
1
5
kg
m
9
to
11
ft
lb
Operating
lad
lock
nut
1
6
to
2
2
kg
m
12
to
16
ft
b
Brake
System
ADJUSTMENT
2
With
brake
booster
Adjustment
is
not
necessary
under
normal
conditions
Check
pedal
free
play
If
it
exceeds
the
above
specifica
tion
adjust
push
rod
length
refer
to
brake
booster
for
adjustment
by
re
moving
master
cylinder
rerer
to
Mas
ter
Cylinder
for
removal
3
After
adjustment
is
completed
depress
brake
pedal
several
times
to
ensure
that
it
travels
over
its
entire
stroke
smoothly
without
squeaking
noise
twisting
or
interference
Pedal
depr
d
Might
d
more
than
70
mm
2
76
in
FRONT
DISC
BRAKE
Front
disc
brake
does
not
require
adjustment
under
normal
conditions
since
pad
to
rotor
clearance
is
auto
malically
adjusted
by
elasticity
of
piston
seal
REAR
BRAKE
Auto
edJuster
type
Adjustment
is
not
necessary
under
normal
conditions
since
brake
drum
t
shoe
clearance
is
automatically
compensated
for
by
operating
hand
brake
Wlien
brake
drum
to
shoe
clearance
is
correct
operating
noise
of
adjuster
is
not
heard
even
if
hand
brake
is
operated
HAND
BRAKE
I
Adjust
rear
brake
shoe
to
drum
clearance
before
adjusting
hand
brake
2
Turn
turnbuckle
so
that
when
hand
brake
control
lever
is
pulled
by
specified
force
lever
stroke
or
number
of
notches
is
as
follows
Pulling
fOil
20
kg
44
Ib
lever
stroke
93
to
106
mm
3
66
to
4
17
in
Numbel
of
notches
7
to
8
BR
2
f
BAQ05A
Fig
BR
2
Adjusting
Hand
Brake
Then
tighten
lock
nut
securely
3
After
returning
hand
brake
con
trol
lever
to
its
original
position
ensure
that
e
All
rear
brake
toggle
levers
return
to
their
original
positions
Rear
cables
are
not
slack
HAND
BRAKE
WARNING
LAMP
SWITCH
Bend
hand
brake
warning
lamp
switch
plate
down
so
that
brake
warn
ing
light
comes
on
when
ratchet
at
hand
brake
lever
is
moved
back
one
notch
and
goes
out
when
returned
to
its
original
position
BLEEDING
HYDRAULIC
SYSTEM
Hydraulic
brake
system
must
be
bled
whenever
any
line
has
been
dis
connected
or
air
has
in
some
way
entered
system
Spongy
pedal
action
is
an
indica
tion
that
air
has
entered
brake
system
Bleeding
hydraulic
system
deserves
much
attention
as
it
is
an
essential
element
in
regular
brake
servicing
Clean
all
dirt
around
master
cyl
inder
reservoir
remove
reservoir
cap
and
top
up
reservoir
with
recommend
edbrake
fluid
Note
Do
not
mix
two
different
brand
oils
2
Thoroughly
clean
mud
or
dust
from
bleeder
valve
so
that
outlet
hole
is
free
from
foreign
particles
Install
a
bleeder
hose
on
bleeder
valve
Page 367 of 548

Relationship
between
oil
pressure
and
pedal
operating
force
is
illustrated
in
Fig
BR
29
If
test
results
are
not
as
specified
in
Fig
BR
29
check
brake
booster
for
condition
in
manner
des
cribed
under
Inspection
before
re
moval
of
this
unit
REMOVAL
M60
120
1
710
AA
I
1
1
110
1
560
1
v
e
100
1
420
I
90
1
280
I
1
1
80
1
140
I
Z
I
t
70
1
000
i
60
850
I
o
50
710
d
40
570
g
i
gl
j
ll
10
140
J
0
1
0
2
0
221
441
Rod
operating
force
kg
lb
Brake
System
Also
check
brake
line
for
evidence
of
fluid
leakage
Note
Detennine
whether
source
of
problem
is
in
brake
booster
or
check
valve
Before
you
reach
a
fmal
conclusion
always
inspect
check
valve
first
o
10
20
30
40
50
22
44
66
88
110
Pedal
operating
force
kg
lb
BA121A
Fig
BR
29
Performance
Diagram
of
Brake
Booster
Remo
parts
in
numerical
order
enumerated
BR593
ti
J
Fig
BR
30
Procedures
for
Removing
Brake
Booster
ADJUSTMENT
I
Adjust
the
length
of
push
rod
to
the
value
indicated
below
Length
ad
justment
of
push
rod
is
made
at
the
tip
of
push
rod
Length
A
9
75
to
10
00
mm
0
3839
to
0
3937
in
j
f
Irl
I
l
if
L
J
BA290
Fig
BR
31
Length
A
BR
13
BR288
Fig
BR
32
Adjusting
Push
Rod
Length
2
Install
clevis
Adjust
length
of
operating
rod
to
specified
value
length
B
135
mm
5
31
in
c
f
lIJ
t
t
B
BR947
Fig
BR
33
Length
B
INSTALLATION
Install
in
the
reverse
sequence
of
removaJ
IiJ
Tightening
torque
Master
cylinder
to
brake
booster
0
8
to
1
1
kg
m
5
8
to
8
0
ft
Ib
Brake
booster
to
body
0
8
to
1
1
kg
m
5
8
to
8
0
ft
lbl
Note
After
brake
boOster
is
properly
installed
in
car
conduct
an
air
tight
and
op
rational
tests
as
previously
described
Page 370 of 548
Brake
System
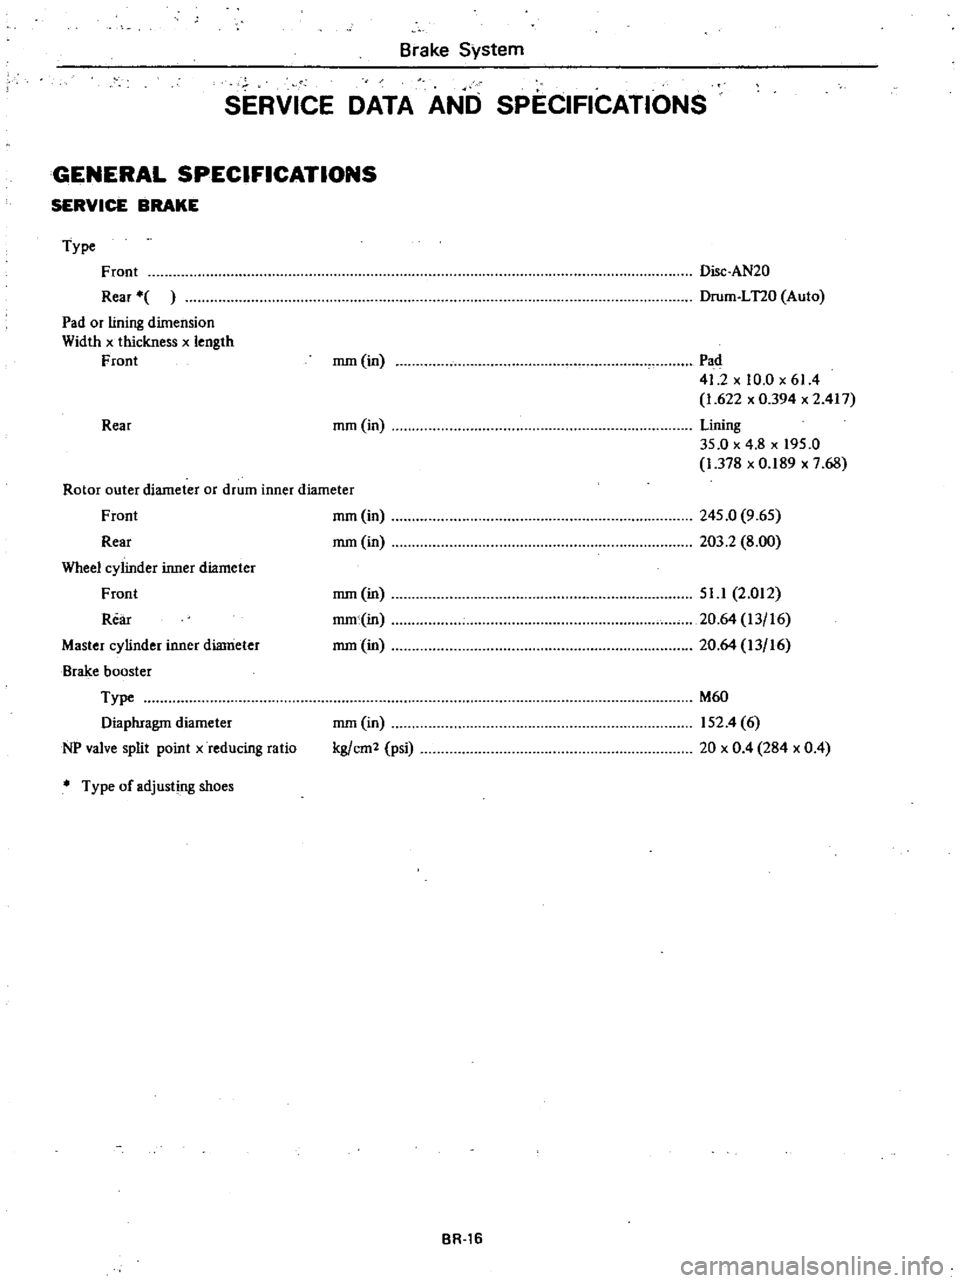
SERVICE
DATA
AND
SPECIFICATIONS
GENERAL
SPECIFICATIONS
SERVICE
BRAKE
Type
Front
Rear
Pad
or
lining
dimension
Width
x
thickness
x
length
Front
Rear
Disc
AN20
Drum
LT20
Auto
rnm
in
Pad
41
2
x
10
0
x
61
4
1
622
x
0394
x
2
417
Lining
35
0
x
4
8
x
195
0
1
378
x
0
189
x
7
68
mm
in
Rotor
outer
diameter
or
drum
inner
diameter
Front
Rear
Wheel
cylinder
inner
diameter
Front
Rear
Master
cylinder
inner
diameter
Brake
booster
Type
Diaphragm
diameter
NP
valve
split
point
x
reducing
ratio
Type
of
adjusting
shoes
rnm
in
rnm
in
245
0
9
65
203
2
8
00
rnm
in
mm
in
rnm
in
51
1
2
012
20
64
13
16
20
64
13
16
mm
in
kg
cm
2
psi
M60
152
4
6
20
x
0
4
284
x
0
4
BR
16
Page 371 of 548
Brake
System
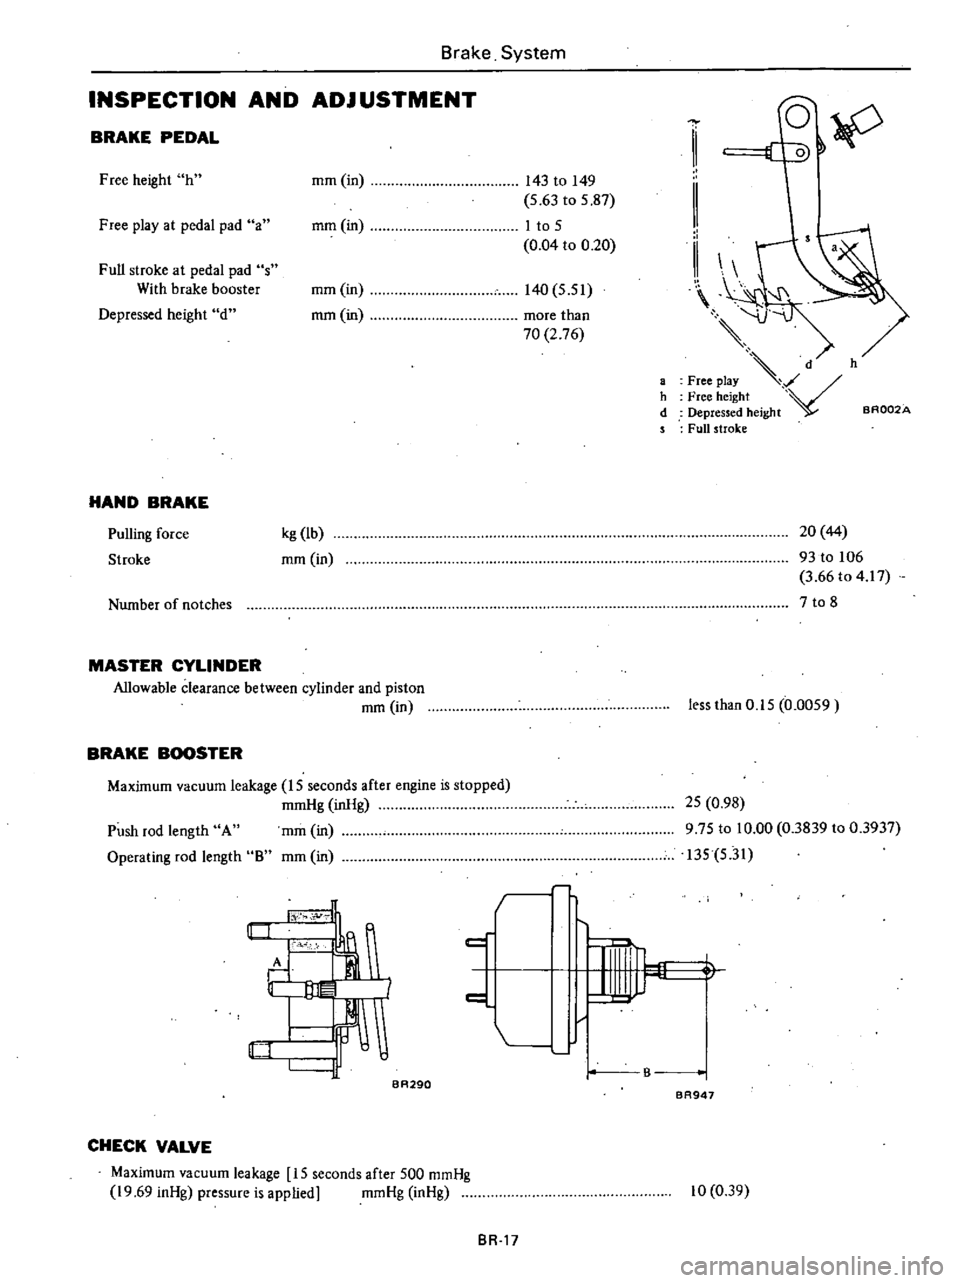
INSPECTION
AND
ADJ
USTMENT
BRAKE
PEDAL
Free
height
h
mm
in
143
to
149
5
63
to
5
87
Free
play
at
pedal
pad
a
mm
in
I
to
5
0
04
to
0
20
Full
stroke
at
pedal
pad
s
With
brake
booster
mm
in
140
5
51
Depressed
height
d
mm
in
more
than
70
2
76
HAND
BRAKE
Pulling
force
Stroke
kg
lb
mm
in
Number
of
notches
MASTER
CYLINDER
Allowable
clearance
between
cylinder
and
piston
mm
in
BRAKE
BOOSTER
Maximum
vacuum
leakage
15
seconds
after
engine
is
stopped
mmHg
inHg
mm
in
mm
in
Push
rod
length
A
Operating
rod
length
8
I
c
tY
1I1
fF
I
BA290
d
IF
CHECK
VALVE
Maximum
vacuum
leakage
15
seconds
after
500
mmHg
19
69
inHg
pressure
is
applied
mmHg
inHg
BR
17
h
d
1
II
II
d
h
Free
play
V
Free
height
Depressed
height
aR002A
Full
stroke
20
44
93
to
106
3
66
to
4
17
7
to
8
less
than
0
15
0
0059
25
0
98
975
to
10
00
0
3839
to
0
3937
135
5
31
1
B
BR947
10
0
39
Page 388 of 548
Inspection
I
When
steering
wheel
can
not
be
rotated
smoothly
but
steering
gear
steering
linkage
and
suspension
system
are
normal
check
the
steering
system
for
the
following
matters
and
replace
faulty
parts
I
Check
column
bearings
for
dam
age
or
unevenness
If
so
lubricate
with
recommended
multi
purpose
grease
or
replace
with
a
new
one
as
steering
column
assembly
2
Check
jacket
tube
for
deforma
tion
or
breakage
and
replace
if
neces
sary
3
Check
column
spring
and
re
place
if
damaged
or
weakened
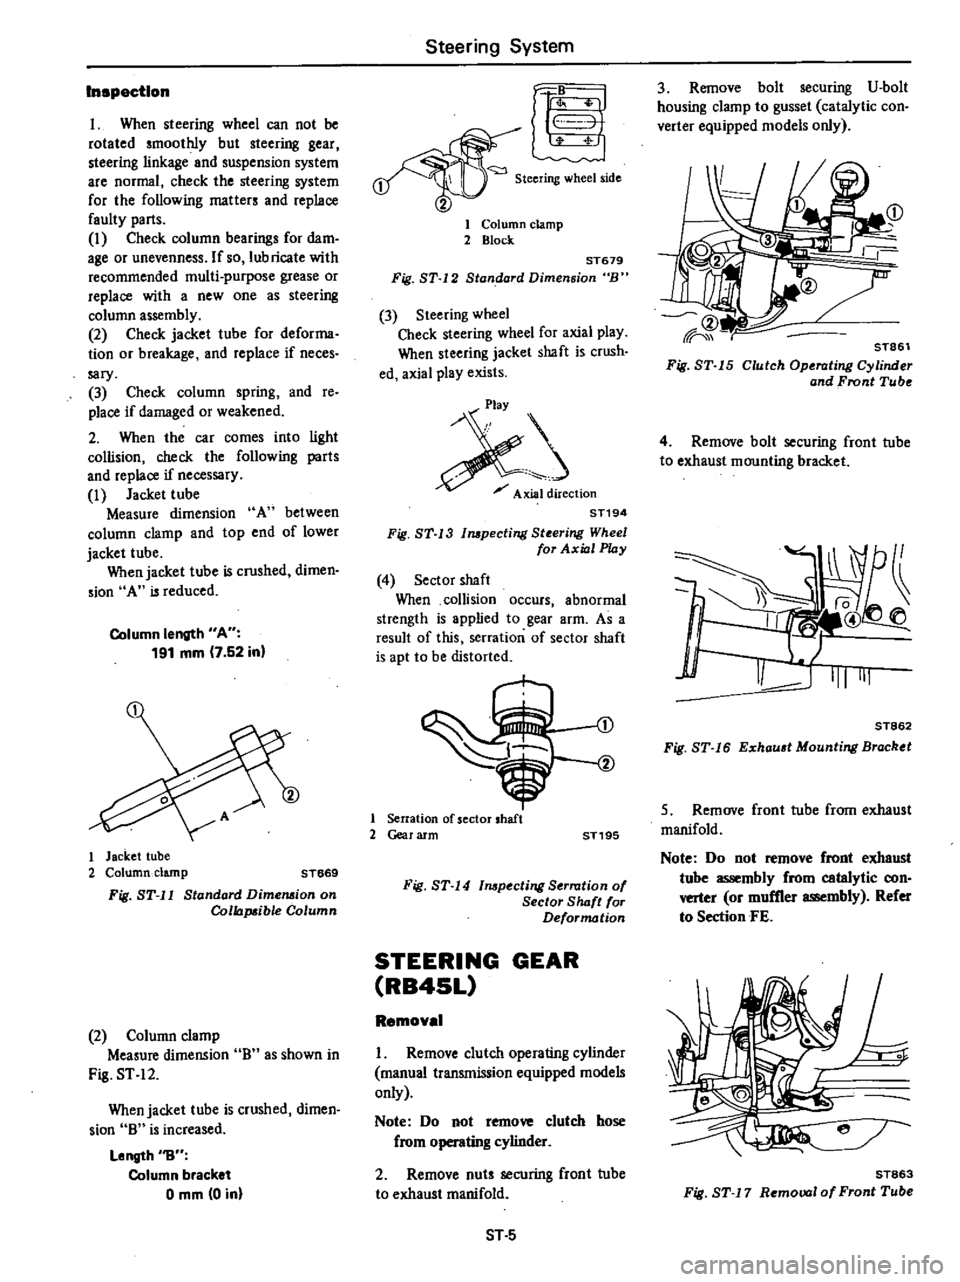
2
When
the
car
comes
into
light
collision
check
the
following
parts
and
replace
if
necessary
I
Jacket
tube
Measure
dimension
A
between
column
clamp
and
top
end
of
lower
jacket
tube
When
jacket
tube
is
crushed
dimen
sion
A
is
reduced
Column
length
A
191
mm
7
52
in
1
Jacket
tube
2
Column
clamp
ST669
Fig
ST
l1
Standard
Dimension
on
Collapsible
Column
2
Column
clamp
Measure
dimension
0
as
shown
in
Fig
ST
12
When
jacket
tube
is
crushed
dimen
sion
0
is
increased
Length
1J
Column
bracket
o
mm
0
in
Steering
System
r
1
Steering
wheel
side
1
Column
clamp
2
Block
ST679
Fig
ST
12
Standard
Dimension
B
3
Steering
wheel
Check
steering
wheel
for
axial
play
When
steering
jacket
shaft
is
crush
ed
axial
play
exists
j
Axial
direction
ST194
Fig
ST
13
mpecting
Steering
Wheel
for
Axial
Play
4
Sector
shaft
When
collision
occurs
abnormal
strength
is
applied
to
gear
arm
As
a
result
of
this
serration
of
sector
shaft
is
apt
to
be
distorted
1
Serration
of
sector
shaft
2
Gear
arm
ST195
Fig
ST
14
mpeeting
Serration
of
Sector
S
IuJft
for
Deformation
STEERING
GEAR
RB4SL
Removal
I
Remove
clutch
operating
cylinder
manual
transmission
equipped
models
only
Note
Do
not
remove
clutch
hose
from
8
cylinder
2
Remove
nuts
securing
front
tube
to
exhaust
manifold
ST
5
3
Remove
bolt
securing
V
bolt
housing
clamp
to
gusset
catalytic
con
verter
equipped
models
only
STa6l
Fig
ST
5
Clutch
Operating
Cylinder
and
Front
Tube
4
Remove
bolt
securing
front
tube
to
exhaust
mounting
bracket
1
Q
I
II
@
J
111111
ST862
Fig
ST
16
Exhau
t
Mounting
Bracktt
5
Remove
front
tube
from
exhaust
manifold
Note
Do
not
remove
front
exhaust
tube
assembly
from
catalytic
con
verter
or
muffler
assembly
Refer
to
Section
FE
ST863
Fig
ST
7
Removal
of
Front
Tube
Page 393 of 548
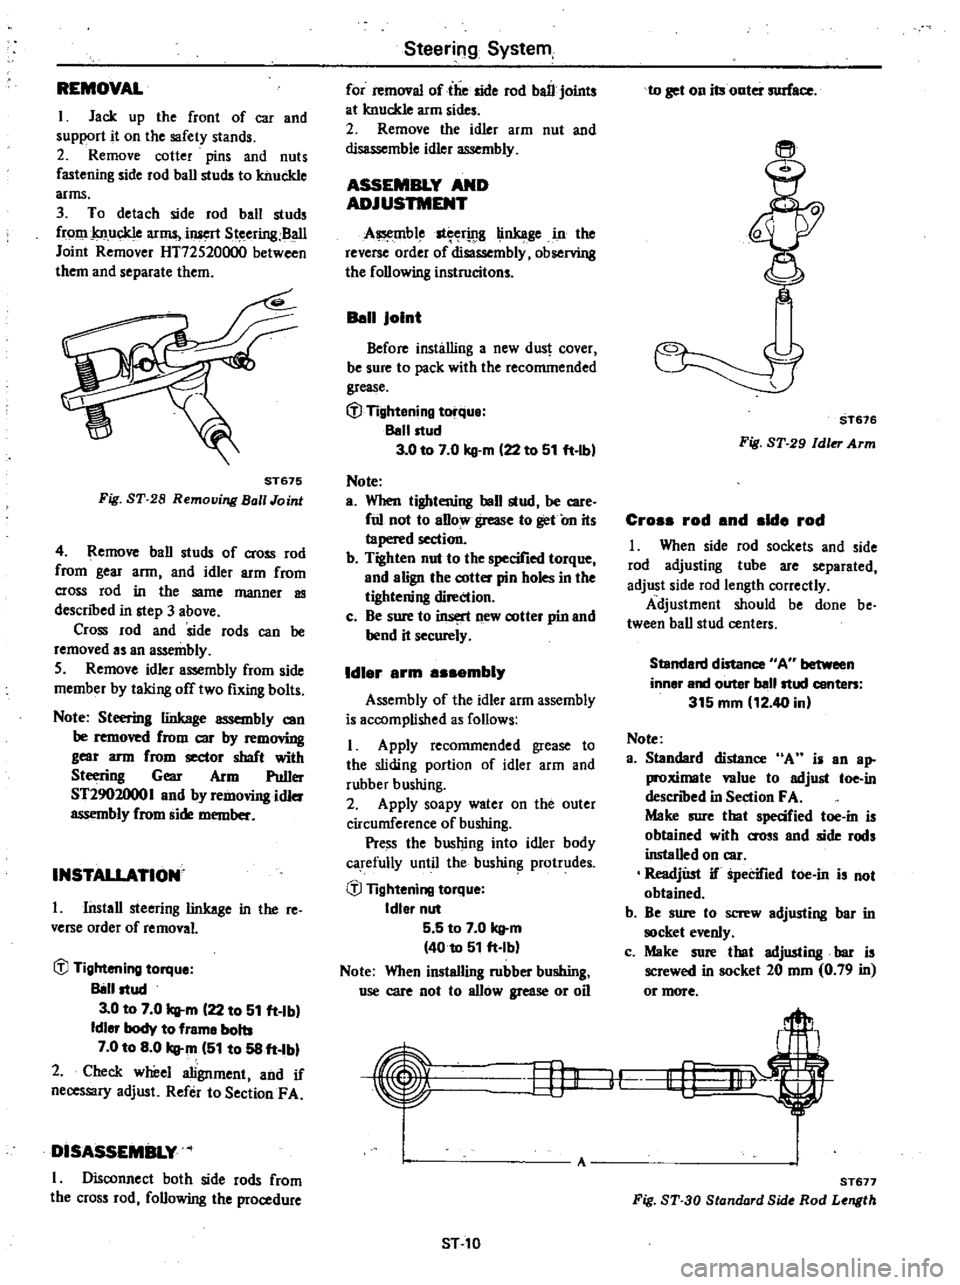
REMOVAL
I
Jack
up
the
front
of
car
and
support
it
on
the
safety
stands
2
Remove
cotter
pins
and
nuts
fastening
side
rod
ball
studs
to
knuckle
arms
3
To
detach
side
rod
ball
studs
from
knuckle
arms
iJuert
Steering
BaII
Joint
Remover
HT72520000
between
them
and
separate
them
ST675
Fig
ST
28
Remouing
Ball
Joint
4
Remove
ball
studs
of
cross
rod
from
gear
arm
and
idler
arm
from
cross
rod
in
the
same
manner
as
descnbed
in
step
3
above
Cross
rod
and
side
rods
can
be
removed
as
an
assembly
5
Remove
idler
assembly
from
side
member
by
taking
off
two
fixing
bolts
Note
Steering
linkage
assembly
can
be
removed
from
CIC
by
rem
mng
gear
arm
from
sector
shaft
with
Steering
Gear
Arm
Puller
ST2902000
I
and
by
removing
idler
assembly
from
side
member
INSTAllATION
I
Install
steering
linkage
in
the
re
verse
order
of
removal
iJJ
Tightening
torque
Il8l1ltud
3
0
to
7
0
q
m
122
to
51
ft
Ibl
Idler
body
to
frame
bolts
7
0
to
8
0
q
m
151
to
58
ft
Ibl
2
Check
wheel
alignment
and
if
necessary
adjust
Refer
to
SectionF
A
DISASSEMBLY
I
Disconnect
both
side
rods
from
the
cross
rod
following
the
procedure
Steering
System
for
removal
of
the
side
rod
ball
joints
at
knuckle
arm
sides
2
Remove
the
idler
arm
nut
and
disassemble
idler
assembly
ASSEMBLY
AND
ADJUSTMENT
A
mble
st
rwg
linkage
in
the
reverse
order
of
disassembly
observing
the
following
instrucitons
Ban
Joint
Before
installing
a
new
dus
cover
be
sure
to
pack
with
the
recommended
grease
t
J
Tightening
torque
Ballltud
3
0
to
7
0
kg
m
122
to
51
ft
lbl
Note
a
When
tightening
ball
stud
be
care
ful
not
to
aBow
grease
to
get
On
its
tapered
section
b
Tighten
nut
to
the
specified
torque
and
align
the
cotter
pin
holes
in
the
tightening
direction
c
Be
sure
to
insert
new
cotter
pin
and
bend
it
securely
Idl
r
rm
mbl
Assembly
of
the
idler
arm
assembly
is
accomplished
as
follows
I
Apply
recommended
grease
to
the
sliding
portion
of
idler
arm
and
rubber
bushing
2
Apply
soapy
water
on
the
outer
circumference
of
bushing
Pre
ss
the
bushing
into
idler
body
carefully
until
the
bushin
protrudes
iJJ
Tightening
torque
Idler
nut
5
5
to
7
0
q
m
4010
51
ft
Ib
Note
When
installing
rubber
bushing
use
care
not
to
allow
grease
or
oil
Hj1
ST
10
to
get
on
its
onter
surface
ST676
Fig
ST
29
Idler
Arm
Cro
rod
nd
Id
rod
I
When
side
rod
sockets
and
side
rod
adjusting
tube
are
separated
adjust
side
rod
length
correctly
Adjustment
should
be
done
be
tween
ball
stud
centers
Standard
distance
AU
between
inner
and
outer
ballltud
conte
315
mm
12
40
in
Note
a
Standard
distance
A
i
an
ap
proximale
value
to
adjust
toe
in
descnbed
in
Section
FA
Maire
sure
tbat
specified
toe
in
is
obtained
with
O
OSs
and
side
rods
installed
on
car
ReadjUst
if
Specified
toe
in
is
not
obtained
b
Be
sure
to
screw
adjusting
bar
in
clret
evenly
c
Make
sure
that
adjusting
bar
is
screwed
in
socket
20
mm
0
79
in
or
more
I
lf
A
ST
77
Fig
ST
30
Standard
Side
Rod
Length
Page 396 of 548
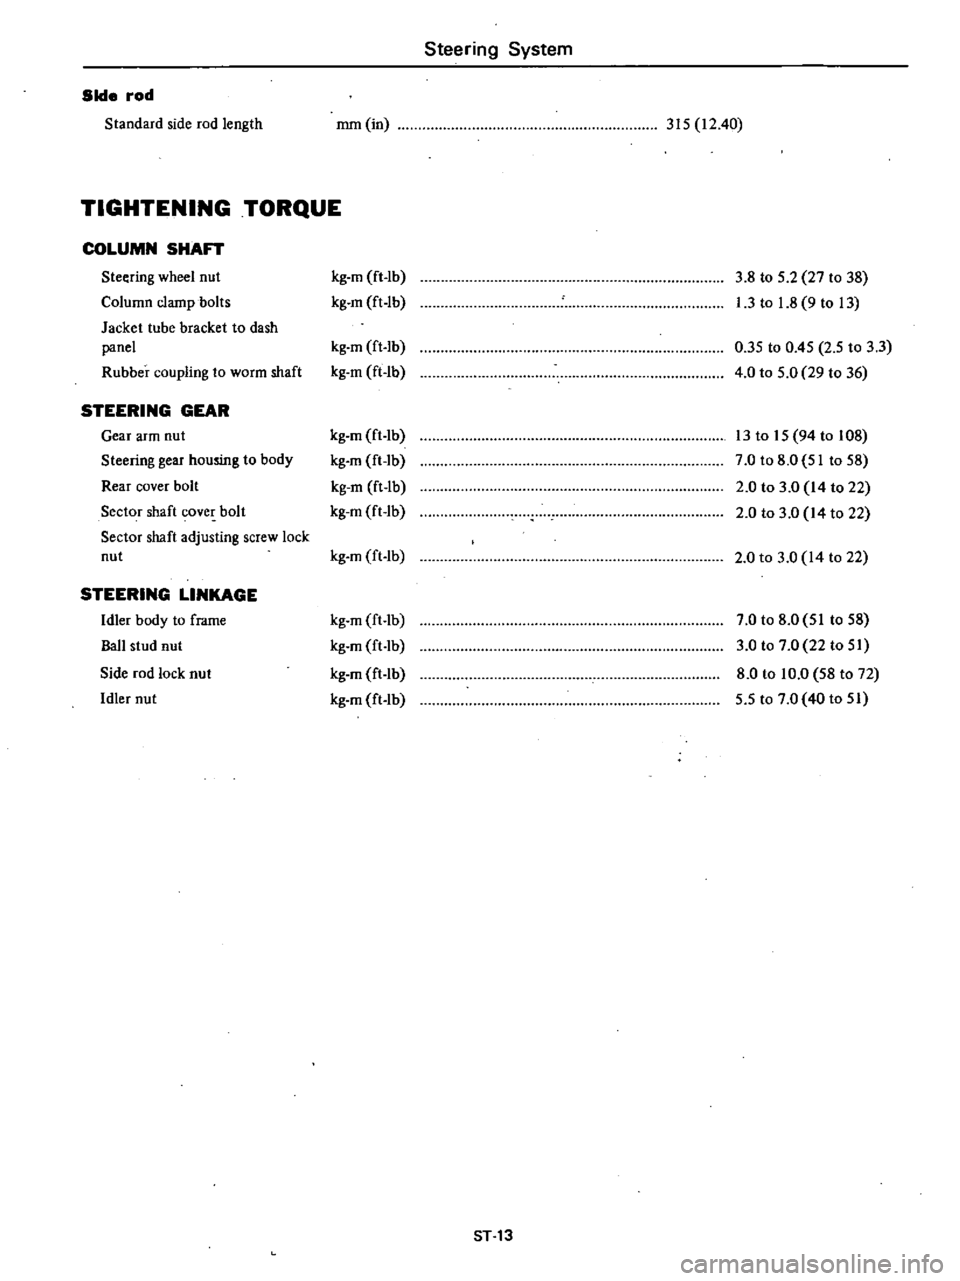
Steering
System
Side
rod
Standard
side
rod
length
mm
in
315
12
40
TIGHTENING
TORQUE
COLUMN
SHAFT
Steering
wheel
nut
kg
m
ft
lb
3
8
to
5
2
27
to
38
Column
clamp
bolts
kg
m
ft
lb
I
3
to
1
8
9
to
13
Jacket
tube
bracket
to
dash
panel
kg
m
ft
lb
0
35
to
0
45
2
5
to
3
3
Rubber
coupling
to
worm
shaft
kg
m
ft
lb
4
0
to
5
0
29
to
36
STEERING
GEAR
Gear
arm
nut
kg
m
ft
lb
13
to
15
94
to
108
Steering
gear
housing
to
body
kg
m
ft
lb
7
0
to
8
0
51
to
58
Rear
cover
bolt
kg
m
ft
lb
2
0
to
3
0
14
to
22
Sector
shaft
cover
bolt
kg
m
ft
lb
2
0
to
3
0
14
to
22
Sector
shaft
adjusting
screw
lock
nut
kg
m
ft
lb
2
0
to
3
0
14
to
22
STEERING
LINKAGE
Idler
body
to
frame
kg
m
ft
lb
7
0
to
8
0
51
to
58
Ball
stud
nut
kg
m
ft
lb
3
0
to
7
0
22
to
51
Side
rod
lock
nut
kg
m
ft
lb
8
0
to
10
0
58
to
72
Idler
nut
kg
m
ft
lb
5
5
to
7
0
40
to
51
ST
13
Page 419 of 548

Body
2
Length
of
shock
absorber
Front
shock
absorber
I
164
6
46
q
j
0
I
0
0
67
2
64
Rear
shock
absorber
G
riA
l
yll
L
J
J
Unit
mm
in
3
Checking
shock
absorber
I
Place
car
in
front
of
a
wall
Apply
hand
brake
and
place
wheel
chocks
securely
2
Place
a
jack
between
wall
and
extend
jack
approximately
20
mm
0
79
in
The
bumper
should
move
approxilnately
50
mm
I
97
in
back
ward
through
shock
absorber
opera
tion
See
Fig
BF
IO
Note
Use
a
jack
with
y
of
more
than
600
kg
I
3231b
94
3
70
rL
I
i
r
T
l
f
L
W
67
2
64
1
8F742B
Fig
BF
9
Length
of
Shock
Absorber
3
Make
sure
bumper
returns
to
its
original
position
when
jack
is
re
tracted
Note
When
replacing
shock
absorb
ers
make
Sure
they
are
of
the
same
type
and
rating
and
manufactured
by
the
same
maker
4
For
rear
bumper
utilize
the
same
procedures
as
described
for
front
bumper
f
BF7438
1
Front
bumper
2
Jack
3
Wheel
chock
Fig
BF
10
Checking
Shock
Abaorber
Function
BF
8
FRONT
BUMPER
REMOVAL
AND
INSTALLATION
1
Loosen
bolts
attaching
front
bumper
to
shock
absorbers
and
re
move
bumper
See
Fig
BF
5
2
Loosen
bolts
attaching
shock
ab
sorbers
to
radia
tor
core
support
and
side
members
and
remove
shock
absorbers
3
Install
shock
absorbers
and
front
bumper
in
reverse
order
of
removal
and
adjust
bumper
height
as
shown
in
Fig
BF
7
fj
Tightening
torque
Front
bumper
Bumper
to
shock
absorber
attaching
bolt
6
0
to
8
0
kg
m
43
to
58
ft
Ib
Shock
absorber
to
body
attaching
bolt
and
nut
front
0
93
to
1
2
kg
m
6
7
to
B
7
ft
Ibl
attaching
bolt
and
nut
sida
1
9
to
2
5
kg
m
14
to
18
ft
b
REAR
BUMPER
REMOVAL
AND
INSTALLATION
1
Loosen
bolts
attaching
rear
bumper
to
shock
absorbers
and
re
move
rear
bumper
See
Fig
BF
6
2
Loosen
bolts
and
nuts
attaching
shock
absorbers
to
side
members
and
remove
shock
absorbers
3
Install
shock
absorbers
an
rear
bumper
in
reverse
order
of
removal
and
adjust
rear
bumper
height
as
shown
in
Fig
BF
B
fj
Tightening
torque
Rear
bumper
Bumper
to
shock
absorber
attaching
bolt
rear
6
0
to
8
0
kg
m
43
to
58
ft
b
Shock
absorber
to
body
attaching
bolt
and
nut
rear
0
93
to
1
2
kg
m
6
7
to
8
7
ft
b
attaching
bolt
and
nut
side
6
0
to
BoO
kg
m
43
to
58
ft
b
Page 499 of 548
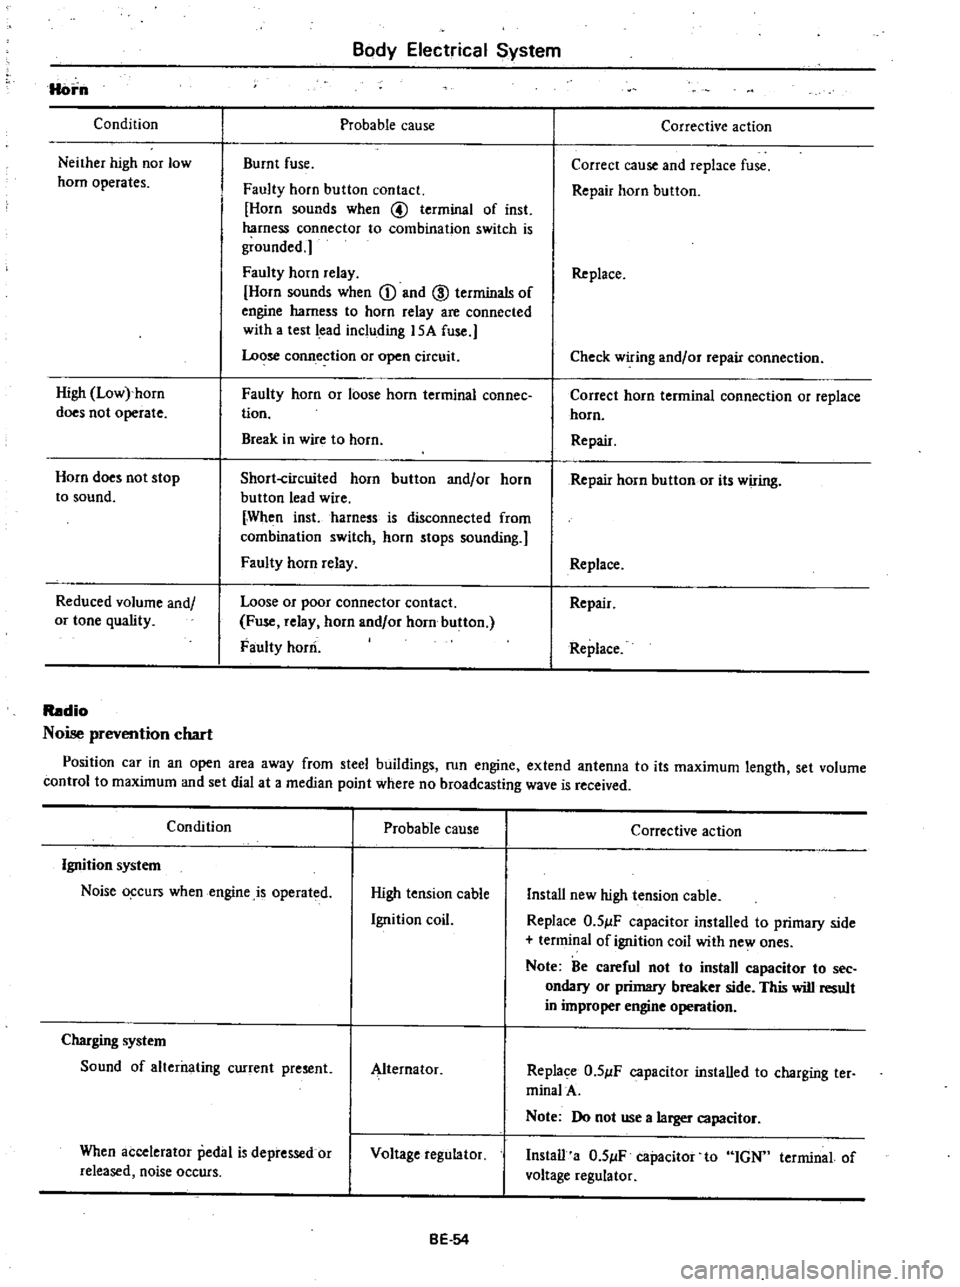
Horn
Condition
Neither
high
nor
low
horn
operates
High
Low
horn
does
not
operate
Horn
does
not
stop
to
sound
Reduced
volume
and
or
tone
quality
Body
Electrical
System
Probable
cause
Burnt
fuse
Faulty
horn
button
contact
Horn
sounds
when
@
terminal
of
inst
harness
connector
to
combination
switch
is
grounded
Faulty
horn
relay
Horn
sounds
when
CD
and
ID
terminals
of
engine
harness
to
horn
relay
are
connected
with
a
test
lead
including
15A
fuse
Lo
se
conn
ection
or
open
circuit
Faulty
horn
or
loose
horn
terminal
connee
tion
Break
in
wire
to
horn
Short
circuited
horn
button
and
or
horn
button
lead
wire
When
inst
harness
is
disconnected
from
combination
switch
horn
stops
sounding
Faulty
horn
relay
Loose
or
poor
connector
contact
Fuse
relay
horn
and
or
horn
button
Faulty
horn
Corrective
action
Correct
cause
and
repbce
fuse
Repair
horn
button
Replace
Check
wiring
and
or
repair
connection
Correct
horn
terminal
connection
or
replace
horn
Repair
Repair
horn
button
or
its
wiring
Replace
Repair
Replace
Radio
Noise
prevention
chart
Position
car
in
an
open
area
away
from
steel
buildings
run
engine
extend
antenna
to
its
maximum
length
set
volume
control
to
maximum
and
set
dial
at
a
median
point
where
no
broadcasting
wave
is
received
Condition
Probable
cause
Ignition
system
Noise
o
curs
when
engine
is
operated
High
tension
cable
Ignition
coil
Charging
system
Sound
of
alterilating
current
present
Alternator
When
accelerator
pedal
is
depressed
or
released
noise
occurs
Voltage
regulator
BE
54
Corrective
action
Install
new
high
tension
cable
Replace
O
5
lF
capacitor
installed
to
primary
side
terminal
of
ignition
coil
with
ne
ones
Note
Be
careful
not
to
install
capacitor
to
see
ondary
or
primary
breaker
side
This
will
result
in
improper
engine
operation
Replace
O
5
lF
capacitor
installed
to
charging
ter
minalA
Note
Do
not
use
a
larger
capacitor
Install
a
O
5
lF
capacitor
to
IGN
terminal
of
voltage
regulator