Operating cylinder DATSUN 210 1979 Owner's Manual
[x] Cancel search | Manufacturer: DATSUN, Model Year: 1979, Model line: 210, Model: DATSUN 210 1979Pages: 548, PDF Size: 28.66 MB
Page 372 of 548

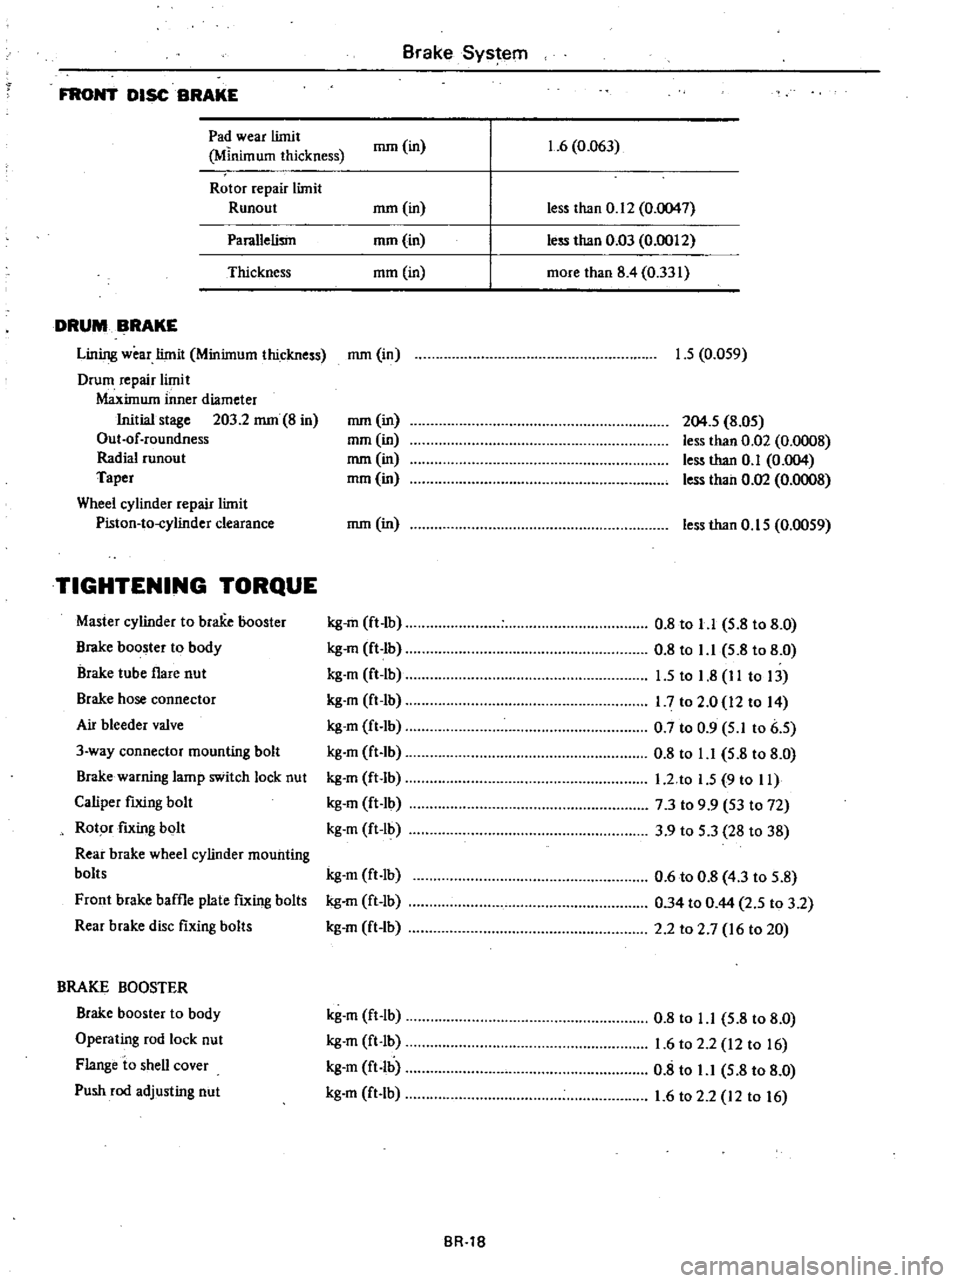
FRONT
DISC
BRAKE
Pad
wear
limit
Minim
urn
thickness
Rotor
repair
limit
Runout
Parallelism
Thickness
DRUM
BRAKE
Lining
wear
limit
Minimum
thickness
Drum
repair
limit
Maximum
inner
diameter
Initial
stage
203
2
nun
8
in
Out
of
roundness
Radial
cunout
Taper
Wheel
cylinder
repair
limit
Piston
to
cylinder
clearance
TIGHTENING
TORQUE
Master
cylinder
to
brake
booster
Brake
booster
to
body
Brake
tube
flare
nut
Brake
hose
connector
Air
bleeder
valve
3
way
connector
mounting
bolt
Brake
warning
lamp
switch
lock
nut
Caliper
fixing
bolt
Rotor
fixing
bolt
Rear
brake
wheel
cylinder
mounting
bolts
Front
brake
baffle
plate
fixing
bolts
Rear
brake
disc
fixing
bolts
BRAKE
BOOSTER
Brake
booster
to
body
Operating
rod
lock
nut
Flange
io
shell
cover
Push
rod
adjusting
nut
nun
in
nun
in
nun
in
mm
in
nun
in
nun
in
mm
in
nun
in
mm
in
nun
in
kg
m
ft
lb
kg
m
ft
lb
kg
m
ft
Ib
kg
m
ft
lb
kg
m
ft
Ib
kg
m
ft
lb
kg
m
ft
Ib
kg
m
ft
lb
kg
m
ft
Ib
kg
m
ft
lb
kg
m
ft
Ib
kg
m
ft
Ib
kg
m
ft
lb
kg
m
ft
lb
kg
m
ft
lb
kg
m
ft
lb
Brake
System
BR
1B
1
6
0
063
less
than
0
12
0
0047
less
than
0
03
0
0012
more
than
8
4
0
331
1
5
0
059
204
5
8
05
less
than
0
02
0
0008
less
than
0
1
0
004
less
than
0
02
0
0008
less
than
0
15
0
0059
0
8
to
1
1
5
8
to
8
0
0
8
to
1
1
5
8
to
8
0
1
5
to
1
8
II
to
13
1
7
to
2
0
12
to
14
0
7
to
0
9
5
1
to
6
5
0
8
to
1
1
5
8
to
8
0
l
2
to
1
5
9
to
II
7
3
to
9
9
53
to
72
3
9
to
5
3
28
to
38
0
6
to
0
8
4
3
to
5
8
0
34
to
0
44
2
5
to
3
2
2
2
to
2
7
16
to
20
0
8
to
1
1
5
8
to
8
0
1
6
to
2
2
12
to
16
0
8
to
1
1
5
8
to
8
0
1
6
to
2
2
12
to
16
Page 388 of 548

Inspection
I
When
steering
wheel
can
not
be
rotated
smoothly
but
steering
gear
steering
linkage
and
suspension
system
are
normal
check
the
steering
system
for
the
following
matters
and
replace
faulty
parts
I
Check
column
bearings
for
dam
age
or
unevenness
If
so
lubricate
with
recommended
multi
purpose
grease
or
replace
with
a
new
one
as
steering
column
assembly
2
Check
jacket
tube
for
deforma
tion
or
breakage
and
replace
if
neces
sary
3
Check
column
spring
and
re
place
if
damaged
or
weakened
2
When
the
car
comes
into
light
collision
check
the
following
parts
and
replace
if
necessary
I
Jacket
tube
Measure
dimension
A
between
column
clamp
and
top
end
of
lower
jacket
tube
When
jacket
tube
is
crushed
dimen
sion
A
is
reduced
Column
length
A
191
mm
7
52
in
1
Jacket
tube
2
Column
clamp
ST669
Fig
ST
l1
Standard
Dimension
on
Collapsible
Column
2
Column
clamp
Measure
dimension
0
as
shown
in
Fig
ST
12
When
jacket
tube
is
crushed
dimen
sion
0
is
increased
Length
1J
Column
bracket
o
mm
0
in
Steering
System
r
1
Steering
wheel
side
1
Column
clamp
2
Block
ST679
Fig
ST
12
Standard
Dimension
B
3
Steering
wheel
Check
steering
wheel
for
axial
play
When
steering
jacket
shaft
is
crush
ed
axial
play
exists
j
Axial
direction
ST194
Fig
ST
13
mpecting
Steering
Wheel
for
Axial
Play
4
Sector
shaft
When
collision
occurs
abnormal
strength
is
applied
to
gear
arm
As
a
result
of
this
serration
of
sector
shaft
is
apt
to
be
distorted
1
Serration
of
sector
shaft
2
Gear
arm
ST195
Fig
ST
14
mpeeting
Serration
of
Sector
S
IuJft
for
Deformation
STEERING
GEAR
RB4SL
Removal
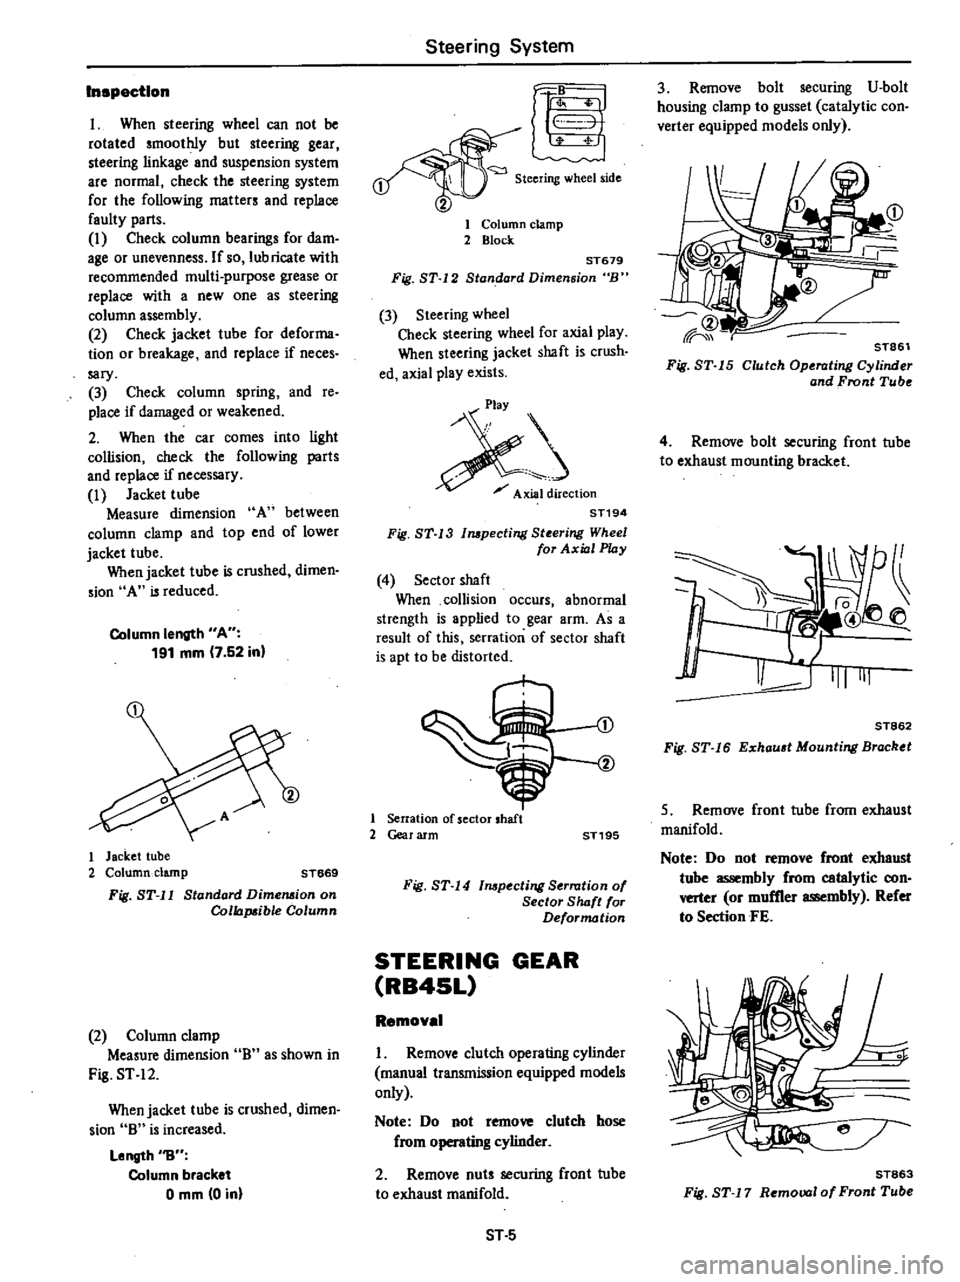
I
Remove
clutch
operating
cylinder
manual
transmission
equipped
models
only
Note
Do
not
remove
clutch
hose
from
8
cylinder
2
Remove
nuts
securing
front
tube
to
exhaust
manifold
ST
5
3
Remove
bolt
securing
V
bolt
housing
clamp
to
gusset
catalytic
con
verter
equipped
models
only
STa6l
Fig
ST
5
Clutch
Operating
Cylinder
and
Front
Tube
4
Remove
bolt
securing
front
tube
to
exhaust
mounting
bracket
1
Q
I
II
@
J
111111
ST862
Fig
ST
16
Exhau
t
Mounting
Bracktt
5
Remove
front
tube
from
exhaust
manifold
Note
Do
not
remove
front
exhaust
tube
assembly
from
catalytic
con
verter
or
muffler
assembly
Refer
to
Section
FE
ST863
Fig
ST
7
Removal
of
Front
Tube