ESP DATSUN 210 1979 Service Manual
[x] Cancel search | Manufacturer: DATSUN, Model Year: 1979, Model line: 210, Model: DATSUN 210 1979Pages: 548, PDF Size: 28.66 MB
Page 4 of 548
FO
REWO
RD
TJili
service
manual
has
been
prepared
for
the
purpose
of
assisting
service
personnel
of
authorized
NISSAN
DATSUN
dealerS
in
providing
effective
service
and
maintenance
of
the
1979
DATSU
II210
Since
proper
maintenance
and
service
are
absolutely
essential
in
satisfying
the
DATSUN
owners
this
manu31
should
be
kept
in
a
handy
place
for
ready
reference
and
should
be
carefully
studied
t
This
manual
includes
procedures
for
maintenance
adjustments
minor
service
operations
removal
and
instaUation
and
for
rli
mblyand
assembly
of
components
Some
of
these
service
opemtions
require
the
of
Special
Tools
especially
designed
for
effective
performance
of
service
operations
The
special
tools
are
presented
at
the
end
of
each
section
As
you
read
through
the
l
lIintenance
procedures
inthis
service
m3
lual
y
lu
w
ll
occasionally
come
across
paragraphs
headed
NOTE
CAUTION
or
WARNING
A
NOTE
is
supplemental
information
that
is
important
to
a
particular
procedure
CAUTION
and
WARNING
warn
of
steps
that
must
be
fonowed
to
prevent
damage
to
some
part
of
the
car
and
or
personal
injury
The
Quick
Reference
Index
on
the
first
page
enables
the
user
to
quickly
locate
the
desired
section
At
the
beginning
of
each
individual
section
is
a
table
of
contents
which
gives
the
page
mimber
on
which
each
major
subject
begins
An
information
illustrations
and
specifications
contained
in
this
manual
are
based
on
the
latest
product
information
available
at
the
time
of
publication
approval
If
your
DATSUN
model
differs
from
the
specificationS
contained
in
this
manual
consult
your
NISSAN
DA
TSUN
dealer
for
information
Rights
for
alteration
at
any
time
of
specifications
and
methods
are
reserved
liability
for
any
personal
injury
or
property
damage
occasioned
by
the
use
of
this
service
manual
in
effecting
maintenance
or
repair
of
Y
1
r
DATSUN
is
in
no
way
assumed
by
Nissan
Motor
Co
td
Accordingly
anyone
using
a
service
procedure
or
tool
which
is
not
specifically
recommended
by
NISSAN
must
first
completely
satisfy
himself
that
neither
his
safety
nor
the
car
s
safety
will
be
jeopaiiliiedby
the
service
method
selected
NISSAN
MOTOR
Co
lTD
17
1
G11ZlI6
chomo
chuD
kil
TokyO
l04
J
n
@
1978
N1SSAN
MOTOR
CO
LTD
Printed
in
Japan
Not
to
be
reproduced
in
whole
or
in
part
without
the
prior
writtenpermisUon
of
Nissan
Motor
Company
Ltd
Tokyo
Japan
Page 20 of 548
SO
B
T
D
C
l650
rpm
Non
California
models
except
Canada
100
B
T
D
C
650
rpm
Canada
models
Note
On
FU
models
ignition
timing
is
set
under
a
condition
where
distributor
vacuum
hose
is
discon
nected
If
necessary
adjust
ignition
timing
as
follows
I
Loosen
set
screw
until
dis
tributor
c
uJ
be
moved
by
hand
2
Adjust
ignition
timing
to
speci
fications
3
Lock
distributor
set
screw
and
make
sure
that
timing
is
correct
YJ
Fig
T
9
Adjusting
Ignition
Timing
7
On
FU
models
proceed
as
fol
lows
I
Remove
blind
plug
from
dis
tributor
vacuum
hose
and
connect
hose
to
distributor
diaphragm
2
If
engine
speed
varies
in
this
state
set
idling
speed
at
specified
value
with
throttle
adjusting
screw
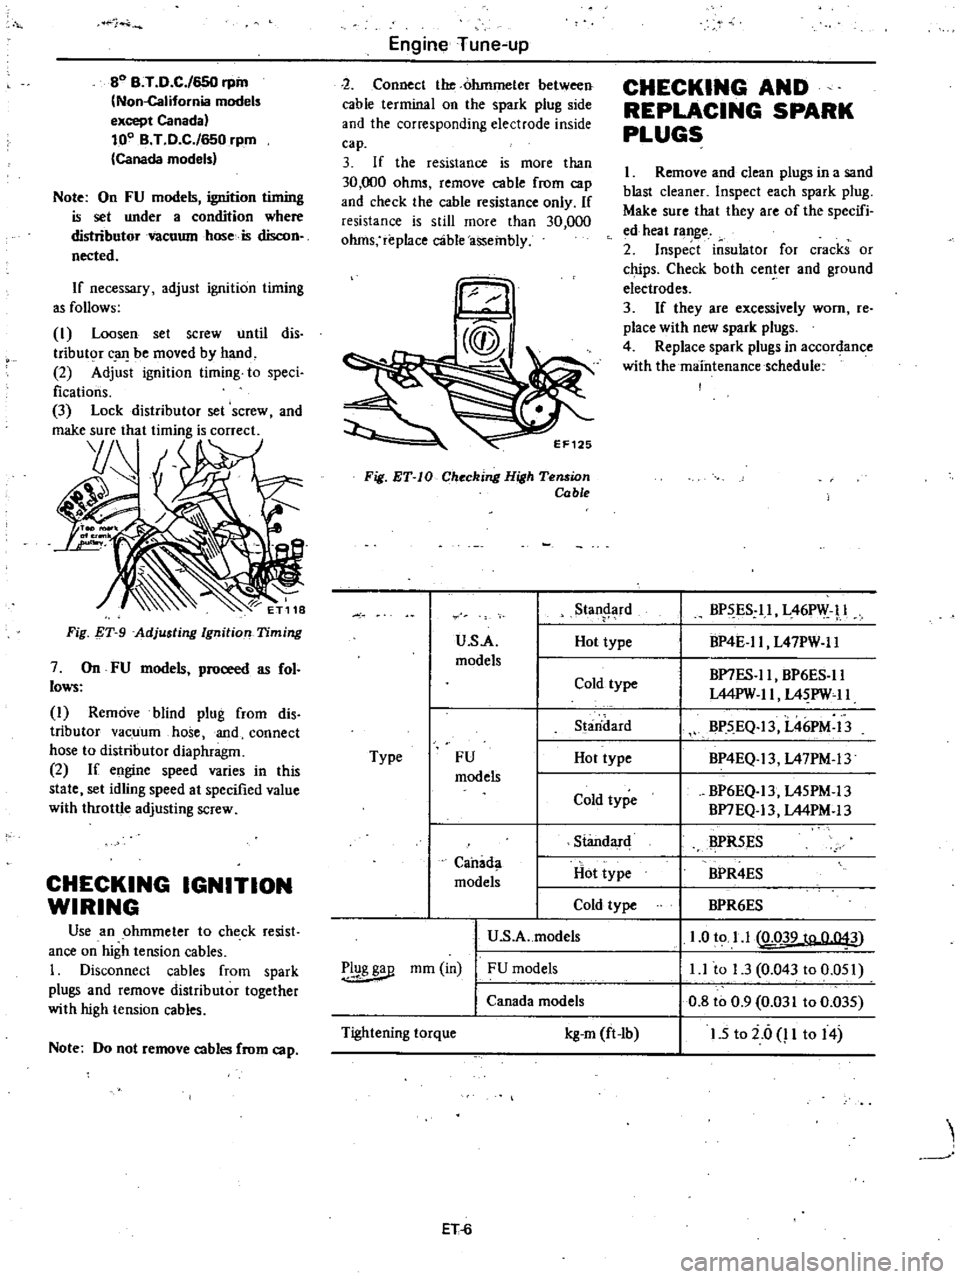
CHECKING
IGNITION
WIRING
Use
an
ohmmeter
to
check
resist
ance
on
high
tension
cables
1
Disconnect
cables
from
spark
plugs
and
remove
distributor
together
with
high
tension
cables
Note
Do
not
remove
cables
from
cap
Engine
Tune
up
2
Connect
the
ohmmeter
between
cable
terminal
on
the
spark
plug
side
and
the
corresponding
electrode
inside
cap
3
If
the
resistance
is
more
than
30
000
ohms
remove
cable
from
cap
and
check
the
cable
resistance
only
If
resistance
is
still
more
than
30
000
ohms
replace
c3ble
assembly
Fig
ET
IO
Checking
High
Tension
Cable
u
s
A
models
Type
FU
models
Standard
Hot
type
Cold
type
U
S
A
models
Canada
models
r
1g
mm
in
FU
models
Canada
models
Tightening
torque
kg
m
ft
lb
ET
6
Stan
rd
Hot
type
Cold
type
S
aridard
Hot
type
Cold
type
CHECKING
AND
REPLACING
SPARK
PLUGS
I
Remove
and
clean
plugs
in
a
sand
blast
cleaner
Inspect
each
spark
plug
Make
sure
that
they
are
of
the
specifi
ed
heat
range
2
Inspect
insulator
for
cracks
or
chips
Check
both
center
and
ground
electrodes
3
If
they
are
excessively
worn
re
place
with
new
spark
plugs
4
Replace
spark
plugs
in
accordance
with
the
maintenance
schedule
BP
ES
ll
L46PW
l
BP4E
ll
L47PW
ll
BP7ES
ll
BP6ES
ll
L44PW
II
L4
PW
11
BP5
EQ
13
L46PM
13
BP4EQ
13
L47PM
13
BP6EQ
13
L45PM
13
BP7EQ
13
L44PM
13
BPR5ES
BPR4ES
BPR6ES
1
0
to
1
1
LQ39
to
0
043
l
l
to
1
3
0
043
to
0
051
0
8
to
0
9
0
031
to
0
035
1
5
to
i
6
P
to
14
Page 21 of 548
CHECKING
AND
ADJUSTING
CARBURETOR
IDLE
RPM
AND
MIXTURE
RATIO
WARNING
a
0
n
a
utomatic
transmission
models
checks
should
be
per
formed
with
the
lever
shifted
to
the
0
position
Be
sure
to
engage
parking
brake
and
to
lock
both
front
and
rear
wheels
with
wheel
chocks
b
Oepress
brake
pedal
while
ac
celerating
the
engine
to
prevent
forward
surge
of
car
c
After
idle
adjustment
has
been
made
shift
the
lever
to
the
N
or
P
positfon
and
remove
wheel
chocks
CAUTION
00
not
attempt
to
screw
the
idle
adjusting
screw
down
completely
00
ing
so
could
cause
damage
to
tip
which
in
turn
will
tend
to
cause
malfunctions
Note
a
When
measuring
CO
percentage
in
sert
probe
into
tail
pipe
more
than
40
cm
15
7
in
b
In
thee
case
of
air
conditioner
e
quipped
models
the
idle
adjust
ment
should
be
carried
out
while
the
air
conditioner
is
OFF
c
When
making
idle
adjustment
do
not
removt
air
cleaner
CO
Idle
adJustment
with
CO
meter
Idle
mixture
adjustment
requires
the
use
of
a
CO
meter
especially
for
California
models
When
preparing
to
adjust
idle
mixture
it
is
essential
to
have
the
meter
thoroughly
warmed
up
and
calibrated
1
Check
carburetor
pipes
for
proper
connection
2
Warm
up
engine
until
water
tern
perature
indicator
points
to
the
middle
of
gauge
The
procedure
to
warm
up
J
Engine
Tune
up
engine
is
not
specifically
recom
mended
Either
driving
car
or
operat
ing
engine
at
no
load
will
be
good
3
Make
sure
that
water
temperature
indicator
points
to
the
middle
Further
keep
engine
running
at
about
2
000
rpm
for
about
5
minutes
without
applying
load
to
engine
in
order
to
stabilize
engine
condition
Engine
hood
should
be
open
4
Run
engine
for
about
10
minutes
at
idling
speed
During
this
10
minutes
proceed
as
described
in
steps
5
to
9
below
5
I
Disconnect
air
hose
from
air
check
valve
and
install
cap
on
air
check
valve
Except
Canada
and
FU
models
EF244
Fig
ET
11
Disconnecting
Air
Hose
from
Air
Check
Valve
Except
Canada
and
FU
models
Canada
and
FU
models
2
Disconnect
air
hose
from
air
induction
pipe
and
install
cap
on
air
induction
pipe
Canada
and
FU
mod
els
EF849
Fig
ET
12
Installing
Cap
on
Air
Induction
Pipe
FU
models
3
On
FU
models
disconnect
dis
tributor
vacuum
hose
at
distributor
diaphragm
side
and
plug
hose
with
blind
plug
ET
7
ET501
Fig
ET
13
Disconnecting
Distributor
Vacuum
Hose
6
Race
engine
I
500
to
2
OOO
rpm
two
or
three
times
under
no
load
then
run
engine
for
one
minute
at
idling
speed
7
Adjust
throttle
adjusting
screw
until
engine
is
at
specified
speed
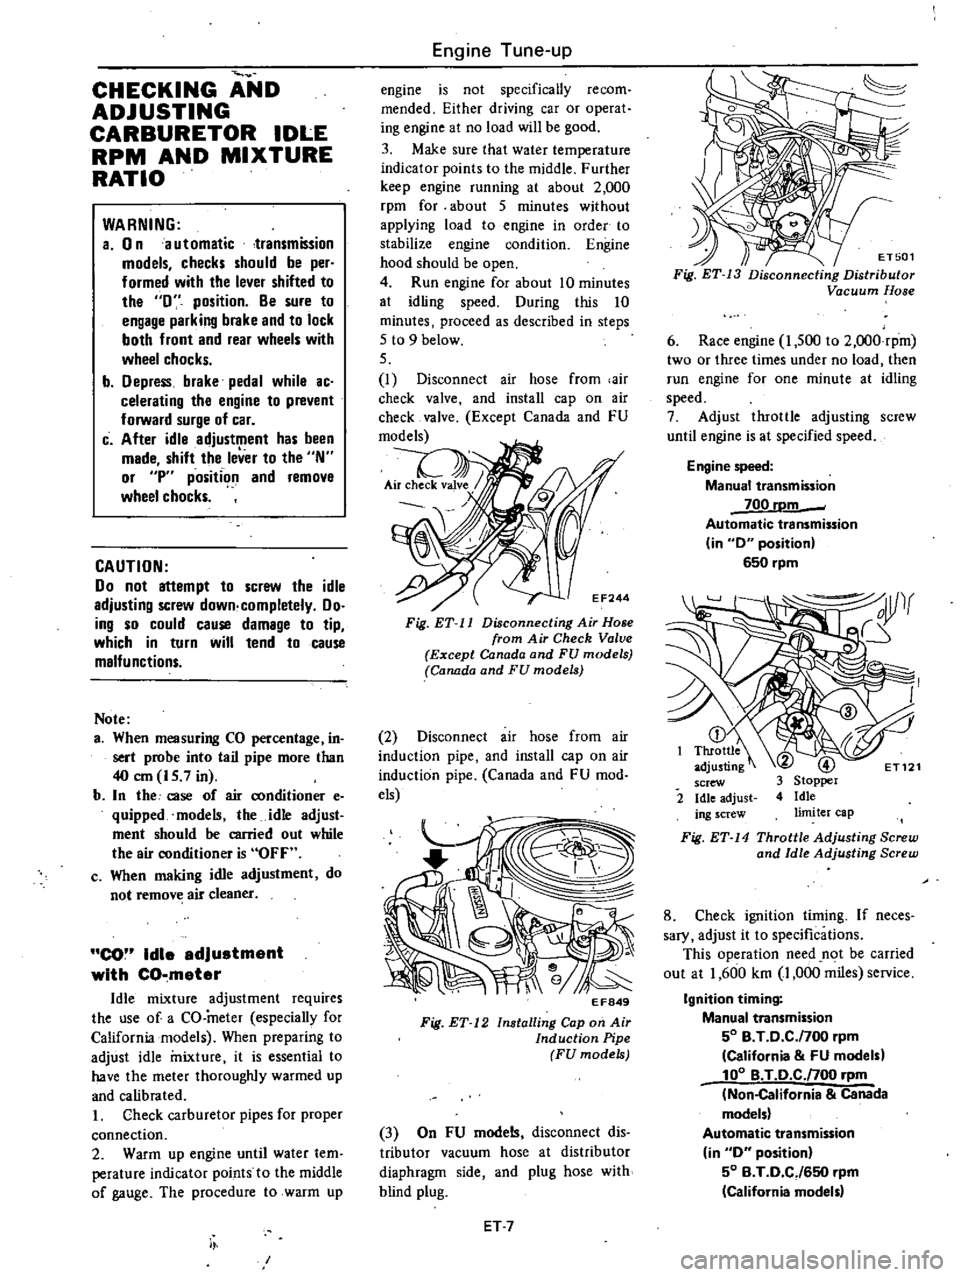
Engine
speed
Manual
transmission
700
rDm
Automatic
transmission
in
0
position
650
rpm
2
Fig
ET
14
Throttle
Adjusting
Screw
and
Idle
Adjusting
Screw
8
Check
ignition
timing
If
neces
sary
adjust
it
to
specifications
This
operation
need
n
t
be
carried
out
at
1
600
km
1
000
miles
service
Ignition
timing
Manual
transmission
50
B
T
0
C
f700
rpm
California
FU
models
100
B
T
O
C
noo
rpm
Non
California
Canada
models
Automatic
transmission
in
0
position
50
B
T
0
CJ650
rpm
California
model
Page 44 of 548
5
Fit
insert
ensuring
that
it
seats
on
bottom
face
of
its
recess
6
Newly
fitted
valve
seat
should
be
cut
or
ground
with
suitable
seat
cutter
or
grinding
stone
7
Apply
smalliunount
of
fine
grind
ing
compound
to
valve
contacting
face
and
put
valve
into
guide
Lap
valve
against
its
seat
ntil
proper
valve
seat
ing
is
obtained
Remove
valve
and
clean
valve
and
valve
seat
VALVE
ROCKER
ARM
1
AND
SHAFT
I
Check
rocker
arm
bore
and
shaft
for
scores
or
scuffs
2
Check
clearance
between
each
rocker
arm
and
shaft
by
measuring
inner
diameter
of
rocker
arm
bore
and
outer
diameter
of
shaft
If
either
clearance
is
not
within
spec
ification
replace
rocker
arm
and
or
shaft
3
Check
valve
end
contact
surface
of
rocker
arm
for
abnormal
wear
or
scuffs
VALVE
LIFTER
AND
PUSH
ROD
I
Check
valve
lifter
for
wear
or
scuffs
Check
bottom
end
of
valve
lifter
to
make
sure
it
has
a
slight
convex
Replace
valve
lifters
that
are
scored
worn
or
have
unsmooth
bot
tom
2
Check
clearance
between
lifter
hole
on
cylinder
block
and
valve
lifter
Replace
valve
lifter
if
clearance
ex
ceeds
wear
limit
3
Check
push
rod
for
bending
and
damage
Check
end
of
push
rod
for
rough
ness
or
excessive
wear
CAMSHAFT
AND
CAMSHAFT
BEARING
CAMSHAFT
BEARING
CLEARANCE
Journal
diameters
should
be
check
ed
with
a
micrometer
and
bearings
with
an
inside
dial
gauge
Measure
ments
should
then
be
compared
to
Engine
Mechanical
determine
whether
bearings
are
worn
If
worn
beyond
0
15
mm
0
0059
in
replace
using
Camshaft
Bearing
Drift
STl6Il0000
In
press
fitting
a
new
bearing
make
certain
that
oil
holes
in
block
and
bearing
are
properly
aligned
EM474
Fig
EM
27
Measuring
Camshaft
Bearing
Inner
Diameter
CAUTION
a
After
replacing
all
bearings
finish
bearing
inner
diameters
by
line
bor
ing
b
I
nstall
welch
plug
into
cylinder
block
applying
sealant
EM475
Fig
EM
28
Replacing
Cam
haft
Bearings
CAMSHAFT
ALIGNMENT
I
Check
camshaft
camshaft
journal
and
earn
surface
for
bending
wear
or
damage
If
fault
is
beyond
limits
replace
affected
parts
2
A
bend
value
is
one
half
of
the
reading
obtained
when
camshaft
is
turned
one
full
revolution
with
a
dial
gauge
applied
to
the
cen
ter
journal
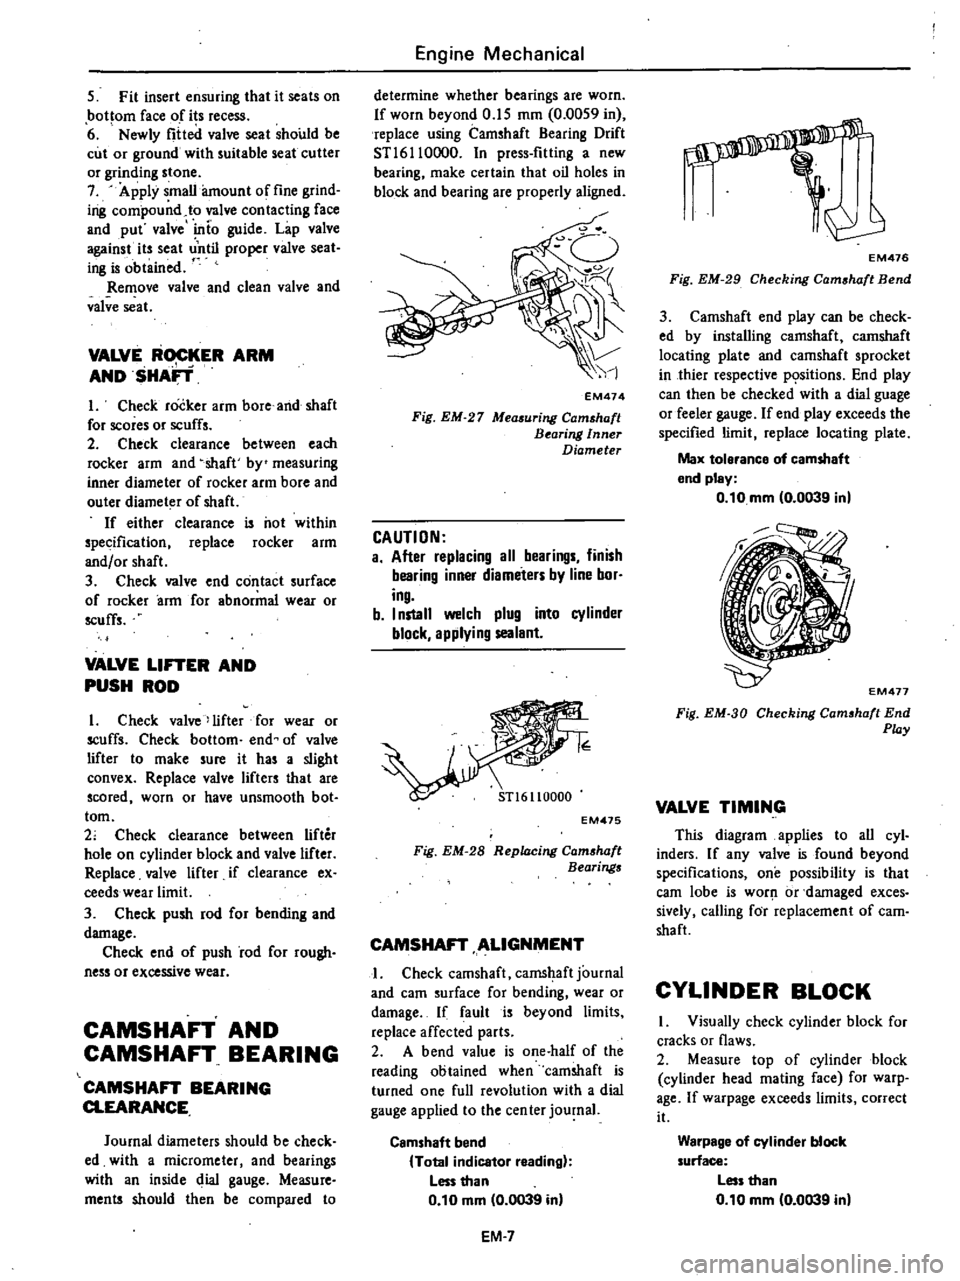
Camshaft
bend
Total
indicator
reading
Less
than
0
10
mm
0
0039
in
EM
7
s
EM476
Fig
EM
29
Checking
Cam
haft
Bend
3
Camshaft
end
play
can
be
check
ed
by
installing
camshaft
camshaft
locating
plate
and
camshaft
sprocket
in
thier
respective
p
sitions
End
play
can
then
be
checked
with
a
dial
guage
or
feeler
gauge
If
end
play
exceeds
the
specified
limit
replace
locating
plate
Max
tolerance
of
camshaft
end
pley
0
10
mm
0
0039
in
EM477
Fig
EM
3D
Checking
Cam
haft
End
Play
VALVE
TIMING
This
diagram
applies
to
all
cyl
inders
If
any
valve
is
found
beyond
specifications
one
possibility
is
that
earn
lobe
is
worJ
1
or
damaged
exces
sively
calling
for
replacement
of
cam
shaft
CYLINDER
BLOCK
I
Visually
check
cylinder
block
for
cracks
or
flaws
2
Measure
top
of
cylinder
block
cylinder
head
mating
face
for
warp
age
If
warpage
exceeds
limits
correct
it
Warpage
of
cylinder
block
surface
Less
than
0
10
mm
0
0039
in
Page 46 of 548
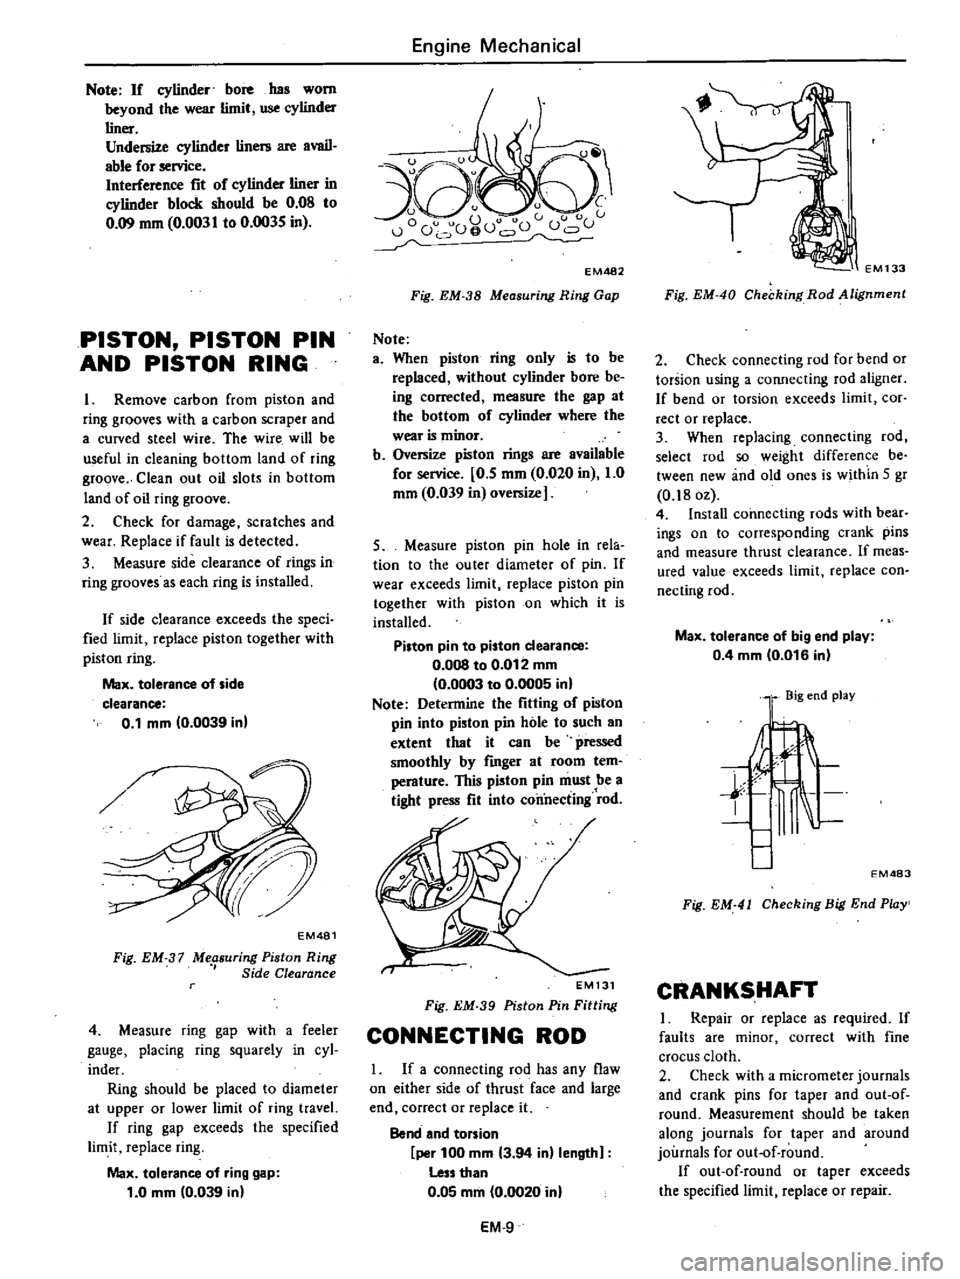
Note
If
cylinder
bore
has
worn
beyond
the
wear
limit
use
cylinder
liner
Undersize
cylinder
liners
are
avail
able
for
service
Interference
fit
of
cylinder
liner
in
cylinder
block
ahould
be
0
08
to
0
09
mm
0
003
I
to
0
0035
in
PISTON
PISTON
PIN
AND
PISTON
RING
I
Remove
carbon
from
piston
and
ring
grooves
with
a
carbon
scraper
and
a
curved
steel
wire
The
wire
will
be
useful
in
cleaning
bottom
land
of
ring
groove
Clean
out
oil
slots
in
bottom
land
of
oil
ring
groove
2
Check
for
damage
scratches
and
wear
Replace
if
fault
is
detected
3
Measure
side
clearance
of
rings
in
ring
grooves
as
each
ring
is
installed
If
side
clearance
exceeds
the
speci
fied
limit
replace
piston
together
with
piston
ring
Max
tolerance
of
side
clearance
0
1
mm
0
0039
in
Engine
Mechanical
u
EM482
Fig
EM
38
Measuring
Ring
Gap
Note
a
When
piston
ring
only
is
to
be
replaced
without
cylinder
bore
be
ing
corrected
measure
the
gap
at
the
bottom
of
cylinder
where
the
wear
is
minor
b
Oversize
piston
rings
are
available
for
service
0
5
mm
0
020
in
1
0
mm
0
039
in
oversize
5
Measure
piston
pin
hole
in
rela
tion
to
the
outer
diameter
of
pin
If
wear
exceeds
limit
replace
piston
pin
together
with
piston
on
which
it
is
installed
Piston
pin
to
piston
clearance
O
OOS
to
0
012
mm
0
0003
to
0
0005
in
Note
Determine
the
fitting
of
piston
pin
into
piston
pin
hole
to
such
an
extent
that
it
can
be
pressed
smoothly
by
fmger
at
room
tem
perature
This
piston
pin
must
be
a
tight
press
fit
into
connecting
rod
EM481
Fig
EM
37
Me
suring
Piston
Ring
Side
Clearance
4
Measure
ring
gap
with
a
feeler
gauge
placing
ring
squarely
in
cyl
inder
Ring
should
be
placed
to
diameter
at
upper
or
lower
limit
of
ring
travel
If
ring
gap
exceeds
the
specified
limit
replace
ring
Max
tolerance
of
ring
gap
1
0
mm
0
039
in
EM131
Fig
EM
39
Piston
Pin
Fitting
CONNECTING
ROD
1
If
a
connecting
rod
has
any
flaw
on
either
side
of
thrust
face
and
large
end
correct
or
replace
it
Bend
and
torsion
per
100
mm
3
94
in
length
Less
than
0
05
mm
0
0020
in
EM
9
EM133
Fig
EM
40
Checking
Rod
Alignment
2
Check
connecting
rod
for
bend
or
torsion
using
a
connecting
rod
aligner
If
bend
or
torsion
exceeds
limit
cor
rect
or
replace
3
When
replacing
connecting
rod
select
rod
so
weight
difference
be
tween
new
and
old
ones
is
within
5
gr
0
180z
4
Install
connecting
rods
with
bear
iogs
on
to
corresponding
crank
pins
and
measure
thrust
clearance
If
meas
ured
value
exceeds
limit
replace
con
necting
rod
Max
tolerance
of
big
end
play
0
4
mm
0
016
in
l
Big
end
play
l
t
t
EM483
Fig
EM
41
Checking
Big
End
Pwy
CRANKSHAFT
I
Repair
or
replace
as
required
If
faults
are
minor
correct
with
fine
crocus
cloth
2
Check
with
a
micrometer
journals
and
crank
pins
for
taper
and
out
of
round
Measurement
should
be
taken
along
journals
for
taper
and
around
journals
for
out
of
round
If
out
of
round
or
taper
exceeds
the
specified
limit
replace
or
repair
Page 88 of 548
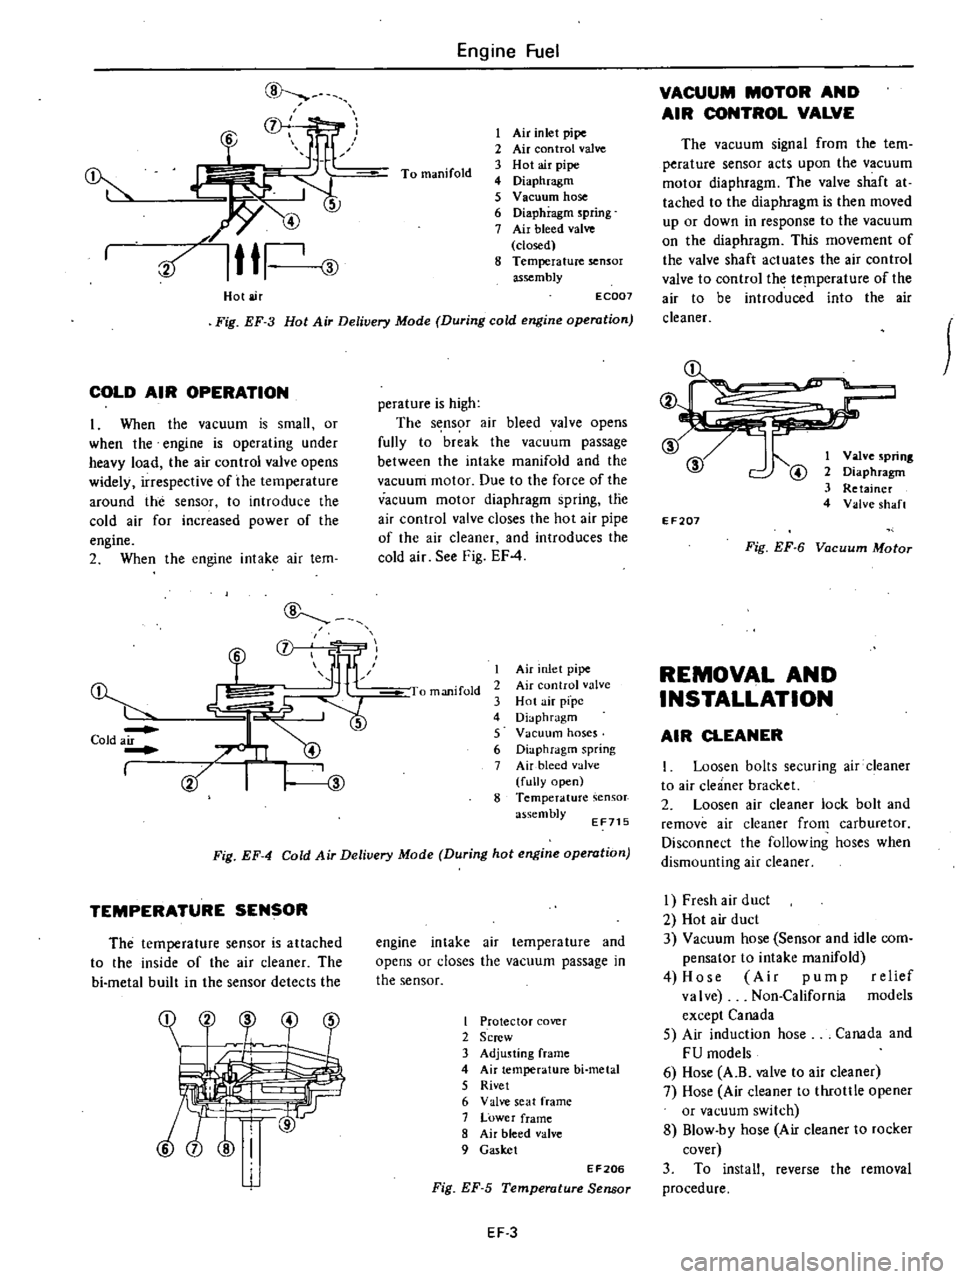
Hot
air
Engine
Fuel
To
manifold
I
Air
inlet
pipe
2
Air
con
trol
valve
3
Hot
air
pipe
4
Diaphragm
5
V
Bellum
hose
6
Diaphragm
spring
7
Air
bleed
valve
closed
8
Temperature
sensor
assembly
Fig
EF
3
Hot
Air
Delivery
Mode
During
cold
engine
operation
EC007
COLD
AIR
OPERATION
1
When
the
vacuum
is
small
or
when
the
engine
is
operating
under
heavy
load
the
air
control
valve
opens
widely
irrespective
of
the
temperature
around
the
sensor
to
introduce
the
cold
air
for
increased
power
of
the
engine
2
When
the
engine
intake
air
tem
Cold
air
I
L
CD
mf
LlF
JII
1
perature
is
high
The
s
ns
r
air
bleed
valve
opens
fully
to
break
the
vacuum
passage
between
the
intake
manifold
and
the
vacuum
motor
Due
to
the
force
of
the
vacuum
motor
diaphragm
spring
tne
air
control
valve
closes
the
hot
air
pipe
of
the
air
cleaner
and
introduces
the
cold
air
See
Fig
EF
4
I
manifold
I
Air
nlet
pipe
2
Air
control
valve
3
Hot
air
pfpc
4
Diaphragm
5
Vacuum
hoses
6
Diaphragm
spring
7
Air
bleed
alve
fully
open
8
Temperature
assembly
EF715
Fig
EF
4
Cold
Air
Deliuery
Mode
During
hot
engine
operation
TEMPERATURE
SENSOR
The
temperature
sensor
is
attached
to
the
inside
of
the
air
cleaner
The
bi
metal
built
in
the
sensor
detects
the
engine
intake
air
temperature
and
opens
or
closes
the
vacuum
passage
in
the
sensor
I
Protector
cover
2
Screw
3
Adjusting
frame
4
Air
temperature
bi
metal
5
Rivet
6
Valve
seat
frame
7
Lower
frame
8
Air
bleed
valve
9
Gasket
EF206
Fig
EF
5
Temperature
Sensor
EF
3
VACUUM
MOTOR
AND
AIR
CONTROL
VALVE
The
vacuum
signal
from
the
tem
perature
sensor
acts
upon
the
vacuum
motor
diaphragm
The
valve
shaft
at
tached
to
the
diaphragm
is
then
moved
up
or
down
in
response
to
the
vacuum
on
the
diaphragm
This
movement
of
the
valve
shaft
actuates
the
air
control
valve
to
control
the
temperature
of
the
air
to
be
introduced
into
the
air
cleaner
@
@
@
I
Valve
spring
2
Diaphragm
3
Retainer
4
Valve
shaft
EF207
Fig
EF
6
Vacuum
Motor
REMOVAL
AND
INSTALLATION
AIR
CLEANER
I
Loosen
bolts
securing
air
cleaner
to
air
cleaner
bracket
2
Loosen
air
cleaner
lock
bolt
and
remove
air
cleaner
from
carburetor
Disconnect
the
following
hoses
when
dismounting
air
cleaner
I
Fresh
air
duct
2
Hot
air
duct
3
Vacuum
hose
Sensor
and
idle
com
pensator
to
intake
manifold
4
Hose
Air
pump
relief
valve
Non
California
models
except
Canada
5
Air
induction
hose
Canada
and
FU
models
6
Hose
A
B
valve
to
air
cleaner
7
Hose
Air
cleaner
to
throttle
opener
or
vacuum
switch
8
Blow
by
hose
Air
cleaner
to
rocker
cover
3
To
install
reverse
the
removal
procedure
Page 95 of 548
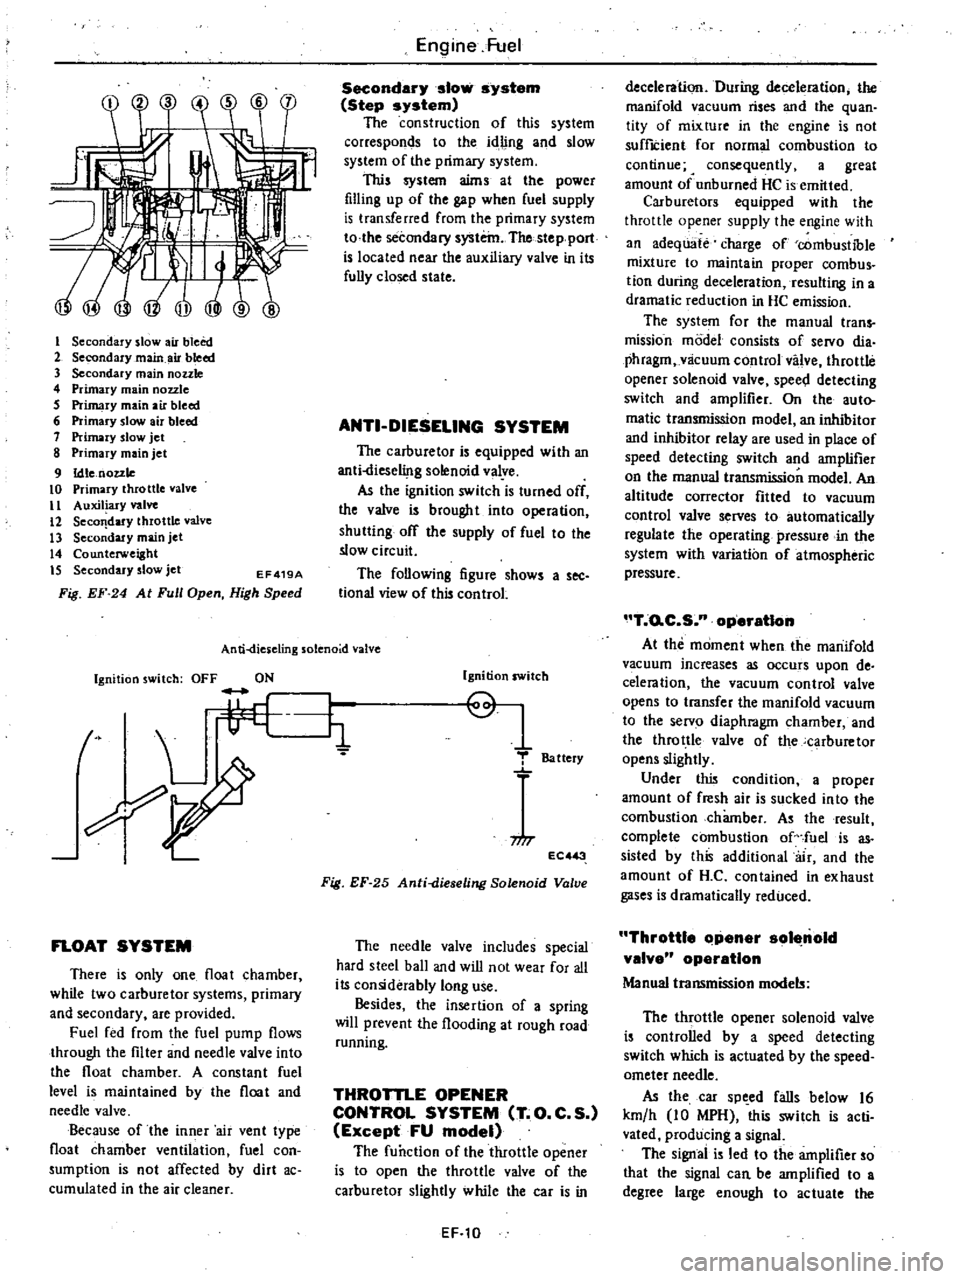
I
Secondary
slow
air
bleed
2
Secondary
main
air
bleed
3
Secondary
main
nozzle
4
Primary
main
nozzle
5
Primary
main
air
bleed
6
Primary
slow
air
bleed
7
Primary
slow
jet
8
Primary
main
jet
9
Idle
nozzle
10
Primary
throttle
valve
II
Auxiliary
valve
12
Seco
dary
throttle
valve
13
Secondary
main
jet
14
Counterweight
IS
Secondary
slow
jet
EF419A
Fig
EF
24
At
Full
Open
High
Speed
Engine
Fuel
Secondary
slow
system
Step
system
The
construction
of
this
system
corresponds
to
the
idling
and
slow
system
of
the
primary
system
This
system
aims
at
the
power
filling
up
of
the
gap
when
fuel
supply
is
transferred
from
the
primary
system
to
the
secondary
system
The
stepport
is
located
near
the
auxiliary
valve
in
its
fully
closed
state
ANTI
DIESELING
SYSTEM
The
carburetor
is
equipped
with
an
anti
liese1i
lg
solenoid
valye
As
the
ignition
switch
is
turned
off
the
valve
is
brought
into
operation
shutting
off
the
supply
of
fuel
to
the
slow
circuit
The
following
figure
shows
a
see
tional
view
of
this
control
An
ti
dies
eling
solenoid
valve
Ignition
switch
OFF
ON
t
L
li
FLOAT
SYSTEM
There
is
only
one
float
chamber
while
two
carburetor
systems
primary
and
secondary
are
provided
Fuel
fed
from
the
fuel
pump
flows
through
the
filter
and
needle
valve
into
the
float
chamber
A
constant
fuel
level
is
maintained
by
the
float
and
needle
valve
Because
of
the
inner
air
vent
type
float
chamber
ventilation
fuel
con
sumption
is
not
affected
by
dirt
ac
cumulated
in
the
air
cleaner
Ignition
switch
Q
1
T
Battery
niT
EC
3
Fig
EF
25
Anti
dieseling
Solenoid
Valve
The
needle
valve
includes
special
hard
steel
ball
and
wiD
not
wear
for
all
its
considerably
long
use
Besides
the
insertion
of
a
spring
will
prevent
the
flooding
at
rough
road
running
THROTTLE
OPENER
CONTROL
SYSTEM
T
O
C
S
Except
FU
model
The
function
of
the
throttle
opener
is
to
open
the
throttle
valve
of
the
carburetor
slightly
while
the
car
is
in
EF
10
deceleration
During
deceleration
the
manifold
vacuum
rises
and
the
quan
tity
of
mixture
in
the
engine
is
not
suffICient
for
normal
combustion
to
continue
4
consequently
a
great
amount
of
unburned
HC
is
emitted
Carburetors
equipped
with
the
throttle
opener
supply
the
engine
with
an
adequate
charge
of
combustible
mixture
to
maintain
proper
combus
tion
during
deceleration
resulting
in
a
dramatic
reduction
in
HC
emission
The
system
for
the
manual
trans
mission
model
consists
of
servo
dia
phragm
vlicuum
control
valve
throttle
opener
solenoid
valve
spee
l
detecting
switch
and
amplifier
On
the
auto
matic
transmission
model
an
inhibitor
and
inhibitor
relay
are
used
in
place
of
speed
detecting
switch
and
amplifier
on
the
manual
transmission
model
An
altitude
corrector
fitted
to
vacuum
control
valve
serves
to
automatically
regulate
the
operating
pressure
in
the
system
with
variation
of
atmospheric
pressure
T
o
C
S
n
operatIon
At
the
moment
when
the
manifold
vacuum
increases
as
occurs
upon
de
celeration
the
vacuum
control
valve
opens
to
transfer
the
manifold
vacuum
to
the
servo
diaphragm
chamber
and
the
throttle
valve
of
the
carburetor
opens
slightly
Under
this
condition
a
proper
amount
of
fresh
air
is
sucked
into
the
combustion
chamber
As
the
result
complete
combustion
of
fuel
is
as
sisted
by
this
additional
air
and
the
amount
of
H
C
contained
in
exhaust
gases
is
dramatically
reduced
Throttle
Clpener
sol
nold
valve
operation
Manual
transmission
models
The
throttle
opener
solenoid
valve
is
controlled
by
a
speed
detecting
switch
which
is
actuated
by
the
speed
ometer
needle
As
the
car
sp
ed
falls
below
16
km
h
10
MPH
this
switch
is
acti
vated
producing
a
signal
The
signal
is
led
to
the
amplifier
so
that
the
signal
can
be
amplified
to
a
degree
large
enough
to
actuate
the
Page 98 of 548
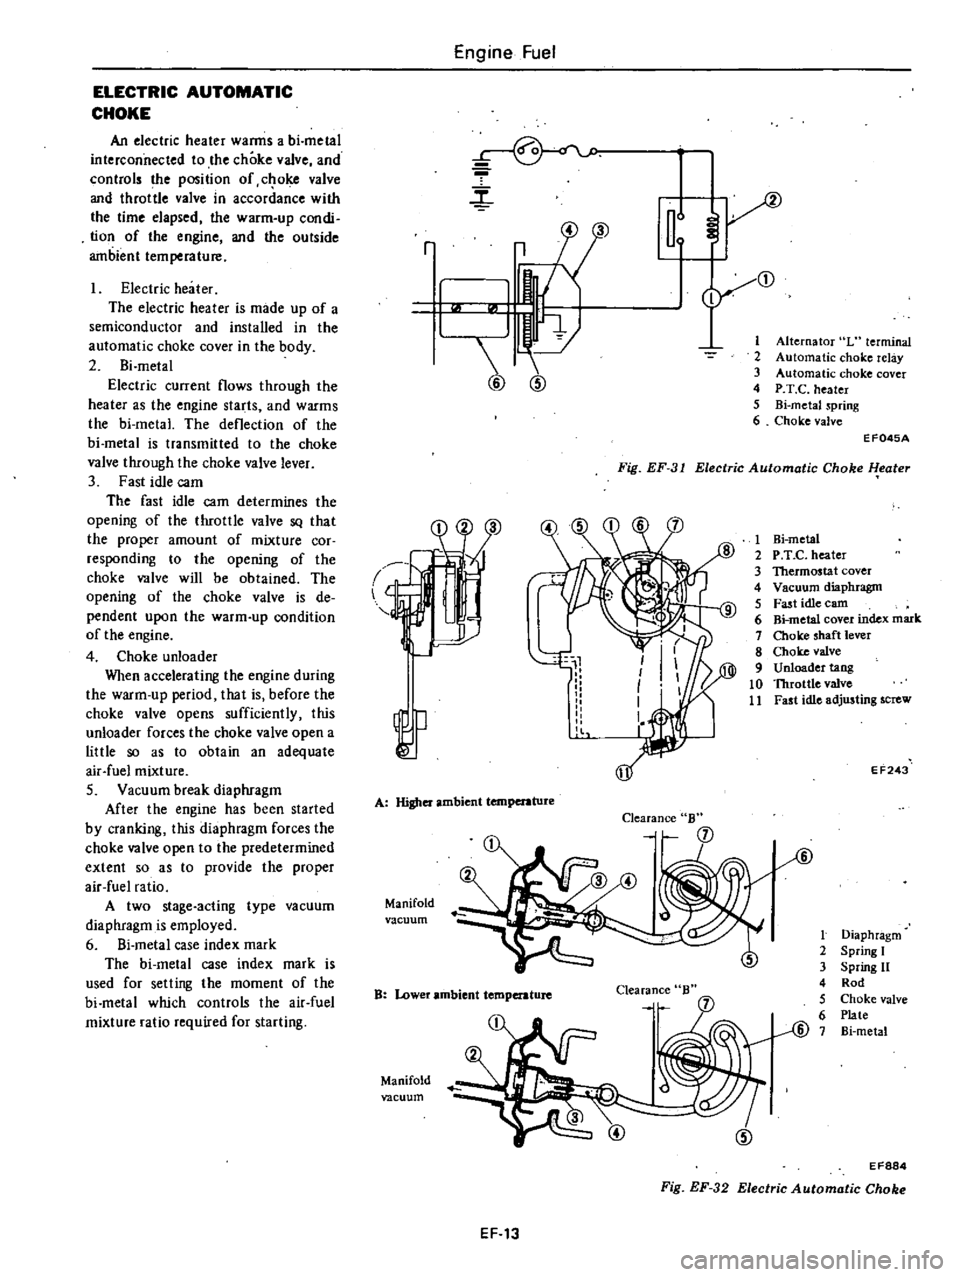
ELECTRIC
AUTOMATIC
CHOKE
An
electric
heater
warms
a
bi
metal
interconnected
to
the
choke
valve
and
controls
the
position
of
c
oke
valve
and
throttle
valve
in
accordance
with
the
time
elapsed
the
warm
up
condi
tion
of
the
engine
and
the
outside
ambient
temperature
Electric
heater
The
electric
heater
is
made
up
of
a
semiconductor
and
installed
in
the
automatic
choke
cover
in
the
body
2
Bi
metal
Electric
current
flows
through
the
heater
as
the
engine
starts
and
warms
the
bi
metal
The
deflection
of
the
bi
metal
is
transmitted
to
the
choke
valve
through
the
choke
valve
lever
3
Fast
idle
cam
The
fast
idle
cam
determines
the
opening
of
the
throttle
valve
SQ
that
the
proper
amount
of
mixture
cor
responding
to
the
opening
of
the
choke
valve
will
be
obtained
The
opening
of
the
choke
valve
is
de
pendent
upon
the
warm
up
condition
of
the
engine
4
Choke
unloader
When
accelerating
the
engine
during
the
warm
up
period
that
is
before
the
choke
valve
opens
sufficiently
this
unloader
forces
the
choke
valve
open
a
little
so
as
to
obtain
an
adequate
air
fuel
mixture
S
Vacuum
break
diaphragm
After
the
engine
has
been
started
by
cranking
this
diaphragm
forces
the
choke
valve
open
to
the
predetermined
extent
so
as
to
provide
the
proper
air
fuel
ratio
A
two
stage
acting
type
vacuum
diaphragm
is
employed
6
Si
metal
case
index
mark
The
bi
metal
case
index
mark
is
used
for
selling
the
moment
of
the
bi
metal
which
controls
the
air
fuel
mixture
ratio
required
for
starting
Engine
Fuel
r
m
2
3
4
5
6
r
3
1
@
@
Alternator
L
terminal
Automatic
choke
relay
Automatic
choke
cover
P
T
C
heater
Bi
metaJ
spring
Choke
valve
Fig
EF
31
Electric
Automatic
Choke
l
eater
EF045A
l
A
Higher
ambient
temperature
Manifold
vacuum
Clearance
B
B
Lower
ambient
temperature
Clearance
Manifold
vacuum
1
Hi
metal
2
P
T
e
heater
3
Thermostat
cover
4
Vacuum
diaphragm
5
Fast
idle
earn
6
Bi
metal
cover
index
mark
7
Choke
shaft
lever
8
Choke
valve
9
Unloader
tang
10
Throttle
valve
11
Fast
idle
adjusting
screw
EF243
t
Diaphragm
2
Spring
I
3
Spring
11
4
Rod
5
Choke
valve
6
Plate
@
7
Bi
metal
EF884
Fig
EF
32
Electric
Automatic
Choke
EF
13
Page 105 of 548
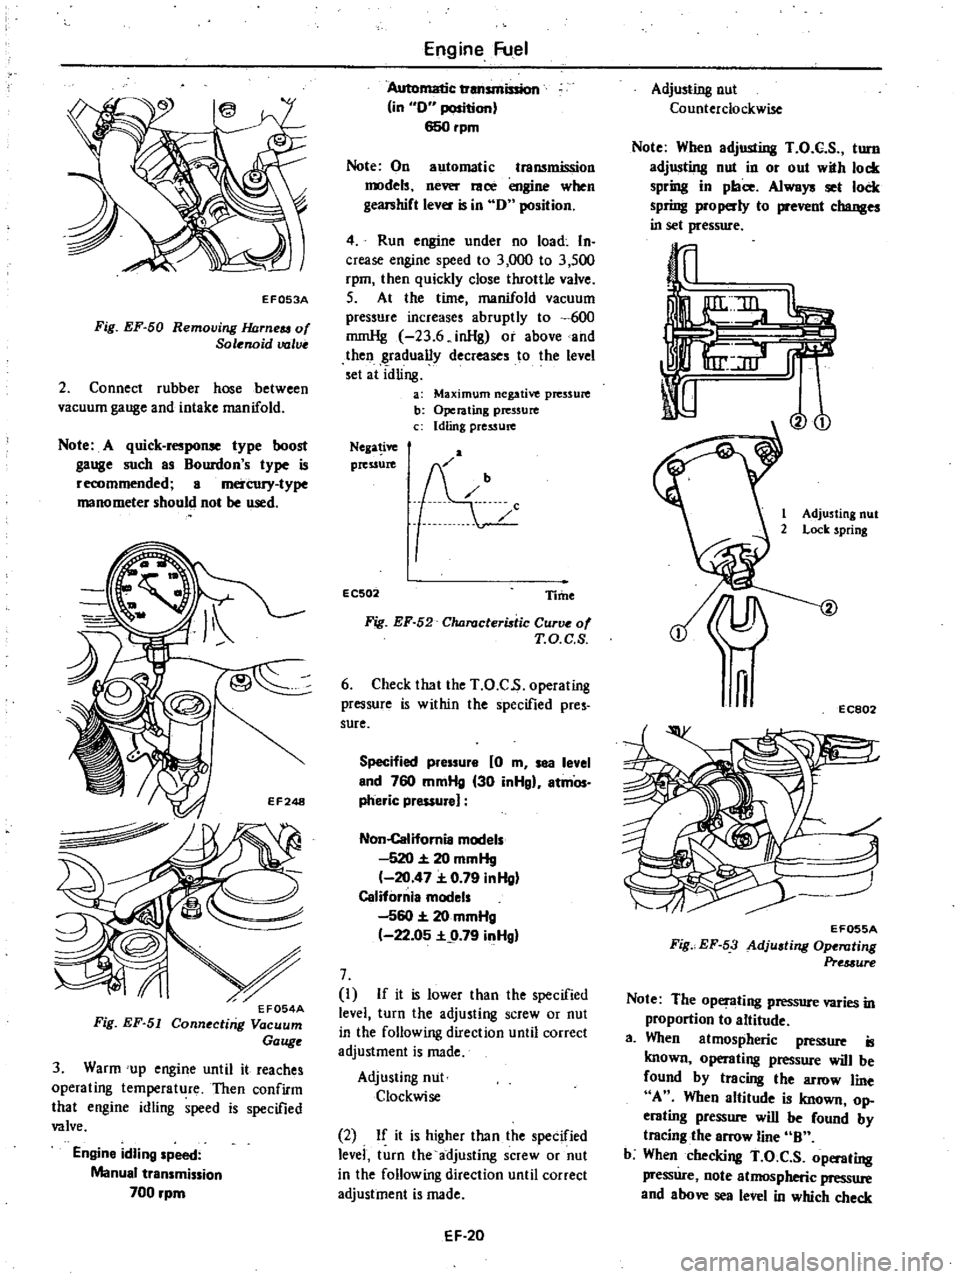
EF053A
Fig
EF
50
Removing
JWrneu
of
Solenoid
valve
2
Connect
rubber
hose
between
vacuum
gauge
and
intake
manifold
Note
A
quick
response
type
boost
gauge
such
as
Bourdon
s
type
is
recommended
a
mercury
type
manometer
should
not
be
used
3
Warm
up
engine
until
it
reaches
operating
temperature
Then
confirm
that
engine
idling
speed
is
specified
valve
Engine
idling
speed
Manual
transmission
700
rpm
Engine
Fuel
Automatic
transmission
in
0
position
650rpm
Note
On
automatic
transmission
models
never
race
engine
when
gearshift
lever
is
in
0
position
4
Run
engine
under
no
load
In
crease
engine
speed
to
3
000
to
3
500
rpm
then
quickly
close
throttle
valve
S
At
the
time
manifold
vacuum
pressure
increases
abruptly
to
600
rnmHg
23
6
inHg
or
above
and
then
gradually
decreases
to
the
level
set
at
idling
a
Maximum
negative
pressure
b
Operating
pressure
c
Idling
pressure
Nega
ive
pressure
EC502
Time
Fig
EF
52
Characteristic
Curve
of
T
O
C
S
6
Check
that
the
T
O
C
s
operating
pressure
is
within
the
specified
pres
sure
Specified
pressure
0
m
sea
level
end
760
mmHg
30
inHgl
atmOs
pheric
pressure
Non
Califomia
models
520
20
mmHg
20
47
0
79
inHg
California
models
560
20
mmHg
22
05
9
79
inHgl
7
I
If
it
is
lower
than
the
specified
level
turn
the
adjusting
screw
or
nut
in
the
following
direction
until
correct
adjustment
is
made
Adjusting
nut
Clockwise
2
If
it
is
higher
than
the
specified
levei
turn
the
adjusting
screw
or
nut
in
the
following
direction
until
correct
adjustment
is
made
EF
20
Adjusting
nut
Counterclockwise
Note
When
adjusting
T
O
C
S
turn
adjusting
nut
in
or
out
with
lock
spring
in
place
Always
set
lock
spring
properly
to
prevent
changes
in
set
pressure
Vo
1
Adjusting
nut
2
Lock
spring
n
EC802
EF055A
Fig
EF
53
Adjusting
Ope
llting
Pre
3ure
Note
The
operating
pressure
varies
in
proportion
to
altitude
a
When
atmospheric
pressure
is
known
operating
pressure
will
be
found
by
tracing
the
arrow
line
A
When
altitude
is
known
op
erating
pressure
will
be
found
by
tracing
the
arrow
line
B
b
When
checking
T
O
C
S
operating
pressure
note
atmospheric
pressure
and
above
sea
level
in
which
check
Page 114 of 548
CLEANING
AND
INSPECTION
Dirt
gum
water
or
carbon
con
tamination
in
or
on
exterior
moving
parts
of
a
carburetor
are
often
respon
sible
for
unsatisfactory
performance
For
this
reason
efficient
carhuretion
depends
upon
careful
cleaning
and
inspection
while
servicing
Blow
all
passages
and
castings
with
compressed
air
and
blow
off
all
parts
until
dry
Note
Do
not
pass
drills
or
wires
through
calibrated
jets
or
passages
as
this
may
enlarge
orifice
and
seriously
affect
carburetor
calibra
tion
2
Check
all
parts
for
wear
If
wear
is
noted
damaged
parts
must
be
re
placed
Note
especially
the
following
I
Check
float
needle
and
seat
for
wear
If
wear
is
noted
assembly
must
be
replaced
2
Check
throttle
and
choke
shaft
bores
in
throttle
chamber
and
choke
chamber
for
wear
or
out
of
roundness
3
Inspect
idle
adjusting
needle
for
hurrs
or
ridges
Such
a
condition
re
quires
replacement
Engine
Fuel
3
Inspect
gaskets
to
see
if
they
appear
hard
or
brittle
or
if
edges
are
torn
or
distorted
If
any
such
condi
tion
is
noted
they
must
be
replaced
4
Check
filter
screen
for
dirt
or
lint
Clean
and
if
screen
is
distorted
or
remains
plugged
replace
5
Check
linkage
for
operating
condition
6
Inspect
operation
of
accelerating
pump
Pour
fuel
into
float
chamber
and
make
throttle
lever
operate
Check
condition
of
fuel
injection
from
the
accelerating
nome
7
Push
connecting
rod
of
dia
phragm
chamber
and
block
passage
of
vacuum
with
finger
When
connecting
rod
becomes
free
check
for
leakage
of
air
or
damage
to
diaphragm
Jets
Carburetor
performance
depend
on
jets
and
air
bleeds
That
is
why
these
components
must
be
fabricated
with
utmost
care
To
clean
them
use
cleaning
solvent
and
blow
air
on
them
Larger
inner
nwnbers
stamped
on
the
EF
29
jets
indicate
larger
diameters
Ac
cordingIy
main
and
slow
jets
with
larger
numbers
provide
richer
mixture
the
smaller
numbers
the
leaner
mix
ture
Conversely
the
main
and
slow
air
bleeds
through
which
air
to
passes
make
the
fuel
leaner
if
they
bear
larger
numbers
the
smaller
numbers
the
richer
fuel
Assembly
To
assemble
reverse
the
disassem
bly
procedure
taking
care
to
the
following
I
Thoroughly
wash
all
the
parts
before
assembling
2
Inspect
gaskets
to
see
if
they
appear
hard
or
brittle
or
if
edges
are
torn
or
distorted
If
any
of
such
undesirable
condi
tions
is
noted
they
must
be
replaced
3
Install
jet
and
air
bleed
having
the
Same
size
number
as
that
of
original
one
4
After
reassembling
carburetor
check
each
rotating
portion
or
sliding
portion
for
smooth
operation