fuel filter DATSUN 210 1979 Service Manual
[x] Cancel search | Manufacturer: DATSUN, Model Year: 1979, Model line: 210, Model: DATSUN 210 1979Pages: 548, PDF Size: 28.66 MB
Page 9 of 548
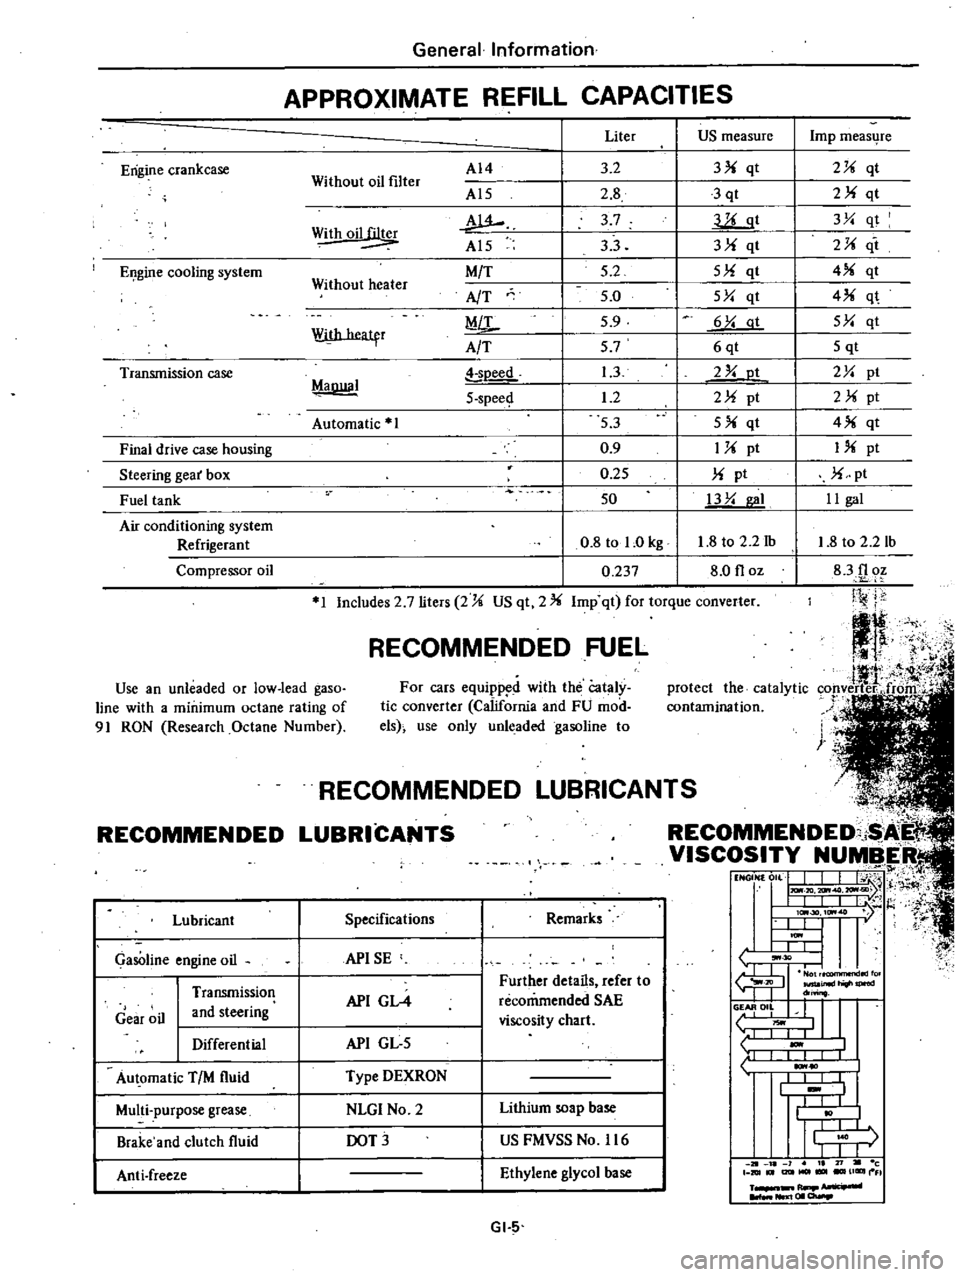
Erigine
crankcase
EI
gine
cooling
system
Transmission
case
Final
drive
case
housing
Steering
gear
box
Fuel
tank
Air
conditioning
system
Refrigerant
Compressor
oil
f
tl
It
J
4
i
1
protect
the
catalytic
cop
verter
froitr
contamination
t
n
General
Information
APPROXIMATE
REFILL
CAPACITIES
Without
oil
filter
AI4
Al5
w
Al5
M
T
AfT
MiL
A
T
Liter
US
measure
3
2
3
qt
2
8
3
qt
3
7
llLgt
33
3
qt
5
2
5
qt
5
0
5Y
qt
5
9
6
Y
at
57
6qt
1
3
2
Y
ot
1
2
2
pt
53
5
qt
0
9
1
pt
0
25
pt
50
13
Y
I
0
8
tol
Okg
1
8
to
2
2
1b
0
237
8
0
floz
Withoil
Without
heater
With
heatfr
MaDllal
soeed
5
spee
Automatic
1
1
Includes
2
7
liters
2
US
qt
2
Imp
qt
for
torque
converter
RECOMMENDED
FUEL
Use
an
unleaded
or
low
lead
gaso
line
with
a
minimum
octane
rating
of
91
RON
Research
Octane
Number
For
cars
equipp
d
with
the
Cataly
tic
converter
California
and
FU
mod
els
use
only
unleaded
gasoline
to
RECOMMENDED
Lubricant
GasOline
engine
oil
Gear
oil
Transmission
and
steering
Differential
Au
omatic
TIM
fluid
Multi
purpose
grease
Brake
and
clutch
fluid
Anti
freeze
L
NDED
LUBRICAN
COMMENDED
i
I
VISCOSITY
NUMBER
t1
NGON
0
L
J
I
j
H
I
IlL
I
t
l
I
lc
30
ItM
7
l
t
U
I
ItM
I
L
L
tJ
30
I
I
fu
JIl
inld
do
o
II
L
liOwl
1
I
I
1
10
I
I
I
I
t
I
I
j
r
I
I
J
1
21
l
1
I
71
c
DIUt
I2lItMOl
UGIIII
FI
R
NIl
I
01
a
Specifications
Remarks
APISE
API
GL4
Further
details
refer
to
recommended
SAE
viscosity
chart
API
GL
5
Type
DEXRON
NLGI
No
2
Lithium
soap
base
DOT
US
FMVSS
No
116
Ethylene
glycol
base
GI
5
Imp
meas4re
2
qt
2
qt
3Y
qt
2
it
4
qt
4
q
5Y
qt
5
qt
2Y
pt
2
pt
4
qt
I
pt
pt
II
gal
1
8
to
2
2
lb
83f1
oz
Ji
j
j
Page 15 of 548
DATSUN
210
Model
8310
Series
SECTIONET
ET
ENGINE
TUNE
UP
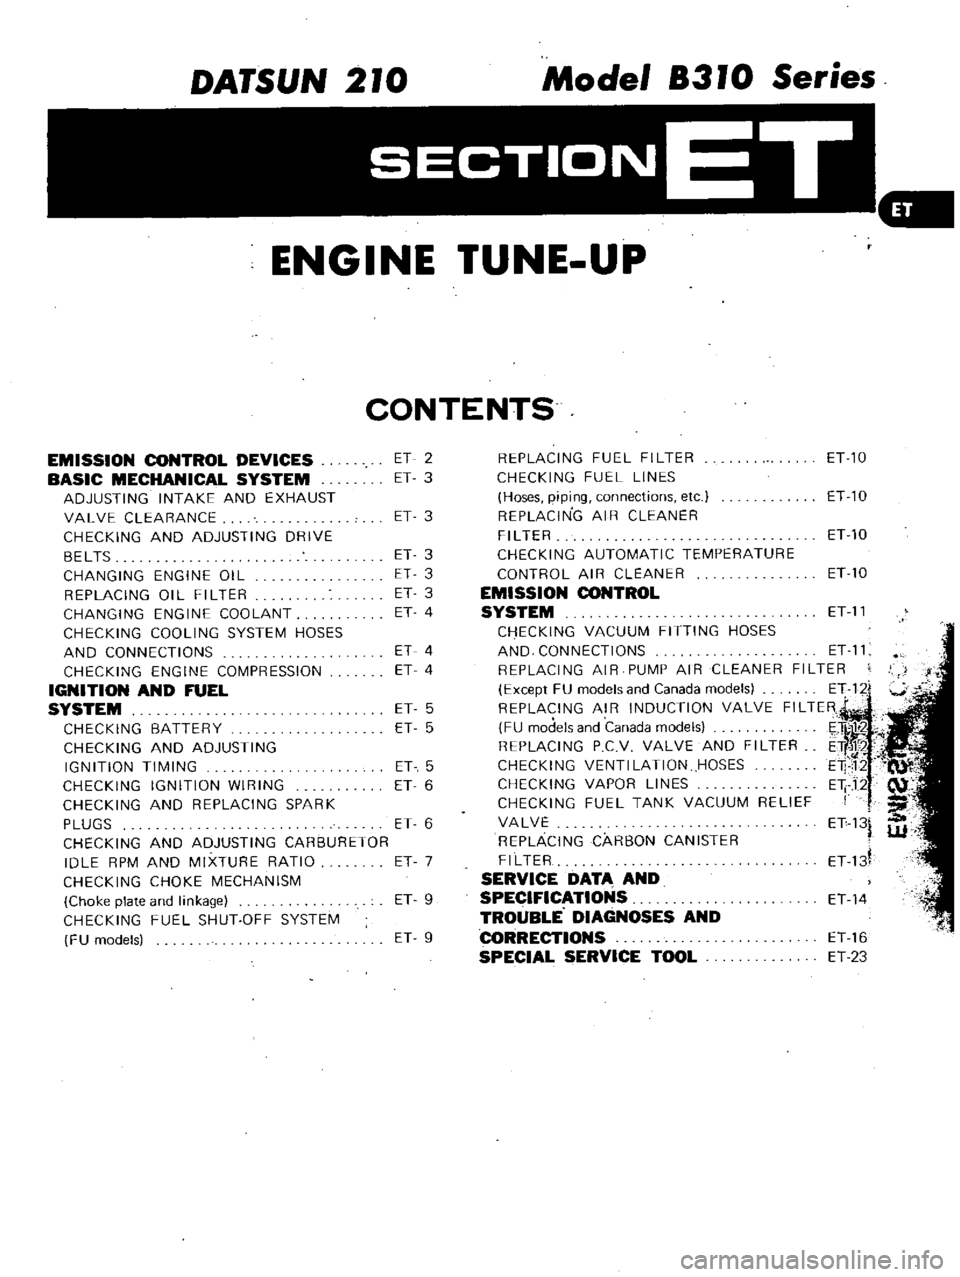
CONTENTS
EMISSION
CONTROL
DEVICES
BASIC
MECHANICAL
SYSTEM
ADJUSTING
INTAKE
AND
EXHAUST
VALVE
CLEARANCE
CHECKING
AND
ADJUSTING
DRIVE
BELTS
CHANGING
ENGINE
OIL
REPLACING
01
L
FI
L
TER
CHANGING
ENGINE
COOLANT
CHECKING
COOLING
SYSTEM
HOSES
AND
CONNECTIONS
CHECKING
ENGINE
COMPRESSION
IGNITION
AND
FUEL
SYSTEM
CHECKING
BATTERY
CHECKING
AND
ADJUSTING
IGNITION
TIMING
CHECKING
IGNITION
WIRING
CHECKING
AND
REPLACING
SPARK
PLUGS
CHECKING
AND
ADJUSTING
CARBURETOR
IDLE
RPM
AND
MIXTURE
RATIO
CHECKING
CHOKE
MECHANISM
Choke
plate
and
linkage
CHECKING
FUEL
SHUT
OFF
SYSTEM
FU
models
ET
2
ET
3
ET
3
ET
3
ET
3
ET
3
ET
4
ET
4
ET
4
ET
5
ET
5
ET
5
ET
6
ET
6
ET
7
ET
9
ET
9
REPLACING
FUEL
FILTER
ET
10
CHECKING
FUEL
LINES
Hoses
piping
connections
etc
ET
10
REPLACING
AIR
CLEANER
FILTER
ETlO
CHECKING
AUTOMATIC
TEMPERATURE
CONTROL
AIR
CLEANER
ET
10
EMISSION
CONTROL
SYSTEM
ET
11
CHECKING
VACUUM
FITTING
HOSES
AND
CONNECTIONS
ET
11
REPLACING
AIR
PUMP
AIR
CLEANER
FILTER
Except
FU
models
and
Canada
models
E
1122i
REPLACING
AIR
INDUCTION
VALVE
FILTER
FU
models
and
Canada
models
E
tlil1r2
C
REPLACING
PCV
VALVE
AND
FILTER
ETf
CHECKING
VENTI
LATION
HOSES
E1P12
CHECKING
VAPOR
LINES
Eli
J2
CHECKING
FUEL
TANK
VACUUM
RELIEF
I
f
III
VALVE
ET
13
REPLACING
CARBON
CANISTER
W
FILTER
ET
d
SERVICE
DATA
AND
SPECIFICATIONS
ET
14
TROUBLE
DIAGNOSES
AND
CORRECTIONS
ET
16
SPECIAL
SERVICE
TOOL
ET
23
Page 16 of 548
f
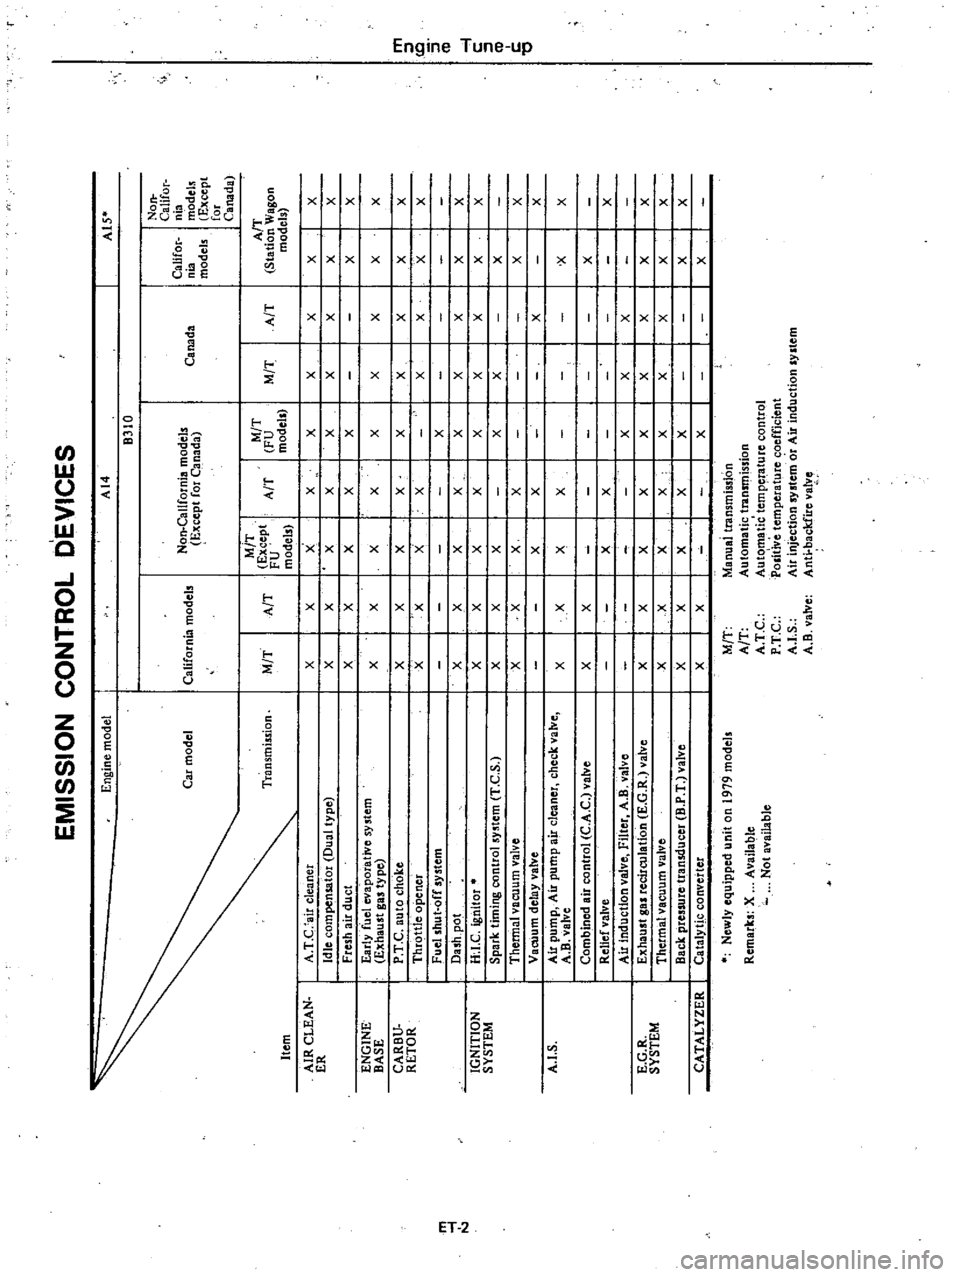
EMISSION
CONTROL
DEVICES
En
ine
model
I
AI4
I
A1S
B310
Non
CaliCor
Non
California
models
Califor
nia
Car
model
California
models
E
cept
for
C
nada
Canada
nia
modeb
models
Except
for
Canada
M
T
M
T
A
T
Ti
ansmiuion
M
T
A
T
Except
A
T
FU
M
T
A
T
Station
Wagon
FU
models
models
models
AIR
CLEAN
I
A
T
C
air
cleaner
I
X
I
X
X
I
X
I
X
I
X
I
X
I
X
X
ER
Idle
compensator
Dual
type
X
I
X
X
I
X
I
X
I
X
I
X
I
X
X
Fresh
air
duct
X
I
X
X
I
X
I
X
I
I
I
X
X
ENGINE
I
Early
fuel
evaporative
system
X
I
X
X
xl
X
I
X
I
X
I
X
X
BASE
Exhaust
gas
type
CARBV
I
P
T
C
auto
choke
X
I
X
X
X
I
X
I
X
I
X
I
X
X
m
RETOR
I
l
Thr
ttle
opener
X
X
X
X
I
I
X
I
X
I
X
X
Q
I
Fuel
shut
off
system
I
X
I
I
I
3
m
ll
i
Dash
po
t
X
X
X
X
I
X
I
X
I
X
I
X
X
N
l
IGNITION
I
H
I
C
ignitor
X
X
X
X
I
X
I
X
I
X
I
X
X
c
SYSTEM
Spark
timing
contra
system
T
e
S
X
X
X
I
I
I
I
l
X
X
I
X
ll
Thermal
vacuum
valve
X
X
X
I
X
I
I
I
I
X
X
c
Vacuum
delay
valve
X
I
X
I
I
I
X
I
0
X
A
I
S
I
Air
pump
Air
pump
air
cleaner
check
valve
I
X
X
I
X
I
X
I
I
I
I
x
X
A
B
valve
Combined
air
control
C
A
C
valve
I
X
X
I
I
I
I
I
I
X
Relief
valve
I
I
X
I
X
I
I
I
I
X
Air
induction
valve
Filter
A
B
valve
I
I
I
I
X
I
X
I
X
E
G
R
I
Exhaust
gas
recirculation
E
G
R
valve
I
X
I
X
I
X
I
X
I
X
I
X
I
X
I
X
X
SYSTEM
Thetmalvacuum
valve
I
X
I
X
I
X
I
X
I
X
I
X
I
X
I
X
X
Back
pressure
transducer
B
P
T
valve
I
X
I
X
I
X
I
X
I
X
I
I
I
X
X
CATALYZER
I
CatalytJc
converter
I
X
I
X
I
I
I
X
I
I
I
X
Newly
equipped
unit
on
1979
models
M
T
Manual
transmission
Remarks
X
Available
A
T
Automatic
transmission
Not
available
A
T
C
Aute
matic
tempeJ
ature
control
P
T
C
POlitive
temperature
coefficient
A
I
S
Air
injection
system
or
Air
induction
system
A
B
valve
Anti
backfire
valve
Page 18 of 548
pl
ice
mter
as
an
assembly
2
When
installing
oil
mter
tighten
by
hand
Note
Do
not
overtighten
oil
filter
lest
leakage
shoUld
occur
CHANGING
ENGINE
COOLANT
PERMANENT
ANTI
FREEZE
COOLANT
Note
The
permanent
anti
freeze
coolant
is
an
ethylene
glya
l
base
product
containing
chemical
in
hibitors
to
protect
the
cooling
system
from
rusting
and
corrosion
The
anti
freeze
does
not
cOntain
any
glycerine
or
ethyl
alcohol
It
will
not
evaporate
or
boil
a
ay
and
can
be
ilsed
with
either
high
or
low
temperature
thermostats
It
flows
freely
transfers
heat
efficiently
and
will
not
clog
the
passages
in
the
cooling
system
The
anti
freeze
must
not
be
mixed
with
other
product
This
coolant
can
be
used
throughout
the
seasons
of
the
year
Whenever
coolant
is
changed
the
cooling
system
must
be
flushed
and
refilled
with
a
new
coolant
Check
the
coolant
level
See
instructions
attached
to
the
anti
freeze
container
for
mixing
ratio
of
anti
freeze
to
water
CHECKING
COOLING
SYSTEM
HOSES
AND
CONNECTIONS
Check
hoses
and
fittings
for
loose
connections
or
deterioration
Re
tighten
or
replace
if
necessary
INSPECTION
OF
RADIATOR
CAP
Apply
reference
pressure
0
9
kgj
cm2
13
psi
to
radiator
cap
by
means
of
a
cap
tester
to
see
if
it
is
satisfactory
Replace
cap
assembly
if
necessary
I
j
ngine
Tune
up
ET012
Fig
ET
3
Testing
Radiator
Cap
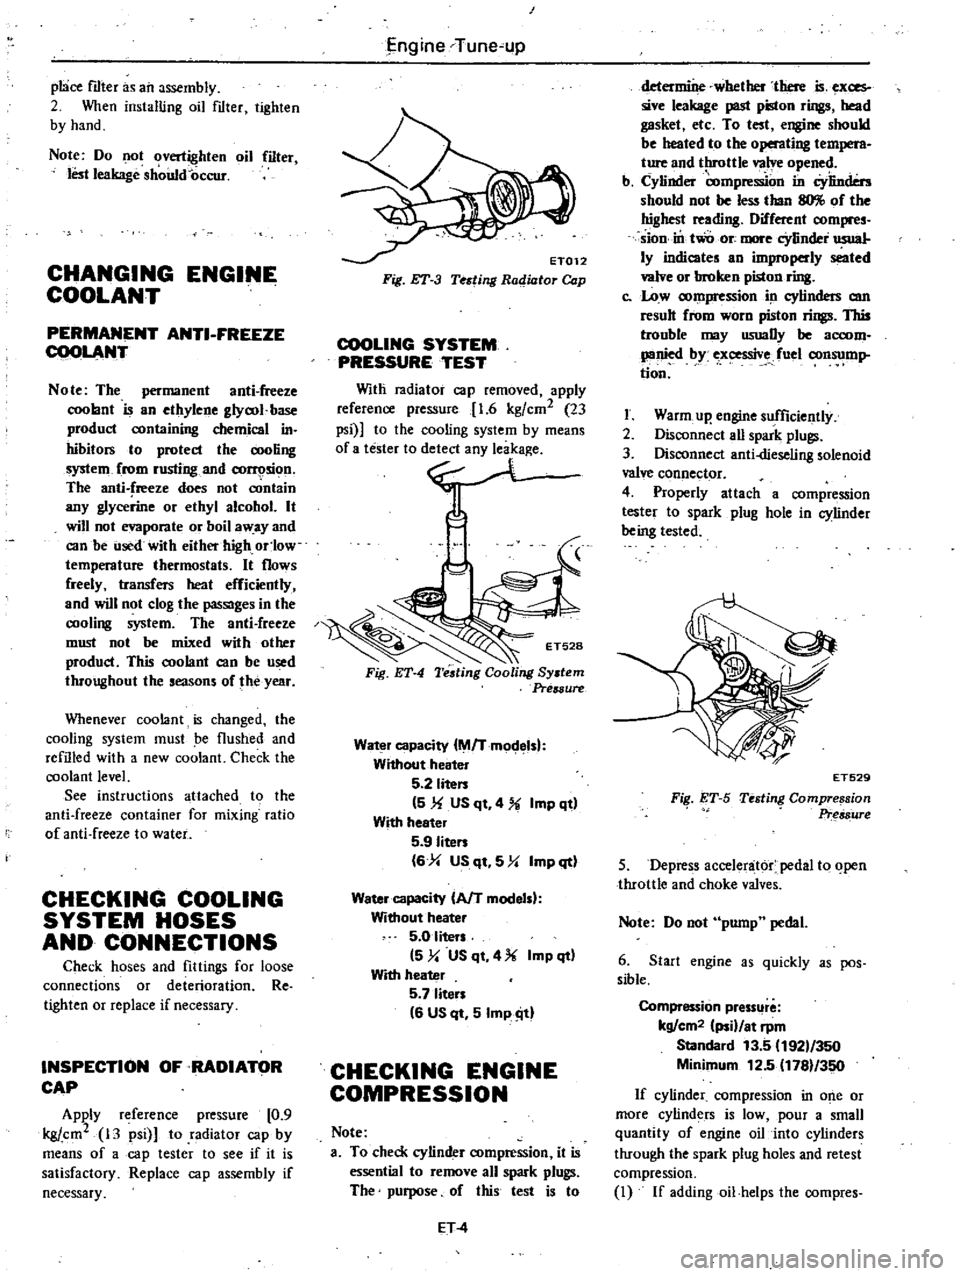
COOLING
SYSTEM
PRESSURE
TEST
Witli
radiator
cap
removed
apply
reference
pressure
1
6
kgfcm2
23
psi
to
the
cooling
system
by
means
0
no
Fig
ET
4
Water
capacity
M
Tmodelsl
Without
heater
5
2
liten
5
1f
US
qt
4
Imp
qt
With
heeter
5
9
Iiten
6
4
US
qt
5
Y
Imp
qt
Water
capacity
AfT
modelsl
Without
heater
5
0
liters
5
y
US
qt
4
Imp
qt
With
heater
5
7
liten
6
US
qt
5
Imp
ill
CHECKING
ENGINE
COMPRESSION
Note
a
To
check
cylinder
compression
it
is
essential
to
remove
all
spark
plugs
The
purpose
of
this
test
is
to
ET
4
determine
whether
there
is
exces
sive
leakage
past
piston
rings
head
gasket
etc
To
test
engine
should
be
heated
to
the
operating
t
M
ture
and
throttle
valve
opened
b
Cylinder
compre
on
in
Cylinders
should
not
be
less
than
llO
of
the
highest
reading
Different
compres
sion
in
two
ore
more
cYlinder
usual
ly
indicates
an
improperly
seated
valve
or
broken
piston
ring
c
Low
compression
in
cylinders
am
result
from
worn
piston
rings
This
trouble
may
usuaDy
be
accom
panied
by
ex
ssive
fuel
consump
tion
I
Warm
up
engine
sufficiently
2
Disconnect
aU
spark
plugs
3
Disconnect
anti
dieseling
solenoid
valve
connector
4
Properly
attach
a
compression
tester
to
spark
plug
hole
in
cylinder
being
tested
FiI
ET
S
ET529
Testing
Compre
sion
Pr
s8ure
5
Depress
accelenit6r
pedal
to
open
throttle
and
choke
valves
Note
Do
not
pump
pedal
6
Start
engine
as
quickly
as
pos
sible
Compression
pressllre
kg
cm2
ii
at
rpm
Standard
13
5
192
350
Minimum
12
5
1781
350
If
cylinder
compression
in
o
e
or
more
cylinders
is
low
pour
a
small
quantity
of
engine
oil
into
cylinders
through
the
spark
plug
holes
and
retest
compression
I
If
addingoil
helps
the
compres
Page 24 of 548
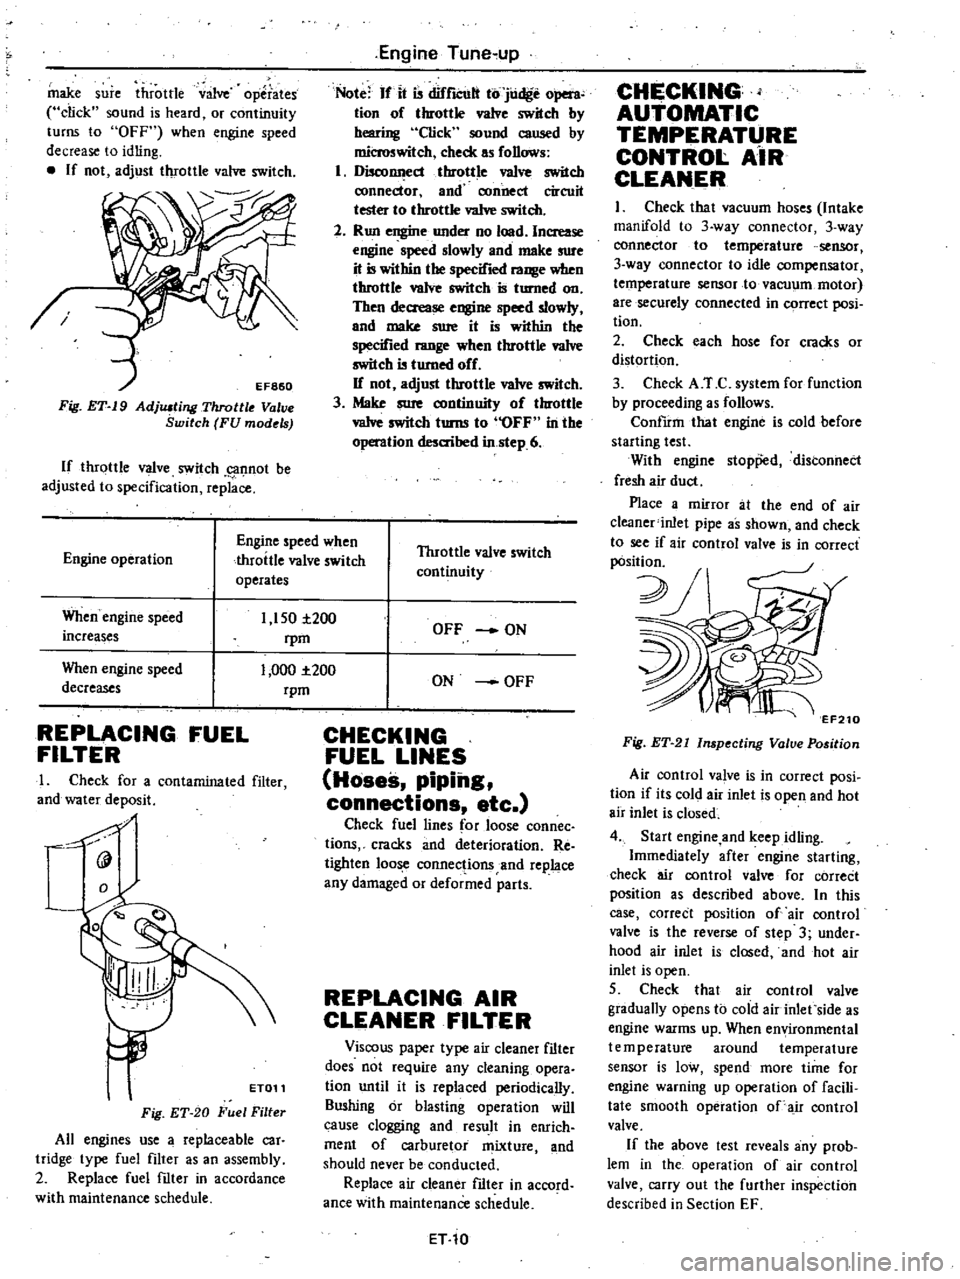
make
sure
throttle
valve
operates
click
sound
is
heard
or
continuity
turns
to
OFF
when
engine
speed
decrease
to
idling
If
not
adjust
throttle
valve
switch
Fig
ET
19
AdjlUting
Throttle
V
ve
Switch
FU
models
If
throttle
valve
switch
g1f1not
be
adjusted
to
specification
replace
Engine
Tune
up
Note
If
it
is
difrlCUlt
to
judge
open
tion
of
throttle
valve
switch
by
hearing
Click
sound
caused
by
microswitch
check
as
follows
1
DiscollI
ecl
throttle
va1ve
switch
ronnector
and
connect
circuit
tester
to
throttle
va1ve
switch
2
Run
engine
under
no
load
Increase
engine
speed
slowly
and
make
sure
it
is
within
the
specified
range
when
throttle
valve
switch
is
turned
on
Then
decrease
engine
speed
slowly
and
make
sure
it
is
within
the
specified
range
when
throttle
va1ve
switch
is
turned
off
If
not
adjust
throttle
valve
switch
3
Make
sure
continuity
of
throttle
vaIve
switch
turns
to
OFF
in
the
operation
desaihed
in
step
6
Engine
operation
Engine
speed
when
throttle
valve
switch
operates
Throttle
valve
switch
continuity
When
engine
speed
increases
1
150
i200
rpm
1
000
1
200
rpm
When
engine
speed
decreases
REPLACING
FUEL
FILTER
I
Check
for
a
contaminated
filter
and
water
deposit
0
9
ET011
Fig
ET
20
Fuel
Filter
All
engines
use
a
replaceable
car
tridge
type
fuel
filter
as
an
assembly
2
Replace
fuel
filter
in
accordance
with
maintenance
schedule
OFF
ON
ON
OFF
CHECKING
FUEL
LINES
Hoses
piping
connections
etc
Check
fuel
lines
for
loose
connec
tions
cracks
and
deterioration
Re
tighten
loose
connections
and
replace
any
damaged
or
deformed
parts
REPLACING
AIR
CLEANER
FILTER
Viscous
paper
type
air
cleaner
filter
does
not
require
any
cleaning
opera
tion
until
it
is
replaced
periodically
Sushing
or
blasting
operation
will
cause
clogging
and
result
in
enrich
ment
of
carburetor
mixture
and
should
never
be
conducted
Replace
air
cleaner
filter
in
accord
ance
with
maintenance
schedule
ET
10
CHECKING
AUTOMATIC
TEMPERATURE
CONTROl
AiR
CLEANER
I
Check
that
vacuum
hoses
Intake
manifold
to
3
way
connector
3
way
connector
to
temperature
sensor
3
way
connector
to
idle
compensator
temperature
sensor
to
vacuum
motor
are
securely
connected
in
C9rrect
posi
tion
2
Check
each
hose
for
cracks
or
distortion
3
Check
A
T
C
system
for
function
by
proceeding
as
follows
ConfIrm
that
engine
is
cold
before
starting
test
With
engine
stopp
d
distonnect
fresh
air
duct
Place
a
mirror
at
the
end
of
air
c1eaner
inlet
pipe
as
shown
and
check
to
see
if
air
control
valve
is
in
correct
pOsition
2J
v
7
EF210
Fig
ET
21
Inspecting
Valve
Position
Air
control
va
ve
is
in
correct
posi
tion
if
its
cold
air
inlet
is
open
and
hot
air
inlet
is
closed
4
Start
engine
and
keep
idling
Immediately
after
engine
starting
check
air
control
valve
for
correCt
position
as
described
above
In
this
case
correct
position
of
air
control
valve
is
the
reverse
of
step
3
under
hood
air
inlet
is
closed
and
hot
air
inlet
is
open
5
Check
that
air
control
valve
gradually
opens
to
cold
air
inlet
side
as
engine
warms
up
When
environmental
temperature
around
temperature
sensor
is
low
spend
more
time
for
engine
warning
up
operation
of
facili
tate
smooth
operation
of
air
control
valve
If
the
above
test
reveals
any
prob
lem
in
the
operation
of
air
control
valve
carry
out
the
further
inspection
described
in
Section
EF
Page 26 of 548
R
EPIACING
AIR
PUMP
AIR
CLEANER
FILTER
Except
FU
models
and
Canada
models
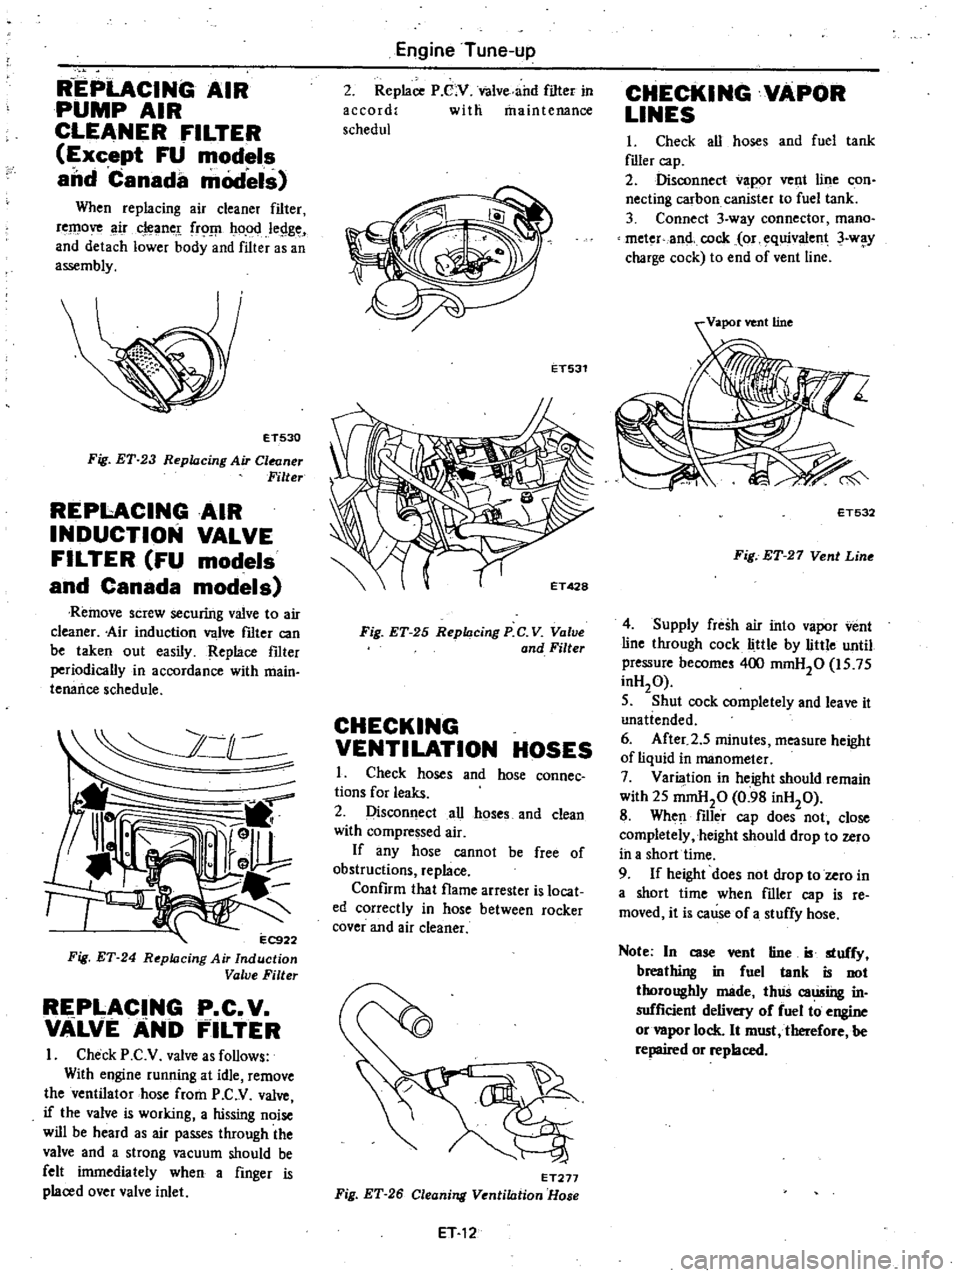
When
replacing
air
cleaner
filter
remove
ir
cleane
frO
ho
od
legge
and
detach
lower
body
and
filter
as
an
assembly
ET530
Fig
ET
23
Replacing
Air
Cleaner
Filter
REPI
ACINGAIR
INDUCTION
VALVE
FILTER
FU
models
and
Canada
models
Remove
screw
securirtg
valve
to
air
cleaner
Air
induction
valve
fIlter
can
be
taken
out
easily
Replace
fIlter
periodically
in
accordance
with
main
tenance
schedule
2
C
l
11
l
r
r
EC9
Fig
ET
24
R
pklcing
Air
Induction
Value
Filter
REPLACING
P
C
V
VALVEANb
FILTER
I
Check
P
C
V
valve
as
follows
With
engine
running
at
idle
remove
the
ventilator
hose
from
P
C
V
valve
if
the
valve
is
working
a
hissing
noise
will
be
heard
as
air
passes
through
the
valve
and
a
strong
vacuum
should
be
felt
inunediately
when
a
finger
is
placed
over
valve
inlet
Engine
Tune
up
2
Replace
P
C
V
Valve
and
filter
in
accord
with
maintenance
schedul
ET531
Fig
ET
25
Replacing
P
C
V
Value
and
Filter
CHECKING
VENTILATION
HOSES
I
Check
hoses
and
hose
connec
tions
for
leaks
2
Disconnect
all
hoses
and
clean
with
compressed
air
If
any
hose
cannot
be
free
of
obstructions
replace
Confirm
that
flame
arrester
is
locat
ed
correctly
in
hose
between
rocker
cover
and
air
cleaner
ET277
Fig
ET
26
Cleaning
Ventilation
Hose
ET
12
CHECKING
VAPOR
LINES
I
Check
all
hoses
and
fuel
tank
flller
cap
2
Disconnect
vapor
vent
line
con
necting
carbon
canister
to
fuel
tank
3
Connect
3
way
connector
mana
meter
and
cock
or
equivalent
3
w
y
charge
cock
to
end
of
vent
line
ET532
Fig
ET
27
Vent
Line
4
Supply
fresh
air
into
vapor
vent
line
through
cock
little
by
little
until
pressure
become
400
mmH20
is
75
inH20
5
Shut
cock
completely
and
leave
it
unatiended
6
After
2
5
minutes
measure
height
of
liquid
in
manometer
7
Varilllion
in
height
should
remain
with
25
mmHp
0
98
inH20
8
When
filler
cap
does
not
close
completely
height
should
drop
to
zero
ih
a
short
time
9
If
height
does
not
drop
to
zero
in
a
short
time
when
filler
cap
is
re
moved
it
is
cause
of
a
stuffy
hose
Note
In
case
vent
tine
B
stuffy
breathing
in
fuel
tank
is
not
thoroughly
made
thlis
caming
in
sufficient
delivery
of
fuel
to
engine
or
vapor
lock
It
must
tberefore
be
repaired
or
replaced
Page 27 of 548
3
way
connector
ck
Air
Manometer
@
Carbon
canister
Engine
Tune
up
400
mmH20
15
75
in
H20
Check
valve
r
F
uel
filler
cap
with
vacuum
relief
valve
1
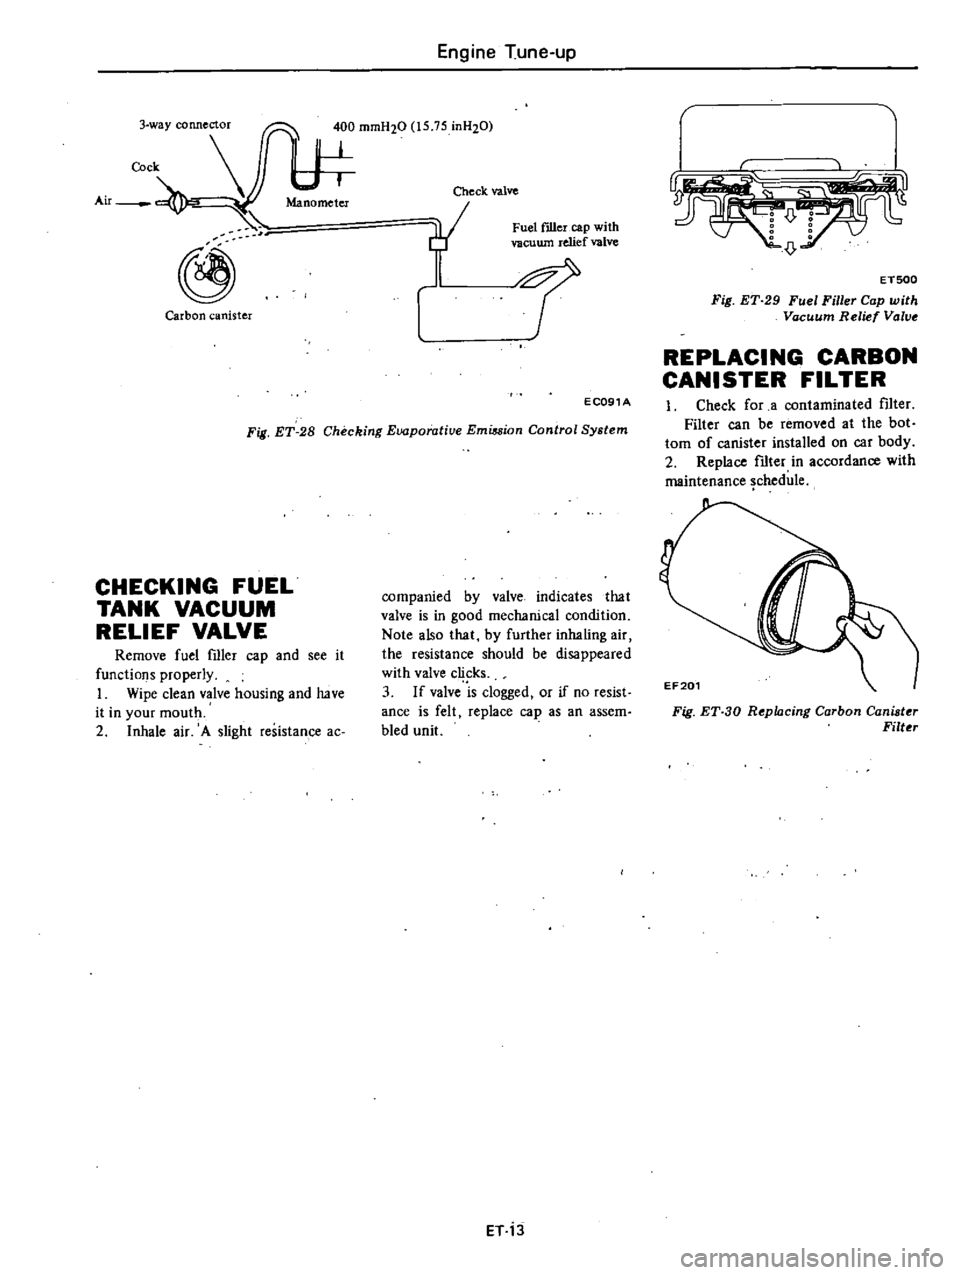
Fig
ET
28
Checking
Evaporatiue
Emiuion
Control
System
EC091A
CHECKING
FUEL
TANK
VACUUM
RELIEF
VALVE
Remove
fuel
filler
cap
and
see
it
functions
properly
I
Wipe
clean
valve
housing
and
have
it
in
your
mouth
2
Inhale
air
A
slight
resistance
ac
companied
by
valve
indicates
that
valve
is
in
good
mechanical
condition
Note
also
that
by
further
inhaling
air
the
resistance
should
be
disappeared
with
valve
c
ks
3
If
valve
is
clogged
or
if
no
resist
ance
is
felt
replace
cap
as
an
assem
bled
unit
ET
j3
D
o
0
o
0
o
0
ET500
Fig
ET
29
Fuel
Filler
Cap
with
Vacuum
Relief
Value
REPLACING
CARBON
CANISTER
FILTER
Check
for
a
contaminated
fJlter
Filter
can
be
removed
at
the
bot
tom
of
canister
installed
on
car
body
2
Replace
fJlter
in
accordance
with
maintenance
chedule
EF201
Fig
ET
30
Repfucing
Carbon
Canister
Filter
Page 31 of 548
Engine
Tune
up
Condition
Probable
cause
Low
or
no
current
Ignition
system
out
of
order
Burned
distributor
point
Improper
point
gap
Faulty
condenser
Leak
at
rotor
cap
and
rotor
Faulty
spark
plug
Improper
ignition
timing
Faulty
ignition
coil
Disconnecrion
of
high
tension
cable
Loose
connection
or
disconnection
in
primary
circuit
Lack
offuel
Dirty
fuel
filter
Dirty
or
clogged
fuel
pipe
Fuel
pump
will
not
w0rk
properly
Carburetor
choke
will
not
work
properly
Improper
adjustment
of
float
level
Improper
idling
Dirty
or
clogged
carburetor
Clogged
breather
pipe
of
fuel
tank
Malfunctionin
g
anti
dieseling
solenoid
valve
Malfunctioning
fuel
shut
off
system
FU
models
Incorrect
spark
plug
tightening
or
faulty
gasket
Improper
grade
engine
oil
or
low
viscosity
Incorrect
valve
clearance
Compression
leak
from
valve
seat
Sticky
valve
stem
Weak
or
damaged
valve
springs
Compression
leak
at
cylinder
head
gasket
Sticking
or
damaged
piston
ring
Worn
piston
ring
or
cylinder
Trouble
looting
procedure
Pour
the
engine
oil
from
plug
hole
and
then
measurt
cylinder
compression
Fuel
system
out
of
order
Low
compression
Compression
increases
Compression
does
not
change
ET
17
Corrective
action
Check
for
loose
terminal
or
disconnection
in
primary
circuit
Check
for
burned
points
Repair
or
replace
Adjust
Replace
Clean
or
replace
Clean
adjust
plug
gap
or
replace
Adjust
Replace
Replace
Repair
or
replace
Supply
Replace
Clean
Repair
or
replace
Check
and
adjust
Correct
Adjust
Disassemble
and
clean
Repair
and
clean
Check
for
loose
terminal
or
wire
harness
Check
fuel
shut
off
system
Adjust
or
re
place
if
necessary
Tighten
to
normal
torque
or
replace
gasket
Replace
with
proper
grade
oil
Adjust
Remove
cylinder
head
and
lap
valves
Correct
or
replace
valve
and
valve
guide
Replace
valve
springs
Replace
gasket
Replace
piston
rings
Overhaul
engine
Malfunctiong
cylinder
or
piston
ring
Compression
leaks
from
valve
cylinder
head
or
head
gasket
Page 32 of 548
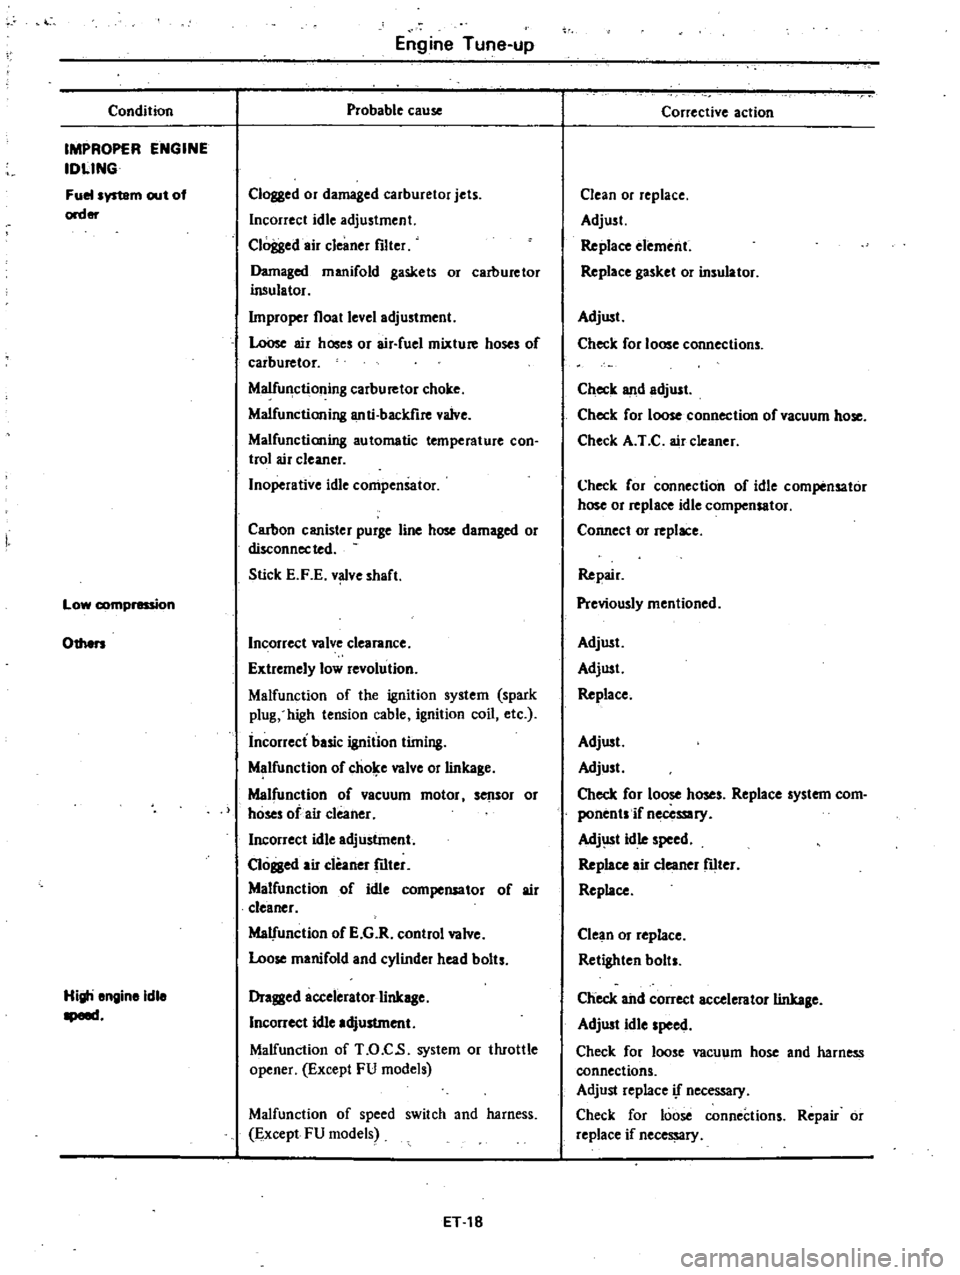
Condition
IMPROPER
ENGINE
IDLING
Fuelsystam
out
of
order
Low
1
ion
Engine
Tune
up
Probable
cause
Clogged
or
damaged
carburetor
jets
Incorrect
idle
adjustment
Clogged
air
cleaner
filter
Damaged
manifold
gaskets
or
carburetor
insulator
bnproper
float
level
adjustment
LoOse
air
hoses
or
air
fuel
mixture
hoses
of
carburetor
Malfunctioning
carburetor
choke
Malfunctioning
anti
backfire
valve
Malfunctioning
automatic
temperature
con
trol
air
cleaner
Inoperative
idle
compensator
Carbon
canister
purge
line
hose
damaged
or
disconnected
Stick
E
F
E
v
ve
shaft
Othen
Incorrect
valve
clearance
Extremely
low
revolution
Malfunction
of
the
ignition
system
spark
plug
high
tension
cable
ignition
coil
etc
incorrect
basic
ignition
timing
Malfunction
of
chol
e
valve
or
linkage
Malfunction
of
vacuum
motor
sensor
or
hoses
of
air
cleaner
Incorrect
idle
adjustment
Cloged
air
cleaner
fIIter
Malfunction
of
idle
compensator
of
air
cleaner
Malfunction
of
E
G
R
control
valve
Loose
manifold
and
cylinder
head
bolts
Higli
engine
idle
opem
Dragged
accelerator
linkage
Incorrect
idle
adjustment
Malfunction
of
T
O
C
s
system
or
tluottle
opener
Except
FU
models
Malfunction
of
speed
switch
and
harness
Except
FU
models
ET
18
Corrective
action
Clean
or
replace
Adjust
Replace
element
Replace
gasket
or
insulator
Adjust
Check
for
loose
connections
Check
lUId
adjust
Check
for
loose
connection
of
vacuum
hose
Check
A
I
C
air
cleaner
Check
for
connection
of
idle
compensator
hose
or
replace
idle
compensator
Connect
or
replace
Repair
Previously
mentioned
Adjust
Adjust
Replace
Adjust
Adjust
Check
for
loose
hoses
Replace
system
com
ponentsif
necessary
Adj
lSt
idle
speed
Replace
air
cleaner
filter
Replace
Clean
or
replace
Retighten
bolts
Check
ahd
correct
accelerator
linkage
Adjust
idle
speed
Check
for
loose
vacuum
hose
and
harness
connections
Adjust
replace
if
necessary
Check
for
loose
connections
Repair
or
replace
if
necessary
Page 33 of 548
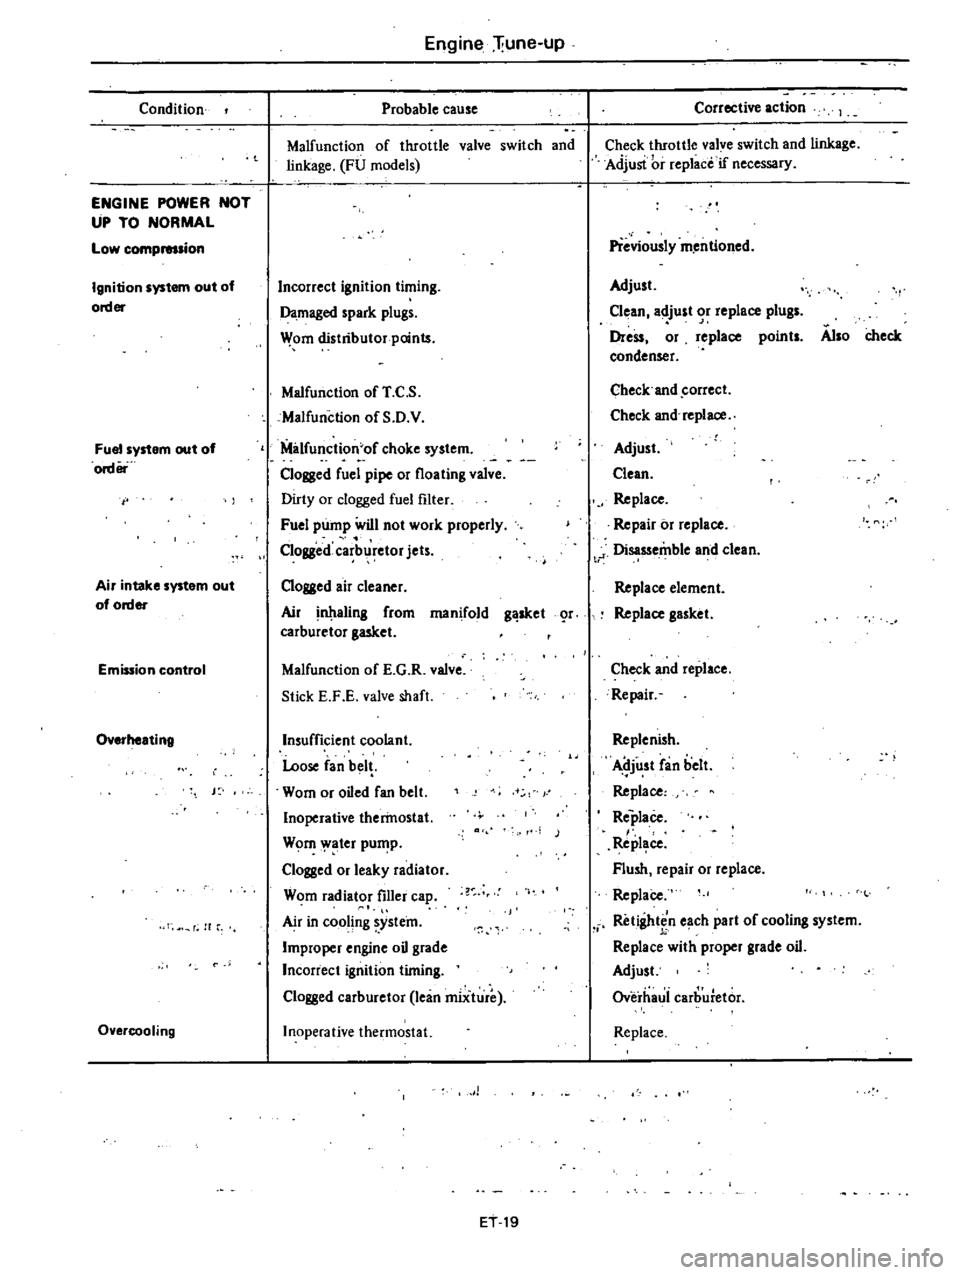
Condition
ENGINE
POWER
NOT
UP
TO
NORMAL
Low
compmsion
Ignition
system
out
of
order
Fuel
system
out
of
order
Air
intake
system
out
of
order
Emission
control
Overheating
J
f
H
r
Overcooling
Engine
liune
up
Probable
cause
Malfunction
of
throttle
valve
switch
and
linkage
FU
models
Incorrect
ignition
timing
Damaged
spark
plugs
Wom
distributor
points
Malfunction
of
T
C
S
cMalfunction
of
S
D
V
Milfunction
of
choke
system
Clogged
fuel
pipe
or
floating
valve
Dirty
or
clogged
fuel
filter
Fuel
pump
will
not
work
properly
Clogged
carb
retor
jets
Clogged
air
cleaner
Air
aling
from
manifold
g
sket
r
carburetor
gasket
Malfunction
of
E
G
R
valve
Stick
E
F
E
valve
shaft
Insufficient
coolant
Loose
fan
bel
Wom
or
oiled
fan
belt
Inoperative
therinostat
Wom
ater
pu
p
Clogged
or
leaky
radiator
Wom
radiator
filler
ca
Air
in
cooling
ystein
Improper
engine
oil
grade
Incorrect
ignition
timing
Clogged
carburetor
lean
miiture
Inoperative
thermostat
1
ET
19
Corrective
action
Check
throttle
valve
switch
and
linkage
Adjusi
i
r
replace
if
necessary
Previously
m
entioned
Adjust
Clean
adjust
or
replace
plugs
Dress
or
replace
points
Also
check
condenser
Check
and
correct
Check
and
replace
Adjust
Clean
Replace
Repair
or
replace
t
J
Disassemble
and
clean
Replace
element
Replace
gasket
Check
and
replace
Repair
Replenish
Adjust
fan
belt
Replace
Replace
Repl
ce
Flush
repair
or
replace
ReplaCe
Retightin
e
ch
part
of
cooling
system
Replace
with
proper
grade
oil
Adjust
Overhaui
carburetor
Replace