bulb DATSUN PICK-UP 1977 Service Manual
[x] Cancel search | Manufacturer: DATSUN, Model Year: 1977, Model line: PICK-UP, Model: DATSUN PICK-UP 1977Pages: 537, PDF Size: 35.48 MB
Page 36 of 537
Replace
bulb
if
bulb
is
burned
ou
t
If
bulb
is
not
burned
trace
wireis
back
to
ignition
switch
Repair
or
replace
if
necessary
2
Be
sure
that
floor
temperature
is
cool
below
800C
1760F
before
carrying
out
the
following
procedure
1
Remove
rear
seat
2
Ignition
switch
is
turned
to
the
Temperature
sensing
switch
Temperature
warning
lamp
Contact
close
Off
Contact
open
On
Note
Avoid
heating
floor
tempera
ture
sensing
switch
directly
If
lamp
does
not
glow
check
floor
temperature
sensing
switch
connector
for
continuity
with
a
circuit
tester
If
continuity
should
exist
after
heated
surrounding
areas
of
floor
tern
rv
wnTP
sen
cinq
S
Vitch
reolace
tem
perature
sensing
switch
If
continuity
does
not
exist
trace
the
wiring
back
to
relay
or
check
the
following
step
3
Repair
or
replace
wire
s
if
necessary
Note
The
floor
temperature
sensing
switch
may
be
heated
through
the
floor
by
a
proper
heater
3
Turn
ignition
switch
to
the
IG
position
anf
disconnect
floor
temper
ature
sensing
connector
The
lamp
should
remain
on
If
not
check
floor
4
0
3
UJ
GJO
Engine
Tune
up
IGU
position
3
Ensure
that
floor
tem
perature
warning
lamp
goes
out
4
Heat
surrounding
areas
of
floor
temperature
sensing
switch
with
a
proper
heater
to
ensure
that
floor
temperature
warning
lamp
glows
when
floor
is
heated
to
lh
specifications
as
shown
in
the
table
below
Floor
temperature
Below
1050C
22IOF
Above
1050C
2210F
temperature
relay
for
continuity
with
a
circuit
tester
Referring
to
the
following
floor
temperature
relay
if
relay
is
normal
trace
wire
s
back
to
ignition
switch
Repair
faulty
wiring
Floor
temperature
rela
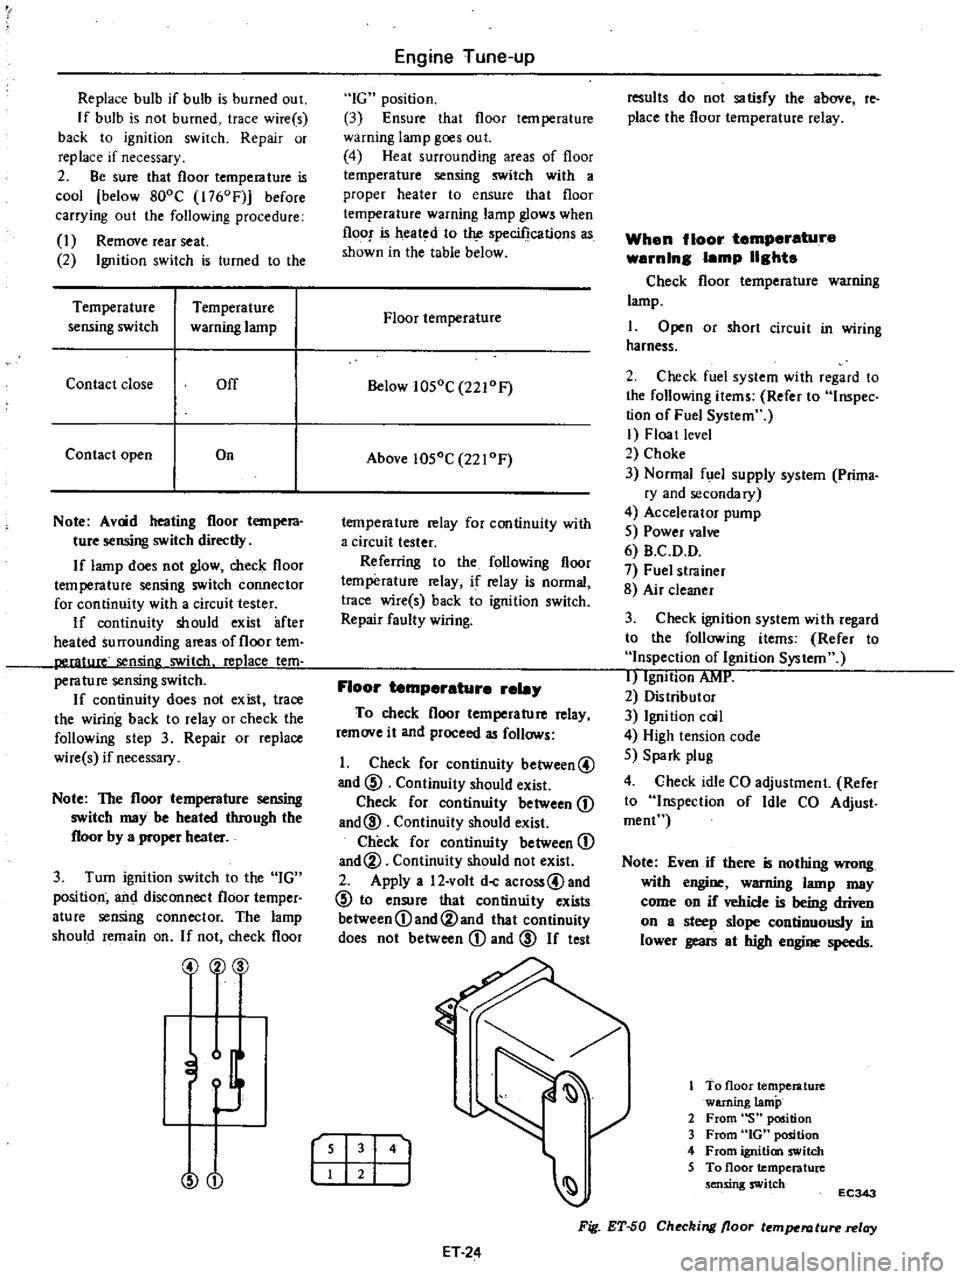
To
check
floor
temperature
relay
remove
it
and
proceed
as
follows
1
Check
for
continuity
between@
and
@
Continuity
should
exist
Check
for
continuity
between
D
and@
Continuity
should
exist
Check
for
continuity
between
D
and@
Continuity
should
not
exist
2
Apply
a
12
volt
doC
across@and
@
to
ensure
that
continuity
exists
between
D
and@and
that
continuity
does
not
between
D
and
@
If
test
r
I
141
ET
24
results
do
not
satisfy
the
above
reo
place
the
floor
temperature
relay
When
floor
temperature
warnln8
lamp
118hts
Check
floor
temperature
warning
lamp
I
Open
or
short
circuit
in
wiring
harness
2
Check
fuel
system
with
regard
to
the
following
items
Refer
to
Inspec
tion
of
Fuel
System
I
Floa
t
level
2
Choke
3
Normal
fuel
supply
system
Prima
ry
and
secondary
4
Accelerator
pump
5
Power
valve
6
B
C
D
D
7
Fuel
strainer
8
Air
cleaner
3
Check
ignition
system
with
regard
to
the
following
items
Refer
to
Inspection
of
Ignition
System
I
IgnItion
AMI
2
Distributor
3
Ignition
coil
4
High
tension
code
5
Spark
plug
4
Check
idle
CO
adjustment
Refer
to
Inspection
of
Idle
CO
Adjust
roeoC
Note
Even
if
there
is
nothing
wrong
with
engine
warning
lamp
may
come
on
if
vehicle
is
being
driven
on
a
steep
slope
continuously
in
lower
gears
at
high
engine
speeds
To
floor
temperature
warning
lamp
2
From
S
position
3
From
GOt
position
4
From
ignition
switch
5
To
floor
temperature
sensing
switch
EC343
Fig
ET
50
Checking
floor
temperature
relay
Page 162 of 537
Floor
temparature
warning
lamp
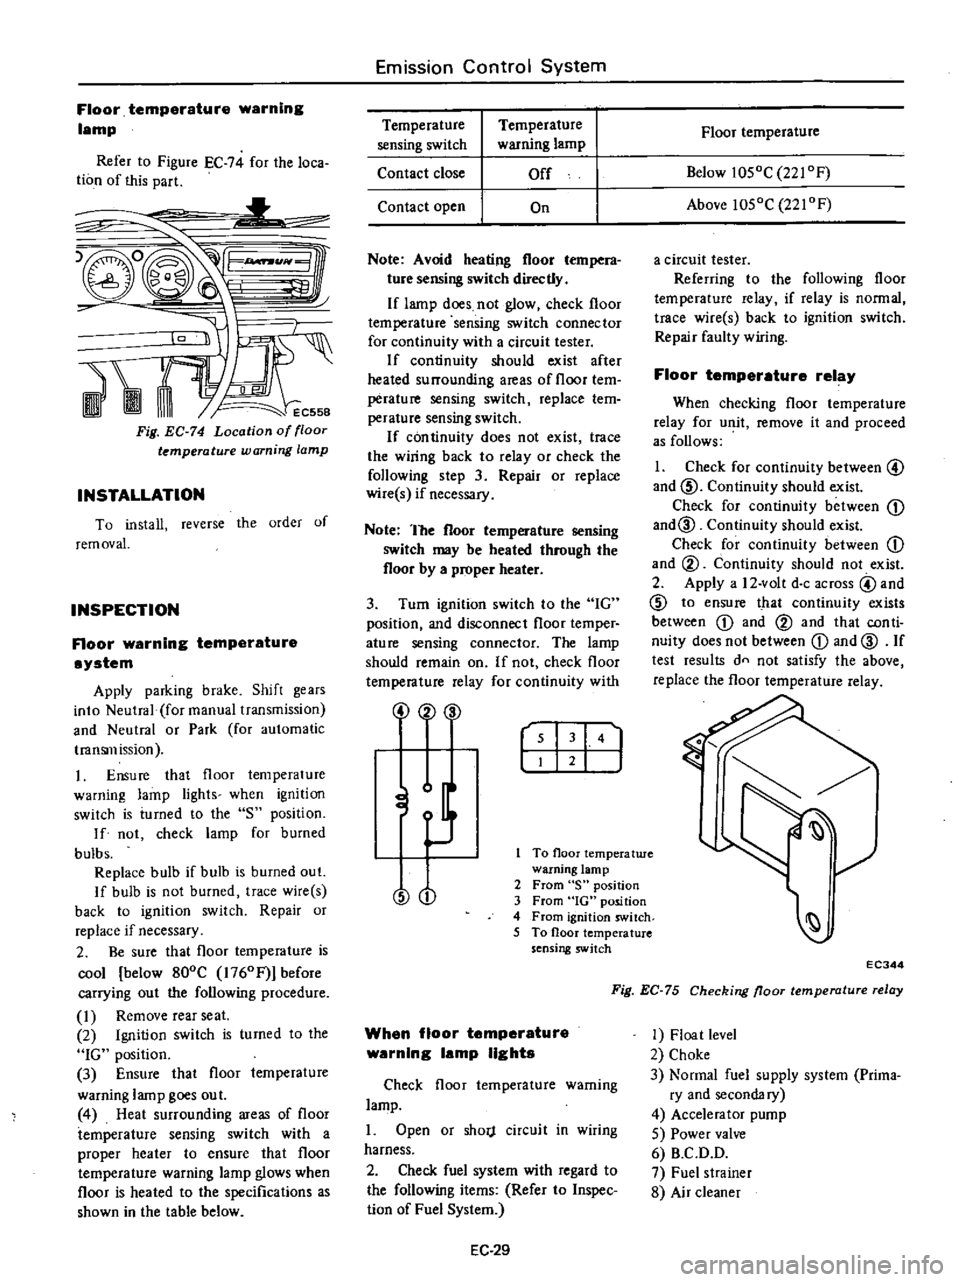
Refer
to
Figure
EC
74
for
the
loca
tion
of
this
part
L
1t
1
RAt
Fig
EC
74
Location
of
floor
temperature
warning
lamp
INSTALLATION
To
install
reverse
the
order
of
rem
ovaL
INSPECTION
Floor
warning
temperature
system
Apply
parking
brake
Shift
gears
into
Neutral
foI
manual
transmission
and
Neutral
or
Park
for
automatic
transmission
1
Ensure
that
floor
temperature
warning
lamp
lights
when
ignition
switch
is
iumed
to
the
S
position
If
not
check
lamp
for
burned
bulbs
Replace
bulb
if
bulb
is
burned
out
If
bulb
is
not
burned
trace
wire
s
back
to
ignition
switch
Repair
or
replace
if
necessary
2
Be
sure
that
floor
temperature
is
cool
below
800C
1760Fj
before
carrying
out
the
following
procedure
I
Remove
rearseat
2
Ignition
switch
is
turned
to
the
IG
position
3
Ensure
that
floor
temperature
warning
lamp
goes
out
4
Heat
surrounding
areas
of
floor
temperature
sensing
switch
with
a
proper
heater
to
ensure
that
floor
temperature
warning
lamp
glows
when
floor
is
heated
to
the
specifications
as
shown
in
the
table
below
Emission
Control
System
Temperature
sensing
switch
Contact
close
Temperature
warning
lamp
Off
Contact
open
On
Note
Avoid
heating
floor
tempera
ture
sensing
switch
directly
If
lamp
does
not
glow
check
floor
temperature
sensing
switch
connector
for
continuity
with
a
circuit
tester
If
continuity
should
exist
after
heated
surrounding
areas
of
floor
tem
perature
sensing
switch
replace
tem
perature
sensing
switch
If
con
tinuity
does
not
exist
trace
the
wiring
back
to
relay
or
check
the
following
step
3
Repair
or
replace
wire
s
if
necessary
Note
The
floor
temperature
sensing
switch
may
be
heated
through
the
floor
by
a
proper
heater
3
Turn
ignition
switch
to
the
IG
position
and
disconnect
floor
temper
ature
sensing
connector
The
lamp
should
remain
on
If
not
check
floor
temperature
relay
for
continuity
with
2
00
r
I
141
J
To
floor
temperatwe
warning
lamp
2
From
S
position
3
From
IG
position
4
From
ignition
switch
5
To
floor
temperature
sensing
switch
O
When
floor
temperature
warning
lamp
lights
Check
floor
temperature
warning
lamp
1
Open
or
shorj
circuit
in
wiring
harness
2
Check
fuel
system
with
regard
to
the
following
items
Refer
to
Inspec
lion
of
Fuel
System
EC
29
Floor
temperature
Below
1050C
221
OF
Above
1050C
221
OF
a
circuit
tester
Referring
to
the
following
floor
temperature
relay
if
relay
is
normal
trace
wire
s
back
to
ignition
switch
Repair
faulty
wiring
Floor
temperature
relay
When
checking
floor
temperature
relay
for
unit
remove
it
and
proceed
as
follows
1
Check
for
continuity
between
@
and
ID
Continuity
should
exist
Check
for
continuity
between
CD
and@
Continuity
should
exist
Check
for
continuity
between
CD
and
@
Continuity
should
not
exist
2
Apply
a
12
volt
doc
across
@
and
ID
to
ensure
that
continuity
exists
between
CD
and
@
and
that
con
ti
nuity
does
not
between
CD
and
@
If
test
results
dn
not
satisfy
the
above
replace
the
floor
temperature
relay
EC344
Fig
EC
75
Checking
floor
temperature
relay
1
Float
level
2
Choke
3
Normal
fuel
supply
system
Prima
ry
and
secondary
4
Accelerator
pump
5
Power
valve
6
B
C
D
D
7
Fuel
strainer
8
Air
cleaner
Page 447 of 537
DESCRIPTION
Cables
are
covered
with
color
coded
vinyl
for
easy
identification
In
the
wiring
diagram
colors
are
indicated
by
one
or
two
alphabetical
letters
It
is
recommended
that
the
battery
be
disconnected
before
performing
any
electrical
service
other
than
bulb
or
fuse
replacement
In
addition
to
fuses
a
fusible
link
has
been
installed
to
protect
wiring
The
fusible
link
functions
almost
the
same
as
a
fuse
though
its
eharac
teristics
are
slightly
different
than
normal
fuses
CABLE
COLORS
Cable
colors
are
indicated
by
one
or
two
alphabetical
letters
B
Black
Be
Brown
G
Green
L
Blue
Lg
Light
green
R
Red
W
White
Y
Yellow
The
main
cable
is
generally
coded
with
a
single
color
The
others
are
coded
with
a
two
tone
color
as
follows
BW
Black
with
white
stripe
gR
Light
green
with
red
stripe
INSPECTION
Inspect
all
electrical
circuits
refer
ring
to
wiring
or
circuit
diagrams
Circuits
should
be
tested
for
conti
nuity
or
short
circuit
with
a
conven
tional
test
lamp
or
low
reading
volt
meter
Before
inspection
of
circuit
ensure
that
I
Each
electrical
component
part
or
cable
is
securely
fastened
to
its
con
nector
or
terminal
2
Each
connection
is
firmly
in
place
and
free
from
rust
and
dirt
3
No
cable
covering
shows
any
evidence
of
cracks
deterioration
or
other
damage
4
Each
terminal
is
at
a
safe
distance
away
from
any
adjacent
metal
parts
5
Each
cable
is
fastened
to
its
proper
connector
or
terminal
Body
Electrical
System
BODY
ELECTRICAL
WIRING
6
Each
grounding
bolt
is
firmly
pbnted
7
Wiring
is
kept
away
from
any
adjacent
parts
with
sharp
edges
or
high
temperature
parts
such
as
exhaust
pipe
8
Wiring
is
kept
away
from
any
rotating
or
working
parts
fan
pulley
fan
belt
etc
9
Cables
between
ftxed
portions
and
moving
parts
are
long
enough
to
withstand
shocks
and
vibratory
forces
Notes
a
Before
starting
to
inspect
and
repair
any
part
of
electrical
system
or
other
parts
which
may
lead
to
a
short
circuit
disconnect
cables
at
battery
terminals
as
follows
Disconnect
cable
at
negative
terminal
and
then
disconnect
cable
at
positive
terminal
Before
connecting
cables
to
battery
terminal
be
sure
to
clean
terminals
with
a
rag
Fasten
cable
at
positive
terminal
and
then
ground
cable
at
negative
terminal
Apply
grease
to
top
of
these
terminals
to
prevent
rust
from
developing
on
them
b
Never
use
a
screwdriver
or
senrice
tool
to
conduct
a
continuity
test
Use
test
leads
c
Never
ground
an
open
circuit
or
circuits
under
no
load
Use
a
test
lamp
12V
3W
or
circuit
tester
as
a
load
FUSE
AND
FUSIBLE
LINK
DESCRIPTION
The
fuse
and
fusible
link
are
protec
tive
devices
used
in
an
electrical
cir
cuit
When
current
increases
beyond
rated
amperage
fusible
metal
melts
and
the
circuit
is
broken
BE
2
MAINTENANCE
INSTRUCTIONS
Fuse
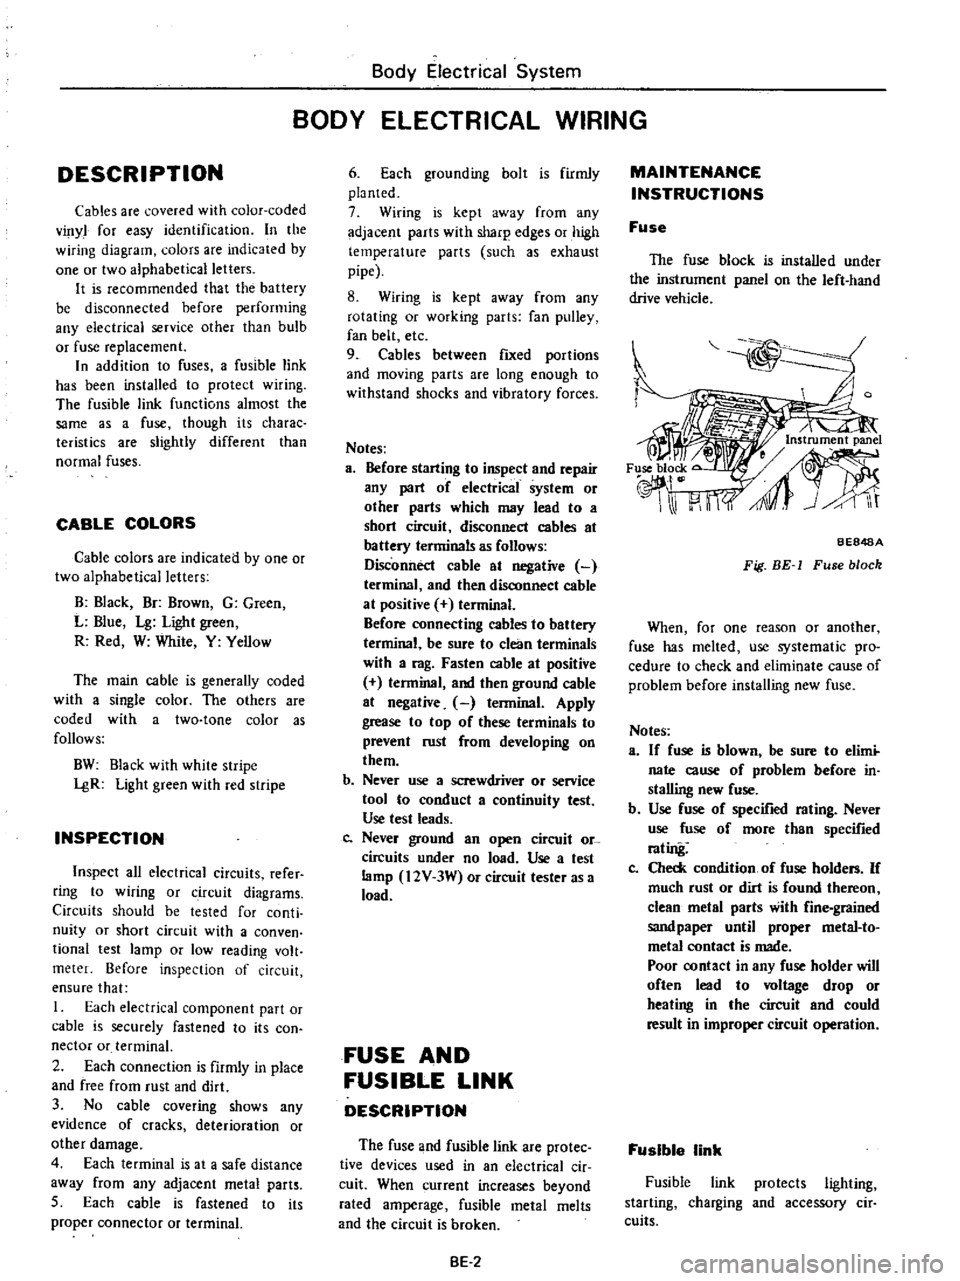
The
fuse
block
is
installed
under
the
instrument
panel
on
the
left
hand
drive
vehicle
BE848A
Fig
BE
1
Fuse
block
When
for
one
reason
or
another
fuse
has
melted
use
systematic
pro
cedure
to
check
and
eliminate
cause
of
problem
before
installing
new
fuse
Notes
a
If
fuse
is
blown
be
sure
to
elimi
nate
cause
of
problem
before
in
stalling
new
fuse
b
Use
fuse
of
specified
rating
Never
use
fuse
of
more
than
specified
rating
Co
Check
condition
of
fuse
holders
If
much
rust
or
dirt
is
found
thereon
clean
metal
parts
with
fine
grained
sandpaper
until
proper
metal
to
metal
contact
is
made
Poor
contact
in
any
fuse
holder
will
often
lead
to
voltage
drop
or
heating
in
the
circuit
and
could
result
in
improper
circuit
operation
Fusible
link
Fusible
link
protects
lighting
starting
charging
and
accessory
cir
cuits
Page 448 of 537

A
melted
fusible
link
can
be
de
tected
either
by
visual
inspection
or
by
feeling
with
finger
tip
If
its
condition
is
questionable
use
circuit
tester
or
test
lamp
as
required
to
conduct
continuity
test
This
continuity
test
can
be
performed
in
the
same
manner
as
for
any
conventional
fuse
Body
Electrical
System
Notes
a
If
fusible
link
should
melt
it
is
possible
that
critical
circuit
power
supply
or
large
current
carrying
circuit
is
shorted
In
such
a
case
carefully
check
and
eliminate
cause
of
problem
b
Never
wrap
periphery
of
fusible
link
with
vinyl
tape
Extreme
care
should
be
taken
with
this
link
to
ensure
that
it
does
not
come
into
contact
with
any
other
wiring
har
ness
or
vinyl
or
rubber
parts
c
BEB49A
Fig
BE
2
Fusible
link
LIGHTING
AND
SIGNAL
LAMP
SYSTEM
DESCRIPTION
LIGHTING
SYSTEM
CIRCUIT
DIAGRAM
HEADLAMP
HEAD
LAMP
BEAM
REPLACEMENT
AIMING
ADJUSTMENT
FRONT
COMBINATION
LAMP
BUL8
REPLACEMENT
REMOVAL
AND
INSTALLATION
SIDE
MARKER
LAMP
BUL8
REPLACEMENT
REMOVAL
AND
INSTALLATION
ROOM
LAMP
BULB
REPLACEMENT
REMOVAL
AND
INSTALLATION
REAR
COMBINATION
LAMP
BULB
REPLACEMENT
REMOVAL
AND
INSTALLATION
LICENSE
LAMP
BULB
REPLACEMENT
REMOVAL
AND
INSTALLATION
ENGINE
COMPARTMENT
LAMP
LIGHTING
SWITCH
REMOVAL
AND
INSTALLATION
INSPECTION
ILLUMINATION
CONTROL
RHEOSTAT
REMOVAL
AND
INSTALLATION
CONTENTS
BE
4
BE
4
BE
5
BE
5
BE
5
8E
7
BE
7
BE
7
8E
7
BE
7
8E
7
BE
8
BE
B
8E
8
BE
8
8E
8
8E
8
8E
8
BE
8
8E
8
BE
9
BE
9
BE
9
8E
9
8E
9
8E
9
INSPECTION
KN08
ILLUMINATION
LAMP
BULB
REPLACEMENT
LAMP
BODY
REPLACEMENT
TURN
SIGNAL
AND
DIMMER
SWITCH
REMOVAL
AND
INSTALLATION
INSPECTION
STOP
LAMP
SWITCH
REMOVAL
AND
INSTALLATION
INSPECTION
DOOR
SWITCH
REMOVAL
AND
INSTALLATION
INSPECTION
HAZARD
SWITCH
REMOVAL
AND
INSTALLATION
INSPECTION
FLASHER
UNIT
REPLACEMENT
8ULB
SPECIFICATIONS
TROUBLE
DIAGNOSES
AND
CORRECTIONS
HEAD
LAMP
TURN
SIGNAL
LAMP
TAIL
LAMP
STOP
LAMP
AND
BACK
UP
LAMP
BE
3
1
BE
9
BE
10
BE
10
BE10
BE
10
BE
10
BE
10
BE
10
BE
10
BE
10
BE
10
BE
10
BE
11
BE
11
BE
11
BE
11
8E
11
BE
11
BE
12
BE
12
BE
12
BE
13
8E
13
Page 452 of 537
FRONT
COMBINATION
LAMP
BULB
REPLACEMENT
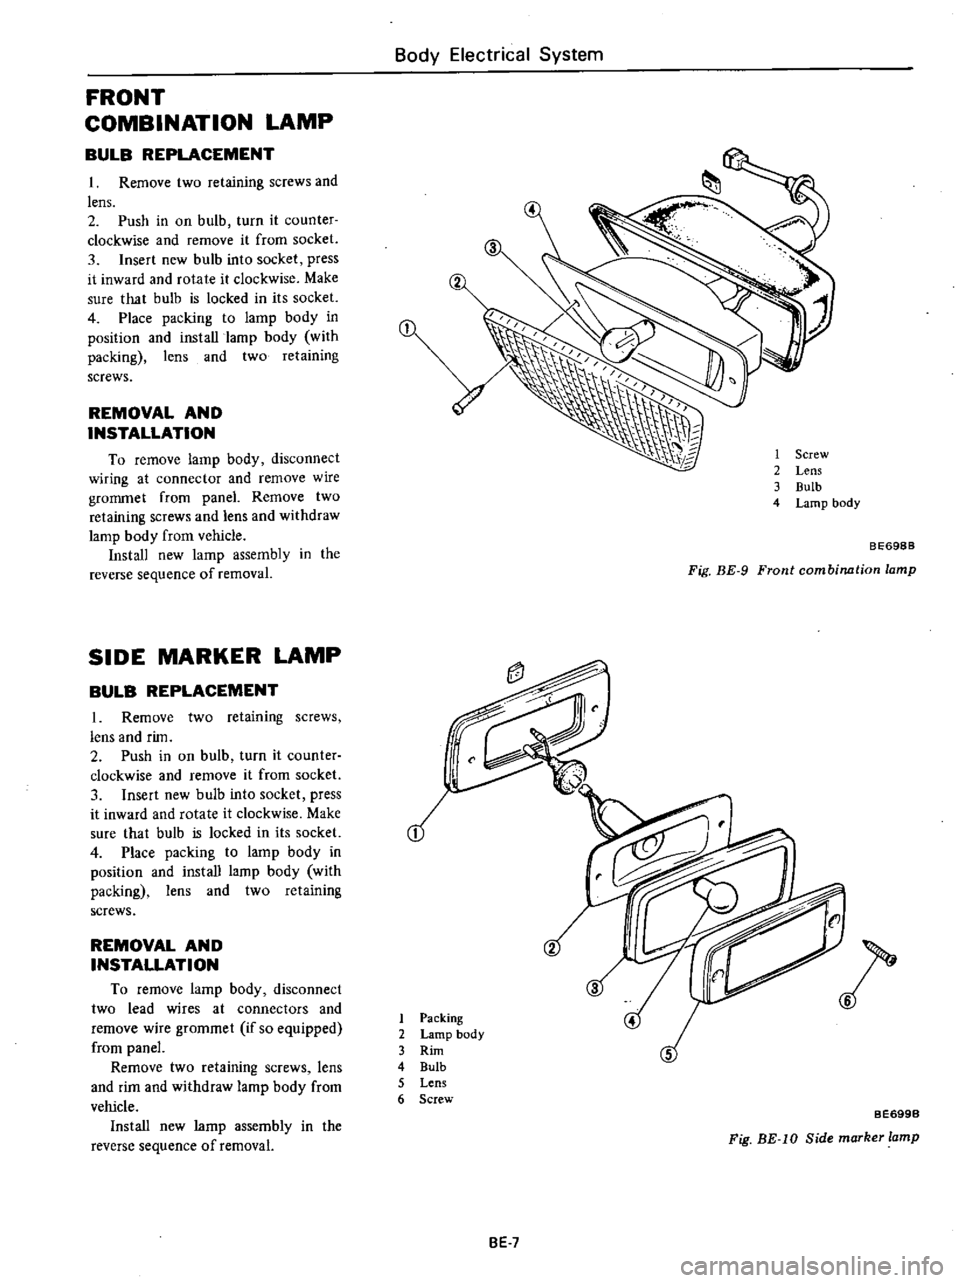
1
Remove
two
retaining
screws
and
lens
2
Push
in
on
bulb
turn
it
counter
clockwise
and
remove
it
from
socket
3
Insert
new
bulb
into
socket
press
it
inward
and
rotate
it
clockwise
Make
sure
that
bulb
is
locked
in
its
socket
4
Place
packing
to
lamp
body
in
position
and
install
lamp
body
with
packing
lens
and
two
retaining
screws
REMOVAL
AND
INSTALLATION
To
remove
lamp
body
disconnect
wiring
at
connector
and
remove
wire
grommet
from
panel
Remove
two
retaining
screws
and
lens
and
withdraw
lamp
body
from
vehicle
Install
new
lamp
assembly
in
the
reverse
sequence
of
removal
SIDE
MARKER
LAMP
BULB
REPLACEMENT
1
Remove
two
retaining
screws
lens
and
rim
2
Push
in
on
bulb
turn
it
counter
clockwise
and
remove
it
from
socket
3
Insert
new
bulb
into
socket
press
it
inward
and
rotate
it
clockwise
Make
sure
that
bulb
is
locked
in
its
socket
4
Place
packing
to
lamp
body
in
position
and
install
lamp
body
with
packing
lens
and
two
retaining
screws
REMOVAL
AND
INSTALLATION
To
remove
lamp
body
disconnect
two
lead
wires
at
connectors
and
remove
wire
grommet
if
so
equipped
from
panel
Remove
two
retaining
screws
lens
and
rim
and
withdraw
lamp
body
from
vehicle
Install
new
lamp
assembly
in
the
reverse
sequence
of
removal
Body
Electrical
System
1
Screw
2
Lens
3
Bulb
4
Lamp
body
BE698B
Fig
BE
9
Front
combinntion
lamp
2
1
Packing
2
Lamp
body
3
Rim
4
Bulb
5
Lens
6
Screw
5
BE699B
Fig
BE
IO
Side
marker
lamp
BE
7
Page 453 of 537
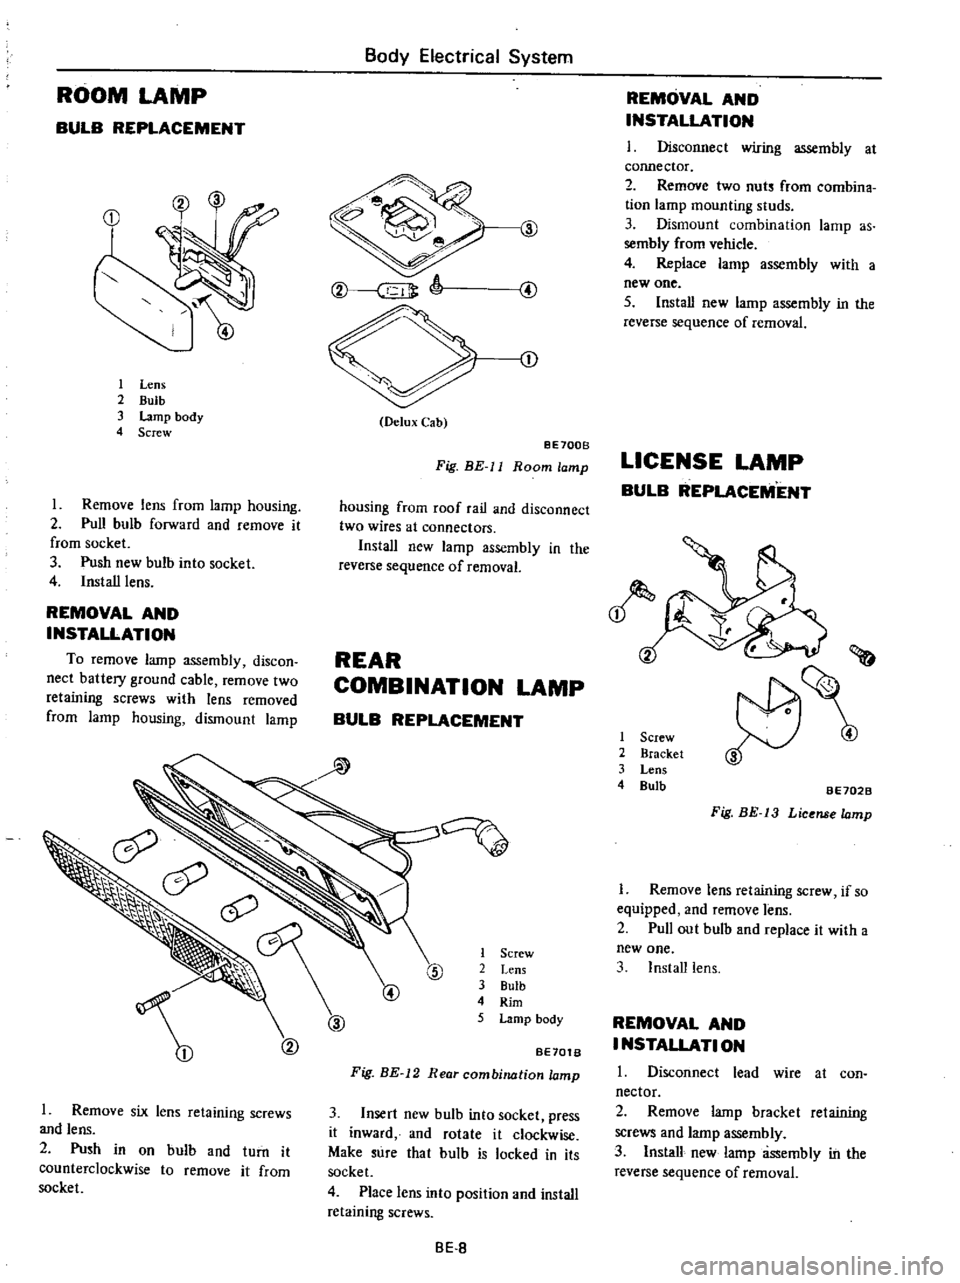
ROOM
LAMP
BULB
REPLACEMENT
1
Lens
2
Bulb
3
Lamp
body
4
Screw
Remove
lens
from
lamp
housing
2
Pull
bulb
forward
and
remove
it
from
socket
3
Push
new
bulb
into
socket
4
Install
lens
REMOVAL
AND
INSTALLATION
To
remove
lamp
assembly
discon
nect
battery
ground
cable
remove
two
retaining
screws
with
lens
removed
from
lamp
housing
dismount
lamp
1
Remove
six
lens
retaining
screws
and
lens
2
Push
in
on
bulb
and
turn
it
counterclockwise
to
remove
it
from
socket
Body
Electrical
System
J
CD
O
lux
Cab
8E700B
Fig
HE
ll
Room
lamp
housing
from
roof
rail
and
disconnect
two
wires
at
connectors
Install
new
lamp
assembly
in
the
reverse
sequence
of
removal
REAR
COMBINATION
LAMP
BULB
REPLACEMENT
1
Screw
2
Lens
3
Bulb
4
Rim
5
Lamp
body
@
BE70tB
Fig
BE
12
Rear
combination
lamp
3
Insert
new
bulb
into
socket
press
it
inward
and
rotate
it
clockwise
Make
sure
that
bulb
is
locked
in
its
socket
4
Place
lens
into
position
and
install
retaining
screws
8E
8
REMOVAL
AND
INSTALLATION
I
Disconnect
wiring
assembly
at
cormector
2
Remove
two
nuts
from
combina
tion
lamp
mounting
studs
3
Dismount
combination
lamp
as
sembly
from
vehicle
4
Replace
lamp
assembly
with
a
new
one
5
Install
new
lamp
assembly
in
the
reverse
sequence
of
removal
LICENSE
LAMP
BULB
REPLACEMENT
1
Screw
2
Bracket
3
Lens
4
Bulb
i
J
BE702B
Fig
HE
13
License
Iomp
1
Remove
lens
retaining
screw
if
so
equipped
and
remove
lens
2
Pull
out
bulb
and
replace
it
with
a
new
one
3
Install
lens
REMOVAL
AND
I
NSTALlATI
ON
1
Disconnect
lead
wire
at
con
nector
2
Remove
lamp
bracket
retaining
screws
and
lamp
assembly
3
Install
new
lamp
assembly
in
the
reverse
sequence
of
removal
Page 454 of 537
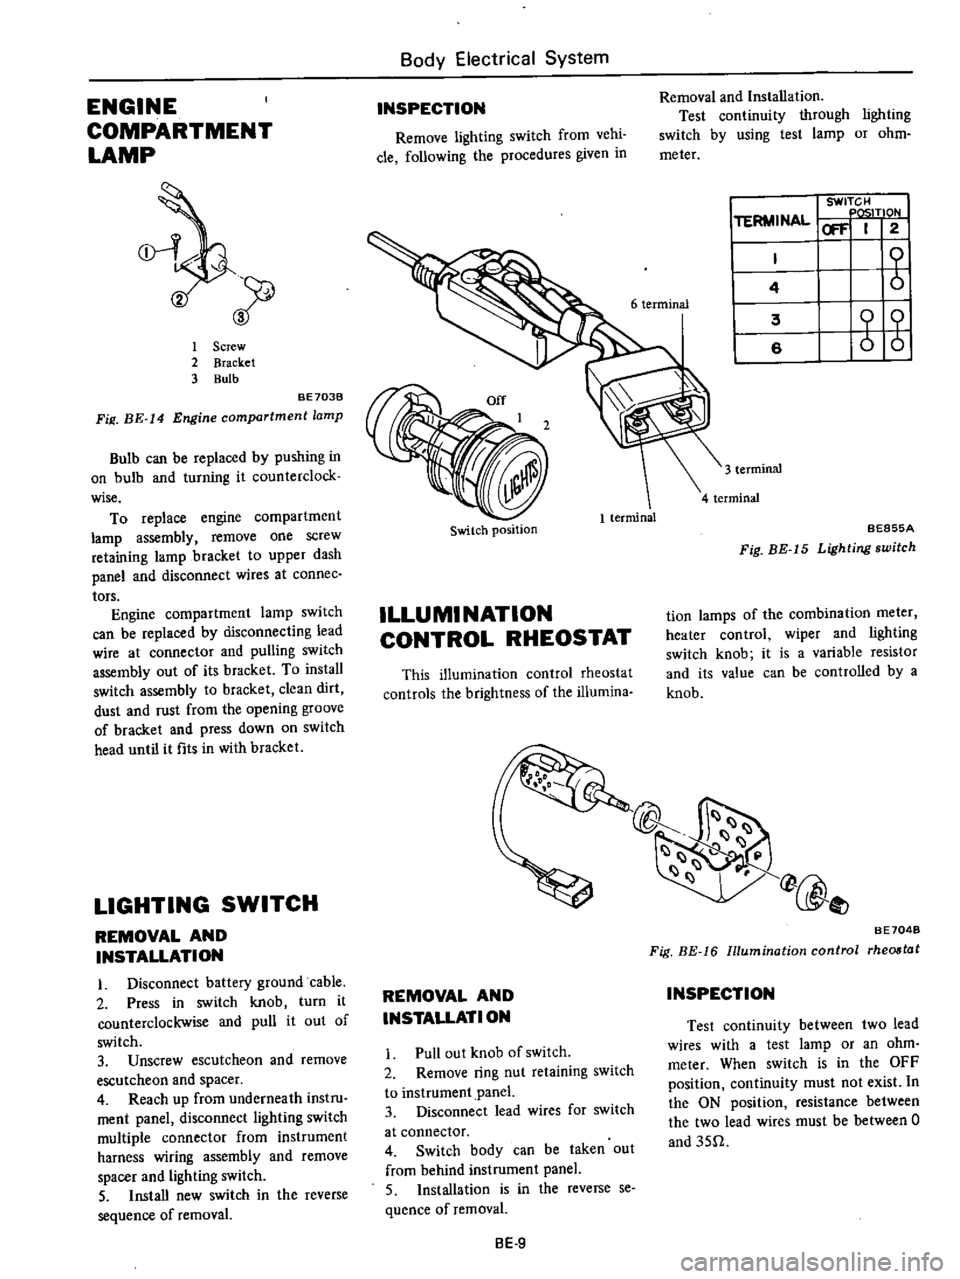
ENGINE
COMPARTMENT
LAMP
2
1
Screw
2
Bracket
3
Bulb
BE
7038
Fill
BE
14
Engine
compartment
lamp
Bulb
can
be
replaced
by
pushing
in
on
bulb
and
turning
it
counterclock
wise
To
replace
engine
compartment
lamp
assembly
remove
one
SCrew
retaining
lamp
bracket
to
upper
dash
panel
and
disconnect
wires
at
connee
tors
Engine
compartment
lamp
switch
can
be
replaced
by
disconnecting
lead
wire
at
connector
and
pulling
switch
assembly
out
of
its
bracket
To
install
switch
assembly
to
bracket
clean
dirt
dust
and
rust
from
the
opening
groove
of
bracket
and
press
down
on
switch
head
until
it
fits
in
with
bracket
LIGHTING
SWITCH
REMOVAL
AND
INSTALLATION
I
Disconnect
battery
ground
cable
2
Press
in
switch
knob
turn
it
counterclockwise
and
pull
it
out
of
switch
3
Unscrew
escutcheon
and
remove
escutcheon
and
spacer
4
Reach
up
from
underneath
instru
ment
panel
disconnect
lighting
switch
multiple
connector
from
instrument
harness
wiring
assembly
and
remove
spacer
and
lighting
switch
5
Install
new
switch
in
the
reverse
sequence
of
removal
Body
Electrical
System
INSPECTION
Remove
lighting
switch
from
vehi
cle
following
the
procedures
given
in
Switch
position
1
terminal
ILLUMINATION
CONTROL
RHEOSTAT
This
illumination
control
rheostat
controls
the
brightness
of
the
iliumina
Removal
and
Installation
Test
continuity
through
lighting
switch
by
using
test
lamp
or
ohm
meter
I
I
SWITCH
TERMINAL
P
T10N
ICI
F
2
I
I
b
I
4
I
I
6
terminal
I
3
I
6
3
terminal
4
terminal
BE855A
Fig
BE
15
Lighting
switch
tion
lamps
of
the
combination
meter
heater
control
wiper
and
lighting
switch
knob
it
is
a
variable
resistor
and
its
value
can
be
controlled
by
a
knob
REMOVAL
AND
INSTALLATION
I
Pull
out
knob
of
switch
2
Remove
ring
nut
retaining
switch
to
instrument
panel
3
Disconnect
lead
wires
for
switch
at
connector
4
Switch
body
can
be
taken
out
from
behind
instrument
panel
5
Installation
is
in
the
reverse
se
quence
of
removal
BE
9
0@
BE
7048
Fig
BE
16
Illumination
control
rhe08tat
INSPECTION
Test
continuity
between
two
lead
wires
with
a
test
lamp
or
an
ohm
meter
When
switch
is
in
the
OFF
position
continuity
must
not
exist
In
the
ON
position
resistance
between
the
two
lead
wires
must
be
between
0
and
3512
Page 455 of 537
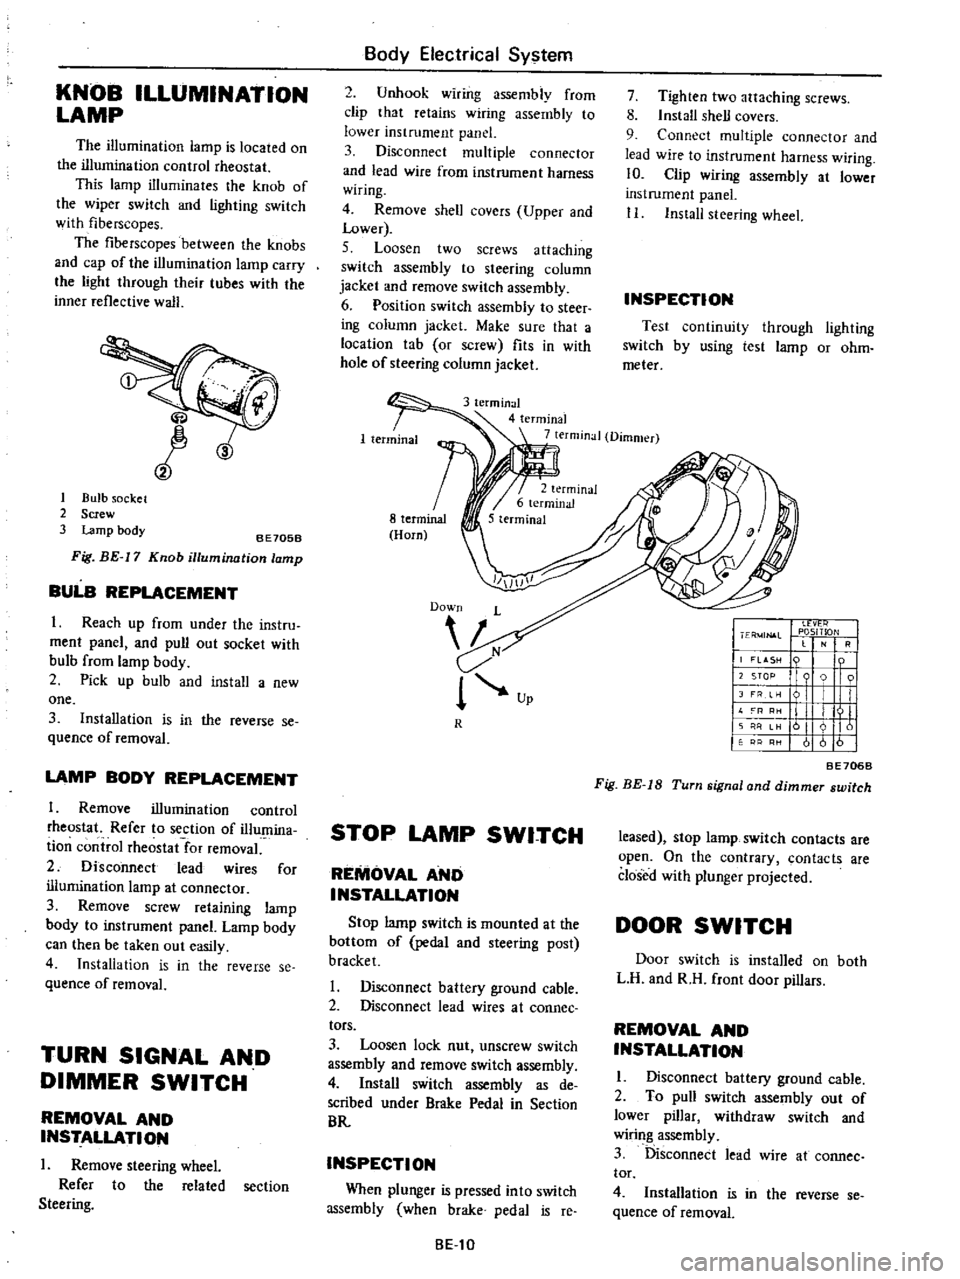
KNOB
ILLUMINATION
LAMP
The
illumination
lamp
is
located
on
the
illumination
control
rheostat
This
lamp
illuminates
the
knob
of
the
wiper
switch
and
lighting
switch
with
fiberscopes
The
fiberscopes
between
the
knobs
and
cap
of
the
illumination
lamp
carry
the
light
through
their
tubes
with
the
inner
reflective
walJ
CID
1
Bulb
socket
2
Screw
3
Lamp
body
8E705B
Fig
BE
17
Knob
illumination
lamp
BULB
REPLACEMENT
I
Reach
up
from
under
the
instru
ment
panel
and
pull
out
socket
with
bulb
from
lamp
body
2
Pick
up
bulb
and
install
a
new
one
3
Installation
is
in
the
reverse
se
quence
of
removal
LAMP
BODY
REPLACEMENT
1
Remove
illumination
control
rheostat
Refer
to
section
of
illumina
ti
on
control
rheostat
for
removal
2
Disconnect
lead
wires
for
illumination
lamp
at
connector
3
Remove
screw
retaining
lamp
body
to
instrument
panel
Lamp
body
can
then
be
taken
out
easily
4
Installation
is
in
the
reverse
se
quence
of
removal
TURN
SIGNAL
AND
DIMMER
SWITCH
REMOVAL
AND
INSTALLATION
I
Remove
steering
wheel
Refer
to
the
related
section
Steering
Body
Electrical
System
2
Unhook
wiring
assembly
from
clip
that
retains
wiring
assembly
to
lower
instrument
panel
3
Disconnect
multiple
connector
and
lead
wire
from
instrument
harness
wiring
4
Remove
shell
covers
Upper
and
Lower
5
Loosen
two
screws
attaching
switch
assembly
to
steering
column
jacket
and
remove
switch
assembly
6
Position
switch
assembly
to
steer
ing
column
jacket
Make
sure
that
a
location
tab
or
screw
fits
in
with
hole
of
steering
column
jacket
7
Tighten
two
attaching
screws
8
Install
shell
covers
9
Connect
multiple
connector
and
lead
wire
to
instrument
harness
wiring
10
Clip
wiring
assembly
at
lower
instrument
panel
II
Install
steering
wheel
INSPECTION
Test
continuity
through
lighting
switch
by
using
test
lamp
or
ohm
meter
3
terminal
4
terminal
7
terminal
Dimmer
R
STOP
LAMP
SWITCH
REMOVAL
AND
INSTALLATION
Stop
lamp
switch
is
mounted
at
the
bottom
of
pedal
and
steering
post
bracket
I
Disconnect
battery
ground
cable
2
Disconnect
lead
wires
at
coonee
tors
3
Loosen
lock
nut
unscrew
switch
assembly
and
remove
switch
assembly
4
Install
switch
assembly
as
de
scribed
under
Brake
Pedal
in
Section
BR
INSPECTION
When
plunger
is
pressed
into
switch
assembly
when
brake
pedal
is
reo
8El0
I
Ll
vt
r
I
ER
4JN
l
L
PlOSITlON
RI
j
LASH
n
I
I
12
STOP
9
91
I
JFRe
I
I
II
L
I
III
11
I
I
II
161
I
61616
BE706B
Fig
BE
IS
Turn
signal
and
dimmer
switch
leased
stop
lamp
switch
contacts
are
open
On
the
contrary
contacts
are
closed
with
plunger
projected
DOOR
SWITCH
Door
switch
is
installed
on
both
L
H
and
R
H
front
door
pillars
REMOVAL
AND
INSTALLATION
I
Disconnect
battery
ground
cable
2
To
pull
switch
assembly
out
of
lower
pillar
withdraw
switch
and
wiring
assembly
3
Disconnect
lead
wire
at
cannee
tor
4
Installation
is
in
the
reverse
se
quence
of
removal
Page 457 of 537

Body
Electrical
System
BULB
SPECIFICATIONS
Item
Wattage
Candlepower
Headlamp
Inner
Outer
37
5W
37
5
S0W
Front
combination
lamp
Turn
signal
and
parking
lamp
23
8W
32
3C
Side
marker
lamp
Front
Rear
8W
4C
8W
4C
Rear
combination
lamp
Turn
signal
lamp
A
B
Tail
lamp
B
C
Stop
lamp
A
B
Back
up
lamp
D
A
23W
32C
B
23j8W
32j3C
C
8W
4C
D
23W
32C
7
SW
6C
License
plate
lamp
Engine
compartment
lamp
6W
Room
lamp
5W
Combination
meter
illurnina
tion
17W
iC
x3
Knob
illumination
lamp
3
4W
2C
Heater
control
illumination
lamp
3
4W
2C
TROUBLEDIAGNOSE
AND
CORRECTIONS
HEADLAMP
Condition
Headlarnps
do
not
light
for
both
high
and
low
beams
High
beam
cannot
be
switched
to
low
beam
or
vice
versa
Probable
cause
Burnt
fuse
Loose
connection
or
open
circuit
Faulty
lighting
switch
Faulty
dimmer
switch
Faulty
light
relay
No
ground
Faulty
dimmer
switch
Faulty
light
relay
BE12
Bulb
SAE
trade
number
4001
4002
1034
67
67
1073
1034
67
1073
89
161
158
158
Corrective
action
Correct
cause
and
replace
fuse
Check
wiring
and
or
repair
connection
Conduct
continuity
test
and
replace
if
neces
sary
Check
light
relay
for
proper
operation
and
replace
if
necessary
Clean
and
tighten
ground
terminal
Conduct
continuity
test
and
replace
if
neces
sary
Check
light
relay
for
proper
operation
and
replace
if
necessary
Page 458 of 537
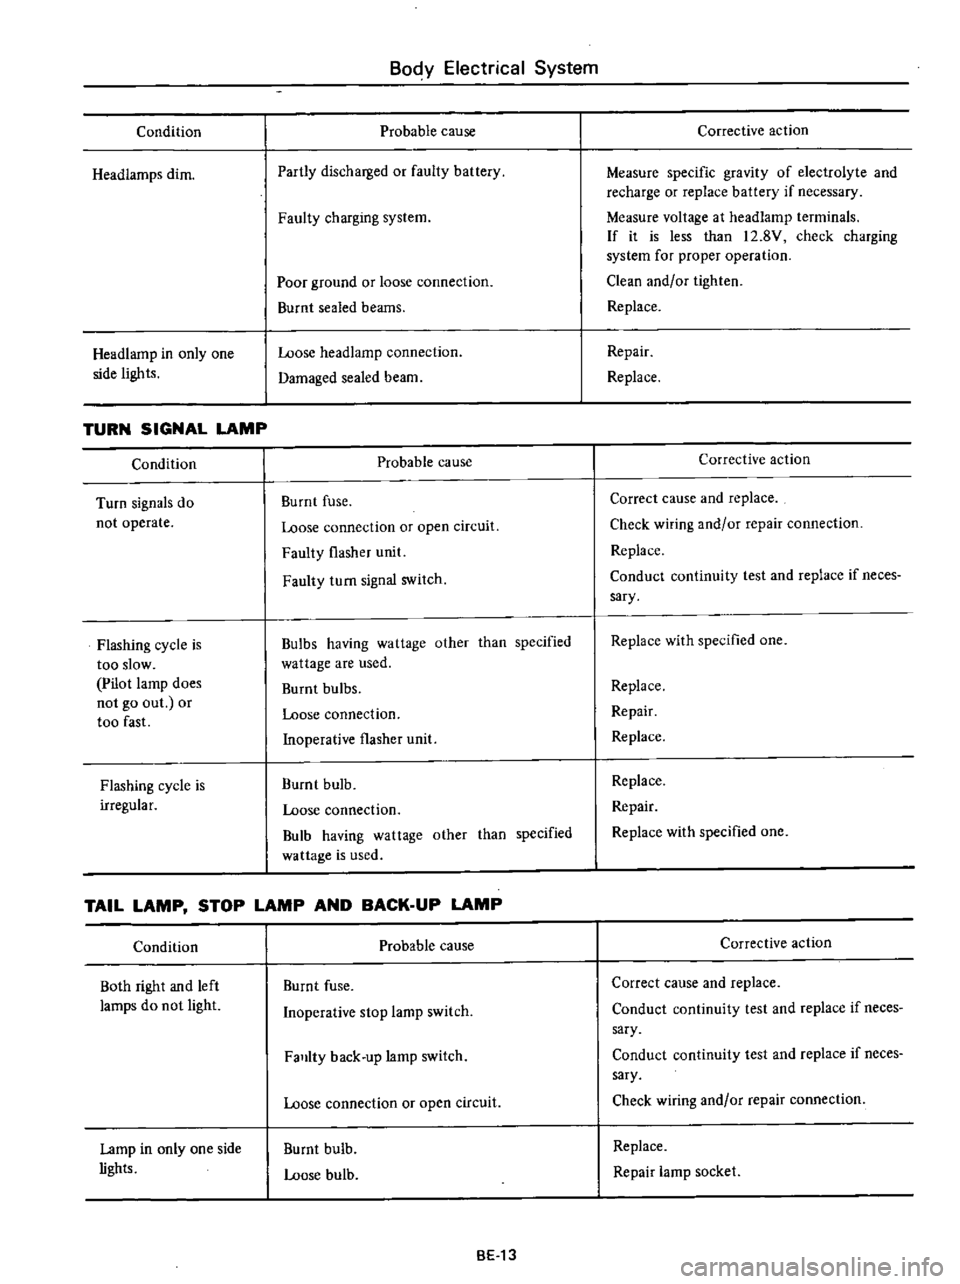
Condition
Headiamps
dim
Headlamp
in
only
one
side
lights
TURN
SIGNAL
LAMP
Condition
Turn
signals
do
not
operate
Flashing
cycle
is
too
slow
Pilot
lamp
does
not
go
out
or
too
fast
Flashing
cycle
is
irregular
Body
Electrical
System
Probable
cause
Partly
discharged
or
faulty
battery
Faulty
charging
system
Poor
ground
or
loose
connection
Burnt
sealed
beams
Loose
headlamp
connection
Damaged
sealed
beam
Probable
cause
Burnt
fuse
Loose
connection
or
open
circuit
Faulty
flasher
unit
Faulty
turn
signal
switch
Bulbs
having
wattage
other
than
specified
wattage
are
used
Burnt
bulbs
Loose
connection
Inoperative
flasher
unit
Burnt
bulb
Loose
connection
Bulb
having
wattage
other
than
specified
wa
ttage
is
used
TAIL
LAMP
STOP
LAMP
AND
BACK
UP
LAMP
Condition
Both
right
and
left
lamps
do
not
light
Lamp
in
only
one
side
lights
Probable
cause
Burnt
fuse
Inoperative
stop
lamp
switch
Falllty
back
up
lamp
switch
Loose
connection
or
open
circuit
Burnt
bulb
Loose
bulb
BE13
Corrective
action
Measure
specific
gravity
of
electrolyte
and
recharge
or
replace
battery
if
necessary
Measure
voltage
at
headlamp
terminals
If
it
is
less
than
12
8V
check
charging
system
for
proper
operation
Clean
and
or
tighten
Replace
Repair
Replace
Corrective
action
Correct
cause
and
replace
Check
wiring
and
or
repair
connection
Replace
Conduct
continuity
test
and
replace
if
neces
sary
Replace
with
specified
one
Replace
Repair
Replace
Replace
Repair
Replace
with
specified
one
Corrective
action
Correct
cause
and
replace
Conduct
continuity
test
and
replace
if
neces
sary
Conduct
continuity
test
and
replace
if
neces
sary
Check
wiring
and
or
repair
connection
Replace
Repair
lamp
socket