ignition DATSUN PICK-UP 1977 Repair Manual
[x] Cancel search | Manufacturer: DATSUN, Model Year: 1977, Model line: PICK-UP, Model: DATSUN PICK-UP 1977Pages: 537, PDF Size: 35.48 MB
Page 216 of 537
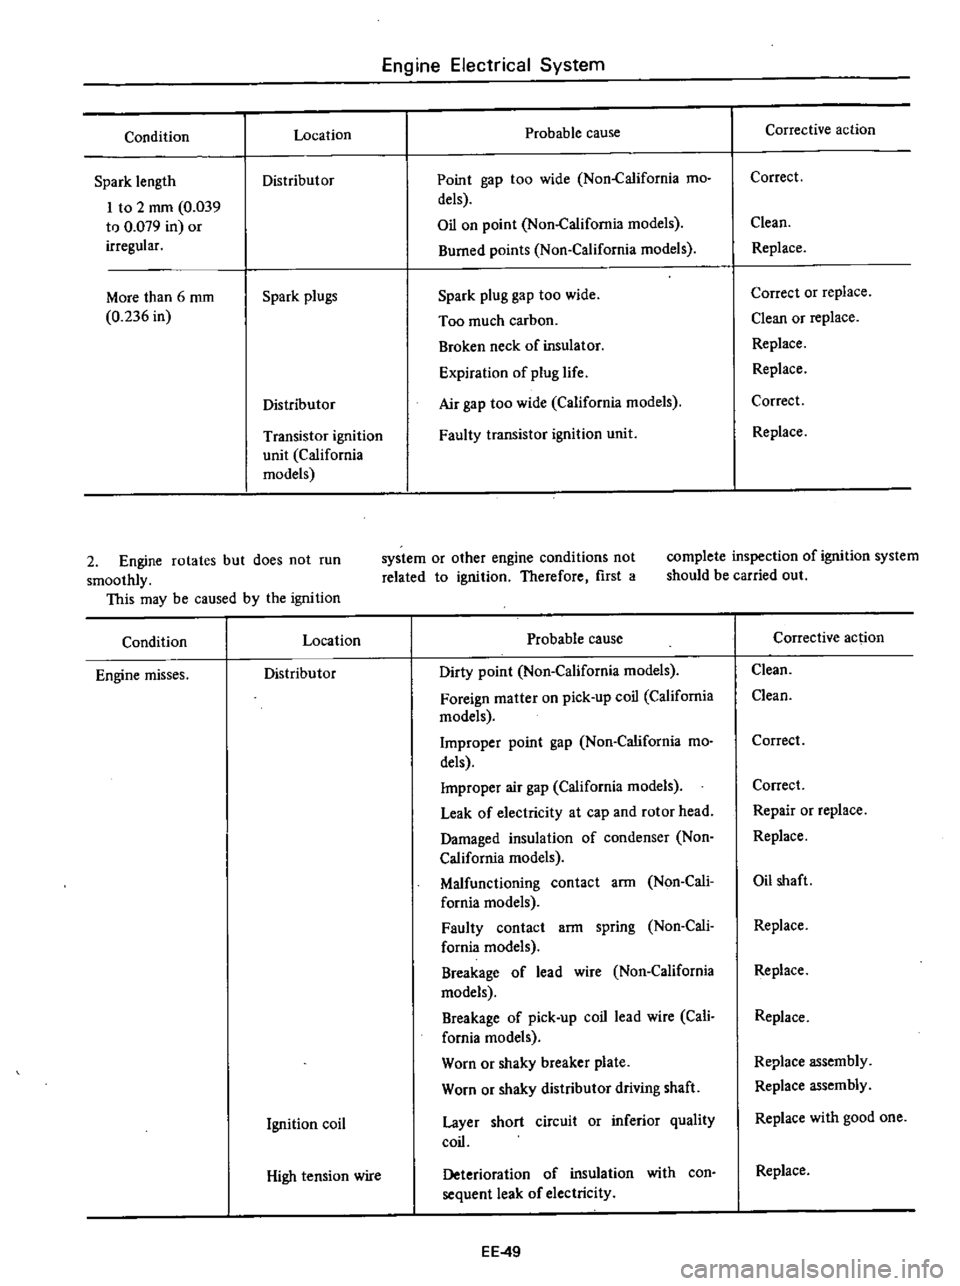
Condition
Spark
length
I
to
2
rnm
0
039
to
0
079
in
Of
irregular
More
than
6
rnm
0
236
in
Engine
Electrical
System
Location
Probable
cause
Distributor
Point
gap
too
wide
Non
California
mo
dels
Oil
on
point
Non
California
models
Burned
points
Non
California
models
Spark
plugs
Spark
plug
gap
too
wide
Too
much
carbon
Broken
neck
of
insulator
Expiration
of
plug
life
Air
gap
too
wide
California
models
Distributor
Transistor
ignition
unit
California
models
Faulty
transistor
ignition
unit
Corrective
action
Correct
Clean
Replace
Correct
or
replace
Clean
or
replace
Replace
Replace
Correct
Replace
2
Engine
rotates
but
does
not
run
smoothly
This
may
be
caused
by
the
ignition
system
or
other
engine
condi
Hons
not
related
to
ignition
Therefore
first
a
complete
inspection
of
ignition
system
should
be
carried
out
Condition
Engine
misses
Location
Probable
cause
Distributor
Dirty
point
Non
California
models
Foreign
mattef
on
pick
up
coil
California
models
Improper
point
gap
Non
California
mo
dels
Impropef
air
gap
California
models
Leak
of
electricity
at
cap
and
rotor
head
Damaged
insulation
of
condenser
Non
California
models
Malfunctioning
contact
arm
Non
Cali
fornia
models
Faulty
contact
arm
spring
Non
Cali
fornia
models
Breakage
of
lead
wire
Non
California
models
Breakage
of
pick
up
coil
lead
wire
Cali
fornia
models
Worn
or
shaky
breaker
plate
Worn
or
shaky
distributor
driving
shaft
Layer
short
circuit
or
inferior
quality
coil
Ignition
coil
High
tension
wire
Deterioration
of
insulation
with
con
sequent
leak
of
electricity
EE
49
Corrective
ac
ion
Clean
Clean
Correct
Correct
Repair
or
replace
Replace
Oil
shaft
Replace
Replace
Replace
Replace
assembly
Replace
assembly
Replace
with
good
one
Replace
Page 217 of 537

Condition
Engine
causes
knocking
very
often
Engine
does
not
deliver
enough
power
Location
Spark
plugs
Transistor
ignition
unit
California
models
Distributor
Spark
plugs
Distributor
Spark
plugs
Engine
Electrical
System
Probable
cause
Fouled
Leak
of
electricity
at
upper
porcelain
insulator
Faulty
transistor
ignition
unit
Improper
ignition
timing
too
advanced
Coming
off
or
breakage
of
governor
spring
Worn
pin
or
hole
of
governor
Burnt
too
much
Improper
ignition
timing
too
retarded
Improper
functioning
governor
Point
gap
too
narrow
Non
California
models
Foreign
particles
stuck
in
air
gap
Cali
fornia
models
Fouled
EE
50
Corrective
action
Clean
Repair
or
replace
Replace
Correct
Correct
or
replace
Replace
Replace
Correct
Replace
assembly
Correct
Oean
Oean
Page 219 of 537
Engine
Removal
Installation
ENGINE
REMOVAL
AND
INSTAllATION
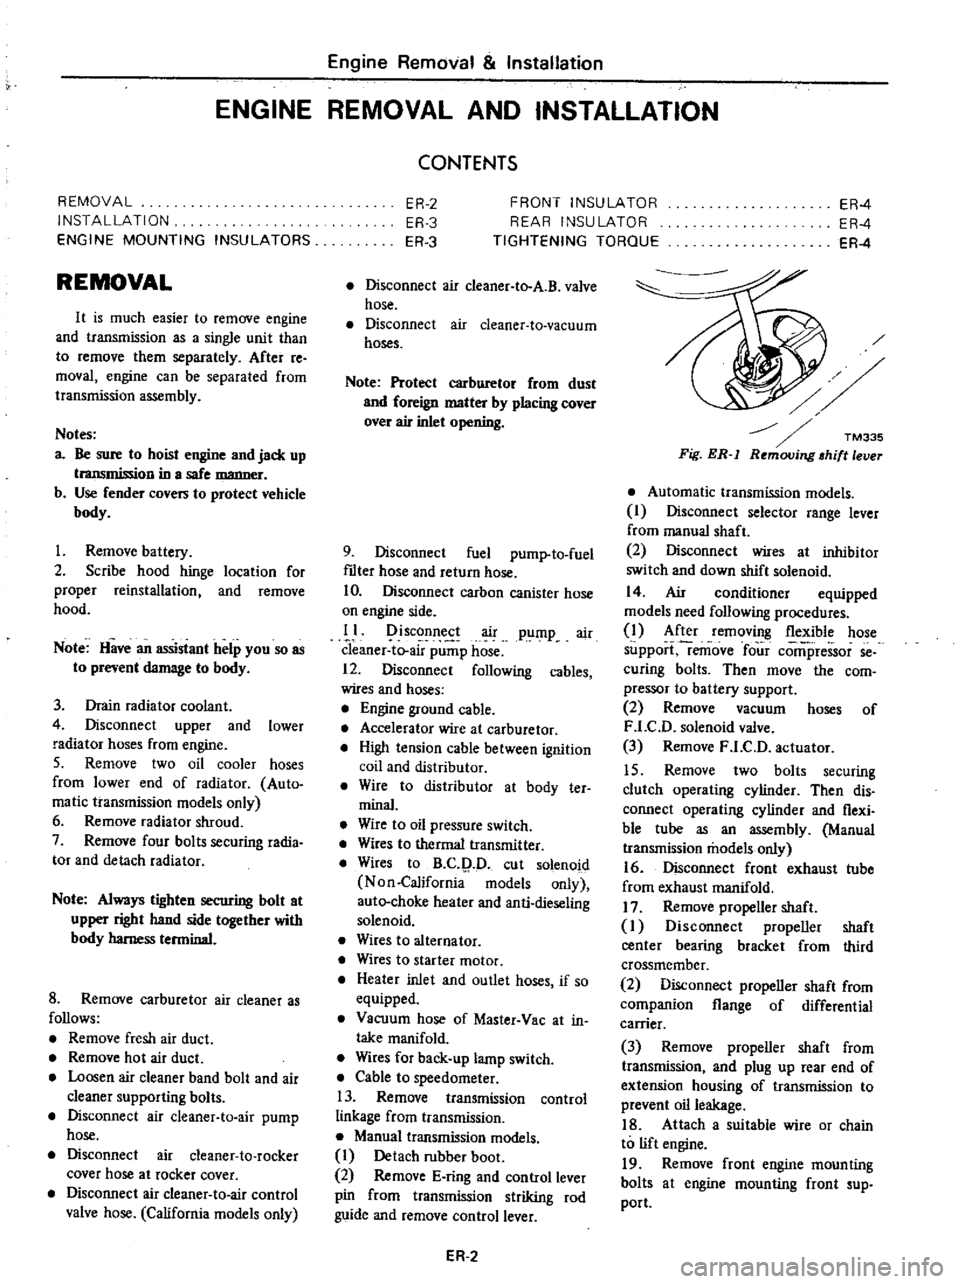
REMOVAL
INSTALLATION
ENGINE
MOUNTING
INSULATORS
REMOVAL
It
is
much
easier
to
remove
engine
and
transmission
as
a
single
unit
than
to
remove
them
separately
After
re
moval
engine
can
be
separated
from
transntission
assembly
Notes
a
Be
sure
to
hoist
engine
and
jack
up
transmission
in
a
safe
manner
b
Use
fender
cove
to
protect
vehicle
body
1
Remove
battery
2
Scribe
hood
hinge
location
for
proper
reinstallation
and
remove
hood
Note
Have
an
assistant
help
you
so
as
to
prevent
damage
to
body
3
Drain
radiator
coolant
4
Disconnect
upper
and
lower
radiator
hoses
from
engine
5
Remove
two
oil
cooler
hoses
from
lower
end
of
radiator
Auto
ma
tic
transmission
models
only
6
Remove
radiator
shroud
7
Remove
four
bolts
securing
radia
tor
and
detach
radiator
Note
Always
tighten
securing
bolt
at
upper
right
hand
side
together
with
body
harness
terminal
8
Remove
carburetor
air
cleaner
as
follows
Remove
fresh
air
duct
Remove
hot
air
duct
Loosen
air
cleaner
band
bolt
and
air
cleaner
supporting
bolts
Disconnect
air
cleaner
ta
air
pump
hose
Disconnect
air
cleaner
to
rocker
cover
hose
at
rocker
cover
Disconnect
air
cleaner
to
air
control
valve
hose
California
models
only
CONTENTS
ER
2
ER
3
ER
3
FRONT
INSULATOR
REAR
INSULATOR
TIGHTENING
TORQUE
ER
4
ER
4
ER
4
Disconnect
air
deaner
to
A
B
valve
hose
Disconnect
air
cleaner
ta
vacuum
hoses
Note
Protect
carburetor
from
dust
and
foreign
matter
by
placing
cover
over
air
inlet
opening
9
Disconnect
fuel
pump
to
fuel
fdter
hose
and
return
hose
10
Disconnect
carbon
canister
hose
on
engine
side
II
Disconnect
air
pump
air
C1eaner
to
al
p
p
hose
12
Disconnect
following
cables
wires
and
hoses
Engine
ground
cable
Accelerator
wire
at
carburetor
High
tension
cable
between
ignition
coil
and
distributor
Wire
to
distributor
at
body
ter
minal
Wire
to
oil
pressure
switch
Wires
to
thermal
transmitter
Wires
to
B
C
p
D
cut
solenoid
Non
California
models
only
auto
choke
heater
and
anti
dieseling
solenoid
Wires
to
alternator
Wires
to
starter
motor
Heater
inlet
and
outlet
hoses
if
so
equipped
Vacuum
hose
of
Master
Vac
at
in
taJce
manifold
Wires
for
back
up
lamp
switch
Cable
to
speedometer
13
Remove
transmission
control
linkage
from
transmission
Manual
transmission
models
I
Detach
rubber
boot
2
Remove
E
ring
and
control
lever
pin
from
transmission
striking
rod
guide
and
remove
control
lever
ER
2
Fig
ER
l
Automatic
transmission
models
I
Disconnect
selector
range
lever
from
manual
shaft
2
Disconnect
wires
at
inhibitor
switch
and
down
shift
solenoid
14
Air
conditioner
equipped
models
need
following
procedures
1
After
removing
flexible
hose
support
remove
four
comi
ressor
se
curing
bolts
Then
move
the
com
pressor
to
battery
support
2
Remove
vacuum
hoses
of
F
LC
D
solenoid
valve
3
Remove
F
LC
D
actuator
15
Remove
two
bolts
securing
clutch
operating
cylinder
Then
dis
connect
operating
cylinder
and
flexi
ble
tube
as
an
assembly
Manual
transmission
models
only
16
Disconnect
front
exhaust
tube
from
exhaust
manifold
17
Remove
propeller
shaft
I
Disconnect
propeller
shaft
center
bearing
bracket
from
third
crossmember
2
Disconnect
propeller
shaft
from
companion
flange
of
differential
carrier
3
Remove
propeller
shaft
from
transmission
and
plug
up
rear
end
of
extension
housing
of
transmission
to
prevent
oil
leakage
18
Attach
a
suitable
wire
or
chain
to
lift
engine
19
Remove
front
engine
mounting
bolts
at
engine
mounting
front
sup
port
Page 257 of 537
Manual
Transmission
I
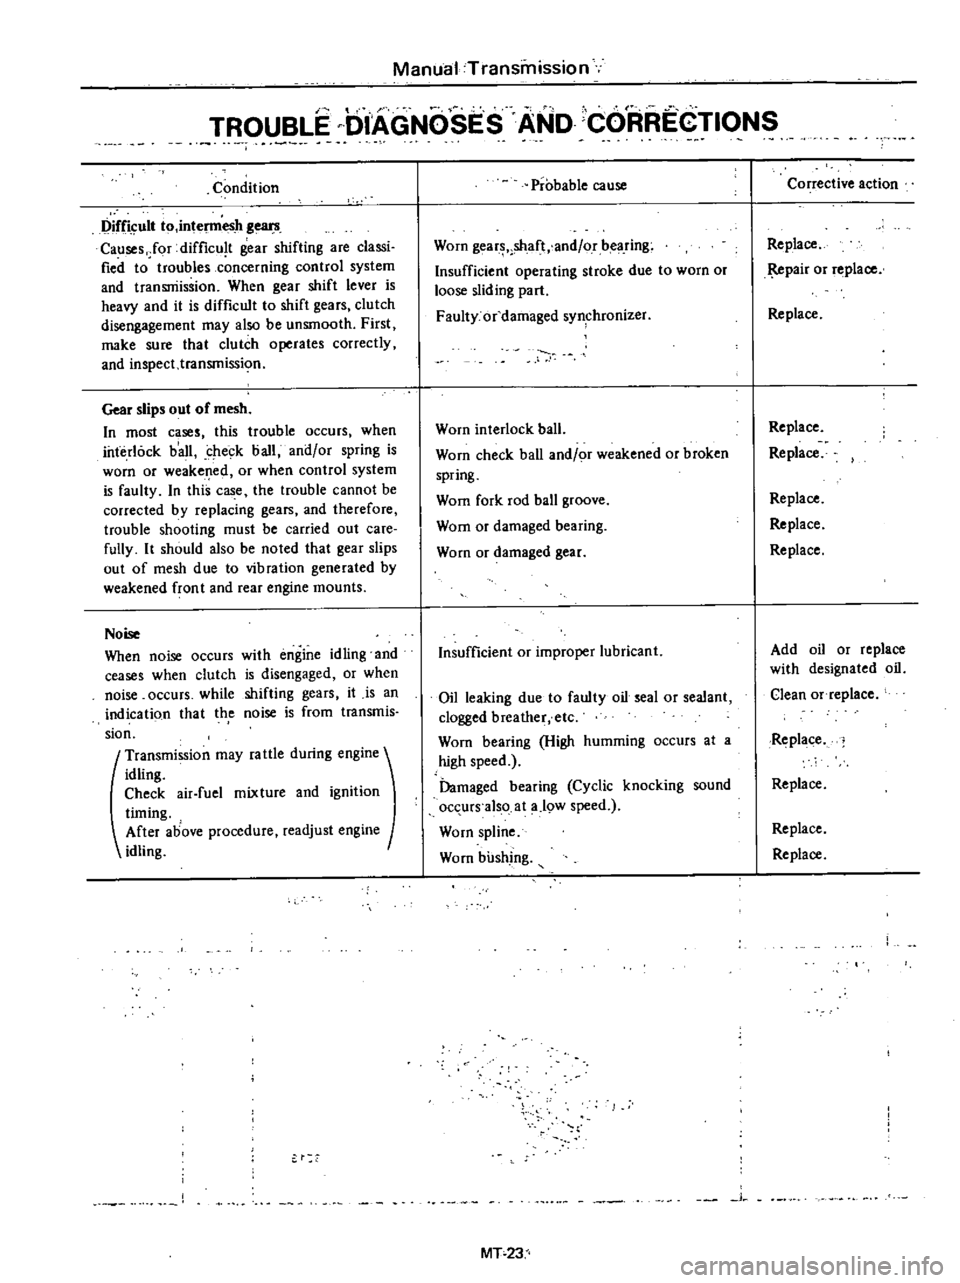
TROUBLE
DIAGNOSES
AND
CORREGTIONS
Condition
Difficult
to
intel11lesh
gears
Causes
Jor
difficu
t
gear
shifting
are
classi
fied
to
troubles
concerning
control
system
and
transniissioo
When
gear
shift
lever
is
heavy
and
it
is
difficult
to
shift
gears
clutch
disengagement
may
also
be
unsmooth
First
make
sure
that
clutch
operates
correctly
and
inspect
transmissi
o
Gear
slips
out
of
mesh
In
most
cases
this
trouble
occurs
when
interlock
b
all
check
ball
and
or
spring
is
worn
or
weakened
or
when
control
system
is
faulty
In
this
case
the
trouble
cannot
be
corrected
by
replacing
gears
and
therefore
trouble
shooting
must
be
carried
out
care
fully
It
should
also
be
noted
that
gear
slips
out
of
mesh
due
to
vibration
generated
by
weakened
fron
t
and
rear
engine
mounts
Noise
When
noise
occurs
with
engine
idling
and
ceases
when
clutch
is
disengaged
or
when
noise
occurs
while
shifting
gears
it
is
an
indicati90
that
th
e
noise
is
from
transmis
sion
t
Transmission
may
fa
ule
during
engine
idling
Check
air
fuel
mixture
and
ignition
timing
After
above
procedure
readjust
engine
idling
Probable
cause
Worn
gear
shaft
and
or
bearing
Insufficient
operating
stroke
due
to
worn
or
loose
sliding
part
Faulty
or
damaged
synchronizer
Worn
interlock
ball
Worn
check
ball
and
or
weakened
or
broken
spring
Wom
fork
rod
ball
groove
Wom
or
damaged
bearing
Worn
or
damaged
gear
Insufficient
or
improper
lubricant
Oil
leaking
due
to
faulty
oil
seal
or
sealant
clogged
breather
etc
Worn
bearing
High
humming
occurs
at
a
high
speed
Damaged
bearing
Cyclic
knocking
sound
occurs
also
at
a
19W
speed
Worn
spline
Worn
bushing
j
MT
23
Corrective
action
Replace
pair
or
replace
Replace
Replace
Replace
Replace
Replace
Replace
Add
oil
or
replace
with
designated
oil
Clean
Of
replace
Replace
Replace
Replace
Replace
Page 317 of 537
Automatic
Transmission
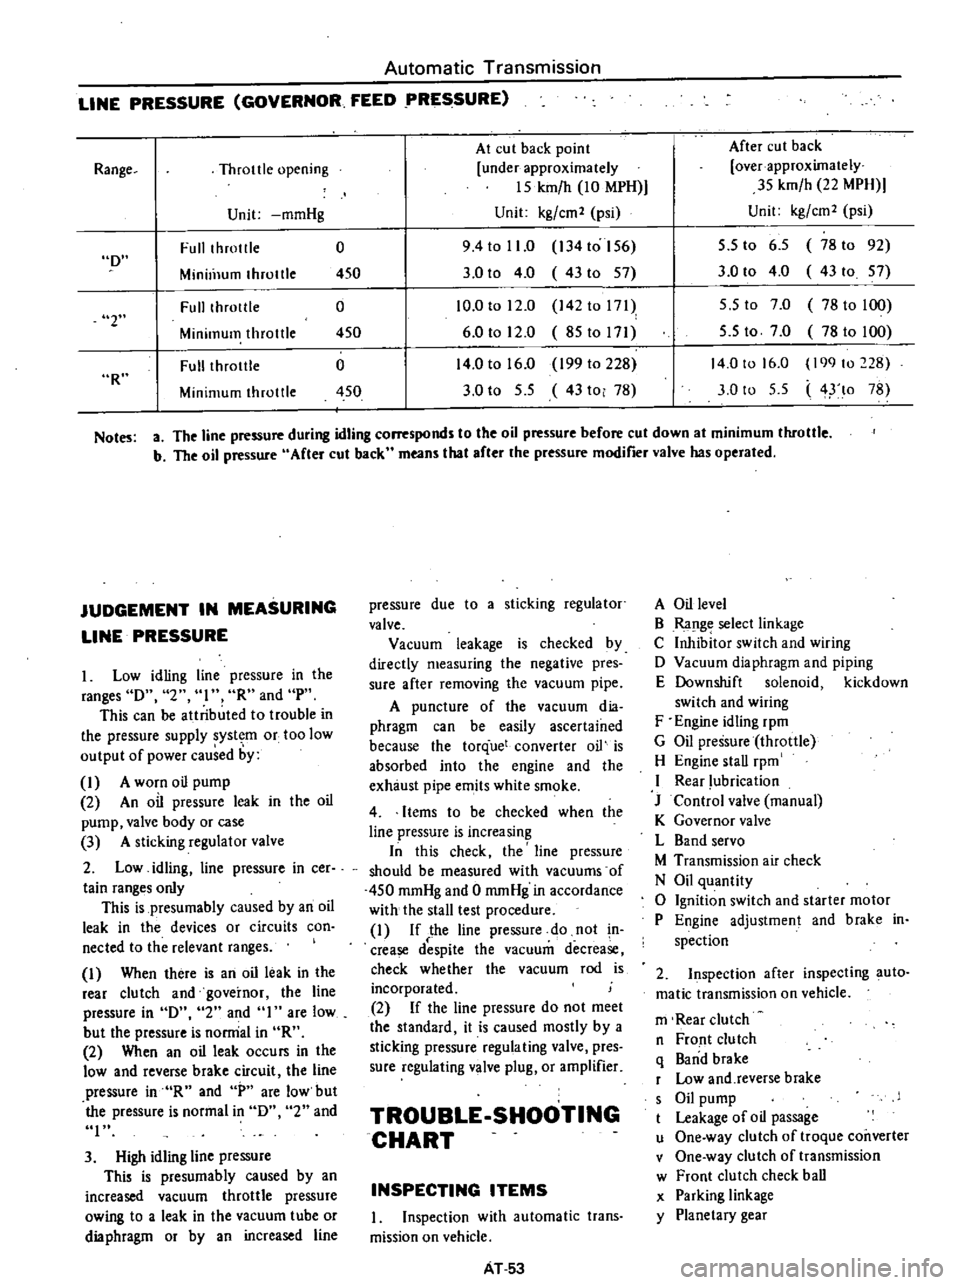
LINE
PRESSURE
GOVERNOR
FEED
PRESSURE
At
cut
back
point
After
cut
back
Throttle
opening
under
approximately
over
approximately
15
kmfh
10
MPH
35
kmfh
22
MPH
Unit
mmHg
Unit
kgfcm2
psi
Unit
kgfcm2
psi
Full
throtlle
0
9
4
to
11
0
134
to
156
5
5
to
6
5
78
to
92
Minill1um
throttle
450
3
0
to
4
0
43to
57
3
0
to
4
0
43
to
57
Fulllhrotlle
0
10
0
to
12
0
142
to
171
5
5
to
7
0
78
to
100
Minimum
throttle
450
6
0
to
12
0
85to171
5
5
to
7
0
78
to
100
Full
throtlle
0
14
0
to
16
0
199
to
228
14
0
to
16
0
199
to
228
Minimum
throttle
450
3
0
to
5
5
43
to
78
3
0
to
5
5
4
lo
78
Range
D
2
R
Notes
a
The
line
pressure
during
idling
corresponds
to
the
oil
pressure
before
cut
down
at
minimum
throttle
b
The
oil
pressure
After
cut
back
means
that
after
the
pressure
modifier
valve
has
operated
JUDGEMENT
IN
MEASURING
LINE
PRESSURE
Low
idling
line
pressure
in
the
ranges
D
2
I
R
and
pH
This
can
be
atlributed
to
trouble
in
the
pressure
supply
system
or
too
low
output
of
power
caused
by
I
A
worn
oil
pump
2
An
oil
pressure
leak
in
the
oil
pump
valve
body
or
case
3
A
sticking
regulator
valve
2
Low
idling
line
pressure
in
cer
tain
ranges
only
This
is
presumably
caused
by
an
oil
leak
in
the
devices
or
circuits
con
nected
to
the
relevant
ranges
I
When
there
is
an
oil
leak
in
the
rear
clutch
and
governor
the
line
pressure
in
D
2
and
I
are
low
but
the
pressure
is
norrrial
in
R
2
When
an
oil
leak
occurs
in
the
low
and
reverse
brake
circuit
the
line
pressure
in
R
and
P
are
low
but
the
pressure
is
normal
in
D
2
and
I
3
High
idling
line
pressure
This
is
presumably
caused
by
an
increased
vacuum
throttle
pressure
owing
to
a
leak
in
the
vacuum
tube
or
dia
phragm
or
by
an
increased
line
pressure
due
to
a
sticking
regulator
valve
Vacuum
leakage
is
checked
by
directly
measuring
the
negative
pres
sure
after
removing
the
vacuum
pipe
A
puncture
of
the
vacuum
dia
phragm
can
be
easily
ascertained
because
the
torque
converter
oil
is
absorbed
into
the
engine
and
the
exhaust
pipe
emits
white
smoke
4
Items
to
be
checked
when
the
line
pressure
is
increasing
In
this
check
the
line
pressure
should
be
measured
with
vacuums
of
450
mmHg
and
0
mmHg
in
accordance
with
the
stall
test
procedure
I
If
the
line
pressure
do
not
n
crease
despite
the
vacuum
decrease
check
whether
the
vacuum
rod
is
incorporated
2
If
the
line
pressure
do
not
meet
the
standard
it
is
caused
mostly
by
a
sticking
pressure
regulating
valve
pres
sure
regulating
valve
plug
or
amplifier
TROUBLE
SHOOTING
CHART
INSPECTING
ITEMS
1
Inspection
with
automatic
trans
mission
on
vehicle
AT
53
A
Oil
level
B
Ra
lge
select
linkage
C
Inhibitor
switch
and
wiring
D
Vacuum
diaphragm
and
piping
E
Downshift
solenoid
kickdown
switch
and
wiring
F
Engine
idling
rpm
G
Oil
pressure
throttle
H
Engine
stall
rpm
I
Rear
lubrication
J
Control
valve
manual
K
Governor
valve
L
Band
servo
M
Transmission
air
check
N
Oil
quantity
o
Ignition
switch
and
starter
motor
P
Engine
adjustment
and
brake
in
spection
2
Inspection
after
inspecting
auto
matic
transmission
on
vehicle
m
Rear
clutch
n
Front
clutch
q
Band
brake
r
Low
and
reverse
brake
s
Oil
pump
t
Leakage
of
oil
passage
u
One
way
clutch
of
troque
coilVerter
v
One
way
clutch
of
transmission
w
Front
clutch
check
ball
x
Parking
linkage
y
Planetary
gear
Page 321 of 537

Automatic
Transmission
TROUBLE
SHOOTING
GUIDE
FOR
3N71B
AUTOMATIC
TRANSMISSION
Order
Test
item
Checking
Oil
level
gauge
2
Downshift
solenoid
3
Manuallinkage
L
4
Inhibitor
switch
5
Engine
idling
rpm
6
Vacuum
pressure
of
vacuum
pipe
7
Operation
in
each
range
8
Creep
of
vehicle
Stall
test
I
Oil
pressure
before
tesling
1
2
Stall
test
3
Oil
pressure
after
testing
Road
test
Slow
acceleration
I
st
2nd
2nd
3rd
2
Quick
acceleration
lst
2nd
2nd
3rd
3
Kick
down
operation
3rd
2nd
or
2nd
1st
Procedure
Check
gauge
for
oil
level
and
leakage
before
and
after
each
test
Check
for
sound
of
operating
solenoid
when
depressing
accelerator
pedal
fully
with
ignition
key
ON
Check
by
shifting
into
P
lR
IN
D
2
and
I
ranges
with
selector
lever
Check
whether
starter
operates
in
N
and
p
ranges
only
and
whether
reverse
lamp
operates
in
R
range
only
Check
whelher
idling
rpm
meet
standard
Check
whether
vacuum
pressure
is
more
than
450
mmHg
in
idling
and
whether
it
decreases
with
increasing
rpm
Check
whether
transmission
engages
positively
by
shifting
N
0
N
2
N
l
I
and
N
R
range
while
idling
with
brake
applied
Check
whether
there
is
any
creep
in
D
2
R
ranges
and
Measure
line
pressures
in
D
2
I
and
R
range
while
idling
Measure
engine
rpm
and
line
pressure
in
D
2
I
and
R
ranges
during
full
throttle
operati
n
Notes
a
Temperature
of
torque
converter
oil
used
in
test
should
be
from
600
to
1000C
1400
to
2120F
i
e
sufficiently
warmed
up
but
not
overheated
b
To
cool
oil
between
each
stall
test
for
D
2
I
and
R
ranges
idle
engine
i
e
rpm
at
about
1
200
rpm
for
more
than
1
minute
in
P
range
Measurement
time
must
not
be
more
than
5
seconds
Same
as
item
I
Check
vehide
speeds
and
engine
cpm
in
shifting
up
Ist
2nd
range
and
2nd
Jo3rd
range
while
running
with
lever
in
D
range
and
engine
vacuum
pressure
of
about
200
I11I1lHg
Same
as
item
1
above
except
with
engine
vacuum
pressure
of
0
mmHg
i
e
in
position
just
before
kickdown
Check
whether
the
kickdown
operates
and
measure
the
time
delays
while
running
at
30
40
50
60
70
km
h
18
25
30
37
43
MPH
in
D3
range
AT
57
Page 449 of 537

Body
Electrical
System
DESCRIPTION
LIGHTING
SYSTEM
CI
RCUIT
DIAGRAM
Headlamp
tail
lamp
and
license
lamp
system
G
o
@
LI
U
CIl
HEADl
AMP
L
H
e
FRONT
SlOE
lIIIARI
ER
LAMP
IR
H
USl
LE
LINK
CJ
lOA
CJ
154
CJ
CJ
FUSE
BLOCK
I
2
IR
n
fMP
IL
H
l
REAR
SIDE
MARKER
LAMP
R
1
1
LIGHTING
SWITCH
l
J
ll
f
1121
I
r
1
x
DIMMER
SWITCH
101
1
I
ON
t
0
I
EA
i
METE
LAMP
ILLUMINATION
LAMP
jSTOPBrURH
STOP
8
TURN
TAIL
TAIL
BSAOC
UP
RE
AR
COMBINATION
LAMP
R
H
I
J
LICE
NSf
r
LAMP
I3
BACIC
UP
TA
L
ST
OP8TURN
TAIL
STOP8TURN
REAR
COMBINATION
LAMP
ILH
I
Q
REAR
SIDE
NAR
tAMP
BEBSOA
Fig
BE
3
Headlamp
tail
lamp
and
liceme
lamp
ay6t
m
Turn
signal
hazard
warning
lamp
stop
lamp
and
back
up
lamp
system
I
HEAOLAMP
R
H
l
CR
H
Ll
lHTINIi
j
nn
A
iNAnON
8A
LAMP
BATTERY
@
4j
Jl
FRONT
COM8IfUl
1ON
LAMP
H
FUSIBLE
LINK
I
a
FUSE
BLOCK
FUSE
FROM
IGNITION
SWITCH
@
h
FRONT
COMBINATION
LAMP
L
H
REAR
COMBINATION
LAMP
R
H
BACK
UP
LAMP
T
A
I
L
SWITCH
n
8ACK
UP
E
W
P
HAZARO
FLASHER
UNIT
HAIARD
2
ON
WA
NING
SWITCH
3
r
TU
N
SIGNAL
FLASHER
UNIT
CJ
U
t
N
iH
ij
I
STOP
t
H
J
EL
L
H
I
TURN
SIGNAL
INDICATOR
LAMP
TURN
SIGNAL
SWITCH
G
BACK
UP
JTA
STOP8TURN
TAIL
STOP
8
TURN
REAR
COMelNATlON
LAMP
IL
H
I
BE851A
Fig
BE
4
Turn
signal
Juuard
warning
lamp
stop
lamp
and
back
up
lamp
system
BE
4
Page 460 of 537

Body
Electrical
System
Circuit
diagram
of
combination
meter
system
BATTERY
r
G
0
J
J
Z2
lIa
I
LlJ
I
Z
J
Z
a
z
J
z
Z
i
g
o
a
I
LlJ
I
ll
B
S
M
D
LIGHT
i
i
RELAY
i2i
mm
S
FROM
J
e
AMP
l1
l1
J
J
00
LlJLlJ
z
z
B
COO
CUT
n
SOLENOID
i
OIL
f
PRESSURE
SWITCH
THERMAL
a
TRANSMITTER
I
FUSIBLE
r
LINK
IGNITION
SWITCH
0
1
lOA
I
g
KG
lOA
r
I
15A
t
15A
i
7
5a
z
u
a
a
I
04LlJ
l1
J
o
02
u
3
FUEL
TANK
J
VOLTAGE
REGULATOR
HAND
BRAKE
SWITCH
J
Jon
0
j
Z
a
l
I
I
I
l
ll
Z
ll
Z
LlJ
LlJ
J
a
J
a
I
I
I
I
1
1
Zza
a
00
a
a
LlJLlJ
ll
ll
a
a
HAZARD
FLASHER
UNIT
L
J
HAZAR
D
SWITCH
I
OFF
ONI
l
I
I
I
2
I
I
3
I
14
61
I
5
6
16
9
I
76
I
FLASHER
UNIT
CJ
TO
LIGHT
IOFF
RELAY
B
l
TERMINAL
I
I
I
LIGHT
SWITCH
21
X
X
BEB57
A
Fig
BE
22
Circuit
diagram
of
combination
meter
ayatt
m
TURN
SIGNAL
SWITCH
I
L
RI
lFLA
I
IR
R
I
IR
L
I
IF
R
u
I
IF
L
u
I
FROM
L1GHT
RELAY
DIMMER
SWITCH
BE
15
Page 461 of 537
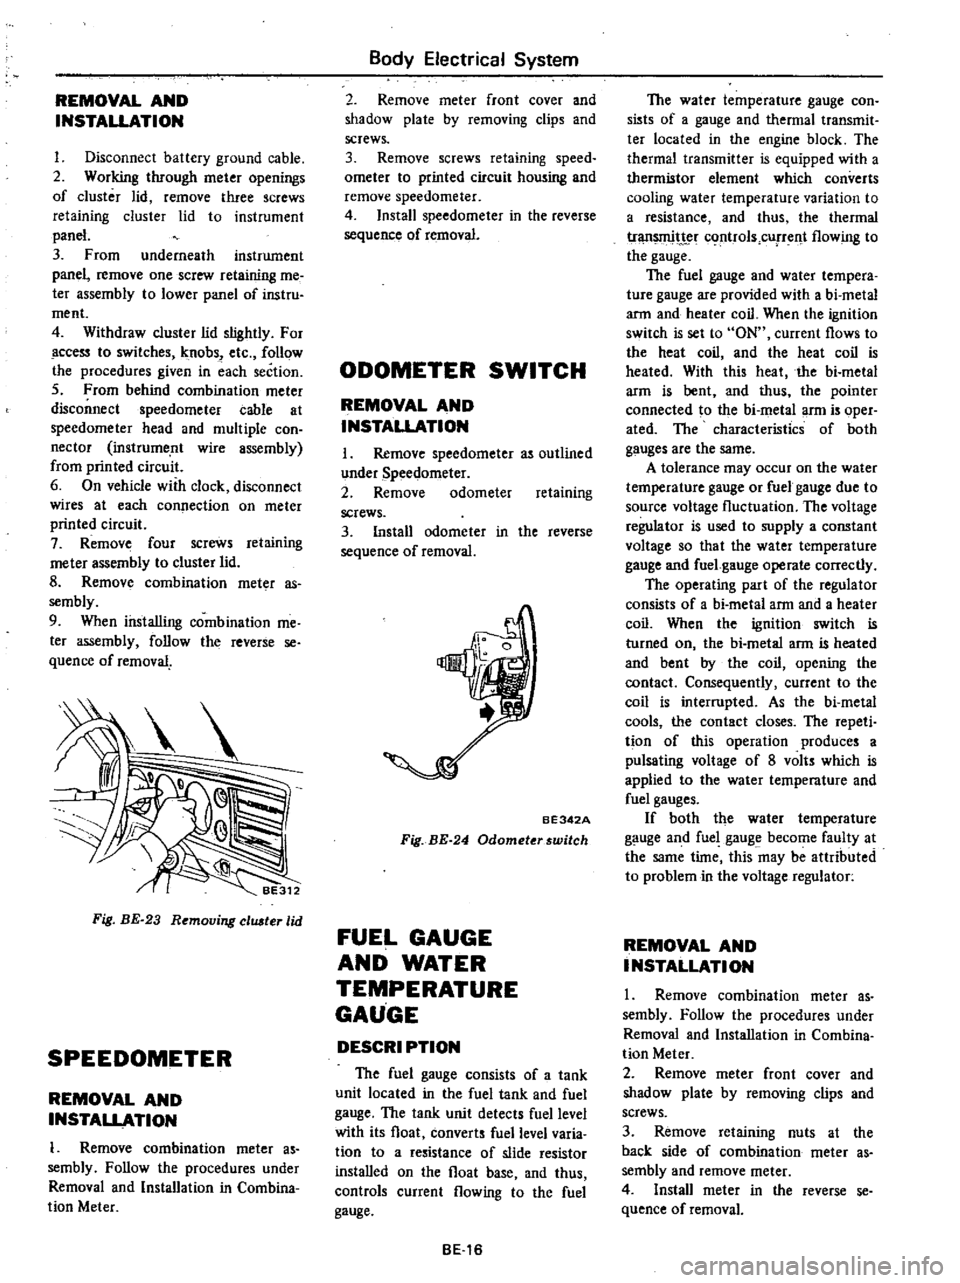
REMOVAL
AND
INSTALLATION
I
Disconnect
battery
ground
cable
2
Working
through
meter
openings
of
cluster
lid
remove
three
screws
retaining
cluster
lid
to
instrument
panel
3
From
underneath
instrument
panel
remove
one
screw
retaining
me
ter
assembly
to
lower
panel
of
instru
ment
4
Withdraw
cluster
lid
slightly
For
ccess
to
switches
knobs
etc
follow
the
procedures
given
in
each
section
5
From
behind
combination
meter
disconnect
speedometer
cable
at
speedometer
head
and
multiple
con
nector
instrume
nt
wire
assembly
from
printed
circuit
6
On
vehicle
with
clock
disconnect
wires
at
each
connection
on
meter
printed
circuit
7
Remove
four
screws
retaining
me
ter
assembly
to
cluster
lid
8
Remov
combination
meter
as
sembly
9
When
installing
combination
me
ter
assembly
follow
the
reverse
se
quence
of
removal
Fig
BE
23
Removing
eluster
lid
SPEEDOMETER
REMOVAL
AND
INSTALLATION
1
Remove
combination
meter
as
sembly
Follow
the
procedures
under
Removal
and
Installation
in
Combina
tion
Meter
Body
Electrical
System
2
Remove
meter
front
cover
and
shadow
plate
by
removing
clips
and
screws
3
Remove
screws
retaining
speed
ometer
to
printed
circuit
housing
and
remove
speedometer
4
Install
speedometer
in
the
reverse
sequence
of
removal
ODOMETER
SWITCH
REMOVAL
AND
INSTALLATION
I
Remove
speedometer
as
outlined
under
Speedometer
2
Remove
odometer
retaining
screws
3
Install
odometer
in
the
reverse
sequence
of
removal
BE342A
Fig
BE
24
Odometerswitch
FUEL
GAUGE
AND
WATER
TEMPERATURE
GAUGE
DESCRI
PTION
The
fuel
gauge
consists
of
a
tank
unit
located
in
the
fuel
tank
and
fuel
gauge
The
tank
unit
detects
fuel
level
with
its
float
converts
fuel
level
varia
tion
to
a
resistance
of
slide
resistor
installed
on
the
float
base
and
thus
controls
current
flowing
to
the
fuel
gauge
BE16
The
water
temperature
gauge
con
sists
of
a
gauge
and
thermal
transmit
ter
located
in
the
engine
block
The
thermal
transmitter
is
equipped
with
a
thermistor
element
which
converts
cooling
water
temperature
variation
to
a
resistance
and
thus
the
thermal
tr
t
c
rtrols
cUfTent
flowing
to
the
gauge
The
fuel
gauge
and
water
tempera
ture
gauge
are
provided
with
a
bi
metal
arm
and
heater
coil
When
the
ignition
switch
is
set
to
ON
current
flows
to
the
heat
coil
and
the
heat
coil
is
heated
With
this
heat
the
bi
metal
arm
is
bent
and
thus
the
pointer
connected
to
the
bi
metal
arm
is
oper
ated
The
characteristics
of
both
gauges
are
the
same
A
tolerance
may
occur
on
the
water
temperature
gauge
or
fuel
gauge
due
to
source
voltage
fluctuation
The
voltage
regulator
is
used
to
supply
a
constant
voltage
so
that
the
water
temperature
gauge
and
fuel
gauge
operate
correctly
The
operating
part
of
the
regulator
consists
of
a
bi
metal
arm
and
a
heater
coil
When
the
ignition
switch
is
turned
on
the
bi
metal
arm
is
heated
and
bent
by
the
coil
opening
the
contact
Consequently
current
to
the
coil
is
interrupted
As
the
bi
metal
cools
the
contact
closes
The
repeti
tion
of
this
operation
produces
a
pulsating
voltage
of
8
volts
which
is
applied
to
the
water
temperature
and
fuel
gauges
If
both
the
water
temperature
gauge
and
fuel
gauge
become
faulty
at
the
same
time
this
may
be
attributed
to
problem
in
the
voltage
regulator
REMOVAL
AND
INSTALLATION
1
Remove
combination
meter
as
sembly
Follow
the
procedures
under
Removal
and
Installation
in
Combina
tion
Meter
2
Remove
meter
front
cover
and
shadow
plate
by
removing
clips
and
screws
3
Remove
retaining
nuts
at
the
back
side
of
combination
meter
as
sembly
and
remove
meter
4
Install
meter
in
the
reverse
se
quence
of
removal
Page 462 of 537
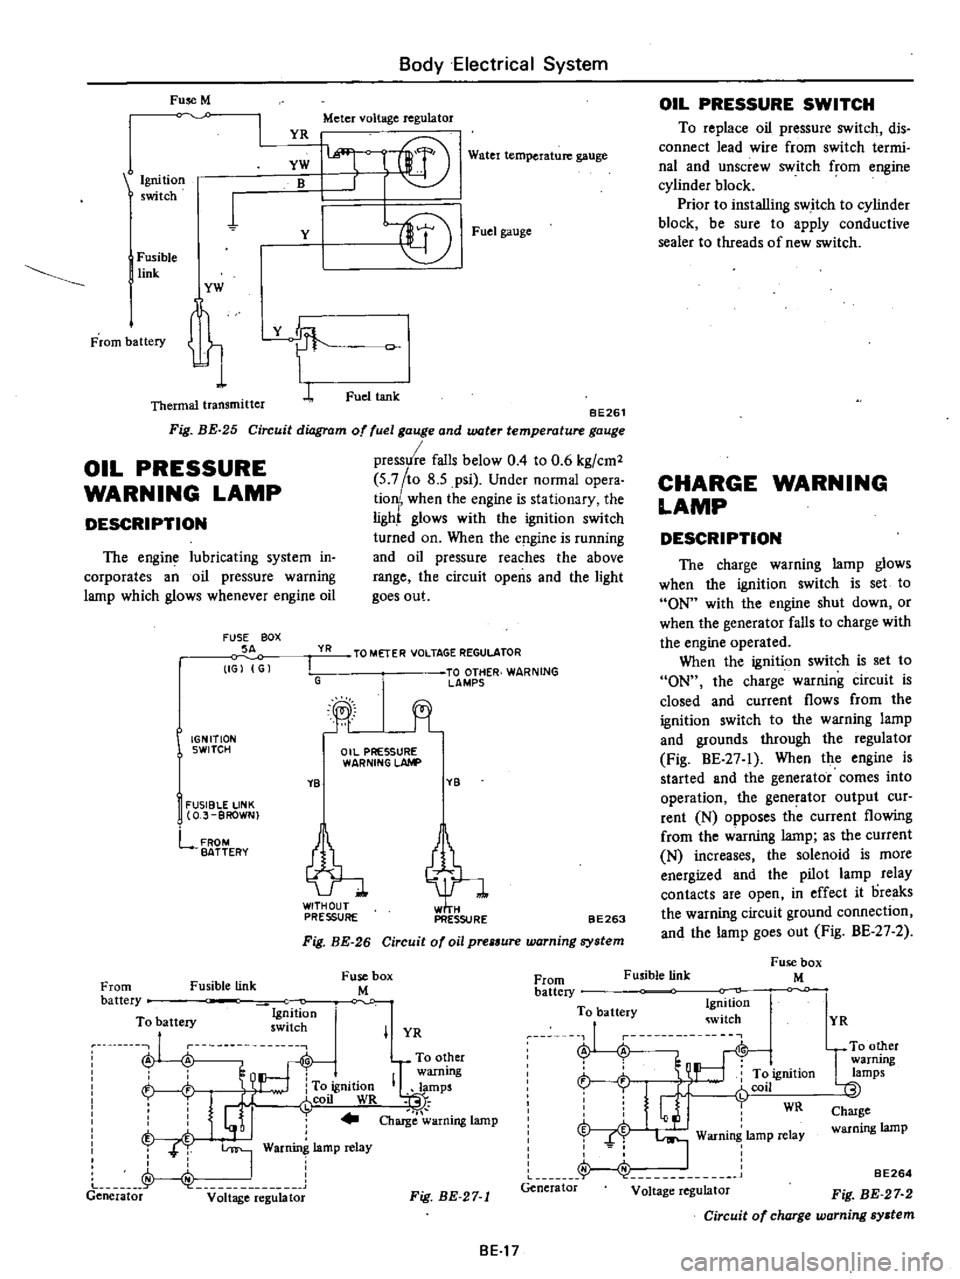
Fuse
M
Body
Electrical
System
YR
Meter
voltage
regulator
Water
temperature
gauge
BE261
Circuit
diagram
of
fuel
gauge
and
water
temperature
gauge
pressure
falls
below
0
4
to
0
6
kg
cm2
5
7
to
8
5
psi
Under
normal
opera
tion
when
the
engine
is
stationary
the
ligh
glows
with
the
ignition
switch
turned
on
When
the
e
gine
is
running
and
oil
pressure
reaches
the
above
range
the
circuit
opens
and
the
light
goes
out
Ignition
switch
YW
B
1
Y
I
Fusible
link
YW
t
Thermal
transmitter
L
Fig
BE
25
OIL
PRESSURE
WARNING
LAMP
DESCRIPTION
The
engine
lubricating
system
in
corporates
an
oil
pressure
warning
lamp
which
glows
whenever
engine
oil
FUSE
BOX
SA
IGJ
G
YR
I
G
IGNITION
SWITCH
YB
I
FUSIBLE
LINK
O
J
BROWN
lffi
l
f
r@
Fuel
gauge
Fuel
tank
TO
METER
VOLTAGE
REGULATOR
TO
OTHER
WARNING
lAMPS
jt
Oil
PRESSURE
WARNING
LAhlP
YB
tl
PRESSURE
PRESSURE
FROM
BATTERY
BE263
Fig
BE
26
Circuit
of
oil
prelSure
warning
system
Fusible
link
Fuse
box
M
OIL
PRESSURE
SWITCH
To
replace
oil
pressure
switch
dis
connect
lead
wire
from
switch
termi
nal
and
unscrew
switch
from
engine
cylinder
block
Prior
to
installing
switch
to
cylinder
block
be
sure
to
apply
conductive
sealer
to
threads
of
new
switch
CHARGE
WARNING
LAMP
DESCRIPTION
The
charge
warning
lamp
glows
when
the
ignition
switch
is
set
to
ON
with
the
engine
shut
down
or
when
the
generator
falls
to
charge
with
the
engine
operated
When
the
ignition
switch
is
set
to
ON
the
charge
warning
circuit
is
closed
and
current
flows
from
the
ignition
switch
to
the
warning
lamp
and
grounds
through
the
regulator
Fig
BE
27
1
When
the
engine
is
started
and
the
generator
comes
into
operation
the
generator
output
cur
rent
N
opposes
th
current
flowing
from
the
warning
lamp
as
the
current
N
increases
the
solenoid
is
more
energized
and
the
pilot
lamp
relay
contacts
are
open
in
effect
it
oreaks
the
warning
circuit
ground
connection
and
the
lamp
goes
out
Fig
BE
27
2
Fusible
link
Fuse
box
M
From
battery
To
battery
Ig
ition
ru
nu
swllch
A
A
To
other
warning
h
To
ignition
IQlamps
i
J
r
coil
WR
t
I
j
Charge
warning
lamp
T
T
I
War
lamp
relay
J
I
Generator
v
it
ge
e
g
bt
From
battery
To
battery
Ignition
witch
J
i
L
r
t
ft
ignition
r
Glj
fCOil
WR
f
I
Warning
lamp
relay
Generator
Voltage
regulator
I
YR
Fig
BE
27
1
BE17
YR
UTO
other
warrung
lamps
Charge
warning
lamp
BE264
Fig
BE
27
2
Circuit
of
charge
warning
system