rear view mirror DATSUN PICK-UP 1977 Service Manual
[x] Cancel search | Manufacturer: DATSUN, Model Year: 1977, Model line: PICK-UP, Model: DATSUN PICK-UP 1977Pages: 537, PDF Size: 35.48 MB
Page 440 of 537

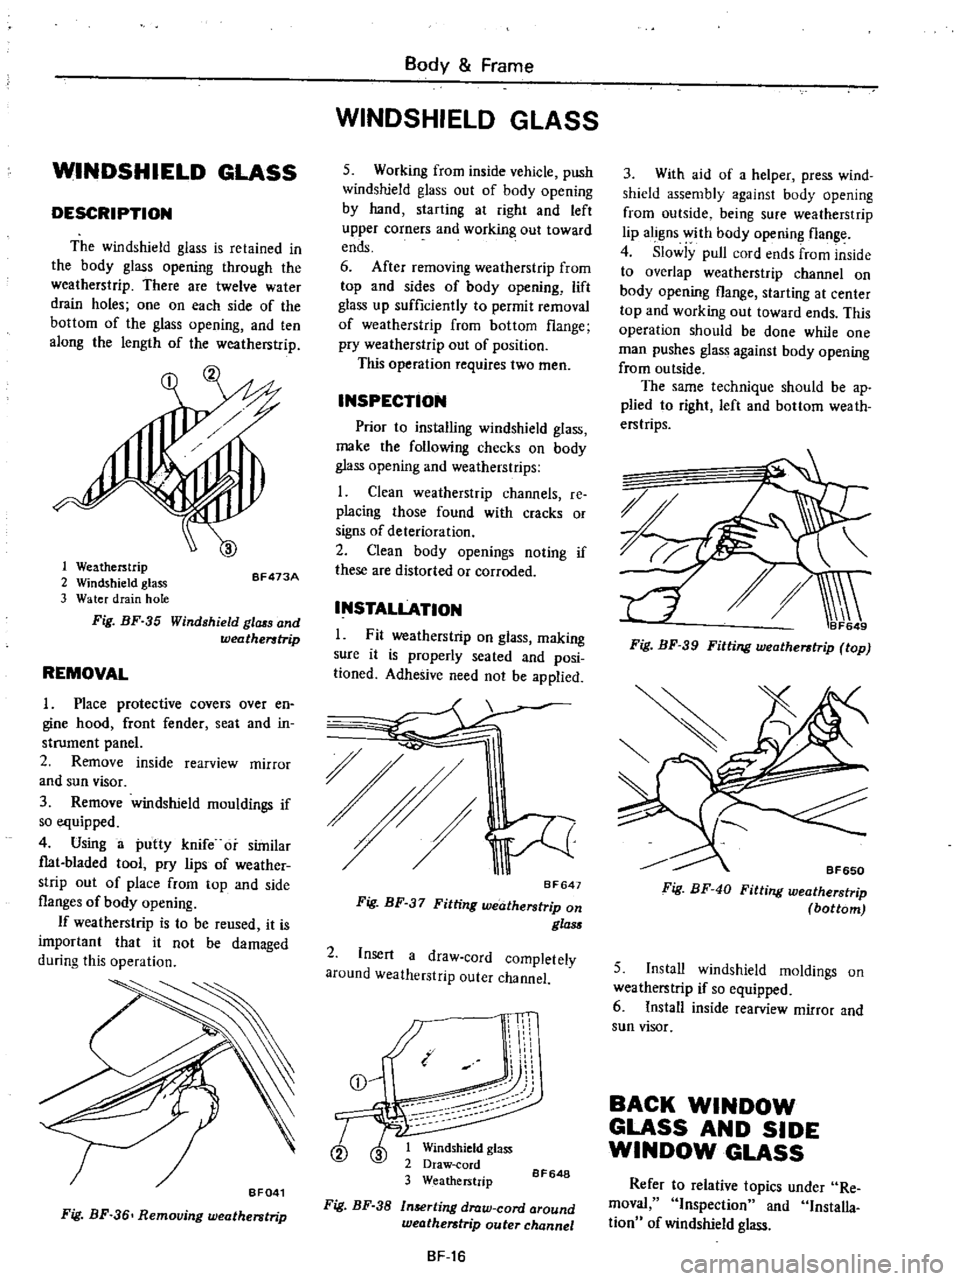
WINDSHIELD
GLASS
DESCRIPTION
The
windshield
glass
is
retained
in
the
body
glass
opening
through
the
weatherstrip
There
are
twelve
water
drain
holes
one
on
each
side
of
the
bottom
of
the
glass
opening
and
ten
along
the
length
of
the
weatherstrip
1
Weatherstrip
2
Windshield
glass
3
Water
drain
hole
Fig
BF
35
Windshield
glass
and
weatherstrip
BF473A
REMOVAL
1
Place
protective
covers
over
en
gine
hood
front
fender
seat
and
in
strument
panel
2
Remove
inside
rearview
mirror
and
sun
visor
3
Remove
windshield
mouldings
if
so
equipped
4
Using
a
putty
knife
or
similar
flat
bladed
tool
pry
lips
of
weather
strip
out
of
place
from
top
and
side
flanges
of
body
opening
If
weatherstrip
is
to
be
reused
it
is
important
that
it
not
be
damaged
during
this
operation
BF041
Fig
BF
36
Removing
weatherstrip
Body
Frame
WINDSHIELD
GLASS
5
Working
from
inside
vehicle
push
windshield
glass
out
of
body
opening
by
hand
starting
at
right
and
left
upper
COIners
and
working
out
toward
ends
6
After
removing
weatherstrip
from
top
and
sides
of
body
opening
lift
glass
up
sufficiently
to
permit
removal
of
weatherstrip
from
bottom
flange
pry
weatherstrip
out
of
position
This
operation
requires
two
men
INSPECTION
Prior
to
installing
windshield
glass
make
the
following
checks
on
body
glass
opening
and
weatherstrips
I
Clean
weatherstrip
channels
re
placing
those
found
with
cracks
or
signs
of
deterioration
2
Clean
body
openings
noting
if
these
are
distorted
or
corroded
INSTALLATION
L
Fit
weatherstrip
on
glass
making
sure
it
is
properly
seated
and
posi
tioned
Adhesive
need
not
be
applied
0
BF641
Fig
BF
37
Fitting
weatherstrip
on
glass
2
Insert
a
draw
cord
completely
around
weatherstrip
outer
channel
Q
i
I
dYii
1
Windshield
glass
2
Draw
cord
3
Weatherstrip
Fig
BF
38
In8erting
draw
cord
around
weatherstrip
outer
channel
8F648
BF
16
3
With
aid
of
a
helper
press
wind
shield
assembly
against
body
opening
from
outside
being
sure
weatherstrip
lip
aligns
ith
body
opening
flange
4
Slowly
pull
cord
ends
from
inside
to
overlap
weatherstrip
channel
on
body
opening
flange
starting
at
center
top
and
working
out
toward
ends
This
operation
should
be
done
while
one
man
pushes
glass
against
body
opening
from
outside
The
same
technique
should
be
ap
plied
to
right
left
and
bottom
wea
th
erstrips
Fig
BF
39
Fitting
weatherstrip
top
BF650
Fig
BF
40
Fitting
weatherstrip
bottom
5
Install
windshield
moldings
on
weatherstrip
if
so
equipped
6
Install
inside
rearview
mirror
and
sun
visor
BACK
WINDOW
GLASS
AND
SIDE
WINDOW
GLASS
Refer
to
relative
topics
under
Re
moval
Inspection
and
Installa
tion
of
windshield
glass
Page 442 of 537

Body
Frame
INTERIOR
TRIM
AND
CENTER
CONSOLE
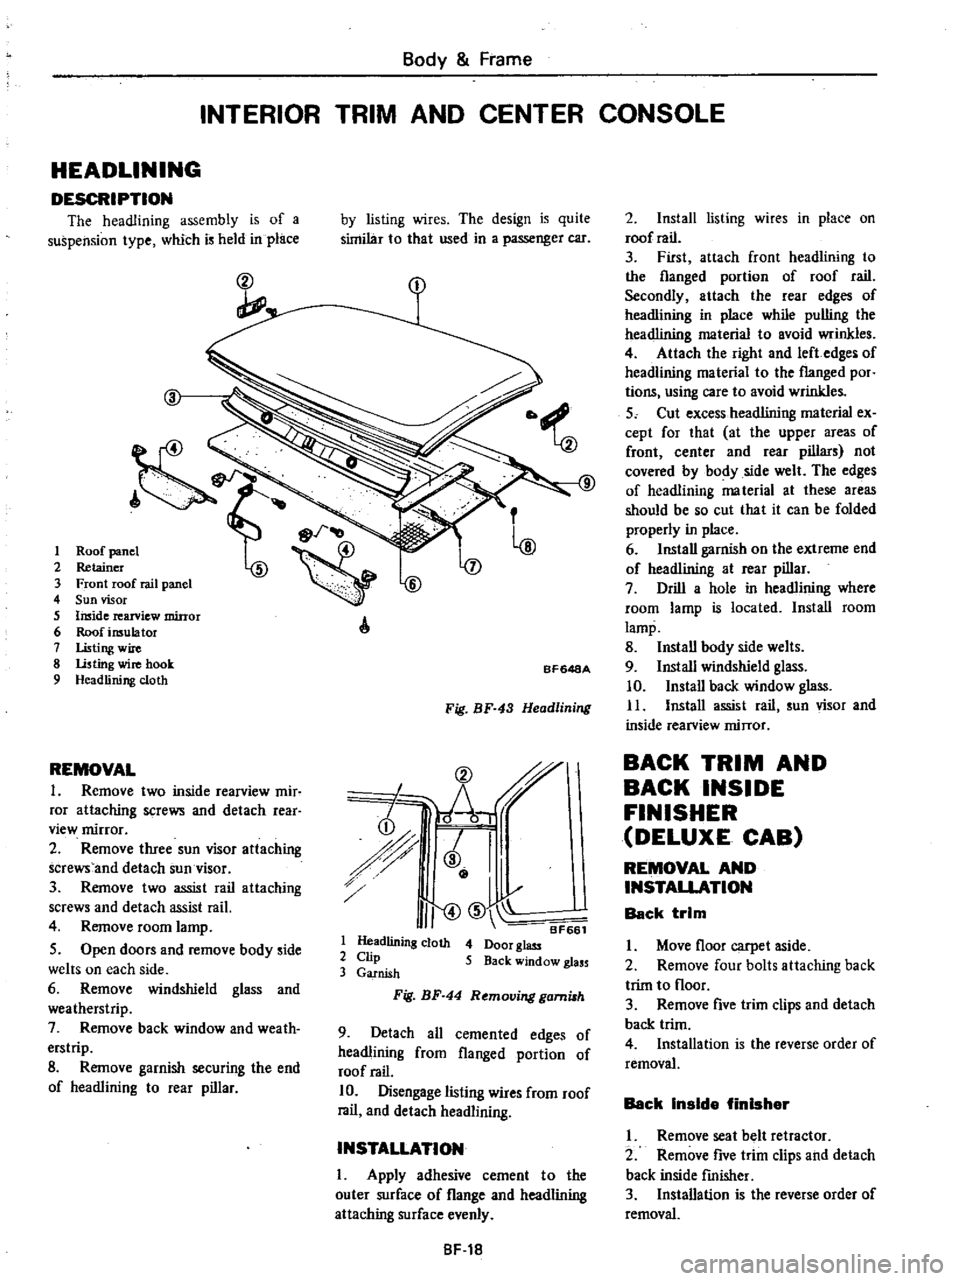
HEADLINING
DESCRIPTION
The
headlining
assembly
is
of
a
suspension
type
which
is
held
in
place
ct
I
2
3
4
5
6
7
8
9
REMOVAL
1
Remove
two
inside
rearview
mir
ror
attaching
screws
and
detach
rear
view
mirror
2
Remove
three
sun
visor
attaching
screws
and
detach
sun
visor
3
Remove
two
assist
rail
attaching
screws
and
detach
assist
rail
4
Remove
room
lamp
5
Open
doors
and
remove
body
side
welts
on
each
side
6
Remove
windshield
glass
and
weatherstrip
7
Remove
back
window
and
weath
erstrip
8
Remove
garnish
securing
the
end
of
headlining
to
rear
pillar
by
listing
wires
The
design
is
quite
similar
to
that
used
in
a
passenger
car
A
BF648A
Fig
BF
43
Headlining
CD
r
h
i
r
J
I
I
I
II
CID
BF661
1
Headlining
cloth
4
Door
glass
2
Clip
5
Back
window
glass
3
Garnish
Fig
BF
44
Removing
gami8h
9
Detach
all
cemented
edges
of
headlining
from
flanged
portion
of
roof
rail
10
Disengage
listing
wires
from
roof
rail
and
detach
headlining
INSTALLATION
I
Apply
adhesive
cement
to
the
outer
surface
of
flange
and
headlining
attaching
surface
evenly
8F
18
2
Install
listing
wires
in
place
on
roof
rail
3
First
attach
front
headlining
to
the
flanged
portion
of
roof
rail
Secondly
attach
the
rear
edges
of
headlining
in
place
while
pulling
the
headlining
material
to
avoid
wrinkles
4
Attach
the
right
and
left
edges
of
headlining
material
to
the
flanged
por
tions
using
care
to
avoid
wrinkles
5
Cut
excess
headlining
material
ex
cept
for
that
at
the
upper
areas
of
front
center
and
rear
pillars
not
covered
by
body
side
welt
The
edges
of
headlining
ma
terial
at
these
areas
should
be
so
cut
that
it
can
be
folded
properly
in
place
6
Install
garnish
on
the
extreme
end
of
headlining
at
rear
pillar
7
Drill
a
hole
in
headlining
where
room
lamp
is
located
Install
room
lamp
8
Install
body
side
welts
9
Install
windshield
glass
10
Install
back
window
glass
11
Install
assist
rail
sun
visor
and
inside
rearview
mirror
BACK
TRIM
AND
BACK
INSIDE
FINISHER
DELUXE
CAB
REMOVAL
AND
INSTALLATION
Back
trim
I
Move
floor
carpet
aside
2
Remove
four
bolts
attaching
back
trim
to
floor
3
Remove
five
trim
clips
and
detach
back
trim
4
Installation
is
the
reverse
order
of
removal
Back
Inside
finisher
I
Remove
seat
belt
retractor
2
Remove
five
trim
clips
and
detach
back
inside
fmisher
3
Installation
is
the
reverse
order
of
removal