wheel DATSUN PICK-UP 1977 Service Manual
[x] Cancel search | Manufacturer: DATSUN, Model Year: 1977, Model line: PICK-UP, Model: DATSUN PICK-UP 1977Pages: 537, PDF Size: 35.48 MB
Page 5 of 537
General
Informa
ion
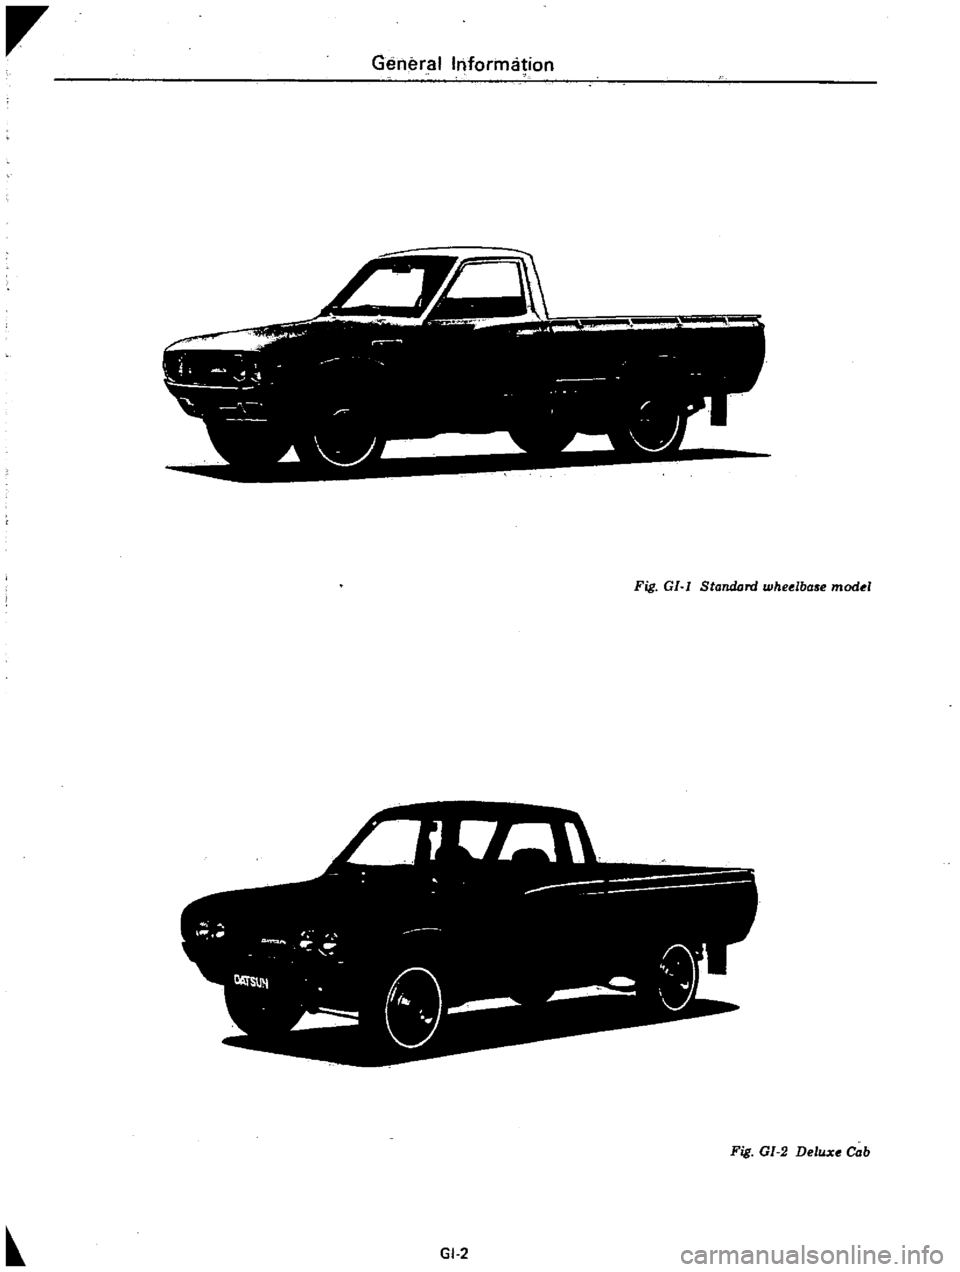
Fig
GI
I
Standord
wheelbase
model
Fig
GI
2
Delux
Cob
GI
2
Page 6 of 537
General
Information
L
GENERAL
INFORMATION
CONTENTS
MOOEL
VARIATION
GI
3
APPROXIMATE
REFILL
CAPACITIES
GI
B
IDENTIFICATION
NUMBERS
GI
5
RECOMMENDED
FUEL
GI
B
LIFTING
POINTS
AND
TOWING
GI
B
RECOMMENDED
LUBRICANTS
GI
8
LIFTING
POINTS
GI
B
RECOMMENDED
SAE
VISCOSITY
SUPPORTABLE
POINTS
GI
7
NUMBER
GI
8
TOWING
GI
7
LUBRICANT
SPECIFICATIONS
GI
g
TIE
DOWN
GI
7
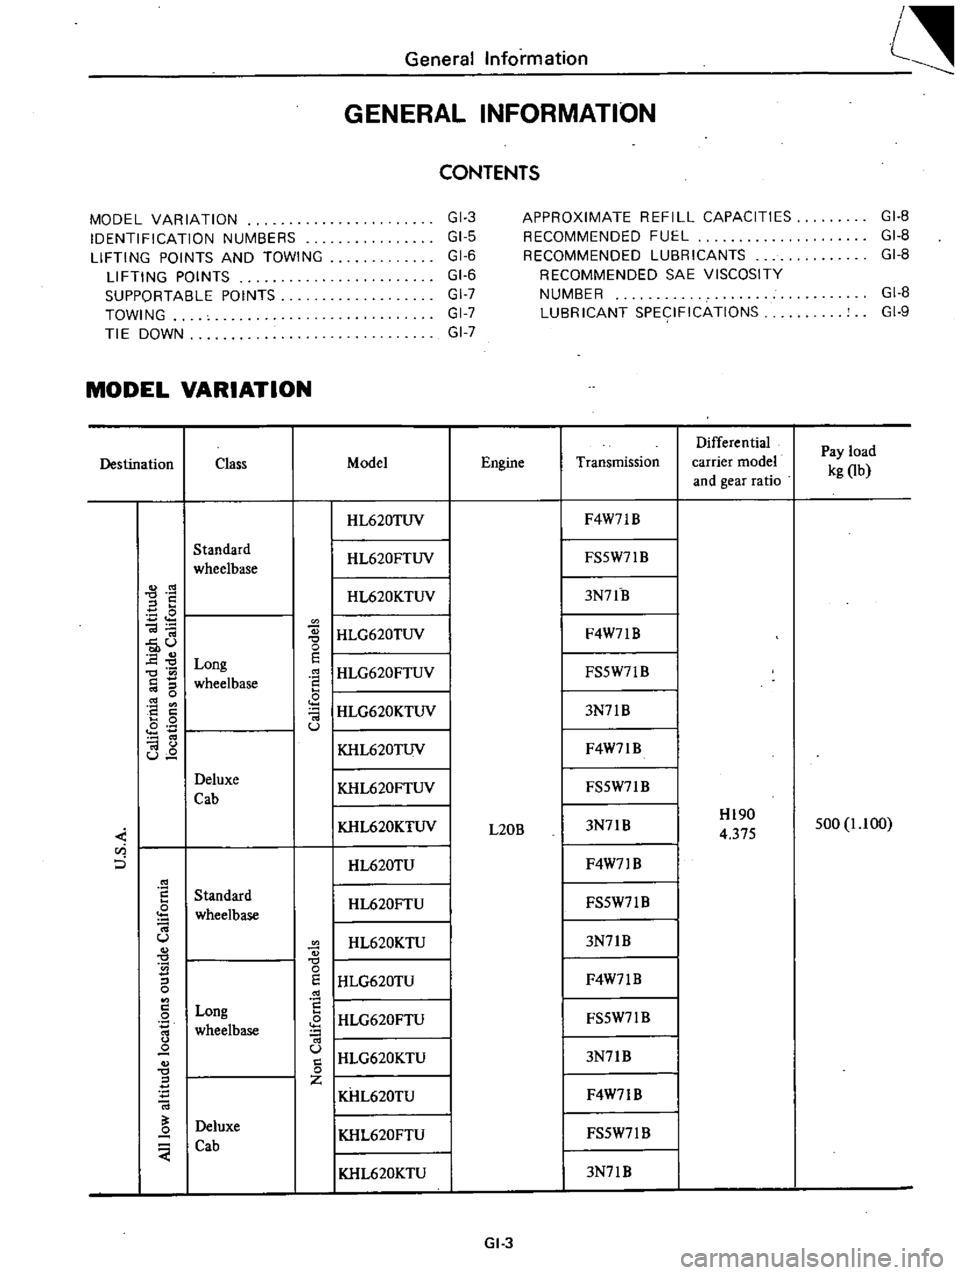
MODEL
VARIATION
Differential
Pay
load
Destination
Class
Model
Engine
Transmission
carrier
model
kg
Ob
and
gear
ratio
I
HL620TUV
F4W7lB
Standard
I
HL620FTUV
FS5W71
B
wheelbase
S
I
HL620KTUV
3N7lB
E
I
HLG620TUV
Ol
F4W7lB
u
0
0
E
Long
E
I
HLG620FTUV
0
FS5W71B
wheelbase
0
I
HLG620KTUV
8
a
3N7lB
0
Ol
0
u
I
KHL620TUV
Ol
F4W7lB
u
Deluxe
I
KHL620FTUV
FS5W7lB
Cab
KHL620KTUV
3N7lB
Hl90
500
1
1
00
L20B
4
375
u
i
0
HL620TU
F4W71
B
Standard
HL620FTU
FS5W7l
B
wheelbase
U
HL620KTU
3N7lB
S
0
I
HLG620TU
0
E
F4W7lB
0
8
Long
I
HLG620FTU
0
FS5W7lB
wheelbase
IHLG620KTU
Q
u
3N7lB
0
0
Z
KHL620TU
F4W71B
Deluxe
Q
KHL620FTU
FS5W7l
B
Cab
I
KHL620KTU
3N7lB
GI
3
Page 7 of 537
r
General
Information
Differential
Pay
load
Destination
Class
Model
Engine
Transmission
carrier
model
kg
lb
and
gear
ratio
Standard
HL620TUN
F4W71B
wheelbase
HL620KTUN
3N71B
0
HLG620TUN
F4W7IB
Long
E
wheelbase
2
I
HLG620KTUN
Hl90
Canada
L20B
3N71B
500
1
100
4
375
I
KHL620TUN
F4W71B
0
Deluxe
Z
I
KHL620FTUN
Cab
FS5W7IB
I
KHL620KTUN
3N7J
B
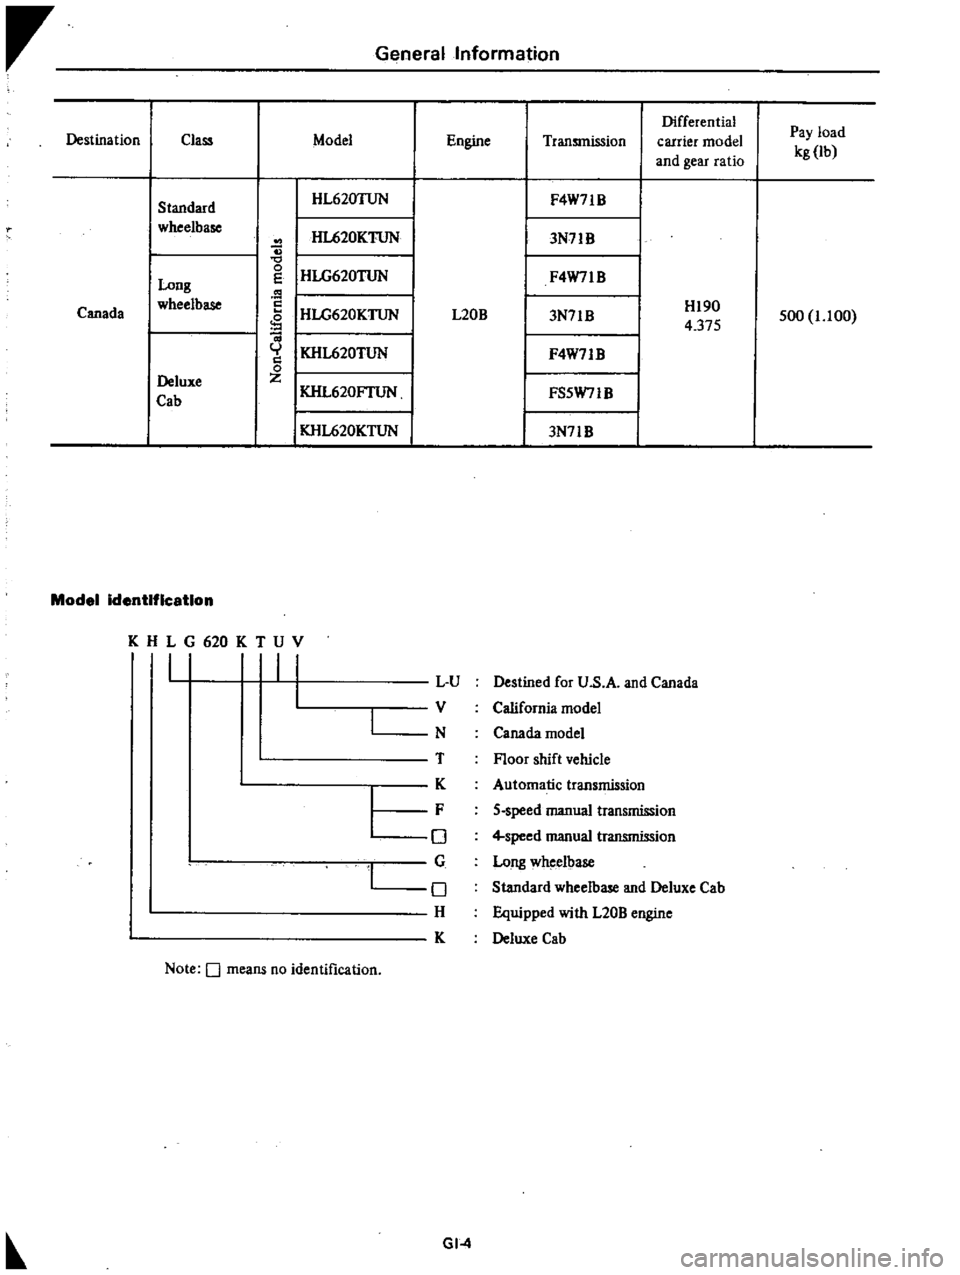
Model
identification
KHLG620KTUV
I
I
L
U
V
N
T
K
F
0
G
o
H
K
I
Note
0
means
no
identification
Destined
for
U
s
A
and
Canada
California
model
Canada
model
Floor
shift
vehicle
Automatic
transmission
5
speed
manual
transmission
4
speed
manual
transmission
Long
wheelbase
Standard
wheelbase
and
Deluxe
Cab
Equipped
with
L20B
engine
Deluxe
Cab
GI
4
Page 9 of 537
Fig
GI
9
Manual
trammiuion
number
location
Automatic
transmission
number
The
transmission
serial
number
is
attached
to
the
right
hand
side
of
transmission
case
Numbering
system
X
XXXXX
I
Serial
number
monthly
Month
of
manufacture
I
2
9
X
Y
Z
last
figure
of
year
of
manufacture
AT344
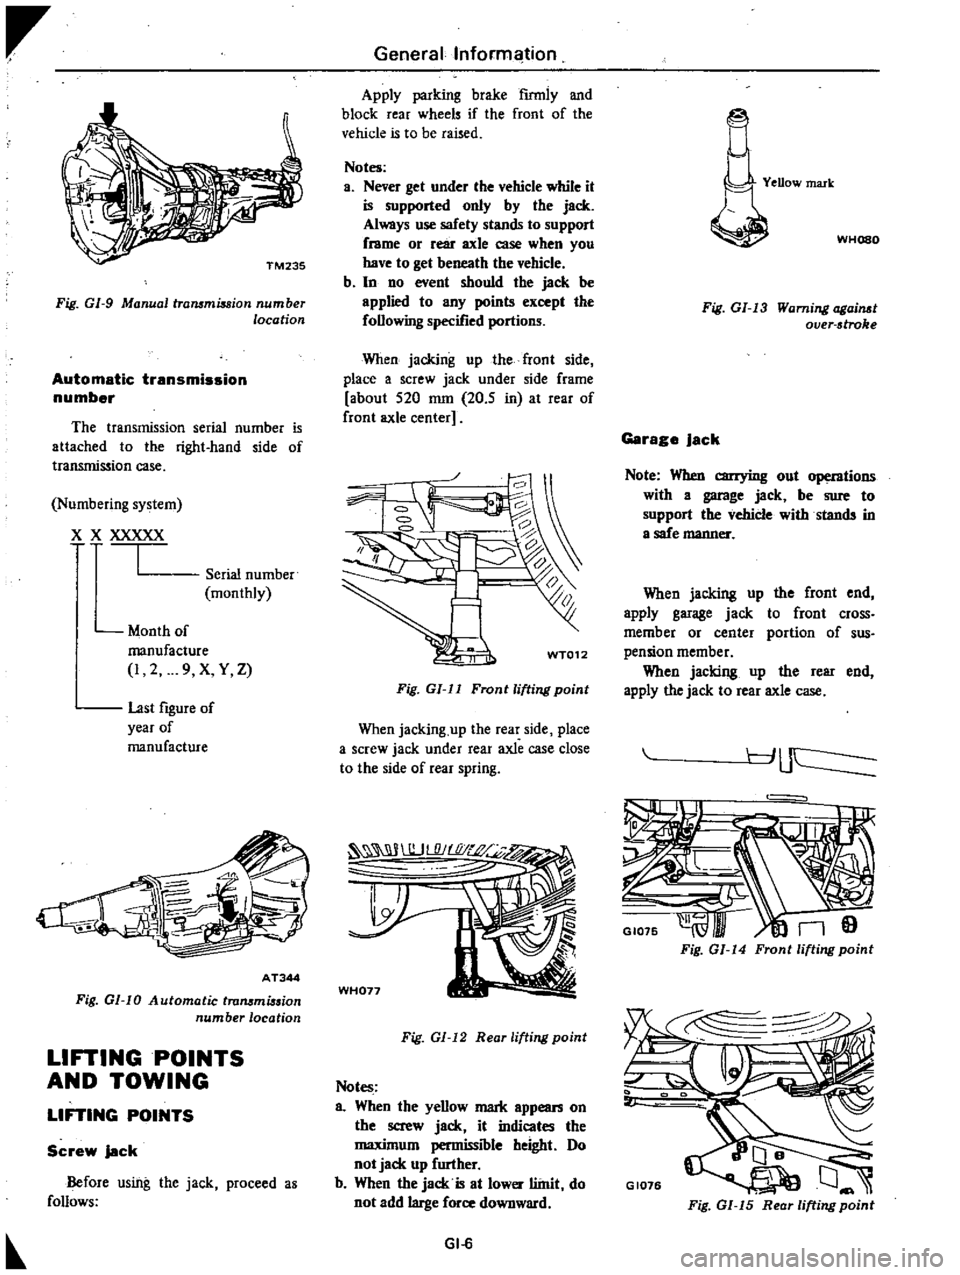
Fig
01
10
Automatic
trammi
sion
number
location
LIFTING
POINTS
AND
TOWING
LIFTING
POINTS
Screw
jack
Before
using
the
jack
proceed
a
follows
Generallnforml
ition
Apply
parking
brake
firmly
and
block
rear
wheels
if
the
front
of
the
vehicle
is
to
be
raised
Notes
a
Never
get
under
the
vehicle
while
it
is
supported
only
by
the
jack
Always
use
safety
stands
to
support
frame
or
rear
axle
case
when
you
have
to
get
beneath
the
vehicle
b
In
no
event
should
the
jack
be
applied
to
any
points
except
the
following
specified
portions
When
jacking
up
the
front
side
place
a
screw
jack
under
side
frame
about
520
nun
20
5
in
at
rear
of
front
axle
center
WT012
Fig
GI
ll
Front
lifting
point
When
jacking
up
the
rear
side
place
a
screw
jack
under
rear
axle
case
close
to
the
side
of
rear
spring
WH077
Fig
GI
12
Reor
lifting
point
Notes
a
When
the
yellow
mark
appean
on
the
screw
jack
it
indicates
the
maximum
permissible
height
Do
not
jack
up
further
b
When
the
jack
is
at
lower
llinit
do
not
add
large
force
downward
GI
6
YeDow
mark
WHOSO
Fig
GI
13
Warning
ogai
t
over
stroke
Garage
Jack
Note
When
carrying
out
operntions
with
a
garage
jack
be
sure
to
support
the
vehicle
withstands
in
a
safe
manner
When
jacking
up
the
front
end
apply
garage
jack
to
front
cross
member
or
center
portion
of
sus
pension
member
When
jacking
up
the
rear
end
apply
the
jack
to
rear
axle
case
r
J
uc
I
GI075
n9
Fig
GI
14
Front
lifting
point
GI076
Fig
GI
15
Rear
lifting
point
Page 10 of 537
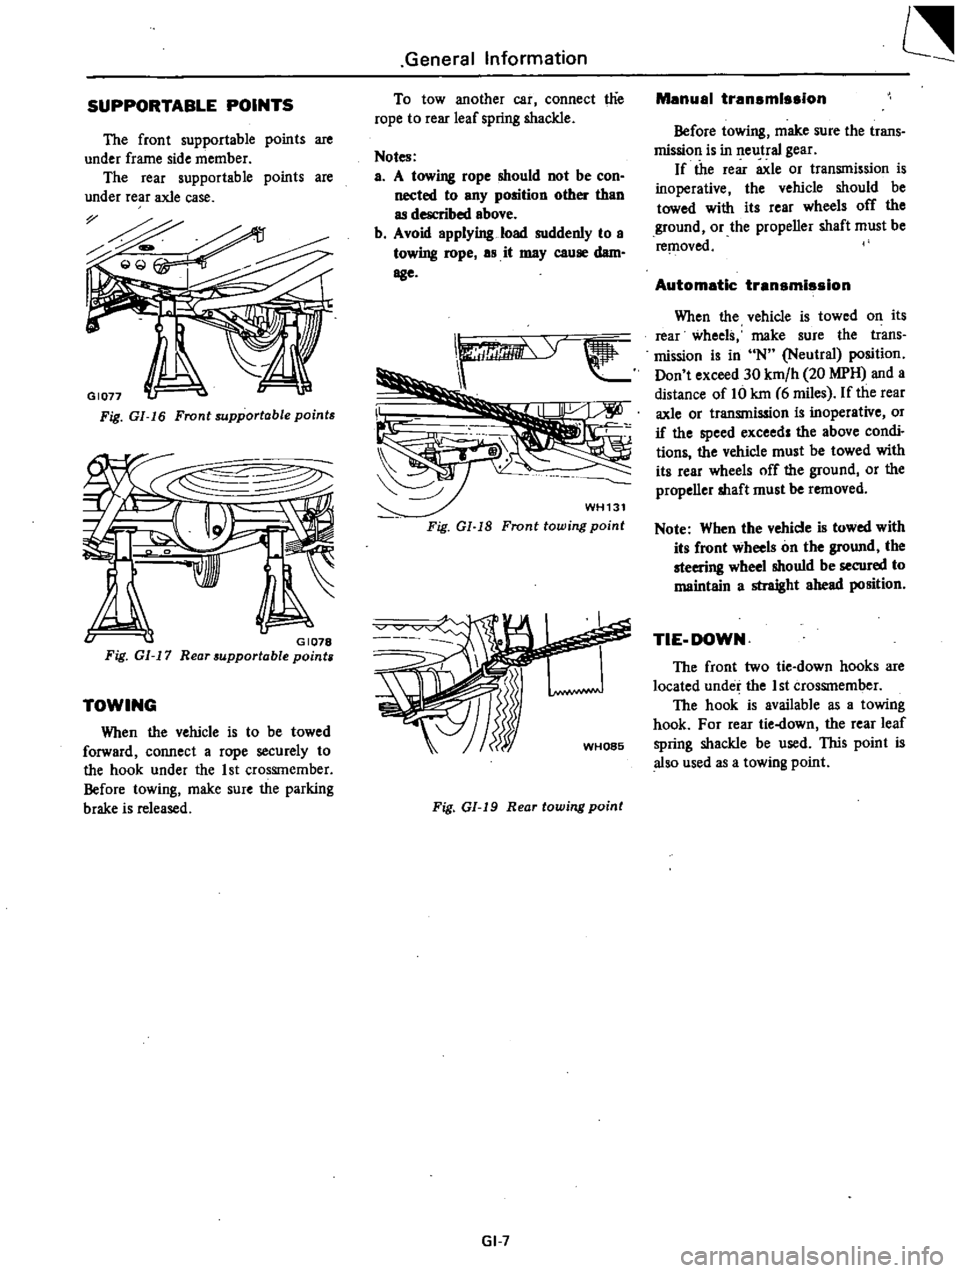
SUPPORTABLE
POINTS
The
front
supportable
points
are
under
frame
side
member
The
rear
supportable
points
are
under
rear
axle
case
Fig
GI
16
Front
supportable
points
v
GI078
Fig
GI
17
Rear
supportable
points
TOWING
When
the
vehicle
is
to
be
towed
forward
connect
a
rope
securely
to
the
hook
under
the
1st
CrosSIn
ember
Before
towing
make
sure
the
parking
brake
is
released
General
Information
To
tow
another
car
connect
t1ie
rope
to
rear
leaf
spring
shackle
Notes
a
A
towing
rope
should
not
be
con
nected
to
any
position
other
than
as
described
above
b
Avoid
applying
load
suddenly
to
a
towing
rope
as
it
may
cause
dam
age
WH131
Fig
Gl
18
Fronttowing
point
Fig
01
19
Rear
towing
point
GI
7
Manual
transmission
Before
towing
make
sure
the
trans
mission
is
in
neutral
gear
If
the
rear
axle
or
transmission
is
inoperative
the
vehicle
should
be
towed
with
its
rear
wheels
off
the
ground
or
the
propeller
shaft
must
be
re
l1oved
Automatic
transmission
When
the
vehicle
is
towed
on
its
rear
wheels
make
sure
the
trans
mission
is
in
N
Neutral
position
Don
t
exceed
30
km
h
20
MPH
and
a
distance
of
Hi
kin
6
miles
If
the
rear
axle
or
transmission
is
inoperative
or
if
the
speed
exceed
the
above
condi
tions
the
vehicle
must
be
towed
with
its
rear
wheels
off
the
ground
or
the
propeller
shaft
must
be
removed
Note
When
the
vehicle
is
towed
with
its
front
wheels
on
the
ground
the
steering
wheel
shouId
be
secured
to
maintain
a
straight
ahead
position
TIE
DOWN
The
front
two
tie
down
hooks
are
located
under
the
1st
crosSInember
The
hook
is
available
as
a
towing
hook
For
rear
tie
down
the
rear
leaf
spring
shackle
be
used
lIDs
point
is
also
used
as
a
towing
point
Page 23 of 537
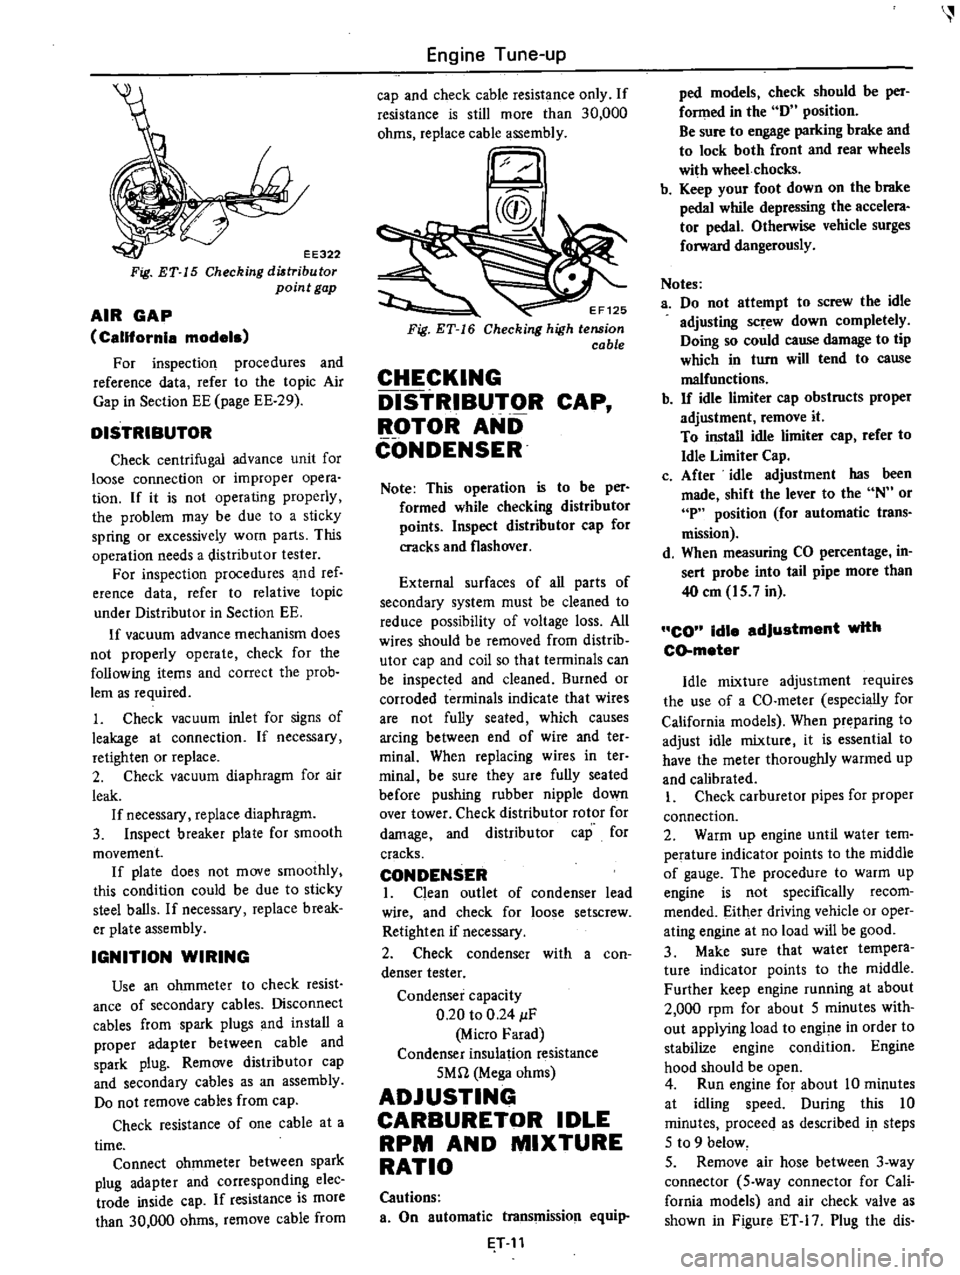
EE322
Fig
ET
15
Checking
diltribu
tor
point
gap
AIR
GAP
California
models
For
inspection
procedures
and
reference
data
refer
to
the
topic
Air
Gap
in
Section
EE
page
EE
29
DISTRIBUTOR
Check
centrifugal
advance
unit
for
loose
connection
or
improper
opera
tion
If
it
is
not
operating
properly
the
problem
may
be
due
to
a
sticky
spring
or
excessively
worn
parts
This
operation
needs
a
distributor
tester
For
inspection
procedures
and
ref
erence
data
refer
to
relative
topic
under
Distributor
in
Section
EE
If
vacuum
advance
mechanism
does
not
properly
operate
check
for
the
following
items
and
correct
the
prob
lem
as
required
1
Check
vacuum
inlet
for
signs
of
leakage
at
connection
If
necessary
retighten
or
replace
2
Check
vacuum
diaphragm
for
air
leak
If
necessary
replace
diaphragm
3
Inspect
breaker
plate
for
smooth
movement
If
plate
does
not
move
smoothly
this
condition
could
be
due
to
sticky
steel
balls
If
necessary
replace
break
er
plate
assembly
IGNITION
WIRING
Use
an
ohmmeter
to
check
resist
ance
of
secondary
cables
Disconnect
cables
from
spark
plugs
and
install
a
proper
adapter
between
cable
and
spark
plug
Remove
distributor
cap
and
secondary
cables
as
an
assembly
Do
not
remove
cables
from
cap
Check
resistance
of
one
cable
at
a
time
Connect
ohmmeter
between
spark
plug
adapter
and
corresponding
elec
trade
inside
cap
If
resistance
is
more
than
30
000
ohms
remove
cable
from
Engine
Tune
up
cap
and
check
cable
resistance
only
If
resistance
is
still
more
than
30
000
ohms
replace
cable
assembly
EF125
Checking
high
tension
cable
CHECKING
DISTRIBUTOR
CAP
ROTOR
AND
CONDENSER
Note
This
operation
is
to
be
per
formed
while
checking
distributor
points
Inspect
distributor
cap
for
cracks
and
flashover
External
surfaces
of
all
parts
of
secondary
system
must
be
cleaned
to
reduce
possibility
of
voltage
loss
All
wires
should
be
removed
from
distrib
utor
cap
and
coil
so
that
terminals
can
be
inspected
and
cleaned
Burned
or
corroded
terminals
indicate
that
wires
are
not
fully
seated
which
causes
arcing
between
end
of
wire
and
ter
minal
When
replacing
wires
in
ter
minai
be
sure
they
are
fully
seated
before
pushing
rubber
nipple
down
over
tower
Check
distributor
rotor
for
damage
and
distributor
cap
for
cracks
CONDENSER
I
Clean
outlet
of
condenser
lead
wire
and
check
for
loose
setscrew
Retighten
if
necessary
2
Check
condenser
with
a
con
denser
tester
Condenser
capacity
0
20
to
0
24
IF
Micro
Farad
Condenser
insulation
resistance
5Mn
Mega
ohms
ADJUSTING
CARBURETOR
IDLE
RPM
AND
MIXTURE
RATIO
Cautions
a
On
automatic
transmission
equip
T
11
ped
models
check
should
be
per
fonned
in
the
D
position
Be
sure
to
engage
parking
brake
and
to
lock
both
front
and
rear
wheels
with
wheel
chocks
b
Keep
your
foot
down
on
the
brake
pedal
while
depressing
the
accelera
tor
pedal
Otherwise
vehicle
surges
forward
dangerously
Notes
a
Do
not
attempt
to
screw
the
idle
adjusting
sc
ew
down
completely
Doing
so
could
cause
damage
to
tip
which
in
turn
will
tend
to
cause
malfunctions
b
If
idle
limiter
cap
obstructs
proper
adjustment
remove
it
To
install
idle
limiter
cap
refer
to
Idle
Limiter
Cap
c
After
idle
adjustment
has
been
made
shift
the
lever
to
the
N
or
P
position
for
automatic
trans
mission
d
When
measuring
CO
percentage
in
sert
probe
into
tail
pipe
more
than
40
em
15
7
in
CO
idle
adjustment
with
CD
meter
Idle
mixture
adjustment
requires
the
use
of
a
CO
meter
especially
for
California
models
When
preparing
to
adjust
idle
mixture
it
is
essential
to
have
the
meter
thoroughly
warmed
up
and
calibrated
I
Check
carburetor
pipes
for
proper
connection
2
Warm
up
engine
until
water
tem
perature
indicator
points
to
the
middle
of
gauge
The
procedure
to
warm
up
engine
is
not
specifically
recom
mended
Either
driving
vehicle
or
oper
ating
engine
at
no
load
will
be
good
3
Make
sure
that
water
tempera
ture
indicator
points
to
the
middle
Further
keep
engine
running
at
about
2
000
rpm
for
about
5
minutes
with
out
applying
load
to
engine
in
order
to
stabilize
engine
condition
Engine
hood
should
be
open
4
Run
engine
for
about
10
minutes
at
idling
speed
During
this
10
minutes
proceeq
as
described
i
steps
5
to
9
below
5
Remove
air
hose
between
3
way
connector
5
way
connector
for
Cali
fornia
models
and
air
check
valve
as
shown
in
Figure
ET
17
Plug
the
dis
Page 49 of 537
r
I
I
PRELIMINARY
CLEANING
AND
INSPECTION
DISASSEMBL
Y
PRELIMINARY
CLEANING
AND
INSt
ECTION
Before
disassembling
engine
note
the
following
I
Fuel
oil
or
water
may
leak
past
cylinder
head
and
block
Prior
to
disassembling
check
cylinder
head
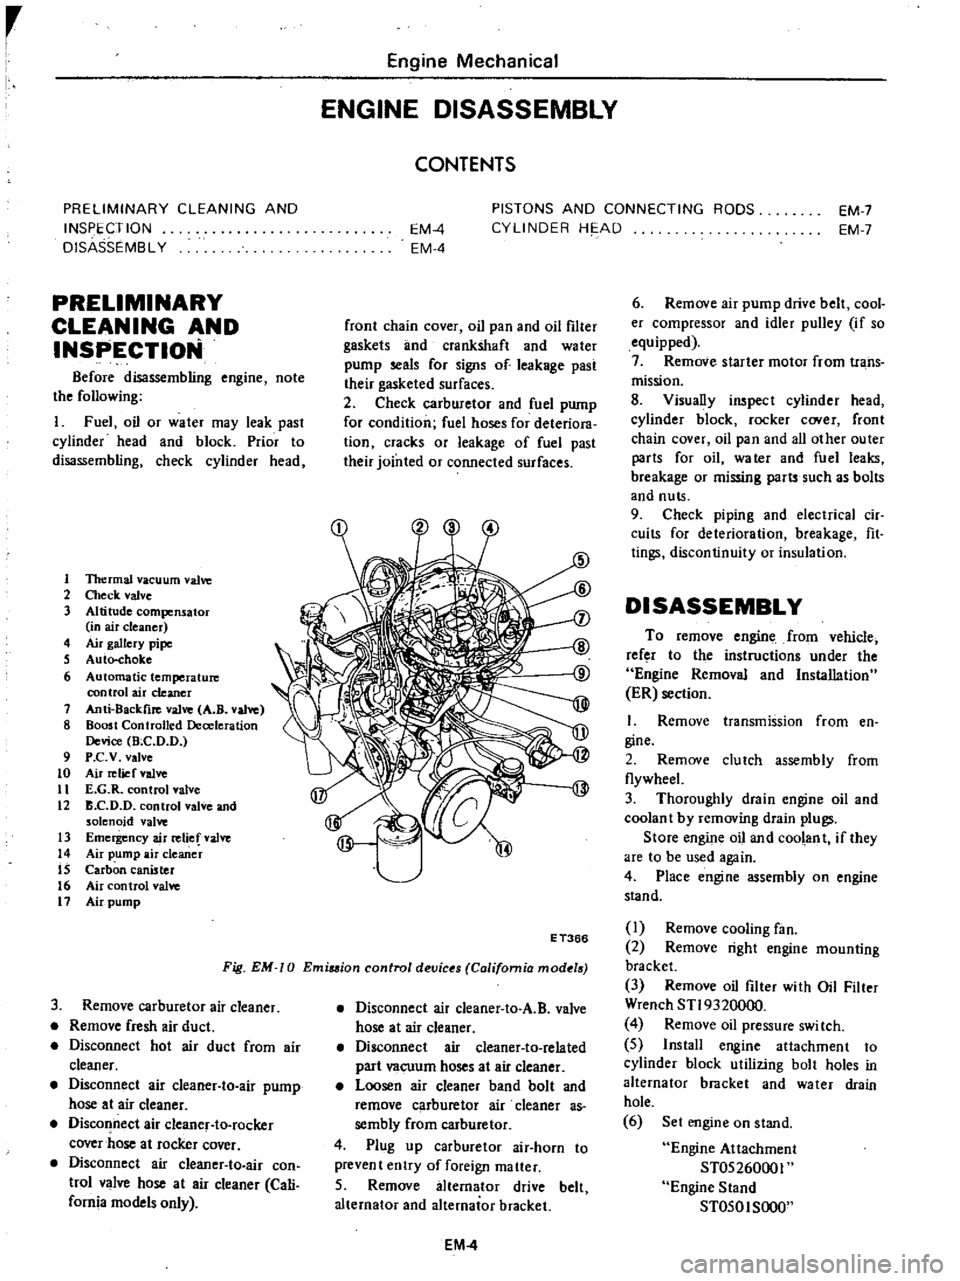
1
1ltermal
vacuum
valve
2
Check
valve
3
Altitude
compensator
in
air
cleaner
4
Air
gallery
pipe
S
Auto
choke
6
Automatic
temperature
control
air
cleaner
7
Anti
8ackfire
valve
A
B
valve
8
Boost
Controlled
Deceleration
Device
Bee
D
D
9
P
c
v
valve
to
Air
relief
valve
11
E
G
R
control
valve
12
B
C
D
D
control
valve
and
solenoid
valve
13
Emergency
air
relief
valve
14
Air
pump
air
cleaner
IS
Carbon
canister
16
Air
control
valve
11
Air
pump
Engine
Mechanical
ENGINE
DISASSEMBLY
CONTENTS
EM
4
EM
4
PISTONS
AND
CONNECTING
RODS
CYLINDER
HE
AD
EM
7
EM
7
front
chain
cover
oil
pan
and
oil
filter
gaskets
lInd
crankshaft
and
water
pump
seals
for
signs
of
leakage
past
their
gasketed
surfaces
2
Check
carburetor
and
fuel
pump
for
condition
fuel
hoses
for
deteriora
tion
cracks
or
leakage
of
fuel
past
their
jointed
or
connected
surfaces
Fig
EM
0
Emiuion
control
devic
s
California
mod
18
E
T366
3
Remove
carburetor
air
cleaner
Remove
fresh
air
duct
Disconnect
hot
air
duct
from
air
cleaner
Disconnect
air
cleaner
to
air
pump
hose
at
air
cleaner
Disconnect
air
cleanef
to
rocker
cover
hose
at
rocker
cover
Disconnect
air
cIeaner
to
air
con
trol
valve
hose
at
air
cleaner
Cali
fornia
models
only
Disconnect
air
cleaner
to
A
B
valve
hose
at
air
cleaner
Disconnect
air
cleaner
to
related
part
vacuum
hoses
at
air
cleaner
Loosen
air
cleaner
band
bolt
and
remove
carburetor
air
cleaner
as
sembly
from
carburetor
4
Plug
up
carburetor
air
horn
to
prevent
entry
of
foreign
matter
5
Remove
alternator
drive
belt
alternator
and
alternator
bracket
EM
4
6
Remove
air
pump
drive
belt
cool
er
compressor
and
idler
pulley
if
so
equipped
7
Remove
starter
motor
from
trans
mission
8
Visually
inspect
cylinder
head
cylinder
block
rocker
C
Ner
front
chain
cover
oil
pan
and
all
other
outer
parts
for
oil
water
and
fuel
leaks
breakage
or
missing
parts
such
as
bolts
and
nuts
9
Check
piping
and
electrical
cir
cuits
for
deterioration
breakage
fit
tings
discontinuity
or
insulation
DISASSEMBLY
To
remove
engine
from
vehicle
refer
to
the
instructions
under
the
Engine
Removal
and
Installation
ER
section
I
Remove
transmission
from
en
gine
2
Remove
clutch
assembly
from
flywheeL
3
Thoroughly
drain
engine
oil
and
coolan
t
by
removing
drain
plugs
Store
engine
oil
and
coolant
if
they
are
to
be
used
again
4
Place
engine
assembly
on
engine
stand
I
Remove
cooling
fan
2
Remove
right
engine
mounting
bracket
3
Remove
oil
filter
with
Oil
Filter
Wrench
STI9320000
4
Remove
oil
pressure
swi
tch
5
Install
engine
attachment
to
cylinder
block
utilizing
bolt
holes
in
alternator
bracket
and
water
drain
hole
6
Set
engine
on
stand
Engine
Attachment
ST05260001
Engine
Stand
ST050I
SOOO
Page 51 of 537
r
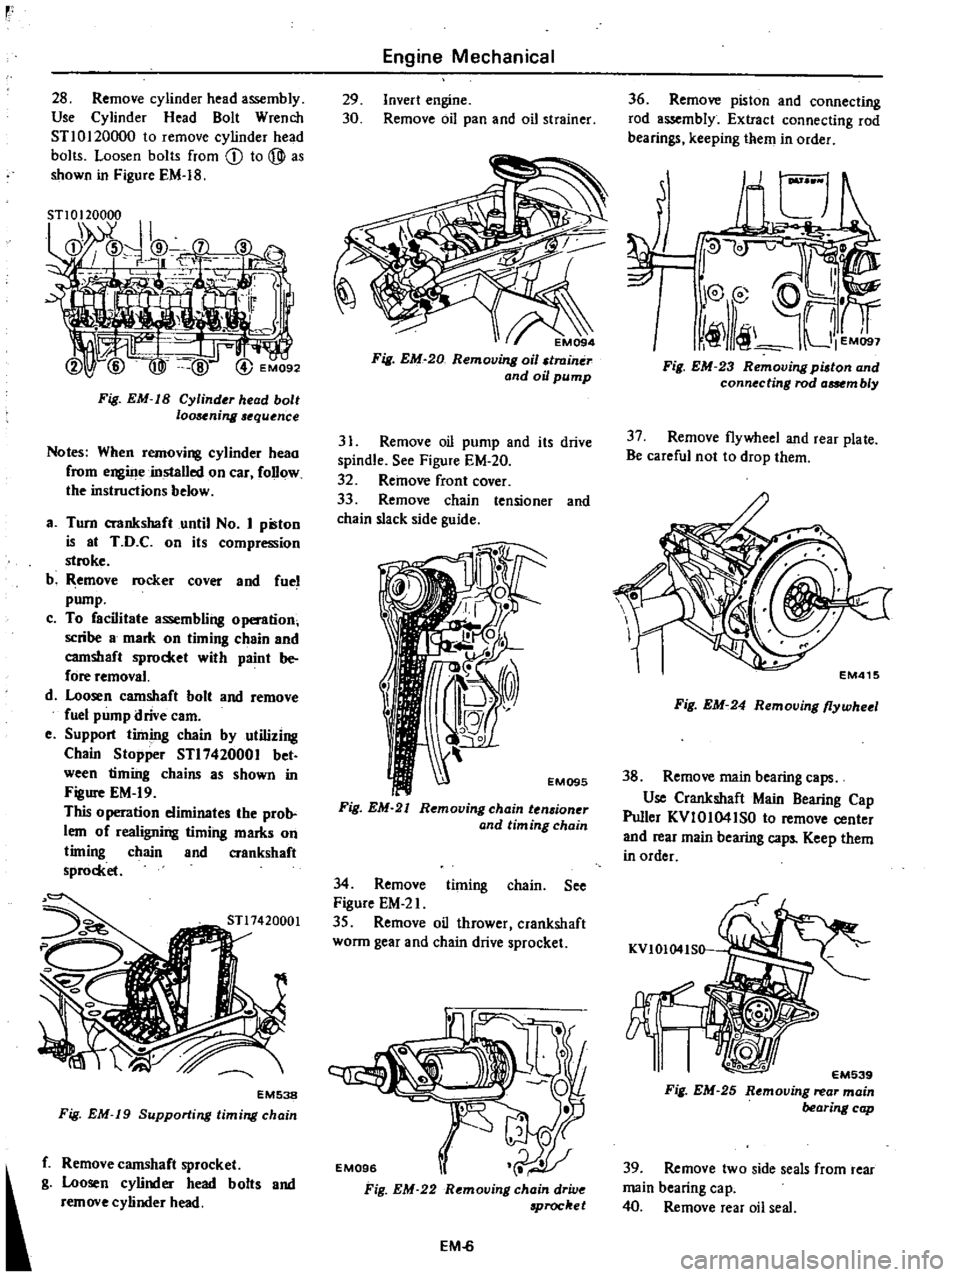
28
Remove
cylinder
head
assembly
Use
Cylinder
Head
Bolt
Wrench
STl0120000
to
remove
cylinder
head
bolts
Loosen
bolts
from
CD
to
@
as
shown
in
Figure
EM
18
Fig
EM
IS
Cylinder
head
bolt
loosening
equence
Notes
When
removing
cylinder
heao
from
engiJJe
installed
on
car
follow
the
instructions
below
a
Turn
crankshaft
until
No
I
pilton
is
at
T
D
C
on
its
compression
stroke
b
Remove
rocker
Cover
and
fuel
pump
c
To
facilitate
assembling
o
tion
scribe
8
mark
on
timing
c
8in
and
camshaft
sprocket
with
paint
be
fore
removal
d
Loosen
camshaft
bolt
and
remove
fuel
pump
drive
earn
e
Support
timing
chain
by
utilizing
Chain
Stopper
STl7420001
bet
ween
timiilg
chains
as
shown
in
Figure
EM
19
This
0
peration
eliminates
the
prob
lem
of
realigning
timing
marks
on
timing
chain
and
crankshaft
sprocket
EM538
Fig
EM
19
Supporting
timing
chain
f
Remove
camshaft
sprocket
g
Loosen
cylinder
head
bolts
and
remove
cylinder
head
Engine
Mechanical
29
Invert
engine
30
Remove
oil
pan
and
oil
strainer
EM094
Fig
EM
20
Removing
oil
traintir
and
oil
pump
31
Remove
oil
pump
and
its
drive
spindle
See
Figure
EM
20
32
Remove
front
cover
33
Remove
chain
tensioner
and
chain
slack
side
guide
EM095
Fig
EM
21
Removing
chain
ten
ioner
and
tim
ing
chain
34
Remove
timing
chain
See
Figure
EM
2l
35
Remove
oil
thrower
crankshaft
wonn
gear
and
chain
drive
sprocket
Fig
EM
22
Removing
chain
drive
Proc
et
EM
6
36
Remove
piston
and
connecting
rod
a
mbly
Extract
connecting
rod
bearings
keeping
them
in
order
I
Fig
EM
23
Removing
pilton
and
connecting
rod
aat
m
b
y
37
Remove
flywheel
and
rear
plate
Be
careful
not
to
drop
them
EM415
Fig
EM
24
Removing
flywheel
38
Remove
main
bearing
caps
Use
Crankshaft
Main
Bearing
Cap
Puller
KVIOI04ISO
to
remove
center
and
rear
main
bearing
caps
Keep
them
in
order
KVIOI04IS0
EM539
Fig
EM
25
Removing
rear
main
bearing
cap
39
Remove
two
side
seals
from
rear
main
bearing
ca
p
40
Remove
rear
oil
seal
Page 53 of 537
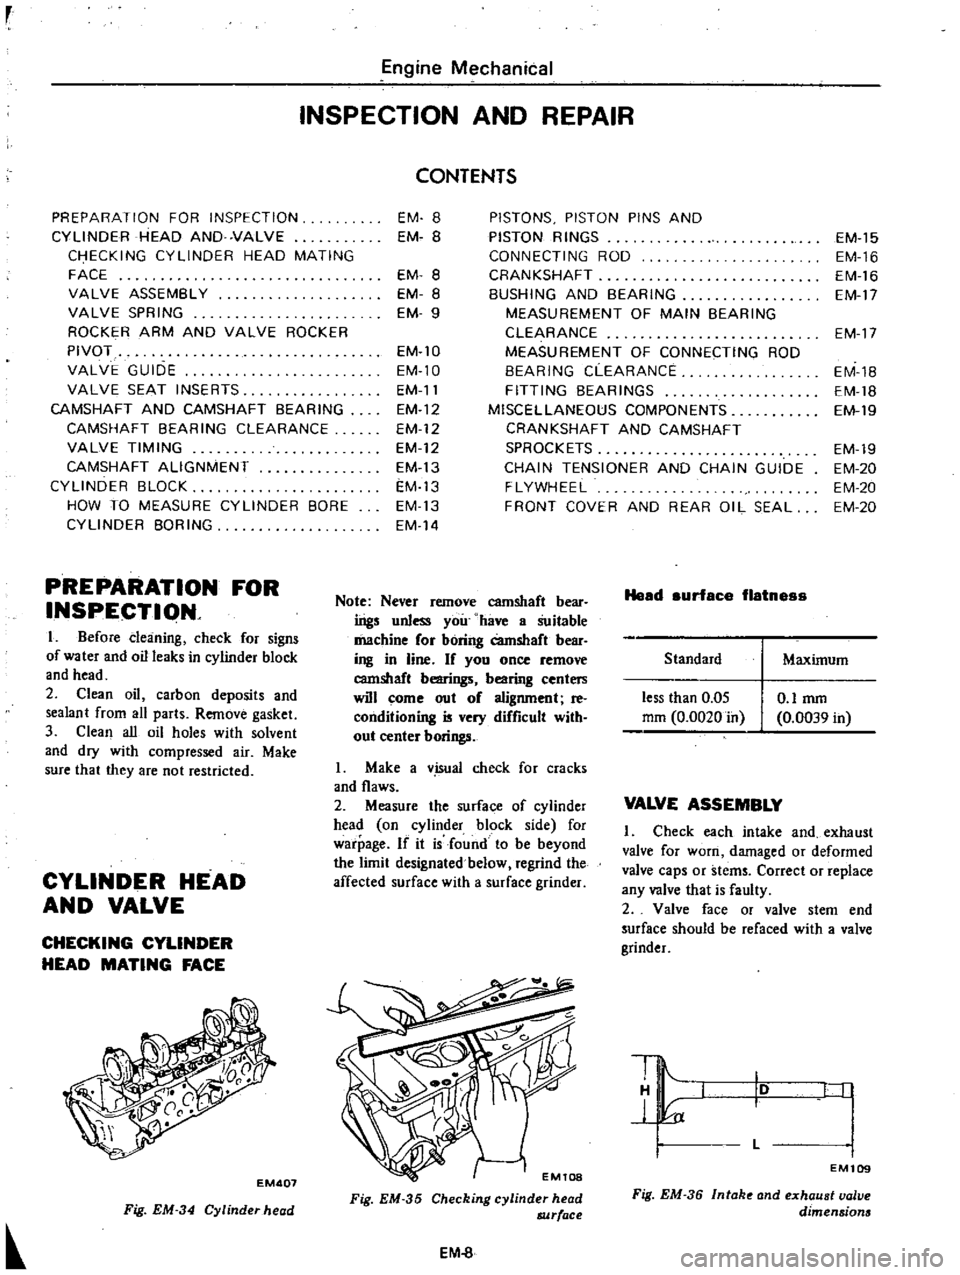
r
Engine
Mechanical
INSPECTION
AND
REPAIR
PREPARATION
FOR
INSPECTION
CYLINDER
HEAD
AND
VALVE
CHECKING
CYLINDER
HEAD
MATING
FACE
VALVE
ASSEMBLY
VALVE
SPRING
ROCKER
ARM
AND
VALVE
ROCKER
PIVOT
VALVE
GUIDE
VALVE
SEAT
INSERTS
CAMSHAFT
AND
CAMSHAFT
BEARING
CAMSHAFT
BEARING
CLEARANCE
VALVE
TIMING
CAMSHAFT
ALIGNMENT
CYLINDER
BLOCK
HOW
TO
MEASURE
CYLINDER
BORE
CYLINDER
BORING
PREPARATION
FOR
INSPECTI
N
I
Before
cleaning
check
for
signs
of
water
and
oil
leaks
in
cylinder
block
and
head
2
Clean
oil
carbon
deposits
and
sealant
from
an
parts
Remove
gasket
3
Clean
all
oil
holes
with
solvent
and
dry
with
compressed
air
Make
sure
that
they
are
not
restricted
CYLINDER
HEAD
AND
VALVE
CHECKING
CYLINDER
HEAD
MATING
FACE
EM407
Fig
EM
34
Cylinder
head
CONTENTS
EM
8
EM
B
EM
8
EM
8
EM
9
EM
lO
EM
l0
EM
11
EM
12
EM
12
EM
12
EM
13
EM
13
EM
13
EM
14
PISTONS
PISTON
PINS
AND
PISTON
RINGS
CONNECTING
ROD
CRANKSHAFT
BUSHING
AND
BEARING
MEASUREMENT
OF
MAIN
BEARING
CLEARANCE
MEASUREMENT
OF
CONNECTING
ROD
BEARING
CLEARANCE
FITTING
BEARINGS
MISCELLANEOUS
COMPONENTS
CRANKSHAFT
AND
CAMSHAFT
SPROCKETS
CHAIN
TENSIONER
AND
CHAIN
GUIDE
FLYWHEEL
FRONT
COVER
AND
REAR
OIL
SEAL
Note
Never
remove
camshaft
bear
ings
unless
you
have
a
Suitable
machine
or
boring
Camshaft
bear
ing
in
line
If
you
once
remove
camshaft
bearings
bearing
centers
will
come
out
o
alignment
reo
conditioning
is
very
difficult
with
out
center
borings
L
Make
a
v
isual
check
for
cracks
and
flaws
2
Measure
the
surface
of
cylinder
head
on
cylinder
block
side
for
warpage
If
it
is
found
to
be
beyond
the
limit
designated
below
regrind
the
affected
surface
with
a
surface
grinder
Fig
EM
35
Checking
cylinder
head
8JJrface
EM
8
Head
surface
flatnes
Standard
less
than
0
05
mm
0
0020
in
O
lmm
0
0039
in
EM
15
EM
16
EM
16
EM
17
EM
17
EM
1B
EM
18
EM
19
EM
19
EM
20
EM
20
EM
20
Maximum
VALVE
ASSEMBLY
Check
each
intake
and
exhaust
valve
for
worn
damaged
or
deformed
valve
caps
or
stems
Correct
or
replace
any
valve
that
is
faulty
2
Valve
face
or
valve
stem
end
surface
should
be
refaced
with
a
valve
grinder
10
L
I
I
I
EM109
Fig
EM
36
Intak
and
exhaust
valve
dimensions
Page 65 of 537
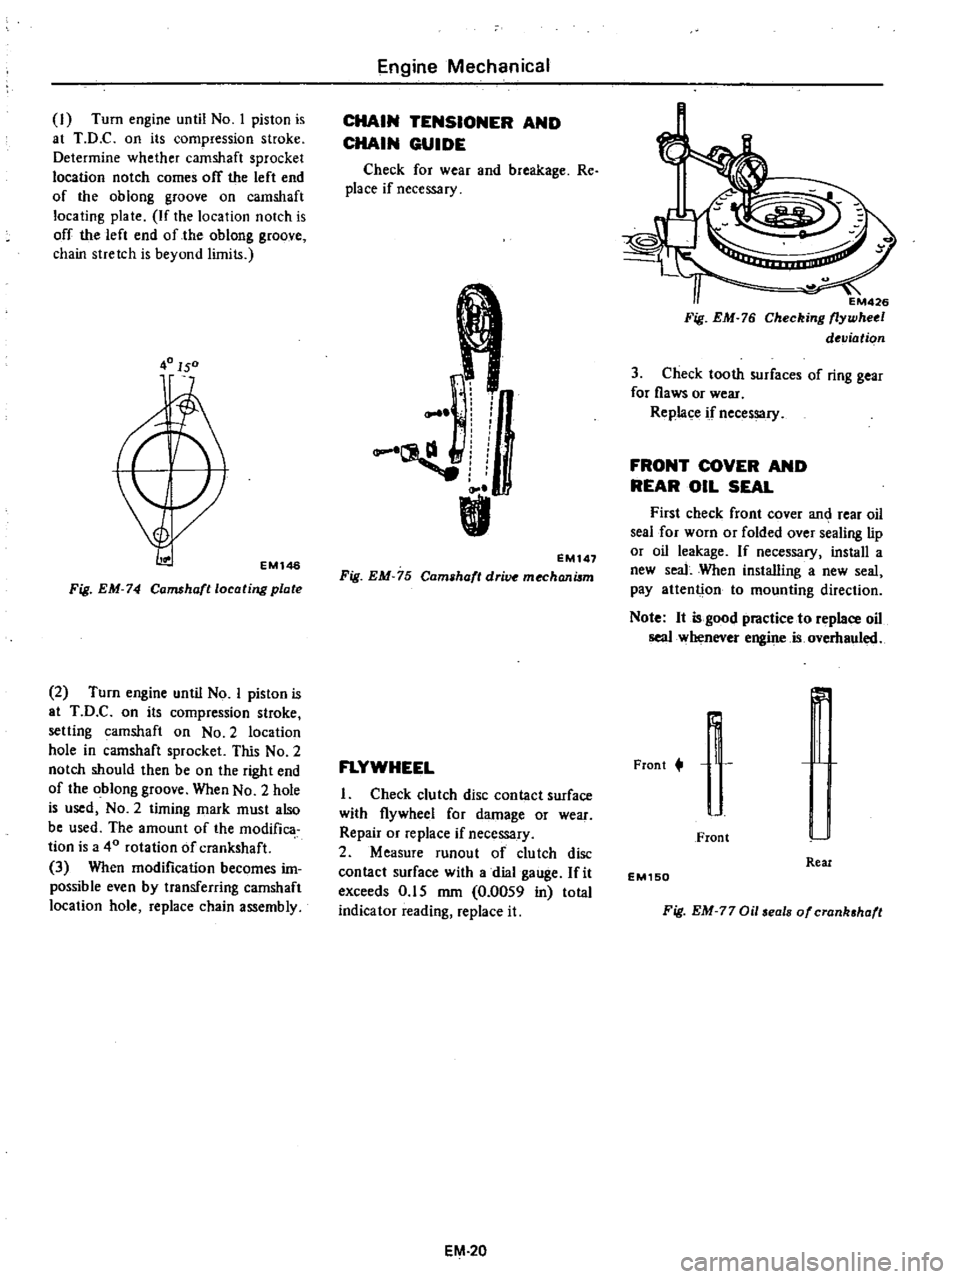
I
Turn
engine
until
No
I
piston
is
at
T
D
C
on
its
compression
stroke
Determine
whether
camshaft
sprocket
location
notch
comes
off
the
left
end
of
the
oblong
groove
on
camshaft
locating
plate
If
the
location
notch
is
off
the
left
end
of
the
oblong
groove
chain
stretch
is
beyond
limits
40150
EMl46
Fig
EM
74
Camshafllocating
plate
2
Turn
engine
until
No
I
piston
is
at
T
D
C
on
its
compression
stroke
setting
camshaft
on
No
2
location
hole
in
camshaft
sprocket
This
No
2
notch
should
then
be
on
the
right
end
of
the
oblong
groove
When
No
2
hole
is
used
NO
2
timing
mark
must
also
be
used
The
amount
of
the
modifica
tion
is
a
40
rotation
of
crankshaft
3
When
modification
becomes
im
possible
even
by
transferring
camshaft
location
hole
replace
chain
assembly
Engine
Mechanical
CHAIN
TENSIONER
AND
CHAIN
GUIDE
Check
for
wear
and
breakage
Re
place
if
necessary
r
I
L
EM147
Fig
EM
75
Cam
haft
dri
mechanilm
FLYWHEEL
I
Check
clutch
disc
contact
surface
with
flywheel
for
damage
or
wear
Repair
or
replace
if
necessary
2
Measure
runout
of
clutch
disc
contact
surface
with
a
dial
gauge
fit
exceeds
0
15
mm
0
0059
in
total
indicator
reading
replace
it
EM
20
EM426
Fig
EM
76
Checking
flywheel
deviation
3
Check
tooth
surfaces
of
ring
gear
for
flaws
or
wear
Replace
if
necessary
FRONT
COVER
AND
REAR
OIL
SEAL
First
check
front
cover
an
rear
oil
seal
for
worn
or
folded
over
sealing
lip
or
oil
leakage
If
necessary
install
a
new
seal
When
installing
a
new
seal
pay
attenti
on
to
mounting
direction
Note
It
is
good
practice
to
replace
oil
seal
whenever
engine
is
overhauled
Frant
t
r
r
J
I
Front
Real
EM150
Fig
EM
77
Oil
eals
of
crank
haft