wheelbase DATSUN PICK-UP 1977 Service Manual
[x] Cancel search | Manufacturer: DATSUN, Model Year: 1977, Model line: PICK-UP, Model: DATSUN PICK-UP 1977Pages: 537, PDF Size: 35.48 MB
Page 5 of 537
General
Informa
ion
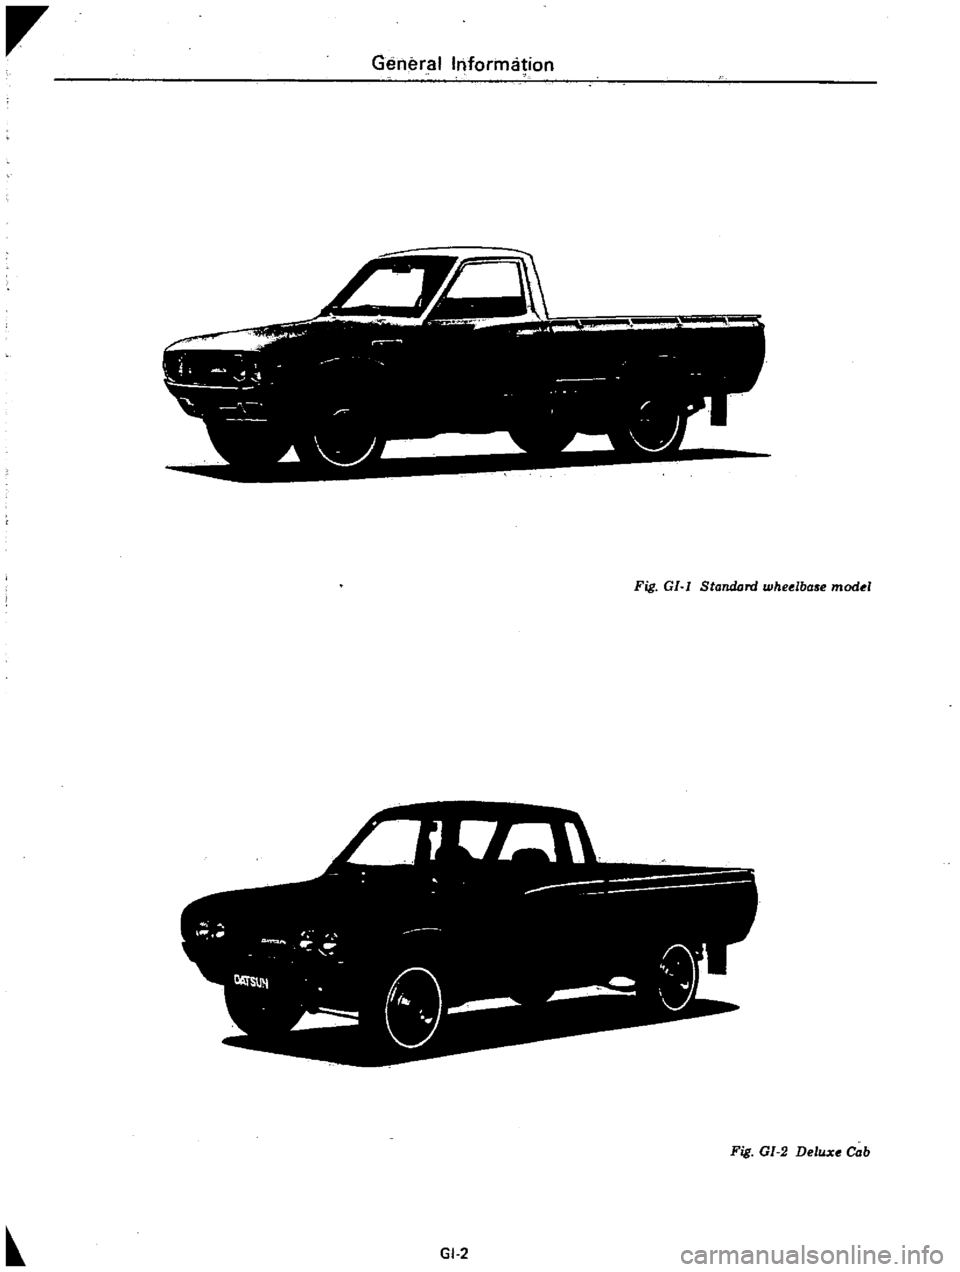
Fig
GI
I
Standord
wheelbase
model
Fig
GI
2
Delux
Cob
GI
2
Page 6 of 537
General
Information
L
GENERAL
INFORMATION
CONTENTS
MOOEL
VARIATION
GI
3
APPROXIMATE
REFILL
CAPACITIES
GI
B
IDENTIFICATION
NUMBERS
GI
5
RECOMMENDED
FUEL
GI
B
LIFTING
POINTS
AND
TOWING
GI
B
RECOMMENDED
LUBRICANTS
GI
8
LIFTING
POINTS
GI
B
RECOMMENDED
SAE
VISCOSITY
SUPPORTABLE
POINTS
GI
7
NUMBER
GI
8
TOWING
GI
7
LUBRICANT
SPECIFICATIONS
GI
g
TIE
DOWN
GI
7
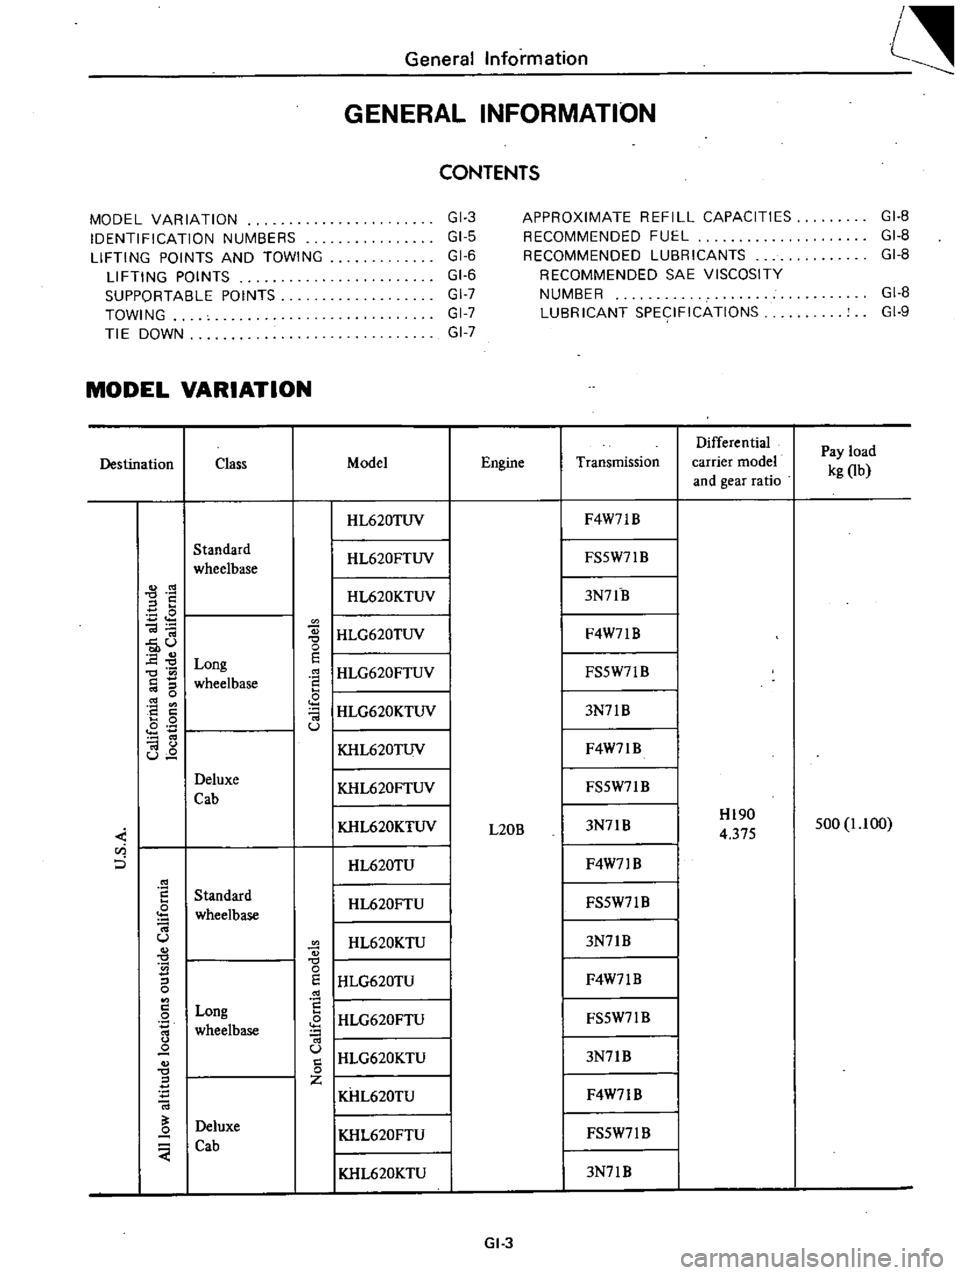
MODEL
VARIATION
Differential
Pay
load
Destination
Class
Model
Engine
Transmission
carrier
model
kg
Ob
and
gear
ratio
I
HL620TUV
F4W7lB
Standard
I
HL620FTUV
FS5W71
B
wheelbase
S
I
HL620KTUV
3N7lB
E
I
HLG620TUV
Ol
F4W7lB
u
0
0
E
Long
E
I
HLG620FTUV
0
FS5W71B
wheelbase
0
I
HLG620KTUV
8
a
3N7lB
0
Ol
0
u
I
KHL620TUV
Ol
F4W7lB
u
Deluxe
I
KHL620FTUV
FS5W7lB
Cab
KHL620KTUV
3N7lB
Hl90
500
1
1
00
L20B
4
375
u
i
0
HL620TU
F4W71
B
Standard
HL620FTU
FS5W7l
B
wheelbase
U
HL620KTU
3N7lB
S
0
I
HLG620TU
0
E
F4W7lB
0
8
Long
I
HLG620FTU
0
FS5W7lB
wheelbase
IHLG620KTU
Q
u
3N7lB
0
0
Z
KHL620TU
F4W71B
Deluxe
Q
KHL620FTU
FS5W7l
B
Cab
I
KHL620KTU
3N7lB
GI
3
Page 7 of 537
r
General
Information
Differential
Pay
load
Destination
Class
Model
Engine
Transmission
carrier
model
kg
lb
and
gear
ratio
Standard
HL620TUN
F4W71B
wheelbase
HL620KTUN
3N71B
0
HLG620TUN
F4W7IB
Long
E
wheelbase
2
I
HLG620KTUN
Hl90
Canada
L20B
3N71B
500
1
100
4
375
I
KHL620TUN
F4W71B
0
Deluxe
Z
I
KHL620FTUN
Cab
FS5W7IB
I
KHL620KTUN
3N7J
B
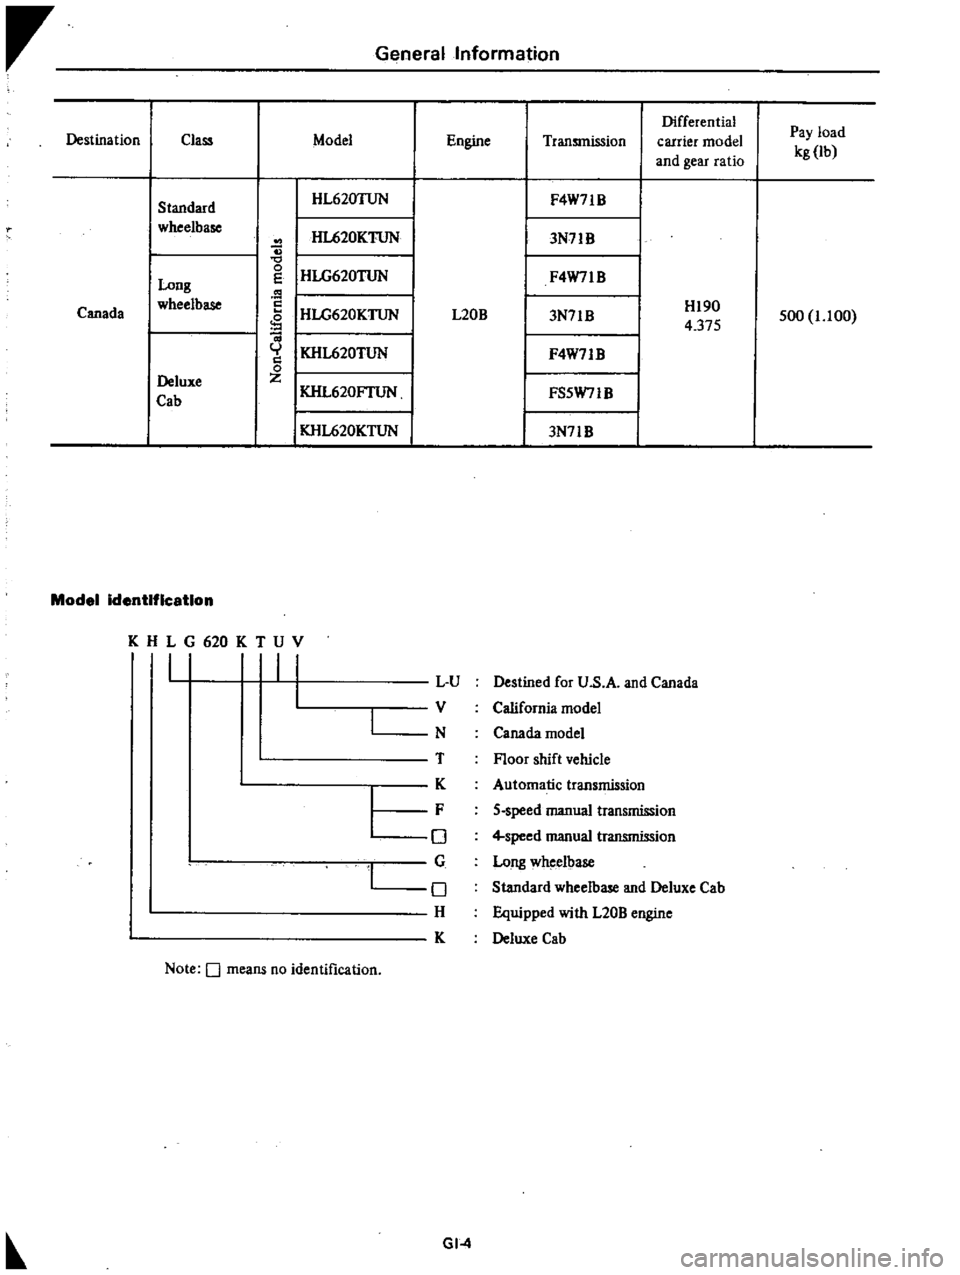
Model
identification
KHLG620KTUV
I
I
L
U
V
N
T
K
F
0
G
o
H
K
I
Note
0
means
no
identification
Destined
for
U
s
A
and
Canada
California
model
Canada
model
Floor
shift
vehicle
Automatic
transmission
5
speed
manual
transmission
4
speed
manual
transmission
Long
wheelbase
Standard
wheelbase
and
Deluxe
Cab
Equipped
with
L20B
engine
Deluxe
Cab
GI
4
Page 330 of 537
PROPElLER
SHAFT
DIFFERENTIAL
CARRIER
PROPELLER
SHAFT
AND
CENTER
BEARING
CONTENTS
DESCRIPTION
REMOVAL
AND
INSTALLATION
DISASSEMBLY
AND
ASSEMBLY
INSPECTION
i
t
I
tl
J
I
O
148
5
5
85
PD
2
PD
2
PD
3
PD
3
CHECKING
AND
CORRECTING
UNBALANCED
PROPELLER
SHAFT
SERVICE
DATA
TROUBLE
DIAGNOSES
AND
CORRECTIONS
PD
4
PD
3
PD
4
2
483
19
02
750
29
53
987
38
86
Long
wheelbase
and
Deluxe
cab
models
Unit
mm
in
35
1
38
Front
5
Companion
flange
6
Plain
washer
7
Self
locking
nut
8
Flange
yoke
Rea
1
Sleeve
yoke
assembly
2
Center
bearing
3
Center
bearing
insulator
4
Center
bearing
bracket
DESCRIP
TION
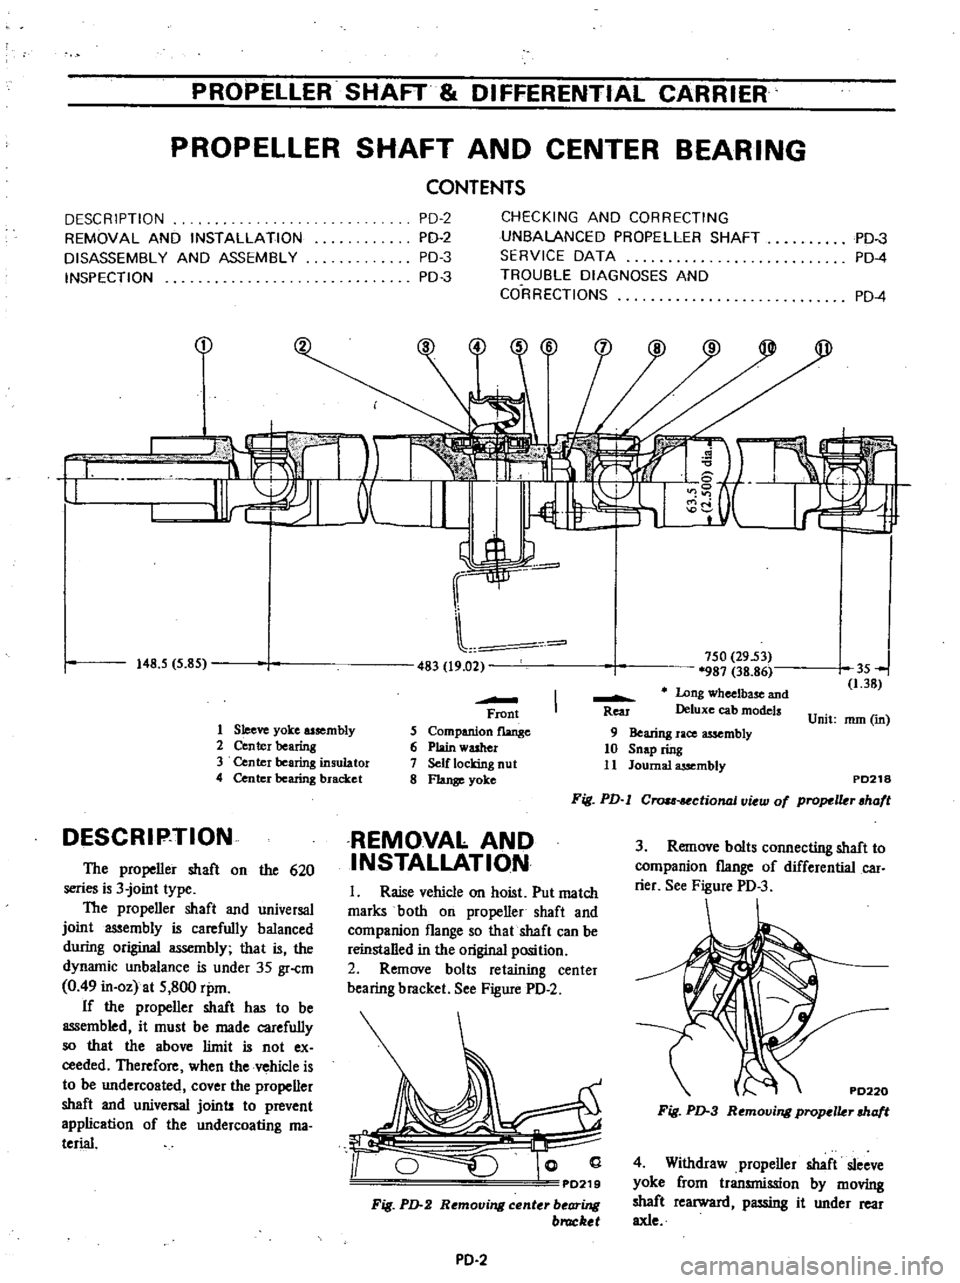
The
propeller
shaft
on
the
620
series
is
3
joint
type
The
propeller
shaft
and
universal
joint
assembly
is
carefully
balanced
during
original
assembly
that
is
the
dynamic
unbalance
is
under
35
gr
cm
0
49
in
oz
at
S
800
rpm
If
the
propeller
shaft
has
to
be
assembled
it
must
be
made
carefully
so
that
the
above
limit
is
not
ex
ceeded
Therefore
when
the
vehicle
is
to
be
undercoated
cover
the
propeller
shaft
and
universal
joints
to
prevent
application
of
the
undercoating
ma
terial
9
Bearing
race
assembly
10
Snap
ring
11
Journal
assembly
PD218
Fig
PD
l
Crou
ctional
v
w
of
propelkr
hafl
REMOVAL
AND
INSTALLATION
3
Remove
bolts
connecting
shaft
to
companion
flange
of
differential
car
rier
See
Figure
PD
3
I
Raise
vehicle
on
hoist
Put
match
marks
both
on
propeller
shaft
and
companion
flange
so
that
shaft
can
be
reinstalled
in
the
original
position
2
Remove
bolts
retaining
center
bearing
bracket
See
Figure
PD
2
PD220
Fig
PD
3
Removing
propclkr
cha
t
PD219
Fig
PD
2
Removing
center
bearing
bruckel
4
Withdraw
propeller
shaft
sleeve
yoke
from
transmission
by
moving
shaft
rearward
passing
it
under
rear
axle
PD
2
Page 426 of 537
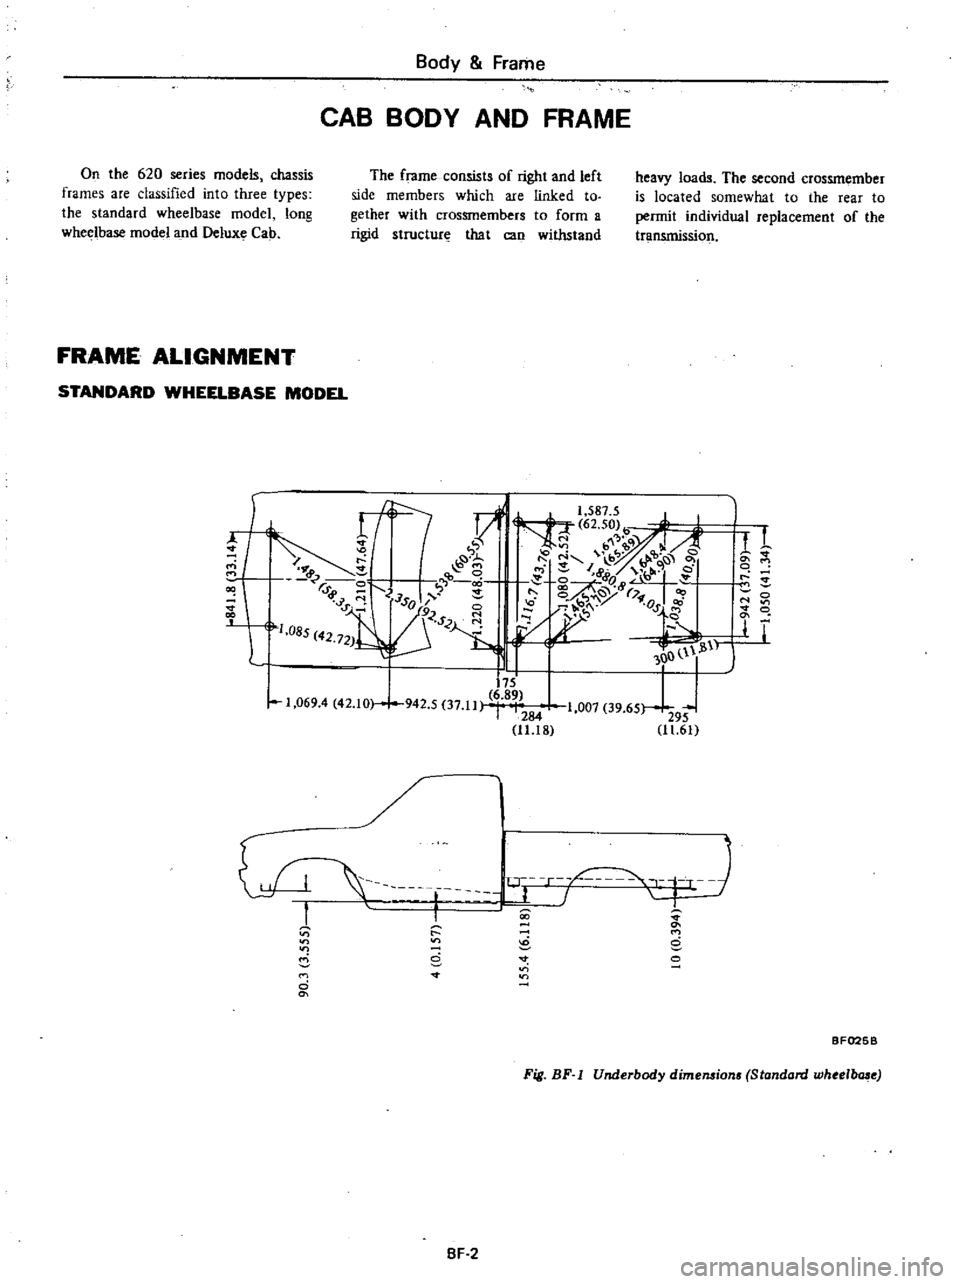
Body
Frame
CAB
BODY
AND
FRAME
On
the
620
series
models
chassis
frames
are
classified
into
three
types
the
standard
wheelbase
model
long
wheelbase
model
and
Deluxe
Cab
The
frame
consists
of
right
and
left
side
members
which
are
linked
to
gether
with
crossmembers
to
form
a
rigid
structure
that
can
withstand
heavy
loads
The
second
crossmember
is
located
somewhat
to
the
rear
to
permit
individual
replacement
of
the
transmissiol
FRAME
ALIGNMENT
STANDARD
WHEELBASE
MODEL
f
r1
1
587
5
J
I
1
X
62
50
I
b
q
J
A
1
7
I
b
9
9
8
I
1
e
t
r
0
ij
e
6
rd
r
r
1sol
1
1
9ClS
1
085
42
721
Cl
H
1
I
11
OO
l
1
i11
175
6
89
1
069
4
42
10
942
5
37
11
1007
39
65
I
284
295
11
18
11
61
00
d
M
o
8
r
r
c
8
o
r
T
L
BF025B
Fig
BF
I
Underbody
dime1l8ion
Standard
whee
b
e
SF
2
Page 427 of 537

Body
Frame
LONG
WHEELBASE
MODEL
In
4
l1
1
873
8
Ir
mrn
0
IN
bi
1
b
v
p
v
M
r
y
M
t
c
I
f
G
0
v
D
c
IS
S
t
I
y
r
M
J
1
0
10
9
V
raj
p
N
78
1
085
42
72
1
350
Ii
I
1
20
63
d3
1
U
n
L
II
t
I
T
r
r
J
M
o
C
M
o
e
I
I
o
M
0
So
I
I
Fig
BF
2
Underbody
dimensions
Long
wheelbase
BF0268
DELUXE
CAB
17
1
C
y
0
l
r
r
M
2
V
d
J
JSO
r
S
1
085
42
72
I
I
I
li4
1
069
4
42
10
942
5
37
11
284
11
18
Jr
t
r
iO
u
b
P
tl
b
c
N
0
l
f
t
0
M
00
I
0
0
0
o
1
00
N
It
1
b
t
8Qa
3
o
OS
A
b
U
n
j
1
007
39
65
1
11
61
1
M
o
bu
c
r
I
T
I
I
M
8
R
It
o
BF
3
Fig
BR
3
Underbody
dimensiom
Delu
Cab
BF027B
Page 443 of 537

2
1
Back
trim
2
Back
inside
imisher
3
Clip
1
CENTER
CONSOLE
REMOVAL
AND
INSTALLATION
Except
for
air
conditioner
equipped
models
I
Remove
two
bolts
from
rear
of
center
console
2
Remove
center
console
by
pulling
it
back
3
To
properly
install
center
con
sole
insert
its
front
portion
into
bracket
on
the
floor
and
install
and
tighten
rear
attaching
bolts
SEAT
DESCRIPTION
There
are
two
types
of
seats
a
semi
separate
bench
seat
for
the
standard
wheelbase
and
long
wheelbase
models
and
a
separate
seat
for
the
Deluxe
Cab
models
CAUTION
In
conforming
with
M
Y
S
s
No
302
be
sure
to
remove
the
thin
polyethylene
covers
from
seat
cushions
seat
backs
and
head
restraints
at
the
time
of
a
Pre
delivery
service
b
Parts
replacement
Body
Frame
BF0328
Fig
BF
45
Back
trim
and
back
inside
finisher
BE033B
Fig
BF
46
Removing
center
console
SEAT
BENCH
SEAT
8F
19
Air
conditioner
equipped
models
I
Remove
two
bolts
from
front
of
center
console
2
Remove
two
bolts
from
the
rear
and
remove
center
console
CONSOLE
WITH
ARMREST
DELUXE
CAB
REMOVAL
AND
INSTALLATION
I
Remove
two
bolts
from
front
of
console
armrest
unit
2
Remove
one
bolt
in
the
console
box
and
remove
center
console
3
Installation
is
the
reverse
order
of
removal
BF034B
Fig
BF
47
Console
with
annrest
JJ
t
qJ
1
Seat
assembly
2
Seat
slide
3
Seat
slide
lock
handle
4
Seat
slide
lock
wire
BF474A
Fig
BF
48
Bench
seal