warning DATSUN PICK-UP 1977 Service Manual
[x] Cancel search | Manufacturer: DATSUN, Model Year: 1977, Model line: PICK-UP, Model: DATSUN PICK-UP 1977Pages: 537, PDF Size: 35.48 MB
Page 9 of 537
Fig
GI
9
Manual
trammiuion
number
location
Automatic
transmission
number
The
transmission
serial
number
is
attached
to
the
right
hand
side
of
transmission
case
Numbering
system
X
XXXXX
I
Serial
number
monthly
Month
of
manufacture
I
2
9
X
Y
Z
last
figure
of
year
of
manufacture
AT344
Fig
01
10
Automatic
trammi
sion
number
location
LIFTING
POINTS
AND
TOWING
LIFTING
POINTS
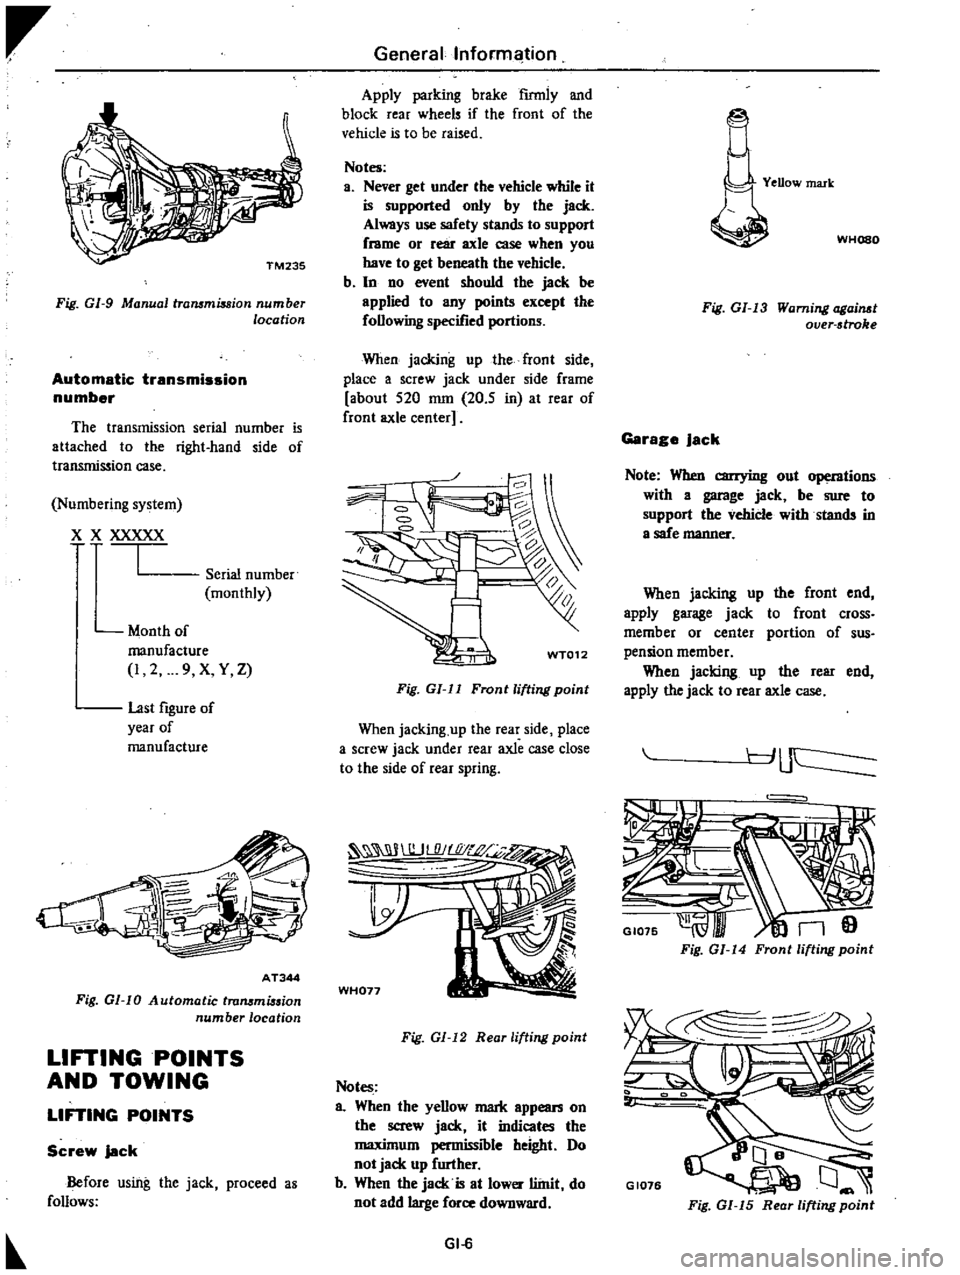
Screw
jack
Before
using
the
jack
proceed
a
follows
Generallnforml
ition
Apply
parking
brake
firmly
and
block
rear
wheels
if
the
front
of
the
vehicle
is
to
be
raised
Notes
a
Never
get
under
the
vehicle
while
it
is
supported
only
by
the
jack
Always
use
safety
stands
to
support
frame
or
rear
axle
case
when
you
have
to
get
beneath
the
vehicle
b
In
no
event
should
the
jack
be
applied
to
any
points
except
the
following
specified
portions
When
jacking
up
the
front
side
place
a
screw
jack
under
side
frame
about
520
nun
20
5
in
at
rear
of
front
axle
center
WT012
Fig
GI
ll
Front
lifting
point
When
jacking
up
the
rear
side
place
a
screw
jack
under
rear
axle
case
close
to
the
side
of
rear
spring
WH077
Fig
GI
12
Reor
lifting
point
Notes
a
When
the
yellow
mark
appean
on
the
screw
jack
it
indicates
the
maximum
permissible
height
Do
not
jack
up
further
b
When
the
jack
is
at
lower
llinit
do
not
add
large
force
downward
GI
6
YeDow
mark
WHOSO
Fig
GI
13
Warning
ogai
t
over
stroke
Garage
Jack
Note
When
carrying
out
operntions
with
a
garage
jack
be
sure
to
support
the
vehicle
withstands
in
a
safe
manner
When
jacking
up
the
front
end
apply
garage
jack
to
front
cross
member
or
center
portion
of
sus
pension
member
When
jacking
up
the
rear
end
apply
the
jack
to
rear
axle
case
r
J
uc
I
GI075
n9
Fig
GI
14
Front
lifting
point
GI076
Fig
GI
15
Rear
lifting
point
Page 25 of 537
CHECKING
CHOKE
MECHANISM
Choke
plate
and
linkage
1
Check
choke
valve
and
mech
anism
for
free
operation
and
clean
or
replace
if
necessary
A
binding
can
result
from
petroleum
gum
formation
on
choke
shaft
or
from
damage
2
Check
bimetal
cover
setting
Index
mark
on
bimetal
cover
is
usually
set
at
center
of
scale
Note
Always
align
the
index
mark
on
bimetal
cover
with
the
center
index
mark
on
choke
housing
3
Every
day
before
starting
engine
depress
the
accelerator
P
dal
to
see
if
choke
valve
is
closed
automatically
If
it
fails
to
be
closed
the
chances
are
that
link
movement
is
unsmooth
Engine
Tune
up
or
that
bimetal
is
out
of
order
Refer
to
Carburetor
in
Section
EF
CHECKING
FUEL
LINES
Hoses
pipings
connections
etc
Check
fuel
lines
for
loose
con
nections
cracks
and
deterioration
Retighten
loose
connections
and
re
place
any
damaged
or
deformed
parts
REPLACING
FUEL
FILTER
Check
for
a
contaminated
filter
and
water
deposit
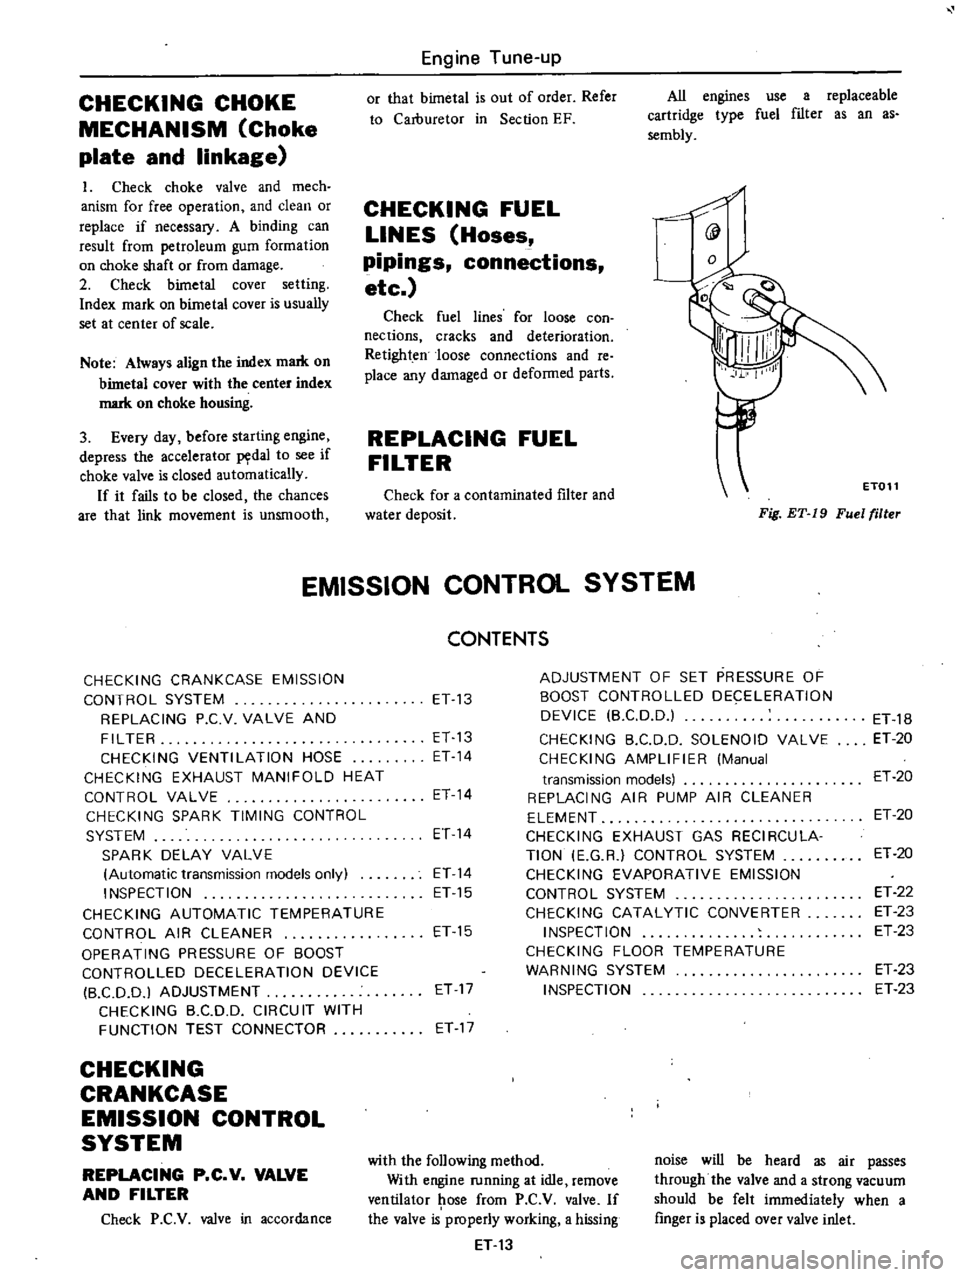
All
engines
use
a
replaceable
cartridge
type
fuel
filter
as
an
as
sembly
@
Fig
ET
19
Fuel
filler
ET011
EMISSION
CONTROL
SYSTEM
CHECKING
CRANKCASE
EMISSION
CONTROL
SYSTEM
REPLACING
P
C
V
VALVE
AND
FILTER
CHECKING
VENTILATION
HOSE
CHECKING
EXHAUST
MANIFOLD
HEAT
CONTROL
VALVE
CHECKING
SPARK
TIMING
CONTROL
SYSTEM
SPARK
DELAY
VALVE
Automatic
transmission
models
only
INSPECTION
CHECKING
AUTOMATIC
TEMPERATURE
CONTROL
AIR
CLEANER
OPERATING
PRESSURE
OF
BOOST
CONTROLLED
DECELERATION
DEVICE
B
CD
D
I
ADJUSTMENT
CHECKING
B
C
DD
CIRCUIT
WITH
FUNCTION
TEST
CONNECTOR
CHECKING
CRANKCASE
EMISSION
CONTROL
SYSTEM
REPLACING
P
C
V
VALVE
AND
FILTER
Check
P
C
V
valve
in
accordance
CONTENTS
ET
13
ET
13
ET
14
ET
14
ET
14
ET
14
ET
15
ET
15
ET
17
ET
17
ADJUSTMENT
OF
SET
PRESSURE
OF
BOOST
CONTROLLED
DECELERATION
DEVICE
B
CD
D
CHECKING
B
C
D
D
SOLENOID
VALVE
CHECKING
AMPLIFIER
Manual
transmission
models
REPLACING
AIR
PUMP
AIR
CLEANER
ELEMENT
CHECKING
EXHAUST
GAS
RECIRCULA
TION
E
G
R
CONTROL
SYSTEM
CHECKING
EVAPORATIVE
EMISSION
CONTROL
SYSTEM
CHECKING
CATALYTIC
CONVERTER
INSPECTION
CHECKING
FLOOR
TEMPERATURE
WARNING
SYSTEM
INSPECTION
with
the
following
method
With
engine
running
at
idle
remove
ventilator
ose
from
P
C
V
valve
If
the
valve
is
properly
working
a
hissing
ET
13
ET
18
ET
20
ET
20
ET
20
ET
20
ET
22
ET
23
ET
23
ET
23
ET
23
noise
will
be
heard
as
air
passes
through
the
valve
and
a
strong
vacuum
should
be
felt
immediately
when
a
finger
is
placed
over
valve
inlet
Page 32 of 537
r
CHECKING
B
C
D
D
SOLENOID
VALVE
I
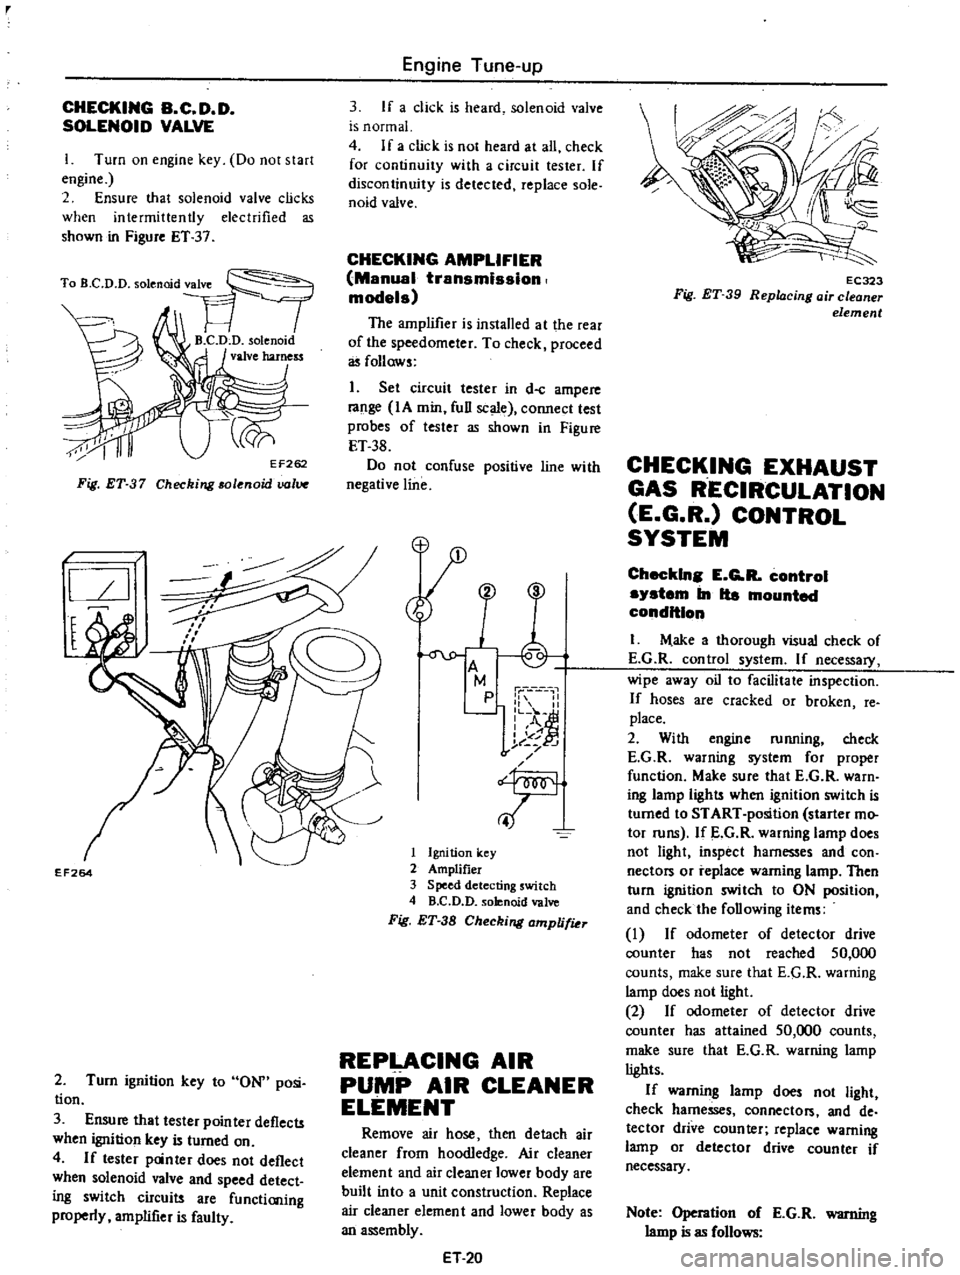
Turn
on
engine
key
Do
not
start
engine
2
Ensure
that
solenoid
valve
clicks
when
intermittently
electrified
as
shown
in
Figure
ET
37
Fig
ET
37
Checking
solenoid
uolV
l
I
l
EF264
2
Turn
ignition
key
to
ON
posi
tion
3
Ensure
that
tester
pointer
deflects
when
ignition
key
is
turned
on
4
If
tester
panter
does
not
deflect
when
solenoid
valve
and
speed
detect
ing
switch
circuits
are
functioning
properly
amplifier
is
faulty
Engine
Tune
up
3
If
a
click
is
heard
solenoid
valve
is
normal
4
If
a
click
is
not
heard
at
all
check
for
continuity
with
a
circuit
tester
If
discontinuity
is
detected
replace
sole
naid
valve
CHECKING
AMPLIFIER
Manual
transmission
models
The
amplifier
is
installed
at
the
rear
of
the
speedometer
To
check
proceed
as
follows
1
Set
circuit
tester
in
d
c
ampere
range
IA
min
full
scale
connect
test
probes
of
tester
as
shown
in
Figure
ET
38
Do
not
confuse
positive
line
with
negative
line
M
p
1
II
L
o
A
I
of
j
t
J
f
T
1
Ignition
key
2
Amplifier
3
Speed
detecting
switch
4
B
C
D
D
solenoid
valve
Fig
ET
38
Checking
amplifiu
REPLACING
AIR
PUMP
AIR
CLEANER
ELEMENT
Remove
air
hose
then
detach
air
cleaner
from
hoodledge
Air
cleaner
element
and
air
cleaner
lower
body
are
built
into
a
unit
construction
Replace
air
cleaner
element
and
lower
body
as
an
assembly
ET
20
EC323
Fig
ET
39
Repl4cing
air
cleaner
element
CHECKING
EXHAUST
GAS
RECIRCULATION
E
G
R
CONTROL
SYSTEM
Checkln
E
G
R
control
system
In
Ita
mounted
condition
I
M
ake
a
thorough
visual
check
of
E
G
R
control
system
If
necessary
wipe
away
oil
to
facilitate
inspection
If
hoses
are
cracked
or
broken
fe
place
2
With
engine
running
check
E
G
R
warning
system
for
proper
function
Make
sure
that
E
G
R
warn
ing
lamp
light
when
ignition
switch
is
turned
to
START
position
starter
mo
tor
runs
If
E
G
R
warning
lamp
does
not
light
inspect
harnesses
and
con
nectors
or
replace
warning
lamp
Then
turn
ignition
switch
to
ON
position
and
check
the
following
items
I
If
odometer
of
detector
drive
counter
has
not
reached
50
000
counts
make
sure
that
E
G
R
warning
lamp
does
not
light
2
If
odometer
of
detector
drive
counter
has
attained
50
000
counts
make
sure
that
E
G
R
warning
lamp
lights
If
warning
lamp
does
not
light
check
harnesses
connector
and
de
tector
drive
counter
replace
warning
lamp
or
detector
drive
counter
if
necessary
Note
Operation
of
E
G
R
warning
lamp
is
as
follows
Page 33 of 537
Ignition
Switch
Position
START
Detector
Drive
Counter
E
G
R
Warning
Lamp
ON
a
After
completing
inspection
of
E
G
R
control
system
be
sure
to
reset
odometer
of
detector
drive
counter
to
zero
b
This
item
applies
to
620
models
except
those
bound
for
California
and
Canada
3
With
engine
stopped
inspect
E
G
R
control
valve
for
any
indication
of
binding
or
sticking
by
movirig
dia
phragm
of
control
valve
upwards
with
fmgers
Engine
Tune
up
ON
Below
50
000
counts
Above
50
000
counts
OFF
ON
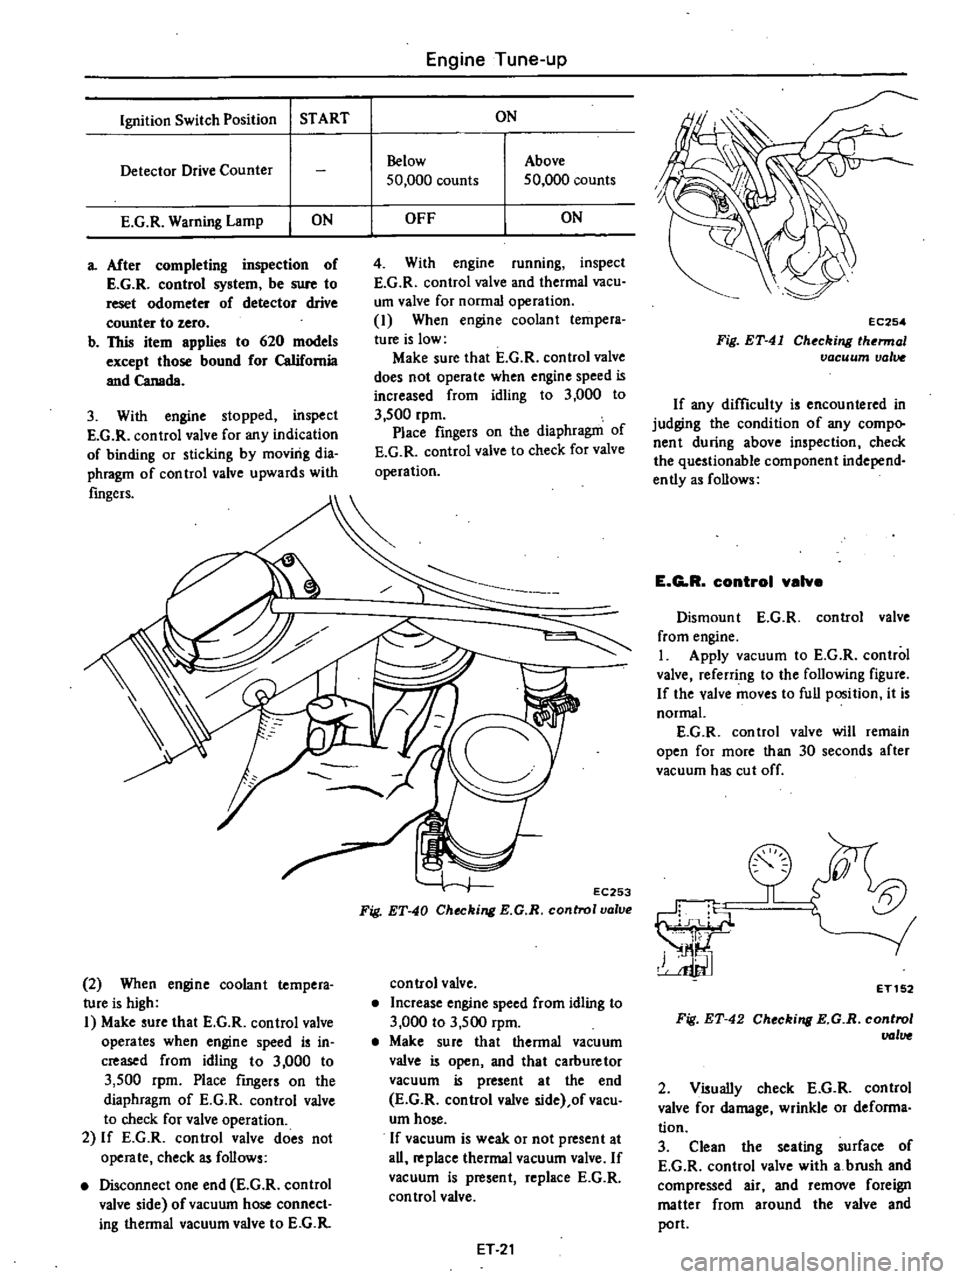
4
With
engine
running
inspect
E
G
R
control
valve
and
thermal
vacu
um
valve
for
normal
operation
I
When
engine
coolant
tempera
ture
is
low
Make
sure
that
E
G
R
control
valve
does
not
operate
when
engine
speed
is
increased
from
idling
to
3
000
to
3
500
rpm
Place
fingers
on
the
diaphragm
of
E
G
R
control
valve
to
check
for
valve
operation
2
When
engine
coolant
tempera
ture
is
high
I
Make
sure
that
E
G
R
control
valve
operates
when
engine
speed
is
in
creased
from
idling
to
3
000
to
3
500
rpm
Place
fingers
on
the
diaphragm
of
E
G
R
control
valve
to
check
for
valve
operation
2
If
E
G
R
control
valve
does
not
operate
check
as
follows
Disconnect
one
end
E
G
R
control
valve
side
ofvacuum
hose
connect
ing
thermal
vacuum
valve
to
E
G
R
EC253
Fig
ET
40
Checking
E
G
R
control
valve
control
valve
Increase
engine
speed
from
idling
to
3
000
to
3
500
rpm
Make
sure
that
thermal
vacuum
valve
is
open
and
that
carburetor
vacuum
is
present
at
the
end
E
G
R
control
valve
side
ofvacu
urn
hose
If
vacuum
is
weak
or
not
present
at
all
replace
thermal
vacuum
valve
If
vacuum
is
present
replace
E
G
R
con
trol
valve
ET
21
EC254
Fig
ET
41
Checking
thermal
vacuum
valw
If
any
difficulty
is
encountered
in
judging
the
condition
of
any
compo
nent
during
above
inspection
check
the
questionable
component
independ
ently
as
follows
E
G
R
control
valve
Dismount
E
G
R
control
valve
from
engine
I
Apply
vacuum
to
E
G
R
control
valve
referring
to
the
following
figure
If
the
valve
moves
to
full
position
it
is
normal
E
G
R
control
valve
will
remain
open
for
more
than
30
seconds
after
vacuum
has
cut
off
0
r11
hC
J
ET152
Fig
ET
42
Checking
E
G
R
control
VGlve
2
Visually
check
E
G
R
control
valve
for
damage
wrinkle
or
deforma
tion
3
Clean
the
seating
surface
of
E
G
R
control
valve
with
a
brush
and
compressed
air
and
remove
foreign
matter
from
around
the
valve
and
port
Page 35 of 537
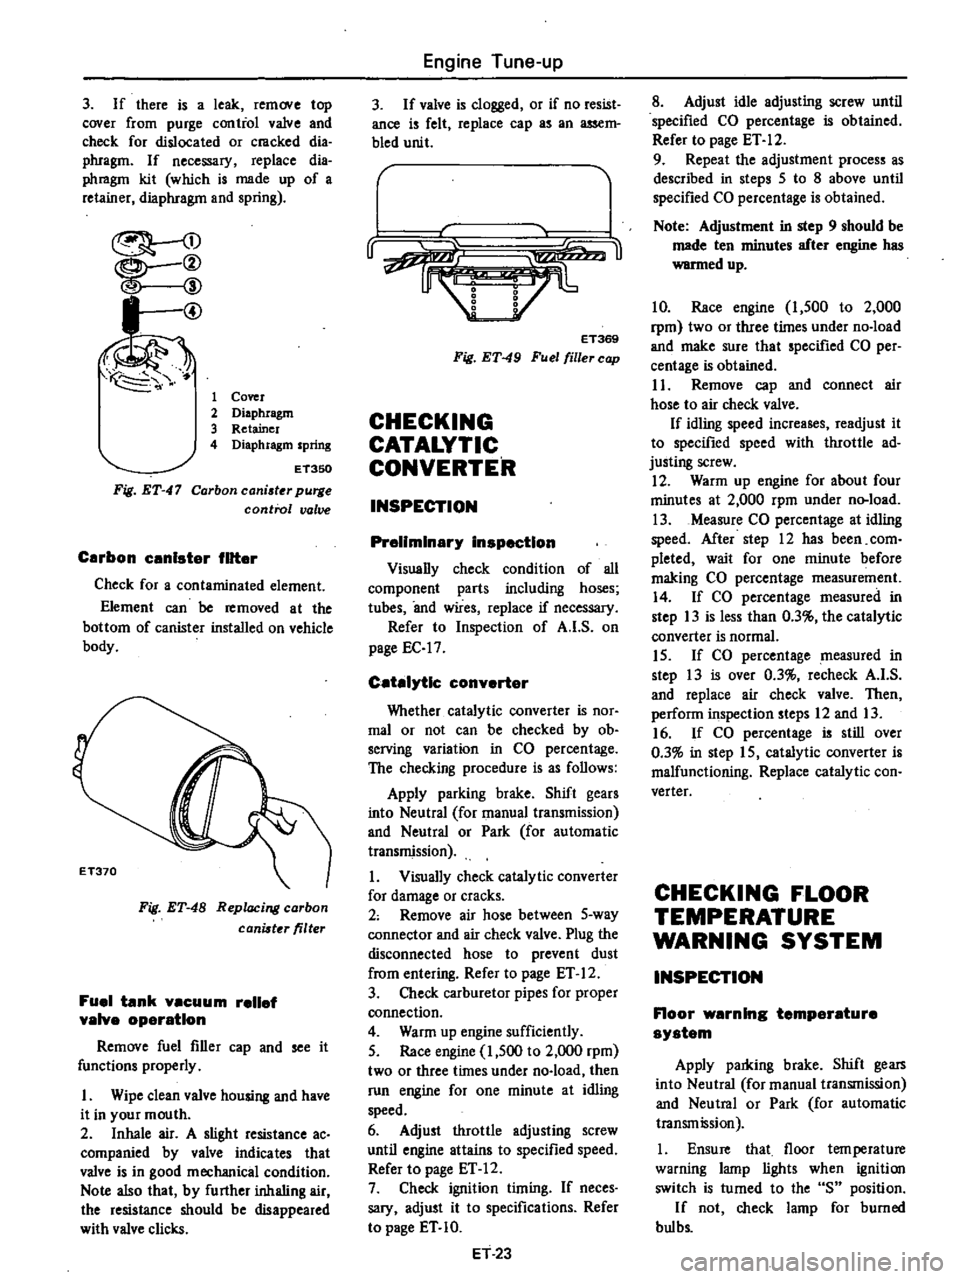
3
If
there
is
a
leak
remove
top
cover
from
purge
contiol
valve
and
check
for
dislocated
or
cmcked
dia
phragm
If
necessary
replace
dia
phmgm
kit
which
is
made
up
of
a
retainer
diaphragm
and
spring
I
@
1
Cover
2
Diaphragm
3
Retainer
4
Diaphragm
spring
Fig
ET
47
ET350
Carbon
caniater
purge
control
valve
Carbon
unlster
filter
Check
for
a
contaminated
element
Element
can
be
removed
at
the
bottom
of
canister
installed
on
vehicle
body
Fig
ET
48
Replacing
carbon
canister
filter
Fuel
tank
vacuum
relief
valve
operation
Remove
fuel
filler
cap
and
see
it
functions
properly
I
Wipe
clean
valve
housing
and
have
it
in
your
mouth
2
Inhale
air
A
slight
resistance
ac
companied
by
valve
indicates
that
valve
is
in
good
mechanical
condition
Note
also
that
by
further
inhaling
air
the
resistance
should
be
disappeared
with
valve
clicks
Engine
Tune
up
3
If
valve
is
clogged
or
if
no
resist
ance
is
felt
replace
cap
as
an
assem
bled
unit
r
u
ET369
Fig
ET
49
Fuel
filler
cap
CHECKING
CATALYTIC
CONVERTER
INSPECTION
Preliminary
inspection
Visually
check
condition
of
all
component
parts
including
hoses
tubes
and
wires
replace
if
necessary
Refer
to
Inspection
of
A
I
S
on
page
EC
17
Catalytic
converter
Whether
catalytic
converter
is
nOf
mal
or
not
can
be
checked
by
ob
serving
variation
in
CO
percentage
The
checking
procedure
is
as
follows
Apply
parking
brake
Shift
gears
into
Neutral
for
manual
transmission
and
Neutral
or
Park
for
automatic
transmission
1
Visually
check
catalytic
converter
for
damage
or
cracks
2
Remove
air
hose
between
5
way
connector
and
air
check
valve
Plug
the
disconnected
hose
to
prevent
dust
from
entering
Refer
to
page
ET
12
3
Check
carburetor
pipes
for
proper
connection
4
Warm
up
engine
sufficiently
5
Race
engine
1
500
to
2
000
rpm
two
or
three
times
under
no
load
then
run
engine
for
one
minute
at
idling
speed
6
Adjust
throttle
adjusting
screw
until
engine
attains
to
specified
speed
Refer
to
page
ET
12
7
Check
ignition
timing
If
neces
sary
adjust
it
to
specifications
Refer
to
page
ET
10
ET
23
8
Adjust
idle
adjusting
screw
until
specified
CO
percentage
is
obtained
Refer
to
page
ET
12
9
Repeat
the
adjustment
process
as
described
in
steps
5
to
8
above
until
specified
CO
percentage
is
obtained
Note
Adjustment
in
step
9
should
be
made
ten
minutes
after
engine
has
warmed
up
10
Race
engine
1
500
to
2
000
rpm
two
or
three
times
under
no
load
and
make
sure
that
specified
CO
per
centage
is
obtained
I
1
Remove
cap
and
connect
air
hose
to
air
check
valve
If
idling
speed
increases
readjust
it
to
specified
speed
with
throttle
ad
justing
screw
12
Warm
up
engine
for
about
four
minutes
at
2
000
rpm
under
n
load
13
Measure
CO
percentage
at
idling
speed
After
step
12
has
been
com
pleted
wait
for
one
minute
before
making
CO
percentage
measurement
14
If
CO
percentage
measured
in
step
13
is
less
than
0
3
the
catalylic
converter
is
normal
15
If
CO
percentage
measured
in
step
13
is
over
0
3
recheck
A
I
S
and
replace
air
check
valve
Then
perform
inspection
steps
12
and
13
16
If
CO
percentage
is
still
over
0
3
in
step
15
catalytic
converter
is
malfunctioning
Replace
catalytic
con
verter
CHECKING
FLOOR
TEMPERATURE
WARNING
SYSTEM
INSPECTION
Floor
warning
temperature
system
Apply
parldng
brake
Shift
gears
into
Neutral
for
manual
transmission
and
Neutral
or
Park
for
automatic
transmission
1
Ensure
that
floor
tern
perature
warning
lamp
lights
when
ignition
switch
is
turned
to
the
S
position
If
not
check
lamp
for
burned
bul
bs
Page 36 of 537
Replace
bulb
if
bulb
is
burned
ou
t
If
bulb
is
not
burned
trace
wireis
back
to
ignition
switch
Repair
or
replace
if
necessary
2
Be
sure
that
floor
temperature
is
cool
below
800C
1760F
before
carrying
out
the
following
procedure
1
Remove
rear
seat
2
Ignition
switch
is
turned
to
the
Temperature
sensing
switch
Temperature
warning
lamp
Contact
close
Off
Contact
open
On
Note
Avoid
heating
floor
tempera
ture
sensing
switch
directly
If
lamp
does
not
glow
check
floor
temperature
sensing
switch
connector
for
continuity
with
a
circuit
tester
If
continuity
should
exist
after
heated
surrounding
areas
of
floor
tern
rv
wnTP
sen
cinq
S
Vitch
reolace
tem
perature
sensing
switch
If
continuity
does
not
exist
trace
the
wiring
back
to
relay
or
check
the
following
step
3
Repair
or
replace
wire
s
if
necessary
Note
The
floor
temperature
sensing
switch
may
be
heated
through
the
floor
by
a
proper
heater
3
Turn
ignition
switch
to
the
IG
position
anf
disconnect
floor
temper
ature
sensing
connector
The
lamp
should
remain
on
If
not
check
floor
4
0
3
UJ
GJO
Engine
Tune
up
IGU
position
3
Ensure
that
floor
tem
perature
warning
lamp
goes
out
4
Heat
surrounding
areas
of
floor
temperature
sensing
switch
with
a
proper
heater
to
ensure
that
floor
temperature
warning
lamp
glows
when
floor
is
heated
to
lh
specifications
as
shown
in
the
table
below
Floor
temperature
Below
1050C
22IOF
Above
1050C
2210F
temperature
relay
for
continuity
with
a
circuit
tester
Referring
to
the
following
floor
temperature
relay
if
relay
is
normal
trace
wire
s
back
to
ignition
switch
Repair
faulty
wiring
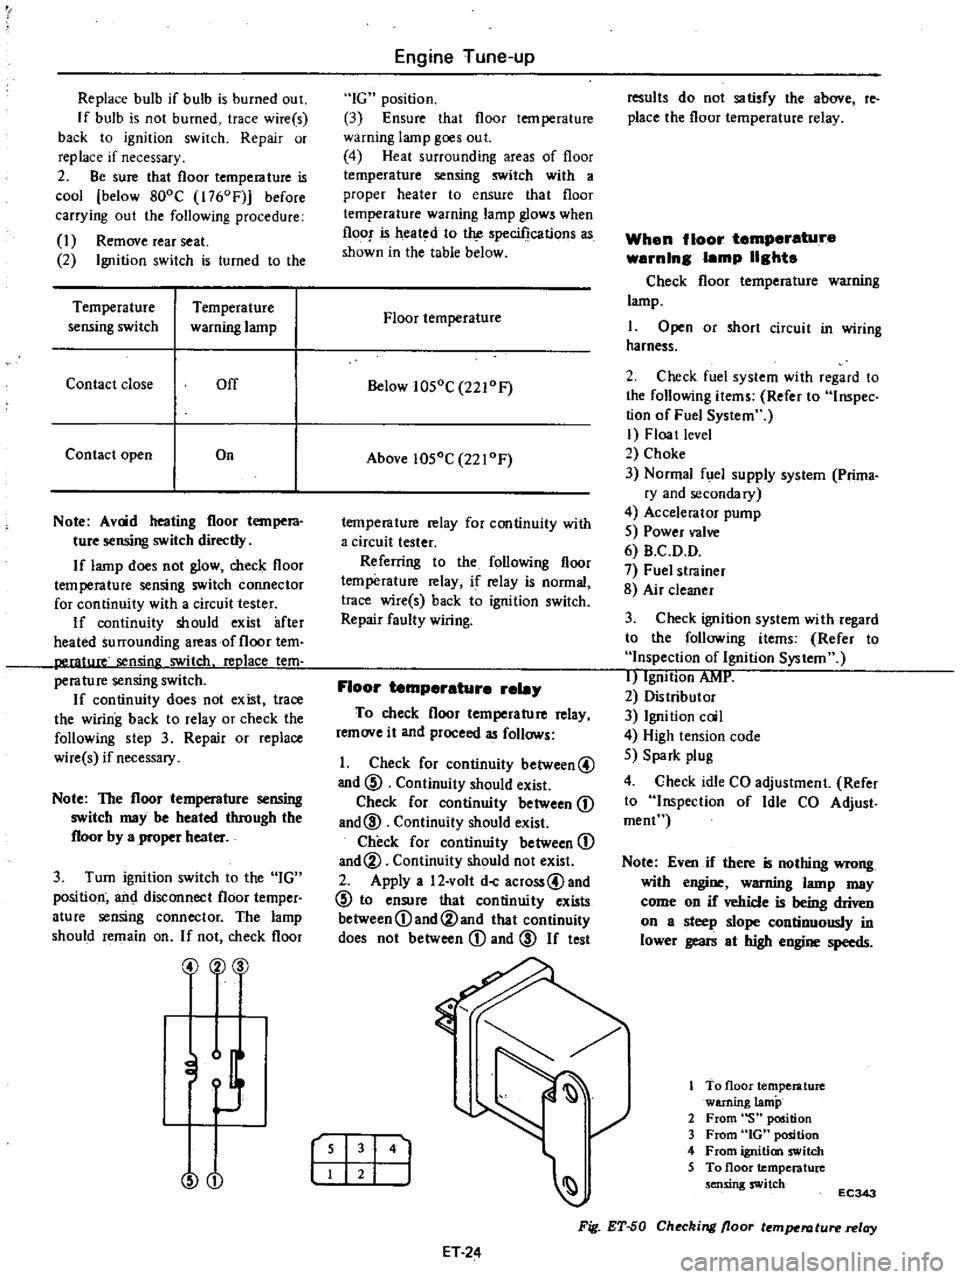
Floor
temperature
rela
To
check
floor
temperature
relay
remove
it
and
proceed
as
follows
1
Check
for
continuity
between@
and
@
Continuity
should
exist
Check
for
continuity
between
D
and@
Continuity
should
exist
Check
for
continuity
between
D
and@
Continuity
should
not
exist
2
Apply
a
12
volt
doC
across@and
@
to
ensure
that
continuity
exists
between
D
and@and
that
continuity
does
not
between
D
and
@
If
test
r
I
141
ET
24
results
do
not
satisfy
the
above
reo
place
the
floor
temperature
relay
When
floor
temperature
warnln8
lamp
118hts
Check
floor
temperature
warning
lamp
I
Open
or
short
circuit
in
wiring
harness
2
Check
fuel
system
with
regard
to
the
following
items
Refer
to
Inspec
tion
of
Fuel
System
I
Floa
t
level
2
Choke
3
Normal
fuel
supply
system
Prima
ry
and
secondary
4
Accelerator
pump
5
Power
valve
6
B
C
D
D
7
Fuel
strainer
8
Air
cleaner
3
Check
ignition
system
with
regard
to
the
following
items
Refer
to
Inspection
of
Ignition
System
I
IgnItion
AMI
2
Distributor
3
Ignition
coil
4
High
tension
code
5
Spark
plug
4
Check
idle
CO
adjustment
Refer
to
Inspection
of
Idle
CO
Adjust
roeoC
Note
Even
if
there
is
nothing
wrong
with
engine
warning
lamp
may
come
on
if
vehicle
is
being
driven
on
a
steep
slope
continuously
in
lower
gears
at
high
engine
speeds
To
floor
temperature
warning
lamp
2
From
S
position
3
From
GOt
position
4
From
ignition
switch
5
To
floor
temperature
sensing
switch
EC343
Fig
ET
50
Checking
floor
temperature
relay
Page 88 of 537
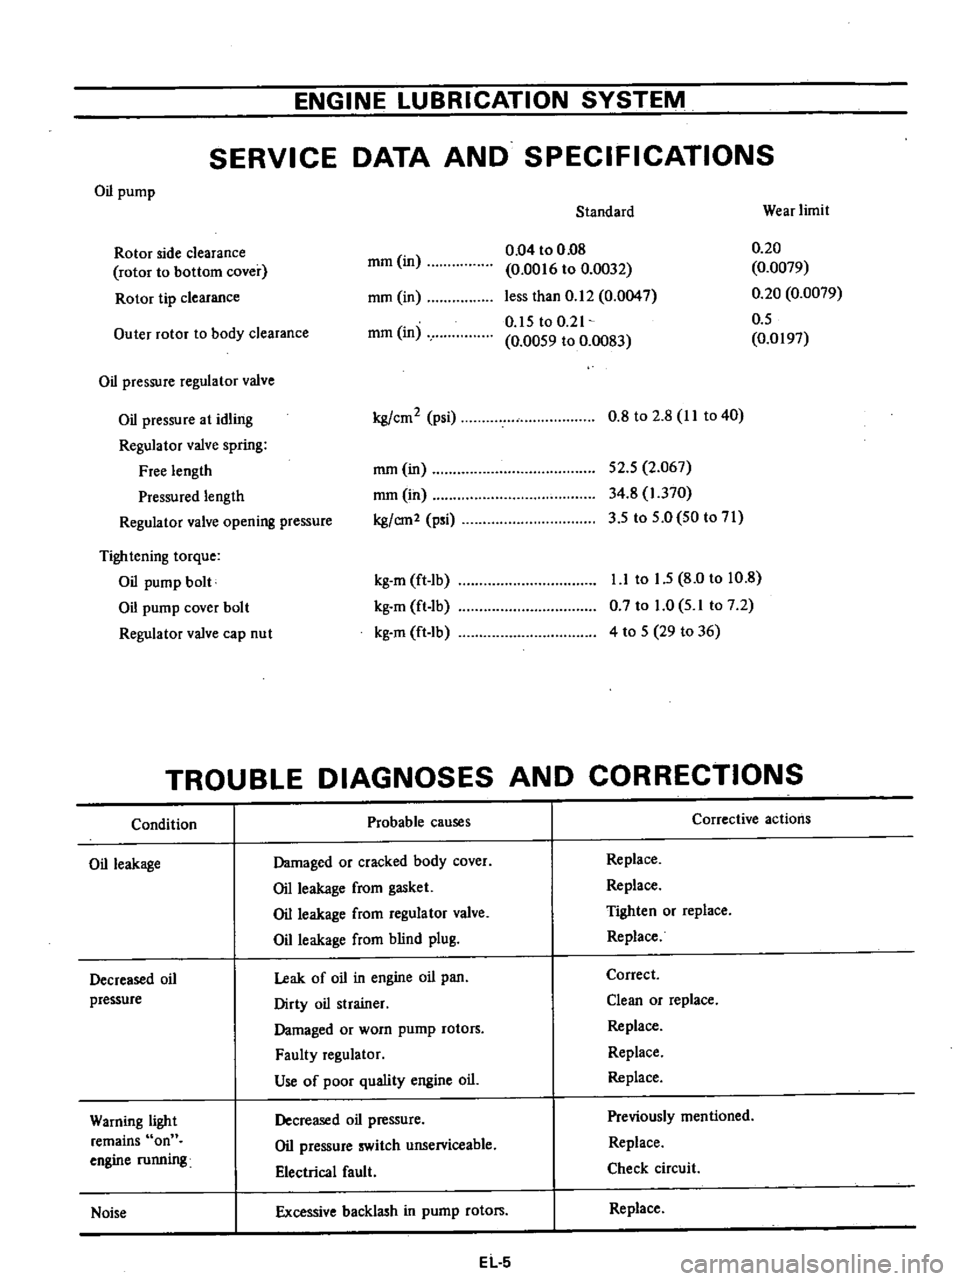
ENGINE
LUBRICATION
SYSTEM
SERVICE
DATA
AND
SPECIFICATIONS
Oil
pump
Standard
Wear
limit
mm
in
0
04
to
0
08
0
0016
to
0
0032
less
than
0
12
0
0047
0
15
toO
21
0
0059
to
0
0083
0
20
0
0079
0
20
0
0079
0
5
0
0197
Rotor
side
clearance
rotor
to
bottom
cover
Rotor
tip
clearance
mm
in
Outer
rotor
to
body
clearance
mm
in
Oil
pressure
regulator
valve
Oil
pressure
at
idling
Regulator
valve
spring
Free
length
Pressured
length
Regulator
valve
opening
pressure
kg
cm2
psi
0
8
to
2
8
II
to
40
mm
in
mmOn
kg
em2
psi
52
5
2
067
34
8
1
370
3
5
to
5
0
50
to
71
Tightening
torque
Oil
pump
bolt
Oil
pump
cover
bolt
Regulator
valve
cap
nut
kg
m
ft
lb
kg
m
ft
lb
kg
m
ft
Ib
1
1
to
1
5
8
0
to
10
8
0
7
to
1
0
5
1
to
7
2
4
to
5
29
to
36
TROUBLE
DIAGNOSES
AND
CORRECTIONS
Condition
Probable
causes
Corrective
actions
Oil
leakage
Damaged
or
cracked
body
cover
Oil
leakage
from
gasket
Oil
leakage
from
regulator
valve
Oil
leakage
from
blind
plug
Replace
Replace
Tighten
or
replace
Replace
Decreased
oil
pressure
Leak
of
oil
in
engine
oil
pan
Dirty
oil
strainer
Damaged
or
worn
pump
rotors
Faulty
regulator
Use
of
poor
quality
engine
oiL
Correct
Clean
or
replace
Replace
Replace
Replace
Warning
light
remains
on
engine
running
Decreased
oil
pressure
Oil
pressure
switch
unserviceable
Electrical
fault
Previously
mentioned
Replace
Check
circuit
Noise
Excessive
backlash
in
pump
rotors
Replace
EL
5
Page 136 of 537
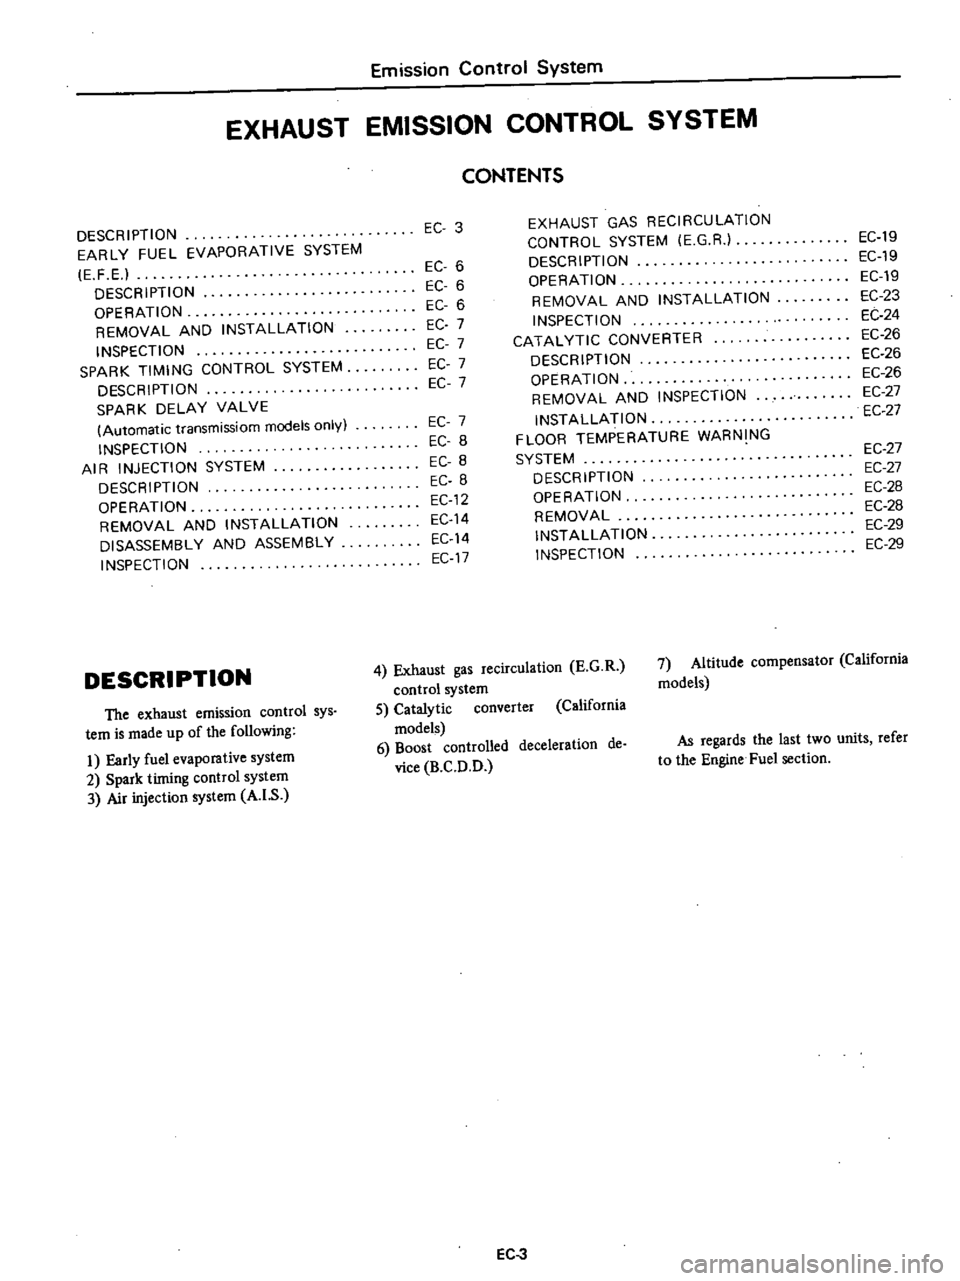
Emission
Control
System
EXHAUST
EMISSION
CONTROL
SYSTEM
DESCRIPTION
EARLY
FUEL
EVAPORATIVE
SYSTEM
E
F
E
DESCRIPTION
OPERATION
REMOVAL
AND
INSTALLATION
INSPECTION
SPARK
TIMING
CONTROL
SYSTEM
DESCRIPTION
SPARK
DELAY
VALVE
Automatic
transmissiom
models
only
INSPECTION
AIR
INJECTION
SYSTEM
DESCRIPTION
OPERATION
REMOVAL
AND
INSTALLATION
DISASSEMBLY
AND
ASSEMBLY
INSPECTION
DESCRIPTION
The
exhaust
emission
control
sys
tem
is
made
up
of
the
following
I
Early
fuel
evaporative
system
2
Spark
timing
control
system
3
Air
injection
system
A
I
S
EC
3
EC
6
EC
6
EC
6
EC
7
EC
7
EC
7
EC
7
EC
7
EC
8
EC
8
EC
8
EC12
EC
14
EC
14
EC
17
CONTENTS
EXHAUST
GAS
RECIRCULATION
CONTROL
SYSTEM
E
G
R
DESCRIPTION
OPERATION
REMOVAL
AND
INSTALLATION
INSPECTION
CATALYTIC
CONVERTER
DESCRIPTION
OPERATION
REMOVAL
AND
INSPECTION
INSTALLATION
FLOOR
TEMPERATURE
WARNING
SYSTEM
DESCRIPTION
OPERATION
REMOVAL
INSTALLATION
INSPECTION
EC
19
EC
19
EC
19
EC
23
EC
24
EC
26
EC
26
EC
26
EC
27
EC
27
EC
27
EC
27
EC
28
EC
28
EC
29
EC
29
7
Altitude
compensator
California
models
4
Exhaust
gas
recirculation
E
G
R
control
system
5
Catalytic
converter
California
models
6
Boost
controlled
deceleration
de
vice
B
C
D
D
As
regards
the
last
two
units
refer
to
the
Engine
Fuel
section
EC
3
Page 155 of 537
j
EC231
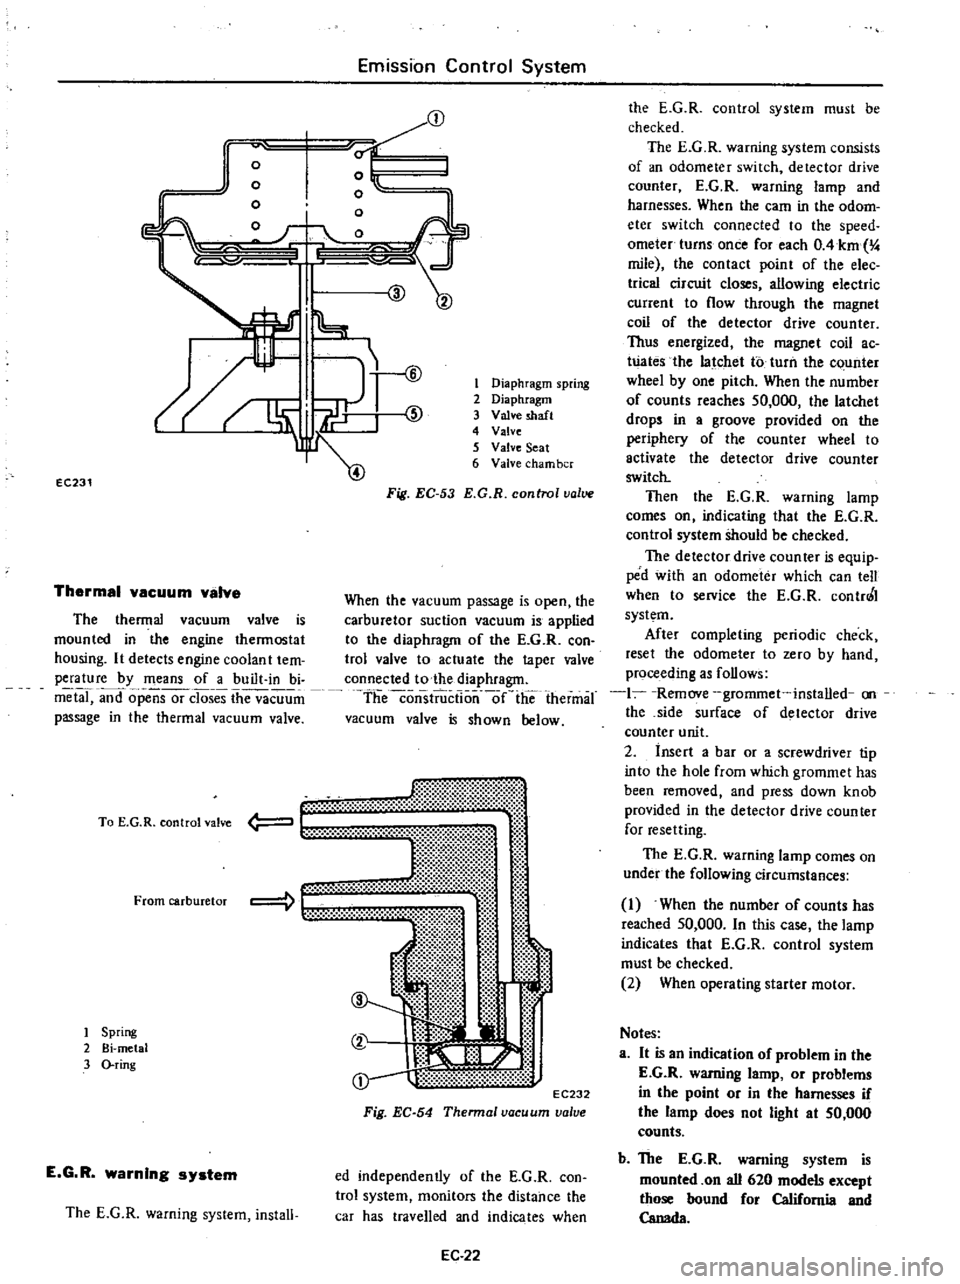
Thermal
vacuum
valva
o
o
m
Emission
Control
System
0
o
o
o
l
l
@
The
thermal
vacuum
valve
is
mounted
in
the
engine
thermostat
housing
It
detects
engine
coolan
t
tem
perature
by
means
of
a
built
in
bi
metal
and
opensor
closes
the
vacuum
passage
in
the
thermal
vacuum
valve
mt
li
t
00
t
EC232
Fig
EC
54
Thennal
vacuum
valve
To
E
G
R
control
valve
From
carburetor
1
Spring
2
Bi
metal
3
O
ring
E
G
R
warning
system
The
E
G
R
warning
system
install
1
Diaphragm
spring
2
Diaphragm
3
Valve
shaft
4
Valve
5
Valve
Seat
6
Valve
cham
ber
Fig
EC
53
E
G
R
control
value
When
the
vacuum
passage
is
open
the
carburetor
suction
vacuum
is
applied
to
the
diaphragm
of
the
E
G
R
con
trol
valve
to
actuate
the
taper
valve
connected
to
the
diaphragm
theconsiiiictlo
nlie
thermal
vacuum
valve
is
shown
below
ed
independently
of
the
E
G
R
con
trol
system
monitors
the
distance
the
car
has
travelled
and
indicates
when
EC
22
the
E
G
R
control
system
must
be
checked
The
E
G
R
warning
system
consists
of
an
odometer
switch
detector
drive
counter
E
G
R
warning
lamp
and
harnesses
When
the
earn
in
the
odom
eter
switch
connected
to
the
speed
ometer
turns
once
for
each
OAkm
4
mile
the
contact
point
of
the
elec
trica
circuit
closes
allowing
electric
current
to
flow
through
the
magnet
coil
of
the
detector
drive
counter
Thus
energized
the
magnet
coil
ac
Wates
the
latchet
to
turn
the
c
unter
wheel
by
one
pitch
When
the
number
of
counts
reaches
50
000
the
latchet
drops
in
a
groove
provided
on
the
periphery
of
the
counter
wheel
to
activate
the
detector
drive
counter
switch
Then
the
E
G
R
warning
lamp
comes
on
indicating
that
the
E
G
R
control
system
Should
be
checked
The
detector
drive
coun
teT
is
equip
ped
with
an
odometer
which
can
tell
when
to
service
the
E
G
R
contr0
I
system
After
completing
periodic
check
reset
the
odometer
to
zero
by
hand
proceeding
as
follows
1
Remove
grommet
installed
on
the
side
surface
of
detector
drive
counter
unit
2
insert
a
bar
or
a
screwdriver
tip
into
the
hole
from
which
grommet
has
been
removed
and
press
down
knob
provided
in
the
detector
drive
counter
for
resetting
The
E
G
R
warning
lamp
comes
on
under
the
following
circumstances
1
When
the
number
of
counts
has
reached
50
000
In
this
case
the
lamp
indicates
that
E
G
R
control
system
must
be
checked
2
When
operating
starter
motor
Notes
a
It
is
an
indication
of
problem
in
the
E
G
R
warning
lamp
or
problems
in
the
point
or
in
the
harnesses
if
the
lamp
does
not
light
at
50
000
counts
b
The
E
G
R
warning
system
is
mounted
on
all
620
models
except
those
bound
for
California
and
Canada
Page 156 of 537
1
1
I
I
I
1
v
v
I
I
I
I
I
I
I
I
I
I
I
I
I
I
I
I
I
I
I
I
I
L
0
I
Magnet
coil
Detector
drive
counter
REMOVAL
AND
INSTALLATION
Remove
air
cleaner
before
removing
E
G
R
control
system
For
removal
and
installation
of
air
cleaner
refer
to
Air
Cleaner
section
Page
EF
S
Removal
I
E
G
R
control
valve
After
removing
the
following
parts
the
E
G
R
controi
valve
can
be
dis
mounted
Vacuum
hose
thermal
vacuum
valve
to
E
G
R
control
valve
E
G
R
control
valve
mounting
nut
Note
To
remove
vacuum
hose
flat
ten
clip
connecting
vacuum
hose
to
E
G
R
control
valve
and
pull
the
hose
off
with
hand
Emission
Control
System
Ignition
switch
E
G
R
warning
lamp
f
1
Ignition
switch
start
position
Fuse
1
A
Odometer
switch
r
I
I
I
I
v
I
I
I
i
lQ
U
1
mi
L
J
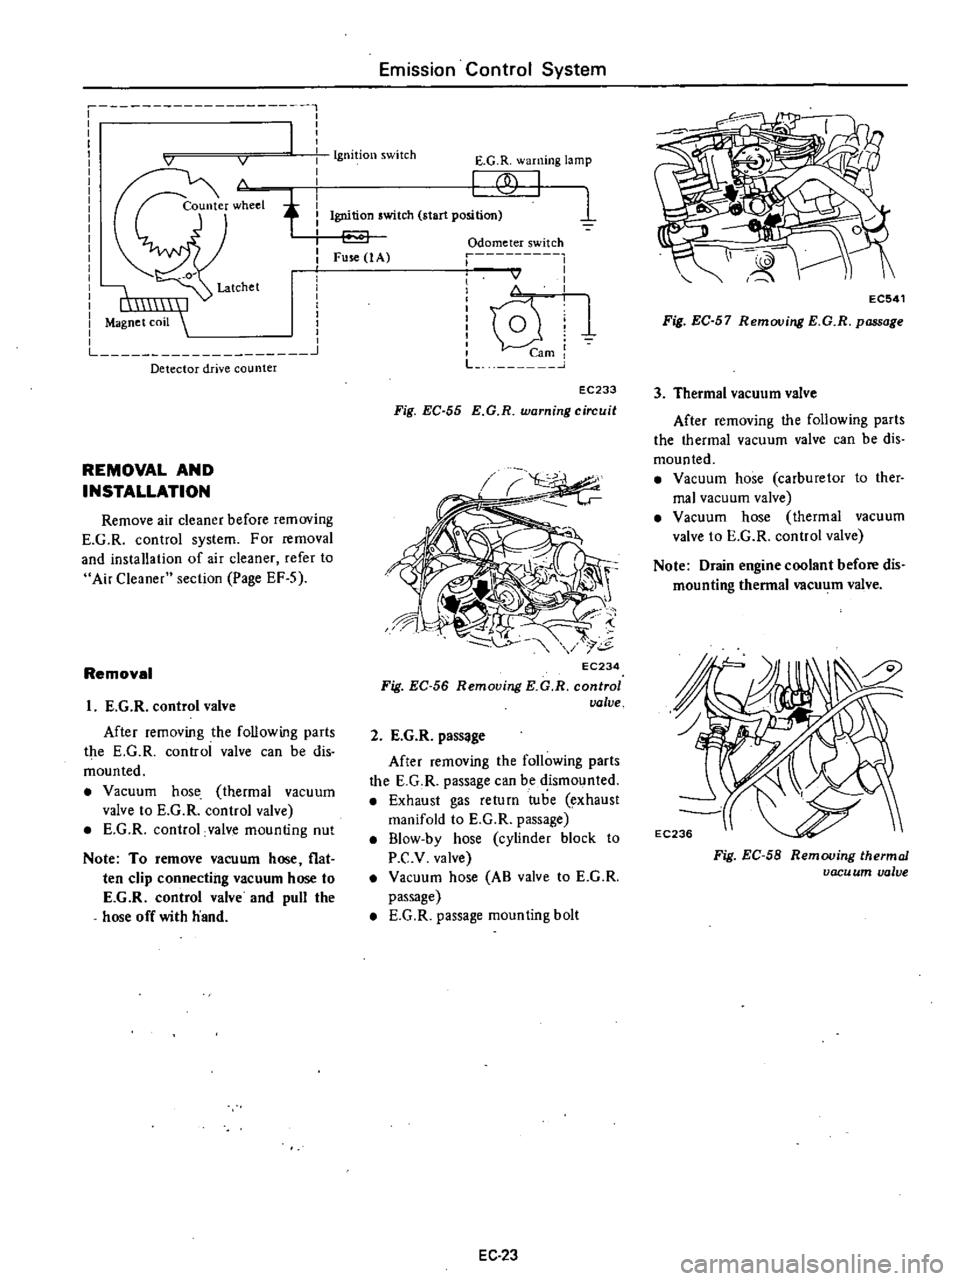
EC233
Fig
EC
55
E
G
R
warning
circuit
EC234
Fig
EC
56
Removing
KG
R
control
valve
2
E
G
R
pass
ge
After
removing
the
following
parts
the
E
G
R
passage
can
be
dismounted
Exhaust
gas
return
tube
exhaust
manifold
to
E
G
R
passage
B1ow
by
hose
cylinder
block
to
P
C
v
valve
Vacuum
hose
AB
valve
to
E
G
R
passage
E
G
R
passage
mounting
bolt
EC
23
EC541
Fig
EC
57
Removing
E
G
R
passage
3
Thermal
vacuum
valve
After
removing
the
following
parts
the
thermal
vacuum
valve
can
be
dis
mounted
Vacuum
hose
carburetor
to
ther
mal
vacuum
valve
Vacuum
hose
thermal
vacuum
valve
to
E
G
R
control
valve
Note
Drain
engine
coolant
before
dis
mounting
thermal
vacu
m
valve
Fig
EC
58
Removing
thermal
vacu
um
valve