DODGE CHALLENGER 2015 3.G User Guide
Manufacturer: DODGE, Model Year: 2015, Model line: CHALLENGER, Model: DODGE CHALLENGER 2015 3.GPages: 220, PDF Size: 30.96 MB
Page 141 of 220
SRT PERFORMANCE FEATURES
Driver Information Display (DID)
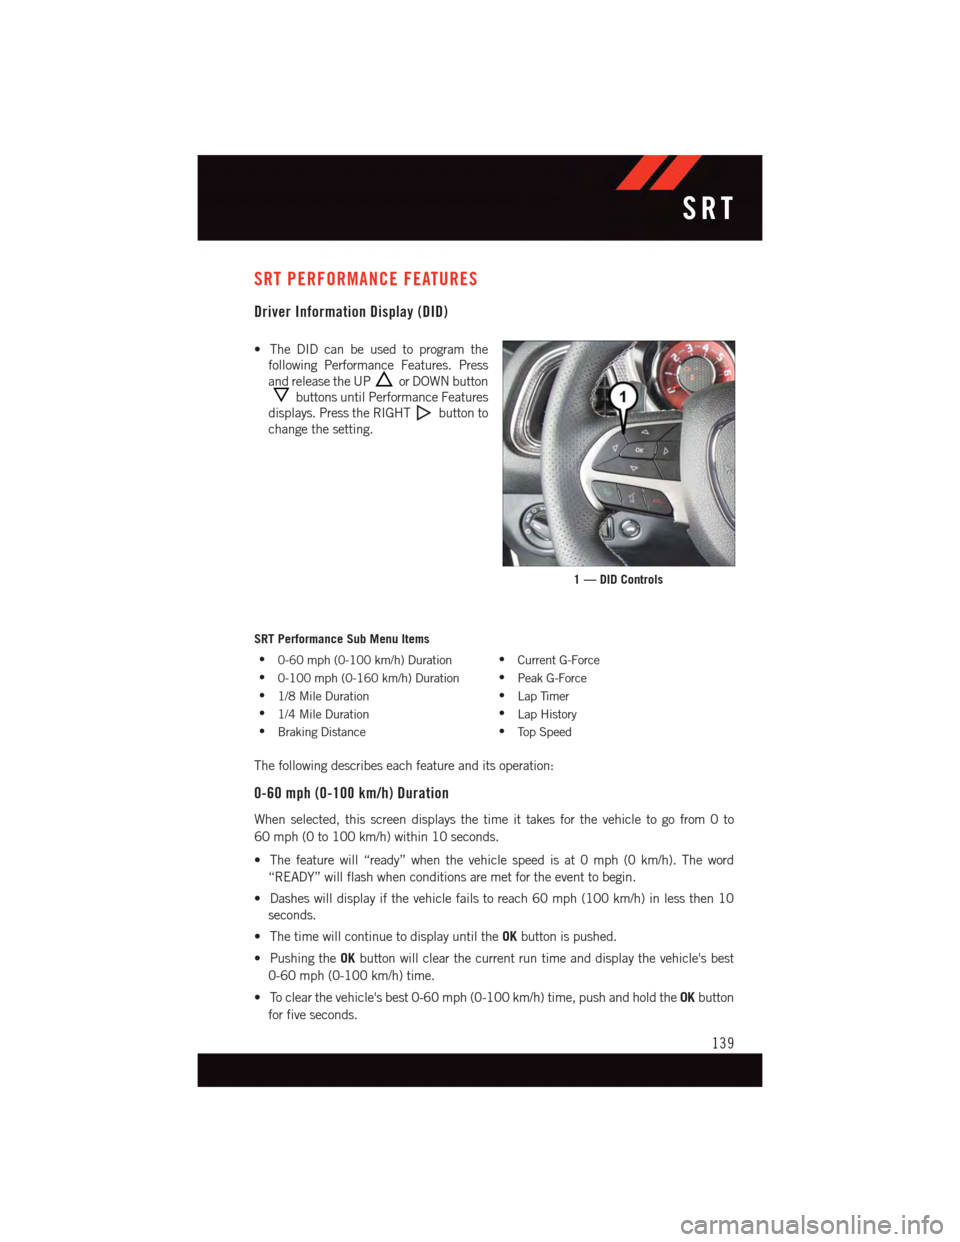
•TheDIDcanbeusedtoprogramthe
following Performance Features. Press
and release the UPor DOWN button
buttons until Performance Features
displays. Press the RIGHTbutton to
change the setting.
SRT Performance Sub Menu Items
•0-60 mph (0-100 km/h) Duration•Current G-Force
•0-100 mph (0-160 km/h) Duration•Peak G-Force
•1/8 Mile Duration•Lap Timer
•1/4 Mile Duration•Lap History
•Braking Distance•To p S p e e d
The following describes each feature and its operation:
0-60 mph (0-100 km/h) Duration
When selected, this screen displays the time it takes for the vehicle to go from 0 to
60 mph (0 to 100 km/h) within 10 seconds.
•Thefeaturewill“ready”whenthevehiclespeedisat0mph(0km/h).Theword
“READY” will flash when conditions are met for the event to begin.
•Dasheswilldisplayifthevehiclefailstoreach60mph(100km/h)inlessthen10
seconds.
•ThetimewillcontinuetodisplayuntiltheOKbutton is pushed.
•PushingtheOKbutton will clear the current run time and display the vehicle's best
0-60 mph (0-100 km/h) time.
•Toclearthevehicle'sbest0-60mph(0-100km/h)time,pushandholdtheOKbutton
for five seconds.
1 — DID Controls
SRT
139
Page 142 of 220
0-100 mph (0-160 km/h) Duration
When selected, this screen displays the time it takes for the vehicle to go from 0 to
100 mph (0 to 161 km/h) within 10 seconds.
•Thefeaturewill“ready”whenthevehiclespeedisat0mph(0km/h).Theword
“READY” will flash when conditions are met for the event to begin.
•Dasheswilldisplayifthevehiclefailstoreach0to100mph(0to161km/h)inless
then 10 seconds.
•ThetimewillcontinuetodisplayuntiltheOKbutton is pushed.
•PushingtheOKbutton will clear the current run time and display the vehicle's best 0
to 100 mph (0 to 161 km/h) time.
•Toclearthevehicle'sbest0to100mph(0to161km/h)time,pushandholdtheOK
button for five seconds.
1/8 Mile Duration
When selected, this screen displays the time it takes the vehicle to travel 1/8 mile within
30 seconds and the vehicle's speed when it reaches 1/8 mile.
•Thefeaturewill“ready”whenthevehicleisat0mph(0km/h).Theword“READY”will
flash when conditions are met for the event to begin.
•Dasheswilldisplayifthevehiclefailstoreach1/8mileinlessthen30seconds.
•ThetimeandspeedwillcontinuetodisplayuntiltheOKbutton is pushed.
•PushingtheOKbutton will clear the current run and display the vehicle's best 1/8 mile
run.
•Toclearthevehicle'sbest1/8milerun,pushandholdtheOKbutton for five seconds.
1/4 Mile Duration
When selected, this screen displays the time it takes the vehicle to travel 1/4 mile within
30 seconds and the vehicle's speed when it reaches 1/4 mile.
•Thefeaturewill“ready”whenthevehicleisat0mph(0km/h).Theword“READY”will
flash when conditions are met for the event to begin.
•Dasheswilldisplayifthevehiclefailstoreach1/4mileinlessthen30seconds.
•ThetimeandspeedwillcontinuetodisplayuntiltheOKbutton is pushed.
•PushingtheOKbutton will clear the current run and display the vehicle's best 1/4 mile
run.
•Toclearthevehicle'sbest1/4milerun,pushandholdtheOKbutton for five seconds.
Braking Distance
When selected, this screen displays the vehicle's braking distance and the speed at which
the brake pedal was depressed.
•Thisfeaturewillonlyfunctionwhenapplyingthebrakesatspeedsabove30mph
(48 km/h).
SRT
140
Page 143 of 220
•Engagingtheparkingbrakewilldisablethisfeature.
•Theword“READY”willdisplaywhenconditionsaremetfortheeventtobegin.
•Thedistanceandspeedmeasurementsdisplaywhiletheeventistakingplace.
•Thedistancemeasurementwillbeabortedifthebrakepedalisreleasedbeforethe
vehicle comes to a complete stop.
•ThedistanceandspeedmeasurementswillcontinuetodisplayuntiltheOKbutton is
pushed.
•PushingtheOKbutton will clear the current run and prepare the cluster to record a new
run.
Current G-Force
•Whenselected,thisscreendisplaysthecurrentG-Force(lateralandlongitudinal)along
with a friction circle that displays the directions of the forces.
Peak G-Force
When selected, this screen displays all four G-Force values (two lateral and two longitu-
dinal).
•Whenaforcegreaterthanzeroismeasured,thedisplaywillupdatethevalueasit
climbs. As the G-Force falls, the peak forces will continue to display.
•PushingtheOKbutton will clear the peak force values.
Lap Timer
When selected the Lap Timer page will show the timer always at 0:00.00 with the previous
Best and Last time data (unless the driver has cleared it via hold to Reset).
•PushingOKwillstart“current”timerfrom0:00.0.
•WhenOKispushedthetimesareupdatedaccordingly.
•AssoonasthedriverexitstheLapTimerpagesthe“current”timerwillstopandthe
time will be reset to 0:00.00.
•IfthedriverstaysontheLapTimerpagesthe“current”timerwillresetto0:00.0when
ignition is placed in the off position, or ignition placed in the ON position (or will roll
over at 59:59.99 if ever possible).
•EachtimethedriverpushesOKforaLapthatcurrenttimepopulatestheLasttimeand
also populates the 1st (top) space on the Timer History page the current time resets to
0:00.0 at every push of the OK button.
•Thetimerwillstopwhenthedrivernavigatesawayfromthispage.
Lap History
When selected, this screen displays the Lap History, and will color highlight the time that
is the best time from the Timer Page.
•EachtimethedriverpressestheOKbutton(whileontheLapTimerpage)thecurrent
Lap Time populates the 1st spot and the rest of the data shifts down.
SRT
141
Page 144 of 220
•ColorwillindicatethetimethatisthebesttimefromtheTimerPage.
•HoldingtheOKbuttononlyresetsthepageyouareon.
•LapHistorypageisastaticdisplayoflaptimesonly.
Top Speed
When selected, this screen displays the To Speed during a drive cycle:
•Populatesatopspeedfromfirstdrivecycleandeverytimethatspeedisexceededthat
number is stored here unless/until the driver resets the screen.
•Latchingoverignitioncycles.
•Unitswillchangewiththeglobalchangeinunits.
WARNING!
Measurement of vehicle statistics with the Performance Features is intended for
off-highway or off-road use only and should not be done on any public roadways. It is
recommended that these features be used in a controlled environment and within the
limits of the law. The capabilities of the vehicle as measured by the performance pages
must never be exploited in a reckless or dangerous manner, which can jeopardize the
user’s safety or the safety of others. Only a safe, attentive, and skillful driver can prevent
accidents.
Uconnect® SRT PERFORMANCE PAGES
•ToaccesstheSRTPerformancePages,pressthe“SRT&Apps”buttononthe
touchscreen then press the “SRT Performance” button on the touchscreen. Press the
feature button on the touchscreen to select that feature.
•ThePerformancePagesincludesthefollowingmenus:
•Home•Gauges 2
•Ti m e r s•G–Force
•Gauges 1•Engine
Home
When Home is selected, the following options will be available:
•Aseriesofsiximageswhichcanbeselectedbytheuser.
•Aleftandrightarrowtoallowtheusertoscrollthroughvehicleimages.
•Ashort-cuttotheSRTDriveModesfeature.
SRT
142
Page 145 of 220
Timers
When the Timers Page is selected you will be able to select from following “Tickets”:
Current
•Pressingthe“Current”buttondisplaysa“realtime”summaryofperformancetimers.
Last
•Pressingthe“Last”buttondisplaysthelastrecordedrunofperformancetimers.
Best
•Pressingthe“Best”buttondisplaysthebestrecordedrunofperformancetimers,
except for braking data.
Save
•Pressingthe“Save”buttonwillletyousavethelastrun.Anysavedrunover10,will
overwrite the last saved run for Uconnect®System storage.
Gauges 1
When selected, this screen displays the following values for the 6.2L:
•CoolantTemperature
•OilPressure
•OilTemperature
•BatteryVoltage
•TransOilTemp
When selected, this screen displays the following values for the 6.4L:
•CoolantTemperature
•OilTemperature
•OilPressure
Gauges 2
When selected, this screen displays the following values for the 6.2L:
•BoostPressure
•AirFuelRatio
•Inter-Cooler(I/C)CoolantTemperature
•IntakeAirTemperature
When selected, this screen displays the following values for the 6.4L:
•BatteryVoltage
•IntakeAirTemperature
•TransmissionTemperature
SRT
143
Page 146 of 220
G-Force
When selected, this screen displays the following values:
•LateralG-ForceLeftandRight
•LongitudinalG-ForceForeandAft
•PeakG-ForcesForeAft,LeftandRight
•VehicleSpeed
•SteeringWheelAngle
Engine
When selected, this screen displays the following values:
•VehicleSpeed
•InstantaneousHorsepower/Kilowatts
•InstantaneousTorque
•OilPressure(6.4LOnly)
•Gear
•BoostPressure(6.2LOnly)
SUMMER/THREE-SEASON TIRES
•Thisvehiclemaybeequippedwithwheelsandtirestoenhancetractioninbothwetand
dry conditions.
•Summertiresarenotintendedtobedriveninsnoworonice.
•Summertireshavesignificantlyreducedgripintemperaturesbelow50°F(10°C)
•Usesummertiresonlyinsetsoffour.
NOTE:
Summer tires will not contain the all season designation or mountain/snowflake symbol on
the sidewall of the tire.
WARNING!
Do not use summer tires in snow/ice conditions. You could lose control, resulting in
severe injury or death. Driving too fast for conditions also creates the possibility of loss
of vehicle control.
SRT
144
Page 147 of 220

ROADSIDE ASSISTANCE
Dial toll-free 1-800-521-2779 for U.S. Residents or 1-800-363-4869 for Canadian
Residents.
•Provideyourname,vehicleidentificationnumber,licenseplatenumber,andyour
location, including the telephone number from which you are calling.
•Brieflydescribethenatureoftheproblemandanswerafewsimplequestions.
•Youwillbegiventhenameoftheserviceproviderandanestimatedtimeofarrival.If
you feel you are in an “unsafe situation”, please let us know. With your consent, we will
contact local police or safety authorities.
INSTRUMENT CLUSTER WARNING LIGHTS
-LowFuelWarningLight
This warning light indicates when the fuel level reaches approximately 2.0 gal (7.8 L), this
light will turn on and a single chime will sound.
-ElectronicStabilityControl(ESC)Activation/MalfunctionIndicatorLight
The “ESC Activation/Malfunction Indicator Light” in the instrument cluster will come on
when the ignition switch is turned to the ON/RUN position. It should go out with the
engine running. If the “ESC Activation/Malfunction Indicator Light” comes on continu-
ously with the engine running, a malfunction has been detected in the ESC system.
If this light remains on after several ignition cycles, and the vehicle has been driven
several miles (kilometers) at speeds greater than 30 mph (48 km/h), we recommend you
drive to the nearest service center and have the vehicle serviced immediately.
-TirePressureMonitoringSystem(TPMS)Light
Each tire, including the spare (if provided), should be checked monthly when cold and
inflated to the inflation pressure recommended by the vehicle manufacturer on the
vehicle placard or tire inflation pressure label. (If your vehicle has tires of a different size
than the size indicated on the vehicle placard or tire inflation pressure label, you should
determine the proper tire inflation pressure for those tires.)
As an added safety feature, your vehicle has been equipped with a tire pressure
monitoring system (TPMS) that illuminates a low tire pressure telltale when one or more
of your tires is significantly under-inflated. Accordingly, when the low tire pressure telltale
illuminates, you should stop and check your tires as soon as possible, and inflate them to
the proper pressure. Driving on a significantly under-inflated tire causes the tire to
overheat and can lead to tire failure. Under-inflation also reduces fuel efficiency and tire
tread life, and may affect the vehicle’s handling and stopping ability.
WHAT TO DO IN EMERGENCIES
145
Page 148 of 220
IF THE LIGHT STARTS FLASHING INDICATING A LOW TIRE PRESSURE, ADJUST THE AIR
PRESSURE IN THE LOW TIRE TO THE AIR PRESSURE SHOWN ON THE VEHICLE PLACARD OR
TIRE INFLATION PRESSURE LABEL LOCATED ON THE DRIVER'S DOOR.
NOTE:
AFTER INFLATION, THE VEHICLE MAY NEED TO BE DRIVEN FOR 20 MINUTES
BEFORE THE FLASHING LIGHT WILL TURN OFF.
Please note that the TPMS is not a substitute for proper tire maintenance, and it is the
driver’s responsibility to maintain correct tire pressure, even if under-inflation has not
reached the level to trigger illumination of the TPMS low tire pressure telltale.
Yo u r v e h i c l e h a s a l s o b e e n e q u i p p e d w i t h a T P M S m a l f u n c t i o n i n d i c a t o r t o i n d i c a t e w h e n
the system is not operating properly. The TPMS malfunction indicator is combined with
the low tire pressure telltale.
When the system detects a malfunction, the telltale will flash for approximately one
minute and then remain continuously illuminated. This sequence will continue upon
subsequent vehicle start-ups as long as the malfunction exists. When the malfunction
indicator is illuminated, the system may not be able to detect or signal low tire pressure
as intended. TPMS malfunctions may occur for a variety of reasons, including the
installation of replacement or alternate tires or wheels on the vehicle that prevent the
TPMS from functioning properly. Always check the TPMS malfunction telltale after
replacing one or more tires or wheels on your vehicle to ensure that the replacement or
alternate tires and wheels allow the TPMS to continue to function properly.
NOTE:
Ti r e p r e s s u r e s c h a n g e b y a p p r o x i m a t e l y 1 p s i ( 7 k P a ) p e r 1 2 ° F ( 7 ° C ) o f a i r t e m p e r a t u r e
change. Keep this in mind when checking tire pressure inside a garage, especially in the
Winter. Example: If garage temperature is 68°F (20°C) and the outside temperature is
32°F (0°C), then the cold tire inflation pressure should be increased by 3 psi (21 kPa),
which equals 1 psi (7 kPa) for every 12°F (7°C) for this outside temperature condition.
CAUTION!
The TPMS has been optimized for the original equipment tires and wheels. TPMS
pressures and warning have been established for the tire size equipped on your vehicle.
Undesirable system operation or sensor damage may result when using replacement
equipment that is not of the same size, type, and/or style. Aftermarket wheels can
cause sensor damage. Do not use tire sealant from a can, or balance beads if your
vehicle is equipped with a TPMS, as damage to the sensors may result.
WHAT TO DO IN EMERGENCIES
146
Page 149 of 220
-EngineTemperatureWarningLight
This light warns of an overheated engine condition.
If the light turns on or flashes continuously while driving, safely pull over and stop the vehicle.
If the A/C system is on, turn it off. Also, shift the transmission into NEUTRAL and idle the
vehicle. If the temperature reading does not return to normal, turn the engine off immediately.
We recommend that you do not operate the vehicle or engine damage will occur. Have the
vehicle serviced immediately.
WARNING!
Ahotenginecoolingsystemisdangerous.Youorotherscouldbebadlyburnedby
steam or boiling coolant.
-BrakeWarningLight
The Brake Warning light illuminates when there is either a system malfunction or the
parking brake is applied. If the light is on and the parking brake is not applied, it indicates
apossiblebrakehydraulicmalfunction,brakeboosterproblemoranAnti-LockBrake
System problem.
Please have your vehicle serviced immediately.
WARNING!
Driving a vehicle with the red brake light on is dangerous. Part of the brake system may
have failed. It will take longer to stop the vehicle. You could have a collision. Have the
vehicle checked immediately.
-MalfunctionIndicatorLight(MIL)
Certain conditions, such as a loose or missing gas cap, poor fuel quality, etc., may
illuminate the MIL after engine start. The vehicle should be serviced if the light stays on
through several typical driving cycles. In most situations, the vehicle will drive normally
and not require towing.
If the MIL flashes when the engine is running, serious conditions may exist that could lead
to immediate loss of power or severe catalytic converter damage. We recommend you do
not operate the vehicle. Have the vehicle serviced immediately.
-ElectronicStabilityControl(ESC)OFFIndicatorLight
This light indicates the Electronic Stability Control (ESC) is off.
-ChargingSystemLight
This light shows the status of the electrical charging system. If the charging system light
remains on, it means that the vehicle is experiencing a problem with the charging system.
WHAT TO DO IN EMERGENCIES
147
Page 150 of 220
We recommend you do not continue driving if the charging system light is on. Have the
vehicle serviced immediately.
-OilPressureWarningLight
This light indicates low engine oil pressure. If the light turns on while driving, stop the
vehicle and shut off the engine as soon as possible. A chime will sound when this light
turns on.
We recommend you do not operate the vehicle or engine damage will occur. Have the
vehicle serviced immediately.
-Anti-LockBrake(ABS)Light
This light monitors the Anti-Lock Brake System (ABS).
If the light is not on during starting, stays on, or turns on while driving, we recommend you
contact the nearest authorized dealer and have the vehicle serviced immediately.
-ElectronicThrottleControl(ETC)IndicatorLight
This light informs you of a problem with the system.
If a problem is detected, the light will come on while the engine is running. Cycle the
ignition when the vehicle has completely stopped and the shift lever is placed in the PARK
position; the light should turn off.
If the light remains lit with the engine running, your vehicle will usually be drivable;
however, see an authorized dealer immediately. If the light is flashing when the engine is
running, immediate service is required and you may experience reduced performance, an
elevated/rough idle or engine stall and your vehicle may require towing.
-SeatBeltReminderLight
When the ignition switch is first turned to the ON/RUN position, this light will turn on for
four to eight seconds as a bulb check. During the bulb check, if the driver's seat belt is
unbuckled, a chime will sound. After the bulb check or when driving, if the driver or front
passenger seat belt remains unbuckled, the Seat Belt Indicator Light will flash or remain
on continuously. Refer to “Seat Belt Systems” in “Things To Know Before Starting” in the
OM on your DVD for further information.
-AirBagWarningLight
If the light is not on during starting, stays on, or turns on while driving, have the vehicle
serviced by an authorized dealer immediately.
-TransmissionTemperatureWarningLight
This light indicates that there is excessive transmission fluid temperature that might
occur with severe usage such as trailer towing. If this light turns on, stop the vehicle and
run the engine at idle, with the transmission in NEUTRAL, until the light turns off. Once
the light turns off, you may continue to drive normally.
WHAT TO DO IN EMERGENCIES
148