DODGE CHARGER 2015 7.G User Guide
Manufacturer: DODGE, Model Year: 2015, Model line: CHARGER, Model: DODGE CHARGER 2015 7.GPages: 236, PDF Size: 35.67 MB
Page 141 of 236
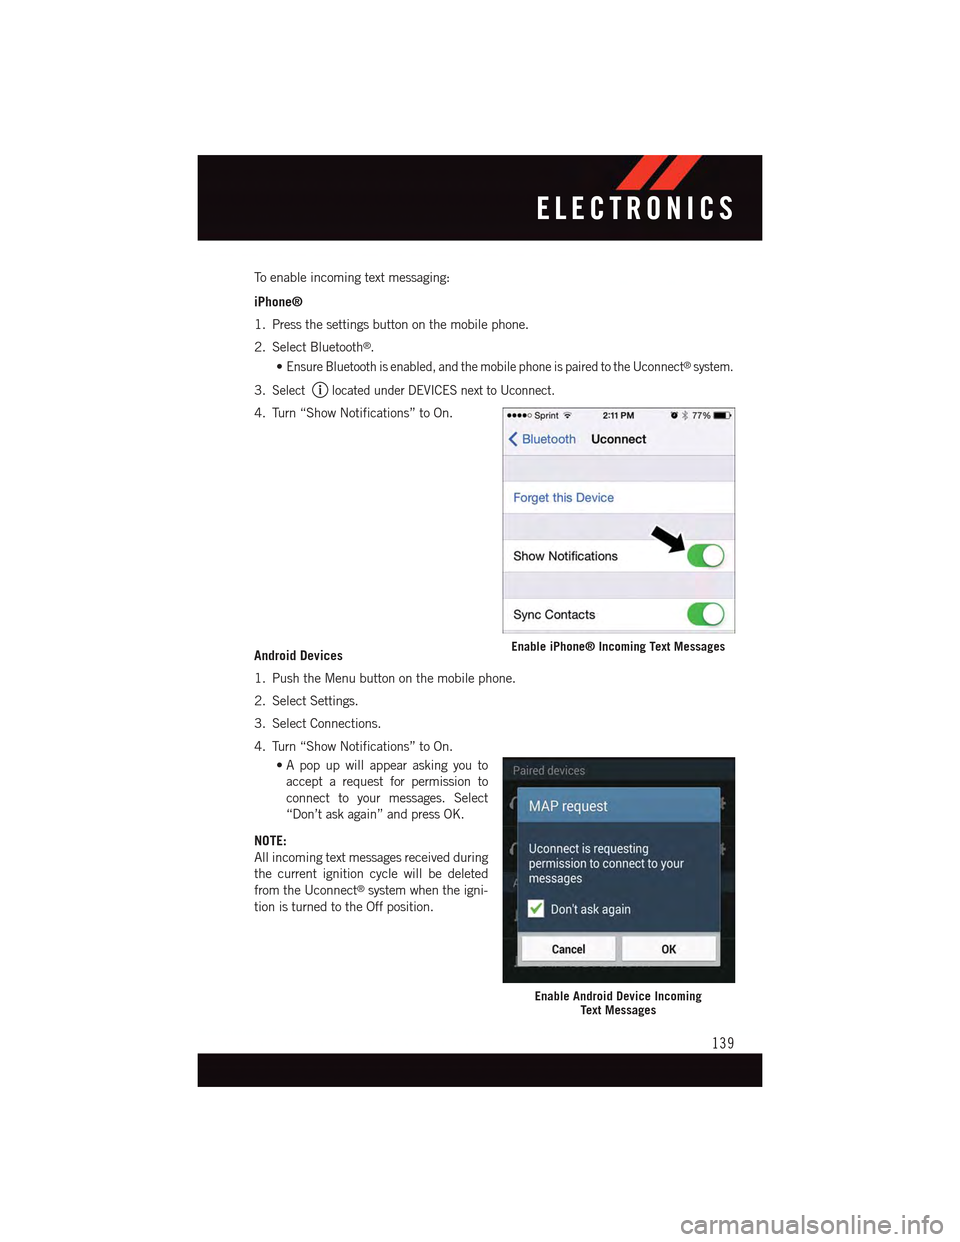
To e n a b l e i n c o m i n g t e x t m e s s a g i n g :
iPhone®
1. Press the settings button on the mobile phone.
2. Select Bluetooth®.
•Ensure Bluetooth is enabled, and the mobile phone is paired to the Uconnect®system.
3.Selectlocated under DEVICES next to Uconnect.
4. Turn “Show Notifications” to On.
Android Devices
1. Push the Menu button on the mobile phone.
2. Select Settings.
3. Select Connections.
4. Turn “Show Notifications” to On.
•A pop up will appear asking you to
accept a request for permission to
connect to your messages. Select
“Don’t ask again” and press OK.
NOTE:
All incoming text messages received during
the current ignition cycle will be deleted
from the Uconnect®system when the igni-
tion is turned to the Off position.
Enable iPhone® Incoming Text Messages
Enable Android Device IncomingText Messages
ELECTRONICS
139
Page 142 of 236
Voice Text Reply (Not Compatible With iPhone®)
NOTE:
Voice texting reply and voice texting features require a compatible mobile device enabled
with Bluetooth®Message Access Profile (MAP). iPhone®,andsomeothersmartphones,
may not entirely support Bluetooth®MAP. Visit UconnectPhone.com for the latest system
and device compatibility.
•Due to the extremely large number of mobile phone manufacturers, your mobile device may
not be listed. For further assistance, contact Uconnect Customer Care @ 1-877-855-8400
for U.S. residents or, 1-800-465-2001 (English) / 1-800-387-9983 (French) for Canadian
residents.
Once your Uconnect®system is paired with a compatible mobile device, the system can
announce a new incoming text message, and read it to your over the vehicle audio system.
Yo u c a n r e p l y t o t h e m e s s a g e u s i n g Vo i c e R e c o g n i t i o n b y s e l e c t i n g , o r s a y i n g , o n e o f t h e
18 pre-defined messages.
Here’s How:
1. Push the Uconnect®Phone buttonand wait for the beep, then say “reply.”
Uconnect®will give the following prompt: “Please say the message you would like to
send.”
2. Wait for the beep and say one of the pre-defined messages. (If you are not sure, you can
say “help”). Uconnect®will then read the pre-defined messages allowed.
3. As soon as you hear the message you would like to send, you can interrupt the list of
prompts by pushing the Uconnect®phone button and saying the phrase. Uconnect®
will confirm the message by reading it back to you.
4. Push the Phone button and say “Send.”
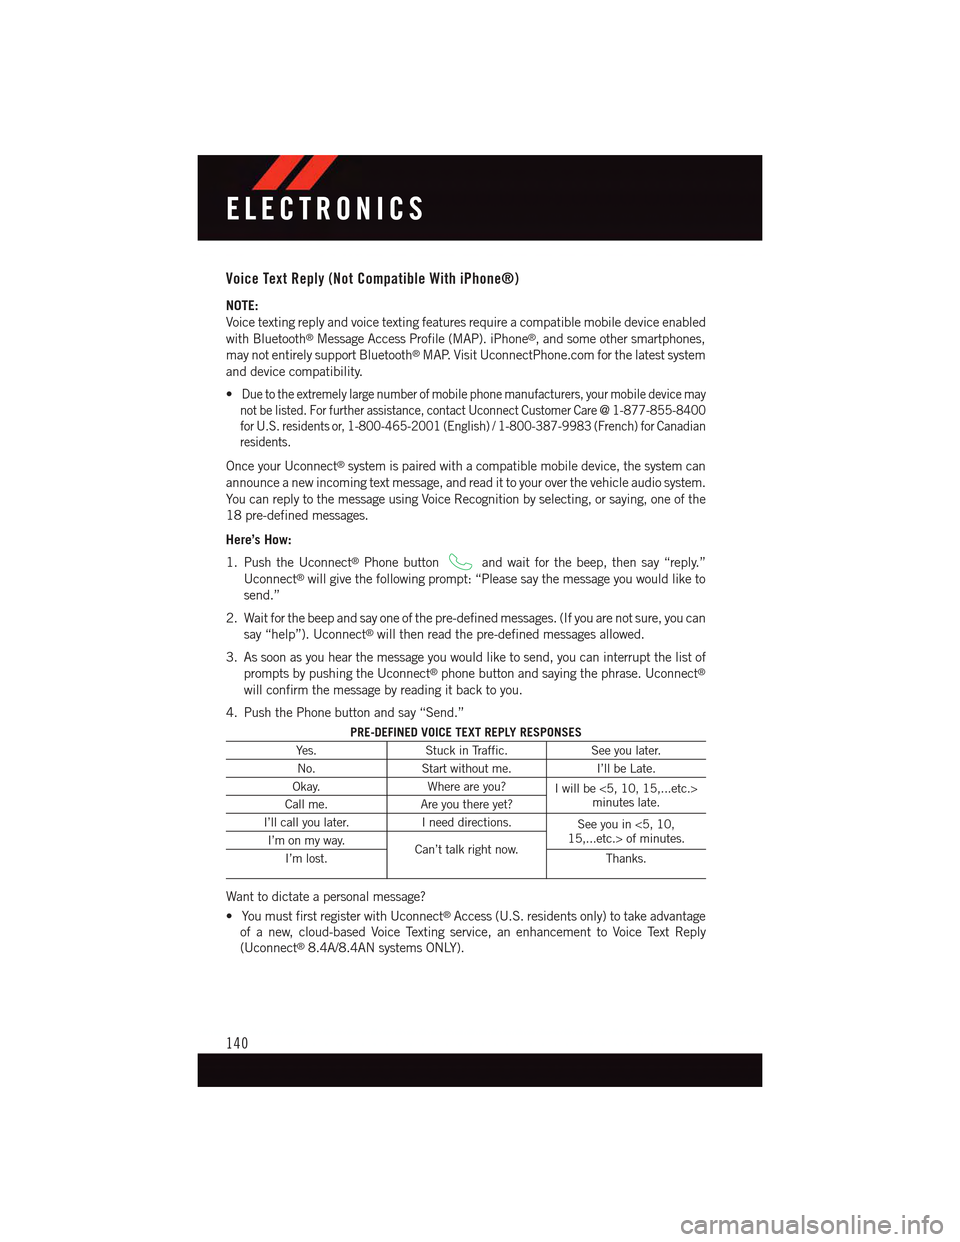
PRE-DEFINED VOICE TEXT REPLY RESPONSES
Ye s .Stuck in Traffic.See you later.
No.Start without me.I’ll be Late.
Okay.Where are you?Iwillbe<5,10,15,...etc.>minutes late.Call me.Are you there yet?
I’ll call you later.Ineeddirections.See you in <5, 10,15,...etc.> of minutes.I’m on my way.Can’t talk right now.I’m lost.Thanks.
Want to dictate a personal message?
•YoumustfirstregisterwithUconnect®Access (U.S. residents only) to take advantage
of a new, cloud-based Voice Texting service, an enhancement to Voice Text Reply
(Uconnect®8.4A/8.4AN systems ONLY).
ELECTRONICS
140
Page 143 of 236
Helpful Tips And Common Questions To Improve Bluetooth® Performance With
Your Uconnect® System
Mobile Phone won’t reconnect to system after pairing:
•Setmobilephonetoauto-connectortrusteddeviceinmobilephoneBluetooth®
settings (Blackberry devices).
•Performafactoryresetonyourmobilephone.Refertoyourmobilephonemanufacturer
or cellular provider for instructions.
•Manymobilephonesdonotautomaticallyreconnectafterbeingrestarted(hard
reboot). Your mobile phone can still be connected manually. Close all applications that
may be operating (refer to mobile phone manufacturer’s instructions), and follow
“Pairing (Wirelessly Connecting) Your Mobile Phone To The Uconnect®System”.
Mobile Phone won’t pair to system:
•Performahardresetinthemobilephonebyremovingthebattery(ifremovable—see
your mobile phone’s owner manual).
•DeletepairinghistoryinmobilephoneandUconnectsystem;usuallyfoundinphone’s
Bluetooth®connection settings.
•Verifyyouareselecting“Uconnect”inthediscoveredBluetooth®devices on your
mobile phone.
•Ifyourvehiclesystemgeneratesapincodethedefaultis0000.
Mobile Phonebook didn’t download:
•Check“Donotaskagain,”thenacceptthe“phonebookdownload”requestonyour
mobile phone.
•Upto5,000contactnameswithfournumberspercontactwilltransfertothe
Uconnect®8.4A/8.4AN system phonebook.
•Upto2,000contactnameswithsixnumberspercontactwilltransfertothe
Uconnect®5.0 system phonebook.
Te x t m e s s a g i n g w o n ’ t w o r k :
•Check“Donotaskagain,”thenacceptthe“connecttoyourmessages”requestonyour
mobile phone.
•VerifythatyourmobilephonehastheBluetooth®feature (Message Access Profile).
Can’t make a conference call:
•CDMA(Code-DivisionMultipleAccess)carriersdonotsupportconferencecalling.
Refer to your mobile phone user’s manual for further information.
Making calls while connected to AUX:
•PlugginginyourmobilephonetoAUXwhileconnectedtoBluetooth®will disable
Hands-Free Calling. Do not make calls while your mobile phone is plugged into the AUX
jack.
ELECTRONICS
141
Page 144 of 236
STEERING WHEEL AUDIO CONTROLS
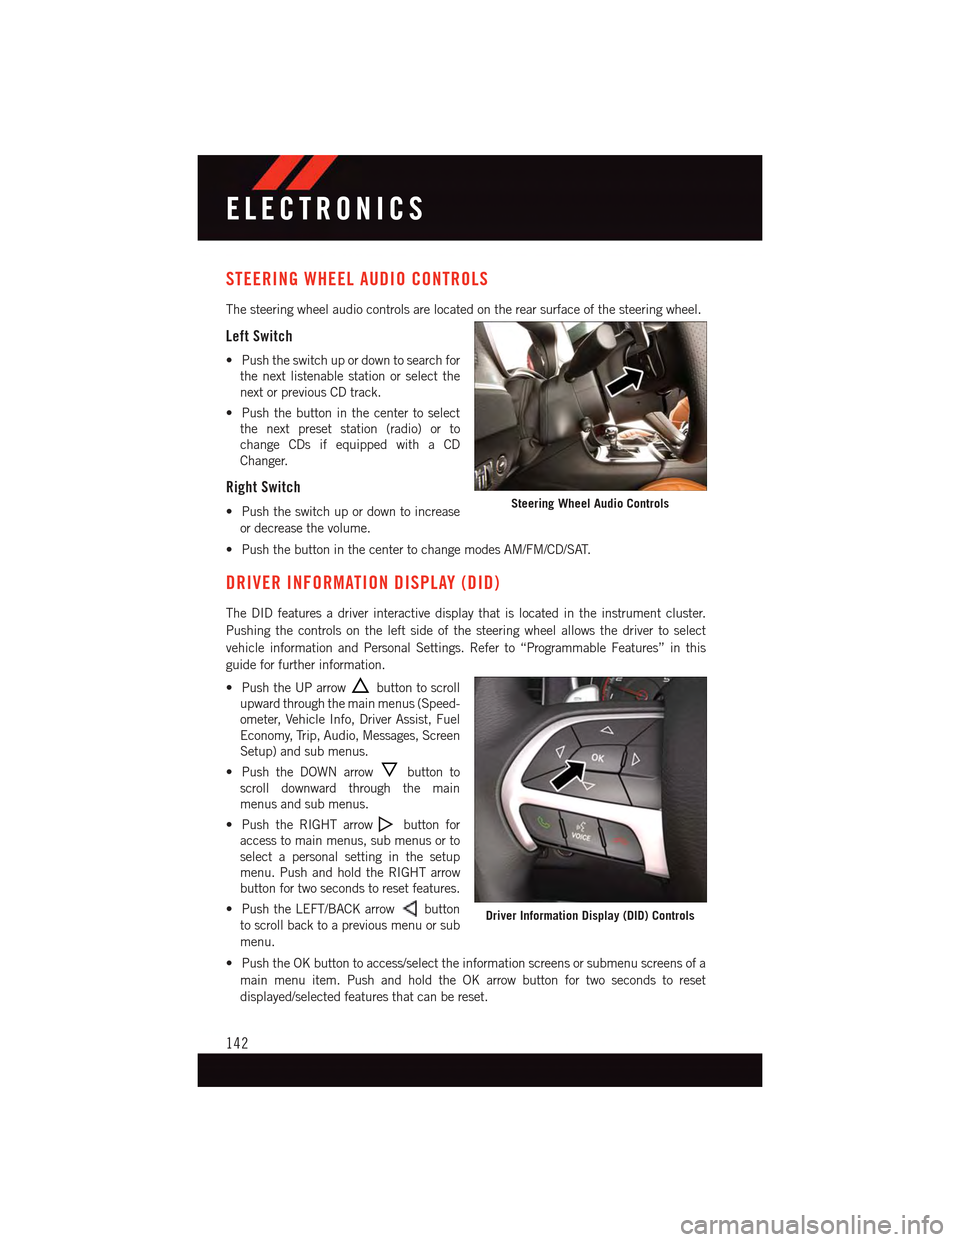
The steering wheel audio controls are located on the rear surface of the steering wheel.
Left Switch
•Pushtheswitchupordowntosearchfor
the next listenable station or select the
next or previous CD track.
•Pushthebuttoninthecentertoselect
the next preset station (radio) or to
change CDs if equipped with a CD
Changer.
Right Switch
•Pushtheswitchupordowntoincrease
or decrease the volume.
•PushthebuttoninthecentertochangemodesAM/FM/CD/SAT.
DRIVER INFORMATION DISPLAY (DID)
The DID features a driver interactive display that is located in the instrument cluster.
Pushing the controls on the left side of the steering wheel allows the driver to select
vehicle information and Personal Settings. Refer to “Programmable Features” in this
guide for further information.
•PushtheUParrowbutton to scroll
upward through the main menus (Speed-
ometer, Vehicle Info, Driver Assist, Fuel
Economy, Trip, Audio, Messages, Screen
Setup) and sub menus.
•PushtheDOWNarrowbutton to
scroll downward through the main
menus and sub menus.
•PushtheRIGHTarrowbutton for
access to main menus, sub menus or to
select a personal setting in the setup
menu. Push and hold the RIGHT arrow
button for two seconds to reset features.
•PushtheLEFT/BACKarrowbutton
to scroll back to a previous menu or sub
menu.
•PushtheOKbuttontoaccess/selecttheinformationscreensorsubmenuscreensofa
main menu item. Push and hold the OK arrow button for two seconds to reset
displayed/selected features that can be reset.
Steering Wheel Audio Controls
Driver Information Display (DID) Controls
ELECTRONICS
142
Page 145 of 236
Compass Calibration
This compass is self-calibrating, which eliminates the need to set the compass manually.
When the vehicle is new, the compass may appear erratic, and the cluster will display
dashes (- -) until the compass is calibrated.
Yo u m a y a l s o c a l i b r a t e t h e c o m p a s s b y c o m p l e t i n g o n e o r m o r e 3 6 0 d e g r e e t u r n s ( i n a n
area free from large metal or metallic objects) until the dashes (- -) displayed in the DID
turns off. The compass will now function normally.
Performance Features
WARNING!
Measurement of vehicle statistics with the Performance Features is intended for
off-highway or off-road use only and should not be done on any public roadways. It is
recommended that these features be used in a controlled environment and within the
limits of the law. The capabilities of the vehicle as measured by the performance pages
must never be exploited in a reckless or dangerous manner, which can jeopardize the
user’s safety or the safety of others. Only a safe, attentive, and skillful driver can prevent
accidents.
The Performance Features include the following:
•0-60mph(0-100km/h)Timer
•Best
•Last
•Current
•ReactionTimer
•0-100mph(0-161km/h)Timer
•Best
•Last
•Current
•ReactionTimer
•1/8Mile(200meters)Timer
•Best
•Last
•Current
•ReactionTimer
•1/4Mile(400meters)Timer
•Best
•Last
•Current
•ReactionTimer
•BrakingDistance
•Distance
•FromSpeed
ELECTRONICS
143
Page 146 of 236
•CurrentG-Forces
•PeakG-Forces
•LapTimer
•LapHistory
•Willlistthelast5lapwiththebestlaphighlightedingreen.
•TopSpeed
The following describes each feature and its operation:
0-60 mph (0-100 km/h)
When selected, this screen displays the time it takes for the vehicle to go from 0 to 60 mph
(0 to 100 km/h) within 10 seconds.
•Thefeaturewill“ready”whenthevehiclespeedisat0mph(0km/h).Theword
“READY” will flash when conditions are met for the event to begin.
•Dasheswilldisplayifthevehiclefailstoreach60mph(100km/h)inlessthen
10 seconds.
•Toclearthevehicle'sbest,last,andcurrent0-60mph(0-100km/h)time,pushand
hold theOKbutton for two seconds.
0 to 100 mph (0 to 161 km/h)
When selected, this screen displays the time it takes for the vehicle to go from 0 to
100 mph (0 to 161 km/h) within 20 seconds.
•Thefeaturewill“ready”whenthevehiclespeedisat0mph(0km/h).Theword
“READY” will flash when conditions are met for the event to begin.
•Dasheswilldisplayifthevehiclefailstoreach0to100mph(0to161km/h)inless
then 20 seconds.
•Toclearthevehicle'sbest,lastandcurrent0to100mph(0to161km/h)time,push
and hold theOKbutton for two seconds.
1/8 Mile (200 Meters)
When selected, this screen displays the time it takes the vehicle to travel 1/8 mile within
15 seconds and the vehicle's speed when it reaches 1/8 mile.
•Thefeaturewill“ready”whenthevehicleisat0mph(0km/h).Theword“READY”will
flash when conditions are met for the event to begin.
•Dasheswilldisplayifthevehiclefailstoreach1/8mile(200meters)inlessthen
15 seconds.
•Toclearthevehicle'sbest1/8mile(200meters)run,pushandholdtheOKbutton for
five seconds.
ELECTRONICS
144
Page 147 of 236
1/4 Mile (400 Meters)
When selected, this screen displays the time it takes the vehicle to travel 1/4 mile within
25 seconds and the vehicle's speed when it reaches 1/4 mile (200 meters).
•Thefeaturewill“ready”whenthevehicleisat0mph(0km/h).Theword“READY”will
flash when conditions are met for the event to begin.
•Dasheswilldisplayifthevehiclefailstoreach1/4mile(400meters)inlessthen
25 seconds.
•Toclearthevehicle'sbest1/4mile400meters)run,pushandholdtheOKbutton for
two seconds.
Braking Distance
When selected, this screen displays the vehicle's braking distance, and the speed at which
the brake pedal was pushed.
•Thisfeaturewillonlyfunctionwhenapplyingthebrakesatspeedsabove30mph
(48 km/h).
•Engagingtheparkingbrakewilldisablethisfeature.
•Theword“READY”willdisplaywhenconditionsaremetfortheeventtobegin.
•Thedistanceandspeedmeasurementsdisplaywhiletheeventistakingplace.
•Thedistancemeasurementwillbeabortedifthebrakepedalisreleasedbeforethe
vehicle comes to a complete stop.
•PushingandholdingtheOKbutton will clear the current and last run values.
Current G-Force
When selected, this screen displays the current G-Force (lateral and longitudinal) that
displays the directions of the forces.
Peak G-Force
When selected, this screen displays all four G-Force values (two lateral and two longitu-
dinal).
•Whenaforcegreaterthanzeroismeasured,thedisplaywillupdatethevalueasit
climbs. As the G-Force falls, the peak forces will continue to display.
•PushandholdtheOKbutton to clear the peak force values.
ELECTRONICS
145
Page 148 of 236
Lap Timer
When selected, the Lap Timer page will show the timer always at 0:00.00 with the
previous Best and Last time data (unless the driver has cleared it via hold to Reset).
•PushingOKwill start “current” timer from 0:00.0.
•WhenOKis pushed, the times are updated accordingly.
•AssoonasthedriverexitstheLapTimerpages,the“current”timerwillstopandthe
time will be reset to 0:00.00.
•IfthedriverstaysontheLapTimerpages,the“current”timerwillresetto0:00.0when
ignition is placed in the off position, or ignition placed in the ON position (or will roll
over at 59:59.99 if ever possible).
•EachtimethedriverpushesOKfor a Lap that current time populates, the Last time and
also populates the 1st (top) space on the Timer History page the current time resets to
0:00.0 at every push of theOKbutton.
•Thetimerwillstopwhenthedrivernavigatesawayfromthispage.
Lap History
When selected, this screen displays the Lap History, and will color highlight the time that
is the best time from the Timer Page.
•EachtimethedriverpushestheOKbutton(whileontheLapTimerpage)thecurrent
Lap Time populates the 1st spot and the rest of the data shifts down.
•ColorwillindicatethetimethatisthebesttimefromtheTimerPage.
•HoldingtheOKbutton only resets the page you are on.
•LapHistorypageisastaticdisplayoflaptimesonly.
Top Speed
When selected, this screen displays the Top Speed since last reset:
•Populatesatopspeedfromfirstdrivecycleandeverytimethatspeedisexceededthat
number is stored here unless/until the driver resets the screen.
•Latchingoverignitioncycles.
•Unitswillchangewiththeglobalchangeinunits.
ELECTRONICS
146
Page 149 of 236
PROGRAMMABLE FEATURES
Driver Information Display (DID)
The DID can be used to view or change the following settings. Push the UPor DOWN
button to scroll through the main menus, then push the RIGHTbutton to scroll
through the submenus of each menu item. Push theBACKbutton to scroll back to a
previous menu or sub menu.
•Speedometer•Audio
•VehicleInfo•Messages
•DriverAssist—IfEquipped•ScreenSetup
•FuelEconomy•SpeedWarning—IfEquipped
•Trip•Diagnostic—IfEquipped
Uconnect® Customer Programmable Features
The Uconnect®system allows you to access Customer Programmable feature settings
such as Display, Units, Voice, Clock, Safety & Driving Assistance, Lights, Doors & Locks,
Auto-On Comfort, Engine Off Options, Audio, Phone/Bluetooth®,SiriusXMSetup,Restore
Settings, Clear Personal Data, System Information, and Compass Settings (5.0 Radio
Only) through buttons on the touchscreen.
NOTE:
If equipped with the Super Track Pak option please refer to the “Drive Mode Supplement”
within your Owners Information Kit for further descriptions of these modes.
•Pressthe“Controls”buttonlocatednearthebottomofthetouchscreen,thenpressthe
“Settings” button on the touchscreen to access the Settings screen. When making a
selection, scroll up or down until the preferred setting is highlighted, then press and
release the preferred setting until a check-mark appears next to the setting, showing
that setting has been selected. The following feature settings are available:
•Display•EngineOffOptions
•Units•Audio
•Voice•Phone/Bluetooth®
•Clock•SiriusXMSetup
•Safety&DrivingAssistance•RestoreSettings
•Lights•ClearPersonalData
•Doors&Locks•SystemInformation
•Auto-OnComfort•Compass(5.0RadioOnly)
Refer to “Uconnect Settings/Customer Programmable Features” found within “Under-
standing Your Instrument Panel” located in your Owner's Manual on the DVD for further
information.
ELECTRONICS
147
Page 150 of 236
UNIVERSAL GARAGE DOOR OPENER
Universal Garage Door Opener (HomeLink®)
HomeLink®replaces up to three hand-held transmitters that operate devices such as
garage door openers, motorized gates, lighting or home security systems. The HomeLink®
unit is powered by your vehicles 12 Volt battery.
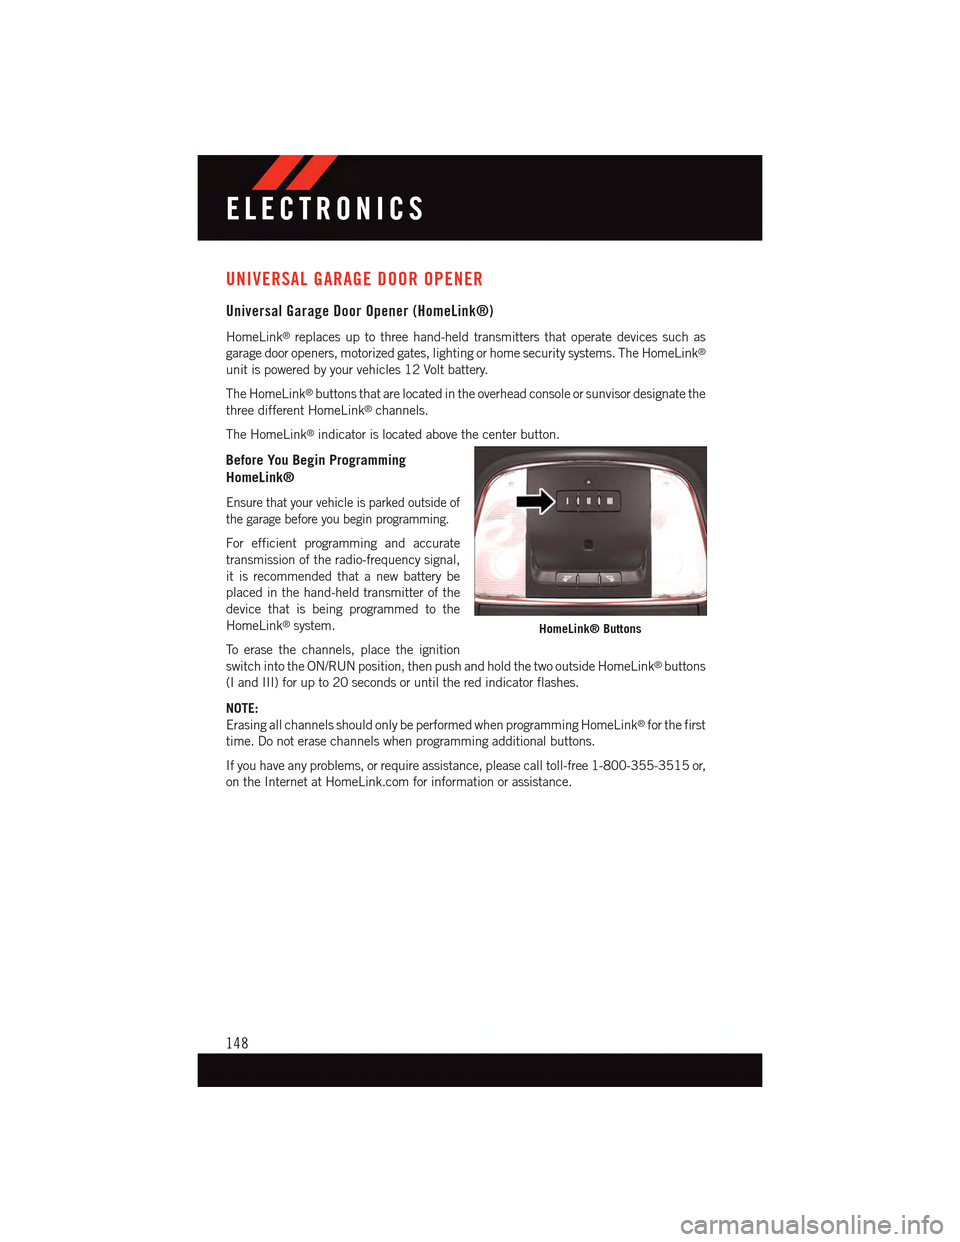
The HomeLink®buttons that are located in the overhead console or sunvisor designate the
three different HomeLink®channels.
The HomeLink®indicator is located above the center button.
Before You Begin Programming
HomeLink®
Ensure that your vehicle is parked outside of
the garage before you begin programming.
For efficient programming and accurate
transmission of the radio-frequency signal,
it is recommended that a new battery be
placed in the hand-held transmitter of the
device that is being programmed to the
HomeLink®system.
To e r a s e t h e c h a n n e l s , p l a c e t h e i g n i t i o n
switch into the ON/RUN position, then push and hold the two outside HomeLink®buttons
(I and III) for up to 20 seconds or until the red indicator flashes.
NOTE:
Erasing all channels should only be performed when programming HomeLink®for the first
time. Do not erase channels when programming additional buttons.
If you have any problems, or require assistance, please call toll-free 1-800-355-3515 or,
on the Internet at HomeLink.com for information or assistance.
HomeLink® Buttons
ELECTRONICS
148