DODGE CHARGER 2015 7.G User Guide
Manufacturer: DODGE, Model Year: 2015, Model line: CHARGER, Model: DODGE CHARGER 2015 7.GPages: 236, PDF Size: 35.67 MB
Page 181 of 236
Jump-Starting Procedure
1. Connect the positive(+)end of the jumper cable to the remote positive(+)post of the
discharged vehicle.
2. Connect the opposite end of the positive(+)jumper cable to the positive(+)post of the
booster battery.
3. Connect the negative end(-)of the jumper cable to the negative(-)post of the booster
battery.
4. Connect the opposite end of the negative(-)jumper cable to the remote negative(-)
post of the vehicle with the discharged battery.
5. Start the engine in the vehicle that has the booster battery, let the engine idle a few
minutes, and then start the engine in the vehicle with the discharged battery.
Once the engine is started, remove the jumper cables in the reverse sequence:
1. Disconnect the negative(-)end of the jumper cable from the remote negative(-)post
of the vehicle with the discharged battery.
2. Disconnect the opposite end of the negative(-)jumper cable from the negative(-)post
of the booster battery.
3. Disconnect the positive(+)end of the jumper cable from the positive(+)post of the
booster battery.
4. Disconnect the opposite end of the positive(+)jumper cable from the remote positive
(+)post of the discharged vehicle.
NOTE:
If frequent jump-starting is required to start your vehicle you should have the battery and
charging system inspected at your authorized dealer.
CAUTION!
•Donotuseaportablebatteryboosterpackoranyotherboostersourcewithasystem
voltage greater than 12 Volts or damage to the battery, starter motor, alternator or
electrical system may occur.
•Failuretofollowtheseprocedurescouldresultindamagetothechargingsystemof
the booster vehicle or the discharged vehicle.
•Accessoriesthatcanbepluggedintothevehiclepoweroutletsdrawpowerfromthe
vehicle’s battery, even when not in use (e.g., cellular phones, etc.). Eventually, if
plugged in long enough, the vehicle’s battery discharges sufficiently to degrade
battery life and/or prevent the engine from starting.
WHAT TO DO IN EMERGENCIES
179
Page 182 of 236
WARNING!
•Whentemperaturesarebelowthefreezingpoint,electrolyteinadischargedbattery
may freeze. Do not attempt jump-starting because the battery could rupture or
explode and cause personal injury. Battery temperature must be brought above
freezing point before attempting a jump-start.
•Takecaretoavoidtheradiatorcoolingfanwheneverthehoodisraised.Itcanstart
anytime the ignition switch is on. You can be injured by moving fan blades.
•Removeanymetaljewelry,suchaswatchbandsorbracelets,thatmightmakean
inadvertent electrical contact. You could be severely injured.
•Batteriescontainsulfuricacidthatcanburnyourskinoreyesandgenerate
hydrogen gas which is flammable and explosive. Keep open flames or sparks away
from the battery.
•Donotallowvehiclestotoucheachotherasthiscouldestablishaground
connection and personal injury could result.
•Failuretofollowthisprocedurecouldresultinpersonalinjuryorpropertydamage
due to battery explosion.
•Donotconnectthecabletothenegativepost(-)of the discharged battery. The
resulting electrical spark could cause the battery to explode and could result in
personal injury.
MANUAL PARK RELEASE — 8 SPEED TRANSMISSION
WARNING!
Always secure your vehicle by fully applying the parking brake, before activating the
Manual Park Release. Activating the Manual Park Release will allow your vehicle to roll
away if it is not secured by the parking brake or by proper connection to a tow vehicle.
Activating the Manual Park Release on an unsecured vehicle could lead to serious
injury or death for those in or around the vehicle.
WHAT TO DO IN EMERGENCIES
180
Page 183 of 236
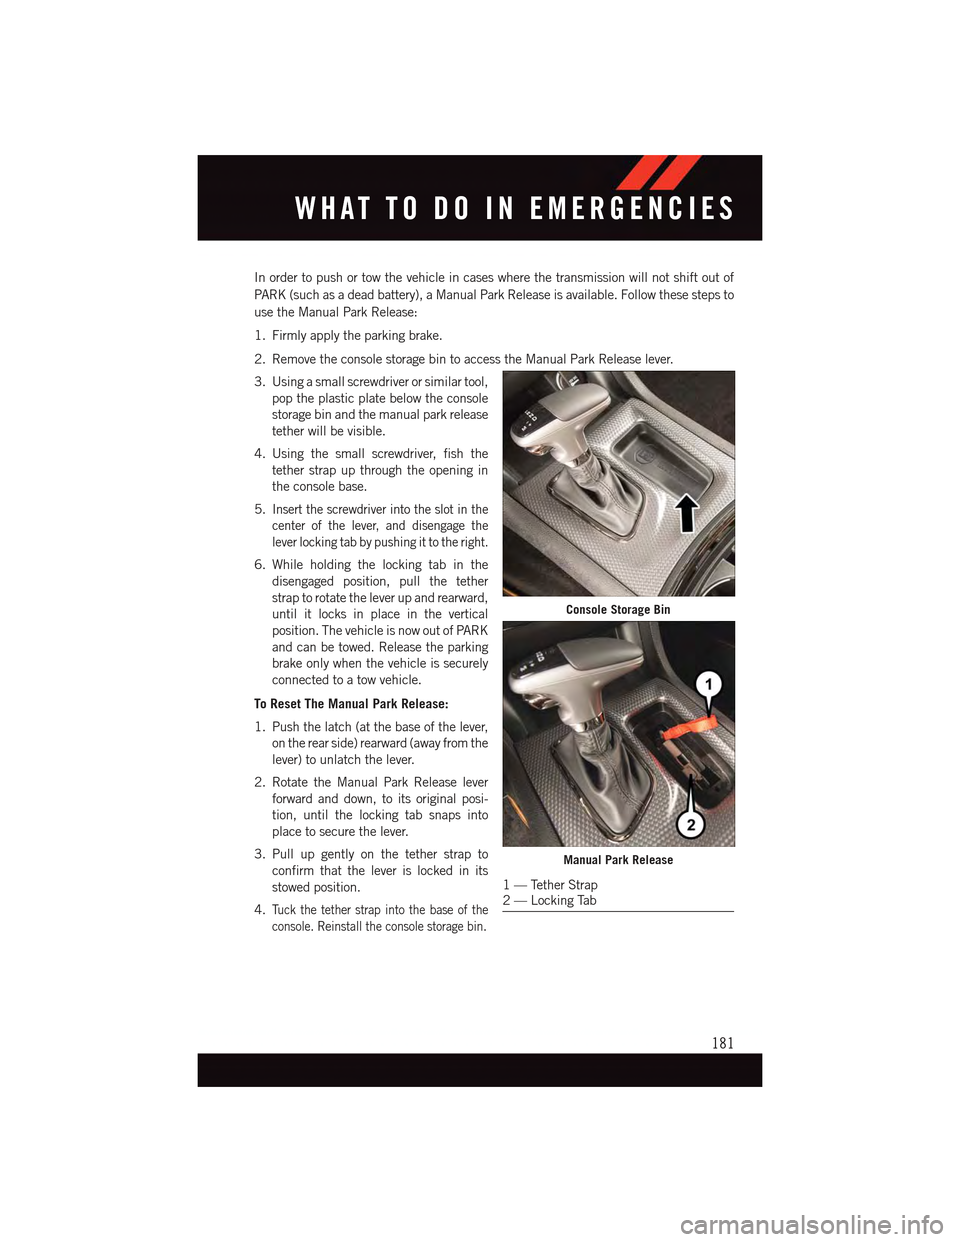
In order to push or tow the vehicle in cases where the transmission will not shift out of
PA R K ( s u c h a s a d e a d b a t t e r y ) , a M a n u a l P a r k R e l e a s e i s a v a i l a b l e . F o l l o w t h e s e s t e p s t o
use the Manual Park Release:
1. Firmly apply the parking brake.
2. Remove the console storage bin to access the Manual Park Release lever.
3. Using a small screwdriver or similar tool,
pop the plastic plate below the console
storage bin and the manual park release
tether will be visible.
4. Using the small screwdriver, fish the
tether strap up through the opening in
the console base.
5.Insert the screwdriver into the slot in the
center of the lever, and disengage the
lever locking tab by pushing it to the right.
6. While holding the locking tab in the
disengaged position, pull the tether
strap to rotate the lever up and rearward,
until it locks in place in the vertical
position. The vehicle is now out of PARK
and can be towed. Release the parking
brake only when the vehicle is securely
connected to a tow vehicle.
To Reset The Manual Park Release:
1. Push the latch (at the base of the lever,
on the rear side) rearward (away from the
lever) to unlatch the lever.
2. Rotate the Manual Park Release lever
forward and down, to its original posi-
tion, until the locking tab snaps into
place to secure the lever.
3. Pull up gently on the tether strap to
confirm that the lever is locked in its
stowed position.
4.Tu c k t h e t e t h e r s t r a p i n t o t h e b a s e o f t h e
console. Reinstall the console storage bin.
Console Storage Bin
Manual Park Release
1—TetherStrap2—LockingTab
WHAT TO DO IN EMERGENCIES
181
Page 184 of 236
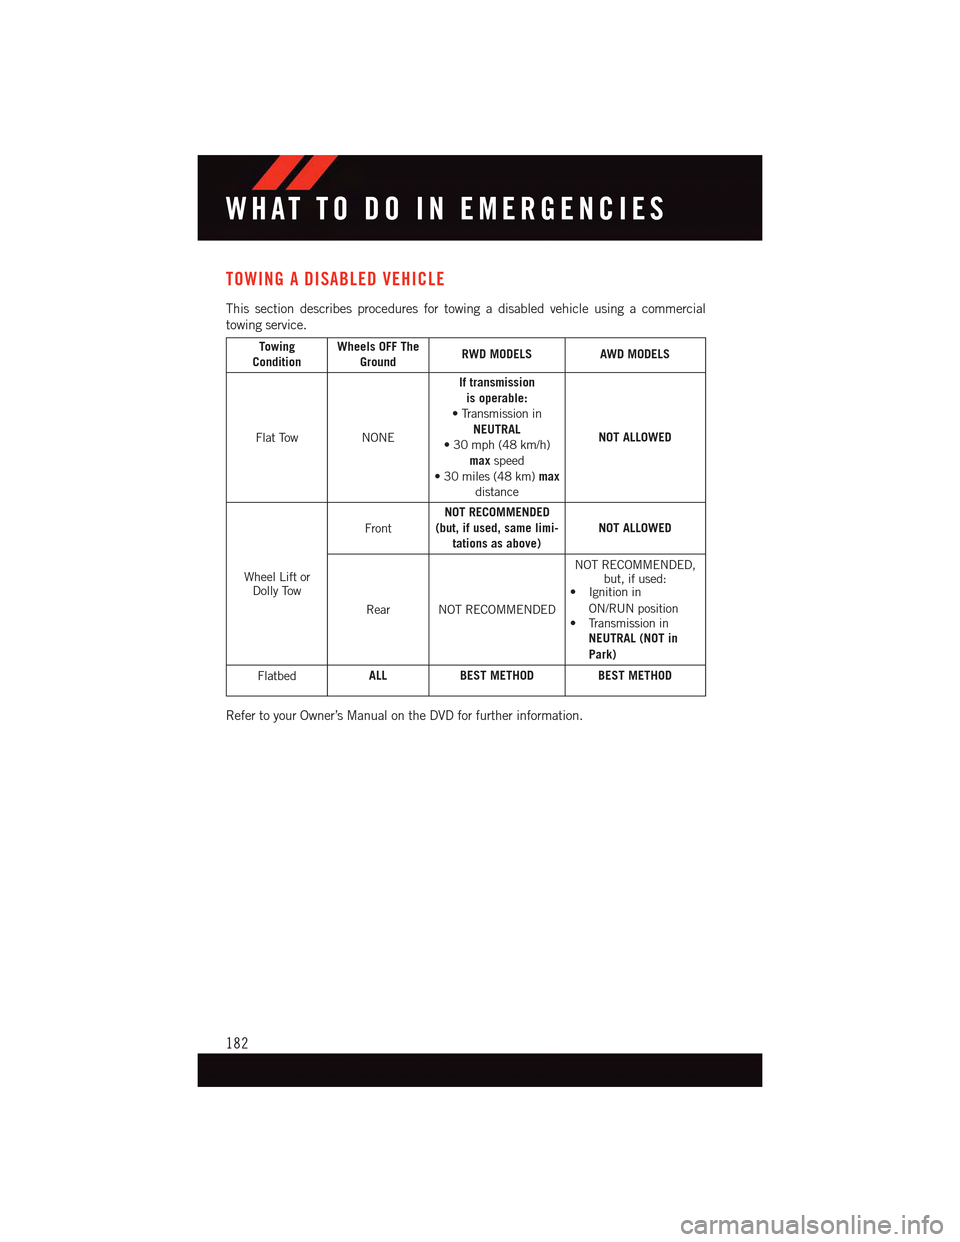
TOWING A DISABLED VEHICLE
This section describes procedures for towing a disabled vehicle using a commercial
towing service.
TowingConditionWheels OFF TheGroundRWD MODELSAWD MODELS
Flat TowNONE
If transmissionis operable:•TransmissioninNEUTRAL•30mph(48km/h)maxspeed•30miles(48km)maxdistance
NOT ALLOWED
Wheel Lift orDolly Tow
Front
NOT RECOMMENDED(but, if used, same limi-tations as above)NOT ALLOWED
Rear NOT RECOMMENDED
NOT RECOMMENDED,but, if used:•Ignitionin
ON/RUN position•TransmissioninNEUTRAL (NOT in
Park)
FlatbedALLBEST METHODBEST METHOD
Refer to your Owner’s Manual on the DVD for further information.
WHAT TO DO IN EMERGENCIES
182
Page 185 of 236
FREEING A STUCK VEHICLE
If your vehicle becomes stuck in mud, sand or snow, it can often be moved using a rocking
motion. Turn the steering wheel right and left to clear the area around the front wheels.
Push and hold the lock button on the shift lever. Then, shift back and forth between
REVERSE and DRIVE, while gently pushing the accelerator. Use the least amount of
accelerator pedal pressure that will maintain the rocking motion, without spinning the
wheels or racing the engine.
NOTE:
•ShiftsbetweenDRIVEandREVERSEcanonlybeachievedatwheelspeedsof5mph
(8 km/h) or less. Whenever the transmission remains in NEUTRAL for more than
2seconds,youmustpushthebrakepedaltoengageDRIVEorREVERSE.
•Pushthe“ESCOff”switch,toplacetheElectronicStabilityControl(ESC)systemin
“Partial Off” mode, before rocking the vehicle. Once the vehicle has been freed, push
the “ESC Off” switch again to restore "ESC On" mode.
CAUTION!
•When“rocking”astuckvehiclebyshiftingbetweenREVERSEandDRIVE,donot
spin the wheels faster than 15 mph (24 km/h), or drivetrain damage may result.
•Revvingtheengineorspinningthewheelstoofastmayleadtotransmission
overheating and failure. It can also damage the tires. Do not spin the wheels above
30 mph (48 km/h) while in gear (no transmission shifting occurring).
WARNING!
Fast spinning tires can be dangerous. Forces generated by excessive wheel speeds may
cause tire damage or failure. A tire could explode and injure someone. Do not spin your
vehicle's wheels faster than 30 mph (48 km/h) when you are stuck. Do not let anyone
near a spinning wheel, no matter what the speed.
WHAT TO DO IN EMERGENCIES
183
Page 186 of 236
EVENT DATA RECORDER (EDR)
This vehicle is equipped with an Event Data Recorder (EDR). The main purpose of an EDR
is to record, in certain crash or near crash-like situations, such as an air bag deployment
or hitting a road obstacle, data that will assist in understanding how a vehicle’s systems
performed. The EDR is designed to record data related to vehicle dynamics and safety
systems for a short period of time, typically 30 seconds or less. The EDR in this vehicle is
designed to record such data as:
•Howvarioussystemsinyourvehiclewereoperating.
•Whetherornotthedriverandpassengersafetybeltswerebuckled/fastened.
•Howfar(ifatall)thedriverwasdepressingtheacceleratorand/orbrakepedal.
•Howfastthevehiclewastraveling.
These data can help provide a better understanding of the circumstances in which crashes
and injuries occur.
NOTE:
EDR data is recorded by your vehicle only if a non-trivial crash situation occurs; no data is
recorded by the EDR under normal driving conditions and no personal data (e.g. name,
gender, age, and crash location) is recorded. However, other parties, such as law
enforcement, could combine the EDR data with the type of personally identifying data
routinely acquired during a crash investigation.
To r e a d d a t a r e c o r d e d b y a n E D R , s p e c i a l e q u i p m e n t i s r e q u i r e d , a n d a c c e s s t o t h e v e h i c l e
or the EDR is needed. In addition to the vehicle manufacturer, other parties such as law
enforcement, that have the special equipment, can read the information if they have
access to the vehicle or the EDR.
WHAT TO DO IN EMERGENCIES
184
Page 187 of 236
OPENING THE HOOD
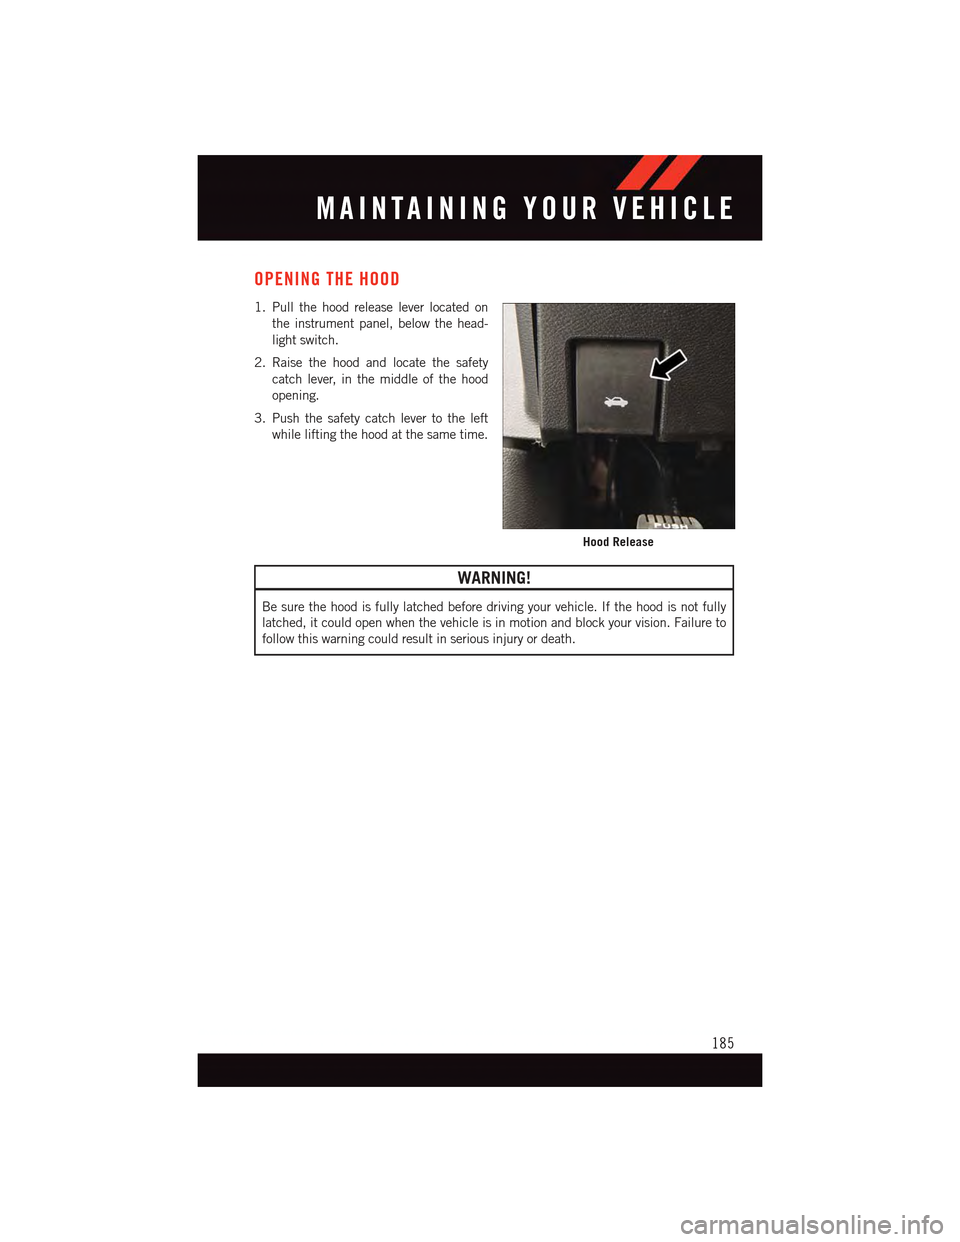
1. Pull the hood release lever located on
the instrument panel, below the head-
light switch.
2. Raise the hood and locate the safety
catch lever, in the middle of the hood
opening.
3. Push the safety catch lever to the left
while lifting the hood at the same time.
WARNING!
Be sure the hood is fully latched before driving your vehicle. If the hood is not fully
latched, it could open when the vehicle is in motion and block your vision. Failure to
follow this warning could result in serious injury or death.
Hood Release
MAINTAINING YOUR VEHICLE
185
Page 188 of 236
ENGINE COMPARTMENT
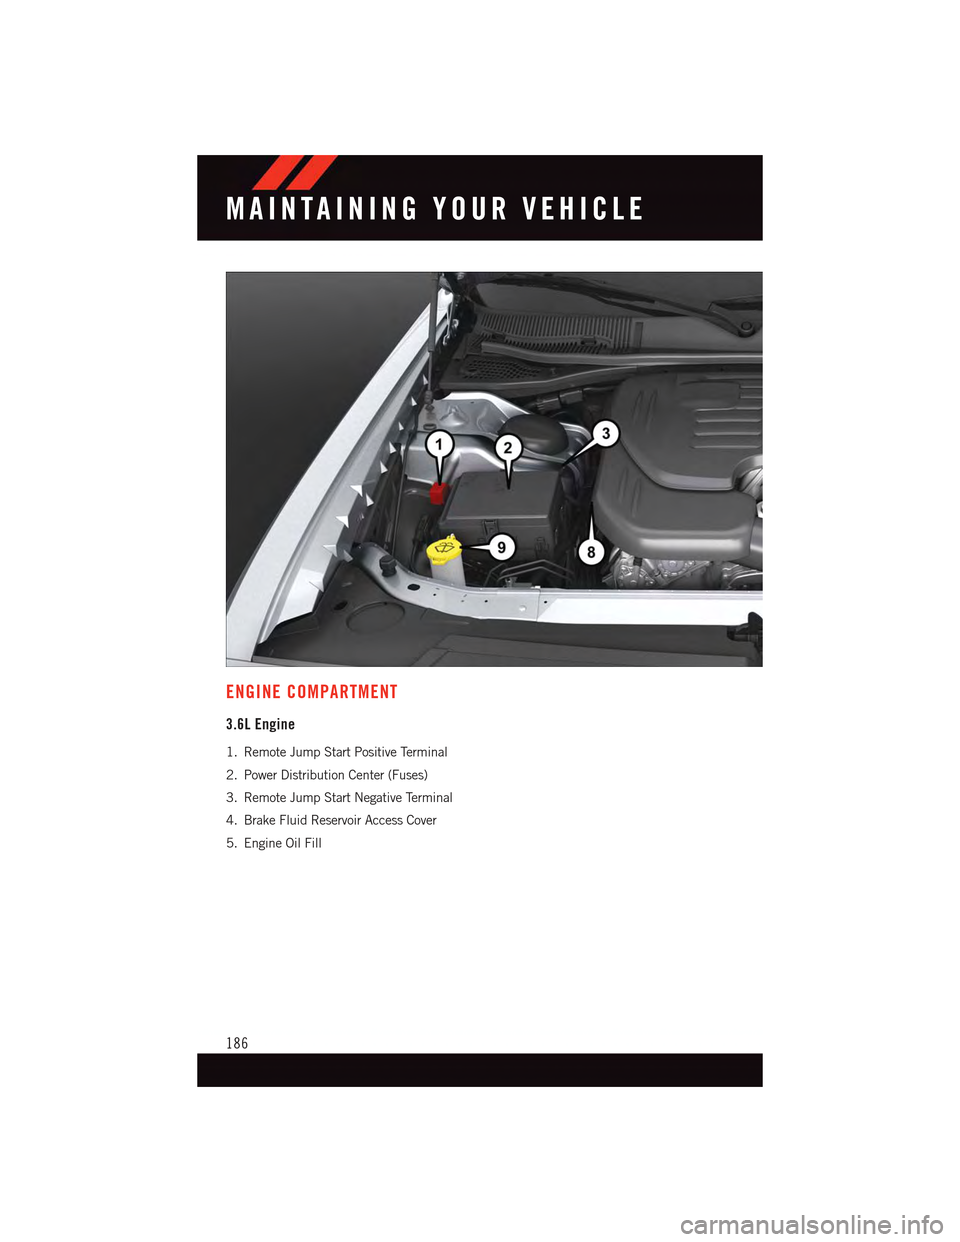
3.6L Engine
1. Remote Jump Start Positive Terminal
2. Power Distribution Center (Fuses)
3. Remote Jump Start Negative Terminal
4. Brake Fluid Reservoir Access Cover
5. Engine Oil Fill
MAINTAINING YOUR VEHICLE
186
Page 189 of 236
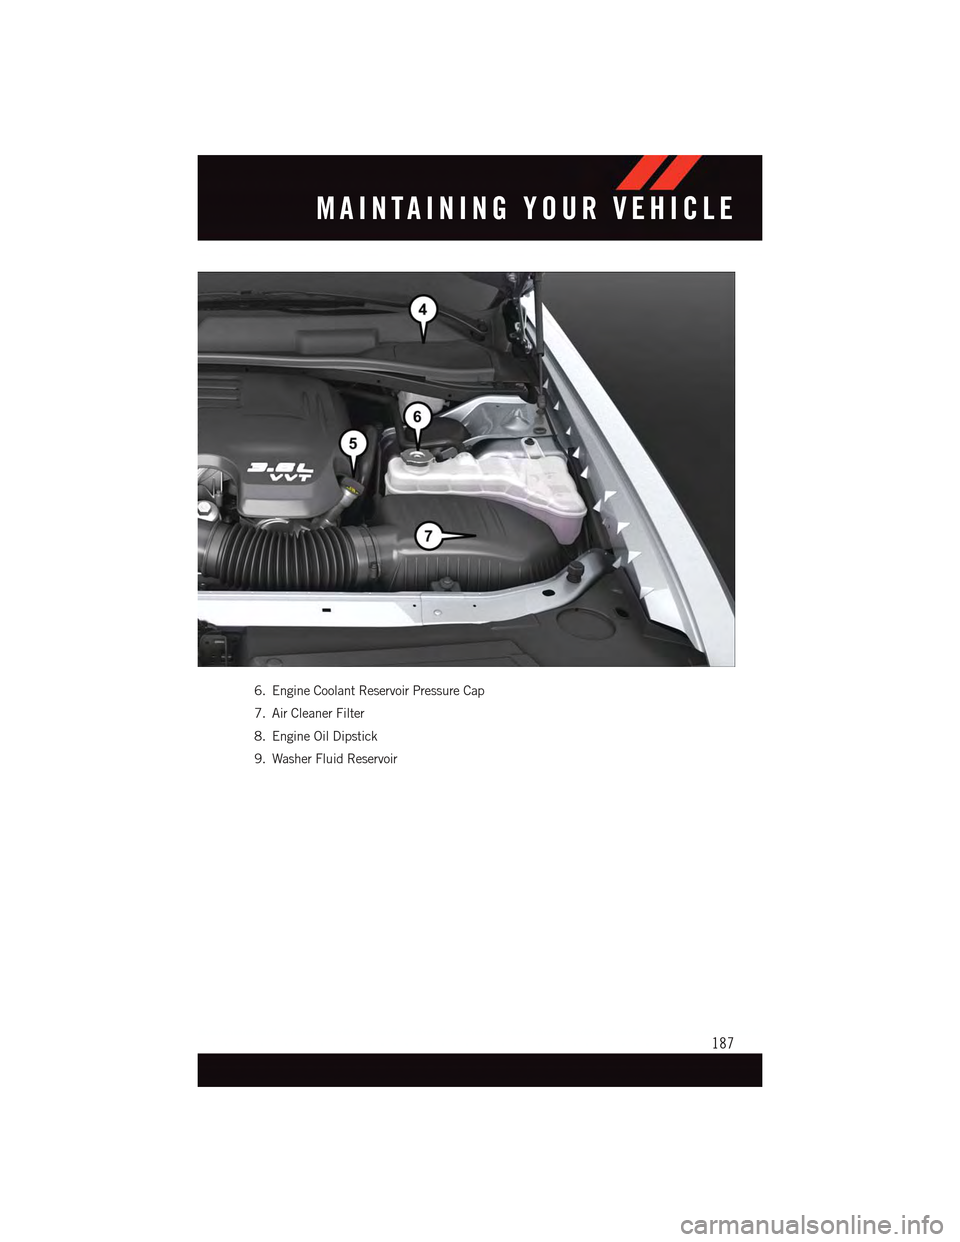
6. Engine Coolant Reservoir Pressure Cap
7. Air Cleaner Filter
8. Engine Oil Dipstick
9. Washer Fluid Reservoir
MAINTAINING YOUR VEHICLE
187
Page 190 of 236
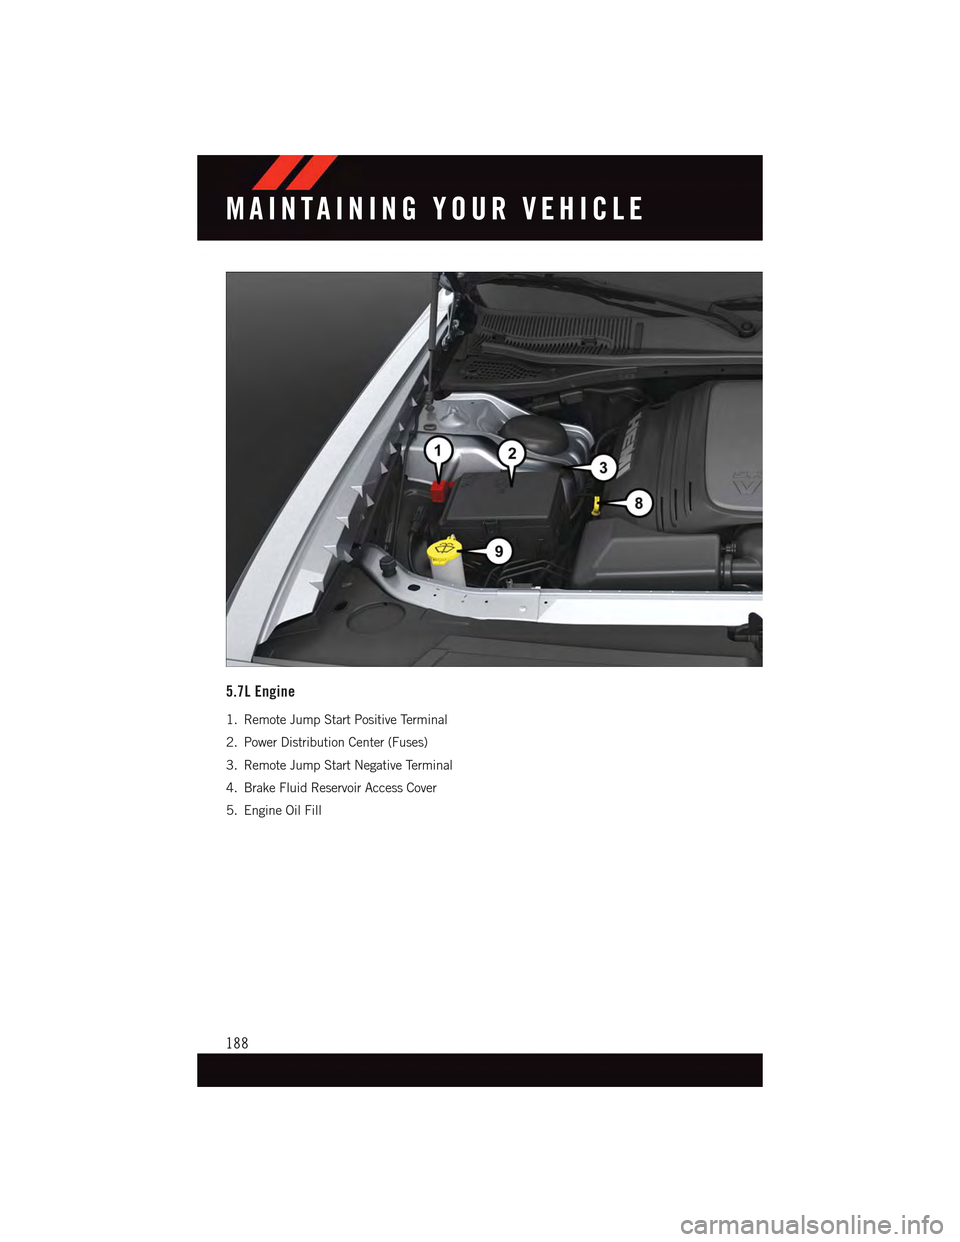
5.7L Engine
1. Remote Jump Start Positive Terminal
2. Power Distribution Center (Fuses)
3. Remote Jump Start Negative Terminal
4. Brake Fluid Reservoir Access Cover
5. Engine Oil Fill
MAINTAINING YOUR VEHICLE
188