DODGE DURANGO 2020 Owners Manual
Manufacturer: DODGE, Model Year: 2020, Model line: DURANGO, Model: DODGE DURANGO 2020Pages: 464, PDF Size: 22.14 MB
Page 361 of 464
TECHNICAL SPECIFICATIONS359
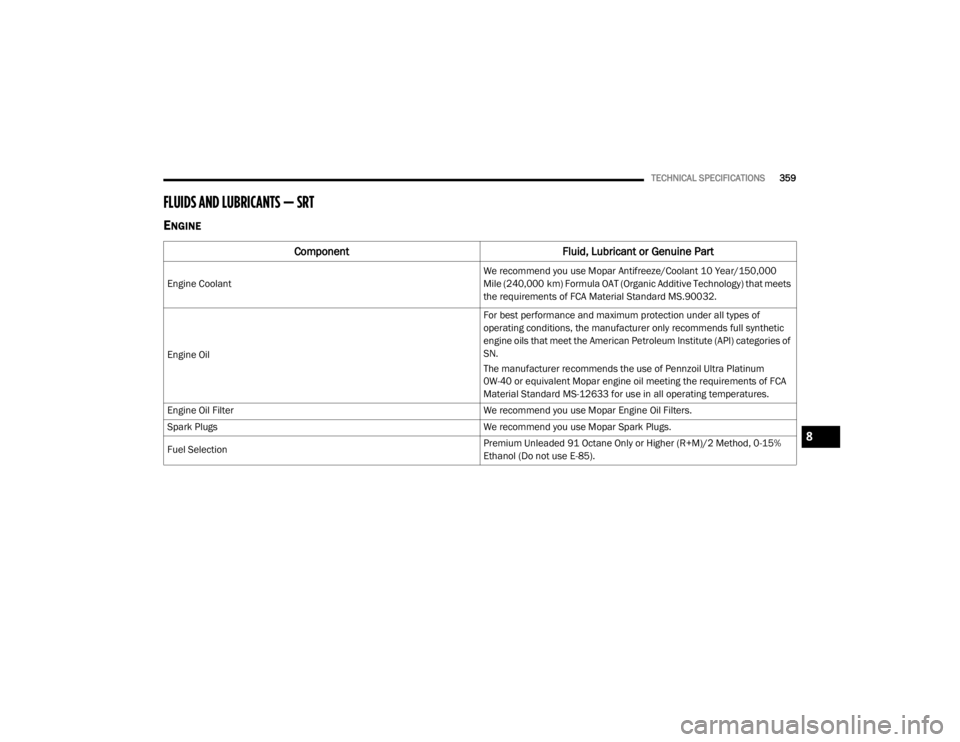
FLUIDS AND LUBRICANTS — SRT
ENGINE
Component Fluid, Lubricant or Genuine Part
Engine Coolant
We recommend you use Mopar Antifreeze/Coolant 10 Year/150,000
Mile (240,000 km) Formula OAT (Organic Additive Technology) that meets
the requirements of FCA Material Standard MS.90032.
Engine Oil For best performance and maximum protection under all types of
operating conditions, the manufacturer only recommends full synthetic
engine oils that meet the American Petroleum Institute (API) categories of
SN.
The manufacturer recommends the use of Pennzoil Ultra Platinum
0W-40 or equivalent Mopar engine oil meeting the requirements of FCA
Material Standard MS-12633 for use in all operating temperatures.
Engine Oil Filter We recommend you use Mopar Engine Oil Filters.
Spark Plugs We recommend you use Mopar Spark Plugs.
Fuel Selection Premium Unleaded 91 Octane Only or Higher (R+M)/2 Method, 0-15%
Ethanol (Do not use E-85).
8
20_WD_OM_EN_USC_t.book Page 359
Page 362 of 464
360TECHNICAL SPECIFICATIONS
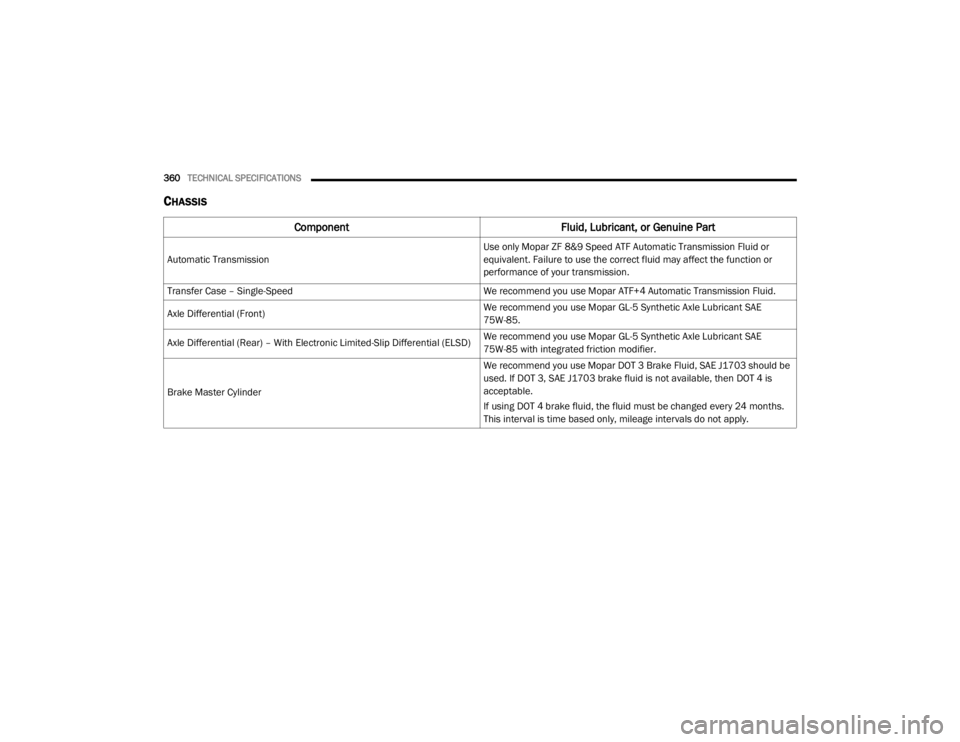
CHASSIS
Component Fluid, Lubricant, or Genuine Part
Automatic Transmission
Use only Mopar ZF 8&9 Speed ATF Automatic Transmission Fluid or
equivalent. Failure to use the correct fluid may affect the function or
performance of your transmission.
Transfer Case – Single-Speed We recommend you use Mopar ATF+4 Automatic Transmission Fluid.
Axle Differential (Front) We recommend you use Mopar GL-5 Synthetic Axle Lubricant SAE
75W-85.
Axle Differential (Rear) – With Electronic Limited-Slip Differential (ELSD) We recommend you use Mopar GL-5 Synthetic Axle Lubricant SAE
75W-85 with integrated friction modifier.
Brake Master Cylinder We recommend you use Mopar DOT 3 Brake Fluid, SAE J1703 should be
used. If DOT 3, SAE J1703 brake fluid is not available, then DOT 4 is
acceptable.
If using DOT 4 brake fluid, the fluid must be changed every 24 months.
This interval is time based only, mileage intervals do not apply.
20_WD_OM_EN_USC_t.book Page 360
Page 363 of 464
361
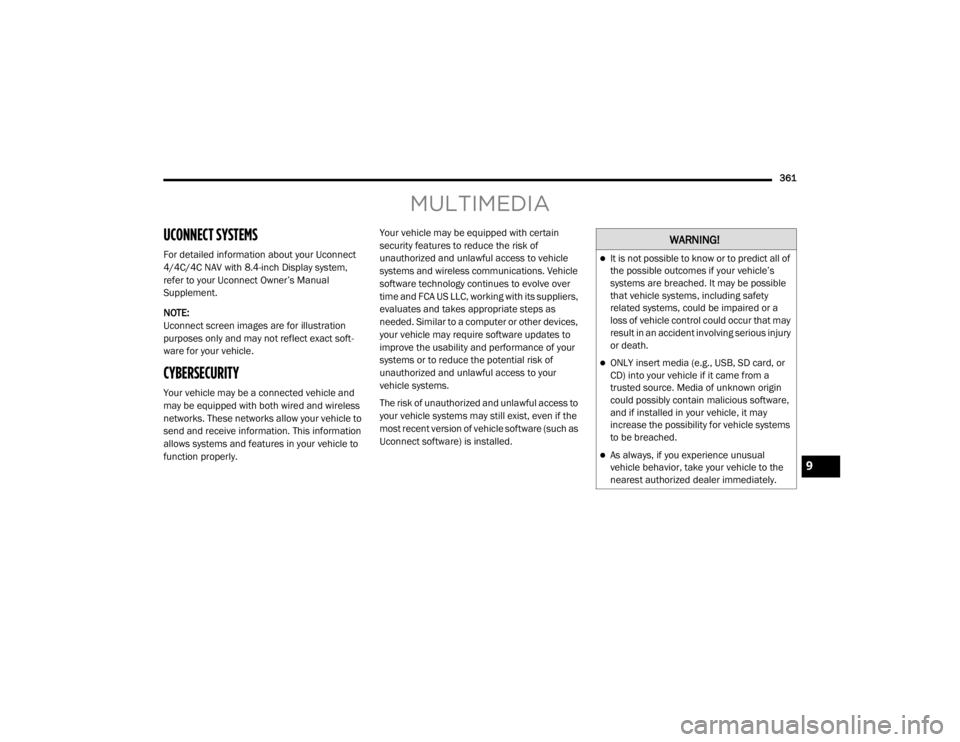
MULTIMEDIA
UCONNECT SYSTEMS
For detailed information about your Uconnect
4/4C/4C NAV with 8.4-inch Display system,
refer to your Uconnect Owner’s Manual
Supplement.
NOTE:
Uconnect screen images are for illustration
purposes only and may not reflect exact soft-
ware for your vehicle.
CYBERSECURITY
Your vehicle may be a connected vehicle and
may be equipped with both wired and wireless
networks. These networks allow your vehicle to
send and receive information. This information
allows systems and features in your vehicle to
function properly. Your vehicle may be equipped with certain
security features to reduce the risk of
unauthorized and unlawful access to vehicle
systems and wireless communications. Vehicle
software technology continues to evolve over
time and FCA US LLC, working with its suppliers,
evaluates and takes appropriate steps as
needed. Similar to a computer or other devices,
your vehicle may require software updates to
improve the usability and performance of your
systems or to reduce the potential risk of
unauthorized and unlawful access to your
vehicle systems.
The risk of unauthorized and unlawful access to
your vehicle systems may still exist, even if the
most recent version of vehicle software (such as
Uconnect software) is installed.
WARNING!
It is not possible to know or to predict all of
the possible outcomes if your vehicle’s
systems are breached. It may be possible
that vehicle systems, including safety
related systems, could be impaired or a
loss of vehicle control could occur that may
result in an accident involving serious injury
or death.
ONLY insert media (e.g., USB, SD card, or
CD) into your vehicle if it came from a
trusted source. Media of unknown origin
could possibly contain malicious software,
and if installed in your vehicle, it may
increase the possibility for vehicle systems
to be breached.
As always, if you experience unusual
vehicle behavior, take your vehicle to the
nearest authorized dealer immediately.9
20_WD_OM_EN_USC_t.book Page 361
Page 364 of 464
362MULTIMEDIA
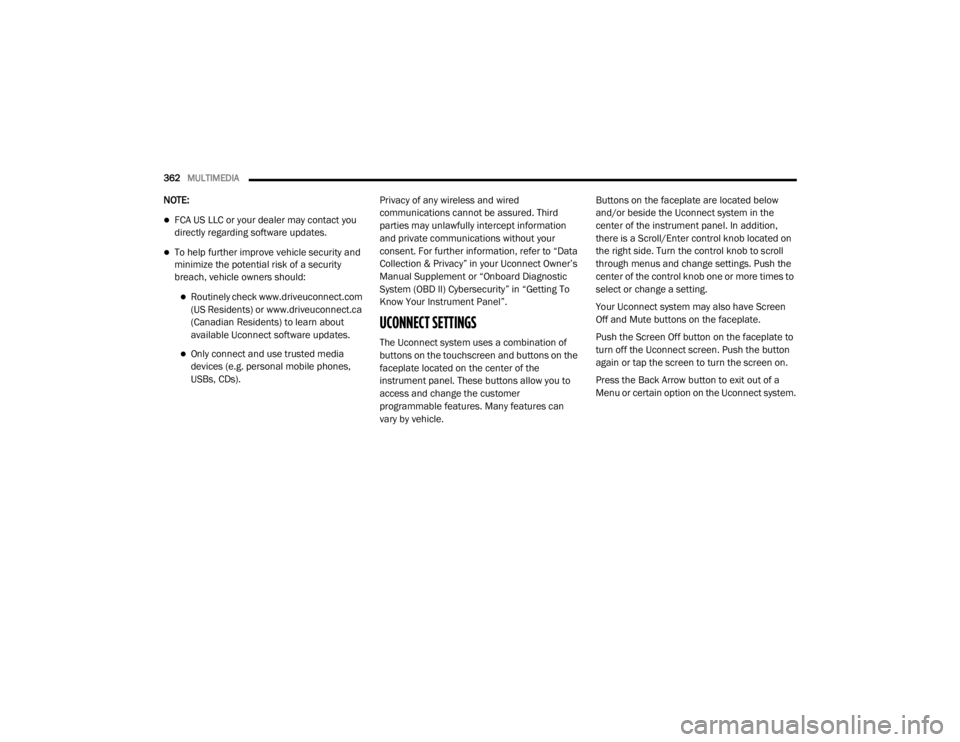
NOTE:
FCA US LLC or your dealer may contact you
directly regarding software updates.
To help further improve vehicle security and
minimize the potential risk of a security
breach, vehicle owners should:
Routinely check www.driveuconnect.com
(US Residents) or www.driveuconnect.ca
(Canadian Residents) to learn about
available Uconnect software updates.
Only connect and use trusted media
devices (e.g. personal mobile phones,
USBs, CDs). Privacy of any wireless and wired
communications cannot be assured. Third
parties may unlawfully intercept information
and private communications without your
consent. For further information, refer to “Data
Collection & Privacy” in your Uconnect Owner’s
Manual Supplement or “Onboard Diagnostic
System (OBD II) Cybersecurity” in “Getting To
Know Your Instrument Panel”.
UCONNECT SETTINGS
The Uconnect system uses a combination of
buttons on the touchscreen and buttons on the
faceplate located on the center of the
instrument panel. These buttons allow you to
access and change the customer
programmable features. Many features can
vary by vehicle. Buttons on the faceplate are located below
and/or beside the Uconnect system in the
center of the instrument panel. In addition,
there is a Scroll/Enter control knob located on
the right side. Turn the control knob to scroll
through menus and change settings. Push the
center of the control knob one or more times to
select or change a setting.
Your Uconnect system may also have Screen
Off and Mute buttons on the faceplate.
Push the Screen Off button on the faceplate to
turn off the Uconnect screen. Push the button
again or tap the screen to turn the screen on.
Press the Back Arrow button to exit out of a
Menu or certain option on the Uconnect system.
20_WD_OM_EN_USC_t.book Page 362
Page 365 of 464
MULTIMEDIA363
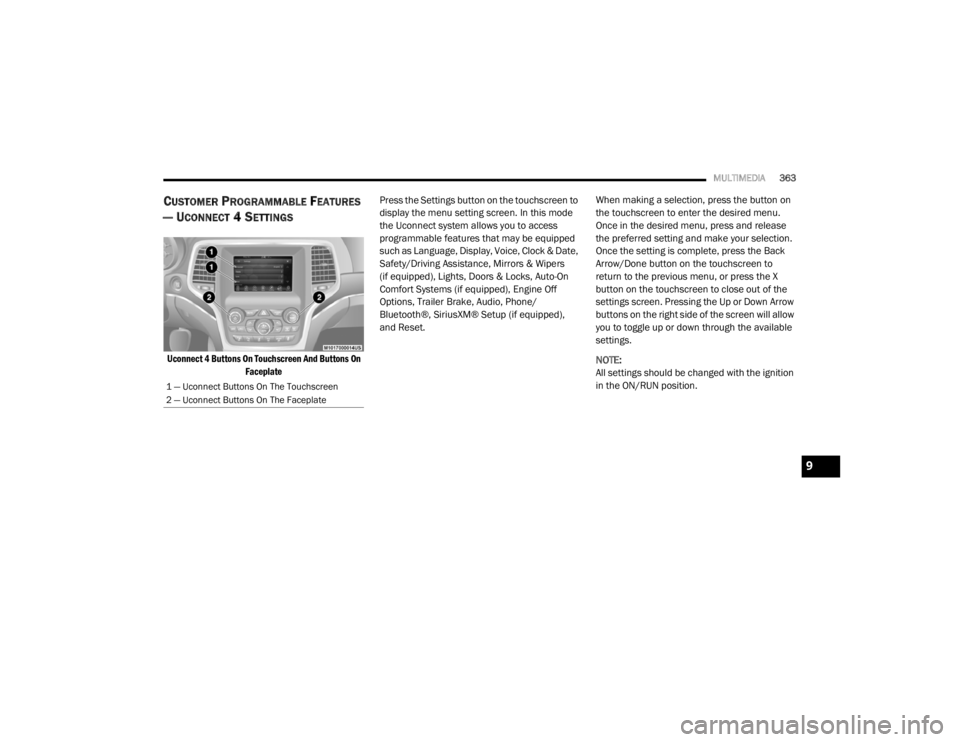
CUSTOMER PROGRAMMABLE FEATURES
— U
CONNECT 4 SETTINGS
Uconnect 4 Buttons On Touchscreen And Buttons On
Faceplate
Press the Settings button on the touchscreen to
display the menu setting screen. In this mode
the Uconnect system allows you to access
programmable features that may be equipped
such as Language, Display, Voice, Clock & Date,
Safety/Driving Assistance, Mirrors & Wipers
(if equipped), Lights, Doors & Locks, Auto-On
Comfort Systems (if equipped), Engine Off
Options, Trailer Brake, Audio, Phone/
Bluetooth®, SiriusXM® Setup (if equipped),
and Reset.
When making a selection, press the button on
the touchscreen to enter the desired menu.
Once in the desired menu, press and release
the preferred setting and make your selection.
Once the setting is complete, press the Back
Arrow/Done button on the touchscreen to
return to the previous menu, or press the X
button on the touchscreen to close out of the
settings screen. Pressing the Up or Down Arrow
buttons on the right side of the screen will allow
you to toggle up or down through the available
settings.
NOTE:
All settings should be changed with the ignition
in the ON/RUN position.
1 — Uconnect Buttons On The Touchscreen
2 — Uconnect Buttons On The Faceplate
9
20_WD_OM_EN_USC_t.book Page 363
Page 366 of 464
364MULTIMEDIA
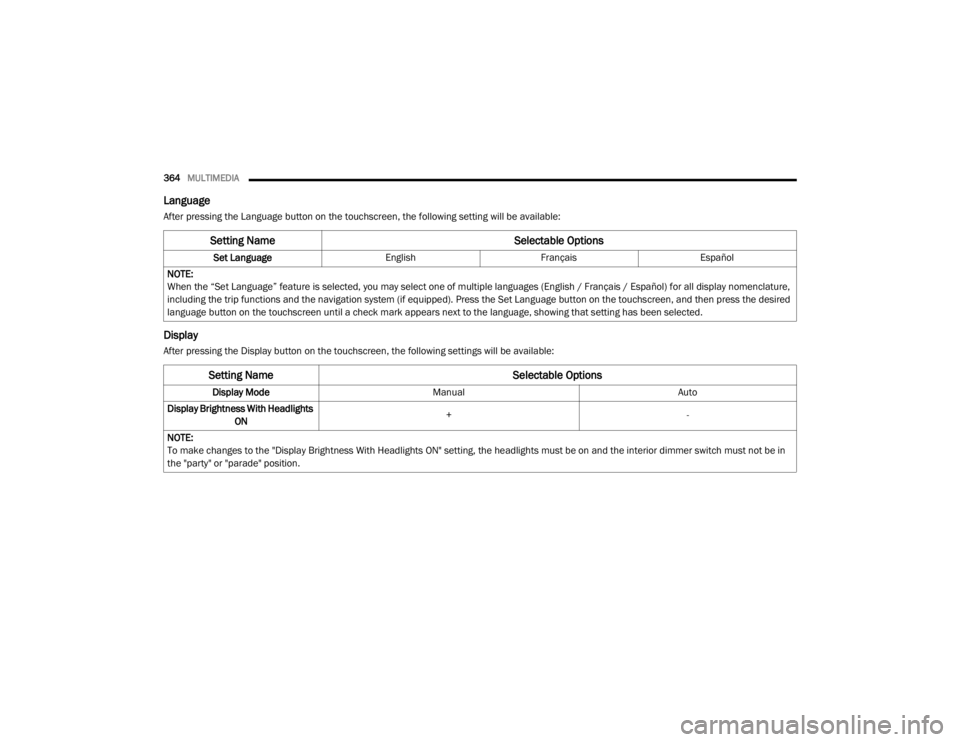
Language
After pressing the Language button on the touchscreen, the following setting will be available:
Display
After pressing the Display button on the touchscreen, the following settings will be available:
Setting Name Selectable Options
Set LanguageEnglishFrançais Español
NOTE:
When the “Set Language” feature is selected, you may select one of multiple languages (English / Français / Español) for all display nomenclature,
including the trip functions and the navigation system (if equipped). Press the Set Language button on the touchscreen, and then press the desired
language button on the touchscreen until a check mark appears next to the language, showing that setting has been selected.
Setting Name Selectable Options
Display ModeManual Auto
Display Brightness With Headlights ON +
-
NOTE:
To make changes to the "Display Brightness With Headlights ON" setting, the headlights must be on and the interior dimmer switch must not be in
the "party" or "parade" position.
20_WD_OM_EN_USC_t.book Page 364
Page 367 of 464
MULTIMEDIA365
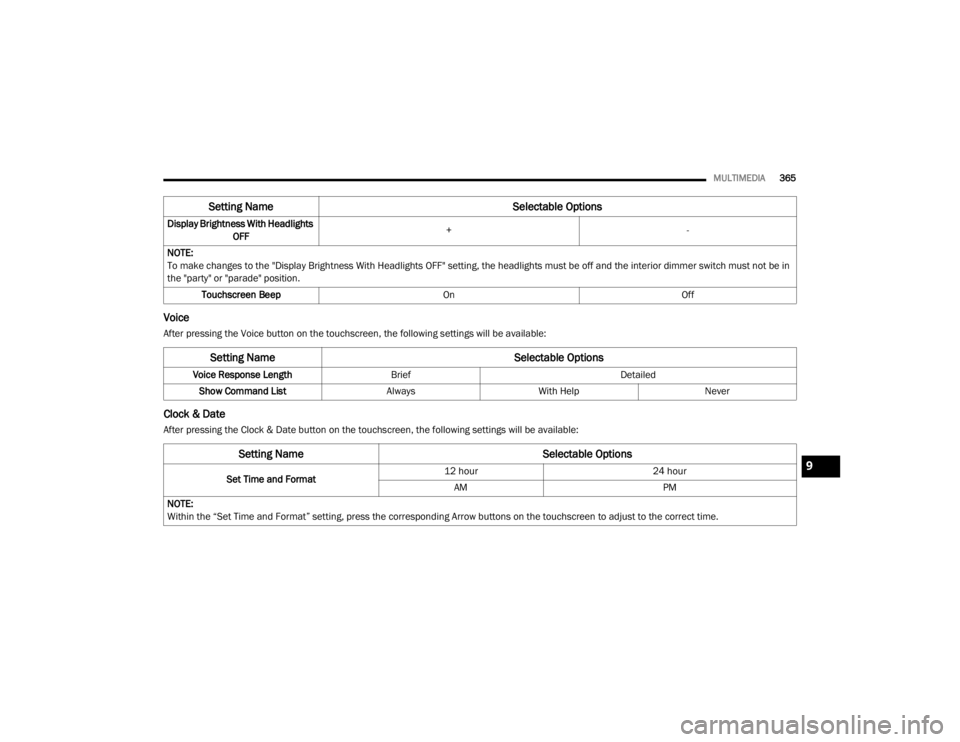
Voice
After pressing the Voice button on the touchscreen, the following settings will be available:
Clock & Date
After pressing the Clock & Date button on the touchscreen, the following settings will be available:Display Brightness With Headlights
OFF +
-
NOTE:
To make changes to the "Display Brightness With Headlights OFF" setting, the headlights must be off and the interior dimmer switch must not be in
the "party" or "parade" position. Touchscreen Beep OnOff
Setting Name Selectable Options
Setting NameSelectable Options
Voice Response LengthBrief Detailed
Show Command List AlwaysWith Help Never
Setting Name Selectable Options
Set Time and Format12 hour
24 hour
AM PM
NOTE:
Within the “Set Time and Format” setting, press the corresponding Arrow buttons on the touchscreen to adjust to the correct time.
9
20_WD_OM_EN_USC_t.book Page 365
Page 368 of 464
366MULTIMEDIA
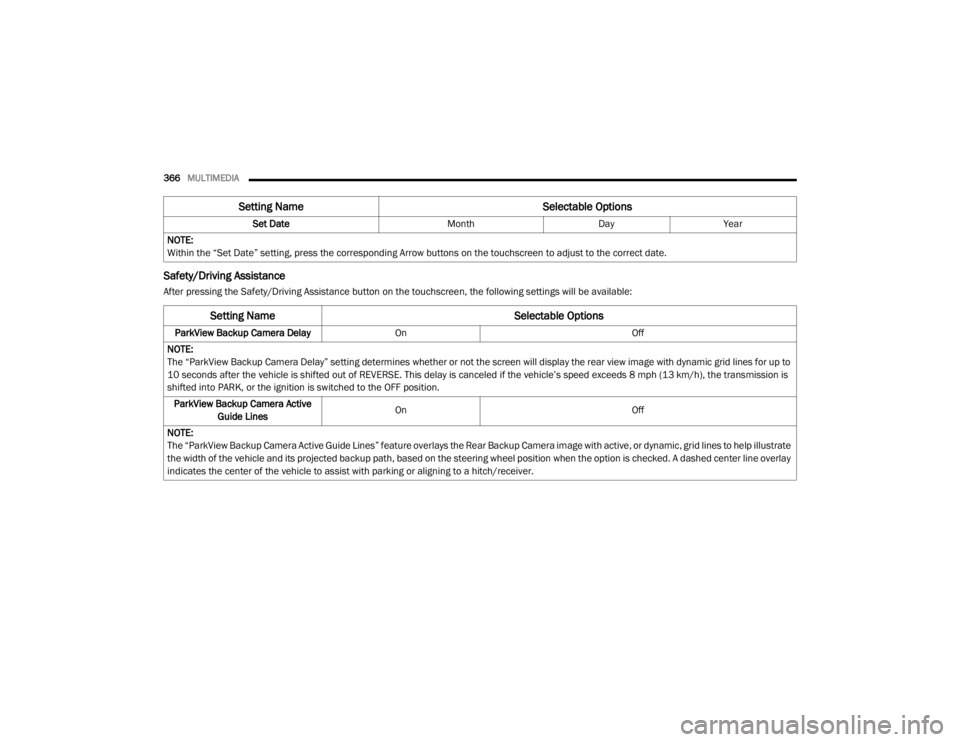
Safety/Driving Assistance
After pressing the Safety/Driving Assistance button on the touchscreen, the following settings will be available: Set Date
MonthDayYear
NOTE:
Within the “Set Date” setting, press the corresponding Arrow buttons on the touchscreen to adjust to the correct date.
Setting Name Selectable Options
Setting NameSelectable Options
ParkView Backup Camera DelayOn Off
NOTE:
The “ParkView Backup Camera Delay” setting determines whether or not the screen will display the rear view image with dynamic grid lines for up to
10 seconds after the vehicle is shifted out of REVERSE. This delay is canceled if the vehicle’s speed exceeds 8 mph (13 km/h), the transmission is
shifted into PARK, or the ignition is switched to the OFF position. ParkView Backup Camera Active Guide Lines On
Off
NOTE:
The “ParkView Backup Camera Active Guide Lines” feature overlays the Rear Backup Camera image with active, or dynamic, grid lines to help illustrate
the width of the vehicle and its projected backup path, based on the steering wheel position when the option is checked. A dashed center line overlay
indicates the center of the vehicle to assist with parking or aligning to a hitch/receiver.
20_WD_OM_EN_USC_t.book Page 366
Page 369 of 464
MULTIMEDIA367
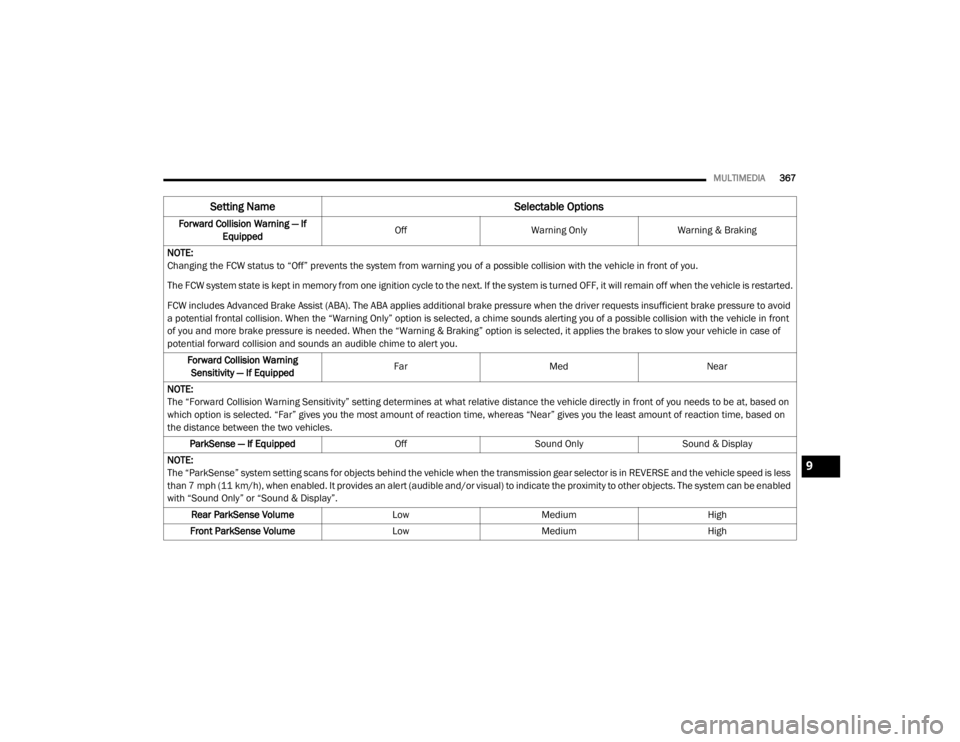
Forward Collision Warning — If
Equipped Off
Warning Only Warning & Braking
NOTE:
Changing the FCW status to “Off” prevents the system from warning you of a possible collision with the vehicle in front of you.
The FCW system state is kept in memory from one ignition cycle to the next. If the system is turned OFF, it will remain off when the vehicle is restarted.
FCW includes Advanced Brake Assist (ABA). The ABA applies additional brake pressure when the driver requests insufficient brake pressure to avoid
a potential frontal collision. When the “Warning Only” option is selected, a chime sounds alerting you of a possible collision with the vehicle in front
of you and more brake pressure is needed. When the “Warning & Braking” option is selected, it applies the brakes to slow your vehicle in case of
potential forward collision and sounds an audible chime to alert you. Forward Collision Warning Sensitivity — If Equipped Far
Med Near
NOTE:
The “Forward Collision Warning Sensitivity” setting determines at what relative distance the vehicle directly in front of you needs to be at, based on
which option is selected. “Far” gives you the most amount of reaction time, whereas “Near” gives you the least amount of reaction time, based on
the distance between the two vehicles. ParkSense — If Equipped OffSound Only Sound & Display
NOTE:
The “ParkSense” system setting scans for objects behind the vehicle when the transmission gear selector is in REVERSE and the vehicle speed is less
than 7 mph (11 km/h), when enabled. It provides an alert (audible and/or visual) to indicate the proximity to other objects. The system can be enabled
with “Sound Only” or “Sound & Display”. Rear ParkSense Volume LowMedium High
Front ParkSense Volume LowMedium High
Setting Name Selectable Options
9
20_WD_OM_EN_USC_t.book Page 367
Page 370 of 464
368MULTIMEDIA
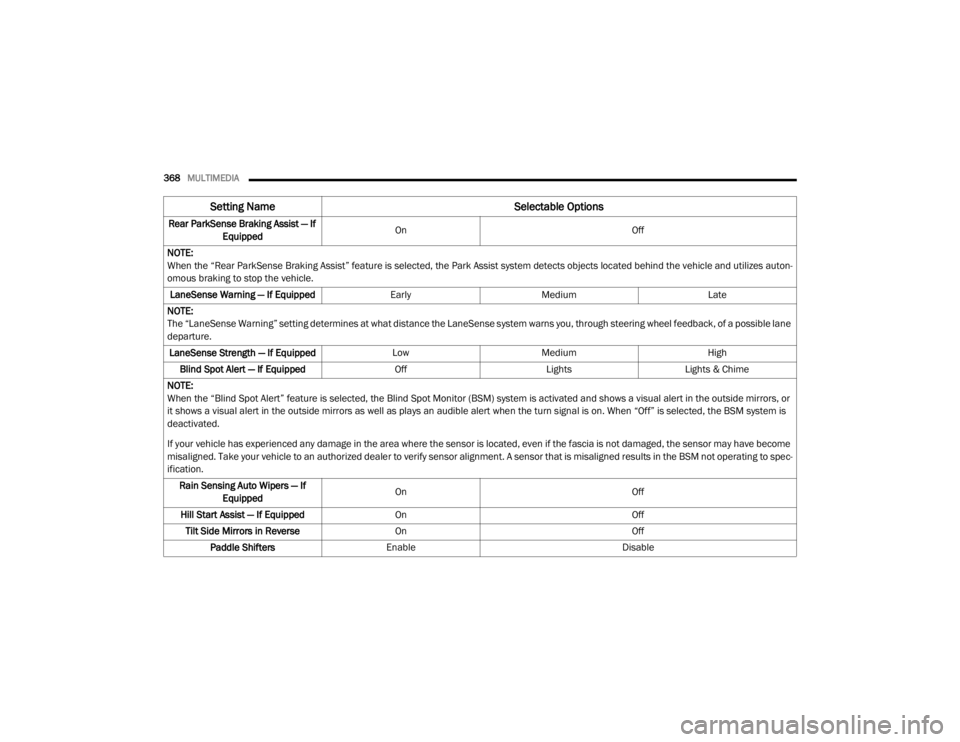
Rear ParkSense Braking Assist — If
Equipped On
Off
NOTE:
When the “Rear ParkSense Braking Assist” feature is selected, the Park Assist system detects objects located behind the vehicle and utilizes auton -
omous braking to stop the vehicle.
LaneSense Warning — If Equipped EarlyMedium Late
NOTE:
The “LaneSense Warning” setting determines at what distance the LaneSense system warns you, through steering wheel feedback, of a possible lane
departure. LaneSense Strength — If Equipped LowMedium High
Blind Spot Alert — If Equipped OffLightsLights & Chime
NOTE:
When the “Blind Spot Alert” feature is selected, the Blind Spot Monitor (BSM) system is activated and shows a visual alert in the outside mirrors, or
it shows a visual alert in the outside mirrors as well as plays an audible alert when the turn signal is on. When “Off” is selected, the BSM system is
deactivated.
If your vehicle has experienced any damage in the area where the sensor is located, even if the fascia is not damaged, the sensor may have become
misaligned. Take your vehicle to an authorized dealer to verify sensor alignment. A sensor that is misaligned results in the BSM not operating to spec -
ification.
Rain Sensing Auto Wipers — If Equipped On
Off
Hill Start Assist — If Equipped On Off
Tilt Side Mirrors in Reverse On Off
Paddle Shifters Enable Disable
Setting Name Selectable Options
20_WD_OM_EN_USC_t.book Page 368