ECO mode DODGE DURANGO 2020 Workshop Manual
[x] Cancel search | Manufacturer: DODGE, Model Year: 2020, Model line: DURANGO, Model: DODGE DURANGO 2020Pages: 464, PDF Size: 22.14 MB
Page 195 of 464
STARTING AND OPERATING193
When the Fuel Economy (ECO) Mode is enabled,
the vehicle control systems will change the
following:
The transmission will upshift sooner and
downshift later.
In SRT models, the transmission will launch
(from a stop) in SECOND gear.
The overall driving performance will be more
conservative.
Some ECO mode functions may be tempo -
rarily inhibited based on temperature and
other factors.
EIGHT-SPEED AUTOMATIC
T
RANSMISSION
The transmission gear range is displayed both
on the gear selector and in the instrument
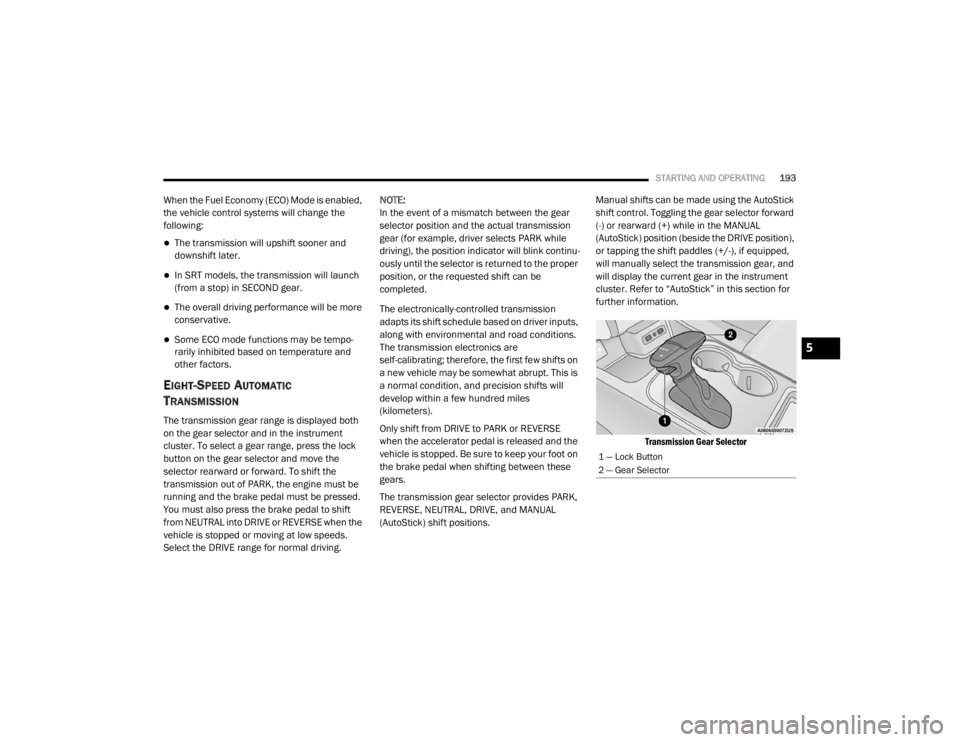
cluster. To select a gear range, press the lock
button on the gear selector and move the
selector rearward or forward. To shift the
transmission out of PARK, the engine must be
running and the brake pedal must be pressed.
You must also press the brake pedal to shift
from NEUTRAL into DRIVE or REVERSE when the
vehicle is stopped or moving at low speeds.
Select the DRIVE range for normal driving. NOTE:
In the event of a mismatch between the gear
selector position and the actual transmission
gear (for example, driver selects PARK while
driving), the position indicator will blink continu
-
ously until the selector is returned to the proper
position, or the requested shift can be
completed.
The electronically-controlled transmission
adapts its shift schedule based on driver inputs,
along with environmental and road conditions.
The transmission electronics are
self-calibrating; therefore, the first few shifts on
a new vehicle may be somewhat abrupt. This is
a normal condition, and precision shifts will
develop within a few hundred miles
(kilometers).
Only shift from DRIVE to PARK or REVERSE
when the accelerator pedal is released and the
vehicle is stopped. Be sure to keep your foot on
the brake pedal when shifting between these
gears.
The transmission gear selector provides PARK,
REVERSE, NEUTRAL, DRIVE, and MANUAL
(AutoStick) shift positions. Manual shifts can be made using the AutoStick
shift control. Toggling the gear selector forward
(-) or rearward (+) while in the MANUAL
(AutoStick) position (beside the DRIVE position),
or tapping the shift paddles (+/-), if equipped,
will manually select the transmission gear, and
will display the current gear in the instrument
cluster. Refer to “AutoStick” in this section for
further information.
Transmission Gear Selector
1 — Lock Button
2 — Gear Selector
5
20_WD_OM_EN_USC_t.book Page 193
Page 198 of 464
196STARTING AND OPERATING
NOTE:
If the gear selector cannot be moved to the
PARK, REVERSE, or NEUTRAL position (when
pushed forward) it is probably in the MANUAL
(AutoStick, +/-) position (beside the DRIVE posi -
tion). In MANUAL (AutoStick) mode, the trans -
mission gear is displayed in the instrument
cluster (as 1, 2, 3, etc.). Move the gear selector
to the right (into the DRIVE position) for access
to PARK, REVERSE, and NEUTRAL.
REVERSE (R)
This range is for moving the vehicle backward.
Shift into REVERSE only after the vehicle has
come to a complete stop.
NEUTRAL (N)
Use this range when the vehicle is standing for
prolonged periods with the engine running.
Apply the parking brake and shift the
transmission into PARK (P) if you must exit the
vehicle. DRIVE (D)
This range should be used for most city and
highway driving. It provides the smoothest
upshifts and downshifts, and the best fuel
economy. The transmission automatically
upshifts through all forward gears. The DRIVE position provides optimum driving
characteristics under all normal operating
conditions.
When frequent transmission shifting occurs
(such as when operating the vehicle under
heavy loading conditions, in hilly terrain,
traveling into strong head winds, or while towing
a heavy trailer), use the AutoStick shift control
(refer to AutoStick in this section for further
information) to select a lower gear. Under these
conditions, using a lower gear will improve
performance and extend transmission life by
reducing excessive shifting and heat buildup.
During cold temperatures, transmission
operation may be modified depending on
engine and transmission temperature as well
as vehicle speed. This feature improves warm
up time of the engine and transmission to
achieve maximum efficiency. Engagement of
the torque converter clutch is inhibited until the
transmission fluid is warm. Normal operation
will resume once the transmission temperature
has risen to a suitable level.WARNING!
Do not coast in NEUTRAL and never turn off
the ignition to coast down a hill. These are
unsafe practices that limit your response to
changing traffic or road conditions. You might
lose control of the vehicle and have a
collision.
CAUTION!
Towing the vehicle, coasting, or driving for any
other reason with the transmission in
NEUTRAL can cause severe transmission
damage.
Refer to “Recreational Towing” in “Starting
And Operating” and “Towing A Disabled
Vehicle” in “In Case Of Emergency” for further
information.
20_WD_OM_EN_USC_t.book Page 196
Page 199 of 464
STARTING AND OPERATING197
Manual (M)
The MANUAL (M, +/-) position (beside the DRIVE
position) enables full manual control of
transmission shifting (also known as AutoStick
mode; refer to “AutoStick” in this section for
further information). Toggling the gear selector
forward (-) or rearward (+) while in the MANUAL
(AutoStick) position will manually select the
transmission gear, and will display the current
gear in the instrument cluster as 1, 2, 3, etc.
Transmission Limp Home Mode
Transmission function is monitored
electronically for abnormal conditions. If a
condition is detected that could result in
transmission damage, Transmission Limp
Home Mode is activated. In this mode, the
transmission may operate only in certain gears,
or may not shift at all. Vehicle performance may
be severely degraded and the engine may stall.
In some situations, the transmission may not
re-engage if the engine is turned off and
restarted. The Malfunction Indicator Light (MIL)
may be illuminated. A message in the
instrument cluster will inform the driver of the
more serious conditions, and indicate what
actions may be necessary. In the event of a momentary problem, the
transmission can be reset to regain all forward
gears by performing the following steps:
NOTE:
In cases where the instrument cluster message
indicates the transmission may not re-engage
after engine shutdown, perform this procedure
only in a desired location (preferably, at an
authorized dealer).
1. Stop the vehicle.
2. Shift the transmission into PARK (P), if
possible. If not, shift the transmission to
NEUTRAL (N).
3. Push and hold the ignition switch until the engine turns off.
4. Wait approximately 30 seconds.
5. Restart the engine.
6. Shift into the desired gear range. If the problem is no longer detected, the
transmission will return to normal
operation. NOTE:
Even if the transmission can be reset, we
recommend that you visit an authorized dealer
at your earliest possible convenience. An autho
-
rized dealer has diagnostic equipment to
assess the condition of your transmission.
If the transmission cannot be reset, authorized
dealer service is required.
AutoStick
AutoStick is a driver-interactive transmission
feature providing manual shift control, giving
you more control of the vehicle. AutoStick
allows you to maximize engine braking,
eliminate undesirable upshifts and downshifts,
and improve overall vehicle performance. This
system can also provide you with more control
during passing, city driving, cold slippery
conditions, mountain driving, trailer towing, and
many other situations.
5
20_WD_OM_EN_USC_t.book Page 197
Page 200 of 464
198STARTING AND OPERATING
Operation
To activate AutoStick mode, move the gear
selector into the MANUAL (M) position (beside
the DRIVE (D) position), or tap one of the shift
paddles on the steering wheel (if equipped).
Tapping the (-) shift paddle (if equipped) to
enter AutoStick mode will downshift the
transmission to the next lower gear, while
tapping (+) to enter AutoStick mode will retain
the current gear. The current transmission gear
will be displayed in the instrument cluster. In
AutoStick mode, you can use the gear selector
(in the MANUAL position), or the shift paddles (if
equipped), to manually shift the transmission.
Tapping the gear selector forward (-) while in the
MANUAL (M) position, or tapping the (-) shift
paddle (if equipped), will downshift the
transmission to the next lower gear. Tapping the
selector rearward (+) or tapping the (+) shift
paddle (if equipped) will command an upshift.
NOTE:
The shift paddles (if equipped) may be disabled
(or re-enabled, as desired) using the Uconnect
Personal Settings. In AutoStick mode, the transmission will shift up
or down when (+/-) is manually selected by the
driver, unless an engine lugging or overspeed
condition would result. It will remain in the
selected gear until another upshift or downshift
is chosen, except as described below.
The transmission will automatically down
-
shift as the vehicle slows (to prevent engine
lugging) and will display the current gear.
The transmission will automatically down -
shift to FIRST gear when coming to a stop.
After a stop, the driver should manually
upshift (+) the transmission as the vehicle is
accelerated.
You can start out, from a stop, in FIRST or
SECOND gear. Tapping (+) at a stop will allow
starting in SECOND gear. Starting out in
SECOND gear can be helpful in snowy or icy
conditions.
If a requested downshift would cause the
engine to over-speed, that shift will not occur.
The system will ignore attempts to upshift at
too low of a vehicle speed.
Holding the (-) paddle depressed (if
equipped), or holding the gear selector in the
(-) position, will downshift the transmission to
the lowest gear possible at the current
speed.
Transmission shifting will be more noticeable
when AutoStick is enabled.
The system may revert to automatic shift
mode if a fault or overheat condition is
detected.
To disengage AutoStick mode, return the gear
selector to the DRIVE (D) position, or press and
hold the (+) shift paddle (if equipped, and if the
gear selector is already in DRIVE) until "D" is
once again indicated in the instrument cluster.
You can shift in or out of AutoStick mode at any
time without taking your foot off the accelerator
pedal.
WARNING!
Do not downshift for additional engine
braking on a slippery surface. The drive
wheels could lose their grip and the vehicle
could skid, causing a collision or personal
injury.
20_WD_OM_EN_USC_t.book Page 198
Page 201 of 464
STARTING AND OPERATING199
SPORT MODE — IF EQUIPPED
Your vehicle is equipped with a Sport Mode
feature. This mode is a configuration set up for
typical enthusiast driving. The engine,
transmission, and steering systems are all set
to their SPORT settings. Sport Mode will provide
improved throttle response and modified
transmission shift points for an enhanced
driving experience, as well as greater amount of
steering feel. This mode may be activated and
deactivated by pushing the Sport button on the
instrument panel switch bank.
ALL-WHEEL DRIVE OPERATION
SINGLE-SPEED OPERATING
I
NSTRUCTIONS/PRECAUTIONS— IF
E
QUIPPED
This system contains a single-speed (HI range
only) transfer case, which provides convenient
full-time All-Wheel Drive (AWD). No driver
interaction is required. The Brake Traction
Control (BTC) System, which combines standard
ABS and Traction Control, provides resistance
to any wheel that is slipping to allow additional
torque transfer to wheels with traction. NOTE:
This system is not appropriate for conditions
where LOW range is recommended. Refer to
“Driving Tips” in this chapter for further informa-
tion.
ELECTRONICALLY SHIFTED TRANSFER
C
ASE (THREE-POSITION SWITCH) — IF
E
QUIPPED
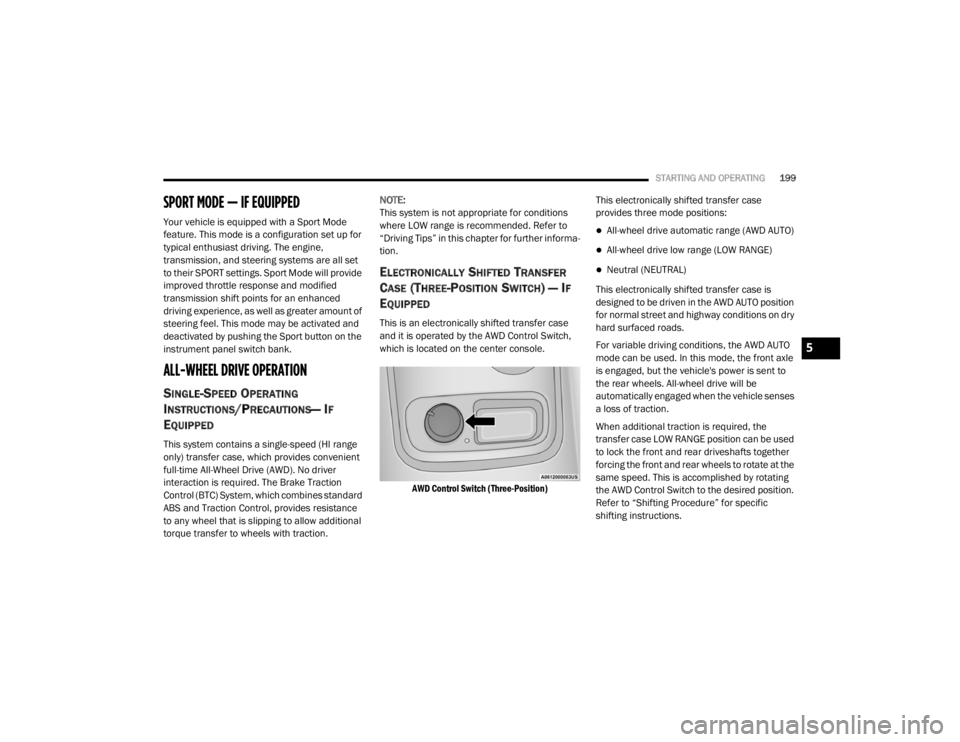
This is an electronically shifted transfer case
and it is operated by the AWD Control Switch,
which is located on the center console.
AWD Control Switch (Three-Position)
This electronically shifted transfer case
provides three mode positions:
All-wheel drive automatic range (AWD AUTO)
All-wheel drive low range (LOW RANGE)
Neutral (NEUTRAL)
This electronically shifted transfer case is
designed to be driven in the AWD AUTO position
for normal street and highway conditions on dry
hard surfaced roads.
For variable driving conditions, the AWD AUTO
mode can be used. In this mode, the front axle
is engaged, but the vehicle's power is sent to
the rear wheels. All-wheel drive will be
automatically engaged when the vehicle senses
a loss of traction.
When additional traction is required, the
transfer case LOW RANGE position can be used
to lock the front and rear driveshafts together
forcing the front and rear wheels to rotate at the
same speed. This is accomplished by rotating
the AWD Control Switch to the desired position.
Refer to “Shifting Procedure” for specific
shifting instructions.
5
20_WD_OM_EN_USC_t.book Page 199
Page 203 of 464

STARTING AND OPERATING201
For additional information on the appropriate
use of each transfer case mode position, see
the information below:
AWD Auto
All-Wheel Drive Auto Range – This range sends
power to the rear wheels. The all-wheel drive
system will be automatically engaged when the
vehicle senses a loss of traction. Additional
traction for varying road conditions.
LOW Range
All-Wheel Drive Low Range – This range
provides low speed all-wheel drive. Locks the
front and rear driveshafts together forcing the
front and rear wheels to rotate at the same
speed. Additional traction and maximum pulling
power for loose, slippery road surfaces only. Do
not exceed 25 mph (40 km/h).
NEUTRAL (N)
This range disengages both the front and rear
driveshafts from the powertrain. To be used for
flat towing behind another vehicle. Refer to
“Recreational Towing” in this chapter for further
information.
SHIFTING PROCEDURE
NOTE:
If any of the requirements to select a new
transfer case position have not been met, the
transfer case will not shift. The position indi -
cator light for the previous position will
remain on and the newly selected position
indicator light will continue to flash until all
the requirements for the selected position
have been met. To retry a shift: return the control switch back
to the original position, make certain all shift
requirements have been met, wait five
seconds and try the shift again.
If all the requirements to select a new
transfer case position have been met, the
current position indicator light will turn off,
the selected position indicator light will flash
until the transfer case completes the shift.
When the shift is complete, the position indi
-
cator light for the selected position will stop
flashing and remain on.
AWD Auto To Low Range
NOTE:
When shifting into or out of LOW RANGE some
gear noise may be heard. This noise is normal
and is not detrimental to the vehicle or occu -
pants.
Shifting can be performed with the vehicle
rolling 2 to 3 mph (3 to 5 km/h) or completely
stopped. Use either of the following procedures:
WARNING!
You or others could be injured or killed if you
leave the vehicle unattended with the transfer
case in the NEUTRAL position without first
fully engaging the parking brake. The transfer
case NEUTRAL position disengages both the
front and rear drive shafts from the
powertrain and will allow the vehicle to roll,
even if the transmission is in PARK. The
parking brake should always be applied when
the driver is not in the vehicle.
5
20_WD_OM_EN_USC_t.book Page 201
Page 215 of 464
STARTING AND OPERATING213
The ACC system applies the brake down to a
full stop when following a target vehicle. If an
ACC host vehicle follows a target vehicle to a
standstill, the host vehicle will release the
vehicle brakes two seconds after coming to a
full stop.
The ACC system maintains set speed when
driving uphill and downhill. However, a slight
speed change on moderate hills is normal. In
addition, downshifting may occur while
climbing uphill or descending downhill. This
is normal operation and necessary to main -
tain set speed. When driving uphill and down -
hill, the ACC system will cancel if the braking
temperature exceeds normal range (over -
heated).
SETTING THE FOLLOWING DISTANCE IN
ACC
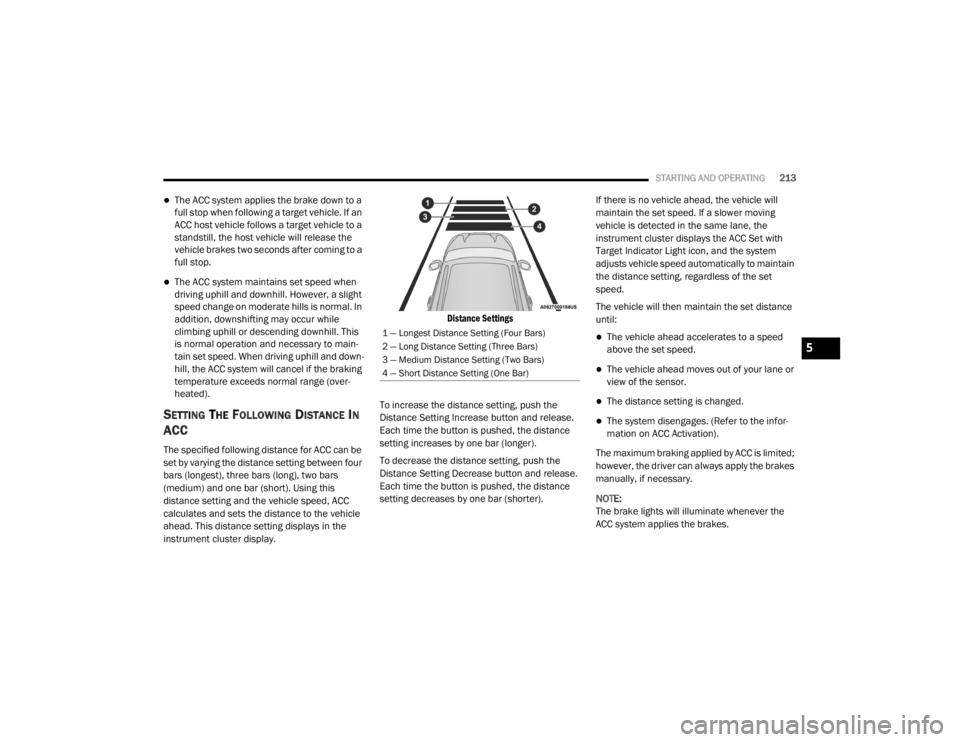
The specified following distance for ACC can be
set by varying the distance setting between four
bars (longest), three bars (long), two bars
(medium) and one bar (short). Using this
distance setting and the vehicle speed, ACC
calculates and sets the distance to the vehicle
ahead. This distance setting displays in the
instrument cluster display.
Distance Settings
To increase the distance setting, push the
Distance Setting Increase button and release.
Each time the button is pushed, the distance
setting increases by one bar (longer).
To decrease the distance setting, push the
Distance Setting Decrease button and release.
Each time the button is pushed, the distance
setting decreases by one bar (shorter). If there is no vehicle ahead, the vehicle will
maintain the set speed. If a slower moving
vehicle is detected in the same lane, the
instrument cluster displays the ACC Set with
Target Indicator Light icon, and the system
adjusts vehicle speed automatically to maintain
the distance setting, regardless of the set
speed.
The vehicle will then maintain the set distance
until:
The vehicle ahead accelerates to a speed
above the set speed.
The vehicle ahead moves out of your lane or
view of the sensor.
The distance setting is changed.
The system disengages. (Refer to the infor
-
mation on ACC Activation).
The maximum braking applied by ACC is limited;
however, the driver can always apply the brakes
manually, if necessary.
NOTE:
The brake lights will illuminate whenever the
ACC system applies the brakes.
1 — Longest Distance Setting (Four Bars)
2 — Long Distance Setting (Three Bars)
3 — Medium Distance Setting (Two Bars)
4 — Short Distance Setting (One Bar)
5
20_WD_OM_EN_USC_t.book Page 213
Page 217 of 464
STARTING AND OPERATING215
Push the Adaptive Cruise Control (ACC) on/off
button (located on the steering wheel) until one
of the following appears in the instrument
cluster display:
Adaptive Cruise Control Off
When ACC is deactivated, the display will read
“Adaptive Cruise Control Off.”
Adaptive Cruise Control Ready
When ACC is activated, but the vehicle speed
setting has not been selected, the display will
read “Adaptive Cruise Control Ready.”
Adaptive Cruise Control Set
When the SET (+) or the SET (-) button (located
on the steering wheel) is pushed, the display will
read “ACC SET.”
When ACC is set, the set speed will show in the
instrument cluster display.
The ACC screen may display once again if any
ACC activity occurs, which may include any of
the following:
System Cancel
Driver Override
System Off
ACC Proximity Warning
ACC Unavailable Warning
The instrument cluster display will return to the
last display selected after five seconds of no
ACC display activity
DISPLAY WARNINGS AND
M
AINTENANCE
“Wipe Front Radar Sensor In Front Of
Vehicle” Warning
The “ACC/FCW Unavailable Wipe Front Radar
Sensor” warning will display and a chime will
sound when conditions temporarily limit system
performance.
This most often occurs at times of poor visibility,
such as in snow or heavy rain. The ACC system
may also become temporarily blinded due to
obstructions, such as mud, dirt or ice. In these
cases, the instrument cluster display will display
“ACC/FCW Unavailable Wipe Front Radar
Sensor” and the system will deactivate.
The “ACC/FCW Unavailable Wipe Front Radar
Sensor” message can sometimes be displayed
while driving in highly reflective areas (i.e.
tunnels with reflective tiles, or ice and snow). The ACC system will recover after the vehicle
has left these areas. Under rare conditions,
when the radar is not tracking any vehicles or
objects in its path this warning may temporarily
occur.
NOTE:
If the “ACC/FCW Unavailable Wipe Front Radar
Sensor” warning is active Normal (Fixed Speed)
Cruise Control is still available. For additional
information refer to “Normal (Fixed Speed)
Cruise Control Mode” in this section.
If weather conditions are not a factor, the driver
should examine the sensor. It may require
cleaning or removal of an obstruction. The
sensor is located in the center of the vehicle
behind the lower grille.
To keep the ACC System operating properly, it is
important to note the following maintenance
items:
Always keep the sensor clean. Carefully wipe
the sensor lens with a soft cloth. Be cautious
not to damage the sensor lens.
Do not remove any screws from the sensor.
Doing so could cause an ACC system
malfunction or failure and require a sensor
realignment.
5
20_WD_OM_EN_USC_t.book Page 215
Page 221 of 464
STARTING AND OPERATING219
GENERAL INFORMATION
The following regulatory statement applies to all
Radio Frequency (RF) devices equipped in this
vehicle:
This device complies with Part 15 of the FCC
Rules and with Innovation, Science and
Economic Development Canada license-exempt
RSS standard(s). Operation is subject to the
following two conditions:
1. This device may not cause harmful
interference, and
2. This device must accept any interference received, including interference that may
cause undesired operation.
Le présent appareil est conforme aux CNR
d`Innovation, Science and Economic
Development applicables aux appareils radio
exempts de licence. L'exploitation est autorisée
aux deux conditions suivantes:
1. l'appareil ne doit pas produire de brouillage, et
2. l'utilisateur de l'appareil doit accepter tout
brouillage radioélectrique subi, même si le
brouillage est susceptible d'en compro -
mettre le fonctionnement.
La operación de este equipo está sujeta a las
siguientes dos condiciones:
1. es posible que este equipo o dispositivo no cause interferencia perjudicial y
2. este equipo o dispositivo debe aceptar cualquier interferencia, incluyendo la que
pueda causar su operación no deseada.
NOTE:
Changes or modifications not expressly
approved by the party responsible for compli -
ance could void the user’s authority to operate
the equipment.
NORMAL (FIXED SPEED) CRUISE
C
ONTROL MODE
In addition to Adaptive Cruise Control mode, a
Normal (Fixed Speed) Cruise Control mode is
available for cruising at fixed speeds. The Normal (Fixed Speed) Cruise Control mode
is designed to maintain a set cruising speed
without requiring the driver to operate the
accelerator. Cruise Control can only be
operated if the vehicle speed is above 20 mph
(32 km/h).
To change between the different control modes,
push the Adaptive Cruise Control (ACC) on/off
button which turns the ACC and the Normal
(Fixed Speed) Cruise Control off. Pushing the
Normal (Fixed Speed) Cruise Control on/off
button will result in turning on (changing to) the
Normal (Fixed Speed) Cruise Control mode.
WARNING!
In the Normal (Fixed Speed) Cruise Control
mode, the system will not react to vehicles
ahead. In addition, the proximity warning
does not activate and no alarm will sound
even if you are too close to the vehicle ahead
since neither the presence of the vehicle
ahead nor the vehicle-to-vehicle distance is
detected. Be sure to maintain a safe distance
between your vehicle and the vehicle ahead.
Always be aware which mode is selected.
5
20_WD_OM_EN_USC_t.book Page 219
Page 239 of 464
STARTING AND OPERATING237
CHANGING LANESENSE STATUS
The LaneSense system has settings to adjust
the intensity of the torque warning and the
warning zone sensitivity (early/late) that you
can configure through the Uconnect system
screen. Refer to “Uconnect Settings” in
“Multimedia” for further information.
NOTE:
When enabled the system operates above
37 mph (60 km/h) and below 112 mph
(180 km/h).
Use of the turn signal suppresses the
warnings.
The system will not apply torque to the
steering wheel whenever a safety system
engages (Anti-Lock Brakes, Traction Control
System, Electronic Stability Control, Forward
Collision Warning, etc.).
PARKVIEW REAR BACK UP CAMERA
Your vehicle is equipped with the ParkView Rear
Back Up Camera that allows you to see an
on-screen image of the rear surroundings of
your vehicle whenever the gear selector is put
into REVERSE. The image will be displayed on
the Navigation/Multimedia radio display screen
along with a caution note to “check entire
surroundings” across the top of the screen.
After five seconds this note will disappear. The
ParkView camera is located on the rear of the
vehicle above the rear license plate.
When the vehicle is shifted out of REVERSE
(with camera delay turned off), the rear camera
mode is exited and the navigation or audio
screen appears again.
Manual Activation Of The Backup Camera
1. Press the “Controls” button located on the
bottom of the Uconnect display.
2. Press the “Backup Camera” button to turn the Rear View Camera system on. NOTE:
The ParkView Rear Back Up Camera has
programmable modes of operation that may be
selected through the Uconnect System.
Refer to “Uconnect Settings” in “Multimedia”
for further information.
When the vehicle is shifted out of REVERSE
(with camera delay turned off), the rear camera
mode is exited and the previous screen appears
again. When the vehicle is shifted out of
REVERSE (with camera delay turned on), the
camera image will continue to be displayed for
up to ten seconds, unless the vehicle speed
exceeds 8 mph (13 km/h), the vehicle is shifted
into PARK, the vehicle’s ignition is placed in the
OFF position, or the user presses image defeat
“X” to exit out of the camera video display.
When enabled, active guidelines are overlaid on
the image to illustrate the width of the vehicle
and its projected backup path based on the
steering wheel position. A dashed center line
overlay indicates the center of the vehicle to
assist with parking or aligning to a hitch/
receiver. Different colored zones indicate the
distance to the rear of the vehicle.
5
20_WD_OM_EN_USC_t.book Page 237