tow DODGE DURANGO 2021 Owner's Guide
[x] Cancel search | Manufacturer: DODGE, Model Year: 2021, Model line: DURANGO, Model: DODGE DURANGO 2021Pages: 340, PDF Size: 20.38 MB
Page 106 of 340
104STARTING AND OPERATING
COLD WEATHER OPERATION
(B
ELOW –22°F OR −30°C)
To ensure reliable starting at these temperatures,
use of an externally powered electric engine block
heater (available from an authorized dealer) is
recommended.
AFTER STARTING
The idle speed is controlled automatically, and it
will decrease as the engine warms up.
ENGINE BLOCK HEATER — IF EQUIPPED
The engine block heater warms the engine, and
permits quicker starts in cold weather. Connect the
cord to a standard 110-115 Volt AC electrical
outlet with a grounded, three-wire extension cord.
The engine block heater must be plugged in at
least one hour to have an adequate warming effect
on the engine. The engine block heater cord is located:
3.6L Engine — Bundled and strapped behind the
engine air cleaner assembly.
5.7L Engine — Bundled and strapped in front of
the power distribution center.
ENGINE BREAK-IN RECOMMENDATIONS
A long break-in period is not required for the engine
and drivetrain (transmission and axle) in your
vehicle.
Drive moderately during the first 300 miles
(500 km). After the initial 60 miles (100 km),
speeds up to 50 or 55 mph (80 or 90 km/h) are
desirable.
Brief full-throttle acceleration within the limits of
local traffic laws contributes to a good break-in.
Wide-open throttle acceleration in low gear can be
detrimental and should be avoided.
WARNING!
Never pour fuel or other flammable liquid into
the throttle body air inlet opening in an
attempt to start the vehicle. This could result
in flash fire causing serious personal injury.
Do not attempt to push or tow your vehicle to
get it started. Vehicles equipped with an auto -
matic transmission cannot be started this
way. Unburned fuel could enter the catalytic
converter and once the engine has started,
ignite and damage the converter and vehicle.
If the vehicle has a discharged battery,
booster cables may be used to obtain a start
from a booster battery or the battery in
another vehicle. This type of start can be
dangerous if done improperly Ú page 255.
CAUTION!
To prevent damage to the starter, do not
continuously crank the engine for more than 25
seconds at a time. Wait 60 seconds before
trying again.
WARNING!
Remember to disconnect the engine block
heater cord before driving. Damage to the
110-115 Volt electrical cord could cause
electrocution.
21_WD_OM_EN_USC_t.book Page 104
Page 107 of 340
STARTING AND OPERATING105
(Continued)
The engine oil installed in the engine at the factory
is a high-quality energy conserving type lubricant.
Oil changes should be consistent with anticipated
climate conditions under which vehicle operations
will occur. For the recommended viscosity and
quality grades see Ú
page 322.
NOTE:A new engine may consume some oil during its first
few thousand miles (kilometers) of operation. This
should be considered a normal part of the break-in
and not interpreted as a problem. Please check
your oil level with the engine oil indicator often
during the break-in period. Add oil as required.
PARKING BRAKE
Before leaving the vehicle, make sure that the
parking brake is fully applied and place the gear
selector in the PARK (P) position.
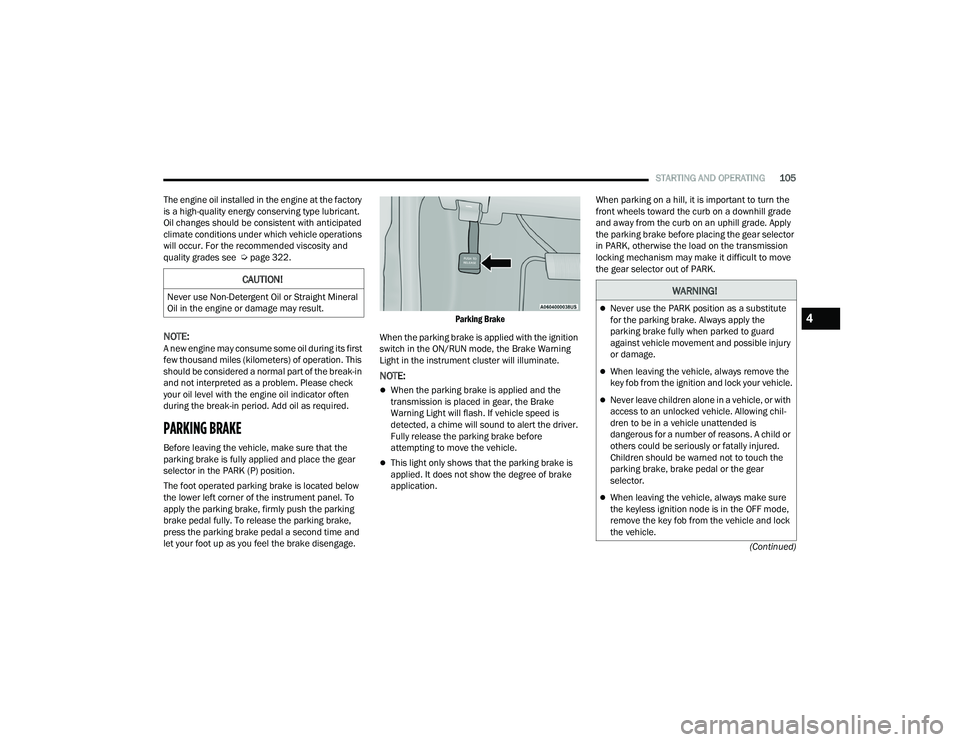
The foot operated parking brake is located below
the lower left corner of the instrument panel. To
apply the parking brake, firmly push the parking
brake pedal fully. To release the parking brake,
press the parking brake pedal a second time and
let your foot up as you feel the brake disengage.
Parking Brake
When the parking brake is applied with the ignition
switch in the ON/RUN mode, the Brake Warning
Light in the instrument cluster will illuminate.
NOTE:
When the parking brake is applied and the
transmission is placed in gear, the Brake
Warning Light will flash. If vehicle speed is
detected, a chime will sound to alert the driver.
Fully release the parking brake before
attempting to move the vehicle.
This light only shows that the parking brake is
applied. It does not show the degree of brake
application. When parking on a hill, it is important to turn the
front wheels toward the curb on a downhill grade
and away from the curb on an uphill grade. Apply
the parking brake before placing the gear selector
in PARK, otherwise the load on the transmission
locking mechanism may make it difficult to move
the gear selector out of PARK.
CAUTION!
Never use Non-Detergent Oil or Straight Mineral
Oil in the engine or damage may result.WARNING!
Never use the PARK position as a substitute
for the parking brake. Always apply the
parking brake fully when parked to guard
against vehicle movement and possible injury
or damage.
When leaving the vehicle, always remove the
key fob from the ignition and lock your vehicle.
Never leave children alone in a vehicle, or with
access to an unlocked vehicle. Allowing chil
-
dren to be in a vehicle unattended is
dangerous for a number of reasons. A child or
others could be seriously or fatally injured.
Children should be warned not to touch the
parking brake, brake pedal or the gear
selector.
When leaving the vehicle, always make sure
the keyless ignition node is in the OFF mode,
remove the key fob from the vehicle and lock
the vehicle.
4
21_WD_OM_EN_USC_t.book Page 105
Page 110 of 340
108STARTING AND OPERATING
8-SPEED AUTOMATIC TRANSMISSION
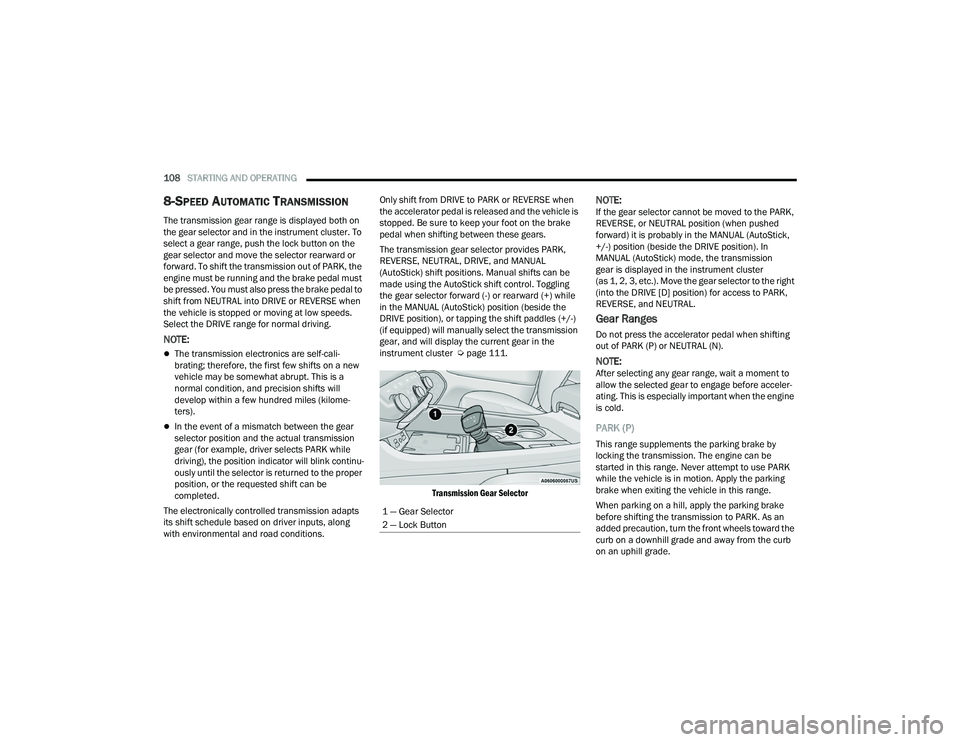
The transmission gear range is displayed both on
the gear selector and in the instrument cluster. To
select a gear range, push the lock button on the
gear selector and move the selector rearward or
forward. To shift the transmission out of PARK, the
engine must be running and the brake pedal must
be pressed. You must also press the brake pedal to
shift from NEUTRAL into DRIVE or REVERSE when
the vehicle is stopped or moving at low speeds.
Select the DRIVE range for normal driving.
NOTE:
The transmission electronics are self-cali -
brating; therefore, the first few shifts on a new
vehicle may be somewhat abrupt. This is a
normal condition, and precision shifts will
develop within a few hundred miles (kilome -
ters).
In the event of a mismatch between the gear
selector position and the actual transmission
gear (for example, driver selects PARK while
driving), the position indicator will blink continu -
ously until the selector is returned to the proper
position, or the requested shift can be
completed.
The electronically controlled transmission adapts
its shift schedule based on driver inputs, along
with environmental and road conditions. Only shift from DRIVE to PARK or REVERSE when
the accelerator pedal is released and the vehicle is
stopped. Be sure to keep your foot on the brake
pedal when shifting between these gears.
The transmission gear selector provides PARK,
REVERSE, NEUTRAL, DRIVE, and MANUAL
(AutoStick) shift positions. Manual shifts can be
made using the AutoStick shift control. Toggling
the gear selector forward (-) or rearward (+) while
in the MANUAL (AutoStick) position (beside the
DRIVE position), or tapping the shift paddles (+/-)
(if equipped) will manually select the transmission
gear, and will display the current gear in the
instrument cluster Ú
page 111.
Transmission Gear Selector
NOTE:If the gear selector cannot be moved to the PARK,
REVERSE, or NEUTRAL position (when pushed
forward) it is probably in the MANUAL (AutoStick,
+/-) position (beside the DRIVE position). In
MANUAL (AutoStick) mode, the transmission
gear is displayed in the instrument cluster
(as 1, 2, 3, etc.). Move the gear selector to the right
(into the DRIVE [D] position) for access to PARK,
REVERSE, and NEUTRAL.
Gear Ranges
Do not press the accelerator pedal when shifting
out of PARK (P) or NEUTRAL (N).
NOTE:After selecting any gear range, wait a moment to
allow the selected gear to engage before acceler -
ating. This is especially important when the engine
is cold.
PARK (P)
This range supplements the parking brake by
locking the transmission. The engine can be
started in this range. Never attempt to use PARK
while the vehicle is in motion. Apply the parking
brake when exiting the vehicle in this range.
When parking on a hill, apply the parking brake
before shifting the transmission to PARK. As an
added precaution, turn the front wheels toward the
curb on a downhill grade and away from the curb
on an uphill grade.
1 — Gear Selector
2 — Lock Button
21_WD_OM_EN_USC_t.book Page 108
Page 112 of 340
110STARTING AND OPERATING
The following indicators should be used to ensure
that you have properly engaged the transmission
into the PARK position:
When shifting into PARK, push the lock button
on the gear selector and firmly move the
selector all the way forward until it stops and is
fully seated.
Look at the transmission gear position display
and verify that it indicates the PARK position (P),
and is not blinking.
With the brake pedal released, verify that the
gear selector will not move out of PARK.
REVERSE (R)
This range is for moving the vehicle backward.
Shift into REVERSE only after the vehicle has come
to a complete stop.
NEUTRAL (N)
Use this range when the vehicle is standing for
prolonged periods with the engine running. Apply
the parking brake and shift the transmission into
PARK (P) if you must exit the vehicle.
DRIVE (D)
This range should be used for most city and
highway driving. It provides the smoothest upshifts
and downshifts, and the best fuel economy. The
transmission automatically upshifts through all
forward gears. When frequent transmission shifting occurs (such
as when operating the vehicle under heavy loading
conditions, in hilly terrain, traveling into strong
head winds, or while towing a heavy trailer), use
the AutoStick shift control to select a lower gear
Ú
page 111. Under these conditions, using a lower
gear will improve performance and extend
transmission life by reducing excessive shifting
and heat buildup.
During cold temperatures, transmission operation
may be modified depending on engine and
transmission temperature as well as vehicle
speed. This feature improves warm up time of the
engine and transmission to achieve maximum
efficiency. Engagement of the torque converter
clutch is inhibited until the transmission fluid is
warm. Normal operation will resume once the
transmission temperature has risen to a suitable
level.
Manual (M)
The MANUAL (M, +/-) position (beside the DRIVE
position) enables full manual control of
transmission shifting (also known as AutoStick
mode Ú page 111). Toggling the gear selector
forward (-) or rearward (+) while in the MANUAL
(AutoStick) position will manually select the
transmission gear, and will display the current gear
in the instrument cluster as 1, 2, 3, etc.
WARNING!
Do not coast in NEUTRAL and never turn off the
ignition to coast down a hill. These are unsafe
practices that limit your response to changing
traffic or road conditions. You might lose control
of the vehicle and have a collision.
CAUTION!
Towing the vehicle, coasting, or driving for any
other reason with the transmission in NEUTRAL
can cause severe transmission damage.
For Recreational Towing Ú page 153.
For Towing A Disabled Vehicle Ú page 261.
21_WD_OM_EN_USC_t.book Page 110
Page 113 of 340
STARTING AND OPERATING111
Transmission Limp Home Mode
Transmission function is monitored electronically
for abnormal conditions. If a condition is detected
that could result in transmission damage,
Transmission Limp Home Mode is activated. In this
mode, the transmission may operate only in
certain gears, or may not shift at all. Vehicle
performance may be severely degraded and the
engine may stall. In some situations, the
transmission may not re-engage if the engine is
turned off and restarted. The Malfunction Indicator
Light (MIL) may be illuminated. A message in the
instrument cluster will inform the driver of the
more serious conditions, and indicate what actions
may be necessary.
In the event of a momentary problem, the
transmission can be reset to regain all forward
gears by performing the following steps:
NOTE:In cases where the instrument cluster message
indicates the transmission may not re-engage after
engine shutdown, perform this procedure only in a
desired location (preferably, at an authorized
dealer):
1. Stop the vehicle.
2. Shift the transmission into PARK (P), if
possible. If not, shift the transmission to
NEUTRAL (N). 3. Push and hold the ignition switch until the
engine turns off.
4. Wait approximately 30 seconds.
5. Restart the engine.
6. Shift into the desired gear range. If the problem is no longer detected, the
transmission will return to normal operation.
NOTE:Even if the transmission can be reset, we
recommend that you visit an authorized dealer at
your earliest possible convenience. An authorized
dealer has diagnostic equipment to assess the
condition of your transmission. If the transmission
cannot be reset, authorized dealer service is
required.
AutoStick — If Equipped
AutoStick is a driver-interactive transmission
feature providing manual shift control, giving you
more control of the vehicle. AutoStick allows you to
maximize engine braking, eliminate undesirable
upshifts and downshifts, and improve overall
vehicle performance. This system can also provide
you with more control during passing, city driving,
cold slippery conditions, mountain driving, trailer
towing, and many other situations. Operation
In AutoStick mode, you can use the gear selector
(in the MANUAL position), or the shift paddles to
the MANUAL (M) position (beside the DRIVE (D)
position), or tap one of the shift paddles on the
steering wheel. Tapping the (-) shift paddle to enter
AutoStick mode will downshift the transmission to
the next lower gear, while tapping (+) to enter
AutoStick mode will retain the current gear. The
current transmission gear will be displayed in the
instrument cluster.
NOTE:The shift paddles (if equipped) may be disabled
using the Uconnect Personal Settings.
AutoStick mode has the following operational
benefits:
The transmission will automatically downshift
as the vehicle slows (to prevent engine lugging)
and will display the current gear.
The transmission will automatically downshift to
FIRST gear when coming to a stop. After a stop,
the driver should manually upshift (+) the trans
-
mission as the vehicle is accelerated.
You can start out, from a stop, in FIRST or
SECOND gear. Tapping (+) at a stop will allow
starting in SECOND gear. Starting out in
SECOND gear can be helpful in snowy or icy
conditions.
4
21_WD_OM_EN_USC_t.book Page 111
Page 116 of 340
114STARTING AND OPERATING
NEUTRAL (N)
This range disengages both the front and rear
driveshafts from the powertrain. To be used for flat
towing behind another vehicle Ú page 153.
SHIFTING PROCEDURE
NOTE:
If any of the requirements to select a new
transfer case position have not been met, the
transfer case will not shift. The position indi -
cator light for the previous position will remain
on and the newly selected position indicator
light will continue to flash until all the require -
ments for the selected position have been met.
To retry a shift: return the control switch back to
the original position, make certain all shift
requirements have been met, wait five seconds
and try the shift again.
If all the requirements to select a new transfer
case position have been met, the current posi -
tion indicator light will turn off, the selected posi -
tion indicator light will flash until the transfer
case completes the shift. When the shift is
complete, the position indicator light for the
selected position will stop flashing and remain
on.
AWD AUTO To AWD LOW
NOTE:When shifting into or out of AWD LOW some gear
noise may be heard. This noise is normal and is not
detrimental to the vehicle or occupants.
Shifting can be performed with the vehicle rolling
2 to 3 mph (3 to 5 km/h) or completely stopped.
Use either of the following procedures:
Preferred Procedure
1. With the engine running, slow the vehicle to 2 to 3 mph (3 to 5 km/h).
2. Shift the transmission into NEUTRAL.
3. While still rolling, push the AWD LOW control switch.
4. After the AWD LOW position indicator light is on (not flashing), shift the transmission back into
gear. Alternate Procedure
1. Bring the vehicle to complete stop.
2. With the ignition in ON/RUN position and
engine running, shift the transmission to
NEUTRAL.
3. Push the AWD LOW control switch.
4. After the AWD LOW position indicator light is on (not flashing), shift the transmission back into
gear.NOTE:
If steps 1 or 2 of either the “Preferred” or “Alter -
nate Procedure” are not satisfied prior to
attempting the shift or if they no longer are
being met while the shift attempt is in process,
the desired position indicator light will flash
continuously while the original position indicator
light is on, until all requirements have been met.
The ignition switch must be in the ON/RUN posi -
tion for a shift to take place and for the position
indicator lights to be operable. If the ignition
switch is not in the ON/RUN position, then the
shift will not take place and no position indicator
lights will be on or flashing.
N (Neutral) Shift Procedure
For information regarding the transfer case N
(Neutral) shift procedure, see Ú page 154.
WARNING!
You or others could be injured or killed if you
leave the vehicle unattended with the transfer
case in the NEUTRAL position without first fully
engaging the parking brake. The transfer case
NEUTRAL position disengages both the front and
rear drive shafts from the powertrain and will
allow the vehicle to roll, even if the transmission
is in PARK. The parking brake should always be
applied when the driver is not in the vehicle.
21_WD_OM_EN_USC_t.book Page 114
Page 117 of 340
STARTING AND OPERATING115
TOW N GO — IF EQUIPPED
Tow N Go combines the capabilities of the vehicle
control systems, along with driver input, to provide
optimum performance for road conditions.
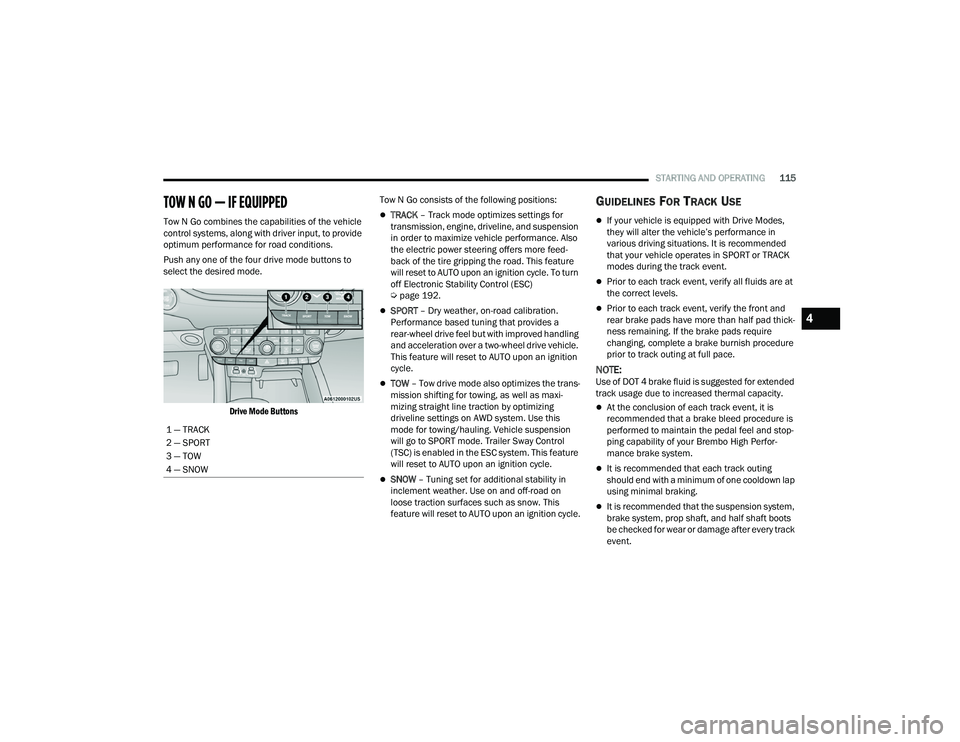
Push any one of the four drive mode buttons to
select the desired mode.
Drive Mode Buttons
Tow N Go consists of the following positions:TRACK
– Track mode optimizes settings for
transmission, engine, driveline, and suspension
in order to maximize vehicle performance. Also
the electric power steering offers more feed -
back of the tire gripping the road. This feature
will reset to AUTO upon an ignition cycle. To turn
off Electronic Stability Control (ESC)
Ú page 192.
SPORT – Dry weather, on-road calibration.
Performance based tuning that provides a
rear-wheel drive feel but with improved handling
and acceleration over a two-wheel drive vehicle.
This feature will reset to AUTO upon an ignition
cycle.
TOW – Tow drive mode also optimizes the trans -
mission shifting for towing, as well as maxi -
mizing straight line traction by optimizing
driveline settings on AWD system. Use this
mode for towing/hauling. Vehicle suspension
will go to SPORT mode. Trailer Sway Control
(TSC) is enabled in the ESC system. This feature
will reset to AUTO upon an ignition cycle.
SNOW – Tuning set for additional stability in
inclement weather. Use on and off-road on
loose traction surfaces such as snow. This
feature will reset to AUTO upon an ignition cycle.
GUIDELINES FOR TRACK USE
If your vehicle is equipped with Drive Modes,
they will alter the vehicle’s performance in
various driving situations. It is recommended
that your vehicle operates in SPORT or TRACK
modes during the track event.
Prior to each track event, verify all fluids are at
the correct levels.
Prior to each track event, verify the front and
rear brake pads have more than half pad thick -
ness remaining. If the brake pads require
changing, complete a brake burnish procedure
prior to track outing at full pace.
NOTE:Use of DOT 4 brake fluid is suggested for extended
track usage due to increased thermal capacity.
At the conclusion of each track event, it is
recommended that a brake bleed procedure is
performed to maintain the pedal feel and stop -
ping capability of your Brembo High Perfor -
mance brake system.
It is recommended that each track outing
should end with a minimum of one cooldown lap
using minimal braking.
It is recommended that the suspension system,
brake system, prop shaft, and half shaft boots
be checked for wear or damage after every track
event.
1 — TRACK
2 — SPORT
3 — TOW
4 — SNOW
4
21_WD_OM_EN_USC_t.book Page 115
Page 124 of 340
122STARTING AND OPERATING
Adaptive Cruise Control (ACC) Operation
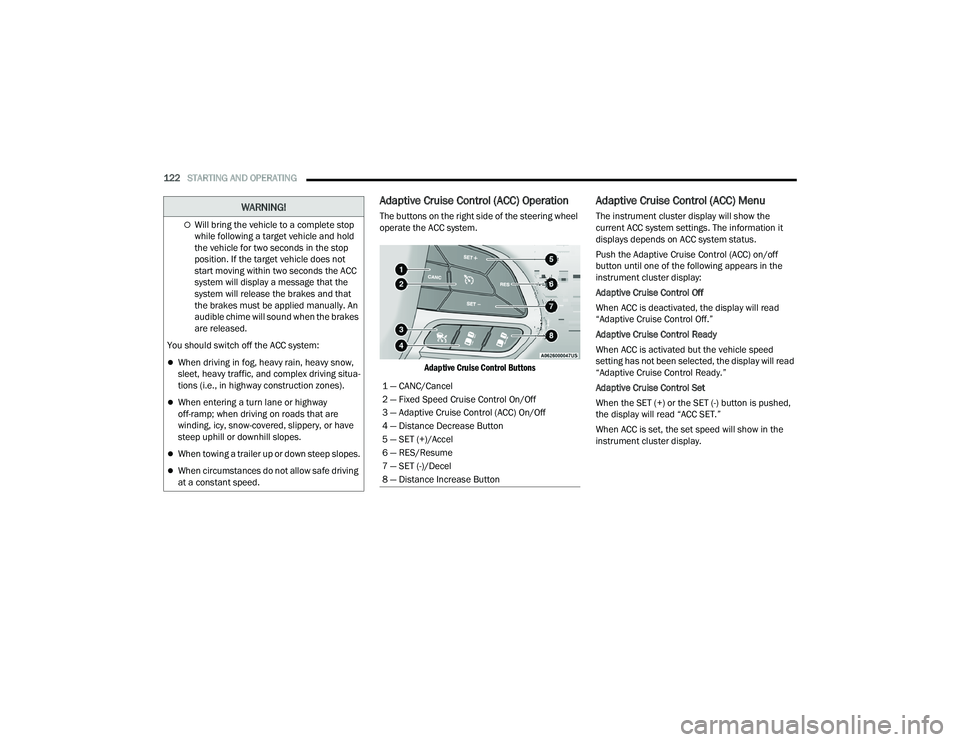
The buttons on the right side of the steering wheel
operate the ACC system.
Adaptive Cruise Control Buttons
Adaptive Cruise Control (ACC) Menu
The instrument cluster display will show the
current ACC system settings. The information it
displays depends on ACC system status.
Push the Adaptive Cruise Control (ACC) on/off
button until one of the following appears in the
instrument cluster display:
Adaptive Cruise Control Off
When ACC is deactivated, the display will read
“Adaptive Cruise Control Off.”
Adaptive Cruise Control Ready
When ACC is activated but the vehicle speed
setting has not been selected, the display will read
“Adaptive Cruise Control Ready.”
Adaptive Cruise Control Set
When the SET (+) or the SET (-) button is pushed,
the display will read “ACC SET.”
When ACC is set, the set speed will show in the
instrument cluster display.Will bring the vehicle to a complete stop
while following a target vehicle and hold
the vehicle for two seconds in the stop
position. If the target vehicle does not
start moving within two seconds the ACC
system will display a message that the
system will release the brakes and that
the brakes must be applied manually. An
audible chime will sound when the brakes
are released.
You should switch off the ACC system:
When driving in fog, heavy rain, heavy snow,
sleet, heavy traffic, and complex driving situa -
tions (i.e., in highway construction zones).
When entering a turn lane or highway
off-ramp; when driving on roads that are
winding, icy, snow-covered, slippery, or have
steep uphill or downhill slopes.
When towing a trailer up or down steep slopes.
When circumstances do not allow safe driving
at a constant speed.
WARNING!
1 — CANC/Cancel
2 — Fixed Speed Cruise Control On/Off
3 — Adaptive Cruise Control (ACC) On/Off
4 — Distance Decrease Button
5 — SET (+)/Accel
6 — RES/Resume
7 — SET (-)/Decel
8 — Distance Increase Button
21_WD_OM_EN_USC_t.book Page 122
Page 130 of 340
128STARTING AND OPERATING
This message can sometimes be displayed
while driving in adverse weather conditions. The
ACC/FCW system will recover after the vehicle has
left these areas. Under rare conditions, when the
camera is not tracking any vehicles or objects in its
path this warning may temporarily occur.
If weather conditions are not a factor, the driver
should examine the windshield and the camera
located on the back side of the inside rearview
mirror. They may require cleaning or removal of an
obstruction.
When the condition that created limited
functionality is no longer present, the system will
return to full functionality.
NOTE:If the “ACC/FCW Limited Functionality Clean Front
Windshield” message occurs frequently (e.g. more
than once on every trip) without any snow, rain,
mud, or other obstruction, have the windshield and
forward facing camera inspected at an authorized
dealer.
SERVICE ACC/FCW WARNING
If the system turns off, and the instrument cluster
display reads “ACC/FCW Unavailable Service
Required” or “Cruise/FCW Unavailable Service
Required”, there may be an internal system fault or
a temporary malfunction that limits ACC
functionality. Although the vehicle is still drivable
under normal conditions, ACC will be temporarily
unavailable. If this occurs, try activating ACC again
later, following an ignition cycle. If the problem
persists, see an authorized dealer.
Precautions While Driving With ACC
In certain driving situations, ACC may have
detection issues. In these cases, ACC may brake
late or unexpectedly. The driver needs to stay alert
and may need to intervene. The following are
examples of these types of situations:
TOWING A TRAILER
ACC while towing a trailer is recommended only
with an Integrated Trailer Brake Controller.
Aftermarket trailer brake controllers will not
activate the trailer brakes when ACC is braking.
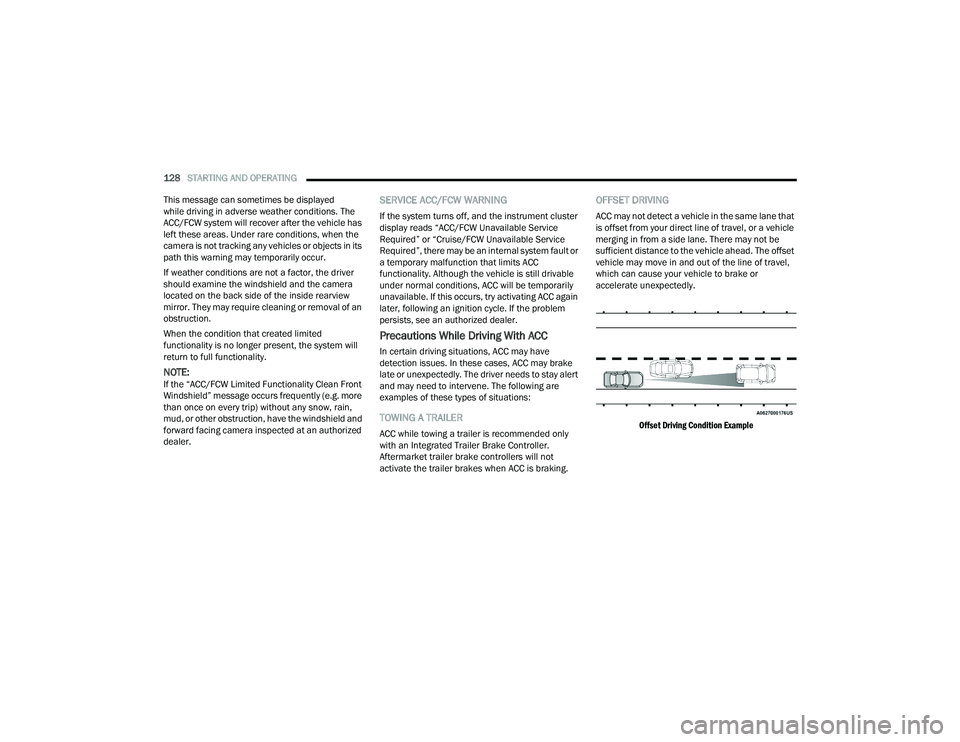
OFFSET DRIVING
ACC may not detect a vehicle in the same lane that
is offset from your direct line of travel, or a vehicle
merging in from a side lane. There may not be
sufficient distance to the vehicle ahead. The offset
vehicle may move in and out of the line of travel,
which can cause your vehicle to brake or
accelerate unexpectedly.
Offset Driving Condition Example
21_WD_OM_EN_USC_t.book Page 128
Page 133 of 340
STARTING AND OPERATING131
Automatic brakes will not be available if there is
a faulted condition detected with the ParkSense
Park Assist system or the Braking System
Module.
The automatic braking function may only be
applied if the vehicle deceleration is not enough
to avoid colliding with a detected obstacle.
The automatic braking function may not be
applied fast enough for obstacles that move
toward the rear of the vehicle from the left
and/or right sides.
The automatic braking function can be
enabled/disabled from the Customer Program -
mable Features section of the Uconnect system.
ParkSense will retain its last known configura -
tion state for the automatic braking function
through ignition cycles.
The automatic braking function is intended to
assist the driver in avoiding possible collisions with
detected obstacles when backing up in REVERSE
gear.
NOTE:
The system is designed to assist the driver and
not to substitute the driver.
The driver must stay in full control of the
vehicle's acceleration and braking and is
responsible for the vehicle's movements. For limitations of this system and
recommendations, see Ú
page 135.
ParkSense will retain the last system state
(enabled or disabled) from the last ignition cycle
when the ignition is changed to the ON/RUN
position.
ParkSense can be active only when the gear
selector is in REVERSE or DRIVE. If ParkSense is
enabled at one of these gear selector positions,
the system will remain active until the vehicle
speed is increased to approximately 7 mph
(11 km/h) or above. The system will become active
again if the vehicle speed is decreased to speeds
less than approximately 6 mph (9 km/h). A display
warning will appear in the instrument cluster
display if the vehicle is in REVERSE and the speed
exceeds 7 mph (11 km/h).
PARKSENSE SENSORS
The six ParkSense sensors (four when vehicle is
not equipped with front sensors), located in the
rear fascia/bumper, and the six ParkSense
sensors located in the front fascia/bumper,
monitor the area in front and behind the vehicle
that is within the sensors’ field of view. The front
sensors detect obstacles from approximately
12 inches (30 cm) up to 47 inches (120 cm) from
the front fascia/bumper. The rear sensors can detect obstacles from
approximately 12 inches (30 cm) up to 79 inches
(200 cm) from the rear fascia/bumper. These
distances depend on the location, type and
orientation of the obstacle in the horizontal
direction.
PARKSENSE DISPLAY
The warning display will turn on indicating the
system status when the vehicle is in REVERSE or
when the vehicle is in DRIVE and an obstacle has
been detected.
The system will indicate a detected obstacle by
showing a single arc in the left and/or right front or
rear regions based on the object’s distance and
location relative to the vehicle.
If an object is detected in the left and/or right rear
region, the display will show a single arc in the left
and/or right rear region and the system will
produce a tone. As the vehicle moves closer to the
object, the display will show the single arc moving
closer to the vehicle and the tone will change from
a single 1/2 second tone to slow, to fast, to
continuous.
4
21_WD_OM_EN_USC_t.book Page 131