tow DODGE DURANGO 2021 Workshop Manual
[x] Cancel search | Manufacturer: DODGE, Model Year: 2021, Model line: DURANGO, Model: DODGE DURANGO 2021Pages: 340, PDF Size: 20.38 MB
Page 152 of 340
150STARTING AND OPERATING
3. When a trailer with electric/EOH brakes is plugged in, the trailer connected message
should appear in the instrument cluster
display (if the connection is not recognized by
the ITBM, braking functions will not be
available), the GAIN setting will illuminate and
the correct type of trailer must be selected
from the instrument cluster display options.
4. Push the UP or DOWN button on the steering wheel until “TRAILER TOW” appears on the
screen.
5. Push the RIGHT arrow on the steering wheel to enter “TRAILER TOW”.
6. Push the UP or DOWN buttons until the Trailer Brake Type appears on the screen.
7. Push the RIGHT arrow and then push the UP or DOWN buttons until the proper Trailer Brake
Type appears on the screen.
8. In a traffic-free environment, tow the trailer on a dry, level surface at a speed of 20–25 mph
(30–40 km/h) and squeeze the manual brake
control lever completely. 9. If the trailer wheels lockup (indicated by
squealing tires), reduce the GAIN setting; if the
trailer wheels turn freely, increase the GAIN
setting.
Repeat steps 8 and 9 until the GAIN setting is at a
point just below trailer wheel lockup. If towing a
heavier trailer, trailer wheel lockup may not be
attainable even with the maximum GAIN setting
of 10.
Display Messages
The trailer brake control interacts with the
instrument cluster display. Display messages,
along with a single chime, will be displayed when a
malfunction is determined in the trailer
connection, trailer brake control, or on the trailer
Ú page 83.
NOTE:
An aftermarket controller may be available for
use with trailers with air or EOH trailer brake
systems. To determine the type of brakes on
your trailer and the availability of controllers,
check with your trailer manufacturer or dealer.
Removal of the ITBM will cause errors and it
may cause damage to the electrical system and
electronic modules of the vehicle. See an autho -
rized dealer if an aftermarket module is to be
installed.
WARNING!
Connecting a trailer that is not compatible with
the ITBM system may result in reduced or
complete loss of trailer braking. There may be an
increase in stopping distance or trailer instability
which could result in personal injury.
CAUTION!
Connecting a trailer that is not compatible with
the ITBM system may result in reduced or
complete loss of trailer braking. There may be an
increase in stopping distance or trailer instability
which could result in damage to your vehicle,
trailer, or other property.
21_WD_OM_EN_USC_t.book Page 150
Page 153 of 340
STARTING AND OPERATING151
Towing Requirements — Trailer Lights And
Wiring
Whenever pulling a trailer, regardless of the trailer
size, stop lights and turn signals on the trailer are
required for motoring safety.
The Trailer Tow Package may include a four- and
seven-pin wiring harness. Use a factory approved
trailer harness and connector.
NOTE:Do not cut or splice wiring into the vehicle’s wiring
harness.
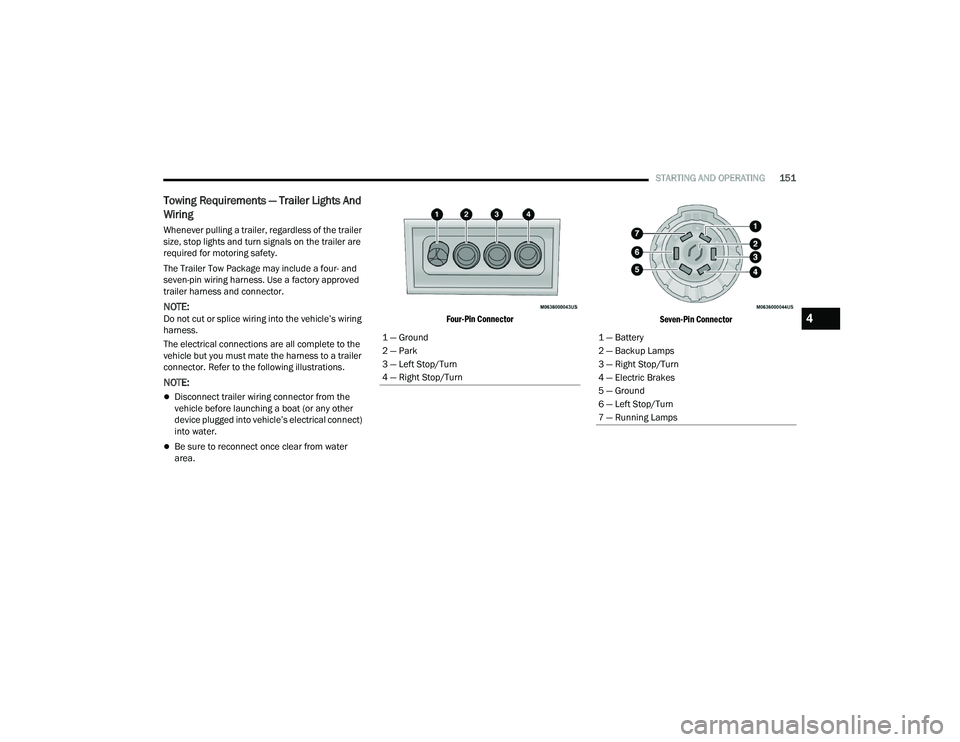
The electrical connections are all complete to the
vehicle but you must mate the harness to a trailer
connector. Refer to the following illustrations.
NOTE:
Disconnect trailer wiring connector from the
vehicle before launching a boat (or any other
device plugged into vehicle’s electrical connect)
into water.
Be sure to reconnect once clear from water
area.
Four-Pin Connector
Seven-Pin Connector
1 — Ground
2 — Park
3 — Left Stop/Turn
4 — Right Stop/Turn
1 — Battery
2 — Backup Lamps
3 — Right Stop/Turn
4 — Electric Brakes
5 — Ground
6 — Left Stop/Turn
7 — Running Lamps
4
21_WD_OM_EN_USC_t.book Page 151
Page 154 of 340
152STARTING AND OPERATING
TOWING TIPS
Before towing, practice turning, stopping, and
backing up the trailer in an area located away from
heavy traffic.
Automatic Transmission
Select the DRIVE (D) range when towing. The
transmission controls include a drive strategy to
avoid frequent shifting when towing. However, if
frequent shifting does occur while in DRIVE, you
can use the AutoStick shift control to manually
select a lower gear.
If equipped with Tow N Go, it is recommended
to place the vehicle in tow mode by pushing the
TOW button.
NOTE:Using a lower gear while operating the vehicle
under heavy loading conditions, will improve
performance and extend transmission life by
reducing excessive shifting and heat buildup.
This action will also provide better engine braking.
AutoStick
When using the AutoStick shift control, select
the highest gear that allows for adequate perfor -
mance and avoids frequent downshifts. For
example, choose “5” if the desired speed can be
maintained. Choose “4” or “3” if needed to
maintain the desired speed.
To prevent excess heat generation, avoid
continuous driving at high RPM. Reduce vehicle
speed as necessary to avoid extended driving at
high RPM. Return to a higher gear or vehicle
speed when grade and road conditions allow.
Cruise Control — If Equipped
Do not use on hilly terrain or with heavy loads.
When using the Cruise Control, if you experience
speed drops greater than 10 mph (16 km/h),
disengage until you can get back to cruising
speed.
Use Cruise Control in flat terrain and with light
loads to maximize fuel efficiency.
21_WD_OM_EN_USC_t.book Page 152
Page 155 of 340
STARTING AND OPERATING153
RECREATIONAL TOWING (BEHIND MOTORHOME)
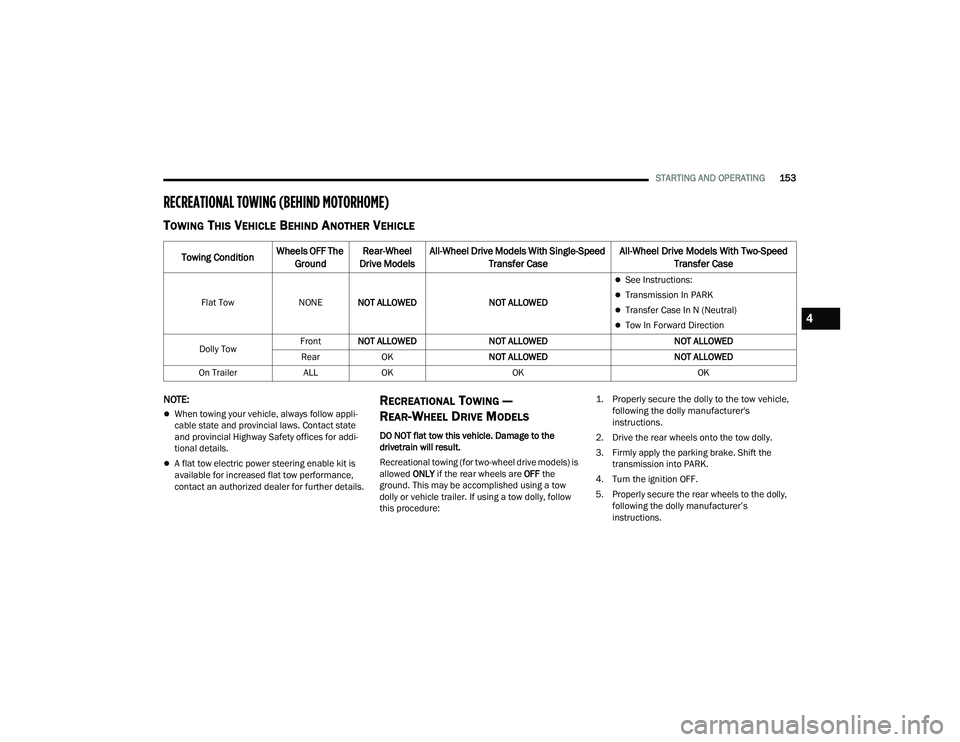
TOWING THIS VEHICLE BEHIND ANOTHER VEHICLE
NOTE:
When towing your vehicle, always follow appli -
cable state and provincial laws. Contact state
and provincial Highway Safety offices for addi -
tional details.
A flat tow electric power steering enable kit is
available for increased flat tow performance,
contact an authorized dealer for further details.
RECREATIONAL TOWING —
R
EAR-WHEEL DRIVE MODELS
DO NOT flat tow this vehicle. Damage to the
drivetrain will result.
Recreational towing (for two-wheel drive models) is
allowed ONLY if the rear wheels are OFF the
ground. This may be accomplished using a tow
dolly or vehicle trailer. If using a tow dolly, follow
this procedure:
1. Properly secure the dolly to the tow vehicle,
following the dolly manufacturer's
instructions.
2. Drive the rear wheels onto the tow dolly.
3. Firmly apply the parking brake. Shift the transmission into PARK.
4. Turn the ignition OFF.
5. Properly secure the rear wheels to the dolly, following the dolly manufacturer’s
instructions.
Towing Condition Wheels OFF The
Ground Rear-Wheel
Drive Models All-Wheel Drive Models With Single-Speed
Transfer Case All-Wheel Drive Models With Two-Speed
Transfer Case
Flat Tow NONENOT ALLOWED NOT ALLOWED
See Instructions:
Transmission In PARK
Transfer Case In N (Neutral)
Tow In Forward Direction
Dolly Tow Front
NOT ALLOWED NOT ALLOWED NOT ALLOWED
Rear OK NOT ALLOWED NOT ALLOWED
On Trailer ALLOK OK OK4
21_WD_OM_EN_USC_t.book Page 153
Page 156 of 340
154STARTING AND OPERATING
(Continued)
6. Install a suitable clamping device, designed for
towing, to secure the front wheels in the
straight position.
RECREATIONAL TOWING —
A
LL-WHEEL DRIVE MODELS
(S
INGLE-SPEED TRANSFER CASE)
Recreational towing is not allowed. These models
do not have a N (Neutral) position in the transfer
case.
NOTE:This vehicle may be towed on a flatbed or vehicle
trailer provided all four wheels are OFF the ground.
RECREATIONAL TOWING —
A
LL-WHEEL DRIVE MODELS
(T
WO-SPEED TRANSFER CASE)
The transfer case must be shifted into N (Neutral)
and the transmission must be in PARK for
recreational towing. The N (Neutral) selection
button is adjacent to the transfer case selector
switch. Shifts into and out of transfer case N
(Neutral) can take place with the selector switch in
any mode position.
Shifting Into N (Neutral)
CAUTION!
Towing with the rear wheels on the ground will
cause severe transmission damage. Damage
from improper towing is not covered under the
New Vehicle Limited Warranty.
CAUTION!
Towing this vehicle in violation of the above
requirements can cause severe transmission
and/or transfer case damage. Damage from
improper towing is not covered under the New
Vehicle Limited Warranty.
CAUTION!
DO NOT dolly tow any AWD vehicle. Towing
with only one set of wheels on the ground
(front or rear) will cause severe transmission
and/or transfer case damage. Tow with all
four wheels either ON the ground, or OFF the
ground (using a vehicle trailer).
Tow only in the forward direction. Towing this
vehicle backwards can cause severe damage
to the transfer case.
The transmission must be in PARK for recre -
ational towing.
Before recreational towing, be certain that the
transfer case is fully in N (Neutral)
Ú page 154. Otherwise, internal damage will
result.
Towing this vehicle in violation of the above
requirements can cause severe transmission
and/or transfer case damage. Damage from
improper towing is not covered under the New
Vehicle Limited Warranty.
Do not use a bumper-mounted clamp-on tow
bar on your vehicle. The bumper face bar will
be damaged.
WARNING!
You or others could be injured or killed if you
leave the vehicle unattended with the transfer
case in the N (Neutral) position without first fully
engaging the parking brake. The transfer case N
(Neutral) position disengages both the front and
rear driveshafts from the powertrain and will
allow the vehicle to roll, even if the transmission
is in PARK. The parking brake should always be
applied when the driver is not in the vehicle.
CAUTION!
21_WD_OM_EN_USC_t.book Page 154
Page 157 of 340
STARTING AND OPERATING155
Use the following procedure to prepare your
vehicle for recreational towing.
1. Bring the vehicle to a complete stop on level ground, with the engine running.
2. Press and hold the brake pedal.
3. Shift the transmission into NEUTRAL.
NOTE:
Steps 1 through 3 are requirements that
must be met before pushing the N (Neutral)
button, and must continue to be met until
the shift has been completed. If any of
these requirements are not met before
pushing the N (Neutral) button or are no
longer met during the shift, the N (Neutral)
indicator light will flash continuously until all
requirements are met or until the N
(Neutral) button is released.
The ignition must be in the ON/RUN mode
for a shift to take place and for the position
indicator lights to be operable. If the ignition
is not in the ON/RUN mode, the shift will not
take place and no position indicator lights
will be on or flashing.
A flashing N (Neutral) position indicator light
indicates that shift requirements have not
been met.
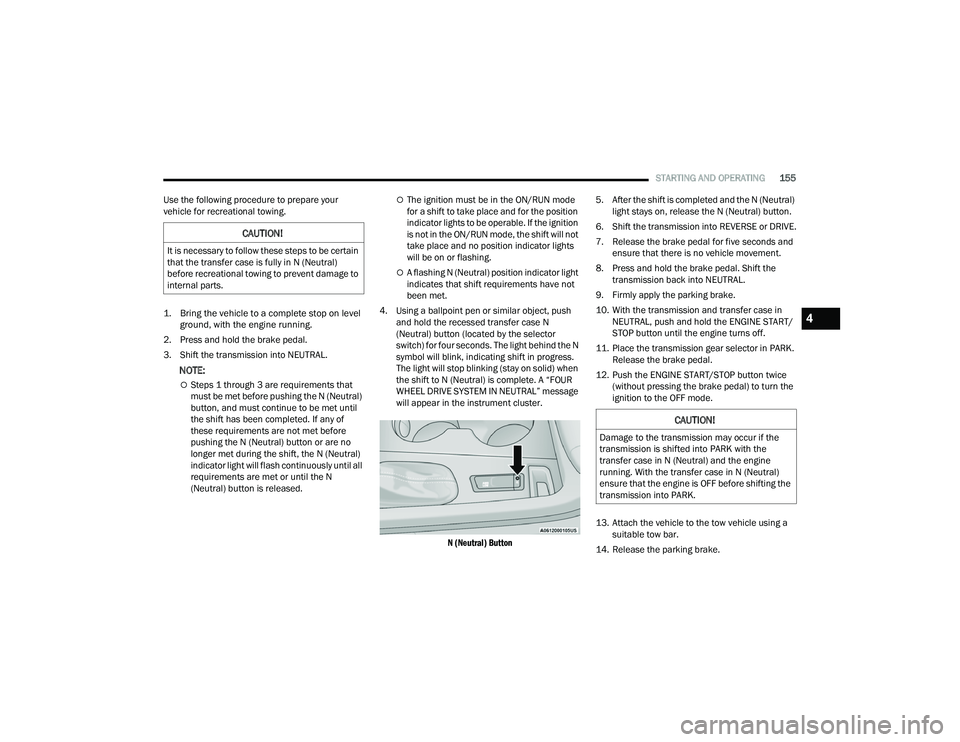
4. Using a ballpoint pen or similar object, push and hold the recessed transfer case N
(Neutral) button (located by the selector
switch) for four seconds. The light behind the N
symbol will blink, indicating shift in progress.
The light will stop blinking (stay on solid) when
the shift to N (Neutral) is complete. A “FOUR
WHEEL DRIVE SYSTEM IN NEUTRAL” message
will appear in the instrument cluster.
N (Neutral) Button
5. After the shift is completed and the N (Neutral)
light stays on, release the N (Neutral) button.
6. Shift the transmission into REVERSE or DRIVE.
7. Release the brake pedal for five seconds and ensure that there is no vehicle movement.
8. Press and hold the brake pedal. Shift the transmission back into NEUTRAL.
9. Firmly apply the parking brake.
10. With the transmission and transfer case in NEUTRAL, push and hold the ENGINE START/
STOP button until the engine turns off.
11. Place the transmission gear selector in PARK. Release the brake pedal.
12. Push the ENGINE START/STOP button twice (without pressing the brake pedal) to turn the
ignition to the OFF mode.
13. Attach the vehicle to the tow vehicle using a suitable tow bar.
14. Release the parking brake.
CAUTION!
It is necessary to follow these steps to be certain
that the transfer case is fully in N (Neutral)
before recreational towing to prevent damage to
internal parts.
CAUTION!
Damage to the transmission may occur if the
transmission is shifted into PARK with the
transfer case in N (Neutral) and the engine
running. With the transfer case in N (Neutral)
ensure that the engine is OFF before shifting the
transmission into PARK.
4
21_WD_OM_EN_USC_t.book Page 155
Page 158 of 340
156STARTING AND OPERATING
Shifting Out Of N (Neutral)
Use the following procedure to prepare your
vehicle for normal usage.
1. Bring the vehicle to a complete stop, leaving
it connected to the tow vehicle.
2. Firmly apply the parking brake.
3. Start the engine.
4. Press and hold the brake pedal.
5. Shift the transmission into NEUTRAL.
NOTE:
Steps 1 through 5 are requirements that
must be met before pushing the N (Neutral)
button, and must continue to be met until
the shift has been completed. If any of
these requirements are not met before
pushing the N (Neutral) button or are no
longer met during the shift, the N (Neutral)
indicator light will flash continuously until all
requirements are met or until the N
(Neutral) button is released.
The ignition must be in the ON/RUN mode
for a shift to take place and for the position
indicator lights to be operable. If the ignition
is not in the ON/RUN mode, the shift will not
take place and no position indicator lights
will be on or flashing.
A flashing N (Neutral) position indicator light
indicates that shift requirements have not
been met.
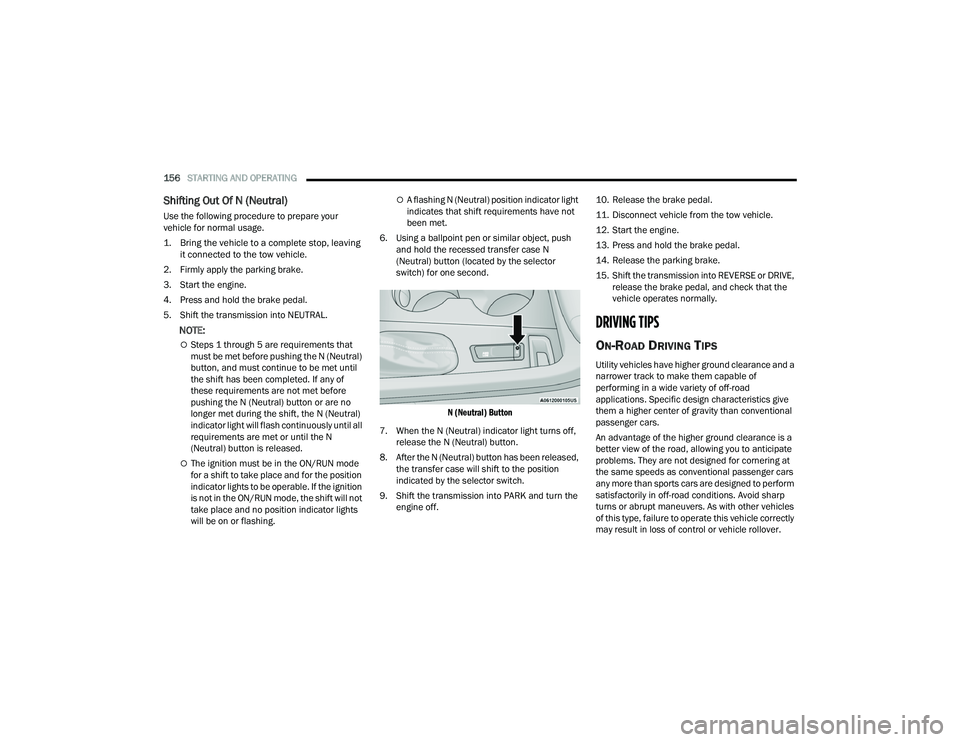
6. Using a ballpoint pen or similar object, push and hold the recessed transfer case N
(Neutral) button (located by the selector
switch) for one second.
N (Neutral) Button
7. When the N (Neutral) indicator light turns off, release the N (Neutral) button.
8. After the N (Neutral) button has been released, the transfer case will shift to the position
indicated by the selector switch.
9. Shift the transmission into PARK and turn the engine off. 10. Release the brake pedal.
11. Disconnect vehicle from the tow vehicle.
12. Start the engine.
13. Press and hold the brake pedal.
14. Release the parking brake.
15. Shift the transmission into REVERSE or DRIVE,
release the brake pedal, and check that the
vehicle operates normally.
DRIVING TIPS
ON-ROAD DRIVING TIPS
Utility vehicles have higher ground clearance and a
narrower track to make them capable of
performing in a wide variety of off-road
applications. Specific design characteristics give
them a higher center of gravity than conventional
passenger cars.
An advantage of the higher ground clearance is a
better view of the road, allowing you to anticipate
problems. They are not designed for cornering at
the same speeds as conventional passenger cars
any more than sports cars are designed to perform
satisfactorily in off-road conditions. Avoid sharp
turns or abrupt maneuvers. As with other vehicles
of this type, failure to operate this vehicle correctly
may result in loss of control or vehicle rollover.
21_WD_OM_EN_USC_t.book Page 156
Page 170 of 340
168MULTIMEDIA
Trailer
Camera
When the Trailer button is pressed on the touchscreen, the system will display settings related to trailer towing.
NOTE:Depending on the vehicle’s options, feature settings may vary.
Setting Name Description
Trailer SelectSelect from “Trailer 1”, “Trailer 2”, “Trailer 3”, and “Trailer 4”. These trailer
designations can be used to save different trailer settings.
Trailer Brake Type This setting will set the system to a specific trailer type. The available options
are “Light Electric”, “Heavy Electric”, “Light Electric-Over-Hydraulic”, and
“Heavy Electric-Over-Hydraulic”.
Trailer Name This setting will personalize the trailer name depending on the type of trailer
you are hauling. Select the trailer name from the following list: trailer, boat,
car, cargo, equipment, flatbed, horse, livestock, motorcycle, snowmobile,
travel, and utility.
When the Camera button is pressed on the touchscreen, the system displays the options related to the vehicle’s camera features.
NOTE:Depending on the vehicle’s options, feature settings may vary.
Setting Name
Description
ParkView Backup Camera DelayThis setting will add a timed delay to the ParkView Backup Camera when
shifting out of REVERSE.
ParkView Backup Camera Active Guidelines This setting will turn the ParkView Backup Camera Active Guidelines on or off.
21_WD_OM_EN_USC_t.book Page 168
Page 196 of 340
194SAFETY
Disabling And Enabling HSA
This feature can be turned on or turned off.
To change the current setting see Ú page 159.
Towing With HSA
HSA will also provide assistance to mitigate roll
back while towing a trailer.
Rain Brake Support (RBS)
RBS may improve braking performance in wet
conditions. It will periodically apply a small amount
of brake pressure to remove any water buildup on
the front brake rotors. It functions when the
windshield wipers are in LO or HI speed. When Rain
Brake Support is active, there is no notification to
the driver and no driver interaction is required.
Ready Alert Braking (RAB)
RAB may reduce the time required to reach full
braking during emergency braking situations. It
anticipates when an emergency braking situation
may occur by monitoring how fast the throttle is
released by the driver. The Electronic Brake
Controller (EBC) will prepare the brake system for
a panic stop.
Traction Control System (TCS)
The TCS monitors the amount of wheel spin of
each of the driven wheels. If wheel spin is
detected, the TCS may apply brake pressure to the
spinning wheel(s) and/or reduce engine power to
provide enhanced acceleration and stability. A
feature of the TCS, Brake Limited Differential (BLD)
functions similarly to a limited slip differential and
controls the wheel spin across a driven axle. If one
wheel on a driven axle is spinning faster than the
other, the system will apply the brake of the
spinning wheel. This will allow more engine power
to be applied to the wheel that is not spinning.
BLD may remain enabled even if TCS and ESC are
in reduced modes.
WARNING!
There may be situations where the Hill Start
Assist (HSA) will not activate and slight rolling
may occur, such as on minor hills or with a
loaded vehicle, or while pulling a trailer. HSA is
not a substitute for active driving involvement. It
is always the driver’s responsibility to be
attentive to distance to other vehicles, people,
and objects, and most importantly brake
operation to ensure safe operation of the vehicle
under all road conditions. Your complete
attention is always required while driving to
maintain safe control of your vehicle. Failure to
follow these warnings can result in a collision or
serious personal injury.
WARNING!
If you use a trailer brake controller with your
trailer, the trailer brakes may be activated and
deactivated with the brake switch. If so, there
may not be enough brake pressure to hold
both the vehicle and the trailer on a hill when
the brake pedal is released. In order to avoid
rolling down an incline while resuming accel -
eration, manually activate the trailer brake or
apply more vehicle brake pressure prior to
releasing the brake pedal.
HSA is not a parking brake. Always apply the
parking brake fully when exiting your vehicle.
Also, be certain to place the transmission
in PARK.
Failure to follow these warnings can result in a
collision or serious personal injury.
21_WD_OM_EN_USC_t.book Page 194
Page 197 of 340
SAFETY195
Trailer Sway Control (TSC)
TSC uses sensors in the vehicle to recognize an
excessively swaying trailer and will take the
appropriate actions to attempt to stop the sway.
Note that TSC cannot stop all trailers from swaying.
Always use caution when towing a trailer and follow
the trailer tongue weight recommendations
Úpage 142.
When TSC is functioning, the ESC Activation/
Malfunction Indicator Light will flash, the engine
power may be reduced and you may feel the brakes
being applied to individual wheels to attempt to
stop the trailer from swaying. TSC is disabled when
the ESC system is in the “Partial Off” mode.
AUXILIARY DRIVING SYSTEMS
BLIND SPOT MONITORING (BSM) —
I
F EQUIPPED
BSM uses two radar sensors, located inside the
rear fascia/bumper, to detect highway licensable
vehicles (automobiles, trucks, motorcycles, etc.) that enter the blind spot zones from the rear/front/
side of the vehicle.
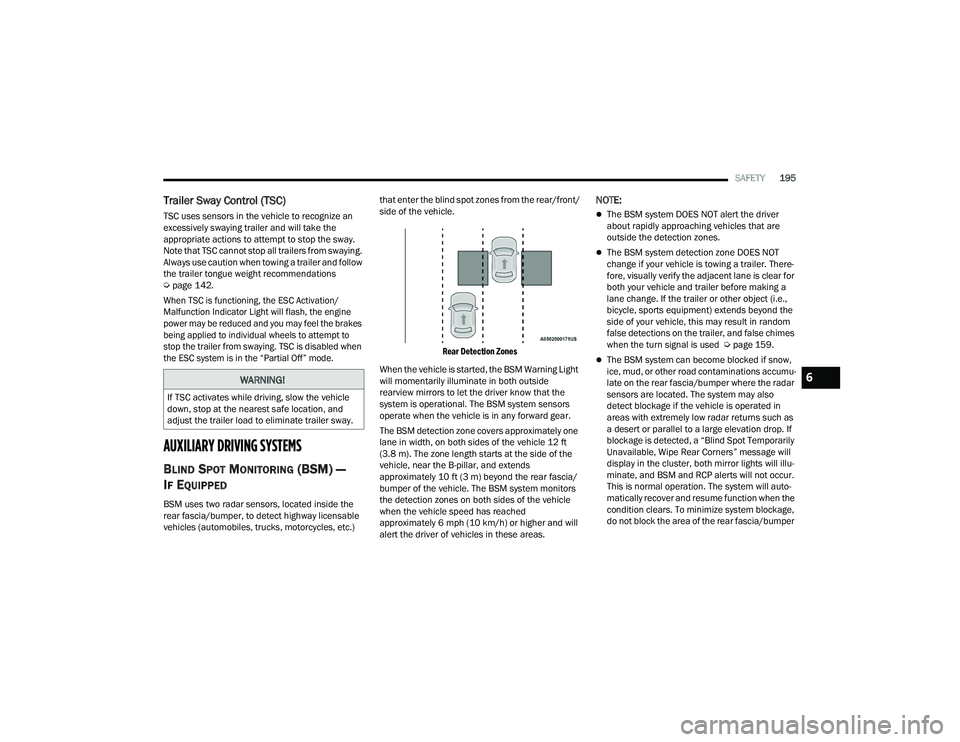
Rear Detection Zones
When the vehicle is started, the BSM Warning Light
will momentarily illuminate in both outside
rearview mirrors to let the driver know that the
system is operational. The BSM system sensors
operate when the vehicle is in any forward gear.
The BSM detection zone covers approximately one
lane in width, on both sides of the vehicle 12 ft
(3.8 m). The zone length starts at the side of the
vehicle, near the B-pillar, and extends
approximately 10 ft (3 m) beyond the rear fascia/
bumper of the vehicle. The BSM system monitors
the detection zones on both sides of the vehicle
when the vehicle speed has reached
approximately 6 mph (10 km/h) or higher and will
alert the driver of vehicles in these areas.
NOTE:
The BSM system DOES NOT alert the driver
about rapidly approaching vehicles that are
outside the detection zones.
The BSM system detection zone DOES NOT
change if your vehicle is towing a trailer. There -
fore, visually verify the adjacent lane is clear for
both your vehicle and trailer before making a
lane change. If the trailer or other object (i.e.,
bicycle, sports equipment) extends beyond the
side of your vehicle, this may result in random
false detections on the trailer, and false chimes
when the turn signal is used Ú page 159.
The BSM system can become blocked if snow,
ice, mud, or other road contaminations accumu -
late on the rear fascia/bumper where the radar
sensors are located. The system may also
detect blockage if the vehicle is operated in
areas with extremely low radar returns such as
a desert or parallel to a large elevation drop. If
blockage is detected, a “Blind Spot Temporarily
Unavailable, Wipe Rear Corners” message will
display in the cluster, both mirror lights will illu -
minate, and BSM and RCP alerts will not occur.
This is normal operation. The system will auto -
matically recover and resume function when the
condition clears. To minimize system blockage,
do not block the area of the rear fascia/bumper
WARNING!
If TSC activates while driving, slow the vehicle
down, stop at the nearest safe location, and
adjust the trailer load to eliminate trailer sway.
6
21_WD_OM_EN_USC_t.book Page 195