Fuel DODGE DURANGO 2022 User Guide
[x] Cancel search | Manufacturer: DODGE, Model Year: 2022, Model line: DURANGO, Model: DODGE DURANGO 2022Pages: 332, PDF Size: 19.82 MB
Page 88 of 332
86GETTING TO KNOW YOUR INSTRUMENT PANEL
INSTRUMENT CLUSTER DISPLAY MENU
I
TEMS
The instrument cluster display can be used to view
the main menu items for several features. Use the
up and down arrow buttons to scroll through
the driver interactive display menu options until
the desired menu is reached.
NOTE:Depending on the vehicle’s options, feature
settings may vary.
Main Menu
Speedometer
Push and release the up or down arrow
button until the main gauge menu icon is displayed
in the instrument cluster display. Push and release
the left or right arrow button to select the
analog or digital type speedometer display. Push
and release the OK button to toggle units (mph or
km/h) of the speedometer.
Vehicle Info
Push and release the up or down arrow
button until the Vehicle Info icon/title is highlighted
in the instrument cluster display. Push the left
or right arrow button to scroll through the
information submenus. Tire Pressure Monitor System
If tire pressure is
OK for all tires a vehicle icon is
displayed with tire pressure values in each
corner of the icon.
If one or more tires have low pressure, “Inflate
Tire To XX” is displayed with the vehicle icon and
the tire pressure values in each corner of the
icon with the pressure value of the low tire are
displayed in a different color than the other tire
pressure value.
If the Tire Pressure system requires service,
“Service Tire Pressure System” is displayed.
Tire Pressure is an information only function, and
cannot be reset Ú page 193.
Transmission Temperature
Displays the actual transmission temperature.
Oil Temperature
Displays the actual oil temperature.
Oil Pressure
Displays the actual oil pressure.
Oil Life
Displays the current oil life of the vehicle.
Battery Voltage
Displays the current voltage level of the battery.
Driver Assist — If Equipped
Push and release the up or down arrow
button until the Driver Assist display icon/title is
highlighted in the instrument cluster display
Ú page 118.
Fuel Economy
Push and release the up or down arrow
button until the Fuel Economy Menu icon/title is
highlighted. Push the left or right arrow
button to scroll the submenus, one with current
fuel economy display and one without it.
Range
Current MPG, L/100 km, or km/L
Average MPG, L/100 km, or km/L
Press the OK button to reset the average fuel
economy
NOTE:The Range feature is not able to be reset through
the instrument cluster display controls.
22_WD_OM_EN_USC_t.book Page 86
Page 89 of 332
GETTING TO KNOW YOUR INSTRUMENT PANEL87
Trip
Push and release the up or down arrow
button until the Trip icon/title is highlighted in the
instrument cluster display, then push and release
the left or right arrow button to select Trip A
or Trip B.
The Trip A and Trip B information will display the
following:
Distance
Average Fuel Economy
Elapsed Time
Hold the OK button to reset all the information.
Trailer Tow — If Equipped
Push and release the up or down arrow
button until the Trailer Tow Menu icon/title is
highlighted in the instrument cluster display. Push
and release the left or right arrow button to
select Trailer Trip or Trailer Brake.
Trailer Trip will display the following:
Distance
NOTE:Press and hold the OK button to reset all the
information. Trailer Brake will display the following:
Output
Type
Gain
Stop/Start – If Equipped
Push and release the
up or down
arrow button on the steering wheel to
scroll to the Stop/Start menu in the driver
interactive display Ú page 114.
Audio
Push and release the up or down arrow
button until the Audio Menu icon/title is
highlighted in the instrument cluster display. This
menu will display the audio source information,
including the Song name, Artist name, and audio
source with an accompanying graphic.
Messages
Push and release the up or down arrow
button until the Messages Menu item is
highlighted. This feature shows the number of
stored warning messages. Pushing the left or
right arrow button will allow you to see what the
stored messages are.
When no messages are present, main menu icon
will be a closed envelope.
Screen Setup
Push and release the up or down arrow
button until the Screen Setup Menu icon/title is
highlighted in the instrument cluster display. Push
and release the OK button to enter the submenus
and follow the prompts on the screen as needed.
The Screen Setup feature allows you to change
what information is displayed in the instrument
cluster as well as the location that information is
displayed.
Current Gear
On
Off
Gear Display
Full
Single
Favorite Menus
Speedometer Driver Assist
(Show/Hide)Stop/Start
Vehicle Info Fuel Economy
(Show/Hide)Trailer Tow
(Show/Hide)
Performance
(Show/Hide) Trip
(Show/Hide)Audio
(Show/Hide)
Stored
Messages Screen Setup
3
22_WD_OM_EN_USC_t.book Page 87
Page 90 of 332
88GETTING TO KNOW YOUR INSTRUMENT PANEL
NOTE:Menus with (show/hide) can push the OK button to
choose whether to show or hide this menu on the
instrument cluster display.
Defaults (Restores All Settings To Default Settings)
Restore
Cancel
BATTERY SAVER ON/BATTERY SAVER
M
ODE MESSAGE — ELECTRICAL LOAD
R
EDUCTION ACTIONS — IF EQUIPPED
This vehicle is equipped with an Intelligent Battery
Sensor (IBS) to perform additional monitoring of the
electrical system and status of the vehicle battery.
In cases when the IBS detects charging system
failure, or the vehicle battery conditions are
deteriorating, electrical load reduction actions will
take place to extend the driving time and distance
of the vehicle. This is done by reducing power to or
turning off non-essential electrical loads.
Load reduction is only active when the engine is
running. It will display a message if there is a risk
of battery depletion to the point where the vehicle
may stall due to lack of electrical supply, or will not
restart after the current drive cycle.
When load reduction is activated, the message
“Battery Saver On” or “Battery Saver Mode” will
appear in the instrument cluster.
These messages indicate the vehicle battery has a
low state of charge and continues to lose electrical
charge at a rate that the charging system cannot
sustain.
NOTE:
The charging system is independent from load
reduction. The charging system performs a diag -
nostic on the charging system continuously.
If the Battery Charge Warning Light is on it may
indicate a problem with the charging system
Ú page 90.
The electrical loads that may be switched off
(if equipped), and vehicle functions which can be
affected by load reduction:
Heated Seat/Vented Seats/Heated Wheel
Rear Defroster And Heated Mirrors
HVAC System
115 Volt AC Power Inverter System
Audio and Telematics System
Loss of the battery charge may indicate one or
more of the following conditions:
The charging system cannot deliver enough
electrical power to the vehicle system because
the electrical loads are larger than the capability
of the charging system. The charging system is
still functioning properly.
Turning on all possible vehicle electrical loads
(e.g. HVAC to max settings, exterior and interior
lights, overloaded power outlets +12 Volt,
115 Volt AC, USB ports) during certain driving
conditions (city driving, towing, frequent stop -
ping, etc.).
Installing options like additional lights, upfitter
electrical accessories, audio systems, alarms
and similar devices.
Upper Left
None Compass Outside Temp
Time Range To
Empty (RTE)Fuel Economy
Average
Fuel Economy
Current Trip A Trip B
Trailer Trip Gain
Upper Right
None Compass Outside Temp
Time Range To
Empty (RTE)Fuel Economy
Average
Fuel Economy
Current Trip A Trip B
Trailer Trip Gain
22_WD_OM_EN_USC_t.book Page 88
Page 95 of 332
GETTING TO KNOW YOUR INSTRUMENT PANEL93
Electronic Stability Control (ESC) OFF
Warning Light
This warning light indicates
the ESC is off.
Each time the ignition is turned to ON/RUN or
ACC/ON/RUN, the ESC system will be on, even if
it was turned off previously.
Service LaneSense Warning Light —
If Equipped
This warning light will illuminate when the
LaneSense system is not operating and
requires service. Please see an
authorized dealer.
LaneSense Warning Light — If Equipped
The LaneSense Warning Light will be
solid yellow when the vehicle is
approaching a lane marker. The warning
light will flash when the vehicle is
crossing the lane marker Ú page 133.
Low Washer Fluid Warning Light —
If Equipped
This warning light will illuminate when the
windshield washer fluid is low
Úpage 261.
Low Fuel Warning Light
When the fuel level reaches
approximately 2 gal (7.5 L), this light will
turn on and a chime will sound. The light
will remain on until fuel is added.
Engine Check/Malfunction Indicator
Warning Light (MIL)
The Engine Check/Malfunction Indicator
Light (MIL) is a part of an Onboard
Diagnostic System called OBD II that
monitors engine and automatic
transmission control systems. This warning light
will illuminate when the ignition is in the ON/RUN
position before engine start. If the bulb does not
come on when turning the ignition switch from OFF
to ON/RUN, have the condition checked promptly.
Certain conditions, such as a loose or missing gas
cap, poor quality fuel, etc., may illuminate the light
after engine start. The vehicle should be serviced if
the light stays on through several typical driving
styles. In most situations, the vehicle will drive
normally and will not require towing. When the engine is running, the MIL may flash to
alert serious conditions that could lead to
immediate loss of power or severe catalytic
converter damage. The vehicle should be serviced
by an authorized dealer as soon as possible if this
occurs.
WARNING!
A malfunctioning catalytic converter, as
referenced above, can reach higher
temperatures than in normal operating
conditions. This can cause a fire if you drive
slowly or park over flammable substances such
as dry plants, wood, cardboard, etc. This could
result in death or serious injury to the driver,
occupants or others.
CAUTION!
Prolonged driving with the Malfunction Indicator
Light (MIL) on could cause damage to the
vehicle control system. It also could affect fuel
economy and driveability. If the MIL is flashing,
severe catalytic converter damage and power
loss will soon occur. Immediate service is
required.
3
22_WD_OM_EN_USC_t.book Page 93
Page 96 of 332
94GETTING TO KNOW YOUR INSTRUMENT PANEL
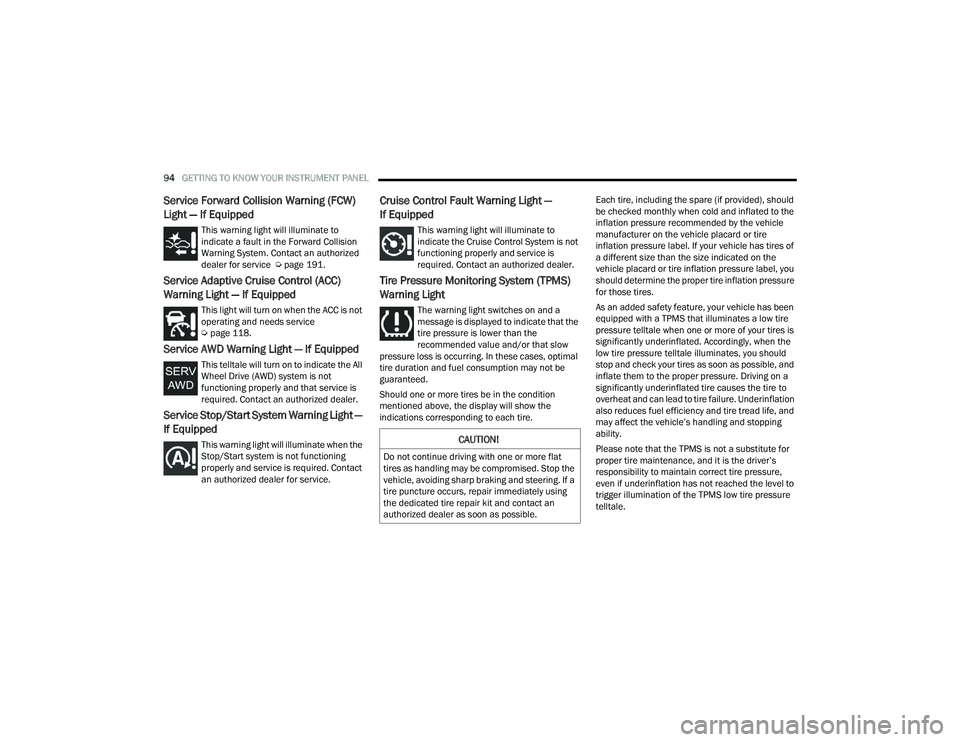
Service Forward Collision Warning (FCW)
Light — If Equipped
This warning light will illuminate to
indicate a fault in the Forward Collision
Warning System. Contact an authorized
dealer for service Úpage 191.
Service Adaptive Cruise Control (ACC)
Warning Light — If Equipped
This light will turn on when the ACC is not
operating and needs service
Úpage 118.
Service AWD Warning Light — If Equipped
This telltale will turn on to indicate the All
Wheel Drive (AWD) system is not
functioning properly and that service is
required. Contact an authorized dealer.
Service Stop/Start System Warning Light —
If Equipped
This warning light will illuminate when the
Stop/Start system is not functioning
properly and service is required. Contact
an authorized dealer for service.
Cruise Control Fault Warning Light —
If Equipped
This warning light will illuminate to
indicate the Cruise Control System is not
functioning properly and service is
required. Contact an authorized dealer.
Tire Pressure Monitoring System (TPMS)
Warning Light
The warning light switches on and a
message is displayed to indicate that the
tire pressure is lower than the
recommended value and/or that slow
pressure loss is occurring. In these cases, optimal
tire duration and fuel consumption may not be
guaranteed.
Should one or more tires be in the condition
mentioned above, the display will show the
indications corresponding to each tire. Each tire, including the spare (if provided), should
be checked monthly when cold and inflated to the
inflation pressure recommended by the vehicle
manufacturer on the vehicle placard or tire
inflation pressure label. If your vehicle has tires of
a different size than the size indicated on the
vehicle placard or tire inflation pressure label, you
should determine the proper tire inflation pressure
for those tires.
As an added safety feature, your vehicle has been
equipped with a TPMS that illuminates a low tire
pressure telltale when one or more of your tires is
significantly underinflated. Accordingly, when the
low tire pressure telltale illuminates, you should
stop and check your tires as soon as possible, and
inflate them to the proper pressure. Driving on a
significantly underinflated tire causes the tire to
overheat and can lead to tire failure. Underinflation
also reduces fuel efficiency and tire tread life, and
may affect the vehicle’s handling and stopping
ability.
Please note that the TPMS is not a substitute for
proper tire maintenance, and it is the driver’s
responsibility to maintain correct tire pressure,
even if underinflation has not reached the level to
trigger illumination of the TPMS low tire pressure
telltale.
CAUTION!
Do not continue driving with one or more flat
tires as handling may be compromised. Stop the
vehicle, avoiding sharp braking and steering. If a
tire puncture occurs, repair immediately using
the dedicated tire repair kit and contact an
authorized dealer as soon as possible.
22_WD_OM_EN_USC_t.book Page 94
Page 99 of 332
GETTING TO KNOW YOUR INSTRUMENT PANEL97
ONBOARD DIAGNOSTIC SYSTEM — OBD II
Your vehicle is equipped with a sophisticated
Onboard Diagnostic system called OBD II.
This system monitors the performance of the
emissions, engine, and transmission control
systems. When these systems are operating
properly, your vehicle will provide excellent
performance and fuel economy, as well as
engine emissions well within current government
regulations.
If any of these systems require service, the OBD II
system will turn on the Malfunction Indicator
Light (MIL). It will also store diagnostic codes and
other information to assist your service technician
in making repairs. Although your vehicle will
usually be driveable and not need towing, see an
authorized dealer for service as soon as possible.
ONBOARD DIAGNOSTIC SYSTEM (OBD II)
C
YBERSECURITY
Your vehicle is required to have an OBD II and a
connection port to allow access to information
related to the performance of your emissions
controls. Authorized service technicians may need
to access this information to assist with the
diagnosis and service of your vehicle and
emissions system Ú page 156.
CAUTION!
Prolonged driving with the MIL on could cause
further damage to the emission control
system. It could also affect fuel economy and
driveability. The vehicle must be serviced
before any emissions tests can be performed.
If the MIL is flashing while the vehicle is
running, severe catalytic converter damage
and power loss will soon occur. Immediate
service is required.
WARNING!
ONLY an authorized service technician should
connect equipment to the OBD II connection
port in order to read the VIN, diagnose, or
service your vehicle.
If unauthorized equipment is connected to the
OBD II connection port, such as a
driver-behavior tracking device, it may:
Be possible that vehicle systems,
including safety related systems, could be
impaired or a loss of vehicle control could
occur that may result in an accident
involving serious injury or death.
Access, or allow others to access,
information stored in your vehicle
systems, including personal information.
3
22_WD_OM_EN_USC_t.book Page 97
Page 104 of 332
102STARTING AND OPERATING
(Continued)
4. If the engine fails to start after eight attempts,
allow the starter to cool for at least
10 minutes, then repeat the procedure.
IF ENGINE FAILS TO START
If the engine fails to start after you have followed
the “Normal Starting” procedure and the vehicle
has not experienced an extended park condition
as defined previously, it may be flooded. Push the
accelerator pedal all the way to the floor and hold
it there while the engine is cranking. This should
clear any excess fuel in case the engine is flooded.
The starter motor will engage automatically, run for
10 seconds, and then disengage. Once this occurs,
release the accelerator pedal and brake pedal,
wait 10 to 15 seconds, then repeat the “Normal
Starting” procedure.
COLD WEATHER OPERATION
(BELOW –22°F OR −30°C)
To ensure reliable starting at these temperatures,
use of an externally powered electric engine block
heater (available from an authorized dealer) is
recommended.
AFTER STARTING
The idle speed is controlled automatically, and it
will decrease as the engine warms up.
ENGINE BREAK-IN RECOMMENDATIONS
A long break-in period is not required for the engine
and drivetrain (transmission and axle) in your
vehicle.
Drive moderately during the first 300 miles
(500 km). After the initial 60 miles (100 km),
speeds up to 50 or 55 mph (80 or 90 km/h) are
desirable.
Brief full-throttle acceleration within the limits of
local traffic laws contributes to a good break-in.
Wide-open throttle acceleration in low gear can be
detrimental and should be avoided.
The engine oil installed in the engine at the factory
is a high-quality energy conserving type lubricant.
Oil changes should be consistent with anticipated
climate conditions under which vehicle operations
will occur. For the recommended viscosity and
quality grades see Ú page 312.
CAUTION!
To prevent damage to the starter, do not crank
continuously for more than 10 seconds at a
time. Wait 10 to 15 seconds before trying again.
WARNING!
Never pour fuel or other flammable liquid into
the throttle body air inlet opening in an
attempt to start the vehicle. This could result
in flash fire causing serious personal injury.
Do not attempt to push or tow your vehicle to
get it started. Vehicles equipped with an auto -
matic transmission cannot be started this
way. Unburned fuel could enter the catalytic
converter and once the engine has started,
ignite and damage the converter and vehicle.
If the vehicle has a discharged battery,
booster cables may be used to obtain a start
from a booster battery or the battery in
another vehicle. This type of start can be
dangerous if done improperly Ú page 246.
CAUTION!
To prevent damage to the starter, do not
continuously crank the engine for more than
10 seconds at a time. Wait 10 to 15 seconds
before trying again.
WARNING!
CAUTION!
Never use Non-Detergent Oil or Straight Mineral
Oil in the engine or damage may result.
22_WD_OM_EN_USC_t.book Page 102
Page 107 of 332
STARTING AND OPERATING105
IGNITION PARK INTERLOCK
This vehicle is equipped with an Ignition Park
Interlock which requires the transmission to be in
PARK (P) before the ignition can be turned to the
OFF position. This helps the driver avoid
inadvertently leaving the vehicle without placing
the transmission in PARK. This system also locks
the transmission in PARK whenever the ignition is
in the OFF position.
NOTE:The transmission is NOT locked in PARK when the
ignition is in the ACC position (even though the
engine will be off). Ensure that the transmission is
in PARK, and the ignition is OFF (not in ACC
position) before exiting the vehicle.
BRAKE TRANSMISSION SHIFT
I
NTERLOCK (BTSI) SYSTEM
This vehicle is equipped with a BTSI system that
holds the transmission gear selector in PARK
unless the brakes are applied. To shift the
transmission out of PARK, the engine must be
running and the brake pedal must be pressed. The
brake pedal must also be pressed to shift from
NEUTRAL into DRIVE or REVERSE when the vehicle
is stopped or moving at low speeds.
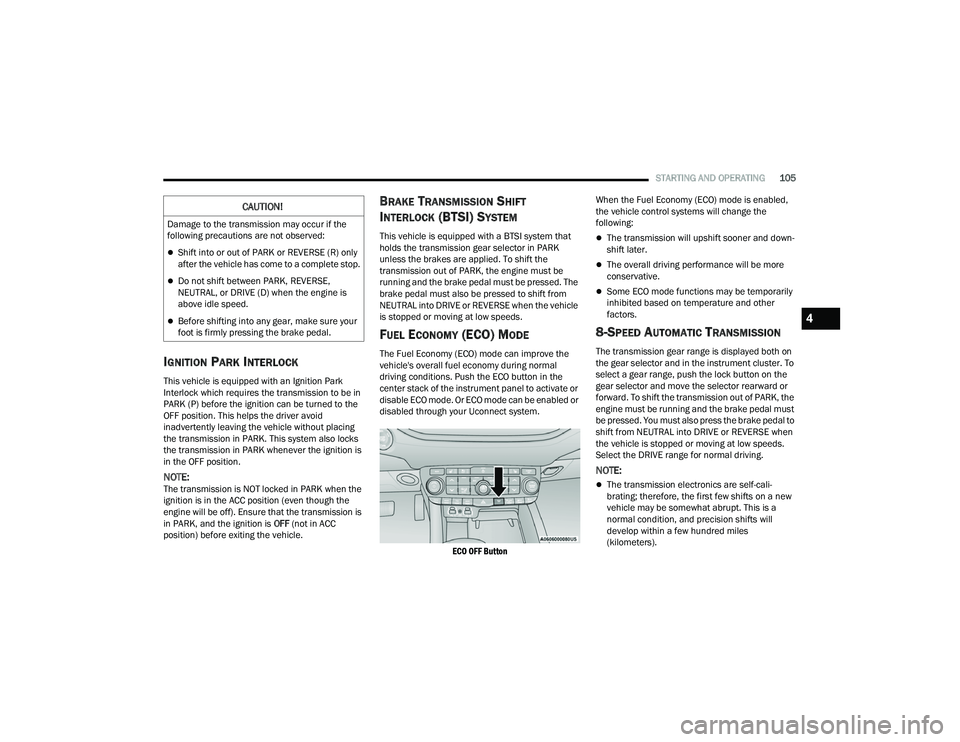
FUEL ECONOMY (ECO) MODE
The Fuel Economy (ECO) mode can improve the
vehicle's overall fuel economy during normal
driving conditions. Push the ECO button in the
center stack of the instrument panel to activate or
disable ECO mode. Or ECO mode can be enabled or
disabled through your Uconnect system.
ECO OFF Button
When the Fuel Economy (ECO) mode is enabled,
the vehicle control systems will change the
following:
The transmission will upshift sooner and down
-
shift later.
The overall driving performance will be more
conservative.
Some ECO mode functions may be temporarily
inhibited based on temperature and other
factors.
8-SPEED AUTOMATIC TRANSMISSION
The transmission gear range is displayed both on
the gear selector and in the instrument cluster. To
select a gear range, push the lock button on the
gear selector and move the selector rearward or
forward. To shift the transmission out of PARK, the
engine must be running and the brake pedal must
be pressed. You must also press the brake pedal to
shift from NEUTRAL into DRIVE or REVERSE when
the vehicle is stopped or moving at low speeds.
Select the DRIVE range for normal driving.
NOTE:
The transmission electronics are self-cali -
brating; therefore, the first few shifts on a new
vehicle may be somewhat abrupt. This is a
normal condition, and precision shifts will
develop within a few hundred miles
(kilometers).
CAUTION!
Damage to the transmission may occur if the
following precautions are not observed:
Shift into or out of PARK or REVERSE (R) only
after the vehicle has come to a complete stop.
Do not shift between PARK, REVERSE,
NEUTRAL, or DRIVE (D) when the engine is
above idle speed.
Before shifting into any gear, make sure your
foot is firmly pressing the brake pedal.4
22_WD_OM_EN_USC_t.book Page 105
Page 109 of 332
STARTING AND OPERATING107
When exiting the vehicle, always:
Apply the parking brake.
Shift the transmission into PARK.
Turn the ignition OFF.
Remove the key fob from the vehicle.
The following indicators should be used to ensure
that you have properly engaged the transmission
into the PARK position:
When shifting into PARK, push the lock button
on the gear selector and firmly move the
selector all the way forward until it stops and is
fully seated.
Look at the transmission gear position display
and verify that it indicates the PARK position (P),
and is not blinking.
With brake pedal released, verify that the gear
selector will not move out of PARK.
REVERSE (R)
This range is for moving the vehicle backward.
Shift into REVERSE only after the vehicle has come
to a complete stop.
NEUTRAL (N)
Use this range when the vehicle is standing for
prolonged periods with the engine running. Apply
the parking brake and shift the transmission into
PARK (P) if you must exit the vehicle.
DRIVE (D)
This range should be used for most city and
highway driving. It provides the smoothest upshifts
and downshifts, and the best fuel economy. The
transmission automatically upshifts through all
forward gears.
When frequent transmission shifting occurs (such
as when operating the vehicle under heavy loading
conditions, in hilly terrain, traveling into strong
head winds, or while towing a heavy trailer), use
the AutoStick shift control to select a lower gear
Ú page 108. Under these conditions, using a lower
gear will improve performance and extend
transmission life by reducing excessive shifting
and heat buildup.
During cold temperatures, transmission operation
may be modified depending on engine and
transmission temperature as well as vehicle
speed. This feature improves warm up time of the
engine and transmission to achieve maximum
efficiency. Engagement of the torque converter
clutch is inhibited until the transmission fluid is
warm. Normal operation will resume once the
transmission temperature has risen to a suitable
level.
CAUTION!
Before moving the transmission gear selector
out of PARK, you must start the engine, and
also press the brake pedal. Otherwise,
damage to the gear selector could result.
DO NOT race the engine when shifting from
PARK or NEUTRAL into another gear range, as
this can damage the drivetrain.
WARNING!
Do not coast in NEUTRAL and never turn off the
ignition to coast down a hill. These are unsafe
practices that limit your response to changing
traffic or road conditions. You might lose control
of the vehicle and have a collision.
CAUTION!
Towing the vehicle, coasting, or driving for any
other reason with the transmission in NEUTRAL
can cause severe transmission damage.
For Recreational Towing Ú page 149.
For Towing A Disabled Vehicle Ú page 253.
4
22_WD_OM_EN_USC_t.book Page 107
Page 116 of 332
114STARTING AND OPERATING
7. New brake pads installed on old rotors require a burnish. New rotors installed with old brake
pads should be burnished at the track or
driven for 300 miles (485 km) of city driving to
develop an adequate lining transfer layer on
the rotor surface prior to track use.
8. Rotors that pulsate during track use should be replaced.
NOTE:Resurfacing of the rotors is not recommended, as
it removes mass from the rotor, reducing its
thermal capacity. Resurfacing also thins the rotor
cheek, making it less robust and increasing the
likelihood of pulsation in further track use.
FUEL SAVER TECHNOLOGY 5.7L ONLY —
IF EQUIPPED
This feature offers improved fuel economy by
shutting off four of the engine's eight cylinders
during light load and cruise conditions. The system
is automatic with no driver inputs.
NOTE:This system may take some time to return to full
functionality after a battery disconnect.
POWER STEERING
The electric power steering system will provide
increased vehicle response and ease of
maneuverability. The power steering system
adapts to different driving conditions and adjusts
accordingly.
Alternate electric power steering efforts can be
selected through the Uconnect System
Úpage 156.
If the Electric Power Steering warning icon is
displayed and the “SERVICE POWER STEERING” or
the “POWER STEERING ASSIST OFF – SERVICE
SYSTEM” message is displayed within the
instrument cluster display, this indicates the
vehicle needs to be taken to the dealer for service
Ú page 89.
NOTE:
Even if the power steering assistance is no
longer operational, it is still possible to steer the
vehicle. Under these conditions there will be a
substantial increase in steering effort, espe -
cially at low speeds and during parking maneu -
vers.
If the condition persists, see an authorized
dealer for service.
If the Steering icon is displayed and the “POWER
STEERING SYSTEM OVER TEMP” message is
displayed on the instrument cluster screen, this
indicates an over temperature condition in the
power steering system. Once driving conditions are
safe, pull over and let the vehicle idle for a few
moments until the icon and message turn off.
STOP/START SYSTEM — IF EQUIPPED
The Stop/Start function is developed to reduce
fuel consumption. The system will stop the engine
automatically during a vehicle stop if the required
conditions are met. Releasing the brake pedal or
pressing the accelerator pedal will automatically
re-start the engine.
This vehicle has been upgraded with a heavy duty
starter, enhanced battery, and other upgraded
engine parts, to handle the additional engine
starts.
WARNING!
Continued operation with reduced assist could
pose a safety risk to yourself and others. Service
should be obtained as soon as possible.
22_WD_OM_EN_USC_t.book Page 114