DODGE GRAND CARAVAN 2020 Owners Manual
Manufacturer: DODGE, Model Year: 2020, Model line: GRAND CARAVAN, Model: DODGE GRAND CARAVAN 2020Pages: 380, PDF Size: 14.92 MB
Page 341 of 380
MULTIMEDIA339
DMTI Spatial is an authorized user and
distributor of selected Statistics Canada
Computer files under Licensing Agreement
6230.
© Copyright, HER MAJESTY THE QUEEN IN
RIGHT OF CANADA, as represented by the
Minister of Industry, Statistics Canada 1996.
Digital Topographic Data produced under
license from Her Majesty the Queen in Right of
Canada, with permission of Natural Resources
Canada.
Governing Law. The above terms and conditions
shall be governed by the laws of the State of
Illinois, without giving effect to (i) its conflict of
laws provisions, or (ii) the United Nations
Convention for Contracts for the International
Sale of Goods, which is explicitly excluded. You
agree to submit to the jurisdiction of the State of
Illinois for any and all disputes, claims and
actions arising from or in connection with the
Traffic Data provided to you hereunder. Government End Users. If the Traffic Data is
being acquired by or on behalf of the United
States government or any other entity seeking
or applying rights similar to those customarily
claimed by the United States government, this
Data is a “commercial item” as that term is
defined at 48 C.F.R. (“FAR”) 2.101, is licensed
in accordance with this Agreement, and the
Traffic Data delivered or otherwise furnished
shall be marked and embedded as appropriate
with the following “Notice of Use,” and shall be
treated in accordance with such Notice:
Notice of Use
Contractor (Manufacturer/ Supplier) Name:
NAVTEQ
Contractor (Manufacturer/supplier) Address:
425 West Randolph Street, Chicago, Illinois
60606.
This Data is a commercial item as defined in
FAR 2.101 and is subject to the NAVTEQ Traffic
End User License Agreement under which this
Data was provided.
© 2019 NAVTEQ; © 2019 Traffic.com – All
rights reserved.If the Contracting Officer, federal government
agency, or any federal official refuses to use the
legend provided herein, the Contracting Officer,
federal government agency, or any federal
official must notify NAVTEQ prior to seeking
additional or alternative rights in the Traffic
Data.
NAVTEQ and Traffic.com are trademarks in the
U.S. and other countries. © 2019 NAVTEQ; ©
2019 Traffic.com. All rights reserved.
HD Radio™ Technology manufactured under
license from iBiquity Digital Corporation. U.S.
and Foreign Patents. HD Radio™ and the HD,
HD Radio™, and "Arc" logos are proprietary
trademarks of iBiquity Digital Corp.
Garmin® is a trademark of Garmin® Ltd. or its
subsidiaries, registered in the USA and other
countries. This trademark may not be used
without the express permission of Garmin®. All
other company names and trademarks
mentioned or referenced in this documentation
are the properties of their respective owners. All
rights reserved.
9
20_RT_OM_EN_USC_t.book Page 339
Page 342 of 380
340MULTIMEDIA
STEERING WHEEL AUDIO CONTROLS — IF
EQUIPPED
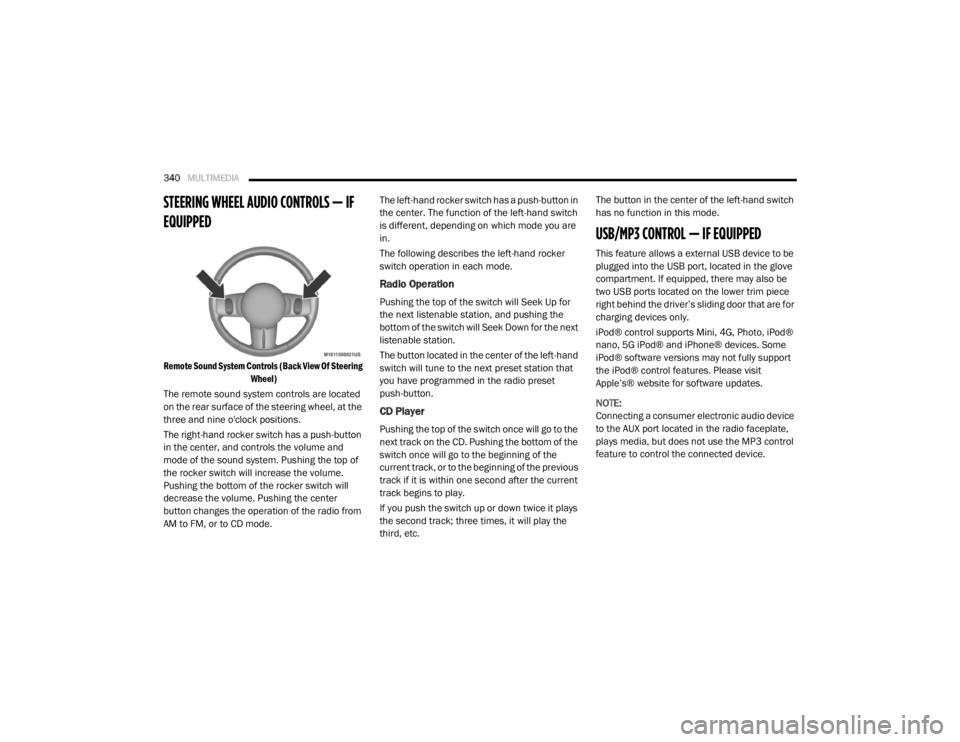
Remote Sound System Controls (Back View Of Steering
Wheel)
The remote sound system controls are located
on the rear surface of the steering wheel, at the
three and nine o'clock positions.
The right-hand rocker switch has a push-button
in the center, and controls the volume and
mode of the sound system. Pushing the top of
the rocker switch will increase the volume.
Pushing the bottom of the rocker switch will
decrease the volume. Pushing the center
button changes the operation of the radio from
AM to FM, or to CD mode. The left-hand rocker switch has a push-button in
the center. The function of the left-hand switch
is different, depending on which mode you are
in.
The following describes the left-hand rocker
switch operation in each mode.
Radio Operation
Pushing the top of the switch will Seek Up for
the next listenable station, and pushing the
bottom of the switch will Seek Down for the next
listenable station.
The button located in the center of the left-hand
switch will tune to the next preset station that
you have programmed in the radio preset
push-button.
CD Player
Pushing the top of the switch once will go to the
next track on the CD. Pushing the bottom of the
switch once will go to the beginning of the
current track, or to the beginning of the previous
track if it is within one second after the current
track begins to play.
If you push the switch up or down twice it plays
the second track; three times, it will play the
third, etc.The button in the center of the left-hand switch
has no function in this mode.
USB/MP3 CONTROL — IF EQUIPPED
This feature allows a external USB device to be
plugged into the USB port, located in the glove
compartment. If equipped, there may also be
two USB ports located on the lower trim piece
right behind the driver’s sliding door that are for
charging devices only.
iPod® control supports Mini, 4G, Photo, iPod®
nano, 5G iPod® and iPhone® devices. Some
iPod® software versions may not fully support
the iPod® control features. Please visit
Apple’s® website for software updates.
NOTE:
Connecting a consumer electronic audio device
to the AUX port located in the radio faceplate,
plays media, but does not use the MP3 control
feature to control the connected device.
20_RT_OM_EN_USC_t.book Page 340
Page 343 of 380
MULTIMEDIA341
Connecting The External USB Device
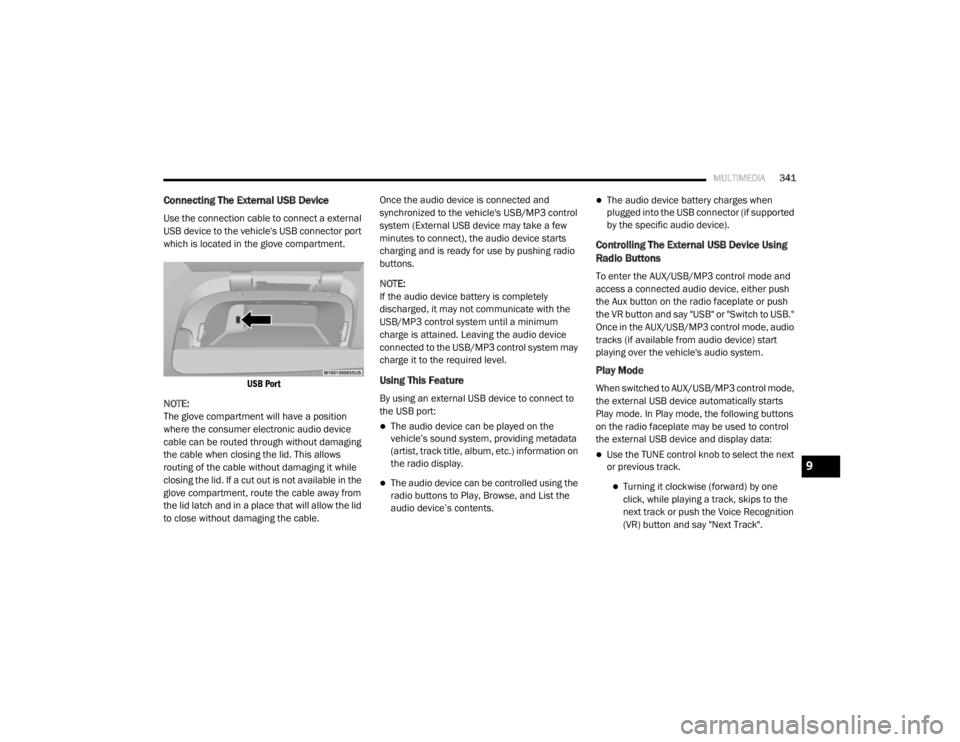
Use the connection cable to connect a external
USB device to the vehicle's USB connector port
which is located in the glove compartment.
USB Port
NOTE:
The glove compartment will have a position
where the consumer electronic audio device
cable can be routed through without damaging
the cable when closing the lid. This allows
routing of the cable without damaging it while
closing the lid. If a cut out is not available in the
glove compartment, route the cable away from
the lid latch and in a place that will allow the lid
to close without damaging the cable. Once the audio device is connected and
synchronized to the vehicle's USB/MP3 control
system (External USB device may take a few
minutes to connect), the audio device starts
charging and is ready for use by pushing radio
buttons.
NOTE:
If the audio device battery is completely
discharged, it may not communicate with the
USB/MP3 control system until a minimum
charge is attained. Leaving the audio device
connected to the USB/MP3 control system may
charge it to the required level.
Using This Feature
By using an external USB device to connect to
the USB port:
The audio device can be played on the
vehicle’s sound system, providing metadata
(artist, track title, album, etc.) information on
the radio display.
The audio device can be controlled using the
radio buttons to Play, Browse, and List the
audio device’s contents.
The audio device battery charges when
plugged into the USB connector (if supported
by the specific audio device).
Controlling The External USB Device Using
Radio Buttons
To enter the AUX/USB/MP3 control mode and
access a connected audio device, either push
the Aux button on the radio faceplate or push
the VR button and say "USB" or "Switch to USB."
Once in the AUX/USB/MP3 control mode, audio
tracks (if available from audio device) start
playing over the vehicle's audio system.
Play Mode
When switched to AUX/USB/MP3 control mode,
the external USB device automatically starts
Play mode. In Play mode, the following buttons
on the radio faceplate may be used to control
the external USB device and display data:
Use the TUNE control knob to select the next
or previous track.
Turning it clockwise (forward) by one
click, while playing a track, skips to the
next track or push the Voice Recognition
(VR) button and say "Next Track".
9
20_RT_OM_EN_USC_t.book Page 341
Page 344 of 380
342MULTIMEDIA
Turning it counterclockwise (backward)
by one click will jump to the previous
track in the list or push the VR button and
say "Previous Track".
Jump backward in the current track by
pushing and holding the << RW button.
Holding the << RW button long enough will
jump to the beginning of the current track.
Jump forward in the current track by pushing
and holding the FF >> button.
A single push backward << RW or forward FF
>> will jump backward or forward respec -
tively, for five seconds.
Use the << SEEK and SEEK >> buttons to
jump to the previous or next track. Pushing
the SEEK >> button during play mode will
jump to the next track in the list, or push the
VR button and say "Next or Previous Track."
While a track is playing, push the INFO button
to see the associated metadata (artist, track
title, album, etc.) for that track. Pushing the
INFO button again jumps to the next screen
of data for that track. Once all screens have
been viewed, the last INFO button push will
go back to the play mode screen on the radio.
Pushing the Repeat button will change the
audio device mode to repeat the current
playing track or push the VR button and say
"Repeat On" or "Repeat Off".
Push the Scan button to use AUX/USB/MP3
device scan mode, which will play the first 10
seconds of each track in the current list and
then forward to the next song. To stop Scan
mode and start playing the desired track,
when it is playing the track, push the Scan
button again. During Scan mode, pushing the
<< SEEK and SEEK >> buttons will select the
previous and next tracks.
RND button: Pushing this button toggles
between Shuffle ON and Shuffle OFF modes
for the external USB device, or push the VR
button and say "Shuffle On" or "Shuffle Off." If
the RND icon is showing on the radio display,
then the shuffle mode is On.
List Or Browse Mode
During Play mode, pushing any of the buttons
described below will bring up List mode. List
mode enables scrolling through the list of
menus and tracks on the audio device. Tune control knob: The Tune control knob
functions in a similar manner as the scroll
wheel on the audio device or external USB
device.
Turning it clockwise (forward) and counter-
clockwise (backward) scrolls through the
lists, displaying the track detail on the radio
display. Once the track to be played is high-
lighted on the radio display, push the Tune
control knob to select and start playing the
track. Turning the TUNE control knob fast will
scroll through the list faster. During fast
scroll, a slight delay in updating the informa
-
tion on the radio display may be noticeable.
In List mode, the radio Preset buttons are used
as shortcuts to the following lists on the
external USB device:
Preset 1 – Playlists
Preset 2 – Artists
Preset 3 – Albums
Preset 4 – Genres
Preset 5 – Audiobooks
Preset 6 – Podcasts
20_RT_OM_EN_USC_t.book Page 342
Page 345 of 380
MULTIMEDIA343
Pushing a PRESET button will display the
current list on the top line and the first item in
that list on the second line.
To exit List mode without selecting a track, push
the same Preset button again to go back to
Play mode.
List button: The List button will display the top
level menu of the external USB device.
Turn the Tune control knob to list the
top-menu item to be selected and push the
Tune control knob. This will display the next
sub-menu list item on the audio device, then
follow the same steps to go to the desired
track in that list. Not all external USB device
sub-menu levels are available on this system.
Music Type button: The Music Type button is
another shortcut button to the genre listing on
your audio device.
Bluetooth® Streaming Audio (BTSA)
Music can be streamed from your cellular
phone to the Uconnect phone system.
Refer to the Uconnect Owner’s Manual
Supplement for further information on
Bluetooth® connectivity.
Controlling BTSA Using Radio Buttons
To enter BTSA mode, push either AUX button on
the radio or push the VR button and say
“Bluetooth® Streaming Audio”.
Play Mode
When switched to BTSA mode, some audio
devices can start playing music over the
vehicle’s audio system, but some devices
require the music to be initiated on the device
first. Then, it will get streamed to the Uconnect
phone system. Seven devices can be paired to
the Uconnect phone system, but just one can be
selected and played.
Selecting A Different Audio Device
1. Push the Phone button to begin.
2. After the "Ready" prompt and following the beep, say "Setup", then say "Select Audio
Devices".
3. Say the name of the audio device or ask the Uconnect phone system to list the audio
devices.
Next Track
Use the Seek Up button, or push the VR
button on the radio and say “Next Track,” to
jump to the next music track on your cellular
phone.
WARNING!
Do not plug in or remove the iPod® or
external USB device while driving. Failure to
follow this warning could result in an
accident.
CAUTION!
Leaving the iPod® or external USB device
(or any supported device) anywhere in the
vehicle in extreme heat or cold can alter the
operation or damage the device. Follow the
device manufacturer’s guidelines.
Placing items on the iPod® or external USB
device, or connections to the iPod® or
external USB device in the vehicle, can
cause damage to the device and/or to the
connectors.
9
20_RT_OM_EN_USC_t.book Page 343
Page 346 of 380
344MULTIMEDIA
Previous Track
Use the Seek Down button, or push the VR
button on the radio and say “Previous Track,” to
jump to the previous music track on your
cellular phone.
Browse
Browsing is not available on a Bluetooth®
Streaming Audio (BTSA) device. Only the current
song that is playing will display info.
UCONNECT MULTIMEDIA — VIDEO
ENTERTAINMENT SYSTEM (VES) — IF
EQUIPPED
Your rear seat Video Entertainment System
(VES) is designed to give your family years of
enjoyment. You can play your favorite CDs or
DVDs, listen to audio over the wireless
headphones, or plug and play a variety of
standard video games or audio devices. Please
review this Owner's Manual to become familiar
with its features and operation. NOTE:
The screen is located in the 2nd row overhead
console.
Getting Started
Screen located in the overhead console
:
Unfold the overhead LCD screen(s) by
pushing the button on the overhead console
behind the screen(s).
Cycle the ignition to the ON/RUN or ACC
position.
Turn on the Player by pushing the Power
button, located on the far left, or by pushing
the button on the Remote Control.
When the video screen is open and a DVD is
inserted into the VES player, the screen turns
on automatically, the headphone transmit -
ters turn on and playback begins.
The system can be controlled by the front
seat occupants using either the touchscreen
radio, the DVD, or by the rear seat occupants
using the remote control.
Play Video Games
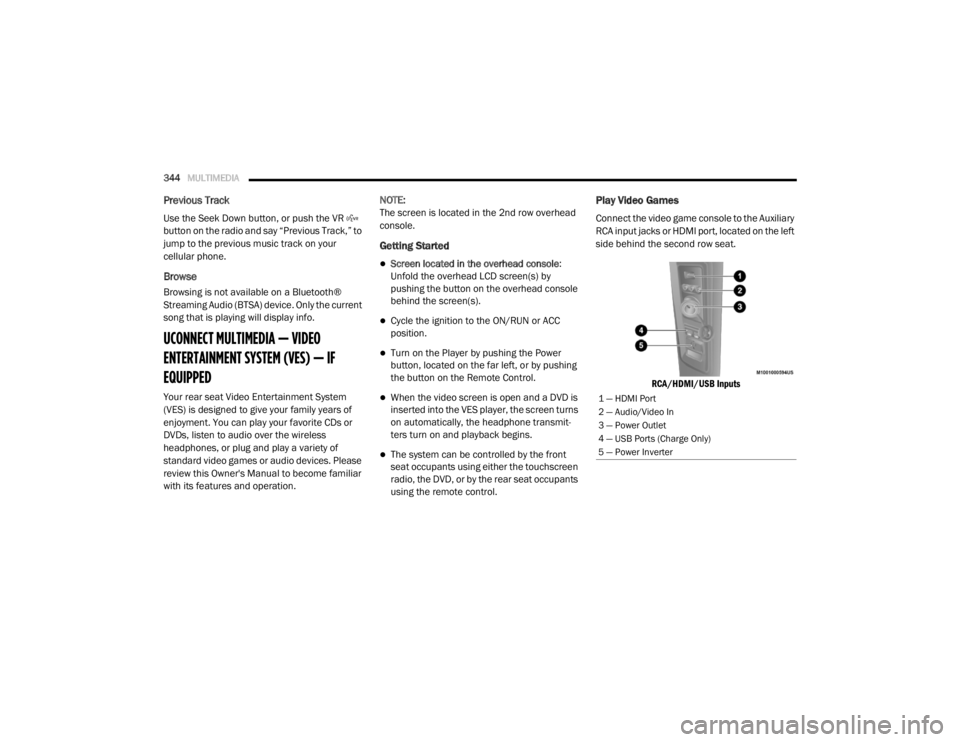
Connect the video game console to the Auxiliary
RCA input jacks or HDMI port, located on the left
side behind the second row seat.
RCA/HDMI/USB Inputs
1 — HDMI Port
2 — Audio/Video In
3 — Power Outlet
4 — USB Ports (Charge Only)
5 — Power Inverter
20_RT_OM_EN_USC_t.book Page 344
Page 347 of 380
MULTIMEDIA345
When connecting an external source to the AUX
input, be sure to follow the standard color
coding for the VES jacks.
NOTE:
Certain high-end video game consoles will
exceed the power limit of the vehicle's Power
Inverter. Refer to “Power Inverter — If Equipped”
in “Getting To Know Your Vehicle” for more
information.
Using The Remote Control
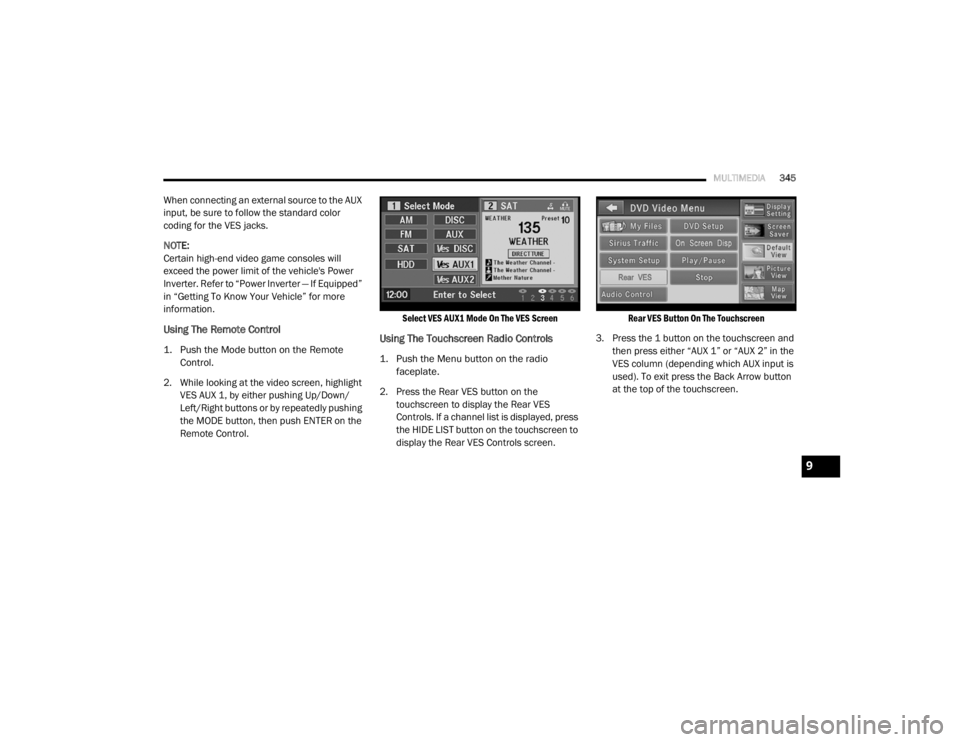
1. Push the Mode button on the Remote
Control.
2. While looking at the video screen, highlight VES AUX 1, by either pushing Up/Down/
Left/Right buttons or by repeatedly pushing
the MODE button, then push ENTER on the
Remote Control.
Select VES AUX1 Mode On The VES Screen
Using The Touchscreen Radio Controls
1. Push the Menu button on the radio
faceplate.
2. Press the Rear VES button on the touchscreen to display the Rear VES
Controls. If a channel list is displayed, press
the HIDE LIST button on the touchscreen to
display the Rear VES Controls screen.
Rear VES Button On The Touchscreen
3. Press the 1 button on the touchscreen and then press either “AUX 1” or “AUX 2” in the
VES column (depending which AUX input is
used). To exit press the Back Arrow button
at the top of the touchscreen.
9
20_RT_OM_EN_USC_t.book Page 345
Page 348 of 380
346MULTIMEDIA
Play A DVD Using The Touchscreen Radio
NOTE:
Headunit DVD player does not play Blu-ray™
Discs.
1. Push the OPEN/CLOSE or LOAD button on
the radio faceplate (Touchscreen).
2. Insert the DVD with the label facing up. The radio automatically selects the appropriate
mode after the disc is recognized and
displays the menu screen or starts playing
the first track.
Using The Remote Control
1. Push the Source button on the Remote Control.
2. Highlight DISC by either pushing Up/Down/ Left/Right buttons or by repeatedly pushing
the Source button, then push “Enter/OK”.
NOTE:
The VES will retain the last setting when turned
off.
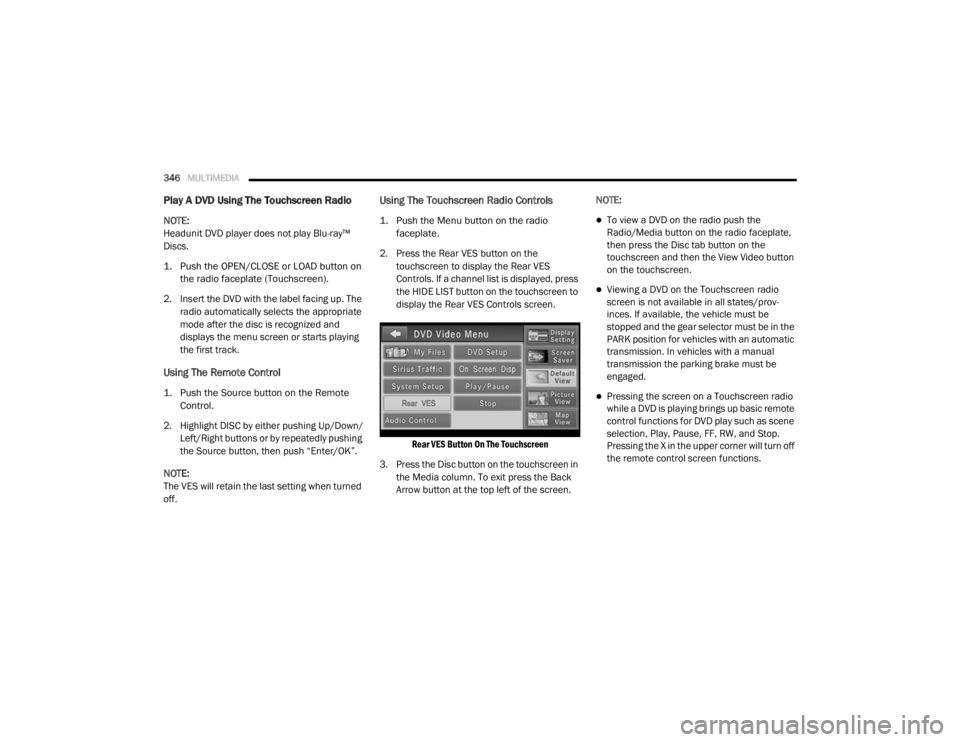
Using The Touchscreen Radio Controls
1. Push the Menu button on the radio faceplate.
2. Press the Rear VES button on the touchscreen to display the Rear VES
Controls. If a channel list is displayed, press
the HIDE LIST button on the touchscreen to
display the Rear VES Controls screen.
Rear VES Button On The Touchscreen
3. Press the Disc button on the touchscreen in the Media column. To exit press the Back
Arrow button at the top left of the screen. NOTE:To view a DVD on the radio push the
Radio/Media button on the radio faceplate,
then press the Disc tab button on the
touchscreen and then the View Video button
on the touchscreen.
Viewing a DVD on the Touchscreen radio
screen is not available in all states/prov
-
inces. If available, the vehicle must be
stopped and the gear selector must be in the
PARK position for vehicles with an automatic
transmission. In vehicles with a manual
transmission the parking brake must be
engaged.
Pressing the screen on a Touchscreen radio
while a DVD is playing brings up basic remote
control functions for DVD play such as scene
selection, Play, Pause, FF, RW, and Stop.
Pressing the X in the upper corner will turn off
the remote control screen functions.
20_RT_OM_EN_USC_t.book Page 346
Page 349 of 380
MULTIMEDIA347
Play A DVD Using The VES Player — If
Equipped
Insert the DVD with the label facing up. The VES
player automatically selects the appropriate
mode after the disc is recognized and starts
playing the DVD.
NOTE:
The VES player has basic DVD control function
such as Menu, Play, Pause, FF, RW and Stop.
Using The Remote Control
1. Push the Source button on the Remote
Control.
2. Highlight VES DISC by either pushing Up/ Down/Left/Right buttons or by repeatedly
pushing the Source button, then push
“Enter/OK” on the Remote Control.
NOTE:
The VES will retain the last setting when turned
off.
Using The Touchscreen Radio Controls
1. Push the Menu button on the radio faceplate.
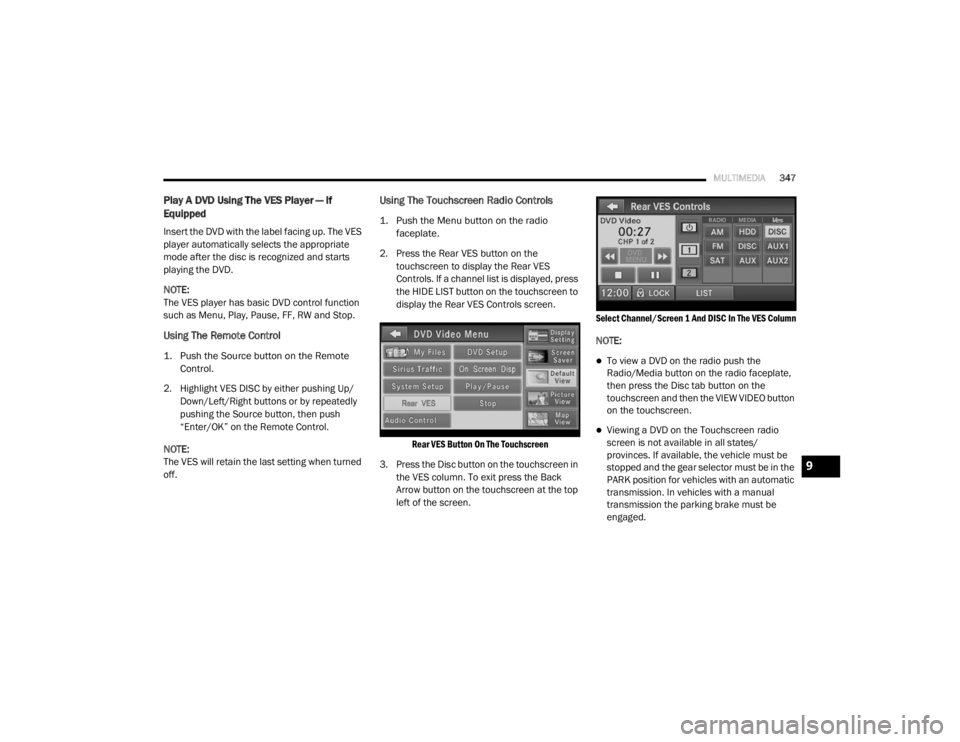
2. Press the Rear VES button on the touchscreen to display the Rear VES
Controls. If a channel list is displayed, press
the HIDE LIST button on the touchscreen to
display the Rear VES Controls screen.
Rear VES Button On The Touchscreen
3. Press the Disc button on the touchscreen in the VES column. To exit press the Back
Arrow button on the touchscreen at the top
left of the screen.
Select Channel/Screen 1 And DISC In The VES Column
NOTE:
To view a DVD on the radio push the
Radio/Media button on the radio faceplate,
then press the Disc tab button on the
touchscreen and then the VIEW VIDEO button
on the touchscreen.
Viewing a DVD on the Touchscreen radio
screen is not available in all states/
provinces. If available, the vehicle must be
stopped and the gear selector must be in the
PARK position for vehicles with an automatic
transmission. In vehicles with a manual
transmission the parking brake must be
engaged.
9
20_RT_OM_EN_USC_t.book Page 347
Page 350 of 380
348MULTIMEDIA
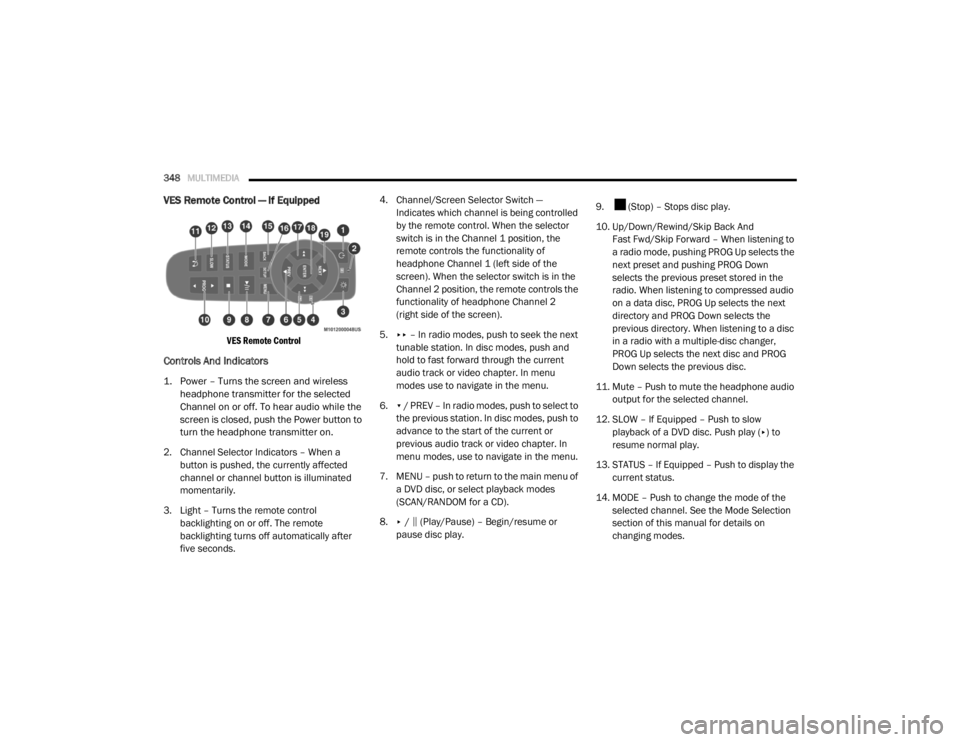
VES Remote Control — If Equipped
VES Remote Control
Controls And Indicators
1. Power – Turns the screen and wireless
headphone transmitter for the selected
Channel on or off. To hear audio while the
screen is closed, push the Power button to
turn the headphone transmitter on.
2. Channel Selector Indicators – When a button is pushed, the currently affected
channel or channel button is illuminated
momentarily.
3. Light – Turns the remote control backlighting on or off. The remote
backlighting turns off automatically after
five seconds. 4. Channel/Screen Selector Switch —
Indicates which channel is being controlled
by the remote control. When the selector
switch is in the Channel 1 position, the
remote controls the functionality of
headphone Channel 1 (left side of the
screen). When the selector switch is in the
Channel 2 position, the remote controls the
functionality of headphone Channel 2
(right side of the screen).
5. ▸▸ – In radio modes, push to seek the next
tunable station. In disc modes, push and
hold to fast forward through the current
audio track or video chapter. In menu
modes use to navigate in the menu.
6. ▾ / PREV – In radio modes, push to select to
the previous station. In disc modes, push to
advance to the start of the current or
previous audio track or video chapter. In
menu modes, use to navigate in the menu.
7. MENU – push to return to the main menu of a DVD disc, or select playback modes
(SCAN/RANDOM for a CD).
8. ▸ / ‖ (Play/Pause) – Begin/resume or
pause disc play. 9. (Stop) – Stops disc play.
10. Up/Down/Rewind/Skip Back And
Fast Fwd/Skip Forward – When listening to
a radio mode, pushing PROG Up selects the
next preset and pushing PROG Down
selects the previous preset stored in the
radio. When listening to compressed audio
on a data disc, PROG Up selects the next
directory and PROG Down selects the
previous directory. When listening to a disc
in a radio with a multiple-disc changer,
PROG Up selects the next disc and PROG
Down selects the previous disc.
11. Mute – Push to mute the headphone audio output for the selected channel.
12. SLOW – If Equipped – Push to slow playback of a DVD disc. Push play ( ▸) to
resume normal play.
13. STATUS – If Equipped – Push to display the current status.
14. MODE – Push to change the mode of the selected channel. See the Mode Selection
section of this manual for details on
changing modes.
20_RT_OM_EN_USC_t.book Page 348