oil DODGE MAGNUM SRT 2007 1.G Owners Manual
[x] Cancel search | Manufacturer: DODGE, Model Year: 2007, Model line: MAGNUM SRT, Model: DODGE MAGNUM SRT 2007 1.GPages: 380, PDF Size: 6.63 MB
Page 21 of 380
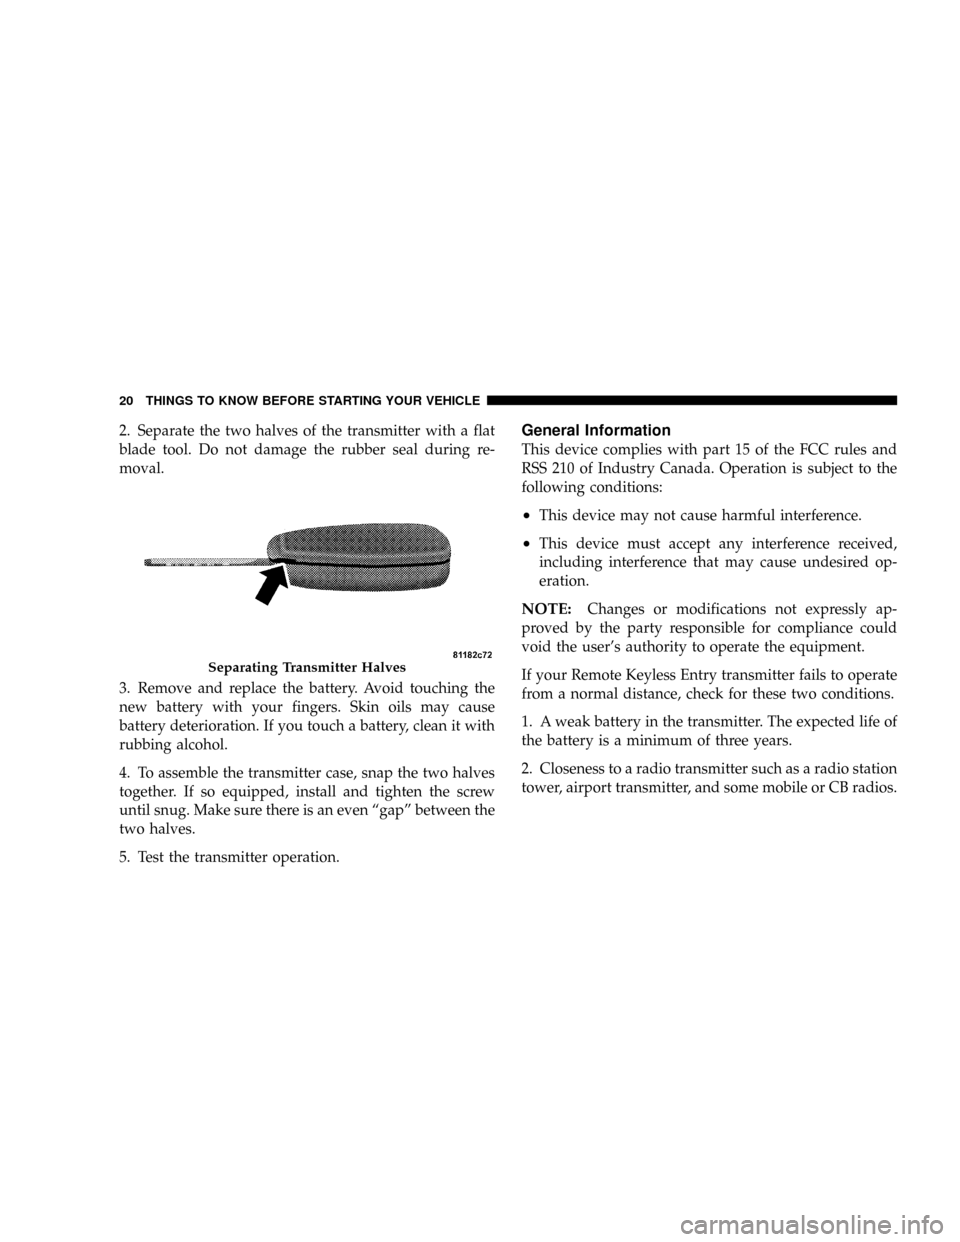
2. Separate the two halves of the transmitter with a flat
blade tool. Do not damage the rubber seal during re-
moval.
3. Remove and replace the battery. Avoid touching the
new battery with your fingers. Skin oils may cause
battery deterioration. If you touch a battery, clean it with
rubbing alcohol.
4. To assemble the transmitter case, snap the two halves
together. If so equipped, install and tighten the screw
until snug. Make sure there is an even ªgapº between the
two halves.
5. Test the transmitter operation.General Information
This device complies with part 15 of the FCC rules and
RSS 210 of Industry Canada. Operation is subject to the
following conditions:
²This device may not cause harmful interference.
²This device must accept any interference received,
including interference that may cause undesired op-
eration.
NOTE:Changes or modifications not expressly ap-
proved by the party responsible for compliance could
void the user's authority to operate the equipment.
If your Remote Keyless Entry transmitter fails to operate
from a normal distance, check for these two conditions.
1. A weak battery in the transmitter. The expected life of
the battery is a minimum of three years.
2. Closeness to a radio transmitter such as a radio station
tower, airport transmitter, and some mobile or CB radios.
Separating Transmitter Halves
20 THINGS TO KNOW BEFORE STARTING YOUR VEHICLE
Page 57 of 380
WARNING!
An incorrectly anchored tether strap could lead to
increased head motion and possible injury to the
child. Use only the anchor positions directly behind
the child seat to secure a child restraint top tether
strap.
Transporting Pets
Airbags deploying in the front seat could harm your pet.
An unrestrained pet will be thrown about and possibly
injured, or injure a passenger during panic braking or in
a collision.
Pets should be restrained in the rear seat in pet harnesses
or pet carriers that are secured by seat belts.
BREAK-IN RECOMMENDATIONS
A long break-in period is not required for the drivetrain
(engine, transmission, and rear axle) in your new vehicle.
Drive moderately during the first 500 miles (800 km).
After the initial 60 miles (100 km), speeds up to 50 or 55
mph (80 or 90 km/h) are desirable.
While cruising, brief full-throttle acceleration, within the
limits of local traffic laws, contributes to a good break-in.
However, wide-open throttle acceleration in low gear can
be detrimental and should be avoided.
The engine oil, transmission fluid, and axle lubricant
installed at the factory is high quality and energy con-
serving. Oil, fluid, and lubricant changes should be
consistent with anticipated climate and conditions under
which vehicle operations will occur. The recommended
viscosity and quality grades is shown in Section 7 of this
manual.
56 THINGS TO KNOW BEFORE STARTING YOUR VEHICLE
Page 58 of 380
CAUTION!
Never use Non-Detergent Oil or Straight Mineral
Oil in the engine or damage may result.
NOTE:A new engine may consume some oil during its
first few thousand miles (kilometers) of operation. This
should be considered as a normal part of the break-in and
not interpreted as an indication of difficulty.
SAFETY TIPS
Transporting Passengers
NEVER TRANSPORT PASSENGERS IN THE CARGO
AREA.
WARNING!
It is extremely dangerous to ride in a cargo area,
inside or outside of a vehicle. In a collision, people
riding in these areas are more likely to be seriously
injured or killed.
Do not allow people to ride in any area of your
vehicle that is not equipped with seats and seat belts.
Be sure everyone in your vehicle is in a seat and
using a seat belt properly.
Lock Your Vehicle
Always remove the keys from the ignition and lock all
doors when leaving the vehicle unattended, even in your
own driveway or garage. Try to park your vehicle in a
well-lit area and never invite theft by leaving articles of
value exposed.
Exhaust Gas
Do not run the engine in a closed garage or in confined
areas any longer than needed to move your vehicle in or
out of the area.
THINGS TO KNOW BEFORE STARTING YOUR VEHICLE 57
2
Page 59 of 380
If it is necessary to sit in a parked vehicle with the engine
running, adjust your heating or cooling controls to force
outside air into the vehicle. Set the blower at high speed.
The best protection against carbon monoxide entry into
the vehicle body is a properly maintained engine exhaust
system.
Whenever a change is noticed in the sound of the exhaust
system, when exhaust fumes can be detected inside the
vehicle, or when the underside or rear of the vehicle is
damaged, have a competent mechanic inspect the com-
plete exhaust system and adjacent body areas for broken,
damaged, deteriorated, or mispositioned parts. Open
seams or loose connections could permit exhaust fumes
to seep into the passenger compartment. In addition,
inspect the exhaust system each time the vehicle is raised
for lubrication or oil change. Replace as required.WARNING!
²Exhaust gases can injure or kill. They contain
carbon monoxide (CO) which is colorless and
odorless. Breathing it can make you unconscious
and can eventually poison you. To avoid breath-
ing (CO) follow the safety tips below.
²If you are required to drive with the liftgate open,
make sure that all windows are closed, and the
climate control blower switch is set at high speed.
DO NOT use the recirculation mode.
Safety Checks You Should Make Inside The
Vehicle
Seat Belts
Inspect the belt system periodically, checking for cuts,
frays and loose parts. Damaged parts must be replaced
immediately. Do not disassemble or modify the system.
58 THINGS TO KNOW BEFORE STARTING YOUR VEHICLE
Page 60 of 380
Front seat belt assemblies must be replaced after a
collision. Rear seat belt assemblies must be replaced after
a collision if they have been damaged (bent retractor, torn
webbing, etc. If there is any question regarding belt or
retractor condition, replace the belt.
Airbag Warning Light
The light should come on and remain on for 6 to 8
seconds as a bulb check when the ignition switch is first
turned ON. If the light is not lit during starting, see you
authorized dealer. If the light stays on, flickers, or comes
on while driving, have the system checked by an autho-
rized dealer.
Defroster
Check operation by selecting the defrost mode and place
the blower control on high speed. You should be able to
feel the air directed against the windshield.
Periodic Safety Checks You Should Make Outside
The Vehicle
Tires
Examine tires for excessive tread wear and uneven wear
patterns. Check for stones, nails, glass, or other objects
lodged in the tread. Inspect tread and sidewall for cuts
and cracks. Check the wheel nuts for tightness. Check the
tires (including spare) for proper pressure.
Lights
Have someone observe the operation of exterior lights
while you work the controls. Check turn signal and high
beam indicator lights on the instrument panel.
Door Latches
Check for positive closing, latching, and locking.
Fluid Leaks
Check area under vehicle after overnight parking for fuel,
engine coolant, oil, or other fluid leaks. Also, if gasoline
fumes are detected or if fuel, power steering fluid, or
brake fluid leaks are suspected, the cause should be
located and corrected immediately.
THINGS TO KNOW BEFORE STARTING YOUR VEHICLE 59
2
Page 137 of 380
engine running, your vehicle will usually be drivable.
However, see your dealer for service as soon as possible.
If the light is flashing when the engine is running,
immediate service is required. In this case, you may
experience reduced performance, an elevated/rough idle
or engine stall, and your vehicle may require towing.
Also, have the system checked by an authorized dealer if
the light does not come on during starting.
8. Temperature Gauge
The temperature gauge shows engine coolant tempera-
ture. Any reading within the normal range indicates that
the engine cooling system is operating satisfactorily.
The gauge pointer will likely indicate a higher tempera-
ture when driving in hot weather, up mountain grades,
or when towing a trailer. It should not be allowed to
exceed the upper limits of the normal operating range.
CAUTION!
Driving with a hot cooling system could damage
your vehicle. If temperature gauge reads 240ÉF
(116ÉC) or greater, pull over and stop the vehicle. Idle
the vehicle with the air conditioner turned off until
the pointer drops back into the normal range 200±
230ÉF (93±110ÉC). If the pointer remains at 240ÉF
(116ÉC) or greater and you hear a chime, turn the
engine off immediately, and call for service.
WARNING!
A hot engine cooling system is dangerous. You or
others could be badly burned by steam or boiling
coolant. You may want to call a service center if your
vehicle overheats. If you decide to look under the
hood yourself, see Section 7 of this manual. Follow
the warnings under the Cooling System Pressure
Cap paragraph.
136 UNDERSTANDING YOUR INSTRUMENT PANEL
Page 139 of 380
cycles, and the vehicle has been driven several miles at
speeds greater than 30 mph (48 km/h), see your
authorized dealer as soon as possible to have the
problem diagnosed and corrected. (See page 222 for
more information.)
14. Oil Pressure Warning Light
This light shows low engine oil pressure. The
light should turn on momentarily when the
engine is started. If the light turns on while driving,
stop the vehicle, and shut off the engine as soon as
possible. A single chime will sound when this light
turns on.
Do not operate the vehicle until the cause is corrected.
This light does not show how much oil is in the engine.
The engine oil level must be checked using the procedure
shown in section 7. (See page 295 for more information.)
15. High Beam Light
This light will turn on when the high beam
headlights are ON. Push the Multi-Function
lever away from the steering wheel to switch the
headlights to high beam. (See page 96 for more
information.)16. Seat Belt Reminder Light
This light will turn on for 5 to 8 seconds as a
bulb check when the ignition switch is first
turned ON. A chime will sound if the driver's
seat belt is unbuckled during the bulb check. The Seat
Belt Warning Light will flash or remain on continu-
ously if the driver's seat belt remains unbuckled after
the bulb check or when driving. (See page 36 for more
information.)
17. Transmission Range Indicator
This display indicator shows the automatic transmission
gear selection.
18. Front Fog Light Indicator Ð If Equipped
This light will turn on when the front fog lights
are ON. (See page 95 for more information.)
19. Electronic Vehicle Information Center Display
This display shows the Electronic Vehicle Information
Center (EVIC) messages when the appropriate conditions
exist. (See page 143 for more information.)
138 UNDERSTANDING YOUR INSTRUMENT PANEL
Page 152 of 380
Navigation Ð If Equipped
Navigation Display Control
Press and release the MENU button until Navigation
displays in the EVIC. When the Navigation System is On,
the steering wheel buttons can be used to select the Map
or Menu display on the Navigation Unit. When the Menu
display is active, the SCROLL button can be used to scroll
through the list, the FUNCTION SELECT button can be
used to select an item, and the AUDIO MODE button can
be used to return to the previous menu. When the Map
display is active, pressing the FUNCTION SELECT but-
ton will change the Navigation Unit Display to the Menu.
Turn By Turn Directions
The EVIC displays turn-by-turn directions to a pro-
grammed destination when Turn by Turn Navigation is
enabled through Personal Settings. When enabled, the
EVIC displays the name of the approaching road at the
top of the screen, followed by an arrow to indicate the
direction to turn the vehicle, and a count down to
indicate the distance to the turn.
NOTE:Refer to your ªNavigation User's Manualº for
detailed operating instructions.
System Warnings (Customer Information
Features)
Press and release the MENU button until ªSYSTEM
WARNINGSº displays in the EVIC. Then, press the
SCROLL button to display anyone of the following
choices:
²Oil Temperature
Shows the actual oil temperature.
²Oil Pressure
Shows the actual oil pressure.
²Tire Pressure
Shows the actual tire pressure for each tire (EXCLUDING
THE SPARE TIRE).
Personal Settings (Customer Programmable
Features)
Personal Settings allows the driver to set and recall
features when the transmission is in PARK.
Press and release the MENU button until Personal Set-
tings displays in the EVIC.
UNDERSTANDING YOUR INSTRUMENT PANEL 151
4
Page 210 of 380
The selector lever is automatically locked while in the P
(Park) position. To move the selector lever out of the P
(Park) position, the brake pedal must be firmly depressed
before the shift lock will release.
Shift the selector lever to the desired position only when
the engine is idling normally and the brake pedal is
applied. Do not release the brake until ready to drive. The
vehicle may otherwise accelerate quickly when the selec-
tor lever is in D (Drive) or R (Reverse) position.WARNING!
Unintended movement of a vehicle could injure
those in and near the vehicle. As with all vehicles,
you should never exit a vehicle while the engine is
running. Before exiting a vehicle, you should always
shift the vehicle into P (Park), remove the key from
the ignition, and apply the parking brake. Once the
key is removed from the ignition, the transmission
selector lever is locked in the P (Park) position,
securing the vehicle against unwanted movement.
Furthermore, you should never leave children unat-
tended inside a vehicle.
Over Temperature Mode
The transmission electronics constantly monitor the
transmission oil temperature. If the transmission exceeds
normal operating temperature, the transmission will
change the way it shifts to help control the condition.
This may result in a slightly different feeling or response
during normal operation in D (Drive) position. After the
transmission cools down, it will return to normal opera-
tion.
STARTING AND OPERATING 209
5
Page 242 of 380
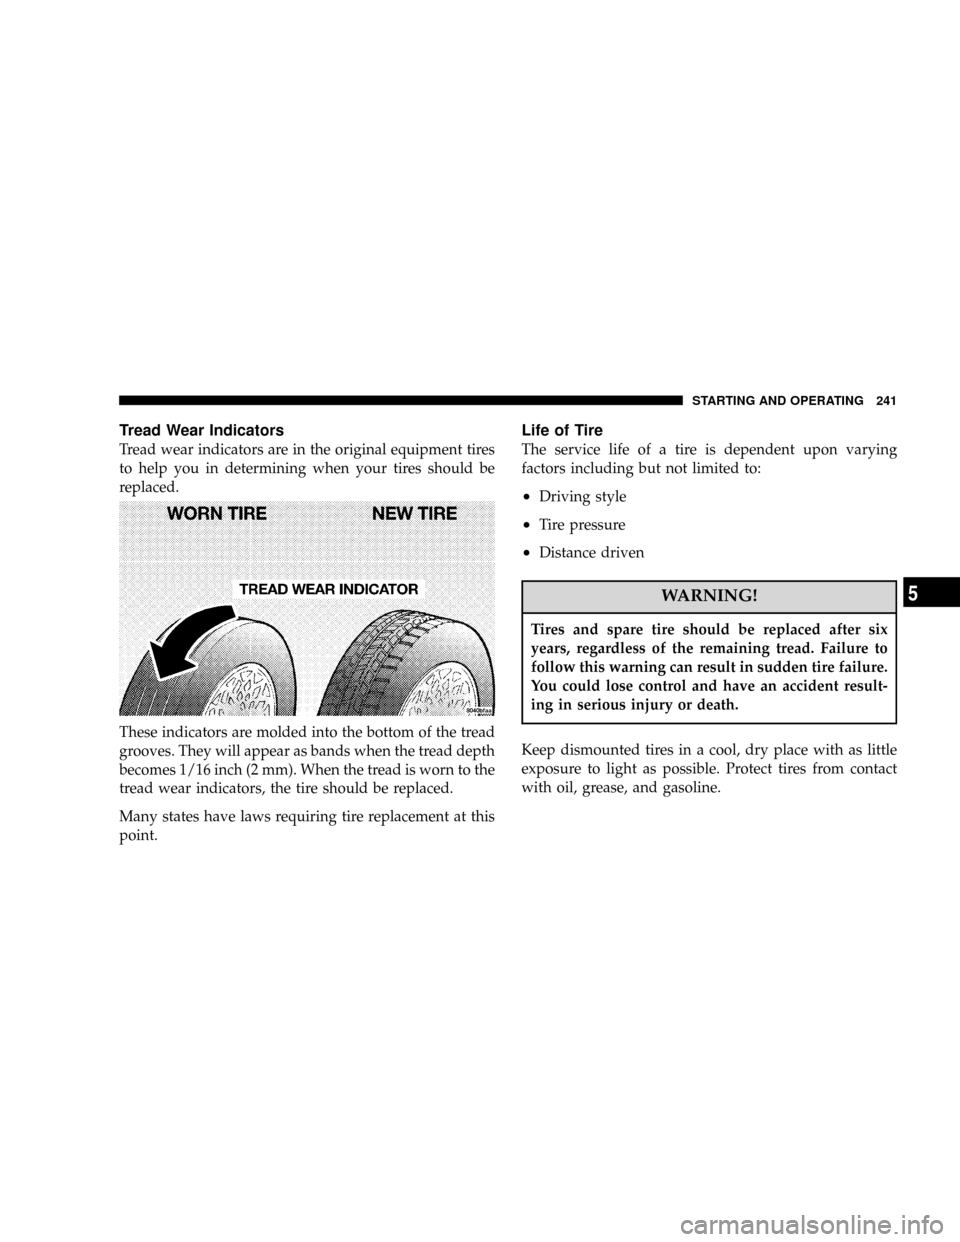
Tread Wear Indicators
Tread wear indicators are in the original equipment tires
to help you in determining when your tires should be
replaced.
These indicators are molded into the bottom of the tread
grooves. They will appear as bands when the tread depth
becomes 1/16 inch (2 mm). When the tread is worn to the
tread wear indicators, the tire should be replaced.
Many states have laws requiring tire replacement at this
point.
Life of Tire
The service life of a tire is dependent upon varying
factors including but not limited to:
²Driving style
²Tire pressure
²Distance driven
WARNING!
Tires and spare tire should be replaced after six
years, regardless of the remaining tread. Failure to
follow this warning can result in sudden tire failure.
You could lose control and have an accident result-
ing in serious injury or death.
Keep dismounted tires in a cool, dry place with as little
exposure to light as possible. Protect tires from contact
with oil, grease, and gasoline.
STARTING AND OPERATING 241
5