fuel system DODGE NEON 1999 Service Owner's Manual
[x] Cancel search | Manufacturer: DODGE, Model Year: 1999, Model line: NEON, Model: DODGE NEON 1999Pages: 1200, PDF Size: 35.29 MB
Page 260 of 1200
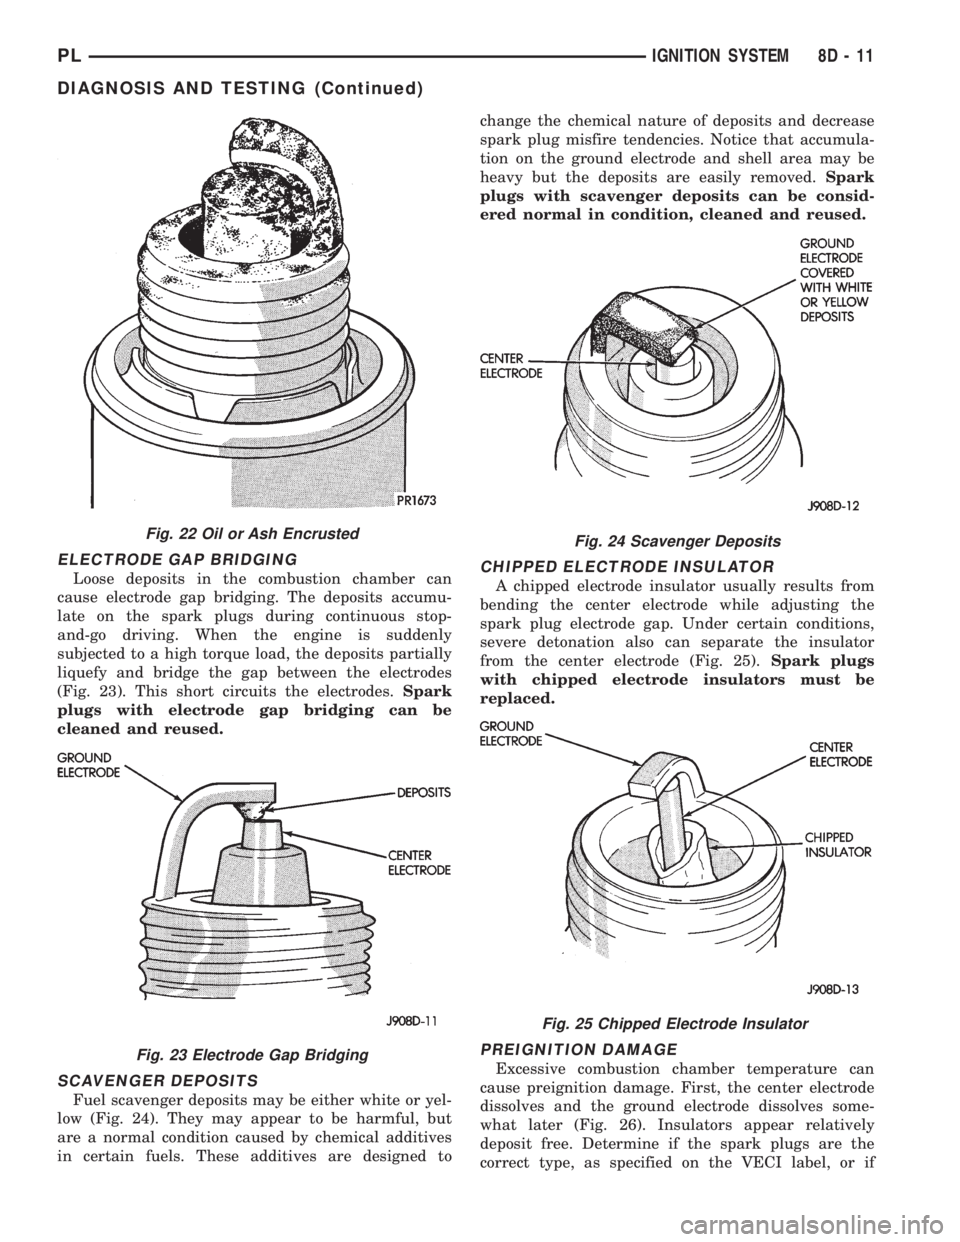
ELECTRODE GAP BRIDGING
Loose deposits in the combustion chamber can
cause electrode gap bridging. The deposits accumu-
late on the spark plugs during continuous stop-
and-go driving. When the engine is suddenly
subjected to a high torque load, the deposits partially
liquefy and bridge the gap between the electrodes
(Fig. 23). This short circuits the electrodes.Spark
plugs with electrode gap bridging can be
cleaned and reused.
SCAVENGER DEPOSITS
Fuel scavenger deposits may be either white or yel-
low (Fig. 24). They may appear to be harmful, but
are a normal condition caused by chemical additives
in certain fuels. These additives are designed tochange the chemical nature of deposits and decrease
spark plug misfire tendencies. Notice that accumula-
tion on the ground electrode and shell area may be
heavy but the deposits are easily removed.Spark
plugs with scavenger deposits can be consid-
ered normal in condition, cleaned and reused.
CHIPPED ELECTRODE INSULATOR
A chipped electrode insulator usually results from
bending the center electrode while adjusting the
spark plug electrode gap. Under certain conditions,
severe detonation also can separate the insulator
from the center electrode (Fig. 25).Spark plugs
with chipped electrode insulators must be
replaced.
PREIGNITION DAMAGE
Excessive combustion chamber temperature can
cause preignition damage. First, the center electrode
dissolves and the ground electrode dissolves some-
what later (Fig. 26). Insulators appear relatively
deposit free. Determine if the spark plugs are the
correct type, as specified on the VECI label, or if
Fig. 22 Oil or Ash Encrusted
Fig. 23 Electrode Gap Bridging
Fig. 24 Scavenger Deposits
Fig. 25 Chipped Electrode Insulator
PLIGNITION SYSTEM 8D - 11
DIAGNOSIS AND TESTING (Continued)
Page 265 of 1200
MAP/IAT SENSORÐSOHC
Refer to Group 14, Fuel Injection Section for
Removal/Installation.
MAP/IAT SENSORÐDOHC
Refer to Group 14, Fuel Injection Section for
Removal/Installation..
THROTTLE POSITION SENSOR
Refer to Group 14, Fuel Injection Section, for
Removal/Installation.
IGNITION SWITCH
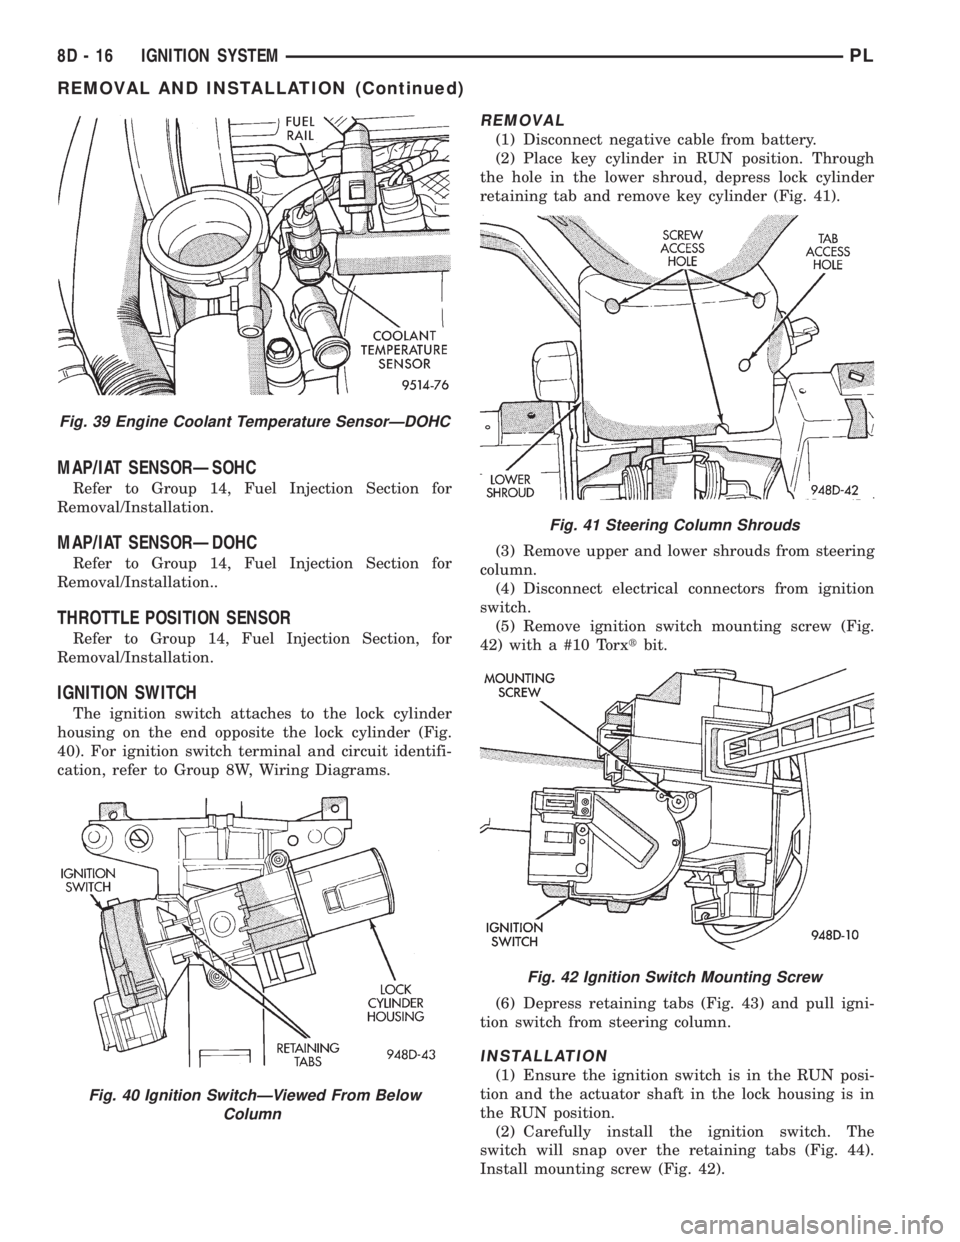
The ignition switch attaches to the lock cylinder
housing on the end opposite the lock cylinder (Fig.
40). For ignition switch terminal and circuit identifi-
cation, refer to Group 8W, Wiring Diagrams.
REMOVAL
(1) Disconnect negative cable from battery.
(2) Place key cylinder in RUN position. Through
the hole in the lower shroud, depress lock cylinder
retaining tab and remove key cylinder (Fig. 41).
(3) Remove upper and lower shrouds from steering
column.
(4) Disconnect electrical connectors from ignition
switch.
(5) Remove ignition switch mounting screw (Fig.
42) with a #10 Torxtbit.
(6) Depress retaining tabs (Fig. 43) and pull igni-
tion switch from steering column.
INSTALLATION
(1) Ensure the ignition switch is in the RUN posi-
tion and the actuator shaft in the lock housing is in
the RUN position.
(2) Carefully install the ignition switch. The
switch will snap over the retaining tabs (Fig. 44).
Install mounting screw (Fig. 42).
Fig. 39 Engine Coolant Temperature SensorÐDOHC
Fig. 40 Ignition SwitchÐViewed From Below
Column
Fig. 41 Steering Column Shrouds
Fig. 42 Ignition Switch Mounting Screw
8D - 16 IGNITION SYSTEMPL
REMOVAL AND INSTALLATION (Continued)
Page 270 of 1200
INSTRUMENT PANEL AND SYSTEMS
CONTENTS
page page
GENERAL INFORMATION
INTRODUCTION......................... 1
DESCRIPTION AND OPERATION
DOME LAMP............................ 1
ELECTRONIC DIGITAL CLOCK.............. 1
INSTRUMENT CLUSTER................... 2
WARNING AND INDICATOR LAMPS......... 2
DIAGNOSIS AND TESTING
AIRBAG WARNING SYSTEM............... 2
BRAKE SYSTEM WARNING LAMP TEST...... 2
FOG LAMP SWITCH TEST................. 2
FUEL TANK SENDING UNIT TEST........... 3
HEADLAMP SWITCH TEST................. 3
HEATER A/C BLOWER SWITCH TEST........ 3
HEATER BLOWER SWITCH TEST............ 3
INDIVIDUAL GAUGE INOPERATIVE.......... 4
INSTRUMENT PANEL AND COMPONENTS.... 4
LOW OIL PRESSURE WARNING LAMP TEST . . 4
MULTIPLE GAUGE INOPERATIVE TEST....... 4
SEAT BELT REMINDER SYSTEM TEST....... 6
SENDING UNIT......................... 6
SERVICE ENGINE SOON INDICATOR......... 6
VEHICLE SPEED SENSOR TEST............. 6
REMOVAL AND INSTALLATION
ASH RECEIVER RETAINER AND LAMP....... 6
CENTER BEZEL.......................... 6
CIGAR LIGHTER RECEPTACLE.............. 6
CLUSTER LAMP......................... 7
CLUSTER PRINTED CIRCUIT BOARD........ 7CLUSTER.............................. 7
DOME LENS/LAMP....................... 8
FLOOR CONSOLE........................ 8
GAUGE................................ 8
GLOVE BOX DOOR/BIN................... 8
GLOVE BOX SWITCH/LAMP................ 9
HEADLAMP SWITCH..................... 9
HEATER A/C CONTROL BLOWER SWITCH . . . 10
HEATER A/C CONTROL LAMP............ 10
HEATER A/C CONTROL................... 9
HEATER CONTROL BLOWER SWITCH....... 10
IGNITION KEY LAMP.................... 10
INSTRUMENT PANEL.................... 10
LEFT TRIM PANEL...................... 10
ODOMETER............................ 10
RADIO................................ 12
REAR WINDOW DEFOGGER AND/OR FOG
LAMP SWITCH....................... 12
RIGHT TRIM PANEL..................... 12
SHIFTER KNOB......................... 13
STEERING COLUMN COVER LINER......... 13
STEERING COLUMN COVER.............. 13
STEERING COLUMN SHROUDS............ 13
TOP COVER AND CLUSTER BEZEL
REMOVAL........................... 14
TRANSMISSION RANGE INDICATOR LAMP . . 14
TRUNK LAMP/LENS..................... 14
VEHICLE SPEED SENSOR................ 14
GENERAL INFORMATION
INTRODUCTION
The purpose of the dash gauges and indicator
lamps is to keep the driver informed about the oper-
ating condition of the vehicle. If an abnormal condi-
tion occurs, the driver is informed by indicator lamp.
The driver can seek service before damage occurs.
Indicator lamps use ON/OFF switch functions for
operation, while gauges use a sending unit or sensor.
DESCRIPTION AND OPERATION
DOME LAMP
The Dome Lamp operates when a door is open or
when the headlamp switch is placed in courtesy posi-
tion.
ELECTRONIC DIGITAL CLOCK
The electronic digital clock is in the radio. The
clock and radio each use the display panel built into
the radio. A digital readout indicates the time in
hours and minutes whenever the ignition switch is in
the ON or ACC position.
PLINSTRUMENT PANEL AND SYSTEMS 8E - 1
Page 272 of 1200
FUEL TANK SENDING UNIT TEST
Refer to Group 14, Fuel for test procedures.
HEADLAMP SWITCH TEST
(1) Remove the headlamp switch. Refer to Head-
lamp Switch Removal.
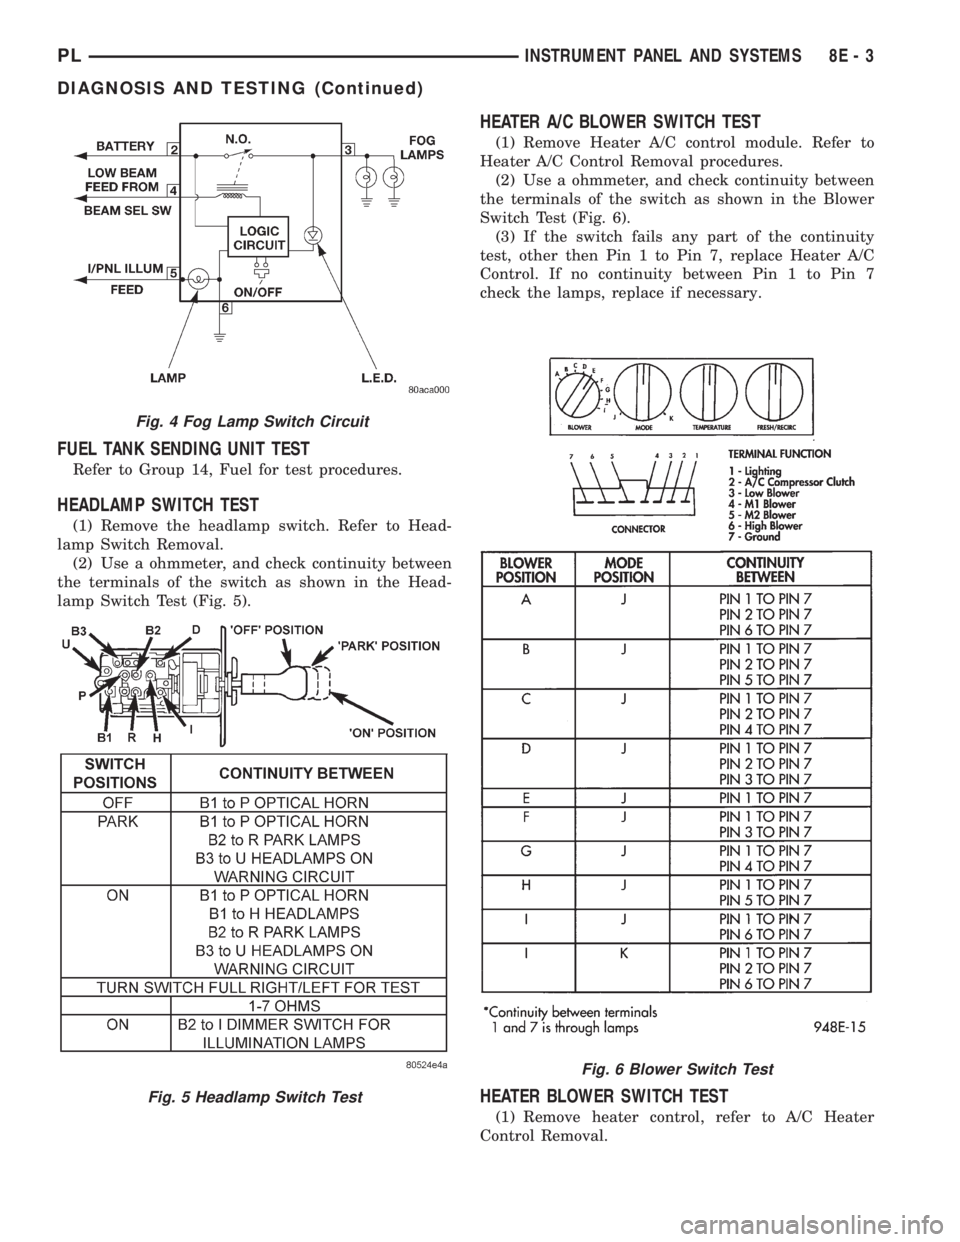
(2) Use a ohmmeter, and check continuity between
the terminals of the switch as shown in the Head-
lamp Switch Test (Fig. 5).
HEATER A/C BLOWER SWITCH TEST
(1) Remove Heater A/C control module. Refer to
Heater A/C Control Removal procedures.
(2) Use a ohmmeter, and check continuity between
the terminals of the switch as shown in the Blower
Switch Test (Fig. 6).
(3) If the switch fails any part of the continuity
test, other then Pin 1 to Pin 7, replace Heater A/C
Control. If no continuity between Pin 1 to Pin 7
check the lamps, replace if necessary.
HEATER BLOWER SWITCH TEST
(1) Remove heater control, refer to A/C Heater
Control Removal.
Fig. 4 Fog Lamp Switch Circuit
Fig. 5 Headlamp Switch Test
Fig. 6 Blower Switch Test
PLINSTRUMENT PANEL AND SYSTEMS 8E - 3
DIAGNOSIS AND TESTING (Continued)
Page 273 of 1200
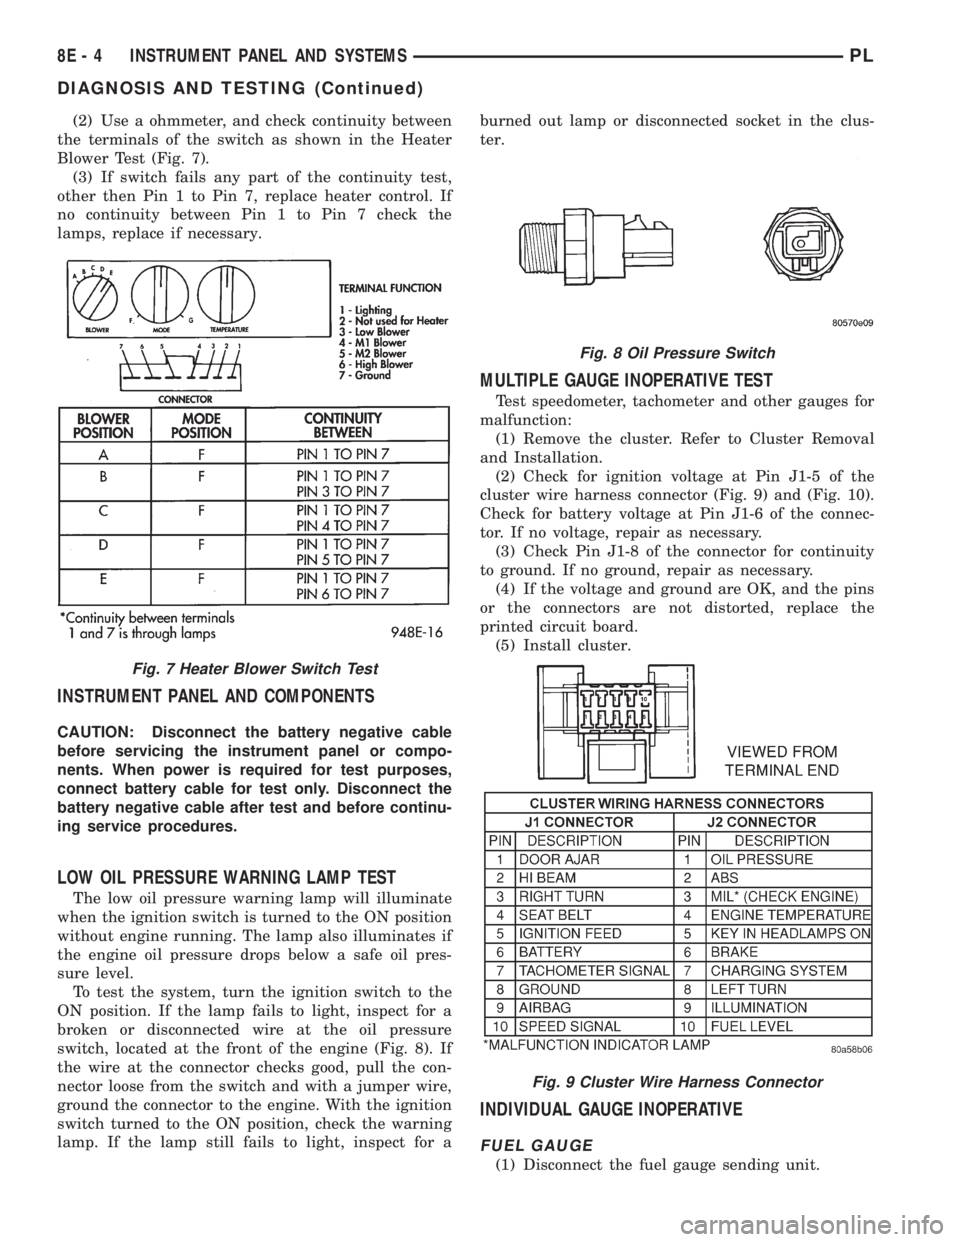
(2) Use a ohmmeter, and check continuity between
the terminals of the switch as shown in the Heater
Blower Test (Fig. 7).
(3) If switch fails any part of the continuity test,
other then Pin 1 to Pin 7, replace heater control. If
no continuity between Pin 1 to Pin 7 check the
lamps, replace if necessary.
INSTRUMENT PANEL AND COMPONENTS
CAUTION: Disconnect the battery negative cable
before servicing the instrument panel or compo-
nents. When power is required for test purposes,
connect battery cable for test only. Disconnect the
battery negative cable after test and before continu-
ing service procedures.
LOW OIL PRESSURE WARNING LAMP TEST
The low oil pressure warning lamp will illuminate
when the ignition switch is turned to the ON position
without engine running. The lamp also illuminates if
the engine oil pressure drops below a safe oil pres-
sure level.
To test the system, turn the ignition switch to the
ON position. If the lamp fails to light, inspect for a
broken or disconnected wire at the oil pressure
switch, located at the front of the engine (Fig. 8). If
the wire at the connector checks good, pull the con-
nector loose from the switch and with a jumper wire,
ground the connector to the engine. With the ignition
switch turned to the ON position, check the warning
lamp. If the lamp still fails to light, inspect for aburned out lamp or disconnected socket in the clus-
ter.
MULTIPLE GAUGE INOPERATIVE TEST
Test speedometer, tachometer and other gauges for
malfunction:
(1) Remove the cluster. Refer to Cluster Removal
and Installation.
(2) Check for ignition voltage at Pin J1-5 of the
cluster wire harness connector (Fig. 9) and (Fig. 10).
Check for battery voltage at Pin J1-6 of the connec-
tor. If no voltage, repair as necessary.
(3) Check Pin J1-8 of the connector for continuity
to ground. If no ground, repair as necessary.
(4) If the voltage and ground are OK, and the pins
or the connectors are not distorted, replace the
printed circuit board.
(5) Install cluster.
INDIVIDUAL GAUGE INOPERATIVE
FUEL GAUGE
(1) Disconnect the fuel gauge sending unit.
Fig. 7 Heater Blower Switch Test
Fig. 8 Oil Pressure Switch
Fig. 9 Cluster Wire Harness Connector
8E - 4 INSTRUMENT PANEL AND SYSTEMSPL
DIAGNOSIS AND TESTING (Continued)
Page 274 of 1200
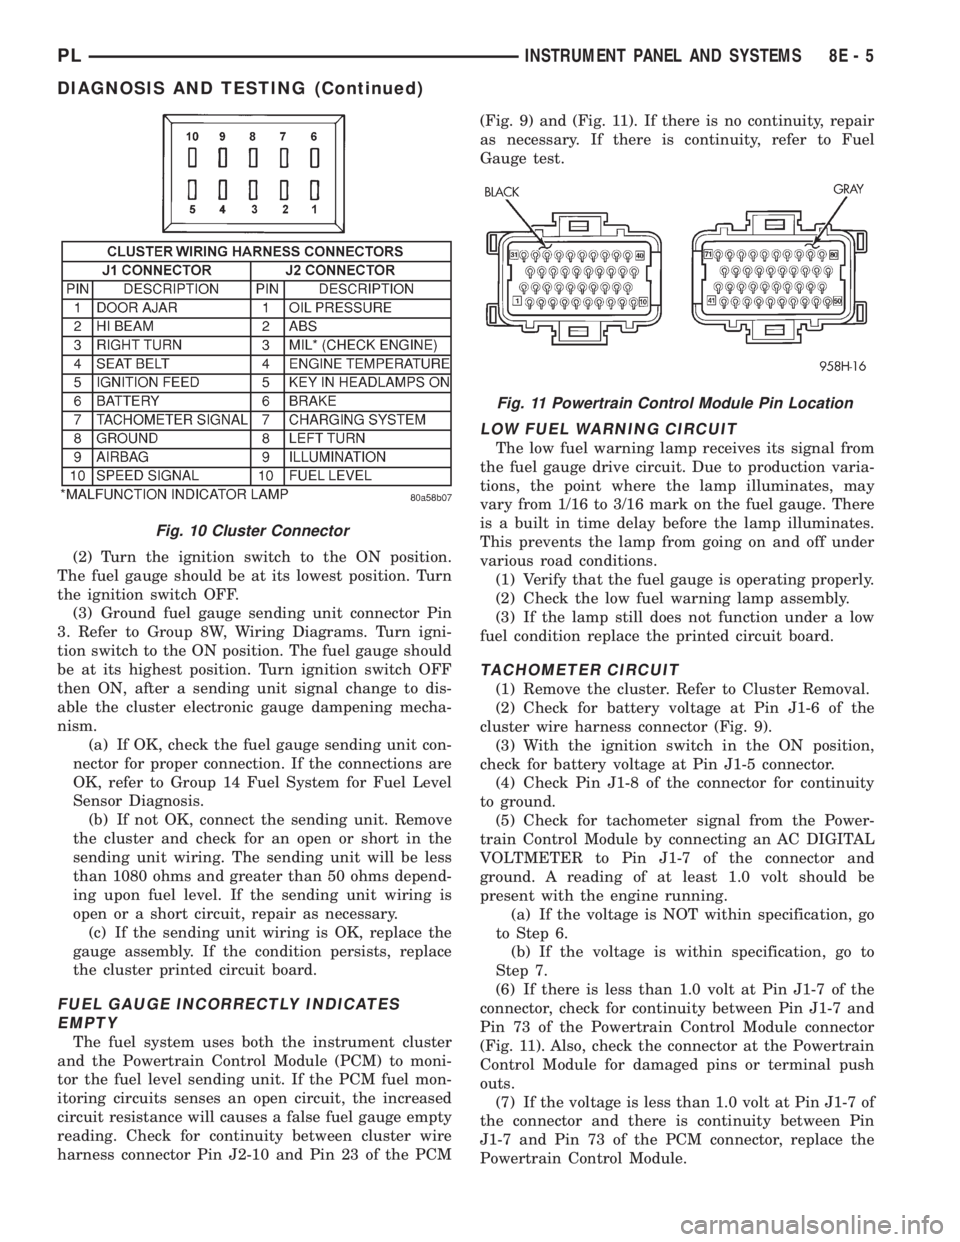
(2) Turn the ignition switch to the ON position.
The fuel gauge should be at its lowest position. Turn
the ignition switch OFF.
(3) Ground fuel gauge sending unit connector Pin
3. Refer to Group 8W, Wiring Diagrams. Turn igni-
tion switch to the ON position. The fuel gauge should
be at its highest position. Turn ignition switch OFF
then ON, after a sending unit signal change to dis-
able the cluster electronic gauge dampening mecha-
nism.
(a) If OK, check the fuel gauge sending unit con-
nector for proper connection. If the connections are
OK, refer to Group 14 Fuel System for Fuel Level
Sensor Diagnosis.
(b) If not OK, connect the sending unit. Remove
the cluster and check for an open or short in the
sending unit wiring. The sending unit will be less
than 1080 ohms and greater than 50 ohms depend-
ing upon fuel level. If the sending unit wiring is
open or a short circuit, repair as necessary.
(c) If the sending unit wiring is OK, replace the
gauge assembly. If the condition persists, replace
the cluster printed circuit board.
FUEL GAUGE INCORRECTLY INDICATES
EMPTY
The fuel system uses both the instrument cluster
and the Powertrain Control Module (PCM) to moni-
tor the fuel level sending unit. If the PCM fuel mon-
itoring circuits senses an open circuit, the increased
circuit resistance will causes a false fuel gauge empty
reading. Check for continuity between cluster wire
harness connector Pin J2-10 and Pin 23 of the PCM(Fig. 9) and (Fig. 11). If there is no continuity, repair
as necessary. If there is continuity, refer to Fuel
Gauge test.
LOW FUEL WARNING CIRCUIT
The low fuel warning lamp receives its signal from
the fuel gauge drive circuit. Due to production varia-
tions, the point where the lamp illuminates, may
vary from 1/16 to 3/16 mark on the fuel gauge. There
is a built in time delay before the lamp illuminates.
This prevents the lamp from going on and off under
various road conditions.
(1) Verify that the fuel gauge is operating properly.
(2) Check the low fuel warning lamp assembly.
(3) If the lamp still does not function under a low
fuel condition replace the printed circuit board.
TACHOMETER CIRCUIT
(1) Remove the cluster. Refer to Cluster Removal.
(2) Check for battery voltage at Pin J1-6 of the
cluster wire harness connector (Fig. 9).
(3) With the ignition switch in the ON position,
check for battery voltage at Pin J1-5 connector.
(4) Check Pin J1-8 of the connector for continuity
to ground.
(5) Check for tachometer signal from the Power-
train Control Module by connecting an AC DIGITAL
VOLTMETER to Pin J1-7 of the connector and
ground. A reading of at least 1.0 volt should be
present with the engine running.
(a) If the voltage is NOT within specification, go
to Step 6.
(b) If the voltage is within specification, go to
Step 7.
(6) If there is less than 1.0 volt at Pin J1-7 of the
connector, check for continuity between Pin J1-7 and
Pin 73 of the Powertrain Control Module connector
(Fig. 11). Also, check the connector at the Powertrain
Control Module for damaged pins or terminal push
outs.
(7) If the voltage is less than 1.0 volt at Pin J1-7 of
the connector and there is continuity between Pin
J1-7 and Pin 73 of the PCM connector, replace the
Powertrain Control Module.
Fig. 10 Cluster Connector
Fig. 11 Powertrain Control Module Pin Location
PLINSTRUMENT PANEL AND SYSTEMS 8E - 5
DIAGNOSIS AND TESTING (Continued)
Page 275 of 1200
(8) If all tests performed test good, replace the dial
and gauge assembly.
(9) If the tachometer continues to be inoperative,
replace the print circuit board.
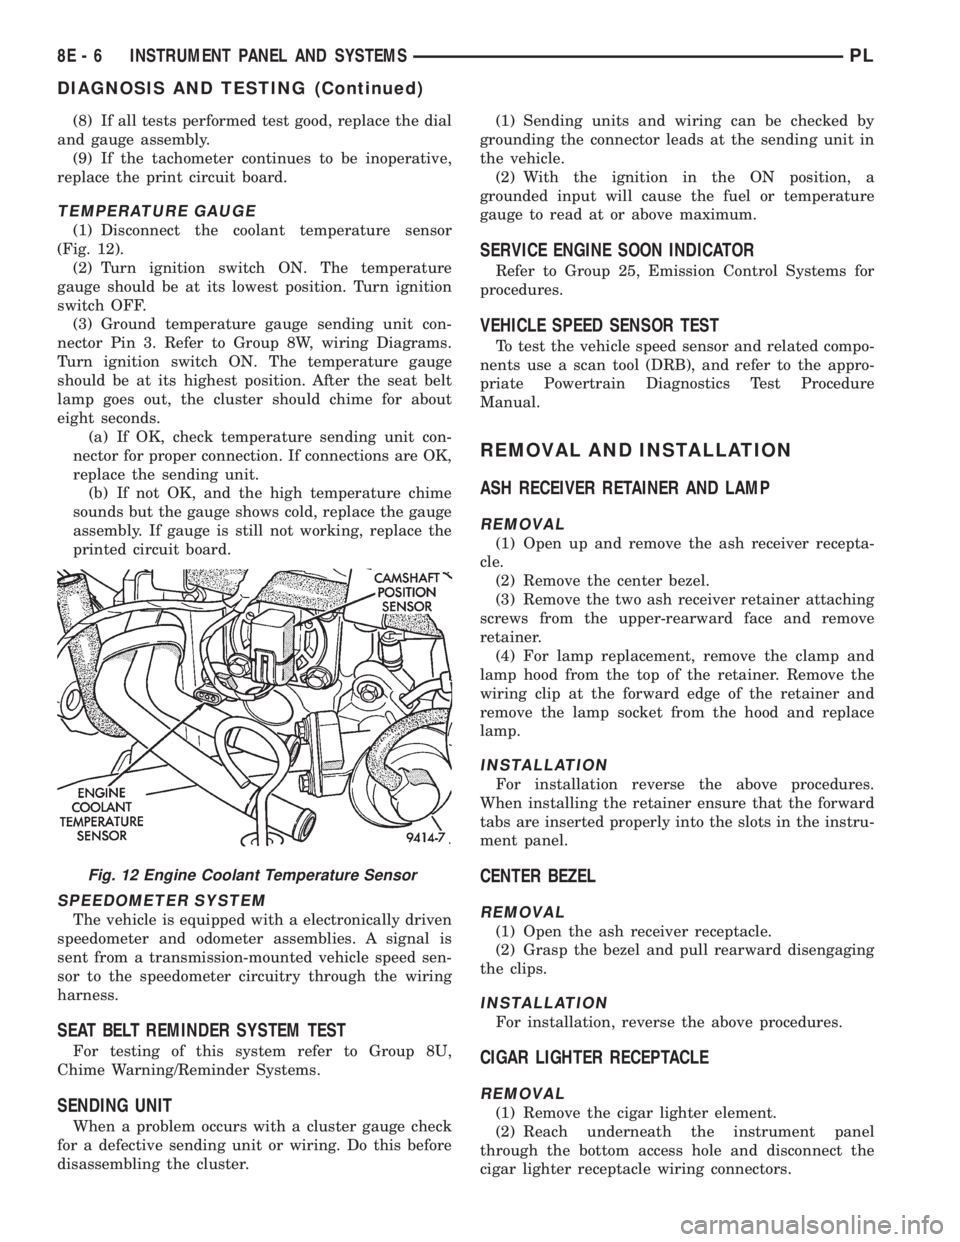
TEMPERATURE GAUGE
(1) Disconnect the coolant temperature sensor
(Fig. 12).
(2) Turn ignition switch ON. The temperature
gauge should be at its lowest position. Turn ignition
switch OFF.
(3) Ground temperature gauge sending unit con-
nector Pin 3. Refer to Group 8W, wiring Diagrams.
Turn ignition switch ON. The temperature gauge
should be at its highest position. After the seat belt
lamp goes out, the cluster should chime for about
eight seconds.
(a) If OK, check temperature sending unit con-
nector for proper connection. If connections are OK,
replace the sending unit.
(b) If not OK, and the high temperature chime
sounds but the gauge shows cold, replace the gauge
assembly. If gauge is still not working, replace the
printed circuit board.
SPEEDOMETER SYSTEM
The vehicle is equipped with a electronically driven
speedometer and odometer assemblies. A signal is
sent from a transmission-mounted vehicle speed sen-
sor to the speedometer circuitry through the wiring
harness.
SEAT BELT REMINDER SYSTEM TEST
For testing of this system refer to Group 8U,
Chime Warning/Reminder Systems.
SENDING UNIT
When a problem occurs with a cluster gauge check
for a defective sending unit or wiring. Do this before
disassembling the cluster.(1) Sending units and wiring can be checked by
grounding the connector leads at the sending unit in
the vehicle.
(2) With the ignition in the ON position, a
grounded input will cause the fuel or temperature
gauge to read at or above maximum.
SERVICE ENGINE SOON INDICATOR
Refer to Group 25, Emission Control Systems for
procedures.
VEHICLE SPEED SENSOR TEST
To test the vehicle speed sensor and related compo-
nents use a scan tool (DRB), and refer to the appro-
priate Powertrain Diagnostics Test Procedure
Manual.
REMOVAL AND INSTALLATION
ASH RECEIVER RETAINER AND LAMP
REMOVAL
(1) Open up and remove the ash receiver recepta-
cle.
(2) Remove the center bezel.
(3) Remove the two ash receiver retainer attaching
screws from the upper-rearward face and remove
retainer.
(4) For lamp replacement, remove the clamp and
lamp hood from the top of the retainer. Remove the
wiring clip at the forward edge of the retainer and
remove the lamp socket from the hood and replace
lamp.
INSTALLATION
For installation reverse the above procedures.
When installing the retainer ensure that the forward
tabs are inserted properly into the slots in the instru-
ment panel.
CENTER BEZEL
REMOVAL
(1) Open the ash receiver receptacle.
(2) Grasp the bezel and pull rearward disengaging
the clips.
INSTALLATION
For installation, reverse the above procedures.
CIGAR LIGHTER RECEPTACLE
REMOVAL
(1) Remove the cigar lighter element.
(2) Reach underneath the instrument panel
through the bottom access hole and disconnect the
cigar lighter receptacle wiring connectors.
Fig. 12 Engine Coolant Temperature Sensor
8E - 6 INSTRUMENT PANEL AND SYSTEMSPL
DIAGNOSIS AND TESTING (Continued)
Page 283 of 1200
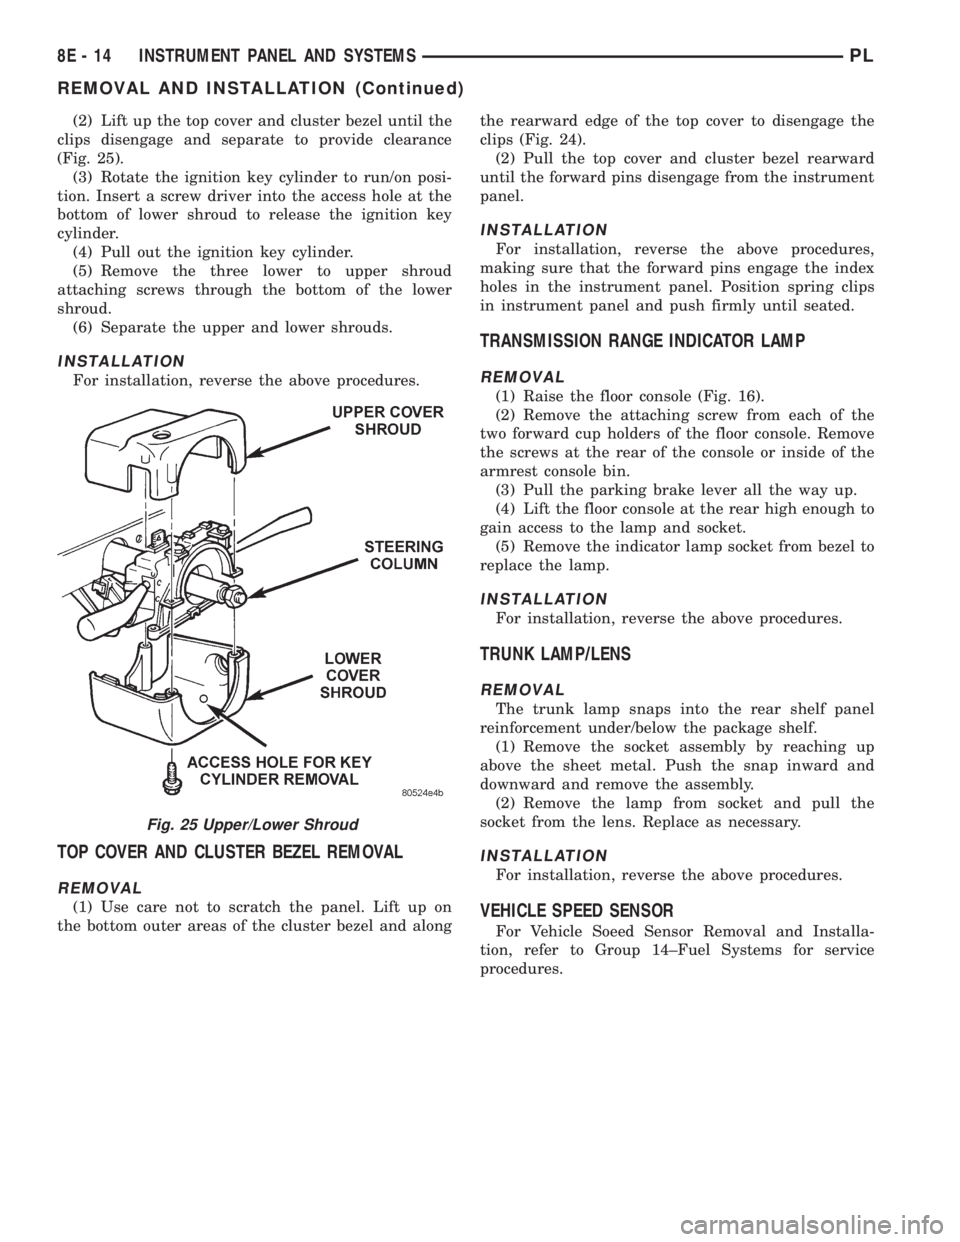
(2) Lift up the top cover and cluster bezel until the
clips disengage and separate to provide clearance
(Fig. 25).
(3) Rotate the ignition key cylinder to run/on posi-
tion. Insert a screw driver into the access hole at the
bottom of lower shroud to release the ignition key
cylinder.
(4) Pull out the ignition key cylinder.
(5) Remove the three lower to upper shroud
attaching screws through the bottom of the lower
shroud.
(6) Separate the upper and lower shrouds.
INSTALLATION
For installation, reverse the above procedures.
TOP COVER AND CLUSTER BEZEL REMOVAL
REMOVAL
(1) Use care not to scratch the panel. Lift up on
the bottom outer areas of the cluster bezel and alongthe rearward edge of the top cover to disengage the
clips (Fig. 24).
(2) Pull the top cover and cluster bezel rearward
until the forward pins disengage from the instrument
panel.
INSTALLATION
For installation, reverse the above procedures,
making sure that the forward pins engage the index
holes in the instrument panel. Position spring clips
in instrument panel and push firmly until seated.
TRANSMISSION RANGE INDICATOR LAMP
REMOVAL
(1) Raise the floor console (Fig. 16).
(2) Remove the attaching screw from each of the
two forward cup holders of the floor console. Remove
the screws at the rear of the console or inside of the
armrest console bin.
(3) Pull the parking brake lever all the way up.
(4) Lift the floor console at the rear high enough to
gain access to the lamp and socket.
(5) Remove the indicator lamp socket from bezel to
replace the lamp.
INSTALLATION
For installation, reverse the above procedures.
TRUNK LAMP/LENS
REMOVAL
The trunk lamp snaps into the rear shelf panel
reinforcement under/below the package shelf.
(1) Remove the socket assembly by reaching up
above the sheet metal. Push the snap inward and
downward and remove the assembly.
(2) Remove the lamp from socket and pull the
socket from the lens. Replace as necessary.
INSTALLATION
For installation, reverse the above procedures.
VEHICLE SPEED SENSOR
For Vehicle Soeed Sensor Removal and Installa-
tion, refer to Group 14±Fuel Systems for service
procedures.
Fig. 25 Upper/Lower Shroud
8E - 14 INSTRUMENT PANEL AND SYSTEMSPL
REMOVAL AND INSTALLATION (Continued)
Page 300 of 1200
The individual switches cannot be repaired. If one
switch fails, the entire switch module must be
replaced.
STOP LAMP SWITCH
Vehicles equipped with the speed control option use
a dual function stop lamp switch. The switch is
mounted on the brake pedal mounting bracket under
the instrument panel. The PCM monitors the state of
the dual function stop lamp switch. Refer to Group 5,
Brakes for more information on stop lamp switch ser-
vice and adjustment procedures.
SERVO CABLE
The speed control servo cable is connected between
the speed control vacuum servo diaphragm and the
throttle body control linkage. This cable causes the
throttle control linkage to open or close the throttle
valve in response to movement of the vacuum servo
diaphragm.
POWERTRAIN CONTROL MODULE
The speed control electronic control circuitry is
integrated into the Powertrain Control Module
(PCM). The PCM is located in the engine compart-
ment. The PCM speed control functions are moni-
tored by the On-Board Diagnostics (OBD). All OBD-
sensed systems are monitored by the PCM. Each
monitored circuit is assigned a Diagnostic Trouble
Code (DTC). The PCM will store a DTC in electronic
memory for any failure it detects. See On-Board
Diagnostic Tests in this group for more information.
The PCM cannot be repaired and must be replaced if
faulty.
USE THE DRB SCAN TOOL TO REPROGRAM
THE NEW PCM WITH THE VEHICLES ORIGI-
NAL IDENTIFICATION NUMBER (VIN) AND
THE ORIGINAL VEHICLES MILEAGE. IF THIS
STEP IS NOT DONE A DIAGNOSTIC TROUBLE
CODE (DTC) MAY BE SET.
VACUUM RESERVOIR
The reservoir contains a one-way check valve to
trap engine vacuum in the reservoir. When engine
vacuum drops, as in climbing a grade while driving,
the reservoir supplies the vacuum needed to main-
tain proper speed control operation. The vacuum res-
ervoir cannot be repaired and must be replaced if
faulty.
VEHICLE SPEED AND DISTANCE
The 4 speed automatic Transmission Control Mod-
ule (TCM) supplies the speed input to the PCM. The
PCM determines acceleration rates. The speed con-
trol software in the PCM uses vehicle speed and
acceleration to control to the set speed.Vehicles with a 3 speed automatic or manual trans-
mission have a vehicle speed sensor (VSS) mounted
to an adapter near the transmission output shaft.
The sensor is driven through the adapter by a speed-
ometer pinion gear. The VSS pulse signal is moni-
tored by the PCM to determine vehicle speed and to
maintain speed control set speed. Refer to the appro-
priate Powertrain Diagnostic Procedures manual for
diagnosis and testing of this component. Refer to
group 14, Fuel System for Removal/Installation
DIAGNOSIS AND TESTING
ROAD TEST
Perform a vehicle road test to verify reports of
speed control system malfunction. The road test
should include attention to the speedometer. Speed-
ometer operation should be smooth and without flut-
ter at all speeds.
Flutter in the speedometer indicates a problem
which might cause surging in the speed control sys-
tem. The cause of any speedometer problems should
be corrected before proceeding. Refer to Group 8E,
Instrument Panel and Gauges for speedometer diag-
nosis.
If a road test verifies a surge following a set and
the speedometer operates properly see ªOvershoot/
Undershoot on speed control setº.
If a road test verifies an inoperative system, and
the speedometer operates properly, check for:
²A Diagnostic Trouble Code (DTC). If a DTC
exists, conduct tests per the Powertrain Diagnostic
Procedures service manual.
²A misadjusted brake (stop) lamp switch. This
could also cause an intermittent problem.
²Loose or corroded electrical connections at the
servo. Corrosion should be removed from electrical
terminals and a light coating of Mopar Multipurpose
Grease, or equivalent, applied.
²Leaking vacuum reservoir.
²Loose or leaking vacuum hoses or connections.
²Defective one-way vacuum check valve.
²Secure attachment at both ends of the speed
control servo cable.
²Smooth operation of throttle linkage and throttle
body air valve.
²Conduct electrical test at PCM.
²Failed speed control servo. Do the servo vacuum
test.
CAUTION: When test probing for voltage or conti-
nuity at electrical connectors, care must be taken
not to damage connector, terminals or seals. If
these components are damaged, intermittent or
complete system failure may occur.
PLVEHICLE SPEED CONTROL SYSTEM 8H - 3
DESCRIPTION AND OPERATION (Continued)
Page 307 of 1200
POWERTRAIN CONTROL MODULE
For Removal/Installation refer to Powertrain Con-
trol Module in Group 14, Fuel Injection System.
USE THE DRB SCAN TOOL TO REPROGRAM
THE NEW PCM WITH THE VEHICLES ORIGI-
NAL IDENTIFICATION NUMBER (VIN) AND
THE ORIGINAL VEHICLES MILEAGE. IF THIS
STEP IS NOT DONE A DIAGNOSTIC TROUBLE
CODE (DTC) MAY BE SET.
VACUUM RESERVOIR
REMOVAL
(1) Raise and support vehicle.
(2) Remove bolt on top of vacuum reservoir.
(3) Remove vacuum hoses.
(4) Remove vacuum reservoir.
INSTALLATION
(1) Install vacuum reservoir, install push pin and
tighten screw to 5 N.m (44 in. lbs.)..
(2) Install vacuum hoses.
(3) Lower vehicle.
VEHICLE SPEED SENSOR
For Removal/Installation, refer to Vehicle Speed
Sensor in Group 14, Fuel Injections.
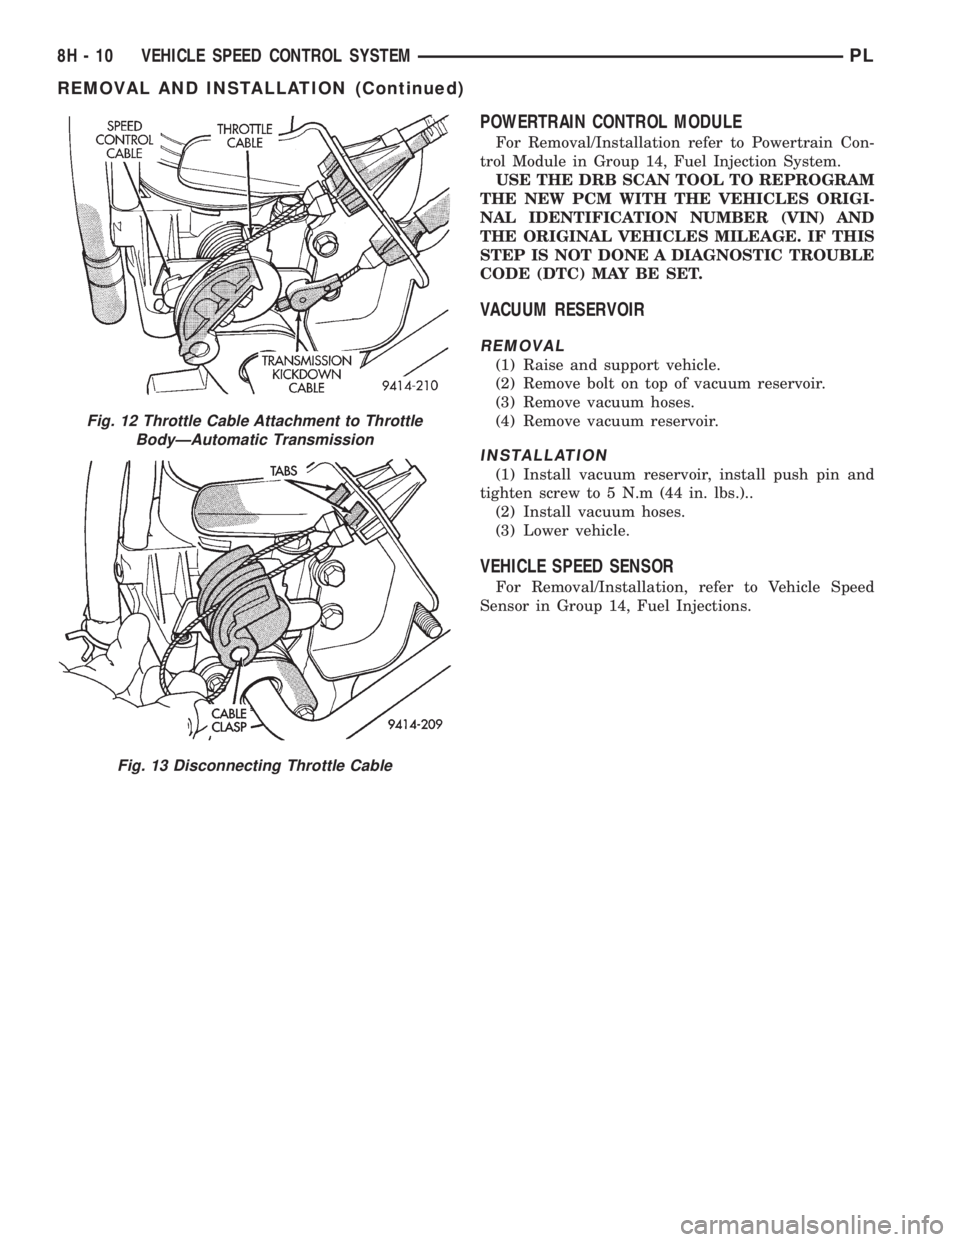
Fig. 12 Throttle Cable Attachment to Throttle
BodyÐAutomatic Transmission
Fig. 13 Disconnecting Throttle Cable
8H - 10 VEHICLE SPEED CONTROL SYSTEMPL
REMOVAL AND INSTALLATION (Continued)