Timing DODGE NEON 1999 Service Owner's Guide
[x] Cancel search | Manufacturer: DODGE, Model Year: 1999, Model line: NEON, Model: DODGE NEON 1999Pages: 1200, PDF Size: 35.29 MB
Page 748 of 1200
CAMSHAFT AND CRANKSHAFT TIMING
PROCEDURE AND BELT INSTALLATIONÐ
SOHC ENGINE
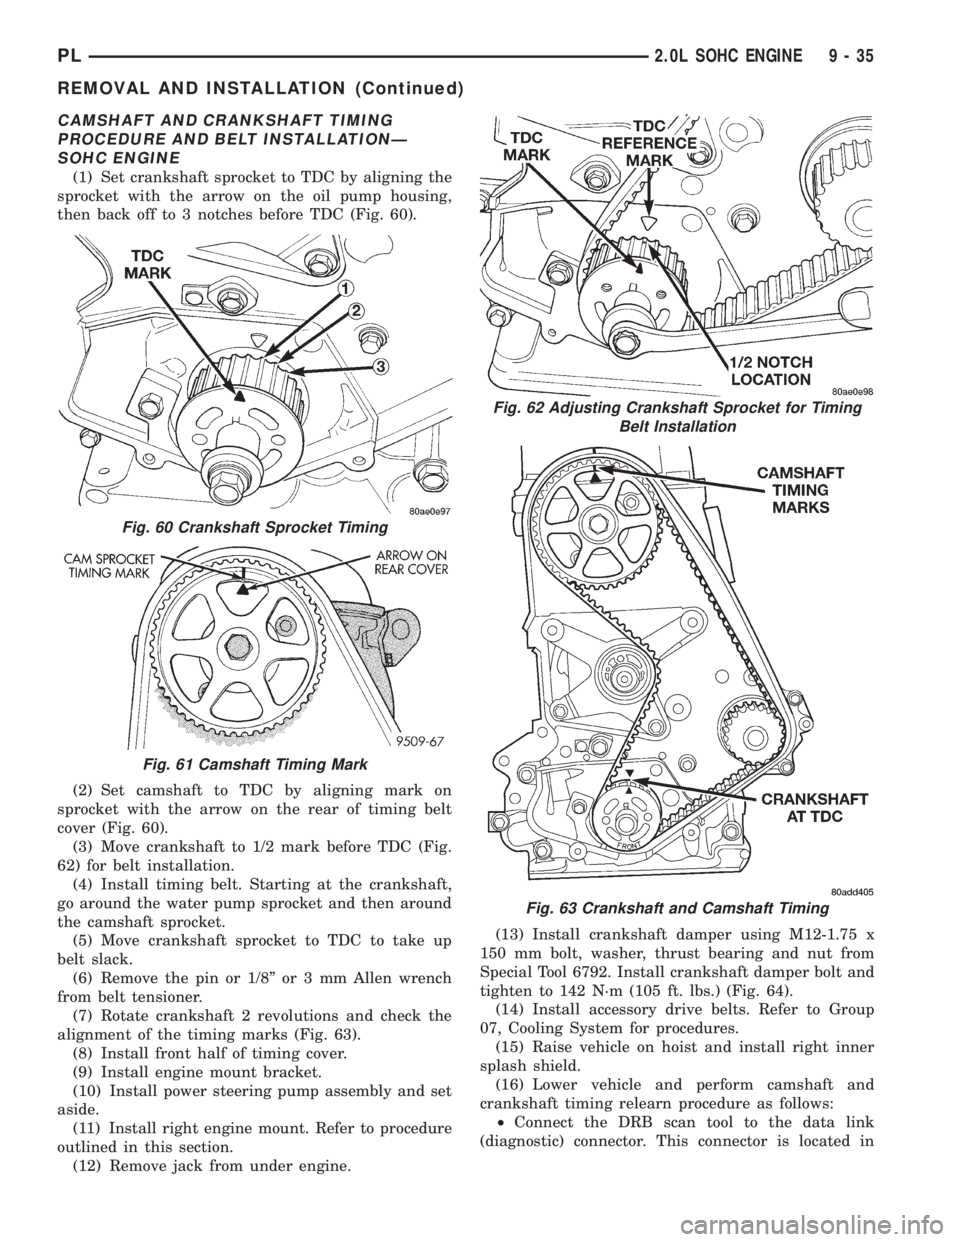
(1) Set crankshaft sprocket to TDC by aligning the
sprocket with the arrow on the oil pump housing,
then back off to 3 notches before TDC (Fig. 60).
(2) Set camshaft to TDC by aligning mark on
sprocket with the arrow on the rear of timing belt
cover (Fig. 60).
(3) Move crankshaft to 1/2 mark before TDC (Fig.
62) for belt installation.
(4) Install timing belt. Starting at the crankshaft,
go around the water pump sprocket and then around
the camshaft sprocket.
(5) Move crankshaft sprocket to TDC to take up
belt slack.
(6) Remove the pin or 1/8º or 3 mm Allen wrench
from belt tensioner.
(7) Rotate crankshaft 2 revolutions and check the
alignment of the timing marks (Fig. 63).
(8) Install front half of timing cover.
(9) Install engine mount bracket.
(10) Install power steering pump assembly and set
aside.
(11) Install right engine mount. Refer to procedure
outlined in this section.
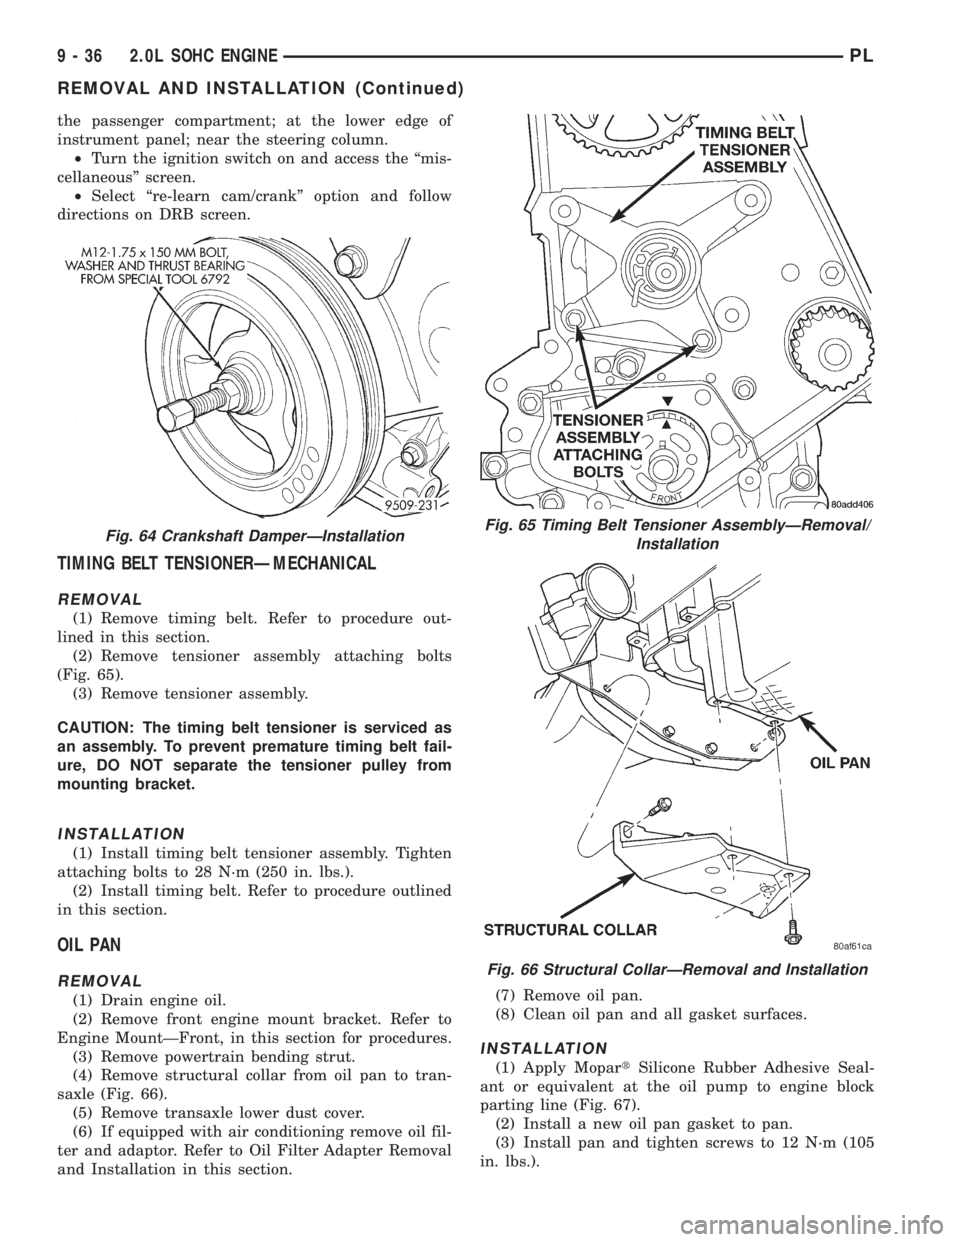
(12) Remove jack from under engine.(13) Install crankshaft damper using M12-1.75 x
150 mm bolt, washer, thrust bearing and nut from
Special Tool 6792. Install crankshaft damper bolt and
tighten to 142 N´m (105 ft. lbs.) (Fig. 64).
(14) Install accessory drive belts. Refer to Group
07, Cooling System for procedures.
(15) Raise vehicle on hoist and install right inner
splash shield.
(16) Lower vehicle and perform camshaft and
crankshaft timing relearn procedure as follows:
²Connect the DRB scan tool to the data link
(diagnostic) connector. This connector is located in
Fig. 60 Crankshaft Sprocket Timing
Fig. 61 Camshaft Timing Mark
Fig. 62 Adjusting Crankshaft Sprocket for Timing
Belt Installation
Fig. 63 Crankshaft and Camshaft Timing
PL2.0L SOHC ENGINE 9 - 35
REMOVAL AND INSTALLATION (Continued)
Page 749 of 1200
the passenger compartment; at the lower edge of
instrument panel; near the steering column.
²Turn the ignition switch on and access the ªmis-
cellaneousº screen.
²Select ªre-learn cam/crankº option and follow
directions on DRB screen.
TIMING BELT TENSIONERÐMECHANICAL
REMOVAL
(1) Remove timing belt. Refer to procedure out-
lined in this section.
(2) Remove tensioner assembly attaching bolts
(Fig. 65).
(3) Remove tensioner assembly.
CAUTION: The timing belt tensioner is serviced as
an assembly. To prevent premature timing belt fail-
ure, DO NOT separate the tensioner pulley from
mounting bracket.
INSTALLATION
(1) Install timing belt tensioner assembly. Tighten
attaching bolts to 28 N´m (250 in. lbs.).
(2) Install timing belt. Refer to procedure outlined
in this section.
OIL PAN
REMOVAL
(1) Drain engine oil.
(2) Remove front engine mount bracket. Refer to
Engine MountÐFront, in this section for procedures.
(3) Remove powertrain bending strut.
(4) Remove structural collar from oil pan to tran-
saxle (Fig. 66).
(5) Remove transaxle lower dust cover.
(6) If equipped with air conditioning remove oil fil-
ter and adaptor. Refer to Oil Filter Adapter Removal
and Installation in this section.(7) Remove oil pan.
(8) Clean oil pan and all gasket surfaces.
INSTALLATION
(1) Apply MopartSilicone Rubber Adhesive Seal-
ant or equivalent at the oil pump to engine block
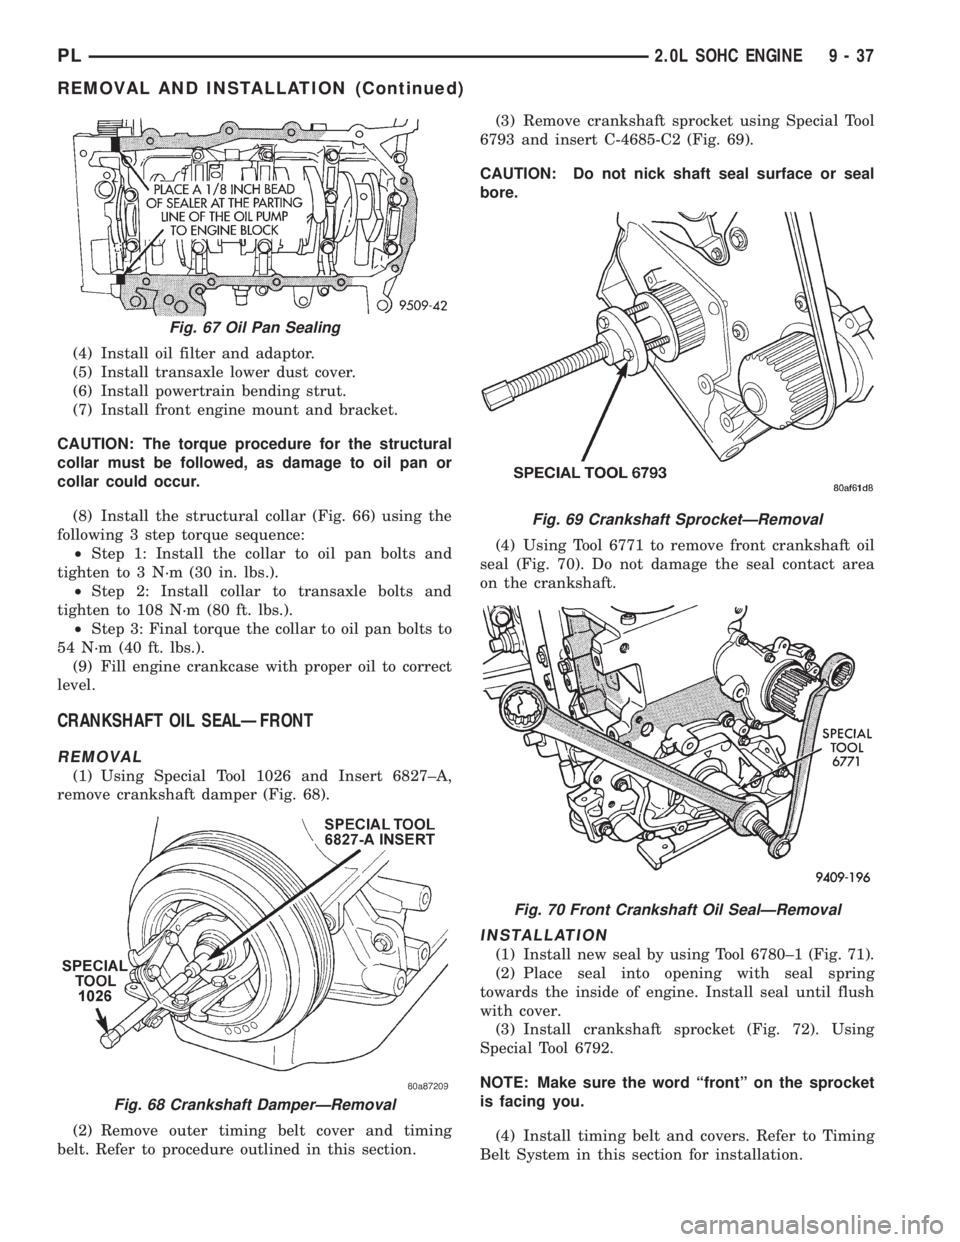
parting line (Fig. 67).
(2) Install a new oil pan gasket to pan.
(3) Install pan and tighten screws to 12 N´m (105
in. lbs.).
Fig. 64 Crankshaft DamperÐInstallationFig. 65 Timing Belt Tensioner AssemblyÐRemoval/
Installation
Fig. 66 Structural CollarÐRemoval and Installation
9 - 36 2.0L SOHC ENGINEPL
REMOVAL AND INSTALLATION (Continued)
Page 750 of 1200
(4) Install oil filter and adaptor.
(5) Install transaxle lower dust cover.
(6) Install powertrain bending strut.
(7) Install front engine mount and bracket.
CAUTION: The torque procedure for the structural
collar must be followed, as damage to oil pan or
collar could occur.
(8) Install the structural collar (Fig. 66) using the
following 3 step torque sequence:
²Step 1: Install the collar to oil pan bolts and
tighten to 3 N´m (30 in. lbs.).
²Step 2: Install collar to transaxle bolts and
tighten to 108 N´m (80 ft. lbs.).
²Step 3: Final torque the collar to oil pan bolts to
54 N´m (40 ft. lbs.).
(9) Fill engine crankcase with proper oil to correct
level.
CRANKSHAFT OIL SEALÐFRONT
REMOVAL
(1) Using Special Tool 1026 and Insert 6827±A,
remove crankshaft damper (Fig. 68).
(2) Remove outer timing belt cover and timing
belt. Refer to procedure outlined in this section.(3) Remove crankshaft sprocket using Special Tool
6793 and insert C-4685-C2 (Fig. 69).
CAUTION: Do not nick shaft seal surface or seal
bore.
(4) Using Tool 6771 to remove front crankshaft oil
seal (Fig. 70). Do not damage the seal contact area
on the crankshaft.
INSTALLATION
(1) Install new seal by using Tool 6780±1 (Fig. 71).
(2) Place seal into opening with seal spring
towards the inside of engine. Install seal until flush
with cover.
(3) Install crankshaft sprocket (Fig. 72). Using
Special Tool 6792.
NOTE: Make sure the word ªfrontº on the sprocket
is facing you.
(4) Install timing belt and covers. Refer to Timing
Belt System in this section for installation.
Fig. 67 Oil Pan Sealing
Fig. 68 Crankshaft DamperÐRemoval
Fig. 69 Crankshaft SprocketÐRemoval
Fig. 70 Front Crankshaft Oil SealÐRemoval
PL2.0L SOHC ENGINE 9 - 37
REMOVAL AND INSTALLATION (Continued)
Page 755 of 1200
(11) Install oil pump. If crankshaft end play is to
be checked refer to service procedures in this section.
(12) Install crankshaft sprocket.
(13) Install oil filter adapter and filter.
(14) Install oil pan and structural collar. Refer to
procedures outlined in the section.
(15) Perform camshaft and crankshaft timing
relearn procedure as follows:
²Connect the DRB scan tool to the data link
(diagnostic) connector. This connector is located in
the passenger compartment; at the lower edge of
instrument panel; near the steering column.
²Turn the ignition switch on and access the ªmis-
cellaneousº screen.
²Select ªre-learn cam/crankº option and follow
directions on DRB screen.
OIL FILTER ADAPTER
REMOVE AND INSTALL
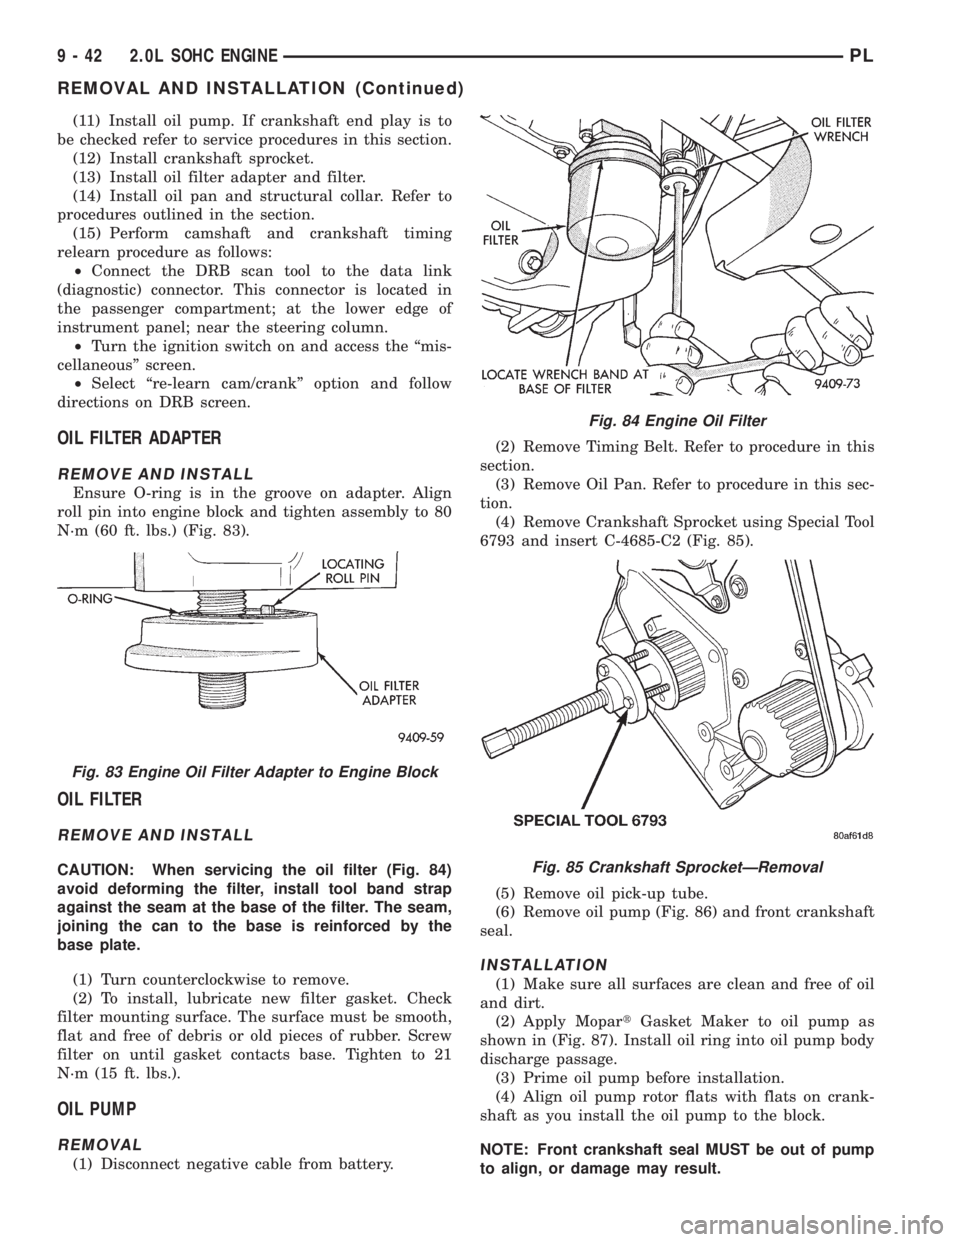
Ensure O-ring is in the groove on adapter. Align
roll pin into engine block and tighten assembly to 80
N´m (60 ft. lbs.) (Fig. 83).
OIL FILTER
REMOVE AND INSTALL
CAUTION: When servicing the oil filter (Fig. 84)
avoid deforming the filter, install tool band strap
against the seam at the base of the filter. The seam,
joining the can to the base is reinforced by the
base plate.
(1) Turn counterclockwise to remove.
(2) To install, lubricate new filter gasket. Check
filter mounting surface. The surface must be smooth,
flat and free of debris or old pieces of rubber. Screw
filter on until gasket contacts base. Tighten to 21
N´m (15 ft. lbs.).
OIL PUMP
REMOVAL
(1) Disconnect negative cable from battery.(2) Remove Timing Belt. Refer to procedure in this
section.
(3) Remove Oil Pan. Refer to procedure in this sec-
tion.
(4) Remove Crankshaft Sprocket using Special Tool
6793 and insert C-4685-C2 (Fig. 85).
(5) Remove oil pick-up tube.
(6) Remove oil pump (Fig. 86) and front crankshaft
seal.
INSTALLATION
(1) Make sure all surfaces are clean and free of oil
and dirt.
(2) Apply MopartGasket Maker to oil pump as
shown in (Fig. 87). Install oil ring into oil pump body
discharge passage.
(3) Prime oil pump before installation.
(4) Align oil pump rotor flats with flats on crank-
shaft as you install the oil pump to the block.
NOTE: Front crankshaft seal MUST be out of pump
to align, or damage may result.
Fig. 83 Engine Oil Filter Adapter to Engine Block
Fig. 84 Engine Oil Filter
Fig. 85 Crankshaft SprocketÐRemoval
9 - 42 2.0L SOHC ENGINEPL
REMOVAL AND INSTALLATION (Continued)
Page 756 of 1200
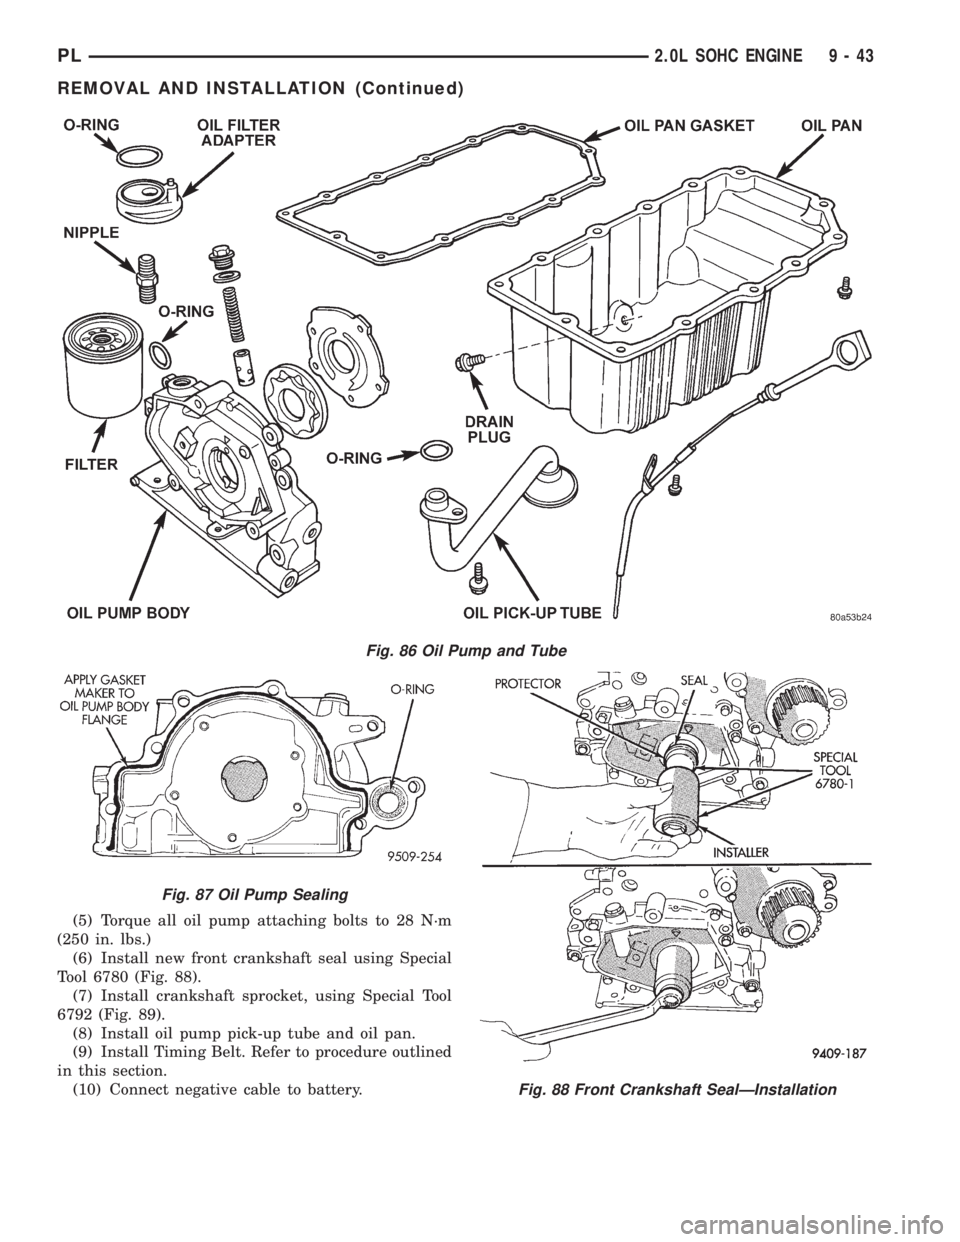
(5) Torque all oil pump attaching bolts to 28 N´m
(250 in. lbs.)
(6) Install new front crankshaft seal using Special
Tool 6780 (Fig. 88).
(7) Install crankshaft sprocket, using Special Tool
6792 (Fig. 89).
(8) Install oil pump pick-up tube and oil pan.
(9) Install Timing Belt. Refer to procedure outlined
in this section.
(10) Connect negative cable to battery.
Fig. 86 Oil Pump and Tube
Fig. 87 Oil Pump Sealing
Fig. 88 Front Crankshaft SealÐInstallation
PL2.0L SOHC ENGINE 9 - 43
REMOVAL AND INSTALLATION (Continued)
Page 757 of 1200
PISTON AND CONNECTING ROD
REMOVAL
(1) Remove top ridge of cylinder bores with a reli-
able ridge reamer before removing pistons from cyl-
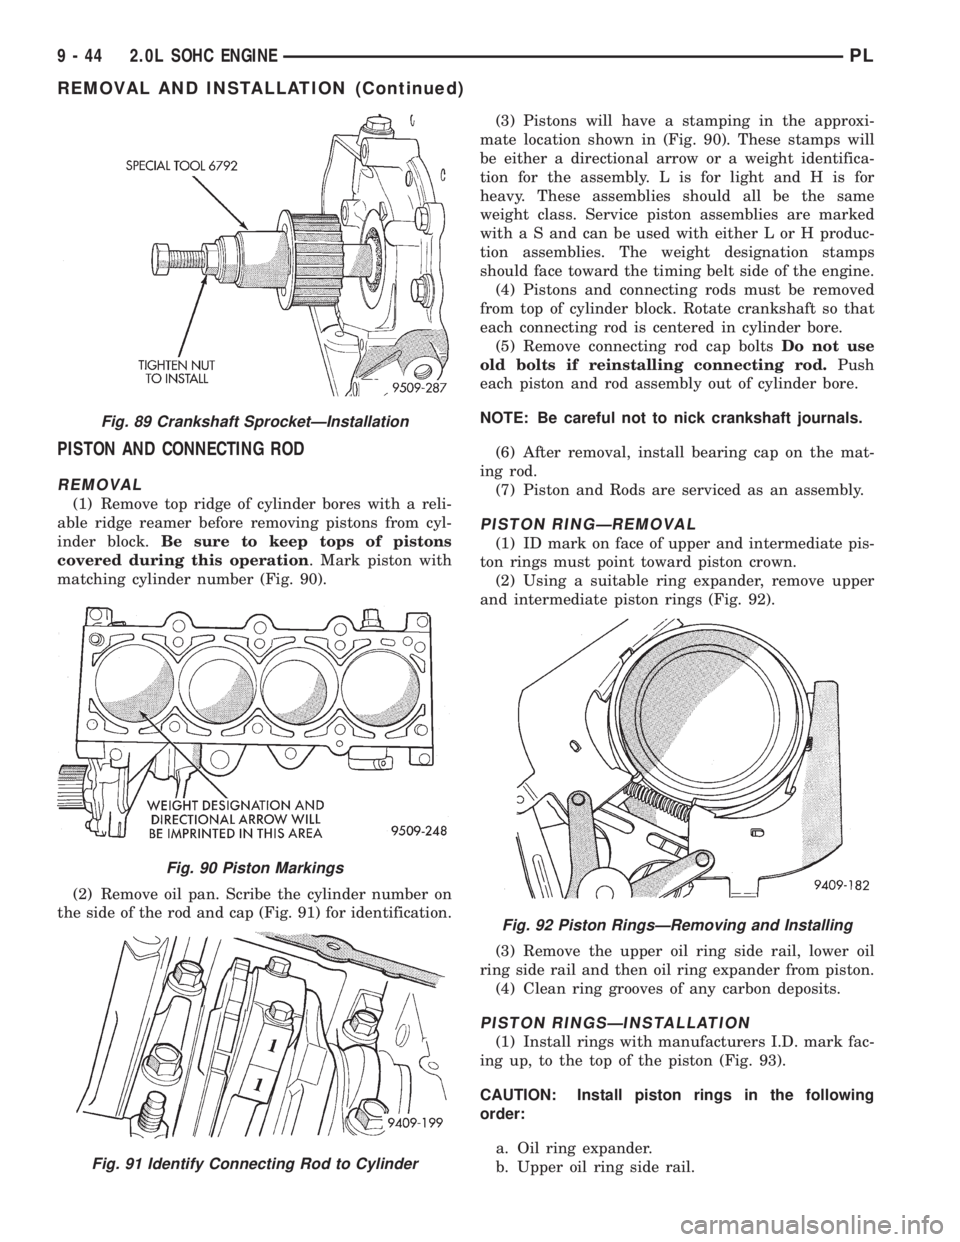
inder block.Be sure to keep tops of pistons
covered during this operation. Mark piston with
matching cylinder number (Fig. 90).
(2) Remove oil pan. Scribe the cylinder number on
the side of the rod and cap (Fig. 91) for identification.(3) Pistons will have a stamping in the approxi-
mate location shown in (Fig. 90). These stamps will
be either a directional arrow or a weight identifica-
tion for the assembly. L is for light and H is for
heavy. These assemblies should all be the same
weight class. Service piston assemblies are marked
with a S and can be used with either L or H produc-
tion assemblies. The weight designation stamps
should face toward the timing belt side of the engine.
(4) Pistons and connecting rods must be removed
from top of cylinder block. Rotate crankshaft so that
each connecting rod is centered in cylinder bore.
(5) Remove connecting rod cap boltsDo not use
old bolts if reinstalling connecting rod.Push
each piston and rod assembly out of cylinder bore.
NOTE: Be careful not to nick crankshaft journals.
(6) After removal, install bearing cap on the mat-
ing rod.
(7) Piston and Rods are serviced as an assembly.
PISTON RINGÐREMOVAL
(1) ID mark on face of upper and intermediate pis-
ton rings must point toward piston crown.
(2) Using a suitable ring expander, remove upper
and intermediate piston rings (Fig. 92).
(3) Remove the upper oil ring side rail, lower oil
ring side rail and then oil ring expander from piston.
(4) Clean ring grooves of any carbon deposits.
PISTON RINGSÐINSTALLATION
(1) Install rings with manufacturers I.D. mark fac-
ing up, to the top of the piston (Fig. 93).
CAUTION: Install piston rings in the following
order:
a. Oil ring expander.
b. Upper oil ring side rail.
Fig. 89 Crankshaft SprocketÐInstallation
Fig. 90 Piston Markings
Fig. 91 Identify Connecting Rod to Cylinder
Fig. 92 Piston RingsÐRemoving and Installing
9 - 44 2.0L SOHC ENGINEPL
REMOVAL AND INSTALLATION (Continued)
Page 766 of 1200
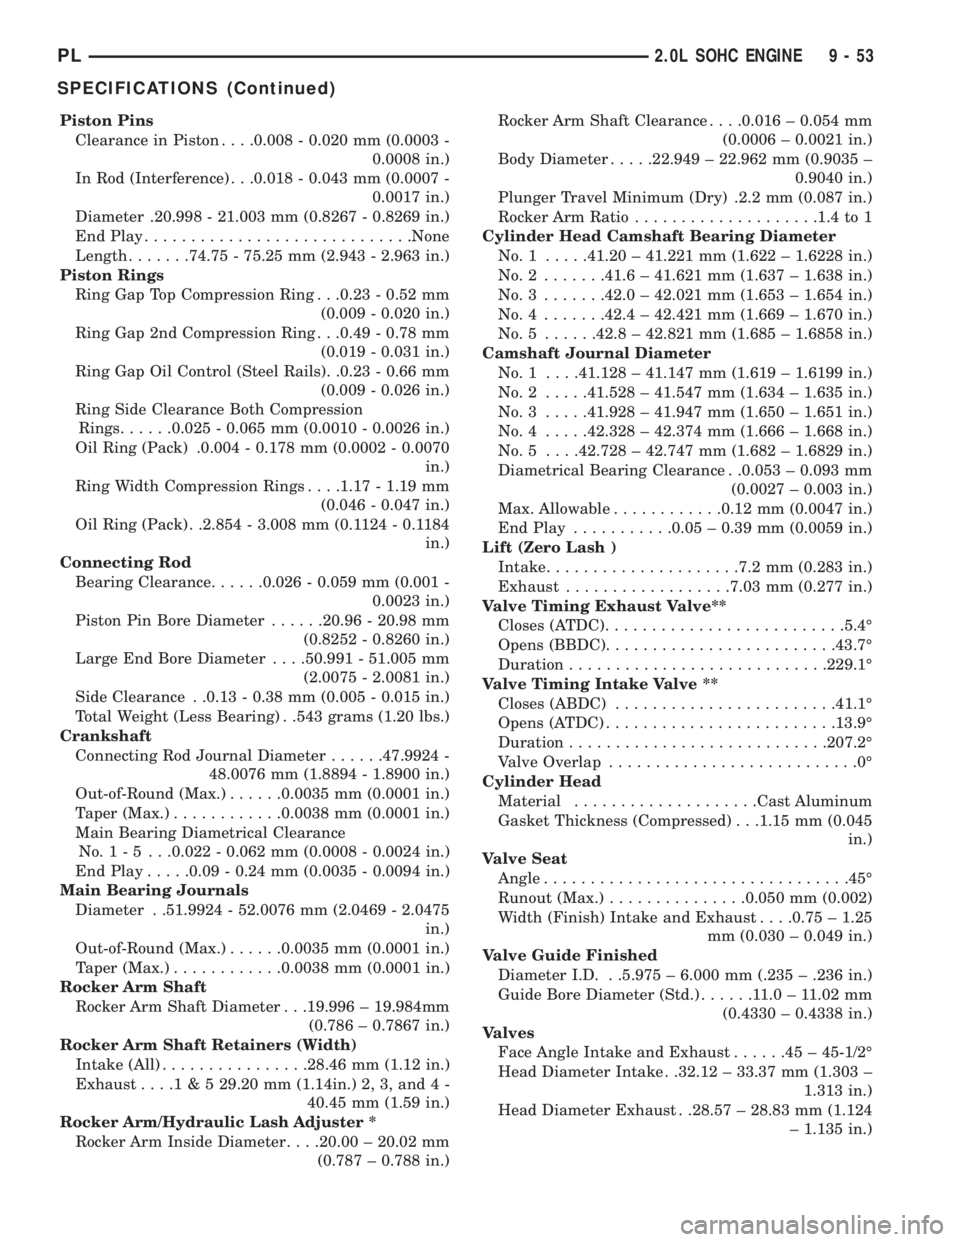
Piston Pins
Clearance in Piston. . . .0.008 - 0.020 mm (0.0003 -
0.0008 in.)
In Rod (Interference) . . .0.018 - 0.043 mm (0.0007 -
0.0017 in.)
Diameter .20.998 - 21.003 mm (0.8267 - 0.8269 in.)
End Play.............................None
Length.......74.75 - 75.25 mm (2.943 - 2.963 in.)
Piston Rings
Ring Gap Top Compression Ring . . .0.23 - 0.52 mm
(0.009 - 0.020 in.)
Ring Gap 2nd Compression Ring . . .0.49 - 0.78 mm
(0.019 - 0.031 in.)
Ring Gap Oil Control (Steel Rails). .0.23 - 0.66 mm
(0.009 - 0.026 in.)
Ring Side Clearance Both Compression
Rings......0.025 - 0.065 mm (0.0010 - 0.0026 in.)
Oil Ring (Pack) .0.004 - 0.178 mm (0.0002 - 0.0070
in.)
Ring Width Compression Rings. . . .1.17 - 1.19 mm
(0.046 - 0.047 in.)
Oil Ring (Pack) . .2.854 - 3.008 mm (0.1124 - 0.1184
in.)
Connecting Rod
Bearing Clearance......0.026 - 0.059 mm (0.001 -
0.0023 in.)
Piston Pin Bore Diameter......20.96 - 20.98 mm
(0.8252 - 0.8260 in.)
Large End Bore Diameter. . . .50.991 - 51.005 mm
(2.0075 - 2.0081 in.)
Side Clearance . .0.13 - 0.38 mm (0.005 - 0.015 in.)
Total Weight (Less Bearing) . .543 grams (1.20 lbs.)
Crankshaft
Connecting Rod Journal Diameter......47.9924 -
48.0076 mm (1.8894 - 1.8900 in.)
Out-of-Round (Max.)......0.0035 mm (0.0001 in.)
Taper (Max.)............0.0038 mm (0.0001 in.)
Main Bearing Diametrical Clearance
No.1-5 ...0.022 - 0.062 mm (0.0008 - 0.0024 in.)
End Play.....0.09 - 0.24 mm (0.0035 - 0.0094 in.)
Main Bearing Journals
Diameter . .51.9924 - 52.0076 mm (2.0469 - 2.0475
in.)
Out-of-Round (Max.)......0.0035 mm (0.0001 in.)
Taper (Max.)............0.0038 mm (0.0001 in.)
Rocker Arm Shaft
Rocker Arm Shaft Diameter . . .19.996 ± 19.984mm
(0.786 ± 0.7867 in.)
Rocker Arm Shaft Retainers (Width)
Intake (All)................28.46 mm (1.12 in.)
Exhaust....1 & 5 29.20 mm (1.14in.) 2, 3, and 4 -
40.45 mm (1.59 in.)
Rocker Arm/Hydraulic Lash Adjuster *
Rocker Arm Inside Diameter. . . .20.00 ± 20.02 mm
(0.787 ± 0.788 in.)Rocker Arm Shaft Clearance. . . .0.016 ± 0.054 mm
(0.0006 ± 0.0021 in.)
Body Diameter.....22.949 ± 22.962 mm (0.9035 ±
0.9040 in.)
Plunger Travel Minimum (Dry) .2.2 mm (0.087 in.)
Rocker Arm Ratio....................1.4 to 1
Cylinder Head Camshaft Bearing Diameter
No.1 .....41.20 ± 41.221 mm (1.622 ± 1.6228 in.)
No.2 .......41.6 ± 41.621 mm (1.637 ± 1.638 in.)
No.3 .......42.0 ± 42.021 mm (1.653 ± 1.654 in.)
No.4 .......42.4 ± 42.421 mm (1.669 ± 1.670 in.)
No.5 ......42.8 ± 42.821 mm (1.685 ± 1.6858 in.)
Camshaft Journal Diameter
No. 1 . . . .41.128 ± 41.147 mm (1.619 ± 1.6199 in.)
No.2 .....41.528 ± 41.547 mm (1.634 ± 1.635 in.)
No.3 .....41.928 ± 41.947 mm (1.650 ± 1.651 in.)
No.4 .....42.328 ± 42.374 mm (1.666 ± 1.668 in.)
No. 5 . . . .42.728 ± 42.747 mm (1.682 ± 1.6829 in.)
Diametrical Bearing Clearance . .0.053 ± 0.093 mm
(0.0027 ± 0.003 in.)
Max. Allowable............0.12 mm (0.0047 in.)
End Play...........0.05 ± 0.39 mm (0.0059 in.)
Lift (Zero Lash )
Intake.....................7.2 mm (0.283 in.)
Exhaust..................7.03 mm (0.277 in.)
Valve Timing Exhaust Valve**
Closes (ATDC)..........................5.4É
Opens (BBDC).........................43.7É
Duration............................229.1É
Valve Timing Intake Valve **
Closes (ABDC)........................41.1É
Opens (ATDC).........................13.9É
Duration............................207.2É
Valve Overlap...........................0É
Cylinder Head
Material....................Cast Aluminum
Gasket Thickness (Compressed) . . .1.15 mm (0.045
in.)
Valve Seat
Angle.................................45É
Runout (Max.)...............0.050 mm (0.002)
Width (Finish) Intake and Exhaust. . . .0.75 ± 1.25
mm (0.030 ± 0.049 in.)
Valve Guide Finished
Diameter I.D. . .5.975 ± 6.000 mm (.235 ± .236 in.)
Guide Bore Diameter (Std.)......11.0±11.02 mm
(0.4330 ± 0.4338 in.)
Valves
Face Angle Intake and Exhaust......45±45-1/2É
Head Diameter Intake . .32.12 ± 33.37 mm (1.303 ±
1.313 in.)
Head Diameter Exhaust . .28.57 ± 28.83 mm (1.124
± 1.135 in.)
PL2.0L SOHC ENGINE 9 - 53
SPECIFICATIONS (Continued)
Page 767 of 1200
Valve Margin
Intake......1.15 ± 1.48 mm (0.0452 ± 0.0582 in.)
Exhaust.....1.475 ± 1.805 mm (0.058 ± 0.071 in.)
Valve Length (Overall)
Intake.....114.69 ± 115.19 mm (4.515 ± 4.535 in.)
Exhaust . . .109.59 ± 110.09 mm (4.603 ± 4.623 in.)
Valve Stem Tip Height
Intake........45.01 ± 46.07 mm (1.77 ± 1.81 in.)
Exhaust.......43.51 ± 44.57 mm (1.71 ± 1.75 in.)
Stem Diameter
Intake......5.934 ± 5.952 mm (0.234 ± 0.234 in.)
Exhaust.....5.906 ± 5.924 mm (0.233 ± 0.233 in.)
Stem to Guide Clearance
Intake. . . .0.048 ± 0.066 mm (0.0018 ± 0.0025 in.)
Exhaust . .0.0736 ± 0.094 mm (0.0029 ± 0.0037 in.)
Max. Allowable Intake......0.076 mm (0.003 in.)
Max. Allowable Exhaust.....0.101 mm (0.004 in.)
Valve Springs
Free Length (Approx.).......44.4 mm (1.747 in.)
Nominal Force (Valve closed) . .91 N´m @ 39.8 mm
(67 ft. lbs. @ 1.57 in.)
Nominal Force (Valve open). . .239 N´m @ 32.6 mm
(176 lbs. @ 1.28 in.)
Installed Height...........40.18 mm (1.580 in.)
* SERVICE AS AN ASSEMBLY WITH ROCKER
ARM.
** ALL READINGS IN CRANKSHAFT DEGREES,
AT 0.5 mm (0.019 in.) OF VALVE LIFT.
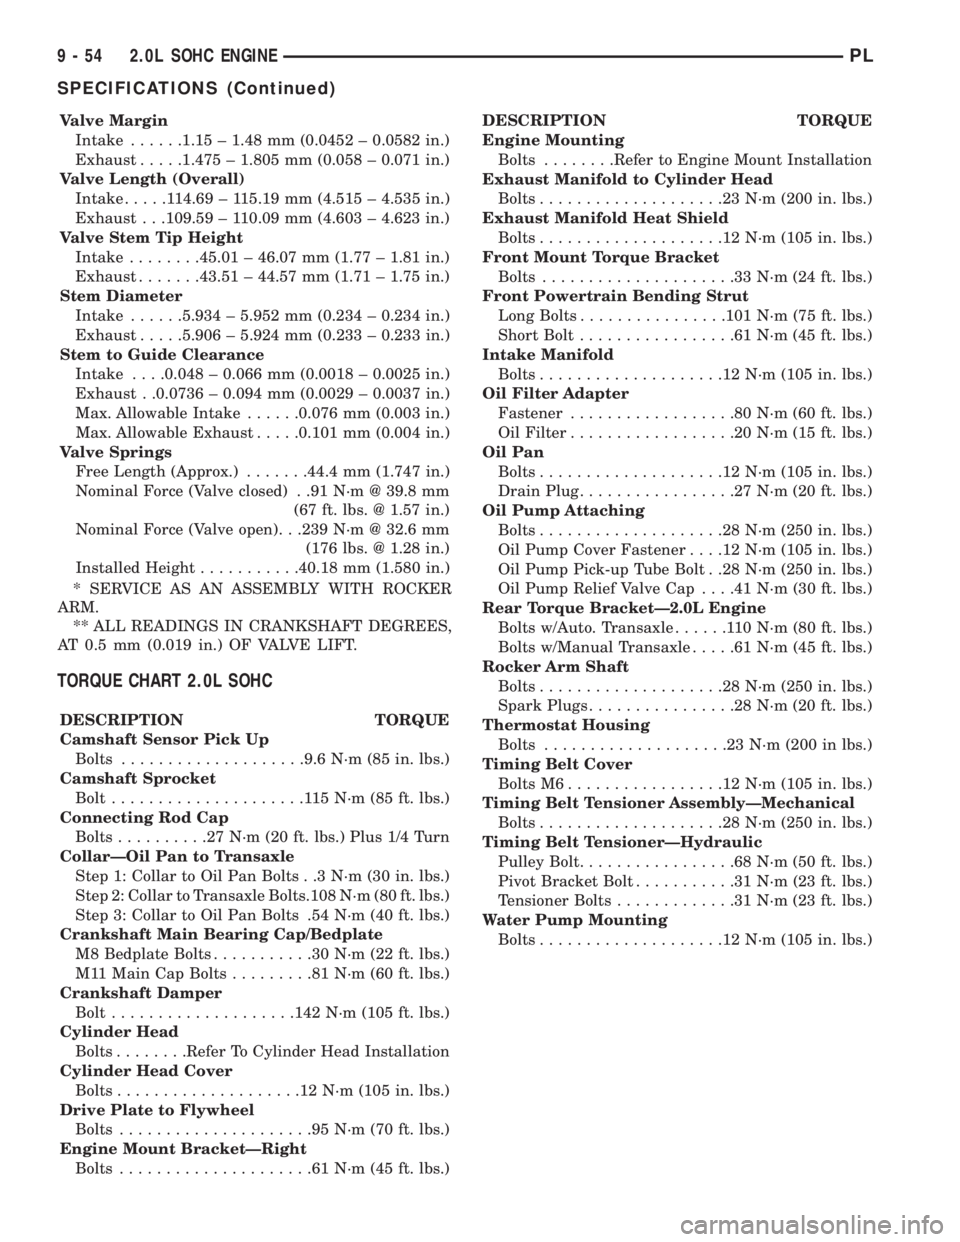
TORQUE CHART 2.0L SOHC
DESCRIPTION TORQUE
Camshaft Sensor Pick Up
Bolts....................9.6 N´m (85 in. lbs.)
Camshaft Sprocket
Bolt.....................115N´m(85ft.lbs.)
Connecting Rod Cap
Bolts..........27N´m(20ft.lbs.) Plus 1/4 Turn
CollarÐOil Pan to Transaxle
Step 1: Collar to Oil Pan Bolts . .3 N´m (30 in. lbs.)
Step 2: Collar to Transaxle Bolts.108 N´m (80 ft. lbs.)
Step 3: Collar to Oil Pan Bolts .54 N´m (40 ft. lbs.)
Crankshaft Main Bearing Cap/Bedplate
M8 Bedplate Bolts...........30N´m(22ft.lbs.)
M11 Main Cap Bolts.........81N´m(60ft.lbs.)
Crankshaft Damper
Bolt....................142 N´m (105 ft. lbs.)
Cylinder Head
Bolts........Refer To Cylinder Head Installation
Cylinder Head Cover
Bolts....................12N´m(105 in. lbs.)
Drive Plate to Flywheel
Bolts.....................95N´m(70ft.lbs.)
Engine Mount BracketÐRight
Bolts.....................61N´m(45ft.lbs.)DESCRIPTION TORQUE
Engine Mounting
Bolts........Refer to Engine Mount Installation
Exhaust Manifold to Cylinder Head
Bolts....................23N´m(200 in. lbs.)
Exhaust Manifold Heat Shield
Bolts....................12N´m(105 in. lbs.)
Front Mount Torque Bracket
Bolts.....................33N´m(24ft.lbs.)
Front Powertrain Bending Strut
Long Bolts................101 N´m (75 ft. lbs.)
Short Bolt.................61N´m(45ft.lbs.)
Intake Manifold
Bolts....................12N´m(105 in. lbs.)
Oil Filter Adapter
Fastener..................80N´m(60ft.lbs.)
Oil Filter..................20N´m(15ft.lbs.)
Oil Pan
Bolts....................12N´m(105 in. lbs.)
Drain Plug.................27N´m(20ft.lbs.)
Oil Pump Attaching
Bolts....................28N´m(250 in. lbs.)
Oil Pump Cover Fastener. . . .12 N´m (105 in. lbs.)
Oil Pump Pick-up Tube Bolt . .28 N´m (250 in. lbs.)
Oil Pump Relief Valve Cap. . . .41 N´m (30 ft. lbs.)
Rear Torque BracketÐ2.0L Engine
Bolts w/Auto. Transaxle......110N´m(80ft.lbs.)
Bolts w/Manual Transaxle.....61N´m(45ft.lbs.)
Rocker Arm Shaft
Bolts....................28N´m(250 in. lbs.)
Spark Plugs................28N´m(20ft.lbs.)
Thermostat Housing
Bolts....................23N´m(200 in lbs.)
Timing Belt Cover
Bolts M6.................12N´m(105 in. lbs.)
Timing Belt Tensioner AssemblyÐMechanical
Bolts....................28N´m(250 in. lbs.)
Timing Belt TensionerÐHydraulic
Pulley Bolt.................68N´m(50ft.lbs.)
Pivot Bracket Bolt...........31N´m(23ft.lbs.)
Tensioner Bolts.............31N´m(23ft.lbs.)
Water Pump Mounting
Bolts....................12N´m(105 in. lbs.)
9 - 54 2.0L SOHC ENGINEPL
SPECIFICATIONS (Continued)
Page 771 of 1200
2.0L DOHC ENGINE
INDEX
page page
DESCRIPTION AND OPERATION
ENGINE COMPONENTS.................. 59
ENGINE IDENTIFICATION NUMBER......... 58
ENGINE LUBRICATION SYSTEM............ 58
GENERAL SPECIFICATION................ 58
DIAGNOSIS AND TESTING
CHECKING ENGINE OIL PRESSURE......... 60
SERVICE PROCEDURES
CRANKSHAFT END PLAY................. 63
CYLINDER BORE AND PISTON SIZING....... 60
FITTING CONNECTING RODS.............. 62
FITTING CRANKSHAFT BEARINGS.......... 62
FITTING PISTON RINGS.................. 61
REMOVAL AND INSTALLATION
CAMSHAFT OIL SEALS................... 81
CAM FOLLOWER AND HYDRAULIC LASH
ADJUSTER ASSEMBLY.................. 69
CAMSHAFT............................ 67
CRANKSHAFT DAMPER.................. 73
CRANKSHAFT OIL SEALÐFRONT........... 82
CRANKSHAFT OIL SEALÐREAR............ 83
CRANKSHAFT.......................... 85
CYLINDER HEAD COVER................. 67
CYLINDER HEAD........................ 71
ENGINE ASSEMBLY...................... 65
ENGINE MOUNTÐFRONT................. 63
ENGINE MOUNTÐLEFT................... 63
ENGINE MOUNTÐRIGHT................. 64OIL FILTER ADAPTER.................... 87
OILFILTER ............................ 87
OILPAN ............................... 81
OIL PUMP............................. 88
PISTON AND CONNECTING ROD........... 89
POWER HOP DAMPER................... 64
STRUCTURAL COLLARÐ2.0L.............. 64
TIMING BELT COVER.................... 74
TIMING BELT TENSIONERÐMECHANICAL.... 80
TIMING BELTÐWITH HYDRAULIC TENSIONER . 75
TIMING BELTÐWITH MECHANICAL
TENSIONER.......................... 78
VALVE SPRING AND SEALSÐ
CYLINDER HEAD NOT REMOVED......... 69
DISASSEMBLY AND ASSEMBLY
OIL PUMP............................. 91
VALVE SERVICE WITH CYLINDER HEAD
REMOVED........................... 91
CLEANING AND INSPECTION
CYLINDER BLOCK AND BORE............. 96
CYLINDER HEAD AND CAMSHAFT JOURNALS . 94
OIL PUMP............................. 94
SPECIFICATIONS
2.0L DOHC............................. 96
TORQUE CHART 2.0L DOHC............... 98
SPECIAL TOOLS
2.0L DOHC............................. 98
DESCRIPTION AND OPERATION
ENGINE IDENTIFICATION NUMBER
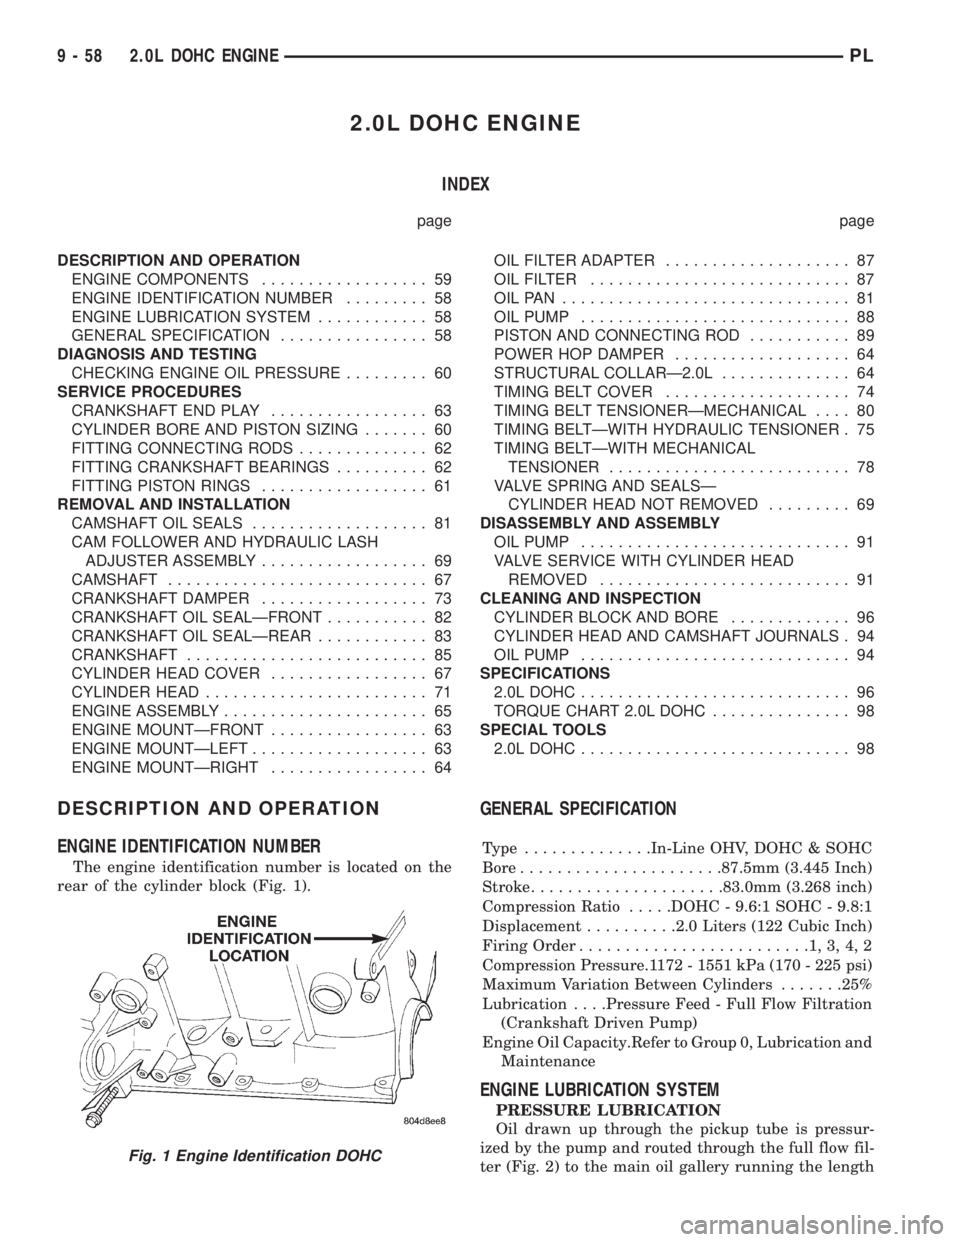
The engine identification number is located on the
rear of the cylinder block (Fig. 1).
GENERAL SPECIFICATION
Type ..............In-Line OHV, DOHC & SOHC
Bore......................87.5mm (3.445 Inch)
Stroke.....................83.0mm (3.268 inch)
Compression Ratio.....DOHC - 9.6:1 SOHC - 9.8:1
Displacement..........2.0 Liters (122 Cubic Inch)
Firing Order.........................1,3,4,2
Compression Pressure.1172 - 1551 kPa (170 - 225 psi)
Maximum Variation Between Cylinders.......25%
Lubrication. . . .Pressure Feed - Full Flow Filtration
(Crankshaft Driven Pump)
Engine Oil Capacity.Refer to Group 0, Lubrication and
Maintenance
ENGINE LUBRICATION SYSTEM
PRESSURE LUBRICATION
Oil drawn up through the pickup tube is pressur-
ized by the pump and routed through the full flow fil-
ter (Fig. 2) to the main oil gallery running the length
Fig. 1 Engine Identification DOHC
9 - 58 2.0L DOHC ENGINEPL
Page 773 of 1200
incorporates main bearing caps. Rear seal retainer is
integral with the block.
CRANKSHAFTA nodular cast iron crankshaft is
used. The engine has 5 main bearings, with number
3 flanged to control thrust. The 52 mm diameter
main and 48 mm diameter crank pin journals (all)
have undercut fillet radiuses that are deep rolled for
added strength. To optimize bearing loading 8 coun-
terweights are used. Hydrodynamic seals provide end
sealing, where the crankshaft exits the block.
Anaerobic gasket material is used for parting line
sealing. A sintered iron timing belt sprocket is
mounted on the crankshaft nose. This sprocket pro-
vides motive power; via timing belt to the camshaft
sprocket providing timed valve actuation.
PISTONSThe DOHC EngineDO NOThave pro-
vision for a free wheeling valve train. Non free
wheeling valve train means, in the event of a broken
timing belt Pistons will contact the Valves. All
engines use pressed-in piston pins to attach forged
powdered metal connecting rods. The connecting rods
are a cracked cap design and are not repairable. Hex
head cap screw are used to provide alignment and
durability in the assembly.
PISTON RINGSThe piston rings include a
molybdenum faced top ring for reliable compression
sealing and a taper faced intermediate ring for addi-
tional cylinder pressure control. Oil Control Ring
Package contains of 2 steel rails and a expander
spacer.
CYLINDER HEADFeatures a Dual Over Head
Camshaft (DOHC), 4 valves per cylinder cross flow
design. The valves are arranged in two in-line banks,
with the ports of the bank of two intake valves per
cylinder facing toward the radiator side of engine
and ports of the bank of two exhaust valves per cyl-
inder facing toward the dash panel. Incorporates
powder metal valve guides and seats. Integral oil gal-
leys within the cylinder head supplies oil to the
hydraulic lash adjusters, camshaft and valve mecha-
nisms.
CAMSHAFTSThe nodular iron camshafts have
six bearing journals and 2 cam lobes per cylinder.
Flanges at the rear journals control camshaft end
play. Provision for cam position sensor is located on
the intake camshaft at the rear of cylinder head. A
hydrodynamic oil seal is used for oil control at the
front of the camshaft.
VA LV E SFour valves per cylinder are actuated by
roller cam followers which pivot on stationary
hydraulic lash adjusters. All valves have 6 mm diam-
eter chrome plated valve stems. The valve sizes are
34.8 mm (1.370 inch.) diameter intake valves and
30.5 mm (1.20 inch.) diameter exhaust valves. Viton
rubber valve stem seals are integral with the springseats. Valve springs, spring retainers, and locks are
conventional.
INTAKE MANIFOLDThe intake manifold is a
two piece aluminum casting, attached to the cylinder
head with ten fasteners. This long branch fan design
enhances low and mid-speed torque.
EXHAUST MANIFOLDThe exhaust manifold is
made of nodular cast iron for strength and high tem-
peratures. Exhaust gasses exit through a machined,
articulated joint connection to the exhaust pipe.
COMPONENT REPLACEMENT
If any of the following parts have been changed or
replaced:
²Camshaft
²Camshaft Position Sensor
²Camshaft Position Sensor Target Magnet
²Cylinder Block
²Cylinder Head
²Water Pump
²Powertrain Control Module (PCM)
²Timing Belt and Timing Belt Tensioner
The camshaft and crankshaft timing relearn proce-
dure must be performed. Refer to the component
Removal and Installation procedure outlined in this
Group.
DIAGNOSIS AND TESTING
CHECKING ENGINE OIL PRESSURE
(1) Remove oil pressure switch and install gauge
assembly C-3292 with adaptor.
(2) Run engine until thermostat opens.
CAUTION: If oil pressure is 0 at idle, Do Not per-
form the 3000 RPM test in the next step.
(3) Oil Pressure:Curb Idle25 kPa (4 psi) mini-
mum3000 RPM170-550 kPa (25-80 psi).
(4) If oil pressure is 0 at idle. Shut off engine,
check for pressure relief valve stuck open, a clogged
oil pick-up screen or a damaged oil pick-up tube
O-ring.
SERVICE PROCEDURES
CYLINDER BORE AND PISTON SIZING
The cylinder walls should be checked for out-of-
round and taper with Tool C-119 (Fig. 4). The cylin-
der bore out-of-round is 0.050 mm (.002 inch)
maximum and cylinder bore taper is 0.051 mm (0.002
inch) maximum. If the cylinder walls are badly
scuffed or scored, the cylinder block should be
rebored and honed, and new pistons and rings fitted.
Whatever type of boring equipment is used, boring
and honing operation should be closely coordinated
9 - 60 2.0L DOHC ENGINEPL
DESCRIPTION AND OPERATION (Continued)