brake rotor DODGE NEON 1999 Service Owner's Guide
[x] Cancel search | Manufacturer: DODGE, Model Year: 1999, Model line: NEON, Model: DODGE NEON 1999Pages: 1200, PDF Size: 35.29 MB
Page 141 of 1200
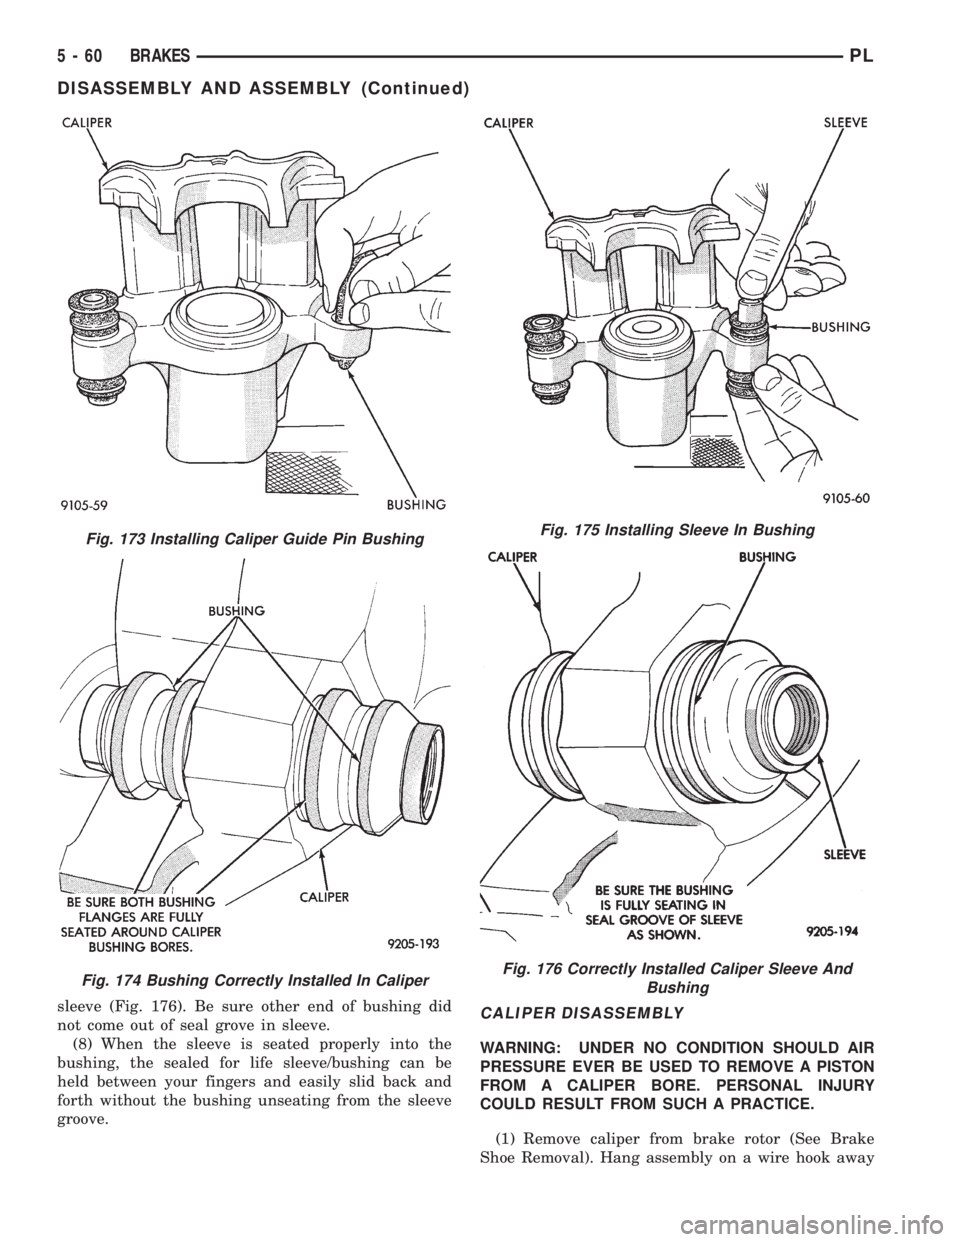
sleeve (Fig. 176). Be sure other end of bushing did
not come out of seal grove in sleeve.
(8) When the sleeve is seated properly into the
bushing, the sealed for life sleeve/bushing can be
held between your fingers and easily slid back and
forth without the bushing unseating from the sleeve
groove.CALIPER DISASSEMBLY
WARNING: UNDER NO CONDITION SHOULD AIR
PRESSURE EVER BE USED TO REMOVE A PISTON
FROM A CALIPER BORE. PERSONAL INJURY
COULD RESULT FROM SUCH A PRACTICE.
(1) Remove caliper from brake rotor (See Brake
Shoe Removal). Hang assembly on a wire hook away
Fig. 173 Installing Caliper Guide Pin Bushing
Fig. 174 Bushing Correctly Installed In Caliper
Fig. 175 Installing Sleeve In Bushing
Fig. 176 Correctly Installed Caliper Sleeve And
Bushing
5 - 60 BRAKESPL
DISASSEMBLY AND ASSEMBLY (Continued)
Page 142 of 1200
from rotor, so hydraulic fluid cannot get on rotor.
Place a small piece of wood between the piston and
caliper fingers.
(2)Carefullydepress brake pedal to hydraulically
push piston out of bore. Then apply and hold down
the brake pedal to any position beyond the first inch
of pedal travel. This will prevent loss of brake fluid
from the master cylinder.
(3) If both front caliper pistons are to be removed,
disconnect brake tube at flexible brake hose at frame
rail. Plug brake tube and remove piston from oppo-
site caliper using the same process as above for the
first piston removal.
(4) Disconnect the brake fluid flex hose from the
caliper assembly.
CAUTION: Do not use excessive force when clamp-
ing caliper in vise. Excessive vise pressure will
cause bore distortion and binding of piston.
(5) To disassemble caliper, mount in a vise
equipped with protective jaws.
(6) Remove guide pin sleeves and guide pin bush-
ings. See Removing Guide Pin Bushings in the cali-
per disassembly section of this manual.
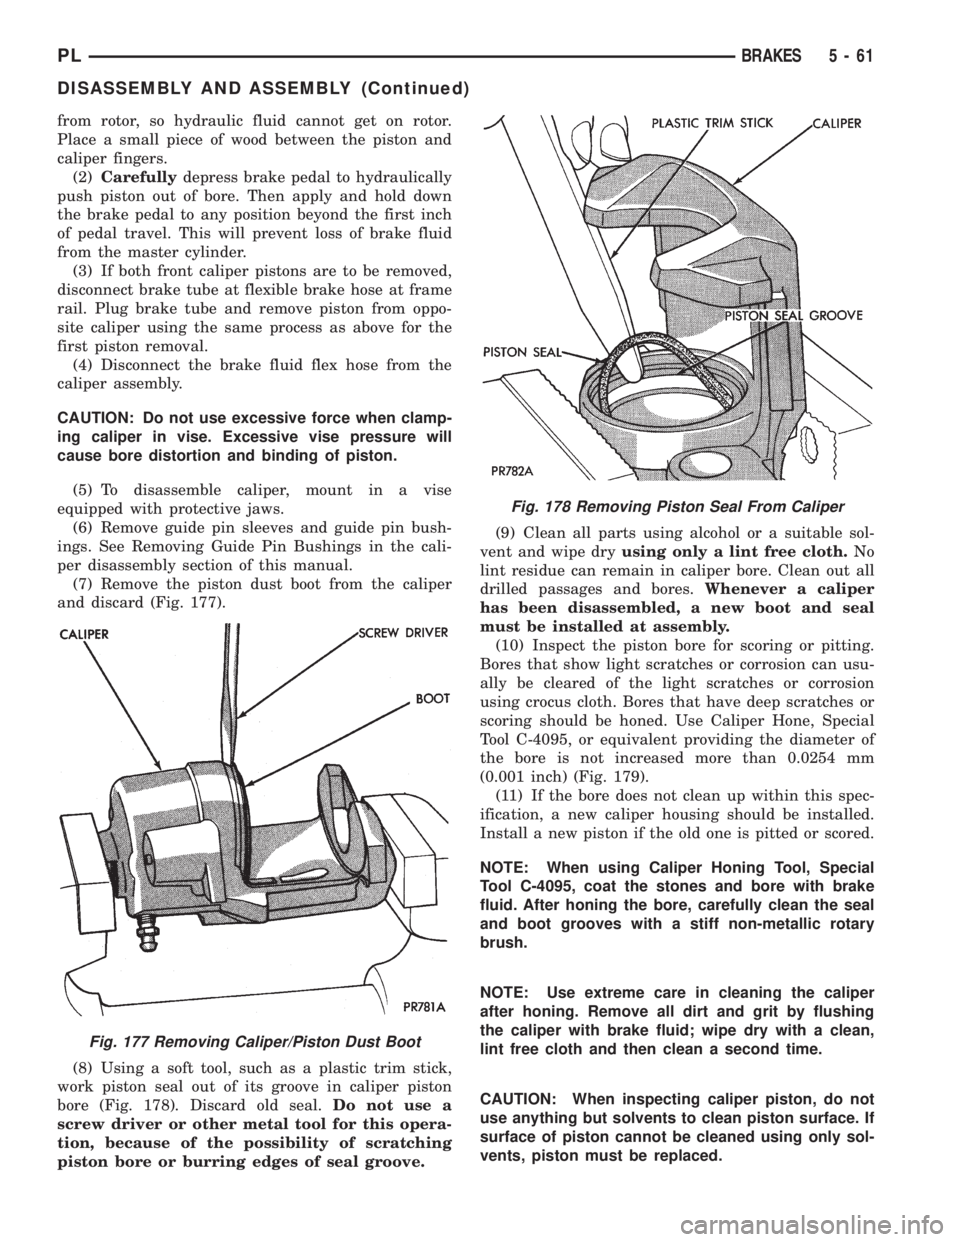
(7) Remove the piston dust boot from the caliper
and discard (Fig. 177).
(8) Using a soft tool, such as a plastic trim stick,
work piston seal out of its groove in caliper piston
bore (Fig. 178). Discard old seal.Do not use a
screw driver or other metal tool for this opera-
tion, because of the possibility of scratching
piston bore or burring edges of seal groove.(9) Clean all parts using alcohol or a suitable sol-
vent and wipe dryusing only a lint free cloth.No
lint residue can remain in caliper bore. Clean out all
drilled passages and bores.Whenever a caliper
has been disassembled, a new boot and seal
must be installed at assembly.
(10) Inspect the piston bore for scoring or pitting.
Bores that show light scratches or corrosion can usu-
ally be cleared of the light scratches or corrosion
using crocus cloth. Bores that have deep scratches or
scoring should be honed. Use Caliper Hone, Special
Tool C-4095, or equivalent providing the diameter of
the bore is not increased more than 0.0254 mm
(0.001 inch) (Fig. 179).
(11) If the bore does not clean up within this spec-
ification, a new caliper housing should be installed.
Install a new piston if the old one is pitted or scored.
NOTE: When using Caliper Honing Tool, Special
Tool C-4095, coat the stones and bore with brake
fluid. After honing the bore, carefully clean the seal
and boot grooves with a stiff non-metallic rotary
brush.
NOTE: Use extreme care in cleaning the caliper
after honing. Remove all dirt and grit by flushing
the caliper with brake fluid; wipe dry with a clean,
lint free cloth and then clean a second time.
CAUTION: When inspecting caliper piston, do not
use anything but solvents to clean piston surface. If
surface of piston cannot be cleaned using only sol-
vents, piston must be replaced.
Fig. 177 Removing Caliper/Piston Dust Boot
Fig. 178 Removing Piston Seal From Caliper
PLBRAKES 5 - 61
DISASSEMBLY AND ASSEMBLY (Continued)
Page 143 of 1200
(12) Inspect caliper piston for pitting, scratches, or
any physical damage. Replace piston if there is evi-
dence of scratches, pitting or physical damage.
CALIPER ASSEMBLY
CAUTION: Excessive vise pressure will cause bore
distortion and binding of piston.
(1) Clamp caliper in a vise (with protective caps
installed on jaws of vise).
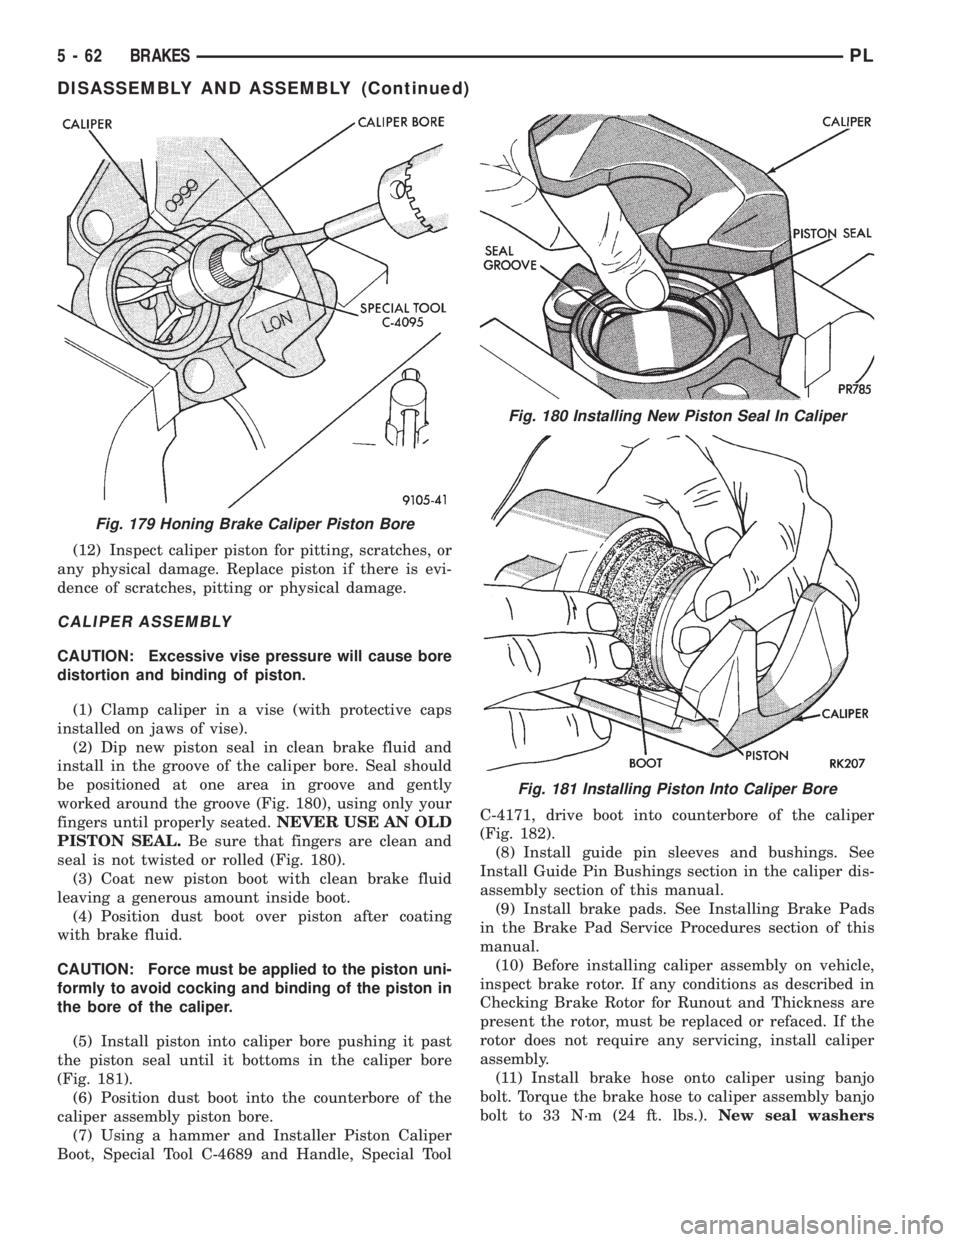
(2) Dip new piston seal in clean brake fluid and
install in the groove of the caliper bore. Seal should
be positioned at one area in groove and gently
worked around the groove (Fig. 180), using only your
fingers until properly seated.NEVER USE AN OLD
PISTON SEAL.Be sure that fingers are clean and
seal is not twisted or rolled (Fig. 180).
(3) Coat new piston boot with clean brake fluid
leaving a generous amount inside boot.
(4) Position dust boot over piston after coating
with brake fluid.
CAUTION: Force must be applied to the piston uni-
formly to avoid cocking and binding of the piston in
the bore of the caliper.
(5) Install piston into caliper bore pushing it past
the piston seal until it bottoms in the caliper bore
(Fig. 181).
(6) Position dust boot into the counterbore of the
caliper assembly piston bore.
(7) Using a hammer and Installer Piston Caliper
Boot, Special Tool C-4689 and Handle, Special ToolC-4171, drive boot into counterbore of the caliper
(Fig. 182).
(8) Install guide pin sleeves and bushings. See
Install Guide Pin Bushings section in the caliper dis-
assembly section of this manual.
(9) Install brake pads. See Installing Brake Pads
in the Brake Pad Service Procedures section of this
manual.
(10) Before installing caliper assembly on vehicle,
inspect brake rotor. If any conditions as described in
Checking Brake Rotor for Runout and Thickness are
present the rotor, must be replaced or refaced. If the
rotor does not require any servicing, install caliper
assembly.
(11) Install brake hose onto caliper using banjo
bolt. Torque the brake hose to caliper assembly banjo
bolt to 33 N´m (24 ft. lbs.).New seal washers
Fig. 179 Honing Brake Caliper Piston Bore
Fig. 180 Installing New Piston Seal In Caliper
Fig. 181 Installing Piston Into Caliper Bore
5 - 62 BRAKESPL
DISASSEMBLY AND ASSEMBLY (Continued)