window DODGE NEON 1999 Service Manual PDF
[x] Cancel search | Manufacturer: DODGE, Model Year: 1999, Model line: NEON, Model: DODGE NEON 1999Pages: 1200, PDF Size: 35.29 MB
Page 1095 of 1200
FRONT DOOR LATCH STRIKER
REMOVAL
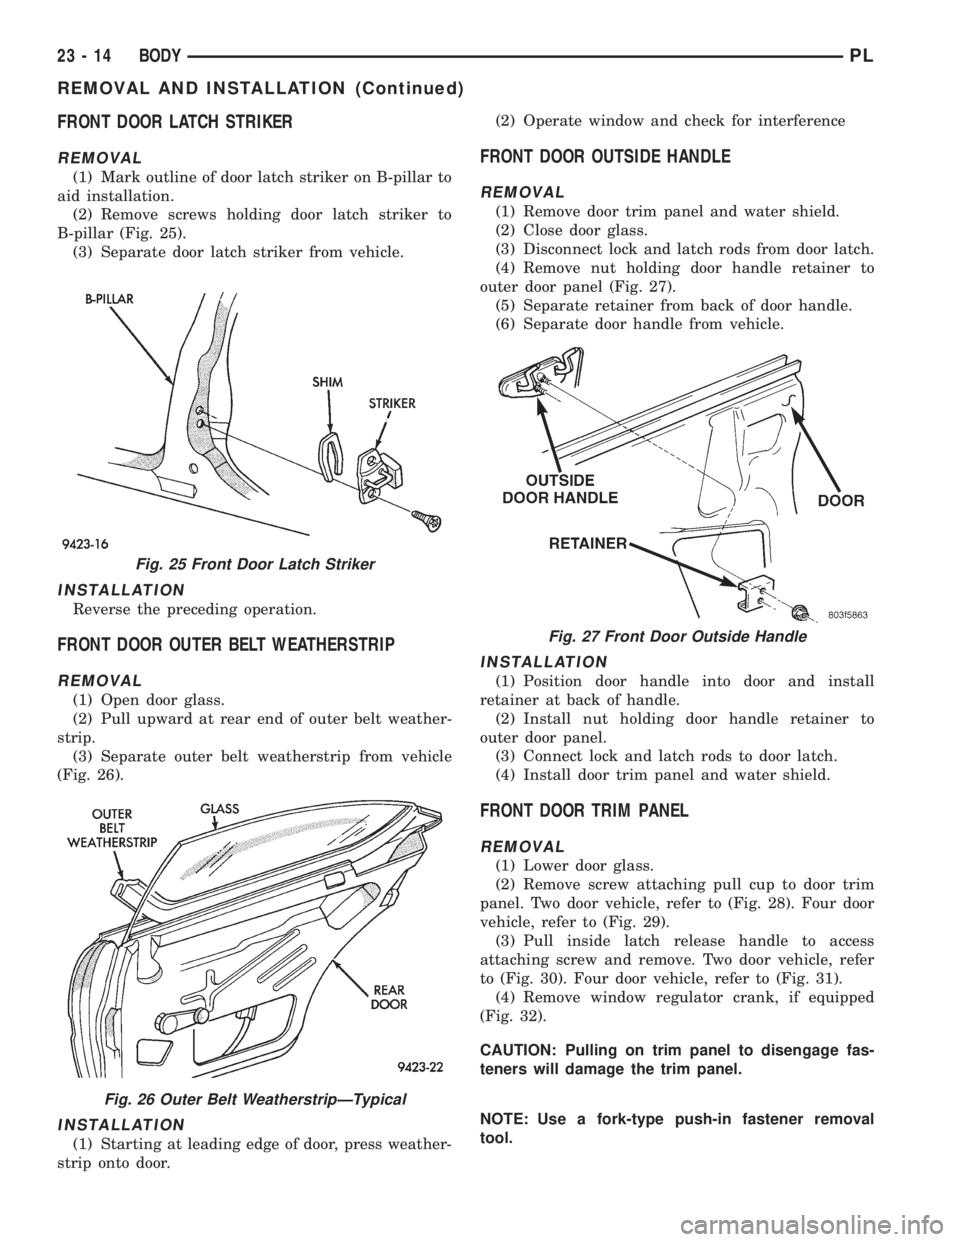
(1) Mark outline of door latch striker on B-pillar to
aid installation.
(2) Remove screws holding door latch striker to
B-pillar (Fig. 25).
(3) Separate door latch striker from vehicle.
INSTALLATION
Reverse the preceding operation.
FRONT DOOR OUTER BELT WEATHERSTRIP
REMOVAL
(1) Open door glass.
(2) Pull upward at rear end of outer belt weather-
strip.
(3) Separate outer belt weatherstrip from vehicle
(Fig. 26).
INSTALLATION
(1) Starting at leading edge of door, press weather-
strip onto door.(2) Operate window and check for interference
FRONT DOOR OUTSIDE HANDLE
REMOVAL
(1) Remove door trim panel and water shield.
(2) Close door glass.
(3) Disconnect lock and latch rods from door latch.
(4) Remove nut holding door handle retainer to
outer door panel (Fig. 27).
(5) Separate retainer from back of door handle.
(6) Separate door handle from vehicle.
INSTALLATION
(1) Position door handle into door and install
retainer at back of handle.
(2) Install nut holding door handle retainer to
outer door panel.
(3) Connect lock and latch rods to door latch.
(4) Install door trim panel and water shield.
FRONT DOOR TRIM PANEL
REMOVAL
(1) Lower door glass.
(2) Remove screw attaching pull cup to door trim
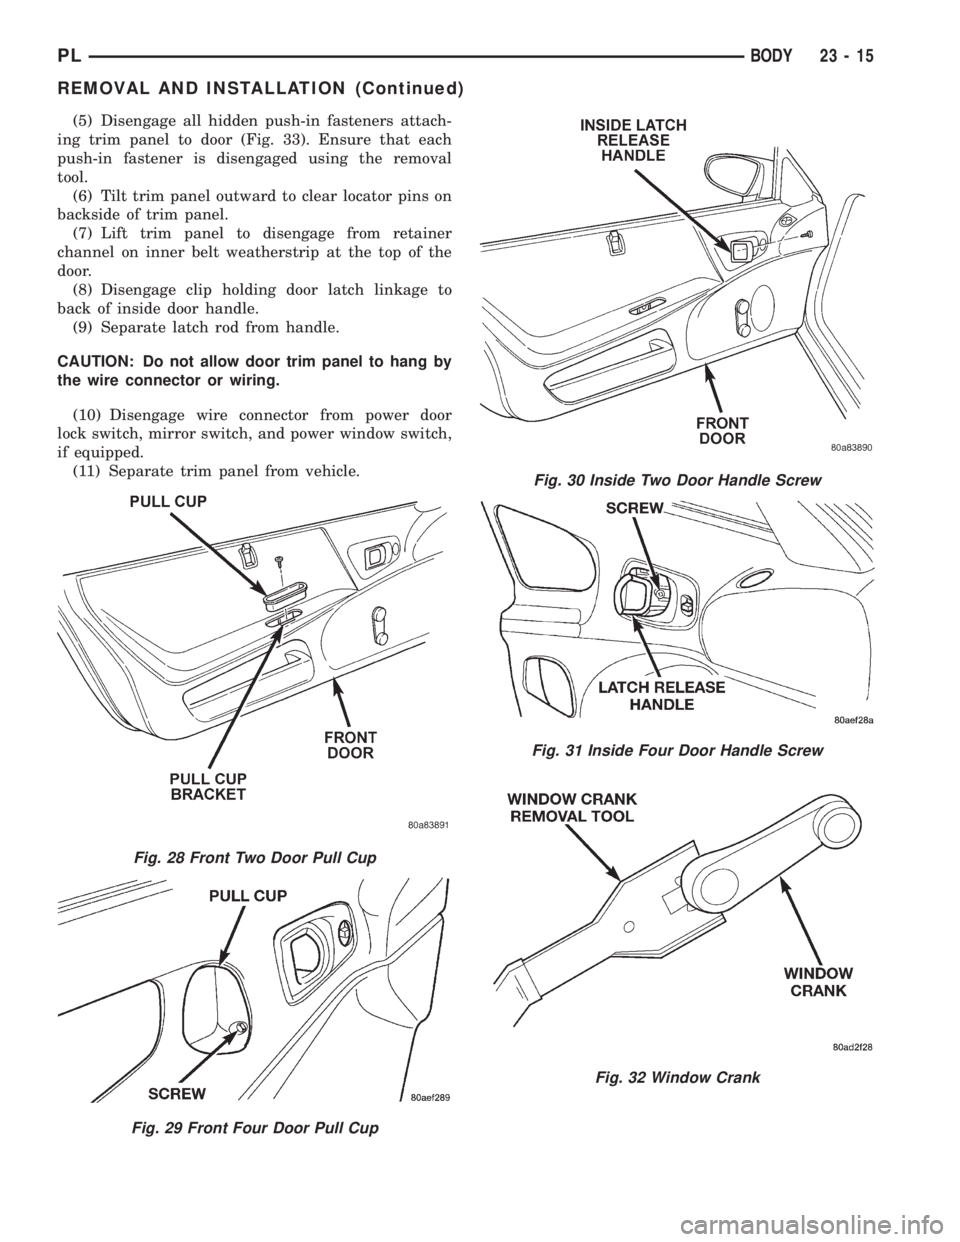
panel. Two door vehicle, refer to (Fig. 28). Four door
vehicle, refer to (Fig. 29).
(3) Pull inside latch release handle to access
attaching screw and remove. Two door vehicle, refer
to (Fig. 30). Four door vehicle, refer to (Fig. 31).
(4) Remove window regulator crank, if equipped
(Fig. 32).
CAUTION: Pulling on trim panel to disengage fas-
teners will damage the trim panel.
NOTE: Use a fork-type push-in fastener removal
tool.
Fig. 25 Front Door Latch Striker
Fig. 26 Outer Belt WeatherstripÐTypical
Fig. 27 Front Door Outside Handle
23 - 14 BODYPL
REMOVAL AND INSTALLATION (Continued)
Page 1096 of 1200
(5) Disengage all hidden push-in fasteners attach-
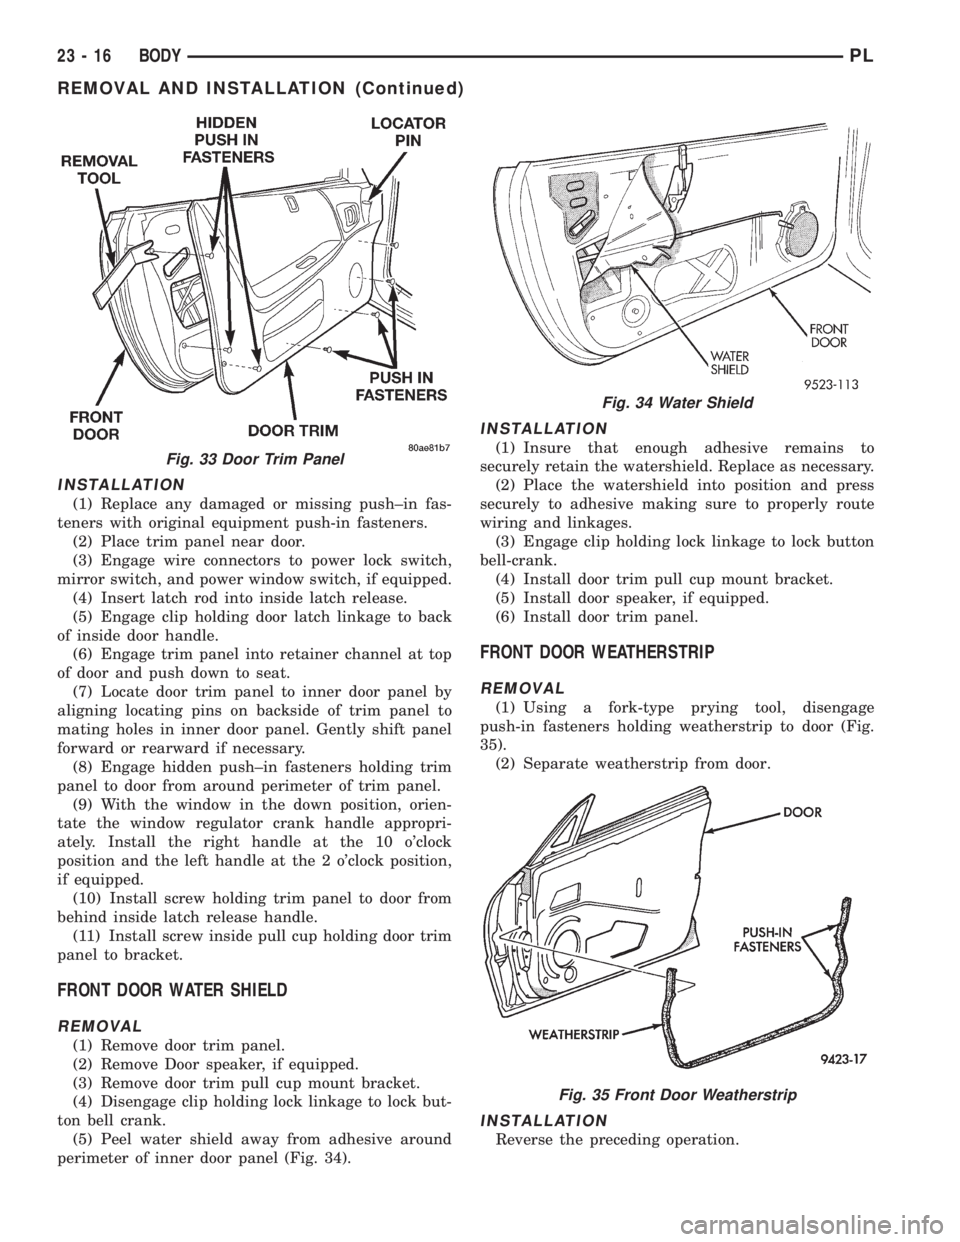
ing trim panel to door (Fig. 33). Ensure that each
push-in fastener is disengaged using the removal
tool.
(6) Tilt trim panel outward to clear locator pins on
backside of trim panel.
(7) Lift trim panel to disengage from retainer
channel on inner belt weatherstrip at the top of the
door.
(8) Disengage clip holding door latch linkage to
back of inside door handle.
(9) Separate latch rod from handle.
CAUTION: Do not allow door trim panel to hang by
the wire connector or wiring.
(10) Disengage wire connector from power door
lock switch, mirror switch, and power window switch,
if equipped.
(11) Separate trim panel from vehicle.
Fig. 28 Front Two Door Pull Cup
Fig. 29 Front Four Door Pull Cup
Fig. 30 Inside Two Door Handle Screw
Fig. 31 Inside Four Door Handle Screw
Fig. 32 Window Crank
PLBODY 23 - 15
REMOVAL AND INSTALLATION (Continued)
Page 1097 of 1200
INSTALLATION
(1) Replace any damaged or missing push±in fas-
teners with original equipment push-in fasteners.
(2) Place trim panel near door.
(3) Engage wire connectors to power lock switch,
mirror switch, and power window switch, if equipped.
(4) Insert latch rod into inside latch release.
(5) Engage clip holding door latch linkage to back
of inside door handle.
(6) Engage trim panel into retainer channel at top
of door and push down to seat.
(7) Locate door trim panel to inner door panel by
aligning locating pins on backside of trim panel to
mating holes in inner door panel. Gently shift panel
forward or rearward if necessary.
(8) Engage hidden push±in fasteners holding trim
panel to door from around perimeter of trim panel.
(9) With the window in the down position, orien-
tate the window regulator crank handle appropri-
ately. Install the right handle at the 10 o'clock
position and the left handle at the 2 o'clock position,
if equipped.
(10) Install screw holding trim panel to door from
behind inside latch release handle.
(11) Install screw inside pull cup holding door trim
panel to bracket.
FRONT DOOR WATER SHIELD
REMOVAL
(1) Remove door trim panel.
(2) Remove Door speaker, if equipped.
(3) Remove door trim pull cup mount bracket.
(4) Disengage clip holding lock linkage to lock but-
ton bell crank.
(5) Peel water shield away from adhesive around
perimeter of inner door panel (Fig. 34).
INSTALLATION
(1) Insure that enough adhesive remains to
securely retain the watershield. Replace as necessary.
(2) Place the watershield into position and press
securely to adhesive making sure to properly route
wiring and linkages.
(3) Engage clip holding lock linkage to lock button
bell-crank.
(4) Install door trim pull cup mount bracket.
(5) Install door speaker, if equipped.
(6) Install door trim panel.
FRONT DOOR WEATHERSTRIP
REMOVAL
(1) Using a fork-type prying tool, disengage
push-in fasteners holding weatherstrip to door (Fig.
35).
(2) Separate weatherstrip from door.
INSTALLATION
Reverse the preceding operation.
Fig. 33 Door Trim Panel
Fig. 34 Water Shield
Fig. 35 Front Door Weatherstrip
23 - 16 BODYPL
REMOVAL AND INSTALLATION (Continued)
Page 1104 of 1200
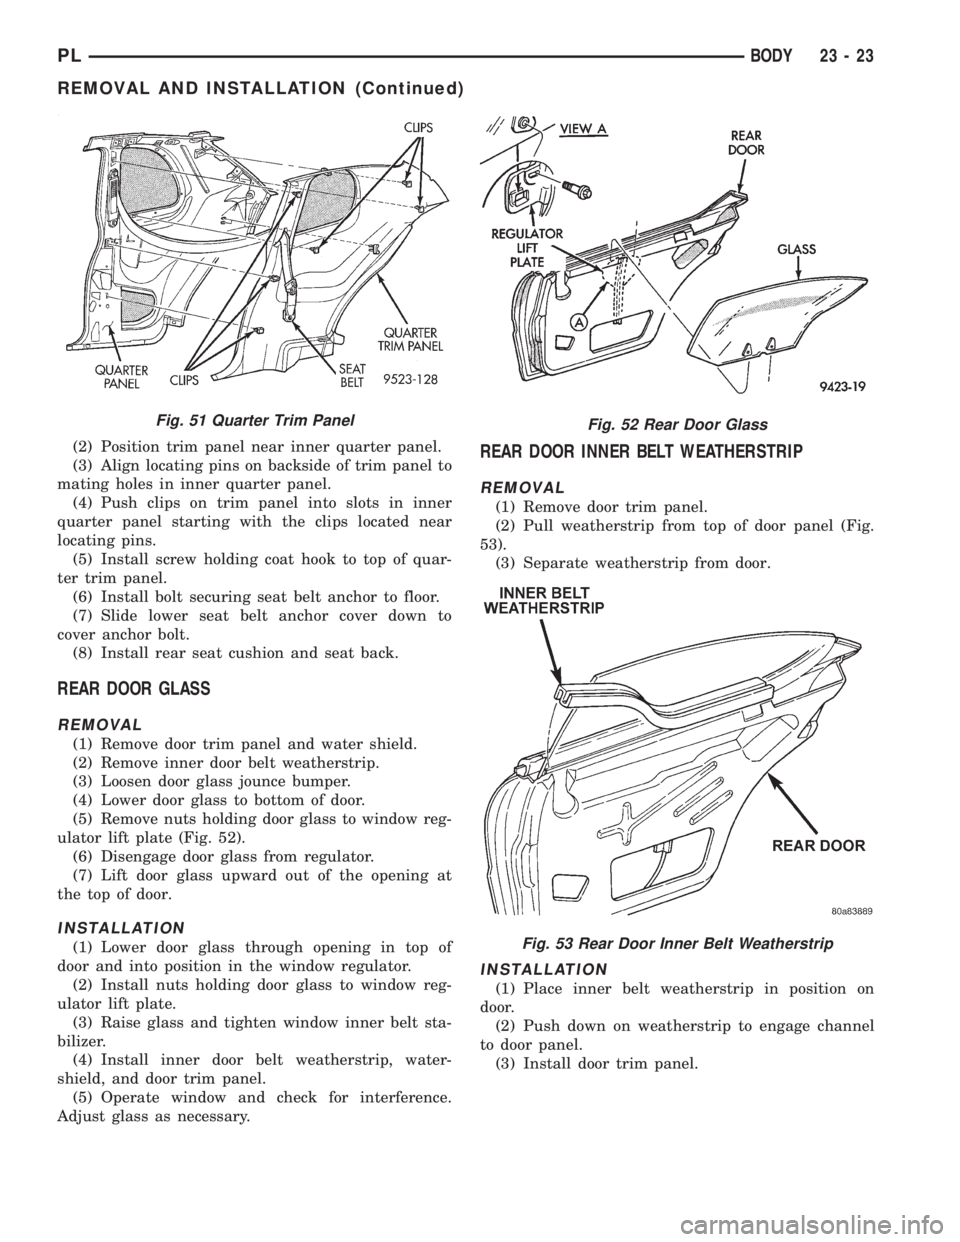
(2) Position trim panel near inner quarter panel.
(3) Align locating pins on backside of trim panel to
mating holes in inner quarter panel.
(4) Push clips on trim panel into slots in inner
quarter panel starting with the clips located near
locating pins.
(5) Install screw holding coat hook to top of quar-
ter trim panel.
(6) Install bolt securing seat belt anchor to floor.
(7) Slide lower seat belt anchor cover down to
cover anchor bolt.
(8) Install rear seat cushion and seat back.
REAR DOOR GLASS
REMOVAL
(1) Remove door trim panel and water shield.
(2) Remove inner door belt weatherstrip.
(3) Loosen door glass jounce bumper.
(4) Lower door glass to bottom of door.
(5) Remove nuts holding door glass to window reg-
ulator lift plate (Fig. 52).
(6) Disengage door glass from regulator.
(7) Lift door glass upward out of the opening at
the top of door.
INSTALLATION
(1) Lower door glass through opening in top of
door and into position in the window regulator.
(2) Install nuts holding door glass to window reg-
ulator lift plate.
(3) Raise glass and tighten window inner belt sta-
bilizer.
(4) Install inner door belt weatherstrip, water-
shield, and door trim panel.
(5) Operate window and check for interference.
Adjust glass as necessary.
REAR DOOR INNER BELT WEATHERSTRIP
REMOVAL
(1) Remove door trim panel.
(2) Pull weatherstrip from top of door panel (Fig.
53).
(3) Separate weatherstrip from door.
INSTALLATION
(1) Place inner belt weatherstrip in position on
door.
(2) Push down on weatherstrip to engage channel
to door panel.
(3) Install door trim panel.
Fig. 51 Quarter Trim PanelFig. 52 Rear Door Glass
Fig. 53 Rear Door Inner Belt Weatherstrip
PLBODY 23 - 23
REMOVAL AND INSTALLATION (Continued)
Page 1106 of 1200
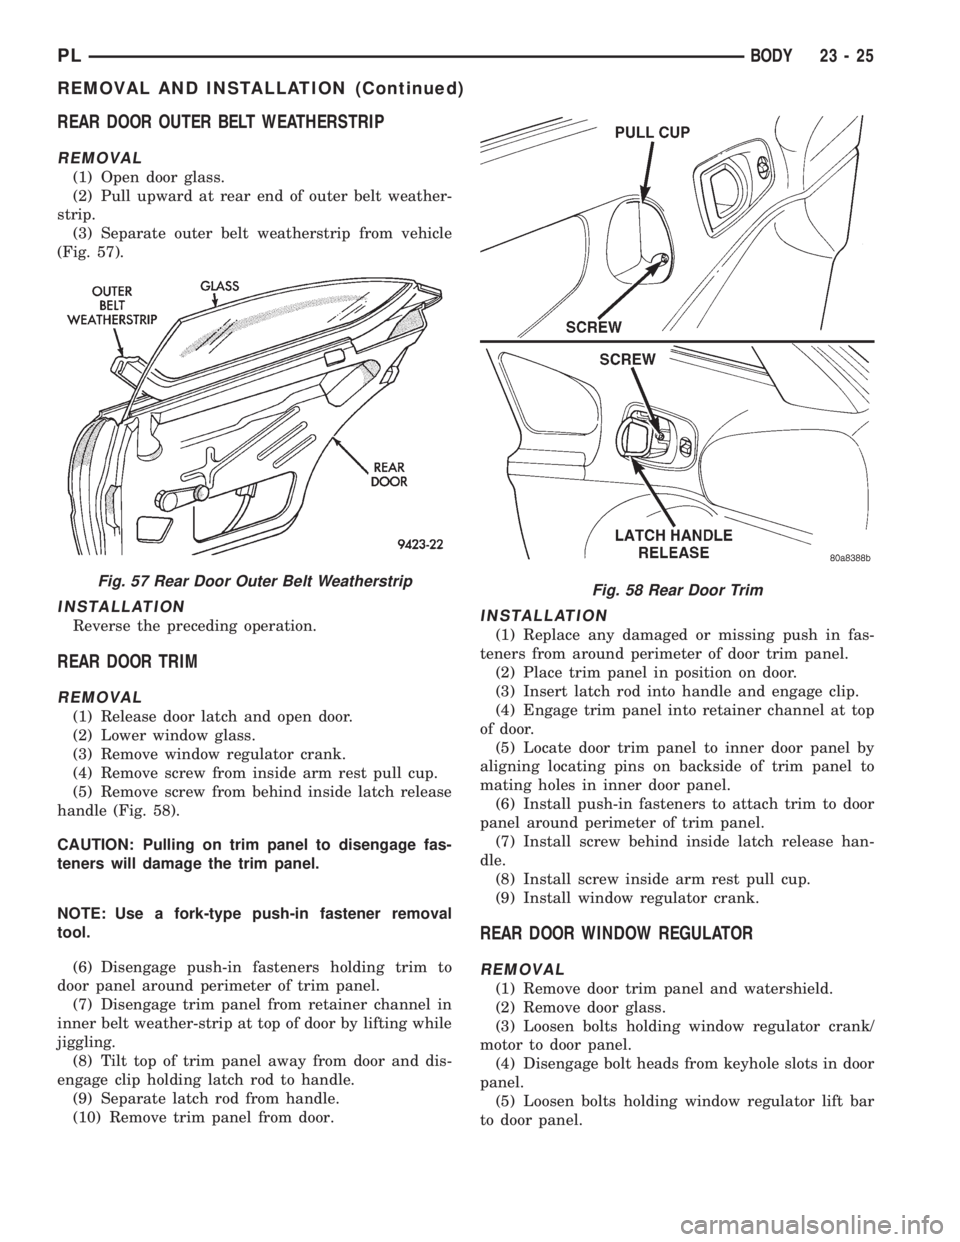
REAR DOOR OUTER BELT WEATHERSTRIP
REMOVAL
(1) Open door glass.
(2) Pull upward at rear end of outer belt weather-
strip.
(3) Separate outer belt weatherstrip from vehicle
(Fig. 57).
INSTALLATION
Reverse the preceding operation.
REAR DOOR TRIM
REMOVAL
(1) Release door latch and open door.
(2) Lower window glass.
(3) Remove window regulator crank.
(4) Remove screw from inside arm rest pull cup.
(5) Remove screw from behind inside latch release
handle (Fig. 58).
CAUTION: Pulling on trim panel to disengage fas-
teners will damage the trim panel.
NOTE: Use a fork-type push-in fastener removal
tool.
(6) Disengage push-in fasteners holding trim to
door panel around perimeter of trim panel.
(7) Disengage trim panel from retainer channel in
inner belt weather-strip at top of door by lifting while
jiggling.
(8) Tilt top of trim panel away from door and dis-
engage clip holding latch rod to handle.
(9) Separate latch rod from handle.
(10) Remove trim panel from door.
INSTALLATION
(1) Replace any damaged or missing push in fas-
teners from around perimeter of door trim panel.
(2) Place trim panel in position on door.
(3) Insert latch rod into handle and engage clip.
(4) Engage trim panel into retainer channel at top
of door.
(5) Locate door trim panel to inner door panel by
aligning locating pins on backside of trim panel to
mating holes in inner door panel.
(6) Install push-in fasteners to attach trim to door
panel around perimeter of trim panel.
(7) Install screw behind inside latch release han-
dle.
(8) Install screw inside arm rest pull cup.
(9) Install window regulator crank.
REAR DOOR WINDOW REGULATOR
REMOVAL
(1) Remove door trim panel and watershield.
(2) Remove door glass.
(3) Loosen bolts holding window regulator crank/
motor to door panel.
(4) Disengage bolt heads from keyhole slots in door
panel.
(5) Loosen bolts holding window regulator lift bar
to door panel.
Fig. 57 Rear Door Outer Belt WeatherstripFig. 58 Rear Door Trim
PLBODY 23 - 25
REMOVAL AND INSTALLATION (Continued)
Page 1107 of 1200
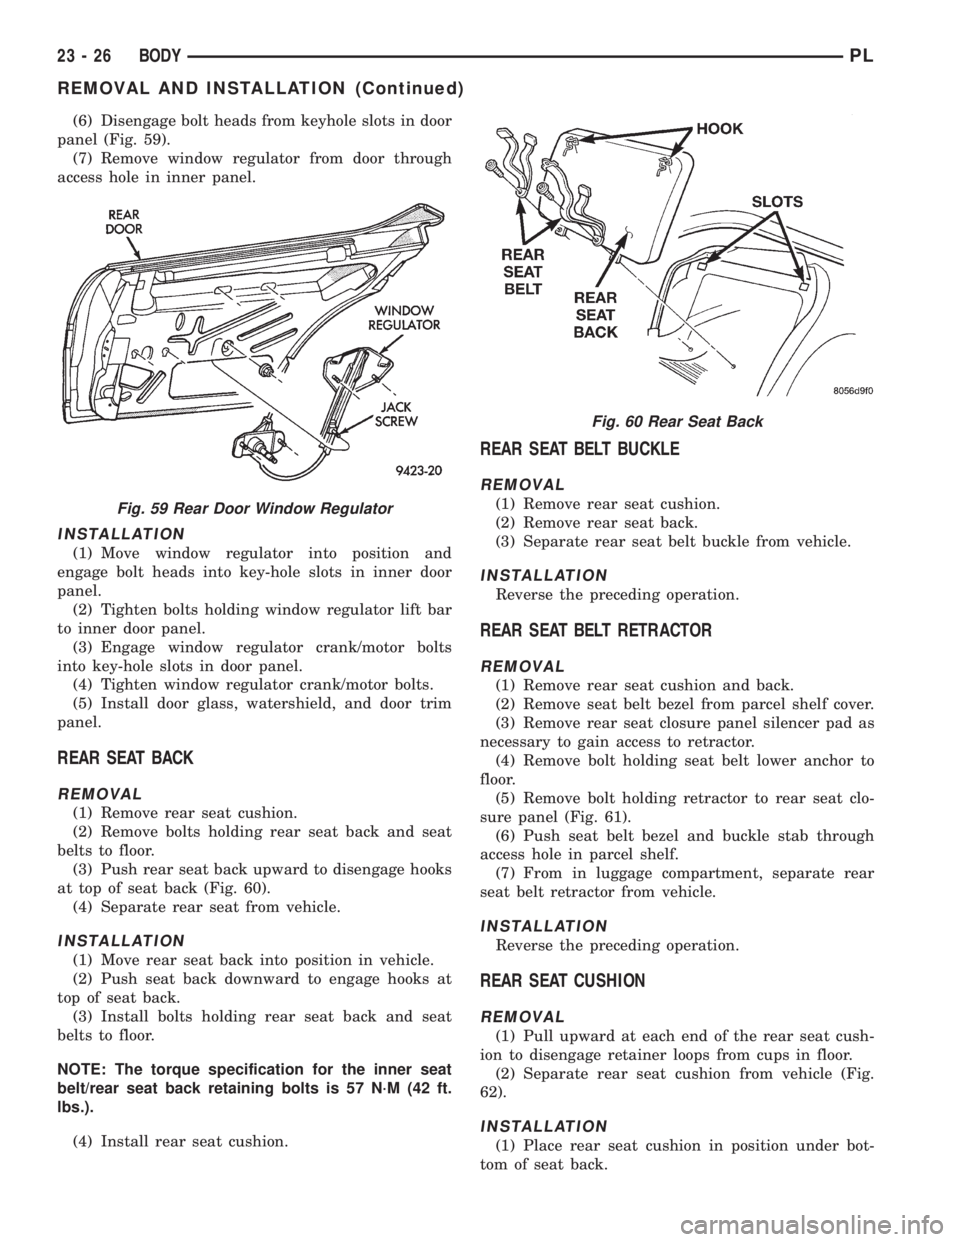
(6) Disengage bolt heads from keyhole slots in door
panel (Fig. 59).
(7) Remove window regulator from door through
access hole in inner panel.
INSTALLATION
(1) Move window regulator into position and
engage bolt heads into key-hole slots in inner door
panel.
(2) Tighten bolts holding window regulator lift bar
to inner door panel.
(3) Engage window regulator crank/motor bolts
into key-hole slots in door panel.
(4) Tighten window regulator crank/motor bolts.
(5) Install door glass, watershield, and door trim
panel.
REAR SEAT BACK
REMOVAL
(1) Remove rear seat cushion.
(2) Remove bolts holding rear seat back and seat
belts to floor.
(3) Push rear seat back upward to disengage hooks
at top of seat back (Fig. 60).
(4) Separate rear seat from vehicle.
INSTALLATION
(1) Move rear seat back into position in vehicle.
(2) Push seat back downward to engage hooks at
top of seat back.
(3) Install bolts holding rear seat back and seat
belts to floor.
NOTE: The torque specification for the inner seat
belt/rear seat back retaining bolts is 57 N´M (42 ft.
lbs.).
(4) Install rear seat cushion.
REAR SEAT BELT BUCKLE
REMOVAL
(1) Remove rear seat cushion.
(2) Remove rear seat back.
(3) Separate rear seat belt buckle from vehicle.
INSTALLATION
Reverse the preceding operation.
REAR SEAT BELT RETRACTOR
REMOVAL
(1) Remove rear seat cushion and back.
(2) Remove seat belt bezel from parcel shelf cover.
(3) Remove rear seat closure panel silencer pad as
necessary to gain access to retractor.
(4) Remove bolt holding seat belt lower anchor to
floor.
(5) Remove bolt holding retractor to rear seat clo-
sure panel (Fig. 61).
(6) Push seat belt bezel and buckle stab through
access hole in parcel shelf.
(7) From in luggage compartment, separate rear
seat belt retractor from vehicle.
INSTALLATION
Reverse the preceding operation.
REAR SEAT CUSHION
REMOVAL
(1) Pull upward at each end of the rear seat cush-
ion to disengage retainer loops from cups in floor.
(2) Separate rear seat cushion from vehicle (Fig.
62).
INSTALLATION
(1) Place rear seat cushion in position under bot-
tom of seat back.
Fig. 59 Rear Door Window Regulator
Fig. 60 Rear Seat Back
23 - 26 BODYPL
REMOVAL AND INSTALLATION (Continued)
Page 1109 of 1200
ROOF APERTURE (RAP) MOLDING
The RAP molding is set in urethane adhesive. The
RAP molding is difficult to salvage during removal.
Verify part availability before proceeding with
removal procedure. The temperature in the work
area and the vehicle should be at least 21ÉC (70ÉF) to
avoid damaging the rear window and windshield
moldings. Apply masking tape to surrounding area of
the RAP molding to protect the finish.
REMOVAL
(1) Using a trim stick, gently lift rear window
molding upward to gain access to end of RAP mold-
ing.
(2) Using a sharp hook tool, pierce the rear end of
the molding.
(3) Lift the rear of the RAP molding upward until
it clears the rear window molding.
(4) Using a common plier, pull the RAP molding
forward to separate molding from urethane bonding.
(5) Separate RAP molding from vehicle.
INSTALLATION
(1) Using a sharpened trim stick, scrape urethane
bonding material from the roof seam trough.
(2) Using touch-up paint, repair scratches in roof
seam trough to prevent corrosion.
(3) Inspect the bottom of the roof seam trough for
gaps in caulking. Repair gaps with suitable seam
sealer following manufacturers instructions.
(4) Apply black-out primer to bottom of roof seam
trough. Allow at lease three minutes before bonding
is applied.
(5) Install RAP molding into the roof seam trough
and position molding so both ends are covered by the
glass moldings. If the molding will not lay flat on the
bottom of the trough, trim the ends of the molding
until proper fit achieved.
(6) Using a suitable marking pencil, mark an
index line across the RAP molding and the adjacent
surfaces.
(7) Remove the RAP molding from the roof seam
trough.
(8) Applya5mm(0.2 in.) bead of urethane adhe-
sive on the bottom/center of the trough along the
entire length.
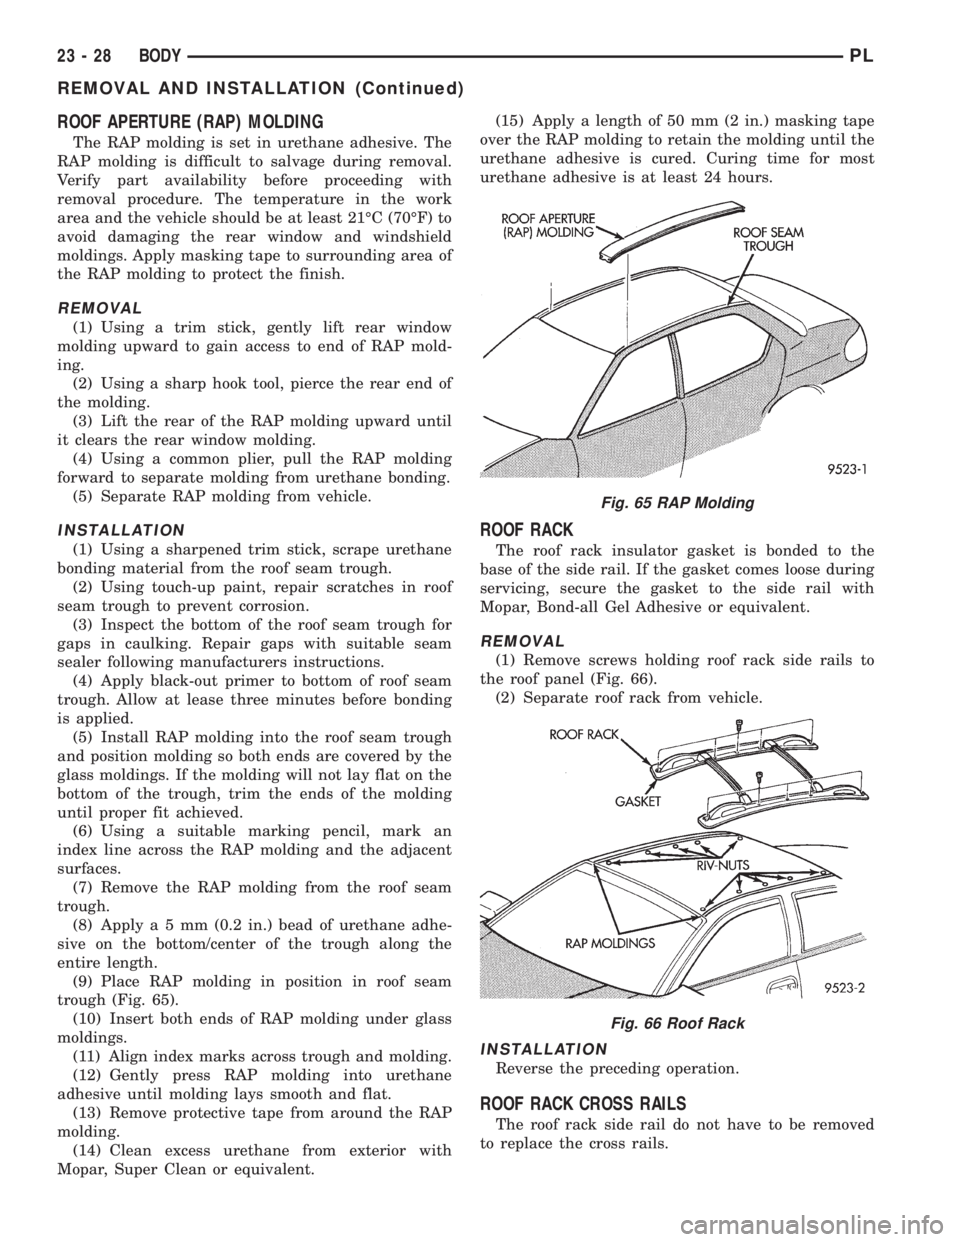
(9) Place RAP molding in position in roof seam
trough (Fig. 65).
(10) Insert both ends of RAP molding under glass
moldings.
(11) Align index marks across trough and molding.
(12) Gently press RAP molding into urethane
adhesive until molding lays smooth and flat.
(13) Remove protective tape from around the RAP
molding.
(14) Clean excess urethane from exterior with
Mopar, Super Clean or equivalent.(15) Apply a length of 50 mm (2 in.) masking tape
over the RAP molding to retain the molding until the
urethane adhesive is cured. Curing time for most
urethane adhesive is at least 24 hours.
ROOF RACK
The roof rack insulator gasket is bonded to the
base of the side rail. If the gasket comes loose during
servicing, secure the gasket to the side rail with
Mopar, Bond-all Gel Adhesive or equivalent.
REMOVAL
(1) Remove screws holding roof rack side rails to
the roof panel (Fig. 66).
(2) Separate roof rack from vehicle.
INSTALLATION
Reverse the preceding operation.
ROOF RACK CROSS RAILS
The roof rack side rail do not have to be removed
to replace the cross rails.
Fig. 65 RAP Molding
Fig. 66 Roof Rack
23 - 28 BODYPL
REMOVAL AND INSTALLATION (Continued)
Page 1111 of 1200
INSTALLATION
(1) Place weather-strip in position on B-pillar
retainer channels.
(2) Insert weather-strip into channels.
(3) Using a suitable awl, zip retaining lip on back
of weather-strip into B-pillar and roof rail channels.
(4) Install push-in fasteners to hold weather-strip
to B-pillar, hinge pillar and quarter panel.
SIDE COWL TRIM
REMOVAL
(1) Disengage clips holding cowl trim to cowl side
panel.
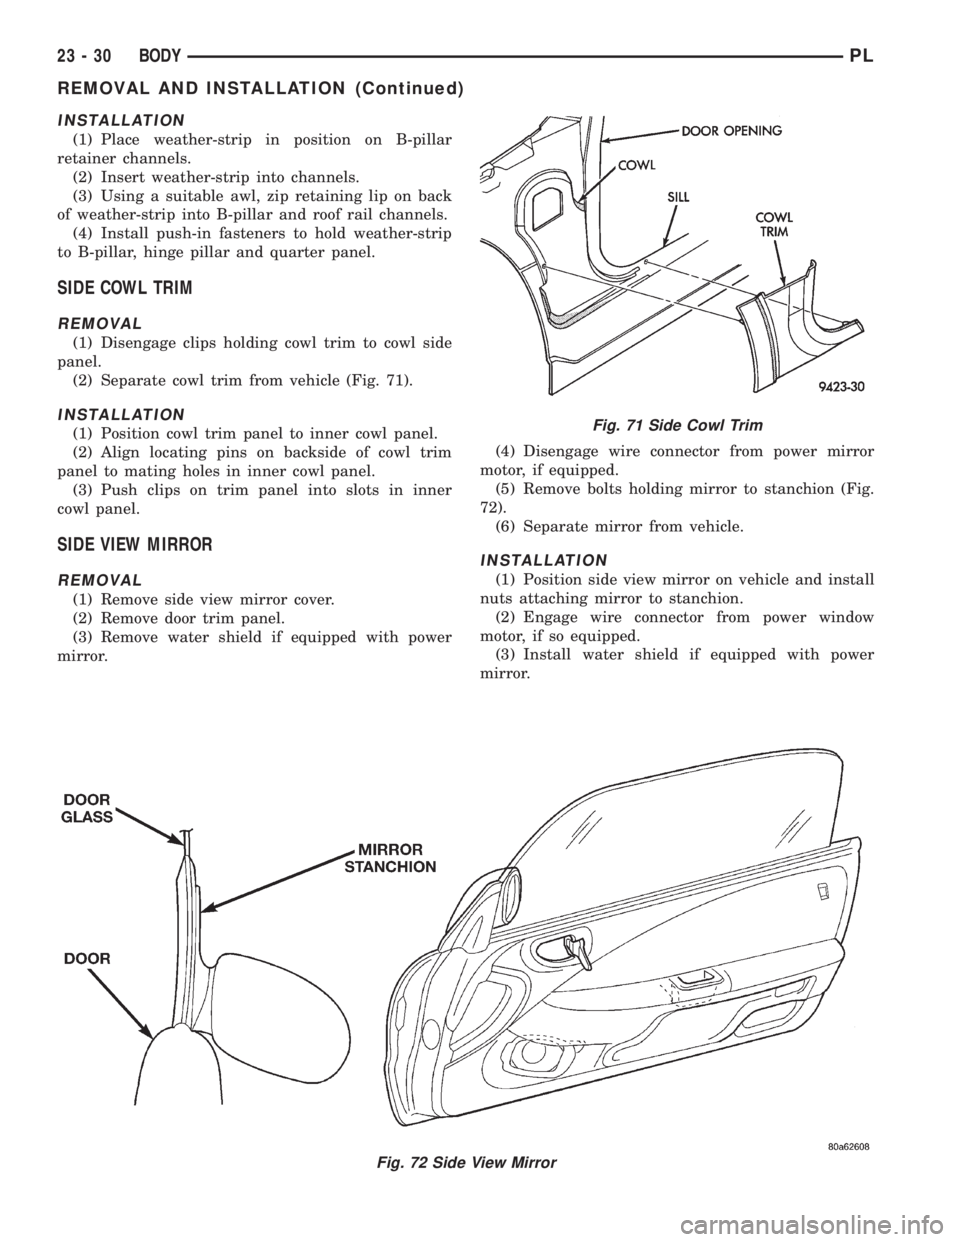
(2) Separate cowl trim from vehicle (Fig. 71).
INSTALLATION
(1) Position cowl trim panel to inner cowl panel.
(2) Align locating pins on backside of cowl trim
panel to mating holes in inner cowl panel.
(3) Push clips on trim panel into slots in inner
cowl panel.
SIDE VIEW MIRROR
REMOVAL
(1) Remove side view mirror cover.
(2) Remove door trim panel.
(3) Remove water shield if equipped with power
mirror.(4) Disengage wire connector from power mirror
motor, if equipped.
(5) Remove bolts holding mirror to stanchion (Fig.
72).
(6) Separate mirror from vehicle.
INSTALLATION
(1) Position side view mirror on vehicle and install
nuts attaching mirror to stanchion.
(2) Engage wire connector from power window
motor, if so equipped.
(3) Install water shield if equipped with power
mirror.
Fig. 72 Side View Mirror
Fig. 71 Side Cowl Trim
23 - 30 BODYPL
REMOVAL AND INSTALLATION (Continued)
Page 1115 of 1200
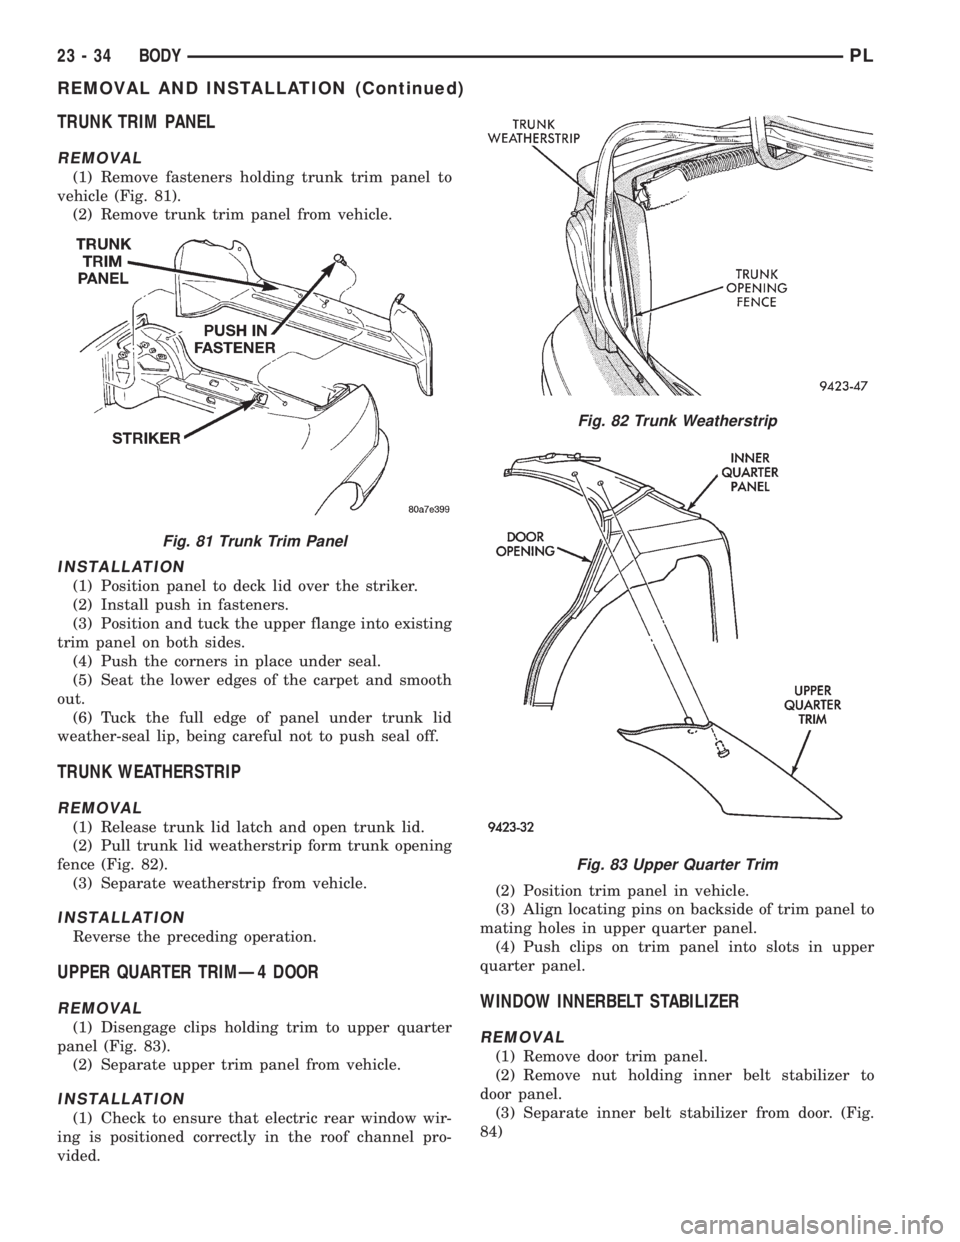
TRUNK TRIM PANEL
REMOVAL
(1) Remove fasteners holding trunk trim panel to
vehicle (Fig. 81).
(2) Remove trunk trim panel from vehicle.
INSTALLATION
(1) Position panel to deck lid over the striker.
(2) Install push in fasteners.
(3) Position and tuck the upper flange into existing
trim panel on both sides.
(4) Push the corners in place under seal.
(5) Seat the lower edges of the carpet and smooth
out.
(6) Tuck the full edge of panel under trunk lid
weather-seal lip, being careful not to push seal off.
TRUNK WEATHERSTRIP
REMOVAL
(1) Release trunk lid latch and open trunk lid.
(2) Pull trunk lid weatherstrip form trunk opening
fence (Fig. 82).
(3) Separate weatherstrip from vehicle.
INSTALLATION
Reverse the preceding operation.
UPPER QUARTER TRIMÐ4 DOOR
REMOVAL
(1) Disengage clips holding trim to upper quarter
panel (Fig. 83).
(2) Separate upper trim panel from vehicle.
INSTALLATION
(1) Check to ensure that electric rear window wir-
ing is positioned correctly in the roof channel pro-
vided.(2) Position trim panel in vehicle.
(3) Align locating pins on backside of trim panel to
mating holes in upper quarter panel.
(4) Push clips on trim panel into slots in upper
quarter panel.
WINDOW INNERBELT STABILIZER
REMOVAL
(1) Remove door trim panel.
(2) Remove nut holding inner belt stabilizer to
door panel.
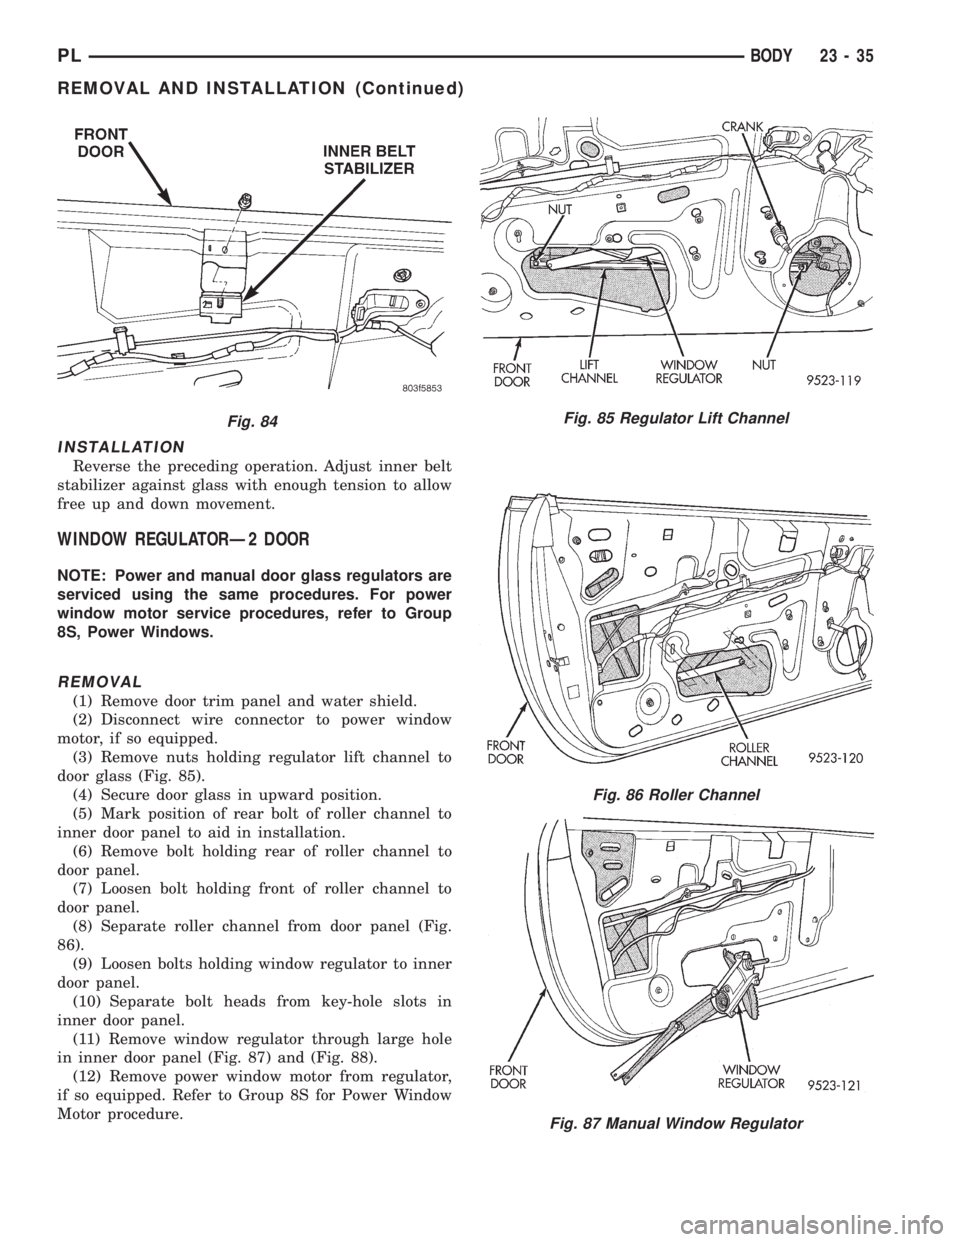
(3) Separate inner belt stabilizer from door. (Fig.
84)
Fig. 81 Trunk Trim Panel
Fig. 82 Trunk Weatherstrip
Fig. 83 Upper Quarter Trim
23 - 34 BODYPL
REMOVAL AND INSTALLATION (Continued)
Page 1116 of 1200
INSTALLATION
Reverse the preceding operation. Adjust inner belt
stabilizer against glass with enough tension to allow
free up and down movement.
WINDOW REGULATORÐ2 DOOR
NOTE: Power and manual door glass regulators are
serviced using the same procedures. For power
window motor service procedures, refer to Group
8S, Power Windows.
REMOVAL
(1) Remove door trim panel and water shield.
(2) Disconnect wire connector to power window
motor, if so equipped.
(3) Remove nuts holding regulator lift channel to
door glass (Fig. 85).
(4) Secure door glass in upward position.
(5) Mark position of rear bolt of roller channel to
inner door panel to aid in installation.
(6) Remove bolt holding rear of roller channel to
door panel.
(7) Loosen bolt holding front of roller channel to
door panel.
(8) Separate roller channel from door panel (Fig.
86).
(9) Loosen bolts holding window regulator to inner
door panel.
(10) Separate bolt heads from key-hole slots in
inner door panel.
(11) Remove window regulator through large hole
in inner door panel (Fig. 87) and (Fig. 88).
(12) Remove power window motor from regulator,
if so equipped. Refer to Group 8S for Power Window
Motor procedure.
Fig. 84Fig. 85 Regulator Lift Channel
Fig. 86 Roller Channel
Fig. 87 Manual Window Regulator
PLBODY 23 - 35
REMOVAL AND INSTALLATION (Continued)