wheel DODGE NEON 1999 Service Repair Manual
[x] Cancel search | Manufacturer: DODGE, Model Year: 1999, Model line: NEON, Model: DODGE NEON 1999Pages: 1200, PDF Size: 35.29 MB
Page 3 of 1200
ENGINE OIL
SAE VISCOSITY RATING INDICATES ENGINE OIL VISCOSITY
An SAE viscosity grade is used to specify the vis-
cosity of engine oil. SAE 30 specifies a single viscos-
ity engine oil. Engine oils also have multiple
viscosities. These are specified with a dual SAE vis-
cosity grade which indicates the cold-to-hot tempera-
ture viscosity range.
²SAE 30 = single grade engine oil.
²SAE 10W-30 = multiple grade engine oil.
API QUALITY CLASSIFICATION
The API Service Grade specifies the type of perfor-
mance the engine oil is intended to provide. The API
Service Grade specifications also apply to energy con-
serving engine oils.
Use engine oils that are API Service Certified.
5W-30 and 10W-30 MOPAR engine oils conform to
specifications.
Refer to Group 9, Engine for engine oil specifica-
tion.
GEAR LUBRICANTS
SAE ratings also apply to multiple grade gear
lubricants. In addition, API classification defines the
lubricants usage.
LUBRICANTS AND GREASES
Lubricating grease is rated for quality and usage
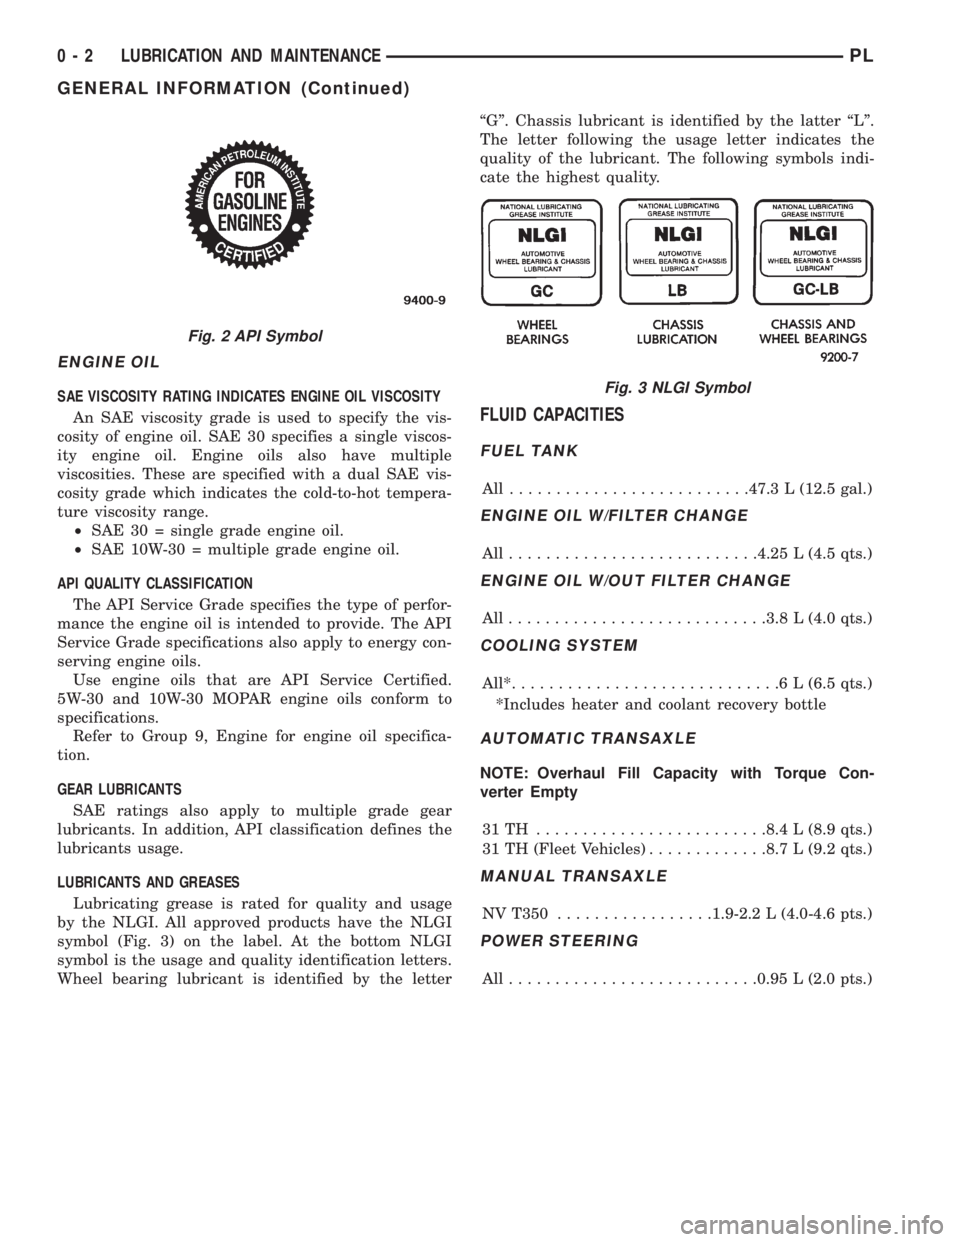
by the NLGI. All approved products have the NLGI
symbol (Fig. 3) on the label. At the bottom NLGI
symbol is the usage and quality identification letters.
Wheel bearing lubricant is identified by the letterªGº. Chassis lubricant is identified by the latter ªLº.
The letter following the usage letter indicates the
quality of the lubricant. The following symbols indi-
cate the highest quality.
FLUID CAPACITIES
FUEL TANK
All ..........................47.3 L (12.5 gal.)
ENGINE OIL W/FILTER CHANGE
All...........................4.25 L (4.5 qts.)
ENGINE OIL W/OUT FILTER CHANGE
All............................3.8 L (4.0 qts.)
COOLING SYSTEM
All*.............................6L(6.5 qts.)
*Includes heater and coolant recovery bottle
AUTOMATIC TRANSAXLE
NOTE: Overhaul Fill Capacity with Torque Con-
verter Empty
31TH .........................8.4 L (8.9 qts.)
31 TH (Fleet Vehicles).............8.7 L (9.2 qts.)
MANUAL TRANSAXLE
NV T350.................1.9-2.2 L (4.0-4.6 pts.)
POWER STEERING
All...........................0.95 L (2.0 pts.)
Fig. 2 API Symbol
Fig. 3 NLGI Symbol
0 - 2 LUBRICATION AND MAINTENANCEPL
GENERAL INFORMATION (Continued)
Page 9 of 1200
DISCONNECT CABLE CLAMPS AS FOLLOWS:
²Disconnect BLACK cable clamp from engine
ground on disabled vehicle.
²When using a Booster vehicle, disconnect
BLACK cable clamp from battery negative terminal.
Disconnect RED cable clamp from battery positive
terminal.
²Disconnect RED cable clamp from battery posi-
tive terminal on disabled vehicle.
TOWING RECOMMENDATIONS
WARNING: DO NOT ALLOW TOWING ATTACH-
MENT DEVICES TO CONTACT THE FUEL TANK OR
LINES, FUEL LEAK CAN RESULT. DO NOT LIFT OR
TOW VEHICLE BY FRONT OR REAR BUMPER, OR
BUMPER ENERGY ABSORBER UNITS. DO NOT
VENTURE UNDER A LIFTED VEHICLE IF NOT SUP-
PORTED PROPERLY ON SAFETY STANDS. DO NOT
ALLOW PASSENGERS TO RIDE IN A TOWED VEHI-
CLE. USE A SAFETY CHAIN THAT IS INDEPENDENT
FROM THE TOWING ATTACHMENT DEVICE.
CAUTION: Do not damage brake lines, exhaust
system, shock absorbers, sway bars, or any other
under vehicle components when attaching towing
device to vehicle. Do not attach towing device to
front or rear suspension components. Do not
secure vehicle to towing device by the use of front
or rear suspension or steering components.
Remove or secure loose or protruding objects from
a damaged vehicle before towing. Refer to state and
local rules and regulations before towing a vehicle.
Do not allow weight of towed vehicle to bear on
lower fascia, air dams, or spoilers.
RECOMMENDED TOWING EQUIPMENT
To avoid damage to bumper fascia and air dams
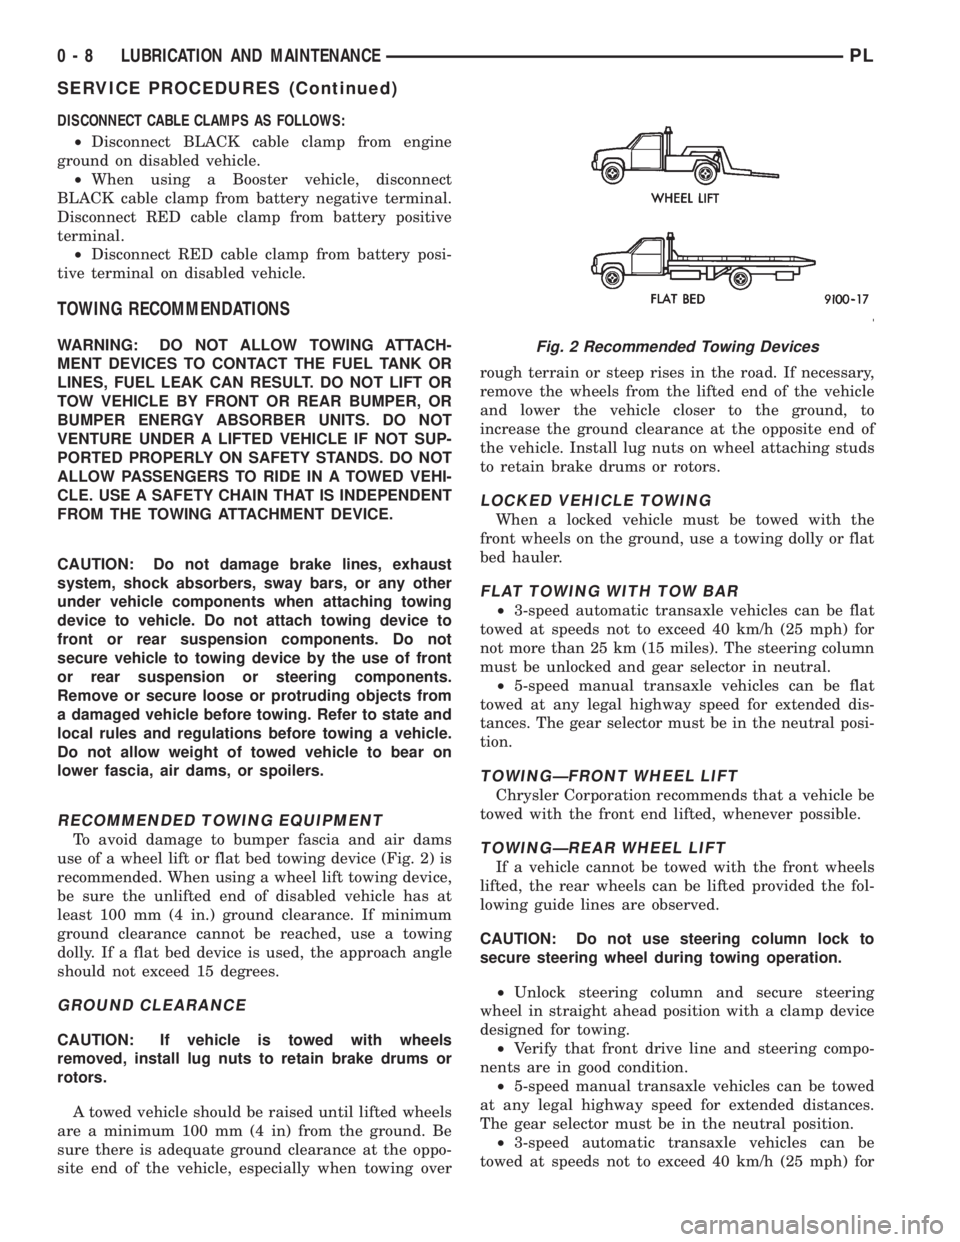
use of a wheel lift or flat bed towing device (Fig. 2) is
recommended. When using a wheel lift towing device,
be sure the unlifted end of disabled vehicle has at
least 100 mm (4 in.) ground clearance. If minimum
ground clearance cannot be reached, use a towing
dolly. If a flat bed device is used, the approach angle
should not exceed 15 degrees.
GROUND CLEARANCE
CAUTION: If vehicle is towed with wheels
removed, install lug nuts to retain brake drums or
rotors.
A towed vehicle should be raised until lifted wheels
are a minimum 100 mm (4 in) from the ground. Be
sure there is adequate ground clearance at the oppo-
site end of the vehicle, especially when towing overrough terrain or steep rises in the road. If necessary,
remove the wheels from the lifted end of the vehicle
and lower the vehicle closer to the ground, to
increase the ground clearance at the opposite end of
the vehicle. Install lug nuts on wheel attaching studs
to retain brake drums or rotors.
LOCKED VEHICLE TOWING
When a locked vehicle must be towed with the
front wheels on the ground, use a towing dolly or flat
bed hauler.
FLAT TOWING WITH TOW BAR
²3-speed automatic transaxle vehicles can be flat
towed at speeds not to exceed 40 km/h (25 mph) for
not more than 25 km (15 miles). The steering column
must be unlocked and gear selector in neutral.
²5-speed manual transaxle vehicles can be flat
towed at any legal highway speed for extended dis-
tances. The gear selector must be in the neutral posi-
tion.
TOWINGÐFRONT WHEEL LIFT
Chrysler Corporation recommends that a vehicle be
towed with the front end lifted, whenever possible.
TOWINGÐREAR WHEEL LIFT
If a vehicle cannot be towed with the front wheels
lifted, the rear wheels can be lifted provided the fol-
lowing guide lines are observed.
CAUTION: Do not use steering column lock to
secure steering wheel during towing operation.
²Unlock steering column and secure steering
wheel in straight ahead position with a clamp device
designed for towing.
²Verify that front drive line and steering compo-
nents are in good condition.
²5-speed manual transaxle vehicles can be towed
at any legal highway speed for extended distances.
The gear selector must be in the neutral position.
²3-speed automatic transaxle vehicles can be
towed at speeds not to exceed 40 km/h (25 mph) for
Fig. 2 Recommended Towing Devices
0 - 8 LUBRICATION AND MAINTENANCEPL
SERVICE PROCEDURES (Continued)
Page 10 of 1200
not more than 25 km (15 miles). The gear selector
must be in the neutral position.
HOISTING RECOMMENDATIONS
Refer to Owner's Manual provided with vehicle for
proper emergency jacking procedures.
WARNING: THE HOISTING AND JACK LIFTING
POINTS PROVIDED ARE FOR A COMPLETE VEHI-
CLE. WHEN THE ENGINE OR REAR SUSPENSION
IS REMOVED FROM A VEHICLE, THE CENTER OF
GRAVITY IS ALTERED MAKING SOME HOISTING
CONDITIONS UNSTABLE. PROPERLY SUPPORT OR
SECURE VEHICLE TO HOISTING DEVICE WHEN
THESE CONDITIONS EXIST.
CAUTION: Do not position hoisting device on sus-
pension components, damage to vehicle can result.
Do not attempt to raise one entire side of the
vehicle by placing a floor jack midway between the
front and rear wheels. This practice may result in
permanent damage to the body.
FLOOR JACK
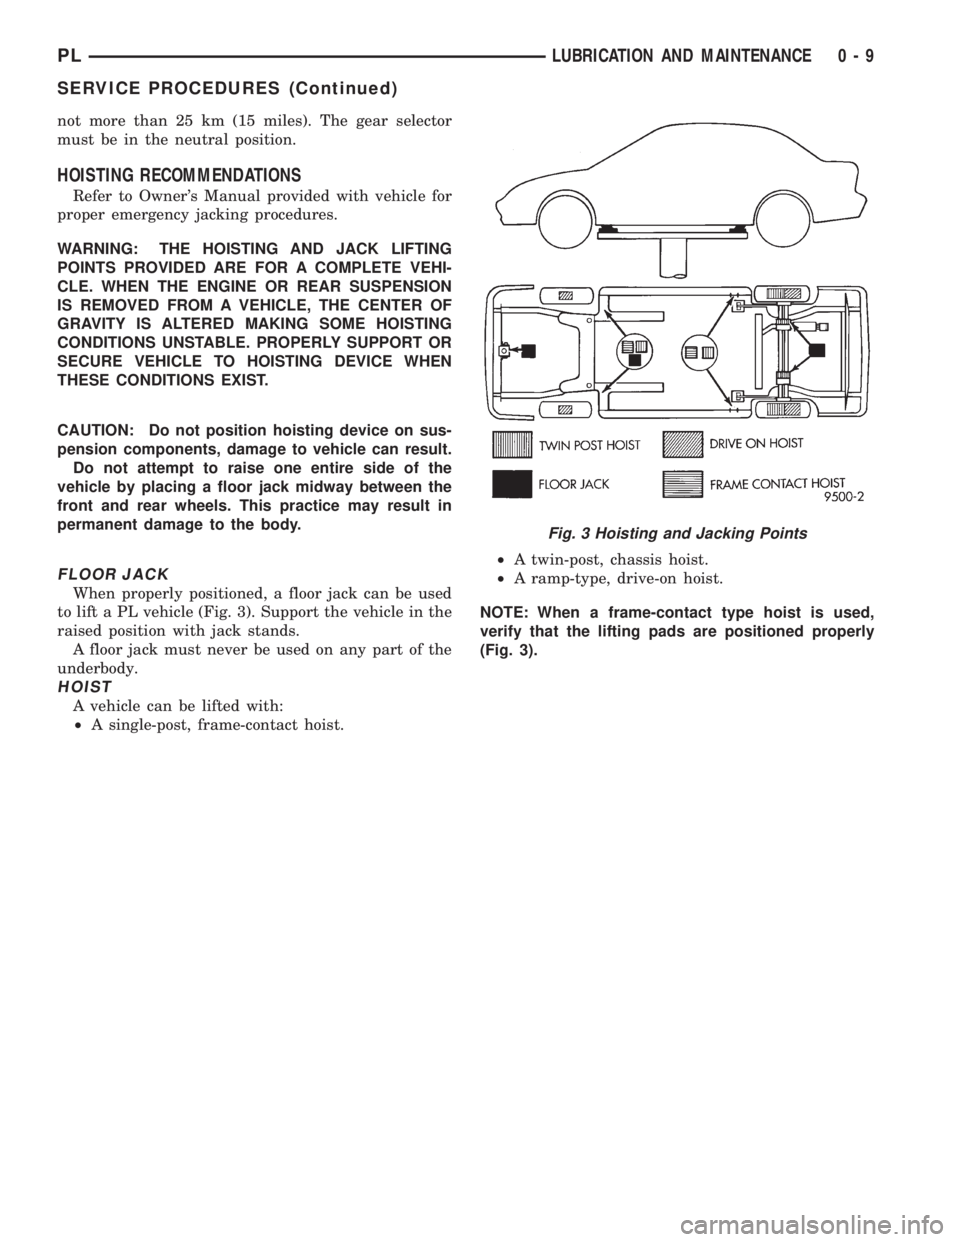
When properly positioned, a floor jack can be used
to lift a PL vehicle (Fig. 3). Support the vehicle in the
raised position with jack stands.
A floor jack must never be used on any part of the
underbody.
HOIST
A vehicle can be lifted with:
²A single-post, frame-contact hoist.²A twin-post, chassis hoist.
²A ramp-type, drive-on hoist.
NOTE: When a frame-contact type hoist is used,
verify that the lifting pads are positioned properly
(Fig. 3).
Fig. 3 Hoisting and Jacking Points
PLLUBRICATION AND MAINTENANCE 0 - 9
SERVICE PROCEDURES (Continued)
Page 12 of 1200
SUSPENSION
CONTENTS
page page
FRONT SUSPENSION..................... 10
REAR SUSPENSION...................... 39WHEEL ALIGNMENT....................... 1
WHEEL ALIGNMENT
INDEX
page page
DESCRIPTION AND OPERATION
COMPETITION PACKAGE ALIGNMENT........ 2
WHEEL ALIGNMENT GENERAL
INFORMATION......................... 1
DIAGNOSIS AND TESTING
PRE-ALIGNMENT VEHICLE INSPECTION...... 5
SUSPENSION AND STEERING DIAGNOSIS.... 3SERVICE PROCEDURES
WHEEL ALIGNMENT CHECK AND
ADJUSTMENT PROCEDURE.............. 5
SPECIFICATIONS
VEHICLE ALIGNMENT SPECIFICATIONS AT
CURB HEIGHT......................... 9
DESCRIPTION AND OPERATION
WHEEL ALIGNMENT GENERAL INFORMATION
Proper vehicle wheel alignment is the proper
adjustment of all interrelated front and rear suspen-
sion angles (Fig. 1). These angles are what affects
the handling and steering of the vehicle when it is in
motion.
The method of checking a vehicle's front and rear
wheel alignment will vary depending on the type and
manufacturer of the equipment being used. Instruc-
tions furnished by the manufacturer of the equip-
ment being used should always be followed to ensure
accuracy of the alignment, except alignment specifi-
cations recommended by Chrysler Corporation
MUST ALWAYSbe used.
CAUTION: Do not attempt to modify any suspen-
sion or steering components by heating or bending
of the component.Wheel alignment adjustments should be made in
the following sequence, to ensure that an accurate
alignment is performed.
(1) Rear Wheel Toe Adjustment within specifica-
tions for both total toe and thrust angle.
(2) Front Wheel Toe Adjustment within specifica-
tions for total toe.
(3)To eis measured in degrees or inches and is
the distance that the front edges of the tires are
closer (or farther apart) than the rear edges (Fig. 1).
See Front Wheel Drive Specifications for correct front
and rear wheel Toe specifications.
(4)Thrust Angleis defined as the average of the
Toe settings on each rear wheel. If this measurement
is out of specification, re-adjust rear wheel Toe so
that each wheel has 1/2 of the total Toe measure-
ment. When re-adjusting, do not exceed the total Toe
specification.
PLSUSPENSION 2 - 1
Page 13 of 1200
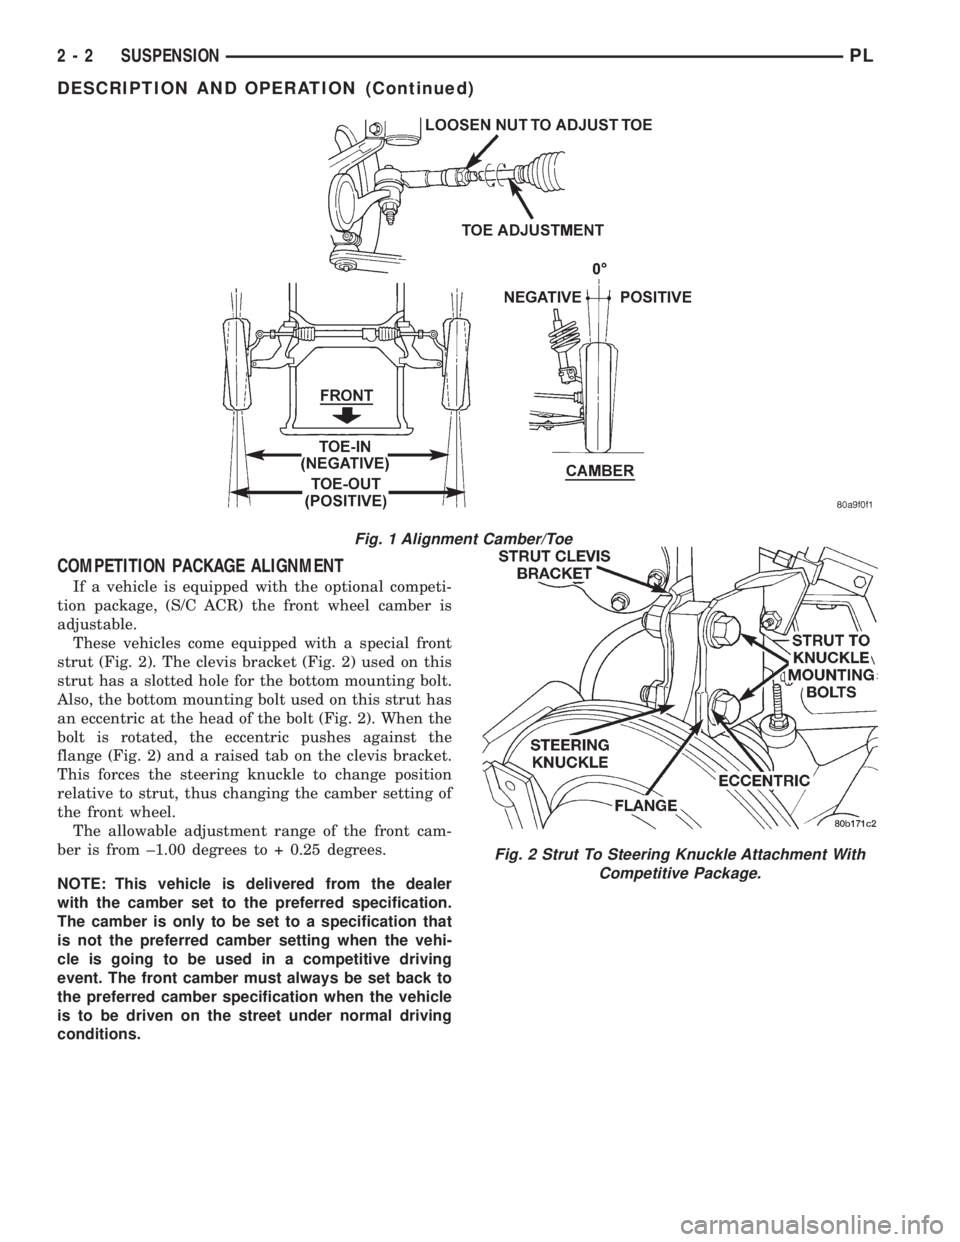
COMPETITION PACKAGE ALIGNMENT
If a vehicle is equipped with the optional competi-
tion package, (S/C ACR) the front wheel camber is
adjustable.
These vehicles come equipped with a special front
strut (Fig. 2). The clevis bracket (Fig. 2) used on this
strut has a slotted hole for the bottom mounting bolt.
Also, the bottom mounting bolt used on this strut has
an eccentric at the head of the bolt (Fig. 2). When the
bolt is rotated, the eccentric pushes against the
flange (Fig. 2) and a raised tab on the clevis bracket.
This forces the steering knuckle to change position
relative to strut, thus changing the camber setting of
the front wheel.
The allowable adjustment range of the front cam-
ber is from ±1.00 degrees to + 0.25 degrees.
NOTE: This vehicle is delivered from the dealer
with the camber set to the preferred specification.
The camber is only to be set to a specification that
is not the preferred camber setting when the vehi-
cle is going to be used in a competitive driving
event. The front camber must always be set back to
the preferred camber specification when the vehicle
is to be driven on the street under normal driving
conditions.
Fig. 1 Alignment Camber/Toe
Fig. 2 Strut To Steering Knuckle Attachment With
Competitive Package.
2 - 2 SUSPENSIONPL
DESCRIPTION AND OPERATION (Continued)
Page 14 of 1200
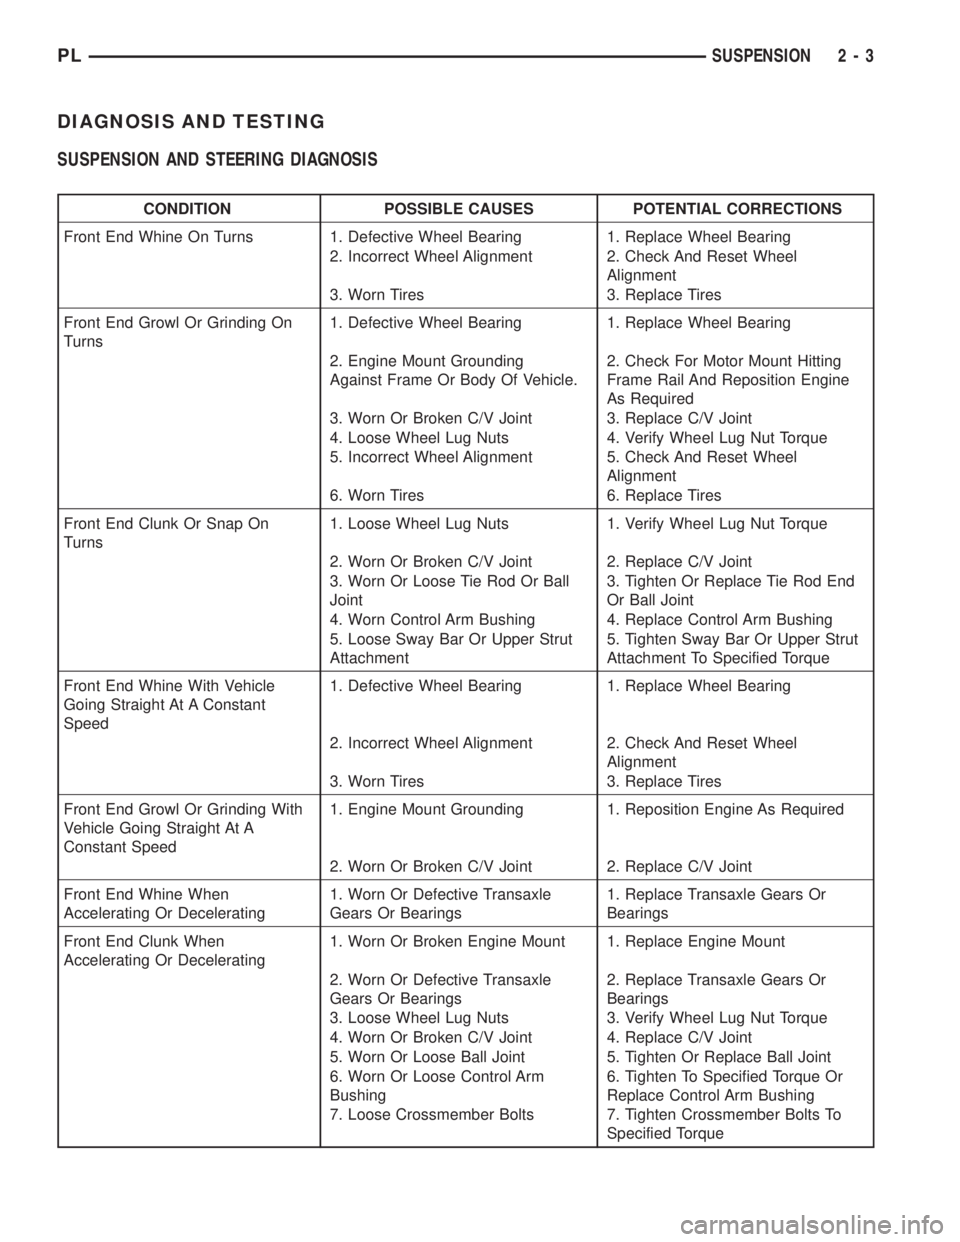
DIAGNOSIS AND TESTING
SUSPENSION AND STEERING DIAGNOSIS
CONDITION POSSIBLE CAUSES POTENTIAL CORRECTIONS
Front End Whine On Turns 1. Defective Wheel Bearing 1. Replace Wheel Bearing
2. Incorrect Wheel Alignment 2. Check And Reset Wheel
Alignment
3. Worn Tires 3. Replace Tires
Front End Growl Or Grinding On
Turns1. Defective Wheel Bearing 1. Replace Wheel Bearing
2. Engine Mount Grounding
Against Frame Or Body Of Vehicle.2. Check For Motor Mount Hitting
Frame Rail And Reposition Engine
As Required
3. Worn Or Broken C/V Joint 3. Replace C/V Joint
4. Loose Wheel Lug Nuts 4. Verify Wheel Lug Nut Torque
5. Incorrect Wheel Alignment 5. Check And Reset Wheel
Alignment
6. Worn Tires 6. Replace Tires
Front End Clunk Or Snap On
Turns1. Loose Wheel Lug Nuts 1. Verify Wheel Lug Nut Torque
2. Worn Or Broken C/V Joint 2. Replace C/V Joint
3. Worn Or Loose Tie Rod Or Ball
Joint3. Tighten Or Replace Tie Rod End
Or Ball Joint
4. Worn Control Arm Bushing 4. Replace Control Arm Bushing
5. Loose Sway Bar Or Upper Strut
Attachment5. Tighten Sway Bar Or Upper Strut
Attachment To Specified Torque
Front End Whine With Vehicle
Going Straight At A Constant
Speed1. Defective Wheel Bearing 1. Replace Wheel Bearing
2. Incorrect Wheel Alignment 2. Check And Reset Wheel
Alignment
3. Worn Tires 3. Replace Tires
Front End Growl Or Grinding With
Vehicle Going Straight At A
Constant Speed1. Engine Mount Grounding 1. Reposition Engine As Required
2. Worn Or Broken C/V Joint 2. Replace C/V Joint
Front End Whine When
Accelerating Or Decelerating1. Worn Or Defective Transaxle
Gears Or Bearings1. Replace Transaxle Gears Or
Bearings
Front End Clunk When
Accelerating Or Decelerating1. Worn Or Broken Engine Mount 1. Replace Engine Mount
2. Worn Or Defective Transaxle
Gears Or Bearings2. Replace Transaxle Gears Or
Bearings
3. Loose Wheel Lug Nuts 3. Verify Wheel Lug Nut Torque
4. Worn Or Broken C/V Joint 4. Replace C/V Joint
5. Worn Or Loose Ball Joint 5. Tighten Or Replace Ball Joint
6. Worn Or Loose Control Arm
Bushing6. Tighten To Specified Torque Or
Replace Control Arm Bushing
7. Loose Crossmember Bolts 7. Tighten Crossmember Bolts To
Specified Torque
PLSUSPENSION 2 - 3
Page 15 of 1200
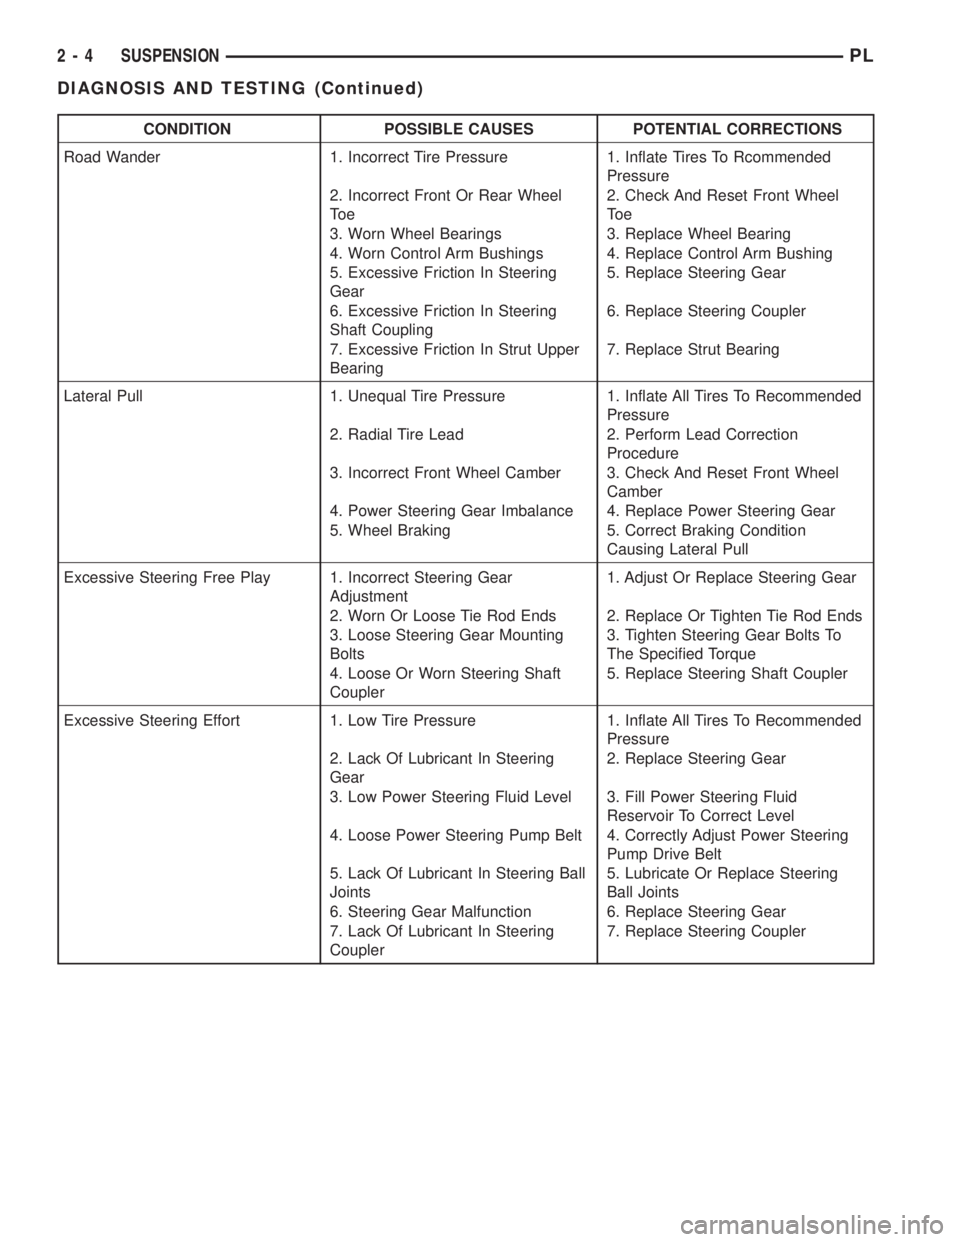
CONDITION POSSIBLE CAUSES POTENTIAL CORRECTIONS
Road Wander 1. Incorrect Tire Pressure 1. Inflate Tires To Rcommended
Pressure
2. Incorrect Front Or Rear Wheel
To e2. Check And Reset Front Wheel
To e
3. Worn Wheel Bearings 3. Replace Wheel Bearing
4. Worn Control Arm Bushings 4. Replace Control Arm Bushing
5. Excessive Friction In Steering
Gear5. Replace Steering Gear
6. Excessive Friction In Steering
Shaft Coupling6. Replace Steering Coupler
7. Excessive Friction In Strut Upper
Bearing7. Replace Strut Bearing
Lateral Pull 1. Unequal Tire Pressure 1. Inflate All Tires To Recommended
Pressure
2. Radial Tire Lead 2. Perform Lead Correction
Procedure
3. Incorrect Front Wheel Camber 3. Check And Reset Front Wheel
Camber
4. Power Steering Gear Imbalance 4. Replace Power Steering Gear
5. Wheel Braking 5. Correct Braking Condition
Causing Lateral Pull
Excessive Steering Free Play 1. Incorrect Steering Gear
Adjustment1. Adjust Or Replace Steering Gear
2. Worn Or Loose Tie Rod Ends 2. Replace Or Tighten Tie Rod Ends
3. Loose Steering Gear Mounting
Bolts3. Tighten Steering Gear Bolts To
The Specified Torque
4. Loose Or Worn Steering Shaft
Coupler5. Replace Steering Shaft Coupler
Excessive Steering Effort 1. Low Tire Pressure 1. Inflate All Tires To Recommended
Pressure
2. Lack Of Lubricant In Steering
Gear2. Replace Steering Gear
3. Low Power Steering Fluid Level 3. Fill Power Steering Fluid
Reservoir To Correct Level
4. Loose Power Steering Pump Belt 4. Correctly Adjust Power Steering
Pump Drive Belt
5. Lack Of Lubricant In Steering Ball
Joints5. Lubricate Or Replace Steering
Ball Joints
6. Steering Gear Malfunction 6. Replace Steering Gear
7. Lack Of Lubricant In Steering
Coupler7. Replace Steering Coupler
2 - 4 SUSPENSIONPL
DIAGNOSIS AND TESTING (Continued)
Page 16 of 1200
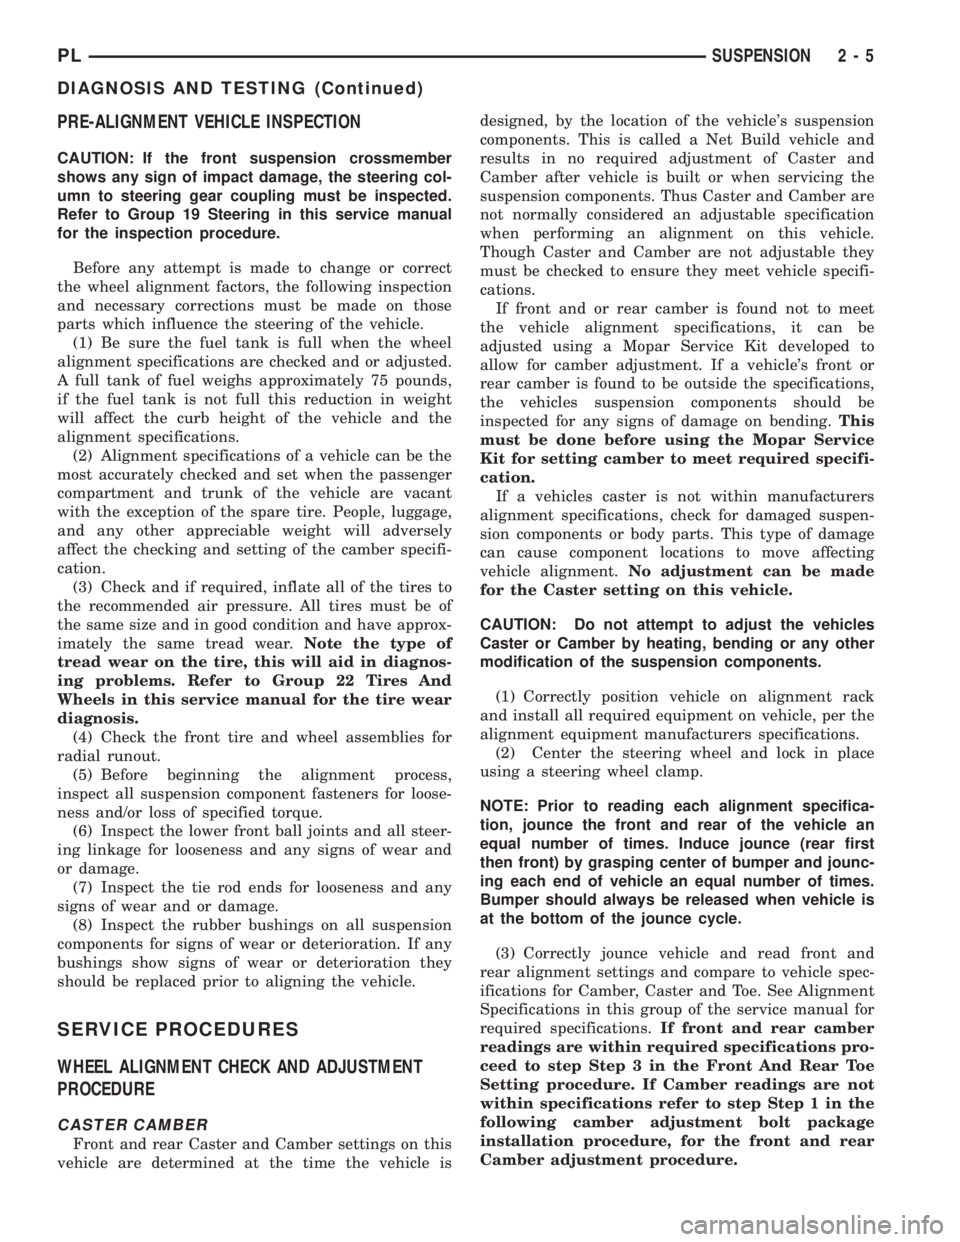
PRE-ALIGNMENT VEHICLE INSPECTION
CAUTION: If the front suspension crossmember
shows any sign of impact damage, the steering col-
umn to steering gear coupling must be inspected.
Refer to Group 19 Steering in this service manual
for the inspection procedure.
Before any attempt is made to change or correct
the wheel alignment factors, the following inspection
and necessary corrections must be made on those
parts which influence the steering of the vehicle.
(1) Be sure the fuel tank is full when the wheel
alignment specifications are checked and or adjusted.
A full tank of fuel weighs approximately 75 pounds,
if the fuel tank is not full this reduction in weight
will affect the curb height of the vehicle and the
alignment specifications.
(2) Alignment specifications of a vehicle can be the
most accurately checked and set when the passenger
compartment and trunk of the vehicle are vacant
with the exception of the spare tire. People, luggage,
and any other appreciable weight will adversely
affect the checking and setting of the camber specifi-
cation.
(3) Check and if required, inflate all of the tires to
the recommended air pressure. All tires must be of
the same size and in good condition and have approx-
imately the same tread wear.Note the type of
tread wear on the tire, this will aid in diagnos-
ing problems. Refer to Group 22 Tires And
Wheels in this service manual for the tire wear
diagnosis.
(4) Check the front tire and wheel assemblies for
radial runout.
(5) Before beginning the alignment process,
inspect all suspension component fasteners for loose-
ness and/or loss of specified torque.
(6) Inspect the lower front ball joints and all steer-
ing linkage for looseness and any signs of wear and
or damage.
(7) Inspect the tie rod ends for looseness and any
signs of wear and or damage.
(8) Inspect the rubber bushings on all suspension
components for signs of wear or deterioration. If any
bushings show signs of wear or deterioration they
should be replaced prior to aligning the vehicle.
SERVICE PROCEDURES
WHEEL ALIGNMENT CHECK AND ADJUSTMENT
PROCEDURE
CASTER CAMBER
Front and rear Caster and Camber settings on this
vehicle are determined at the time the vehicle isdesigned, by the location of the vehicle's suspension
components. This is called a Net Build vehicle and
results in no required adjustment of Caster and
Camber after vehicle is built or when servicing the
suspension components. Thus Caster and Camber are
not normally considered an adjustable specification
when performing an alignment on this vehicle.
Though Caster and Camber are not adjustable they
must be checked to ensure they meet vehicle specifi-
cations.
If front and or rear camber is found not to meet
the vehicle alignment specifications, it can be
adjusted using a Mopar Service Kit developed to
allow for camber adjustment. If a vehicle's front or
rear camber is found to be outside the specifications,
the vehicles suspension components should be
inspected for any signs of damage on bending.This
must be done before using the Mopar Service
Kit for setting camber to meet required specifi-
cation.
If a vehicles caster is not within manufacturers
alignment specifications, check for damaged suspen-
sion components or body parts. This type of damage
can cause component locations to move affecting
vehicle alignment.No adjustment can be made
for the Caster setting on this vehicle.
CAUTION: Do not attempt to adjust the vehicles
Caster or Camber by heating, bending or any other
modification of the suspension components.
(1) Correctly position vehicle on alignment rack
and install all required equipment on vehicle, per the
alignment equipment manufacturers specifications.
(2) Center the steering wheel and lock in place
using a steering wheel clamp.
NOTE: Prior to reading each alignment specifica-
tion, jounce the front and rear of the vehicle an
equal number of times. Induce jounce (rear first
then front) by grasping center of bumper and jounc-
ing each end of vehicle an equal number of times.
Bumper should always be released when vehicle is
at the bottom of the jounce cycle.
(3) Correctly jounce vehicle and read front and
rear alignment settings and compare to vehicle spec-
ifications for Camber, Caster and Toe. See Alignment
Specifications in this group of the service manual for
required specifications.If front and rear camber
readings are within required specifications pro-
ceed to step Step 3 in the Front And Rear Toe
Setting procedure. If Camber readings are not
within specifications refer to step Step 1 in the
following camber adjustment bolt package
installation procedure, for the front and rear
Camber adjustment procedure.
PLSUSPENSION 2 - 5
DIAGNOSIS AND TESTING (Continued)
Page 18 of 1200
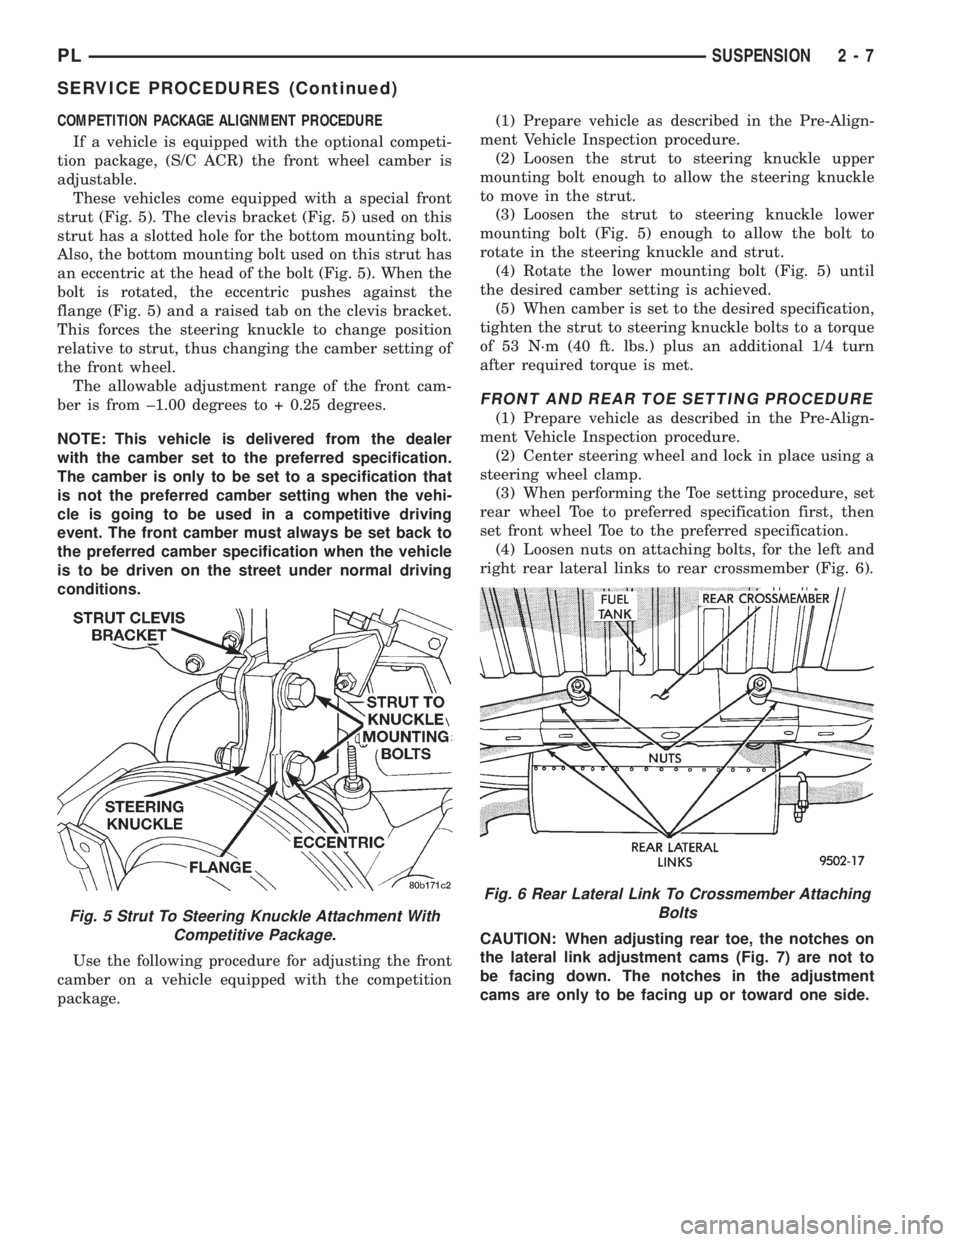
COMPETITION PACKAGE ALIGNMENT PROCEDURE
If a vehicle is equipped with the optional competi-
tion package, (S/C ACR) the front wheel camber is
adjustable.
These vehicles come equipped with a special front
strut (Fig. 5). The clevis bracket (Fig. 5) used on this
strut has a slotted hole for the bottom mounting bolt.
Also, the bottom mounting bolt used on this strut has
an eccentric at the head of the bolt (Fig. 5). When the
bolt is rotated, the eccentric pushes against the
flange (Fig. 5) and a raised tab on the clevis bracket.
This forces the steering knuckle to change position
relative to strut, thus changing the camber setting of
the front wheel.
The allowable adjustment range of the front cam-
ber is from ±1.00 degrees to + 0.25 degrees.
NOTE: This vehicle is delivered from the dealer
with the camber set to the preferred specification.
The camber is only to be set to a specification that
is not the preferred camber setting when the vehi-
cle is going to be used in a competitive driving
event. The front camber must always be set back to
the preferred camber specification when the vehicle
is to be driven on the street under normal driving
conditions.
Use the following procedure for adjusting the front
camber on a vehicle equipped with the competition
package.(1) Prepare vehicle as described in the Pre-Align-
ment Vehicle Inspection procedure.
(2) Loosen the strut to steering knuckle upper
mounting bolt enough to allow the steering knuckle
to move in the strut.
(3) Loosen the strut to steering knuckle lower
mounting bolt (Fig. 5) enough to allow the bolt to
rotate in the steering knuckle and strut.
(4) Rotate the lower mounting bolt (Fig. 5) until
the desired camber setting is achieved.
(5) When camber is set to the desired specification,
tighten the strut to steering knuckle bolts to a torque
of 53 N´m (40 ft. lbs.) plus an additional 1/4 turn
after required torque is met.
FRONT AND REAR TOE SETTING PROCEDURE
(1) Prepare vehicle as described in the Pre-Align-
ment Vehicle Inspection procedure.
(2) Center steering wheel and lock in place using a
steering wheel clamp.
(3) When performing the Toe setting procedure, set
rear wheel Toe to preferred specification first, then
set front wheel Toe to the preferred specification.
(4) Loosen nuts on attaching bolts, for the left and
right rear lateral links to rear crossmember (Fig. 6).
CAUTION: When adjusting rear toe, the notches on
the lateral link adjustment cams (Fig. 7) are not to
be facing down. The notches in the adjustment
cams are only to be facing up or toward one side.
Fig. 5 Strut To Steering Knuckle Attachment With
Competitive Package.
Fig. 6 Rear Lateral Link To Crossmember Attaching
Bolts
PLSUSPENSION 2 - 7
SERVICE PROCEDURES (Continued)
Page 19 of 1200
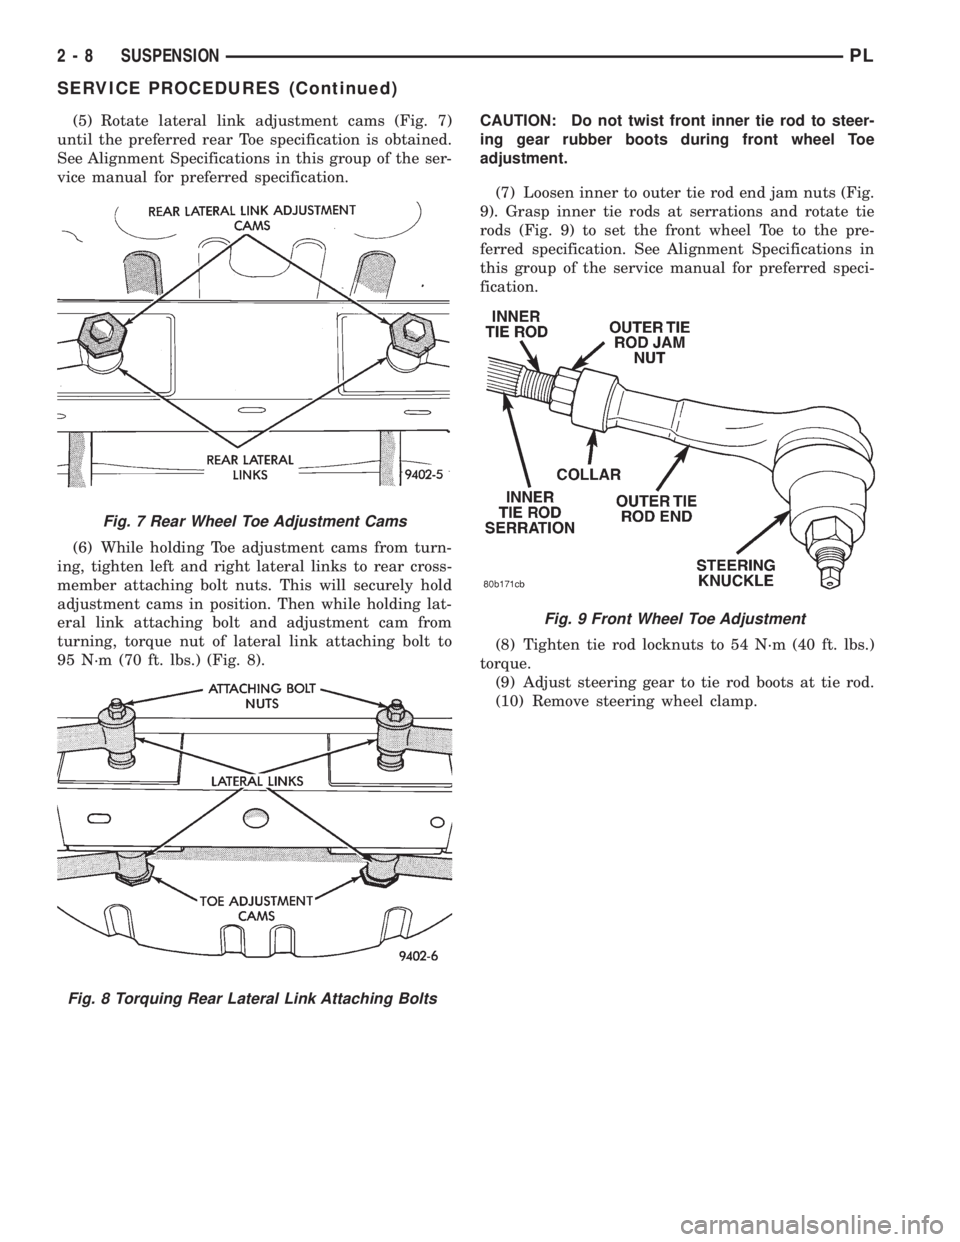
(5) Rotate lateral link adjustment cams (Fig. 7)
until the preferred rear Toe specification is obtained.
See Alignment Specifications in this group of the ser-
vice manual for preferred specification.
(6) While holding Toe adjustment cams from turn-
ing, tighten left and right lateral links to rear cross-
member attaching bolt nuts. This will securely hold
adjustment cams in position. Then while holding lat-
eral link attaching bolt and adjustment cam from
turning, torque nut of lateral link attaching bolt to
95 N´m (70 ft. lbs.) (Fig. 8).CAUTION: Do not twist front inner tie rod to steer-
ing gear rubber boots during front wheel Toe
adjustment.
(7) Loosen inner to outer tie rod end jam nuts (Fig.
9). Grasp inner tie rods at serrations and rotate tie
rods (Fig. 9) to set the front wheel Toe to the pre-
ferred specification. See Alignment Specifications in
this group of the service manual for preferred speci-
fication.
(8) Tighten tie rod locknuts to 54 N´m (40 ft. lbs.)
torque.
(9) Adjust steering gear to tie rod boots at tie rod.
(10) Remove steering wheel clamp.
Fig. 7 Rear Wheel Toe Adjustment Cams
Fig. 8 Torquing Rear Lateral Link Attaching Bolts
Fig. 9 Front Wheel Toe Adjustment
2 - 8 SUSPENSIONPL
SERVICE PROCEDURES (Continued)