DODGE NEON 2000 Service Repair Manual
Manufacturer: DODGE, Model Year: 2000, Model line: NEON, Model: DODGE NEON 2000Pages: 1285, PDF Size: 29.42 MB
Page 311 of 1285
HEADLAMP ALIGNMENT
TABLE OF CONTENTS
page page
DESCRIPTION AND OPERATION
HEADLAMP ALIGNMENT....................4
SERVICE PROCEDURES
HEADLAMP ALIGNMENT PREPARATION........4ADJUSTMENTS
HEADLAMP ADJUSTMENT USING
ALIGNMENT SCREEN....................4
FOG LAMP ALIGNMENT....................6
DESCRIPTION AND OPERATION
HEADLAMP ALIGNMENT
Headlamps and Fog Lamps should be aligned
using the screen method which is provided in this
section.The preferred headlamp alignment set-
ting is 0 for the left/right adjustment and 0 for
the up/down adjustment.
SERVICE PROCEDURES
HEADLAMP ALIGNMENT PREPARATION
(1) Verify headlamp dimmer switch and high beam
indicator operation.
(2) Inspect and correct damaged or defective com-
ponents that could interfere with proper headlamp
alignment.
(3) Verify proper tire inflation.
(4) Clean headlamp lenses.
(5) Verify that luggage area is not heavily loaded.
(6) Fuel tank should be FULL. Add 2.94 kg (6.5
lbs.) of weight over the fuel tank for each estimated
gallon of missing fuel.
ADJUSTMENTS
HEADLAMP ADJUSTMENT USING ALIGNMENT
SCREEN
ALIGNMENT SCREEN PREPARATION
(1) Position vehicle on a level surface perpendicu-
lar to a flat wall 7.62 meters (25 ft.) away from front
of headlamp lens.
(2) If necessary, tape a line on the floor 7.62
meters (25 ft.) away from and parallel to the wall
(Fig. 1).(3) From the floor up 1.27 meters (5 ft.), tape a
line on the wall at the center line of the vehicle.
Sight along the center line of the vehicle (from rear
of vehicle forward) to verify accuracy of the line
placement.
(4) Rock vehicle side-to-side three times to allow
suspension to stabilize.
(5) Jounce front suspension three times by pushing
downward on front bumper and releasing.
(6) A small dot is molded into each headlamp lens
signifying the center of the headlamp. Measure the
distance from the center of the headlamp to the floor.
Transfer measurement to the alignment screen (with
tape). Use this line for up/down adjustment refer-
ence.
(7) Measure distance from the center line of the
vehicle to the center of each headlamp being aligned.
Transfer measurements to screen (with tape) to each
side of vehicle center line. Use these lines for left/
right adjustment reference.
HEADLAMP ADJUSTMENT
The PL headlamp low beam pattern has a distinct
horizontal cutoff line which is used to visually align
the headlamps. A properly aimed headlamp will have
the horizontal cutoff line of the low beam pattern
centered on the low beam pattern centered on the
horizontal center of headlamp line. The side to side
left edge of the low beam hot spot should be located
75 mm (3 inches) to the left of the headlamp center
line (Fig. 1). The high beams on a vehicle with aero
headlamps cannot be aligned. The high beam pattern
should be correct when the low beams are aligned
properly.
To adjust headlamp alignment, rotate alignment
screws to achieve the specified low beam hot spot
pattern.
8L - 4 LAMPSPL
Page 312 of 1285
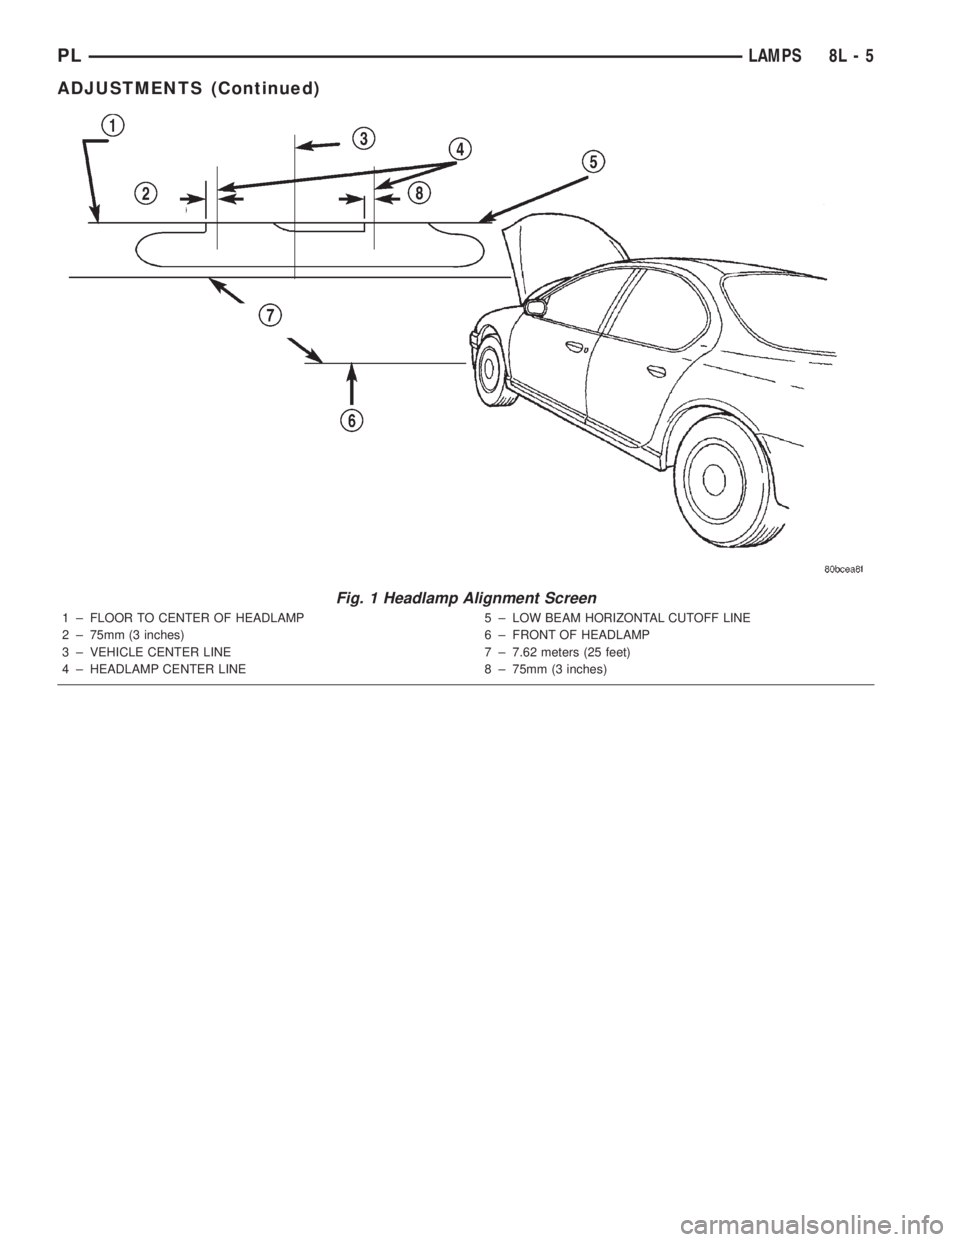
Fig. 1 Headlamp Alignment Screen
1 ± FLOOR TO CENTER OF HEADLAMP
2 ± 75mm (3 inches)
3 ± VEHICLE CENTER LINE
4 ± HEADLAMP CENTER LINE5 ± LOW BEAM HORIZONTAL CUTOFF LINE
6 ± FRONT OF HEADLAMP
7 ± 7.62 meters (25 feet)
8 ± 75mm (3 inches)
PLLAMPS 8L - 5
ADJUSTMENTS (Continued)
Page 313 of 1285
FOG LAMP ALIGNMENT
Prepare an alignment screen. Refer to Alignment
Screen Preparation paragraph in this section. Disen-
gage the wire connectors from the back of the head-
lamp bulbs to disable the headlamps. This will allow
a more accurate projection reading of the fog lamps.
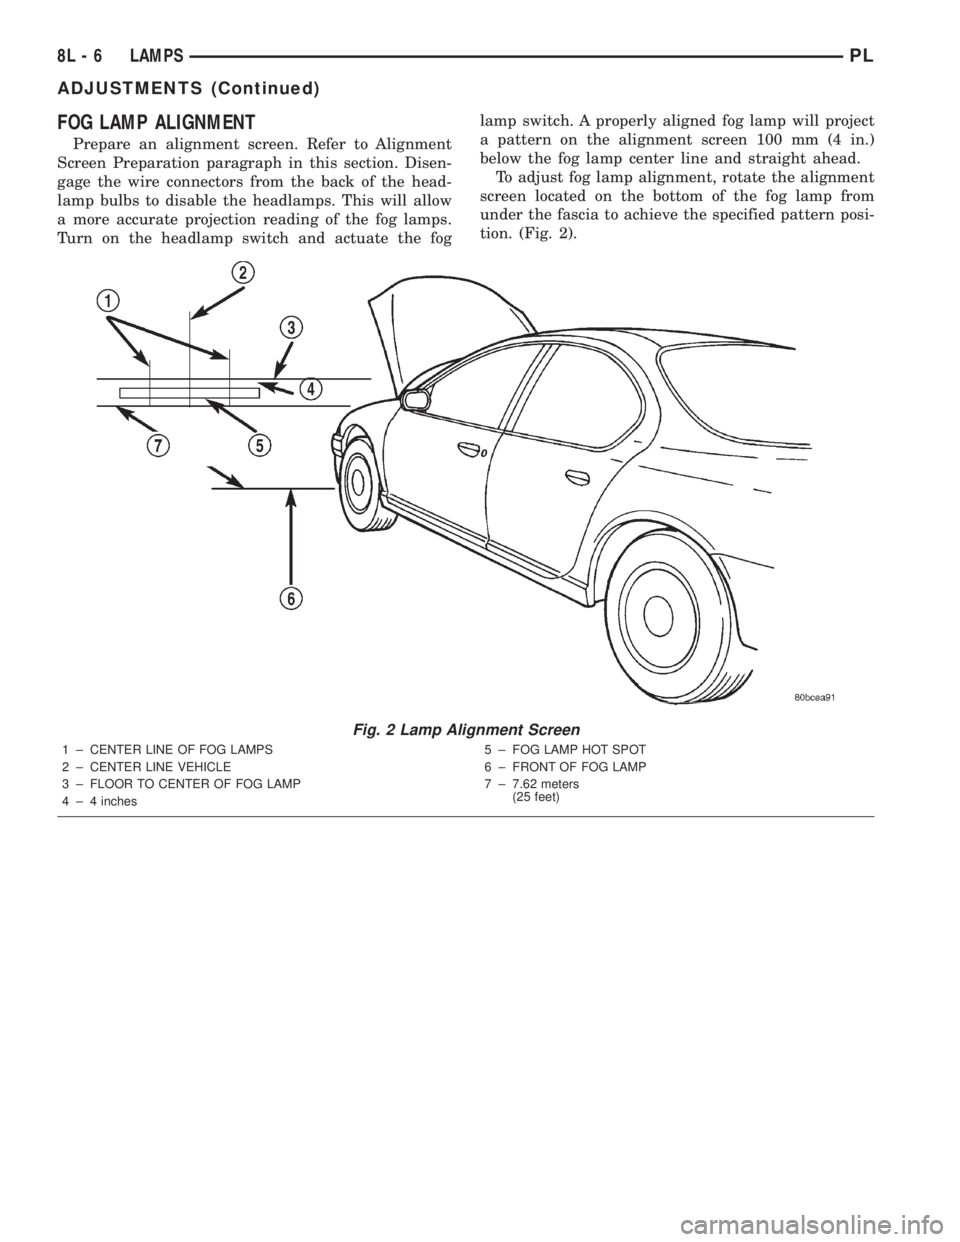
Turn on the headlamp switch and actuate the foglamp switch. A properly aligned fog lamp will project
a pattern on the alignment screen 100 mm (4 in.)
below the fog lamp center line and straight ahead.
To adjust fog lamp alignment, rotate the alignment
screen located on the bottom of the fog lamp from
under the fascia to achieve the specified pattern posi-
tion. (Fig. 2).
Fig. 2 Lamp Alignment Screen
1 ± CENTER LINE OF FOG LAMPS
2 ± CENTER LINE VEHICLE
3 ± FLOOR TO CENTER OF FOG LAMP
4 ± 4 inches5 ± FOG LAMP HOT SPOT
6 ± FRONT OF FOG LAMP
7 ± 7.62 meters
(25 feet)
8L - 6 LAMPSPL
ADJUSTMENTS (Continued)
Page 314 of 1285
LAMP BULB SERVICE
TABLE OF CONTENTS
page page
DESCRIPTION AND OPERATION
BULB...................................7
REMOVAL AND INSTALLATION
HEADLAMP BULB.........................7
FOG LAMP BULB..........................8
PARK AND TURN SIGNAL LAMP BULB.........8
FRONT SIDE MARKER LAMP BULB...........9
CENTER HIGH MOUNTED STOP LAMP BULB....9
TAIL, STOP, BACK-UP AND TURN SIGNAL
LAMP BULB............................9LICENSE PLATE LAMP BULB...............10
UNDERHOOD LAMP BULB.................10
REAR CARGO LAMP BULB.................10
DOME LAMP BULB.......................10
TRANSAXLE RANGE INDICATOR LAMP BULB . . 10
GLOVE BOX LAMP BULB...................11
FLOOR CONSOLE LAMP BULB..............11
VISOR VANITY LAMP BULB.................11
DESCRIPTION AND OPERATION
BULB
The electric light bulb is a source of electromag-
netic radiation which generates light. Vehicles use
many different types of bulbs:
²Headlamp bulb
²Fog Lamp bulb
²Tail Lamp bulb
²Stop Lamp bulb
²Turn Signal bulb
²Back up Lamp bulb
²Dome Lamp bulb
²Transaxle Range Indicator Lamp bulb (PRNDL)
²Glove Box Lamp bulb
²Floor Console Lamp bulb
²Rear Cargo Lamp bulb
²Visor Vanity Lamp bulb
²Underhood Lamp bulb
²etc.
REMOVAL AND INSTALLATION
HEADLAMP BULB
REMOVAL
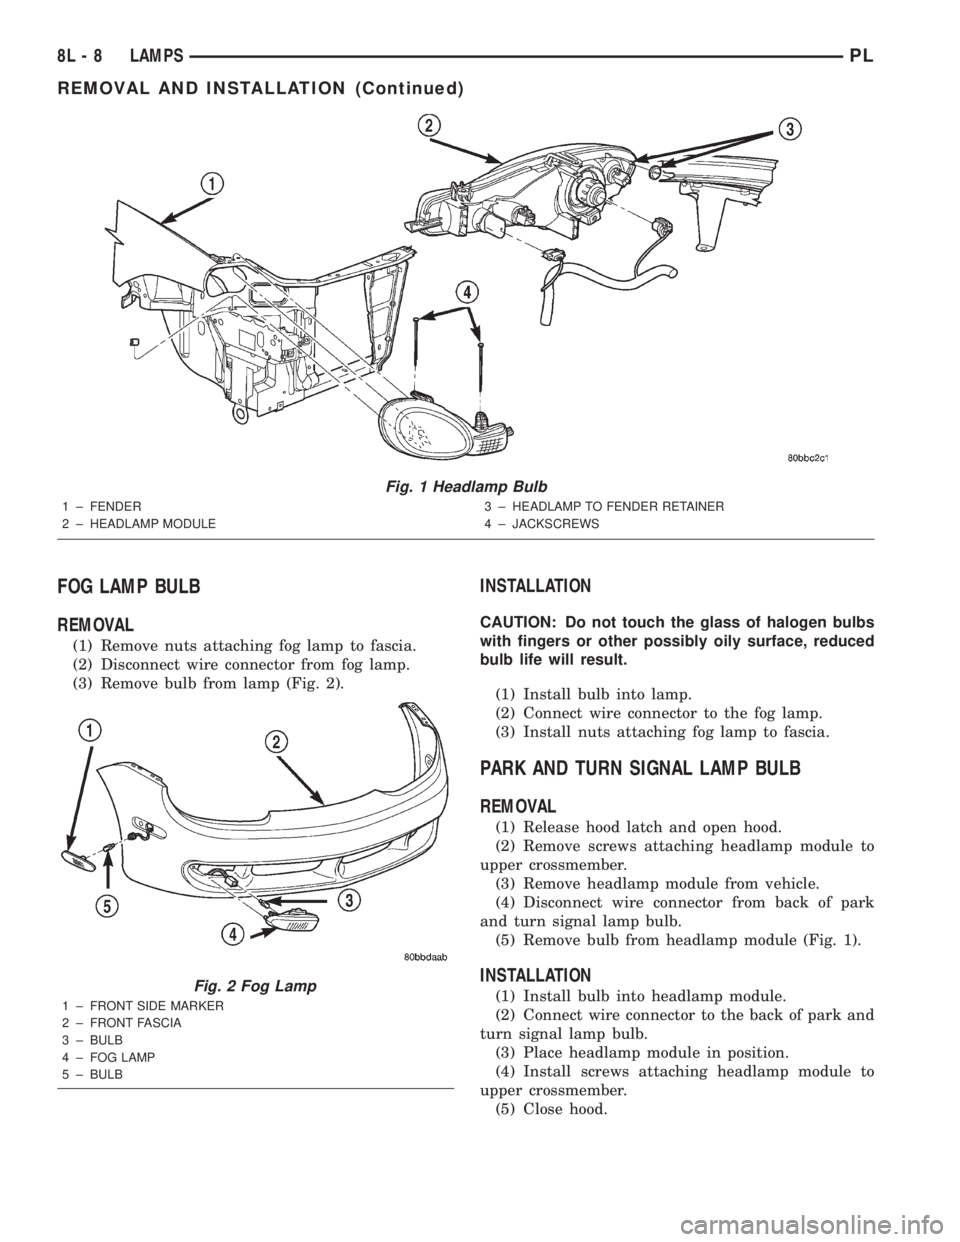
(1) Release hood latch and open hood.
(2) Remove screws attaching headlamp module to
upper crossmember.
(3) Remove headlamp module from vehicle.
(4) Disconnect wire connector from back of head-
lamp bulb.
(5) Rotate retaining ring counterclockwise one
quarter turn.
(6) Remove retaining ring from headlamp module.
(7) Remove bulb from headlamp module (Fig. 1).
INSTALLATION
CAUTION: Do not touch the glass of halogen bulbs
with fingers or other possibly oily surface, reduced
bulb life will result.
(1) Install bulb into headlamp module.
(2) Install retaining ring to headlamp module.
(3) Rotate retaining ring clockwise one quarter
turn.
(4) Connect wire connector to the back of head-
lamp bulb.
(5) Place headlamp module in position.
(6) Install screws attaching headlamp module to
upper crossmember.
(7) Close hood.
PLLAMPS 8L - 7
Page 315 of 1285
FOG LAMP BULB
REMOVAL
(1) Remove nuts attaching fog lamp to fascia.
(2) Disconnect wire connector from fog lamp.
(3) Remove bulb from lamp (Fig. 2).
INSTALLATION
CAUTION: Do not touch the glass of halogen bulbs
with fingers or other possibly oily surface, reduced
bulb life will result.
(1) Install bulb into lamp.
(2) Connect wire connector to the fog lamp.
(3) Install nuts attaching fog lamp to fascia.
PARK AND TURN SIGNAL LAMP BULB
REMOVAL
(1) Release hood latch and open hood.
(2) Remove screws attaching headlamp module to
upper crossmember.
(3) Remove headlamp module from vehicle.
(4) Disconnect wire connector from back of park
and turn signal lamp bulb.
(5) Remove bulb from headlamp module (Fig. 1).
INSTALLATION
(1) Install bulb into headlamp module.
(2) Connect wire connector to the back of park and
turn signal lamp bulb.
(3) Place headlamp module in position.
(4) Install screws attaching headlamp module to
upper crossmember.
(5) Close hood.
Fig. 1 Headlamp Bulb
1 ± FENDER
2 ± HEADLAMP MODULE3 ± HEADLAMP TO FENDER RETAINER
4 ± JACKSCREWS
Fig. 2 Fog Lamp
1 ± FRONT SIDE MARKER
2 ± FRONT FASCIA
3 ± BULB
4 ± FOG LAMP
5 ± BULB
8L - 8 LAMPSPL
REMOVAL AND INSTALLATION (Continued)
Page 316 of 1285
FRONT SIDE MARKER LAMP BULB
REMOVAL
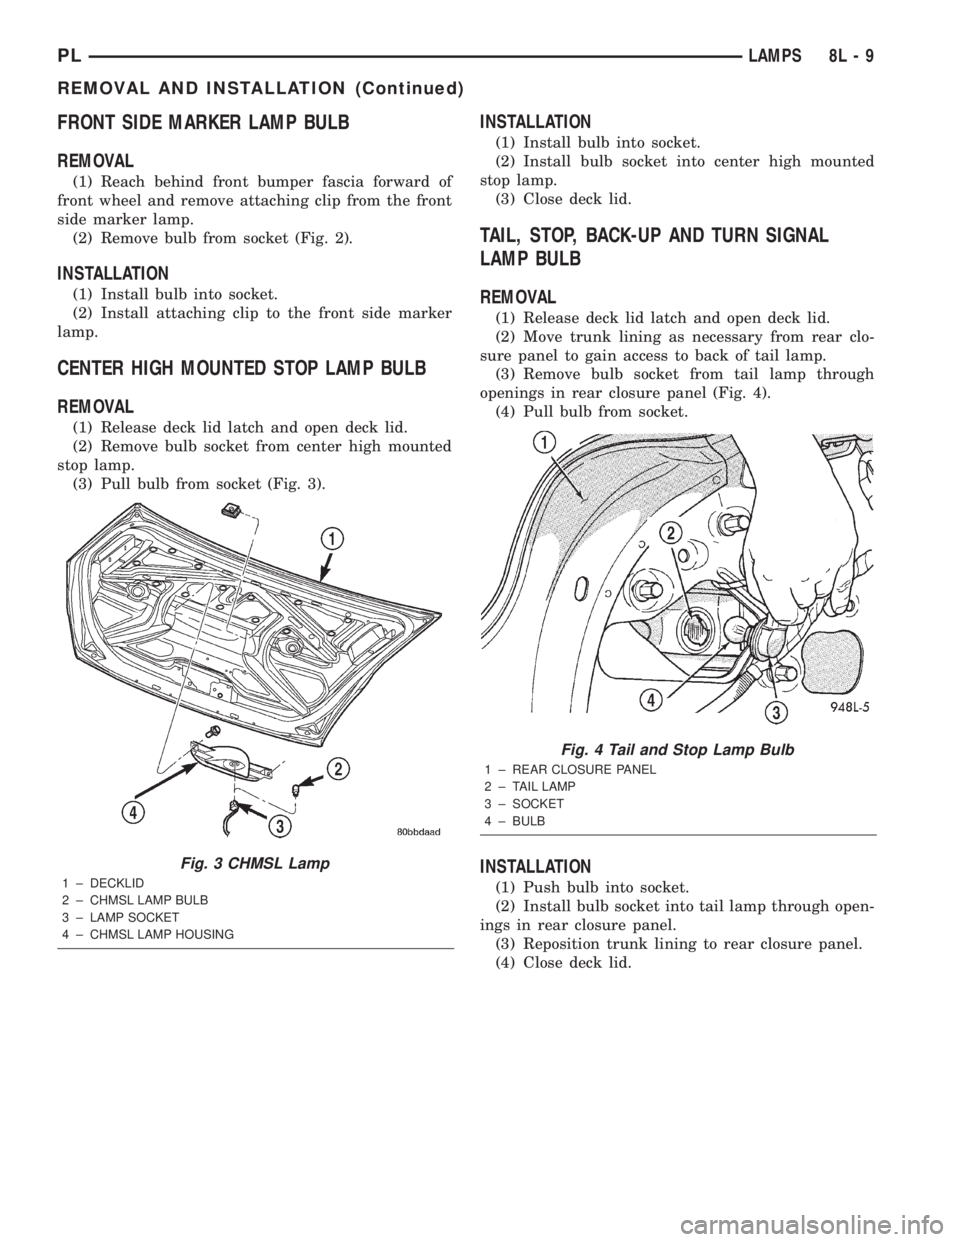
(1) Reach behind front bumper fascia forward of
front wheel and remove attaching clip from the front
side marker lamp.
(2) Remove bulb from socket (Fig. 2).
INSTALLATION
(1) Install bulb into socket.
(2) Install attaching clip to the front side marker
lamp.
CENTER HIGH MOUNTED STOP LAMP BULB
REMOVAL
(1) Release deck lid latch and open deck lid.
(2) Remove bulb socket from center high mounted
stop lamp.
(3) Pull bulb from socket (Fig. 3).
INSTALLATION
(1) Install bulb into socket.
(2) Install bulb socket into center high mounted
stop lamp.
(3) Close deck lid.
TAIL, STOP, BACK-UP AND TURN SIGNAL
LAMP BULB
REMOVAL
(1) Release deck lid latch and open deck lid.
(2) Move trunk lining as necessary from rear clo-
sure panel to gain access to back of tail lamp.
(3) Remove bulb socket from tail lamp through
openings in rear closure panel (Fig. 4).
(4) Pull bulb from socket.
INSTALLATION
(1) Push bulb into socket.
(2) Install bulb socket into tail lamp through open-
ings in rear closure panel.
(3) Reposition trunk lining to rear closure panel.
(4) Close deck lid.
Fig. 3 CHMSL Lamp
1 ± DECKLID
2 ± CHMSL LAMP BULB
3 ± LAMP SOCKET
4 ± CHMSL LAMP HOUSING
Fig. 4 Tail and Stop Lamp Bulb
1 ± REAR CLOSURE PANEL
2 ± TAIL LAMP
3 ± SOCKET
4 ± BULB
PLLAMPS 8L - 9
REMOVAL AND INSTALLATION (Continued)
Page 317 of 1285
LICENSE PLATE LAMP BULB
REMOVAL
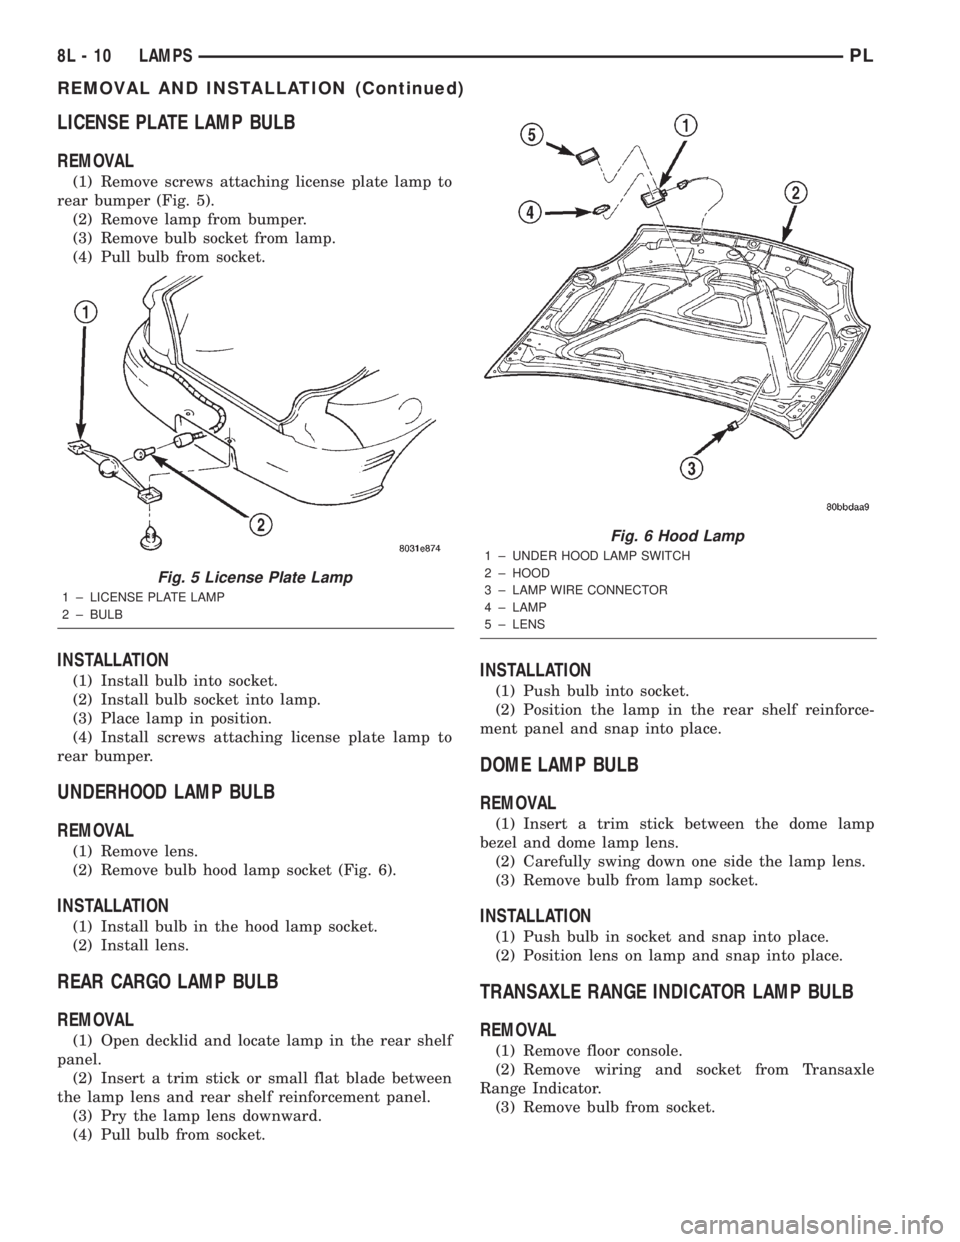
(1) Remove screws attaching license plate lamp to
rear bumper (Fig. 5).
(2) Remove lamp from bumper.
(3) Remove bulb socket from lamp.
(4) Pull bulb from socket.
INSTALLATION
(1) Install bulb into socket.
(2) Install bulb socket into lamp.
(3) Place lamp in position.
(4) Install screws attaching license plate lamp to
rear bumper.
UNDERHOOD LAMP BULB
REMOVAL
(1) Remove lens.
(2) Remove bulb hood lamp socket (Fig. 6).
INSTALLATION
(1) Install bulb in the hood lamp socket.
(2) Install lens.
REAR CARGO LAMP BULB
REMOVAL
(1) Open decklid and locate lamp in the rear shelf
panel.
(2) Insert a trim stick or small flat blade between
the lamp lens and rear shelf reinforcement panel.
(3) Pry the lamp lens downward.
(4) Pull bulb from socket.
INSTALLATION
(1) Push bulb into socket.
(2) Position the lamp in the rear shelf reinforce-
ment panel and snap into place.
DOME LAMP BULB
REMOVAL
(1) Insert a trim stick between the dome lamp
bezel and dome lamp lens.
(2) Carefully swing down one side the lamp lens.
(3) Remove bulb from lamp socket.
INSTALLATION
(1) Push bulb in socket and snap into place.
(2) Position lens on lamp and snap into place.
TRANSAXLE RANGE INDICATOR LAMP BULB
REMOVAL
(1) Remove floor console.
(2) Remove wiring and socket from Transaxle
Range Indicator.
(3) Remove bulb from socket.
Fig. 5 License Plate Lamp
1 ± LICENSE PLATE LAMP
2 ± BULB
Fig. 6 Hood Lamp
1 ± UNDER HOOD LAMP SWITCH
2 ± HOOD
3 ± LAMP WIRE CONNECTOR
4 ± LAMP
5 ± LENS
8L - 10 LAMPSPL
REMOVAL AND INSTALLATION (Continued)
Page 318 of 1285
INSTALLATION
(1) Push bulb in socket and snap into place.
(2) Install floor console.
GLOVE BOX LAMP BULB
REMOVAL
(1) Open glove box door.
(2) Pull downward on lamp/switch assembly to dis-
engage tabs from instrument panel.
(3) Pull bulb from socket.
INSTALLATION
(1) Push bulb into socket.
(2) Place lamp/switch assembly into position.
(3) Push lamp/switch assembly to lock tabs.
(4) Check lamp operation, and close glove door.
FLOOR CONSOLE LAMP BULB
REMOVAL
(1) Using a flat bladed tool, slide it between the
lamp and instrument panel to disengage tabs.(2) Remove bulb from lamp socket.
INSTALLATION
(1) Install bulb into socket.
(2) Place lamp into position.
(3) Push lamp to lock tabs.
(4) Check lamp operation.
VISOR VANITY LAMP BULB
REMOVAL
(1) Lower visor.
(2) Insert a small flat bladed tool between the
lamp lens and lamp.
(3) Carefully pry lens outward.
(4) Remove bulb from socket.
INSTALLATION
(1) Position bulb in socket and snap into place.
(2) Position lens on lamp and snap into place.
PLLAMPS 8L - 11
REMOVAL AND INSTALLATION (Continued)
Page 319 of 1285
LAMP SERVICE
TABLE OF CONTENTS
page page
DESCRIPTION AND OPERATION
LAMP ASSEMBLIES.......................12
REMOVAL AND INSTALLATION
HEADLAMP MODULE.....................12
FOG LAMP..............................13
PARK AND TURN SIGNAL LAMP BULB........13
FRONT SIDE MARKER LAMP...............13
CENTER HIGH MOUNTED STOP LAMP
(CHMSL)..............................14TAIL, STOP AND TURN SIGNAL LAMP........14
LICENSE PLATE LAMP....................14
UNDERHOOD LAMP......................14
REAR CARGO LAMP......................15
DOME LAMP............................15
GLOVE BOX LAMP BULB..................15
FLOOR CONSOLE LAMP BULB..............15
VISOR VANITY LAMP......................15
DESCRIPTION AND OPERATION
LAMP ASSEMBLIES
The lamp assemblies or modules generally consist
of a housing, reflector(s) and lens that directs a light
source. Vehicles use many different types of lamps:
²Headlamp
²Fog Lamp
²Tail Lamp
²Stop Lamp
²Turn Signal Lamp
²Back up Lamp
²Dome Lamp
²Transaxle Range Indicator Lamp (PRNDL)
²Glove Box Lamp
²Floor Console Lamp
²Rear Cargo Lamp
²Visor Vanity Lamp
²Underhood Lamp
²etc.
REMOVAL AND INSTALLATION
HEADLAMP MODULE
REMOVAL
(1) Release hood latch and open hood.
(2) Remove screws attaching headlamp module to
upper crossmember.
(3) Remove headlamp module from vehicle.
(4) Disconnect wire connectors from back of head-
lamp module.
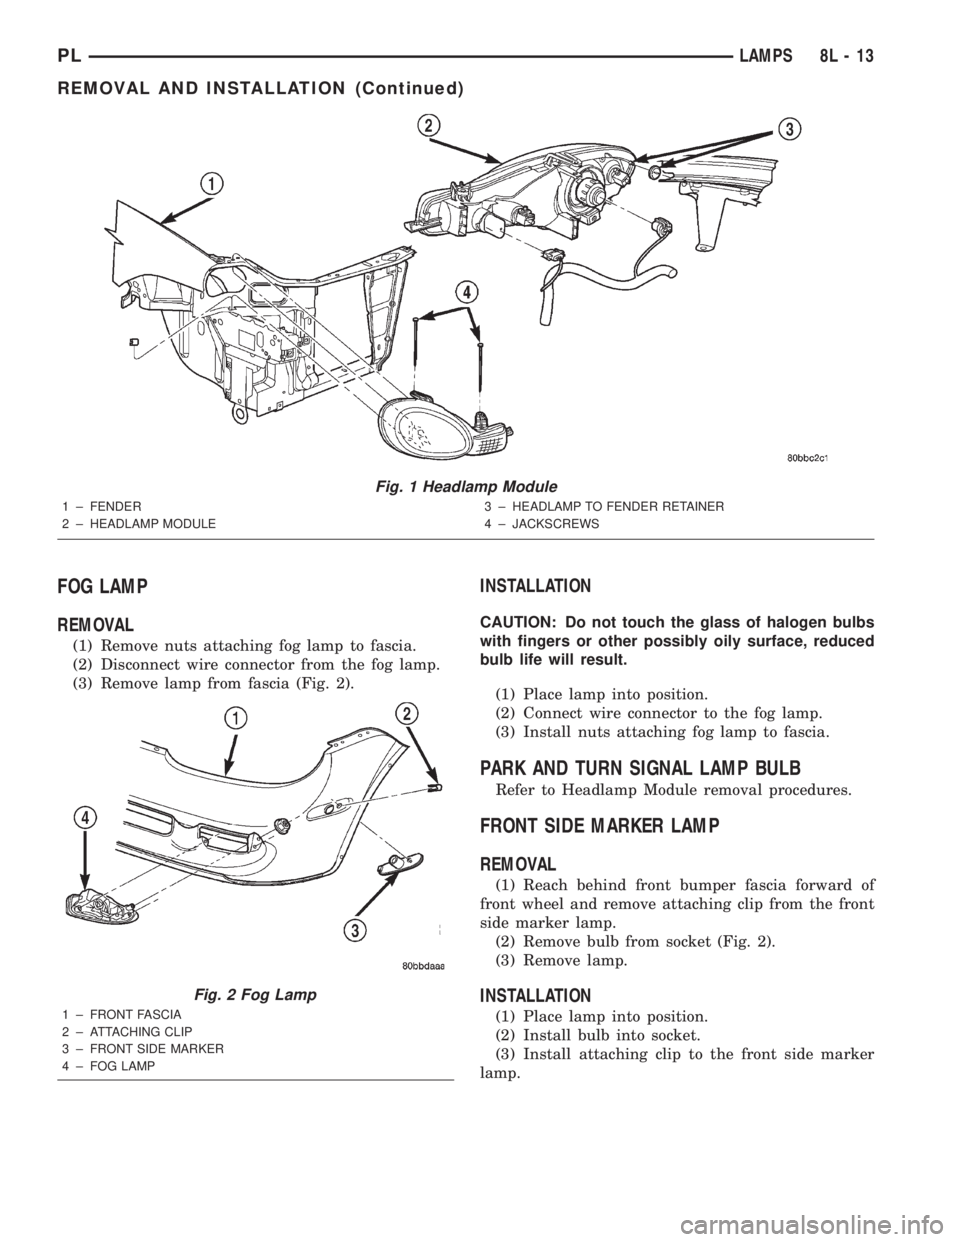
(5) Remove headlamp module (Fig. 1).
INSTALLATION
CAUTION: Do not touch the glass of halogen bulbs
with fingers or other possibly oily surface, reduced
bulb life will result.
(1) Connect wire connectors to the back of head-
lamp module.
(2) Place headlamp module in position.
(3) Install screws attaching headlamp module to
upper crossmember.
(4) Close hood.
8L - 12 LAMPSPL
Page 320 of 1285
FOG LAMP
REMOVAL
(1) Remove nuts attaching fog lamp to fascia.
(2) Disconnect wire connector from the fog lamp.
(3) Remove lamp from fascia (Fig. 2).
INSTALLATION
CAUTION: Do not touch the glass of halogen bulbs
with fingers or other possibly oily surface, reduced
bulb life will result.
(1) Place lamp into position.
(2) Connect wire connector to the fog lamp.
(3) Install nuts attaching fog lamp to fascia.
PARK AND TURN SIGNAL LAMP BULB
Refer to Headlamp Module removal procedures.
FRONT SIDE MARKER LAMP
REMOVAL
(1) Reach behind front bumper fascia forward of
front wheel and remove attaching clip from the front
side marker lamp.
(2) Remove bulb from socket (Fig. 2).
(3) Remove lamp.
INSTALLATION
(1) Place lamp into position.
(2) Install bulb into socket.
(3) Install attaching clip to the front side marker
lamp.
Fig. 1 Headlamp Module
1 ± FENDER
2 ± HEADLAMP MODULE3 ± HEADLAMP TO FENDER RETAINER
4 ± JACKSCREWS
Fig. 2 Fog Lamp
1 ± FRONT FASCIA
2 ± ATTACHING CLIP
3 ± FRONT SIDE MARKER
4 ± FOG LAMP
PLLAMPS 8L - 13
REMOVAL AND INSTALLATION (Continued)