Fig DODGE RAM 1500 1998 2.G Workshop Manual
[x] Cancel search | Manufacturer: DODGE, Model Year: 1998, Model line: RAM 1500, Model: DODGE RAM 1500 1998 2.GPages: 2627
Page 168 of 2627
(1) Through the axle tube use Wrench C-4164 to
adjust each threaded adjuster inward until the differ-
ential bearing free-play is eliminated. Allow some
ring gear backlash approximately 0.25 mm (0.01 in.)
between the ring and pinion gear. Seat the bearing
cups with the procedure described above.
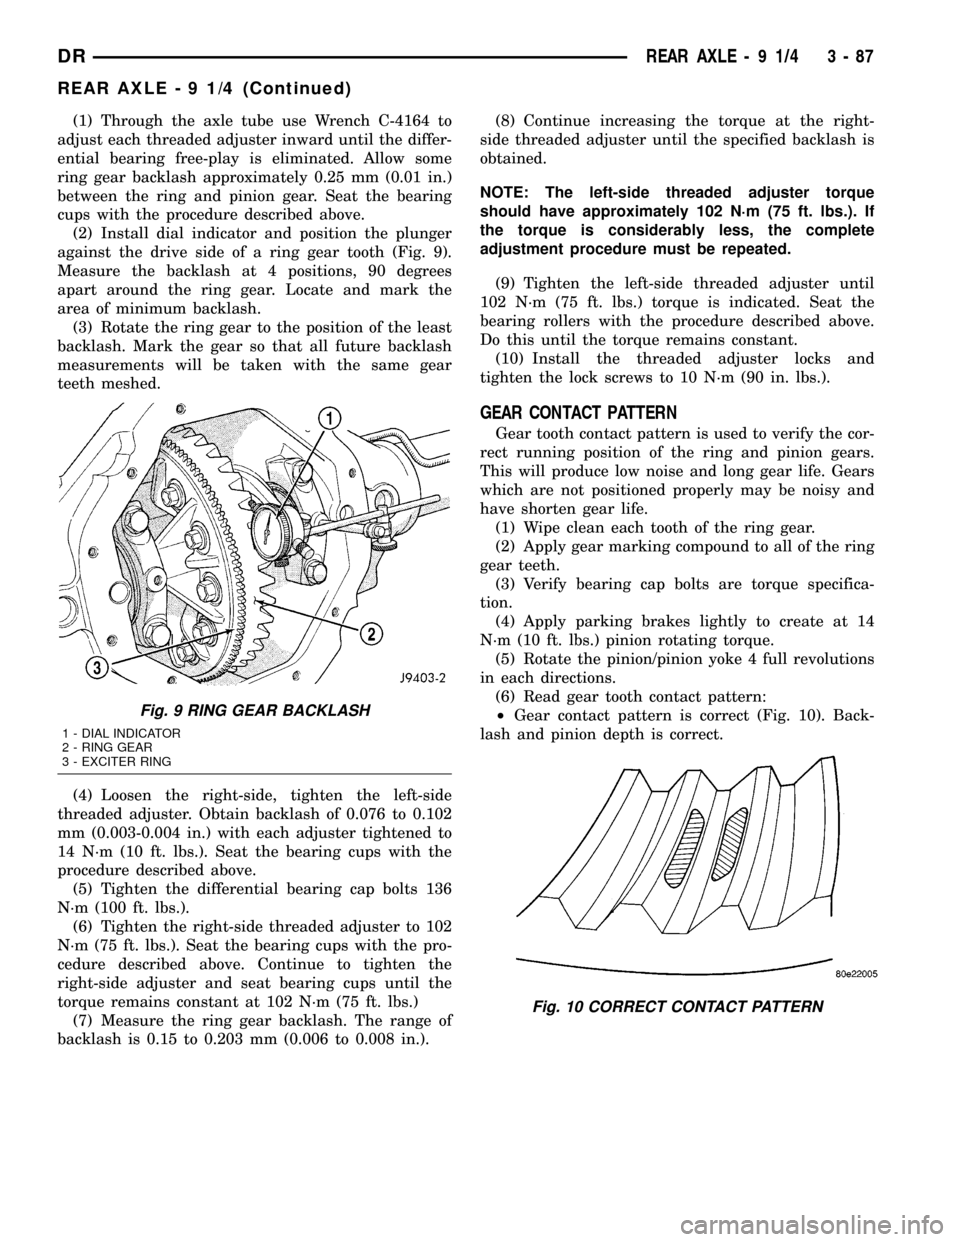
(2) Install dial indicator and position the plunger
against the drive side of a ring gear tooth (Fig. 9).
Measure the backlash at 4 positions, 90 degrees
apart around the ring gear. Locate and mark the
area of minimum backlash.
(3) Rotate the ring gear to the position of the least
backlash. Mark the gear so that all future backlash
measurements will be taken with the same gear
teeth meshed.
(4) Loosen the right-side, tighten the left-side
threaded adjuster. Obtain backlash of 0.076 to 0.102
mm (0.003-0.004 in.) with each adjuster tightened to
14 N´m (10 ft. lbs.). Seat the bearing cups with the
procedure described above.
(5) Tighten the differential bearing cap bolts 136
N´m (100 ft. lbs.).
(6) Tighten the right-side threaded adjuster to 102
N´m (75 ft. lbs.). Seat the bearing cups with the pro-
cedure described above. Continue to tighten the
right-side adjuster and seat bearing cups until the
torque remains constant at 102 N´m (75 ft. lbs.)
(7) Measure the ring gear backlash. The range of
backlash is 0.15 to 0.203 mm (0.006 to 0.008 in.).(8) Continue increasing the torque at the right-
side threaded adjuster until the specified backlash is
obtained.
NOTE: The left-side threaded adjuster torque
should have approximately 102 N´m (75 ft. lbs.). If
the torque is considerably less, the complete
adjustment procedure must be repeated.
(9) Tighten the left-side threaded adjuster until
102 N´m (75 ft. lbs.) torque is indicated. Seat the
bearing rollers with the procedure described above.
Do this until the torque remains constant.
(10) Install the threaded adjuster locks and
tighten the lock screws to 10 N´m (90 in. lbs.).
GEAR CONTACT PATTERN
Gear tooth contact pattern is used to verify the cor-
rect running position of the ring and pinion gears.
This will produce low noise and long gear life. Gears
which are not positioned properly may be noisy and
have shorten gear life.
(1) Wipe clean each tooth of the ring gear.
(2) Apply gear marking compound to all of the ring
gear teeth.
(3) Verify bearing cap bolts are torque specifica-
tion.
(4) Apply parking brakes lightly to create at 14
N´m (10 ft. lbs.) pinion rotating torque.
(5) Rotate the pinion/pinion yoke 4 full revolutions
in each directions.
(6) Read gear tooth contact pattern:
²Gear contact pattern is correct (Fig. 10). Back-
lash and pinion depth is correct.
Fig. 9 RING GEAR BACKLASH
1 - DIAL INDICATOR
2 - RING GEAR
3 - EXCITER RING
Fig. 10 CORRECT CONTACT PATTERN
DRREAR AXLE - 9 1/4 3 - 87
REAR AXLE - 9 1/4 (Continued)
Page 169 of 2627
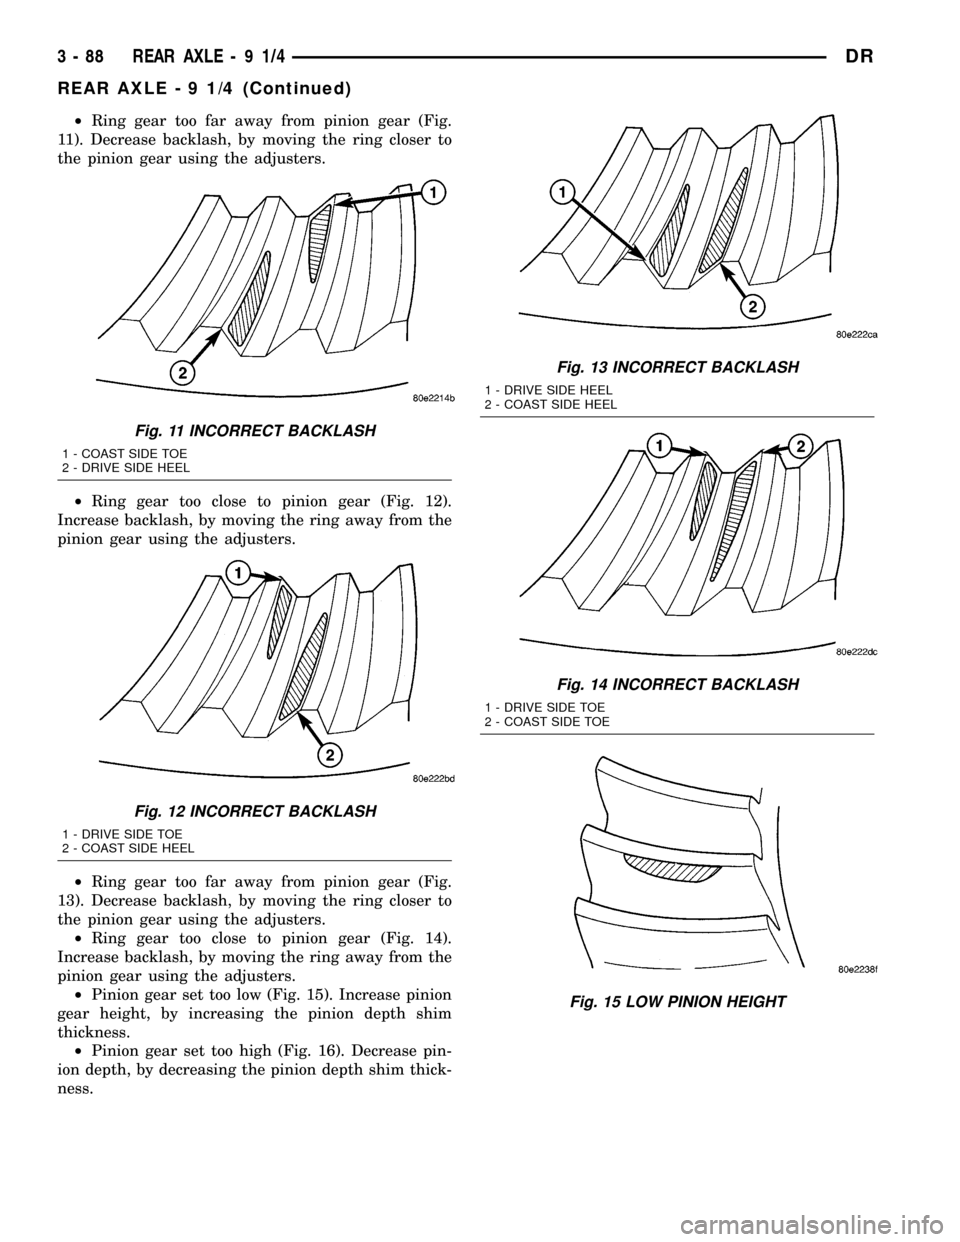
²Ring gear too far away from pinion gear (Fig.
11). Decrease backlash, by moving the ring closer to
the pinion gear using the adjusters.
²Ring gear too close to pinion gear (Fig. 12).
Increase backlash, by moving the ring away from the
pinion gear using the adjusters.
²Ring gear too far away from pinion gear (Fig.
13). Decrease backlash, by moving the ring closer to
the pinion gear using the adjusters.
²Ring gear too close to pinion gear (Fig. 14).
Increase backlash, by moving the ring away from the
pinion gear using the adjusters.
²Pinion gear set too low (Fig. 15). Increase pinion
gear height, by increasing the pinion depth shim
thickness.
²Pinion gear set too high (Fig. 16). Decrease pin-
ion depth, by decreasing the pinion depth shim thick-
ness.
Fig. 11 INCORRECT BACKLASH
1 - COAST SIDE TOE
2 - DRIVE SIDE HEEL
Fig. 12 INCORRECT BACKLASH
1 - DRIVE SIDE TOE
2 - COAST SIDE HEEL
Fig. 13 INCORRECT BACKLASH
1 - DRIVE SIDE HEEL
2 - COAST SIDE HEEL
Fig. 14 INCORRECT BACKLASH
1 - DRIVE SIDE TOE
2 - COAST SIDE TOE
Fig. 15 LOW PINION HEIGHT
3 - 88 REAR AXLE-91/4DR
REAR AXLE - 9 1/4 (Continued)
Page 170 of 2627
SIDE GEAR CLEARANCE
When measuring side gear clearance, check each
gear independently. If it necessary to replace a side
gear, replace both gears as a matched set.
(1) Install the axle shafts and C-locks and pinion
mate shaft.
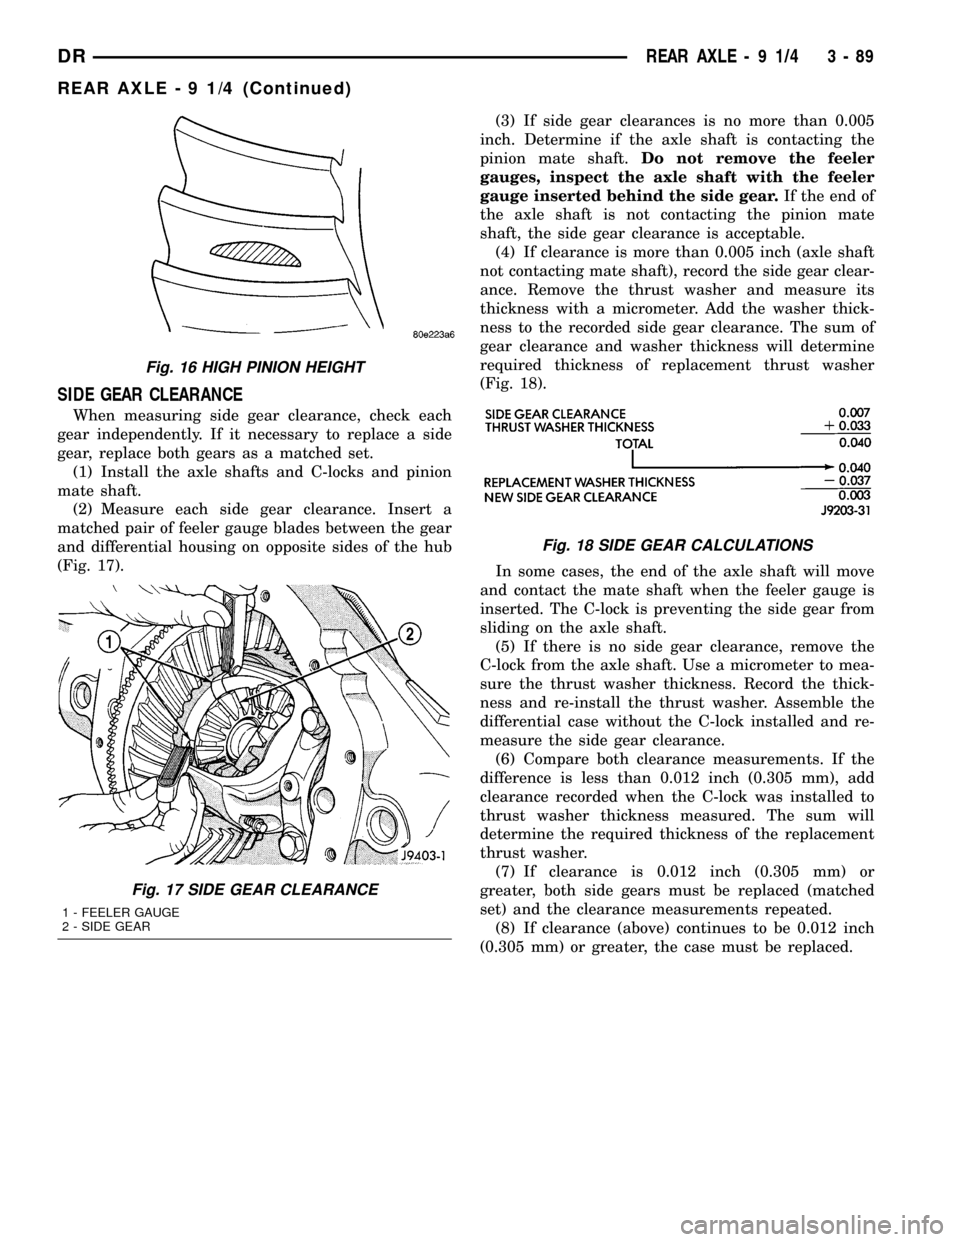
(2) Measure each side gear clearance. Insert a
matched pair of feeler gauge blades between the gear
and differential housing on opposite sides of the hub
(Fig. 17).(3) If side gear clearances is no more than 0.005
inch. Determine if the axle shaft is contacting the
pinion mate shaft.Do not remove the feeler
gauges, inspect the axle shaft with the feeler
gauge inserted behind the side gear.If the end of
the axle shaft is not contacting the pinion mate
shaft, the side gear clearance is acceptable.
(4) If clearance is more than 0.005 inch (axle shaft
not contacting mate shaft), record the side gear clear-
ance. Remove the thrust washer and measure its
thickness with a micrometer. Add the washer thick-
ness to the recorded side gear clearance. The sum of
gear clearance and washer thickness will determine
required thickness of replacement thrust washer
(Fig. 18).
In some cases, the end of the axle shaft will move
and contact the mate shaft when the feeler gauge is
inserted. The C-lock is preventing the side gear from
sliding on the axle shaft.
(5) If there is no side gear clearance, remove the
C-lock from the axle shaft. Use a micrometer to mea-
sure the thrust washer thickness. Record the thick-
ness and re-install the thrust washer. Assemble the
differential case without the C-lock installed and re-
measure the side gear clearance.
(6) Compare both clearance measurements. If the
difference is less than 0.012 inch (0.305 mm), add
clearance recorded when the C-lock was installed to
thrust washer thickness measured. The sum will
determine the required thickness of the replacement
thrust washer.
(7) If clearance is 0.012 inch (0.305 mm) or
greater, both side gears must be replaced (matched
set) and the clearance measurements repeated.
(8) If clearance (above) continues to be 0.012 inch
(0.305 mm) or greater, the case must be replaced.
Fig. 16 HIGH PINION HEIGHT
Fig. 17 SIDE GEAR CLEARANCE
1 - FEELER GAUGE
2 - SIDE GEAR
Fig. 18 SIDE GEAR CALCULATIONS
DRREAR AXLE - 9 1/4 3 - 89
REAR AXLE - 9 1/4 (Continued)
Page 174 of 2627
AXLE SHAFTS
REMOVAL
(1) Place transmission in neutral.
(2) Raise and support the vehicle.
(3) Remove wheel and tire assembly.
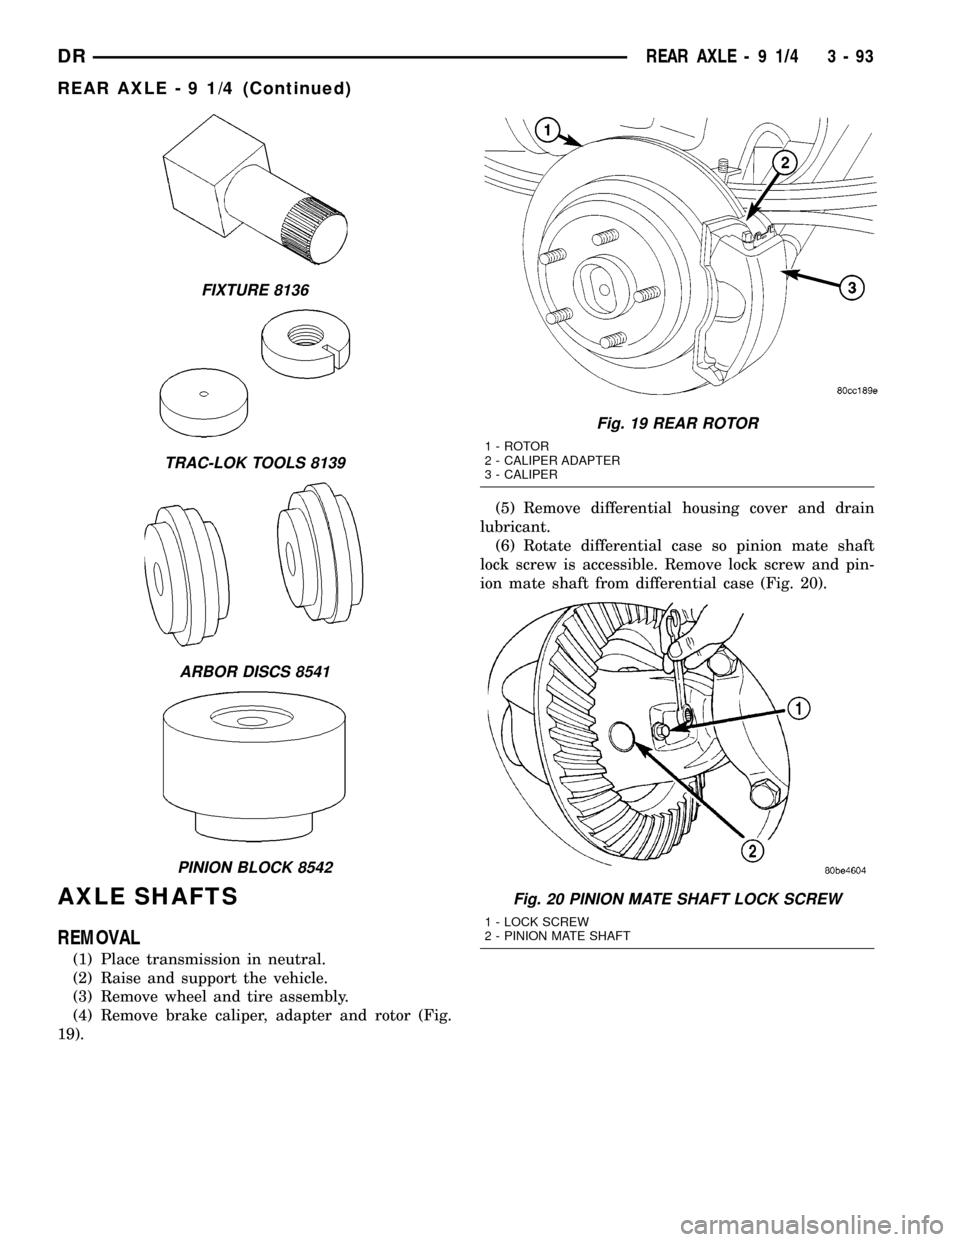
(4) Remove brake caliper, adapter and rotor (Fig.
19).(5) Remove differential housing cover and drain
lubricant.
(6) Rotate differential case so pinion mate shaft
lock screw is accessible. Remove lock screw and pin-
ion mate shaft from differential case (Fig. 20).
FIXTURE 8136
TRAC-LOK TOOLS 8139
ARBOR DISCS 8541
PINION BLOCK 8542
Fig. 19 REAR ROTOR
1 - ROTOR
2 - CALIPER ADAPTER
3 - CALIPER
Fig. 20 PINION MATE SHAFT LOCK SCREW
1 - LOCK SCREW
2 - PINION MATE SHAFT
DRREAR AXLE - 9 1/4 3 - 93
REAR AXLE - 9 1/4 (Continued)
Page 175 of 2627
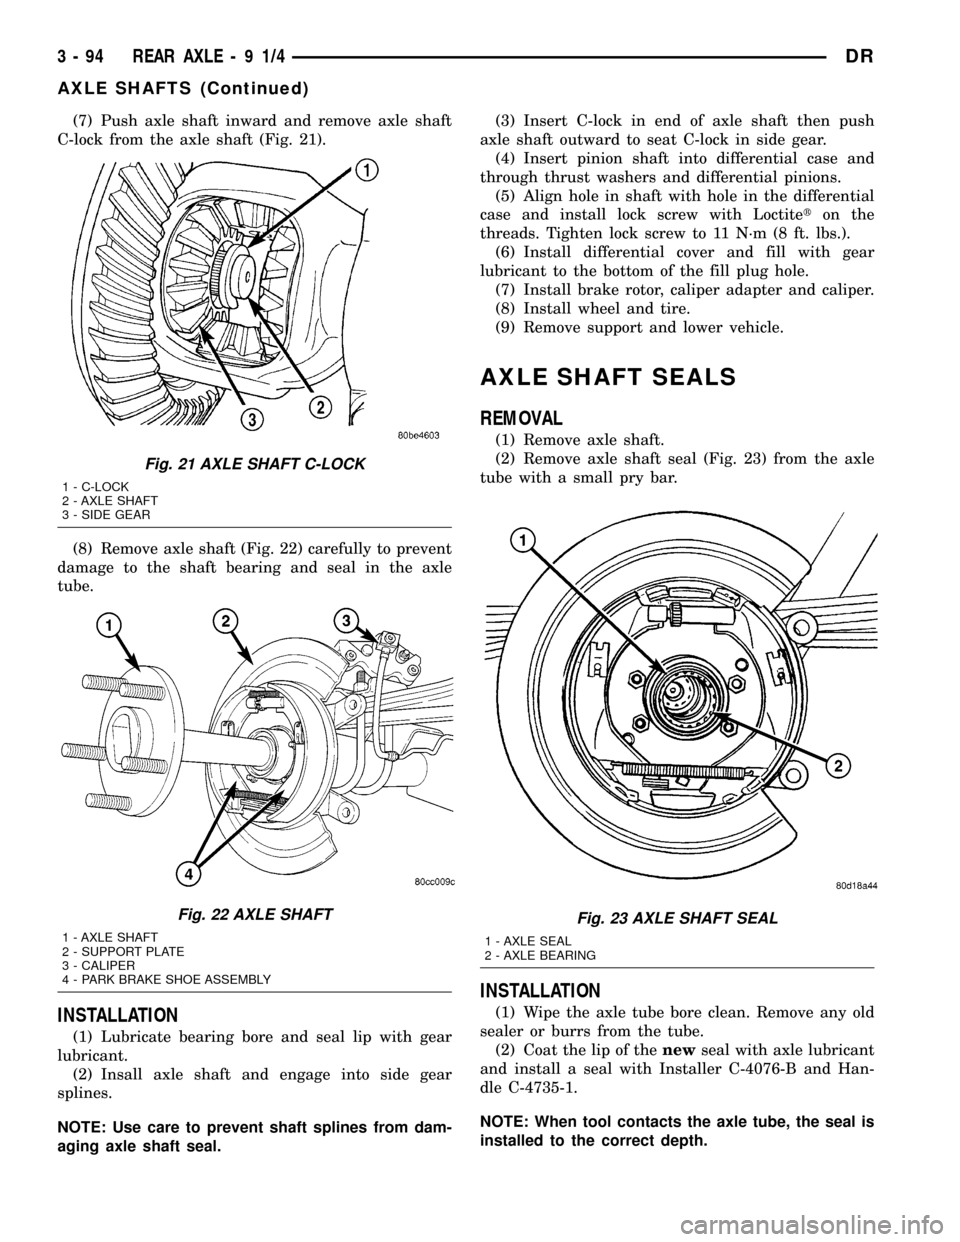
(7) Push axle shaft inward and remove axle shaft
C-lock from the axle shaft (Fig. 21).
(8) Remove axle shaft (Fig. 22) carefully to prevent
damage to the shaft bearing and seal in the axle
tube.
INSTALLATION
(1) Lubricate bearing bore and seal lip with gear
lubricant.
(2) Insall axle shaft and engage into side gear
splines.
NOTE: Use care to prevent shaft splines from dam-
aging axle shaft seal.(3) Insert C-lock in end of axle shaft then push
axle shaft outward to seat C-lock in side gear.
(4) Insert pinion shaft into differential case and
through thrust washers and differential pinions.
(5) Align hole in shaft with hole in the differential
case and install lock screw with Loctiteton the
threads. Tighten lock screw to 11 N´m (8 ft. lbs.).
(6) Install differential cover and fill with gear
lubricant to the bottom of the fill plug hole.
(7) Install brake rotor, caliper adapter and caliper.
(8) Install wheel and tire.
(9) Remove support and lower vehicle.
AXLE SHAFT SEALS
REMOVAL
(1) Remove axle shaft.
(2) Remove axle shaft seal (Fig. 23) from the axle
tube with a small pry bar.
INSTALLATION
(1) Wipe the axle tube bore clean. Remove any old
sealer or burrs from the tube.
(2) Coat the lip of thenewseal with axle lubricant
and install a seal with Installer C-4076-B and Han-
dle C-4735-1.
NOTE: When tool contacts the axle tube, the seal is
installed to the correct depth.
Fig. 21 AXLE SHAFT C-LOCK
1 - C-LOCK
2 - AXLE SHAFT
3 - SIDE GEAR
Fig. 22 AXLE SHAFT
1 - AXLE SHAFT
2 - SUPPORT PLATE
3 - CALIPER
4 - PARK BRAKE SHOE ASSEMBLY
Fig. 23 AXLE SHAFT SEAL
1 - AXLE SEAL
2 - AXLE BEARING
3 - 94 REAR AXLE-91/4DR
AXLE SHAFTS (Continued)
Page 176 of 2627
(3) Install the axle shaft.
(4) Install differential cover and fill with gear
lubricant to the bottom of the fill plug hole.
AXLE BEARINGS
REMOVAL
(1) Remove axle shaft.
(2) Remove axle shaft seal from axle tube with a
small pry bar.
NOTE: The seal and bearing can be removed at the
same time with the bearing removal tool.
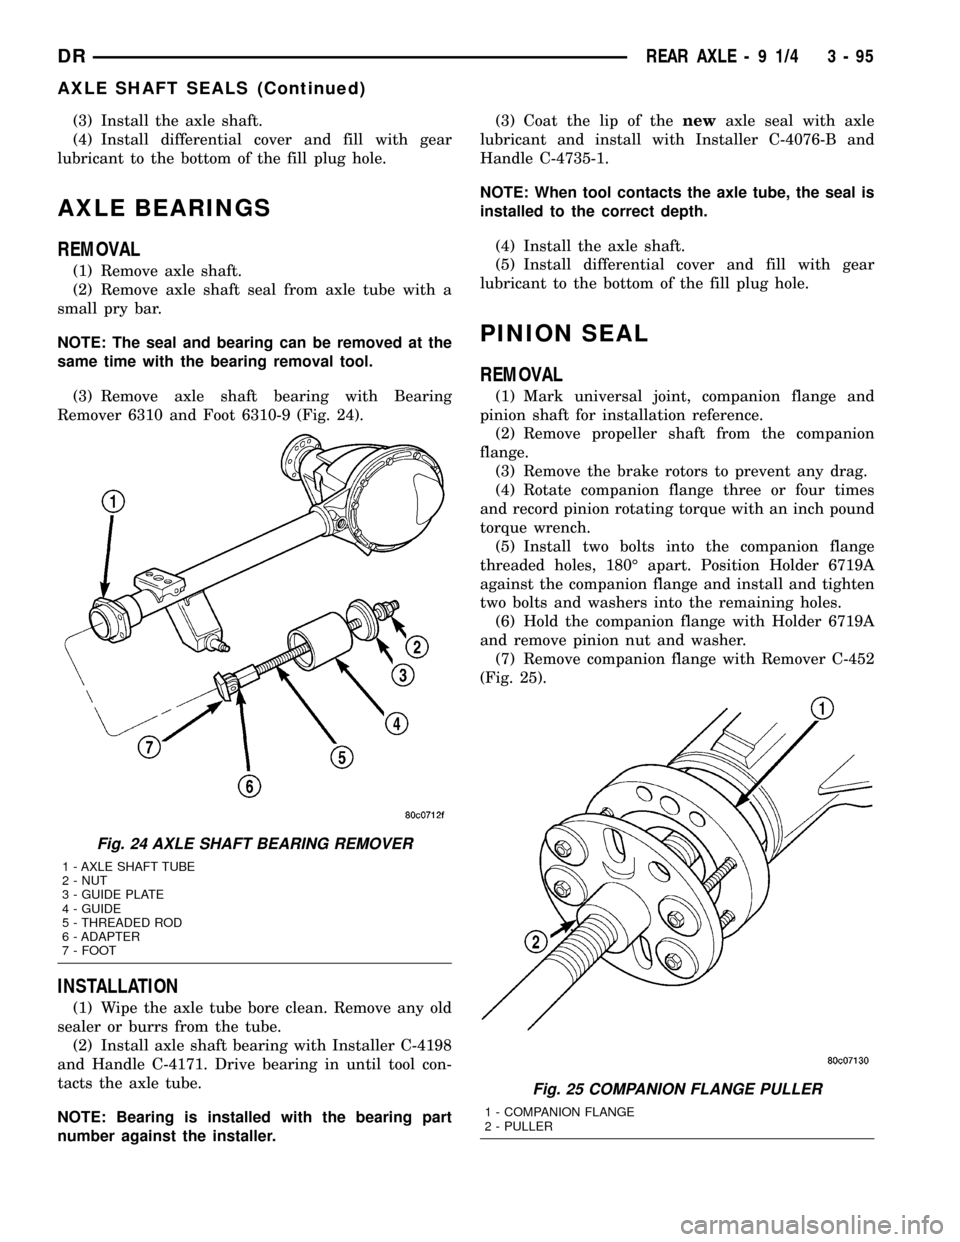
(3) Remove axle shaft bearing with Bearing
Remover 6310 and Foot 6310-9 (Fig. 24).
INSTALLATION
(1) Wipe the axle tube bore clean. Remove any old
sealer or burrs from the tube.
(2) Install axle shaft bearing with Installer C-4198
and Handle C-4171. Drive bearing in until tool con-
tacts the axle tube.
NOTE: Bearing is installed with the bearing part
number against the installer.(3) Coat the lip of thenewaxle seal with axle
lubricant and install with Installer C-4076-B and
Handle C-4735-1.
NOTE: When tool contacts the axle tube, the seal is
installed to the correct depth.
(4) Install the axle shaft.
(5) Install differential cover and fill with gear
lubricant to the bottom of the fill plug hole.
PINION SEAL
REMOVAL
(1) Mark universal joint, companion flange and
pinion shaft for installation reference.
(2) Remove propeller shaft from the companion
flange.
(3) Remove the brake rotors to prevent any drag.
(4) Rotate companion flange three or four times
and record pinion rotating torque with an inch pound
torque wrench.
(5) Install two bolts into the companion flange
threaded holes, 180É apart. Position Holder 6719A
against the companion flange and install and tighten
two bolts and washers into the remaining holes.
(6) Hold the companion flange with Holder 6719A
and remove pinion nut and washer.
(7) Remove companion flange with Remover C-452
(Fig. 25).
Fig. 24 AXLE SHAFT BEARING REMOVER
1 - AXLE SHAFT TUBE
2 - NUT
3 - GUIDE PLATE
4 - GUIDE
5 - THREADED ROD
6 - ADAPTER
7 - FOOT
Fig. 25 COMPANION FLANGE PULLER
1 - COMPANION FLANGE
2 - PULLER
DRREAR AXLE - 9 1/4 3 - 95
AXLE SHAFT SEALS (Continued)
Page 177 of 2627
(8) Remove pinion seal with pry tool or slide-ham-
mer mounted screw.
INSTALLATION
(1) Apply a light coating of gear lubricant on the
lip of pinion seal.
(2) Installnewpinion seal with Installer C-3860-A
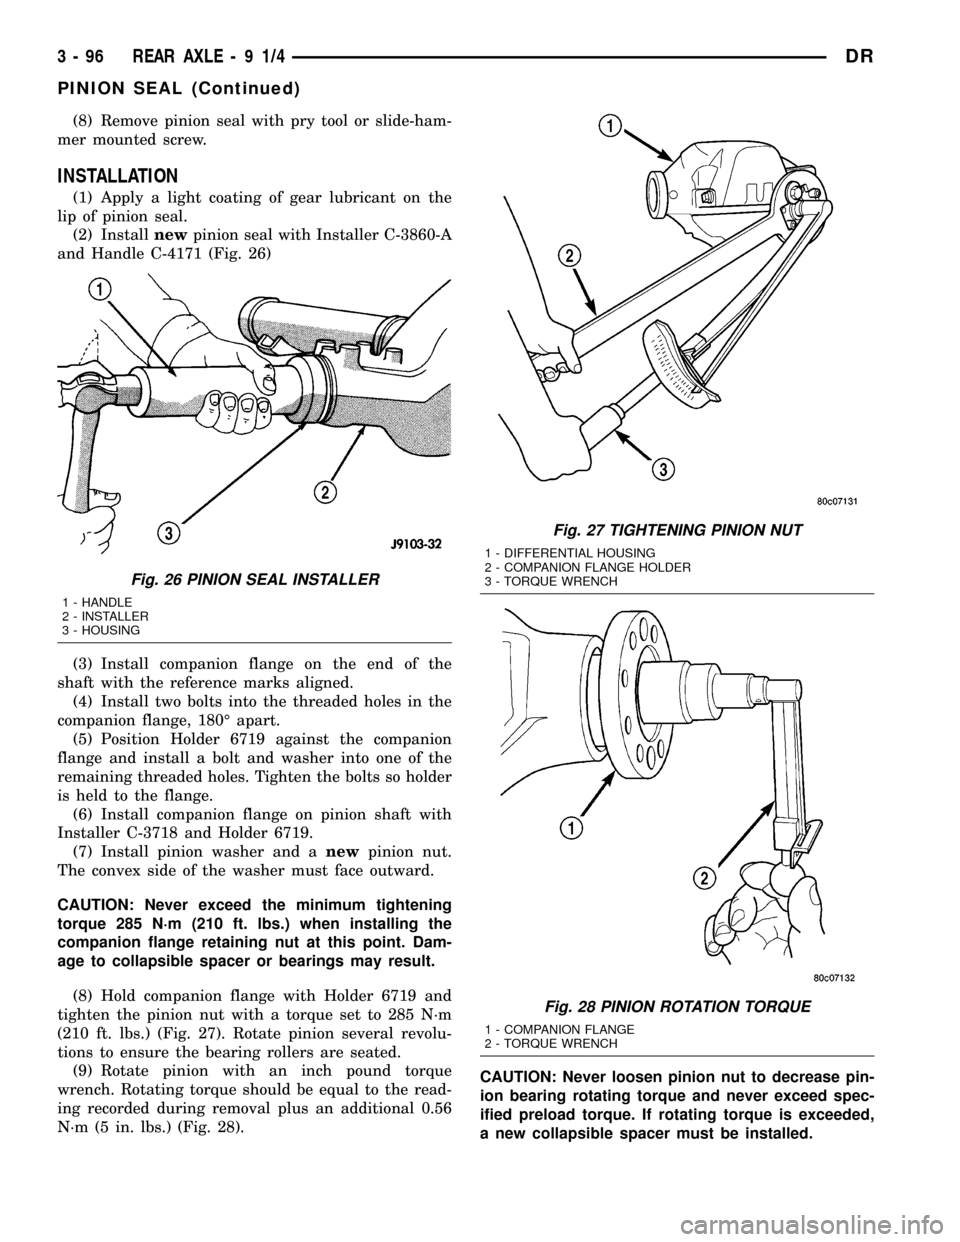
and Handle C-4171 (Fig. 26)
(3) Install companion flange on the end of the
shaft with the reference marks aligned.
(4) Install two bolts into the threaded holes in the
companion flange, 180É apart.
(5) Position Holder 6719 against the companion
flange and install a bolt and washer into one of the
remaining threaded holes. Tighten the bolts so holder
is held to the flange.
(6) Install companion flange on pinion shaft with
Installer C-3718 and Holder 6719.
(7) Install pinion washer and anewpinion nut.
The convex side of the washer must face outward.
CAUTION: Never exceed the minimum tightening
torque 285 N´m (210 ft. lbs.) when installing the
companion flange retaining nut at this point. Dam-
age to collapsible spacer or bearings may result.
(8) Hold companion flange with Holder 6719 and
tighten the pinion nut with a torque set to 285 N´m
(210 ft. lbs.) (Fig. 27). Rotate pinion several revolu-
tions to ensure the bearing rollers are seated.
(9) Rotate pinion with an inch pound torque
wrench. Rotating torque should be equal to the read-
ing recorded during removal plus an additional 0.56
N´m (5 in. lbs.) (Fig. 28).CAUTION: Never loosen pinion nut to decrease pin-
ion bearing rotating torque and never exceed spec-
ified preload torque. If rotating torque is exceeded,
a new collapsible spacer must be installed.
Fig. 26 PINION SEAL INSTALLER
1 - HANDLE
2 - INSTALLER
3 - HOUSING
Fig. 27 TIGHTENING PINION NUT
1 - DIFFERENTIAL HOUSING
2 - COMPANION FLANGE HOLDER
3 - TORQUE WRENCH
Fig. 28 PINION ROTATION TORQUE
1 - COMPANION FLANGE
2 - TORQUE WRENCH
3 - 96 REAR AXLE-91/4DR
PINION SEAL (Continued)
Page 178 of 2627
(10) If rotating torque is low, use Holder 6719 to
hold the companion flange and tighten pinion nut in
6.8 N´m (5 ft. lbs.) increments until proper rotating
torque is achieved.
NOTE: The bearing rotating torque should be con-
stant during a complete revolution of the pinion. If
the rotating torque varies, this indicates a binding
condition.
NOTE: The seal replacement is unacceptable if the
final pinion nut torque is less than 285 N´m (210 ft.
lbs.).
(11) Install propeller shaft with the installation
reference marks aligned.
(12) Tighten the companion flange bolts to 108
N´m (80 ft. lbs.).
(13) Install brake rotors.
(14) Check the differential lubricant level.
DIFFERENTIAL COVER
REMOVAL
(1) With vehicle in neutral, position vehicle on
hoist.
(2) Remove drain plug.
(3) Remove cover bolts.
(4) Remove cover and drain lubricant.
INSTALLATION
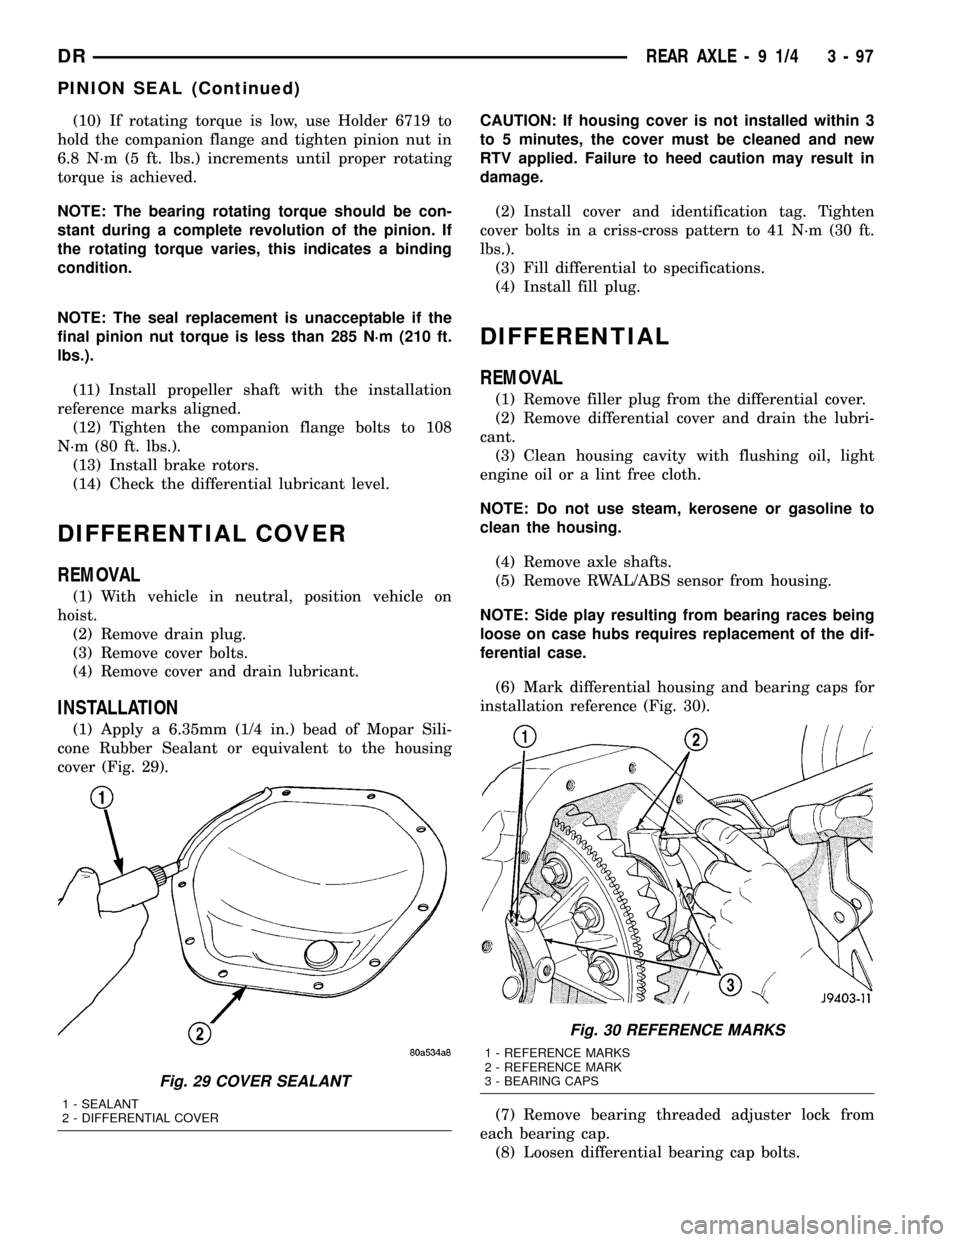
(1) Apply a 6.35mm (1/4 in.) bead of Mopar Sili-
cone Rubber Sealant or equivalent to the housing
cover (Fig. 29).CAUTION: If housing cover is not installed within 3
to 5 minutes, the cover must be cleaned and new
RTV applied. Failure to heed caution may result in
damage.
(2) Install cover and identification tag. Tighten
cover bolts in a criss-cross pattern to 41 N´m (30 ft.
lbs.).
(3) Fill differential to specifications.
(4) Install fill plug.
DIFFERENTIAL
REMOVAL
(1) Remove filler plug from the differential cover.
(2) Remove differential cover and drain the lubri-
cant.
(3) Clean housing cavity with flushing oil, light
engine oil or a lint free cloth.
NOTE: Do not use steam, kerosene or gasoline to
clean the housing.
(4) Remove axle shafts.
(5) Remove RWAL/ABS sensor from housing.
NOTE: Side play resulting from bearing races being
loose on case hubs requires replacement of the dif-
ferential case.
(6) Mark differential housing and bearing caps for
installation reference (Fig. 30).
(7) Remove bearing threaded adjuster lock from
each bearing cap.
(8) Loosen differential bearing cap bolts.
Fig. 29 COVER SEALANT
1 - SEALANT
2 - DIFFERENTIAL COVER
Fig. 30 REFERENCE MARKS
1 - REFERENCE MARKS
2 - REFERENCE MARK
3 - BEARING CAPS
DRREAR AXLE - 9 1/4 3 - 97
PINION SEAL (Continued)
Page 179 of 2627
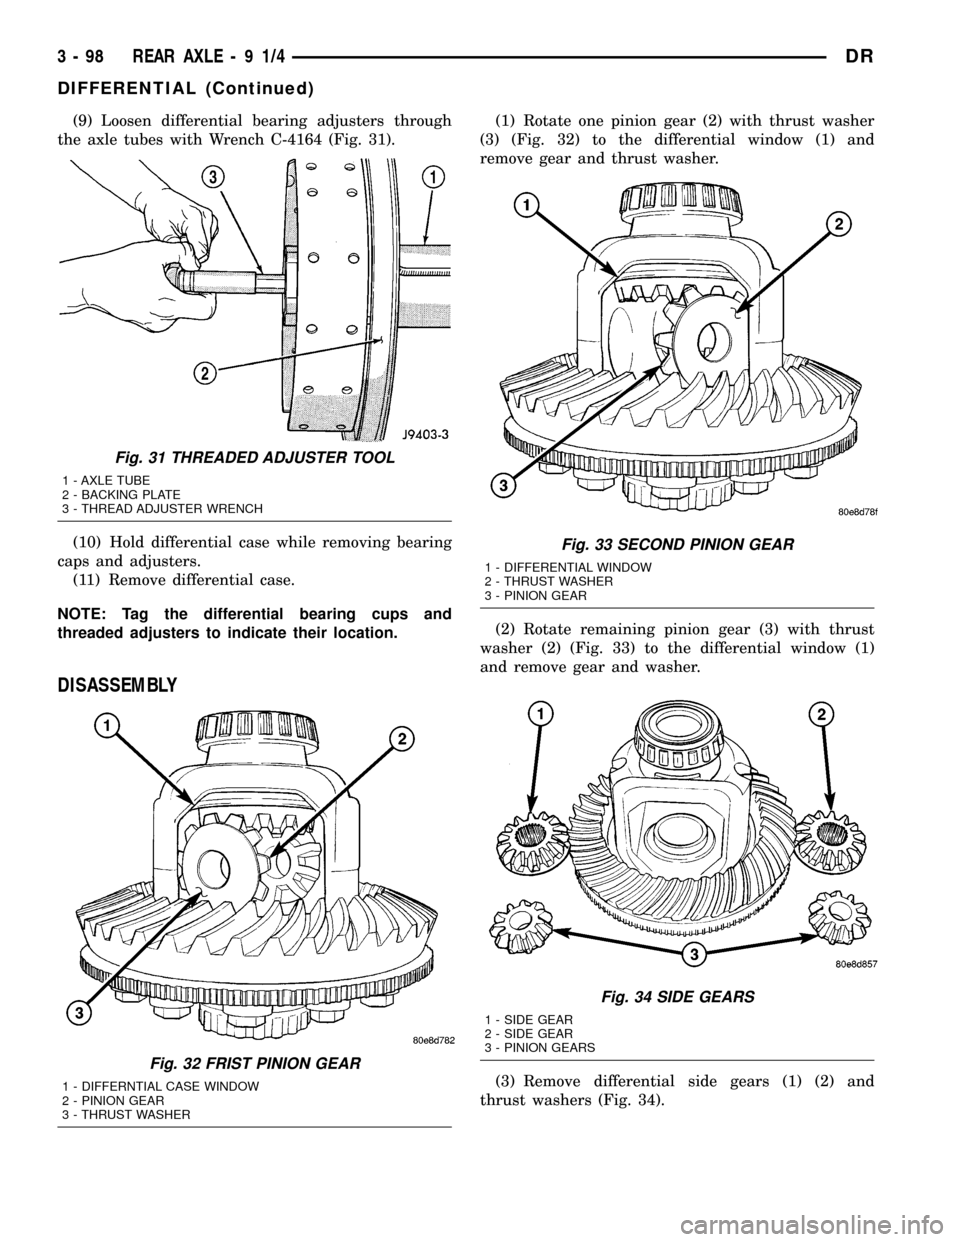
(9) Loosen differential bearing adjusters through
the axle tubes with Wrench C-4164 (Fig. 31).
(10) Hold differential case while removing bearing
caps and adjusters.
(11) Remove differential case.
NOTE: Tag the differential bearing cups and
threaded adjusters to indicate their location.
DISASSEMBLY
(1) Rotate one pinion gear (2) with thrust washer
(3) (Fig. 32) to the differential window (1) and
remove gear and thrust washer.
(2) Rotate remaining pinion gear (3) with thrust
washer (2) (Fig. 33) to the differential window (1)
and remove gear and washer.
(3) Remove differential side gears (1) (2) and
thrust washers (Fig. 34).
Fig. 31 THREADED ADJUSTER TOOL
1 - AXLE TUBE
2 - BACKING PLATE
3 - THREAD ADJUSTER WRENCH
Fig. 32 FRIST PINION GEAR
1 - DIFFERNTIAL CASE WINDOW
2 - PINION GEAR
3 - THRUST WASHER
Fig. 33 SECOND PINION GEAR
1 - DIFFERENTIAL WINDOW
2 - THRUST WASHER
3 - PINION GEAR
Fig. 34 SIDE GEARS
1 - SIDE GEAR
2 - SIDE GEAR
3 - PINION GEARS
3 - 98 REAR AXLE-91/4DR
DIFFERENTIAL (Continued)
Page 180 of 2627
ASSEMBLY
NOTE: If same gears and thrust washers are being
used, install them into their original locations.
(1) Lubricate all differential components with axle
lubricant.
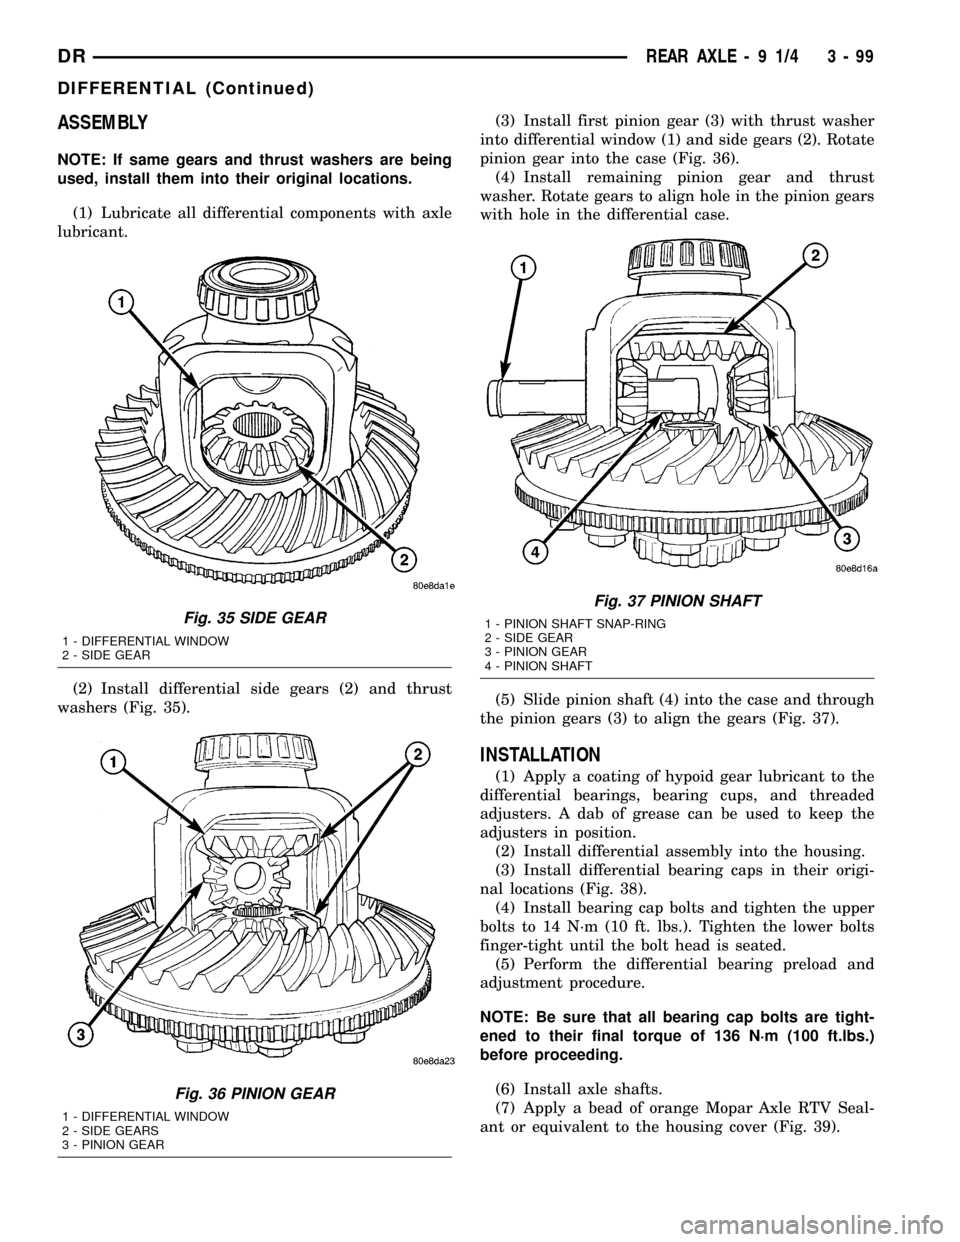
(2) Install differential side gears (2) and thrust
washers (Fig. 35).(3) Install first pinion gear (3) with thrust washer
into differential window (1) and side gears (2). Rotate
pinion gear into the case (Fig. 36).
(4) Install remaining pinion gear and thrust
washer. Rotate gears to align hole in the pinion gears
with hole in the differential case.
(5) Slide pinion shaft (4) into the case and through
the pinion gears (3) to align the gears (Fig. 37).
INSTALLATION
(1) Apply a coating of hypoid gear lubricant to the
differential bearings, bearing cups, and threaded
adjusters. A dab of grease can be used to keep the
adjusters in position.
(2) Install differential assembly into the housing.
(3) Install differential bearing caps in their origi-
nal locations (Fig. 38).
(4) Install bearing cap bolts and tighten the upper
bolts to 14 N´m (10 ft. lbs.). Tighten the lower bolts
finger-tight until the bolt head is seated.
(5) Perform the differential bearing preload and
adjustment procedure.
NOTE: Be sure that all bearing cap bolts are tight-
ened to their final torque of 136 N´m (100 ft.lbs.)
before proceeding.
(6) Install axle shafts.
(7) Apply a bead of orange Mopar Axle RTV Seal-
ant or equivalent to the housing cover (Fig. 39).
Fig. 35 SIDE GEAR
1 - DIFFERENTIAL WINDOW
2 - SIDE GEAR
Fig. 36 PINION GEAR
1 - DIFFERENTIAL WINDOW
2 - SIDE GEARS
3 - PINION GEAR
Fig. 37 PINION SHAFT
1 - PINION SHAFT SNAP-RING
2 - SIDE GEAR
3 - PINION GEAR
4 - PINION SHAFT
DRREAR AXLE - 9 1/4 3 - 99
DIFFERENTIAL (Continued)