vin DODGE RAM 1500 1998 2.G Owner's Manual
[x] Cancel search | Manufacturer: DODGE, Model Year: 1998, Model line: RAM 1500, Model: DODGE RAM 1500 1998 2.GPages: 2627
Page 181 of 2627
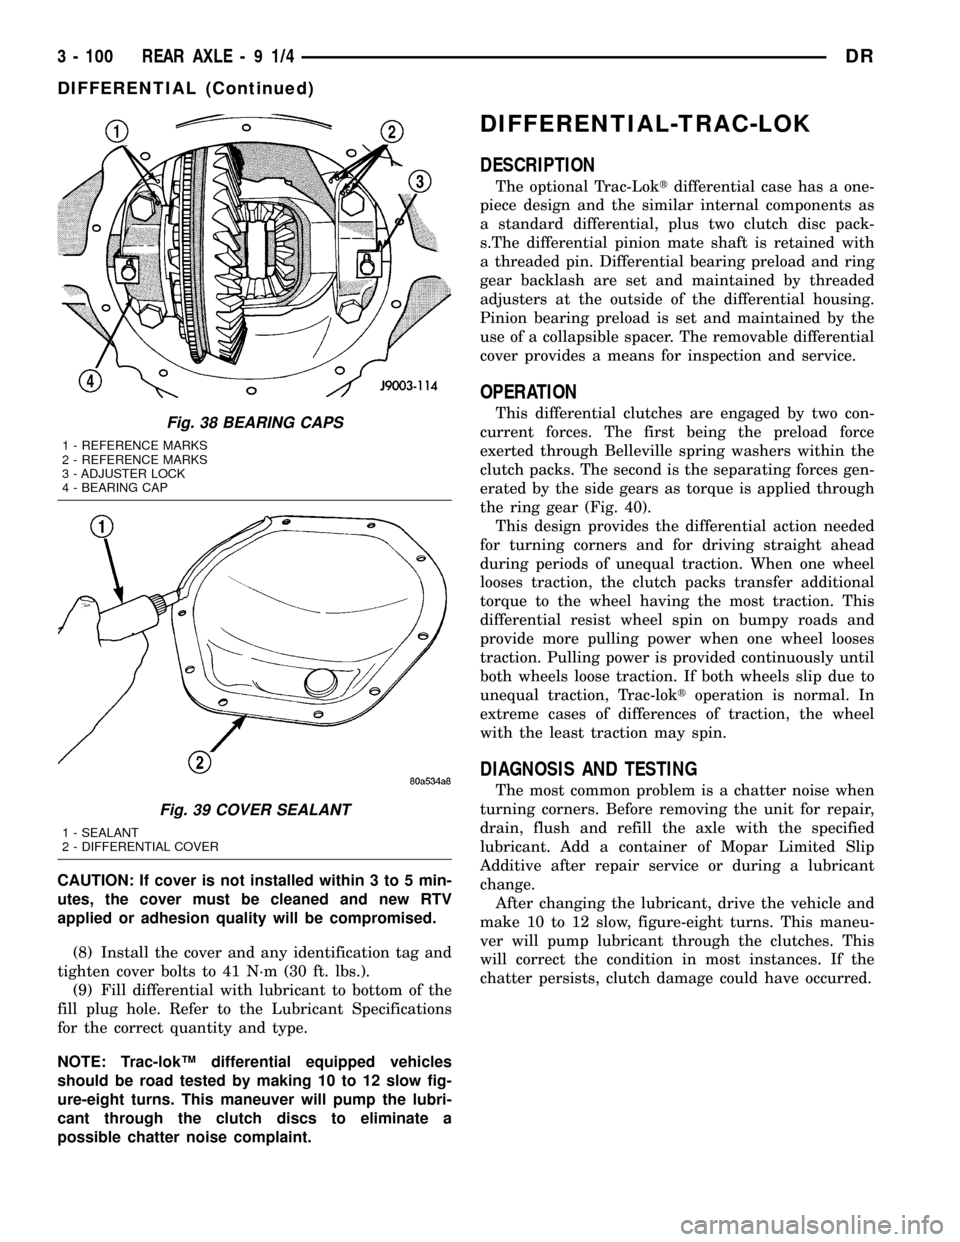
CAUTION: If cover is not installed within 3 to 5 min-
utes, the cover must be cleaned and new RTV
applied or adhesion quality will be compromised.
(8) Install the cover and any identification tag and
tighten cover bolts to 41 N´m (30 ft. lbs.).
(9) Fill differential with lubricant to bottom of the
fill plug hole. Refer to the Lubricant Specifications
for the correct quantity and type.
NOTE: Trac-lokŸ differential equipped vehicles
should be road tested by making 10 to 12 slow fig-
ure-eight turns. This maneuver will pump the lubri-
cant through the clutch discs to eliminate a
possible chatter noise complaint.
DIFFERENTIAL-TRAC-LOK
DESCRIPTION
The optional Trac-Loktdifferential case has a one-
piece design and the similar internal components as
a standard differential, plus two clutch disc pack-
s.The differential pinion mate shaft is retained with
a threaded pin. Differential bearing preload and ring
gear backlash are set and maintained by threaded
adjusters at the outside of the differential housing.
Pinion bearing preload is set and maintained by the
use of a collapsible spacer. The removable differential
cover provides a means for inspection and service.
OPERATION
This differential clutches are engaged by two con-
current forces. The first being the preload force
exerted through Belleville spring washers within the
clutch packs. The second is the separating forces gen-
erated by the side gears as torque is applied through
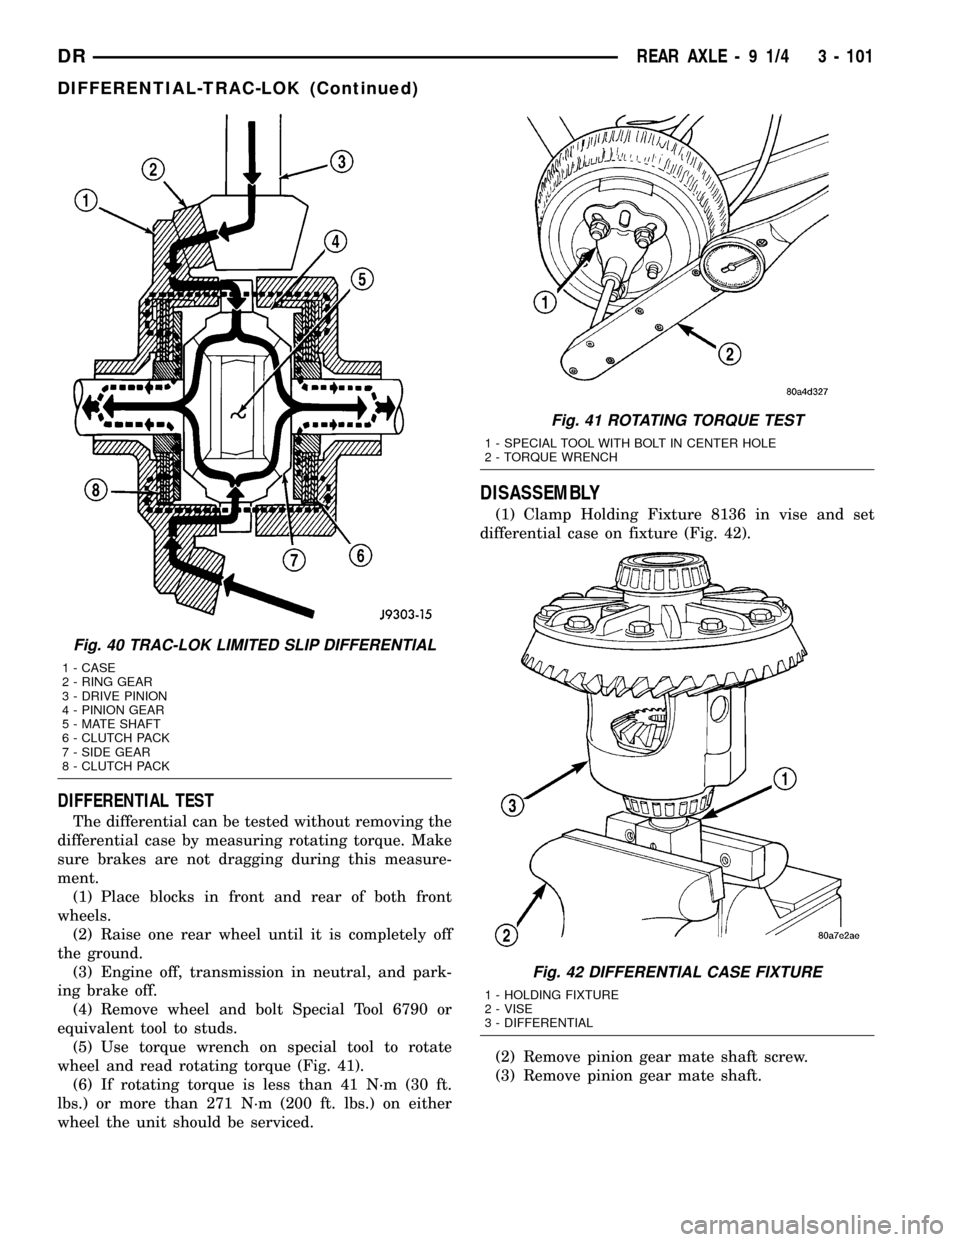
the ring gear (Fig. 40).
This design provides the differential action needed
for turning corners and for driving straight ahead
during periods of unequal traction. When one wheel
looses traction, the clutch packs transfer additional
torque to the wheel having the most traction. This
differential resist wheel spin on bumpy roads and
provide more pulling power when one wheel looses
traction. Pulling power is provided continuously until
both wheels loose traction. If both wheels slip due to
unequal traction, Trac-loktoperation is normal. In
extreme cases of differences of traction, the wheel
with the least traction may spin.
DIAGNOSIS AND TESTING
The most common problem is a chatter noise when
turning corners. Before removing the unit for repair,
drain, flush and refill the axle with the specified
lubricant. Add a container of Mopar Limited Slip
Additive after repair service or during a lubricant
change.
After changing the lubricant, drive the vehicle and
make 10 to 12 slow, figure-eight turns. This maneu-
ver will pump lubricant through the clutches. This
will correct the condition in most instances. If the
chatter persists, clutch damage could have occurred.
Fig. 38 BEARING CAPS
1 - REFERENCE MARKS
2 - REFERENCE MARKS
3 - ADJUSTER LOCK
4 - BEARING CAP
Fig. 39 COVER SEALANT
1 - SEALANT
2 - DIFFERENTIAL COVER
3 - 100 REAR AXLE-91/4DR
DIFFERENTIAL (Continued)
Page 182 of 2627
DIFFERENTIAL TEST
The differential can be tested without removing the
differential case by measuring rotating torque. Make
sure brakes are not dragging during this measure-
ment.
(1) Place blocks in front and rear of both front
wheels.
(2) Raise one rear wheel until it is completely off
the ground.
(3) Engine off, transmission in neutral, and park-
ing brake off.
(4) Remove wheel and bolt Special Tool 6790 or
equivalent tool to studs.
(5) Use torque wrench on special tool to rotate
wheel and read rotating torque (Fig. 41).
(6) If rotating torque is less than 41 N´m (30 ft.
lbs.) or more than 271 N´m (200 ft. lbs.) on either
wheel the unit should be serviced.
DISASSEMBLY
(1) Clamp Holding Fixture 8136 in vise and set
differential case on fixture (Fig. 42).
(2) Remove pinion gear mate shaft screw.
(3) Remove pinion gear mate shaft.
Fig. 40 TRAC-LOK LIMITED SLIP DIFFERENTIAL
1 - CASE
2 - RING GEAR
3 - DRIVE PINION
4 - PINION GEAR
5 - MATE SHAFT
6 - CLUTCH PACK
7 - SIDE GEAR
8 - CLUTCH PACK
Fig. 41 ROTATING TORQUE TEST
1 - SPECIAL TOOL WITH BOLT IN CENTER HOLE
2 - TORQUE WRENCH
Fig. 42 DIFFERENTIAL CASE FIXTURE
1 - HOLDING FIXTURE
2 - VISE
3 - DIFFERENTIAL
DRREAR AXLE - 9 1/4 3 - 101
DIFFERENTIAL-TRAC-LOK (Continued)
Page 193 of 2627
REAR AXLE - 10 1/2 AA
TABLE OF CONTENTS
page page
REAR AXLE - 10 1/2 AA
DIAGNOSIS AND TESTING...............112
REMOVAL............................115
INSTALLATION........................116
ADJUSTMENTS.......................116
SPECIFICATIONS......................120
SPECIAL TOOLS.......................120
AXLE SHAFTS
REMOVAL............................124
INSTALLATION........................124
AXLE BEARINGS
REMOVAL............................125
INSTALLATION........................125
PINION SEAL
REMOVAL............................126
INSTALLATION........................126
DIFFERENTIAL
REMOVAL............................127DISASSEMBLY........................128
ASSEMBLY...........................129
INSTALLATION........................130
DIFFERENTIAL TRAC-RITE
DESCRIPTION........................131
OPERATION..........................131
DISASSEMBLY........................131
CLEANING...........................132
INSPECTION.........................132
ASSEMBLY...........................133
DIFFERENTIAL CASE BEARINGS
REMOVAL............................134
INSTALLATION........................134
PINION GEAR/RING GEAR/TONE RING
REMOVAL............................134
INSTALLATION........................137
REAR AXLE - 10 1/2 AA
DIAGNOSIS AND TESTING
GEAR NOISE
Axle gear noise can be caused by insufficient lubri-
cant, incorrect backlash, incorrect pinion depth, tooth
contact, worn/damaged gears, or the carrier housing
not having the proper offset and squareness.
Gear noise usually happens at a specific speed
range. The noise can also occur during a specific type
of driving condition. These conditions are accelera-
tion, deceleration, coast, or constant load.
When road testing, first warm-up the axle fluid by
driving the vehicle at least 5 miles and then acceler-
ate the vehicle to the speed range where the noise is
the greatest. Shift out-of-gear and coast through the
peak-noise range. If the noise stops or changes
greatly check for:
²Insufficient lubricant.
²Incorrect ring gear backlash.
²Gear damage.
Differential side gears and pinions can be checked
by turning the vehicle. The side gears are loaded dur-
ing turns. They usually do not cause noise during
straight-ahead driving when the gears are unloaded.
A worn pinion shaft can also cause a snapping or a
knocking noise.
BEARING NOISE
The axle shaft, differential and pinion bearings can
all produce noise when worn or damaged. Bearing
noise can be either a whining, or a growling sound.
Pinion bearingshave a constant-pitch noise. This
noise changes only with vehicle speed. Pinion bearing
noise will be higher pitched because it rotates at a
faster rate. Drive the vehicle and load the differen-
tial. If bearing noise occurs, the rear pinion bearing
is the source of the noise. If the bearing noise is
heard during a coast, the front pinion bearing is the
source.
Differential bearingsusually produce a low pitch
noise. Differential bearing noise is similar to pinion
bearing noise. The pitch of differential bearing noise
is also constant and varies only with vehicle speed.
Axle shaft bearingsproduce noise and vibration
when worn or damaged. The noise generally changes
when the bearings are loaded. Road test the vehicle.
Turn the vehicle sharply to the left and to the right.
This will load the bearings and change the noise
level. Where axle bearing damage is slight, the noise
is usually not noticeable at speeds above 30 m.p.h.
LOW SPEED KNOCK
Low speed knock is generally caused by:
²Worn U-joint(s).
²Worn side-gear thrust washers.
²Worn pinion shaft bore.
3 - 112 REAR AXLE - 10 1/2 AADR
Page 198 of 2627
DIFFERENTIAL CASE BEARING PRELOAD AND
GEAR BACKLASH
Backlash is adjusted by moving the adjusters in
and out or both. By moving the adjusters the case/
ring gear will move closer or further away from the
pinion. In most cases this adjustment can be used to
achieve the correct gear tooth pattern and set the
case bearing preload.
(1) Remove adjuster lock bolts and adjuster locks
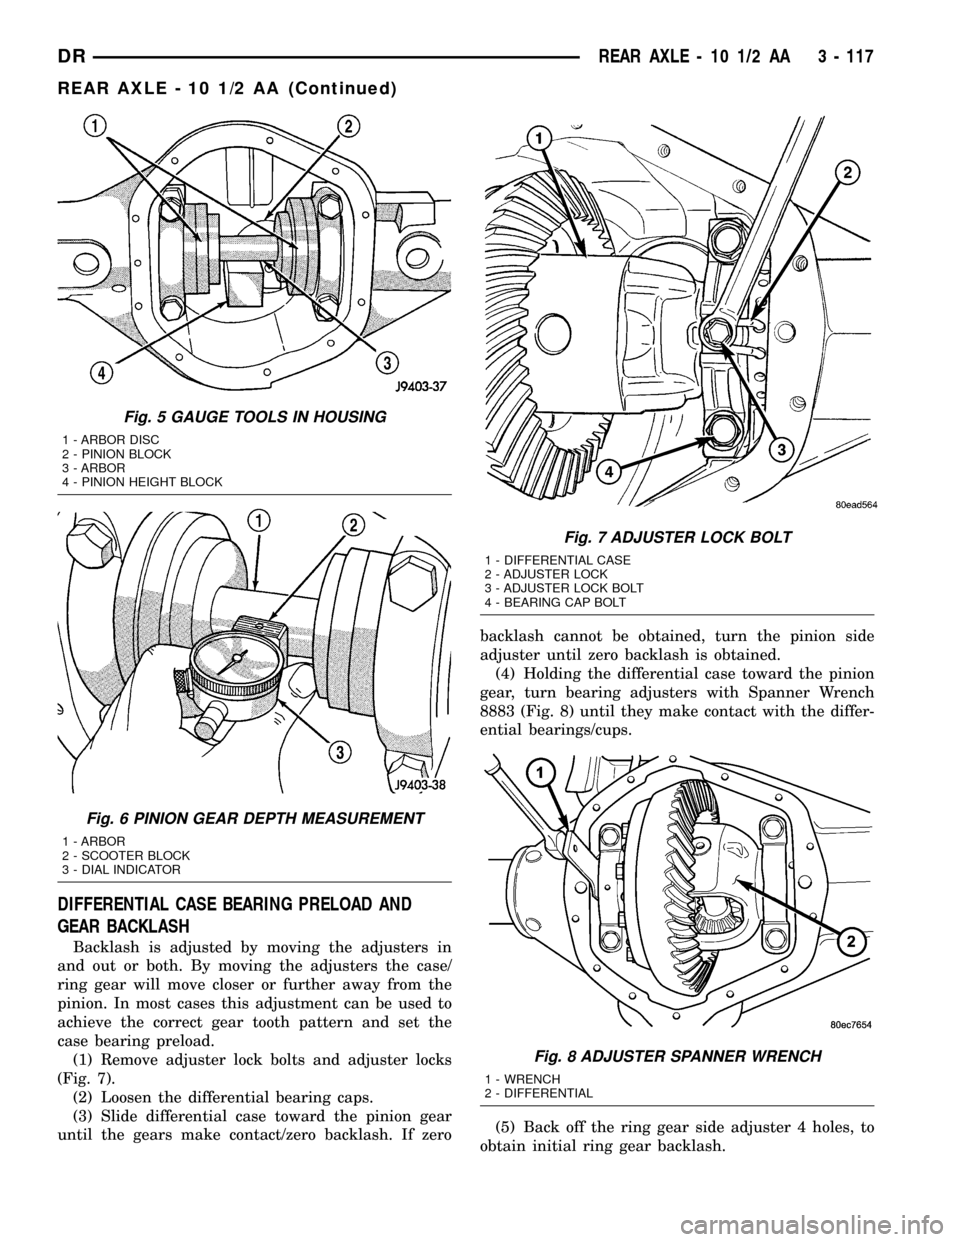
(Fig. 7).
(2) Loosen the differential bearing caps.
(3) Slide differential case toward the pinion gear
until the gears make contact/zero backlash. If zerobacklash cannot be obtained, turn the pinion side
adjuster until zero backlash is obtained.
(4) Holding the differential case toward the pinion
gear, turn bearing adjusters with Spanner Wrench
8883 (Fig. 8) until they make contact with the differ-
ential bearings/cups.
(5) Back off the ring gear side adjuster 4 holes, to
obtain initial ring gear backlash.
Fig. 5 GAUGE TOOLS IN HOUSING
1 - ARBOR DISC
2 - PINION BLOCK
3 - ARBOR
4 - PINION HEIGHT BLOCK
Fig. 6 PINION GEAR DEPTH MEASUREMENT
1 - ARBOR
2 - SCOOTER BLOCK
3 - DIAL INDICATOR
Fig. 7 ADJUSTER LOCK BOLT
1 - DIFFERENTIAL CASE
2 - ADJUSTER LOCK
3 - ADJUSTER LOCK BOLT
4 - BEARING CAP BOLT
Fig. 8 ADJUSTER SPANNER WRENCH
1 - WRENCH
2 - DIFFERENTIAL
DRREAR AXLE - 10 1/2 AA 3 - 117
REAR AXLE - 10 1/2 AA (Continued)
Page 199 of 2627
(6) Install ring gear side adjuster lock and bolt. Do
not tighten adjuster lock bolt at this time.
(7) Tighten pinion gear side adjuster firmly
against the differential case bearing cup.
(8) Rotate the pinion several times to seat the def-
erential bearings.
(9) Loosen pinion gear side adjuster until it is no
longer in contact with the bearing cup, then tighten
it until it makes contact.
(10) Tighten pinion gear side adjuster an addi-
tional:
²New Bearings:6 Adjuster Holes
²Original Bearings:4 Adjuster Holes
(11) Install pinion gear side adjuster lock and bolt.
Do not tighten adjuster lock bolt at this time.
(12) Tighten bearing cap bolts to 115 N´m (85 ft.
lbs.).
(13) Tighten adjuster lock bolts to 33 N´m (24 ft.
lbs.).
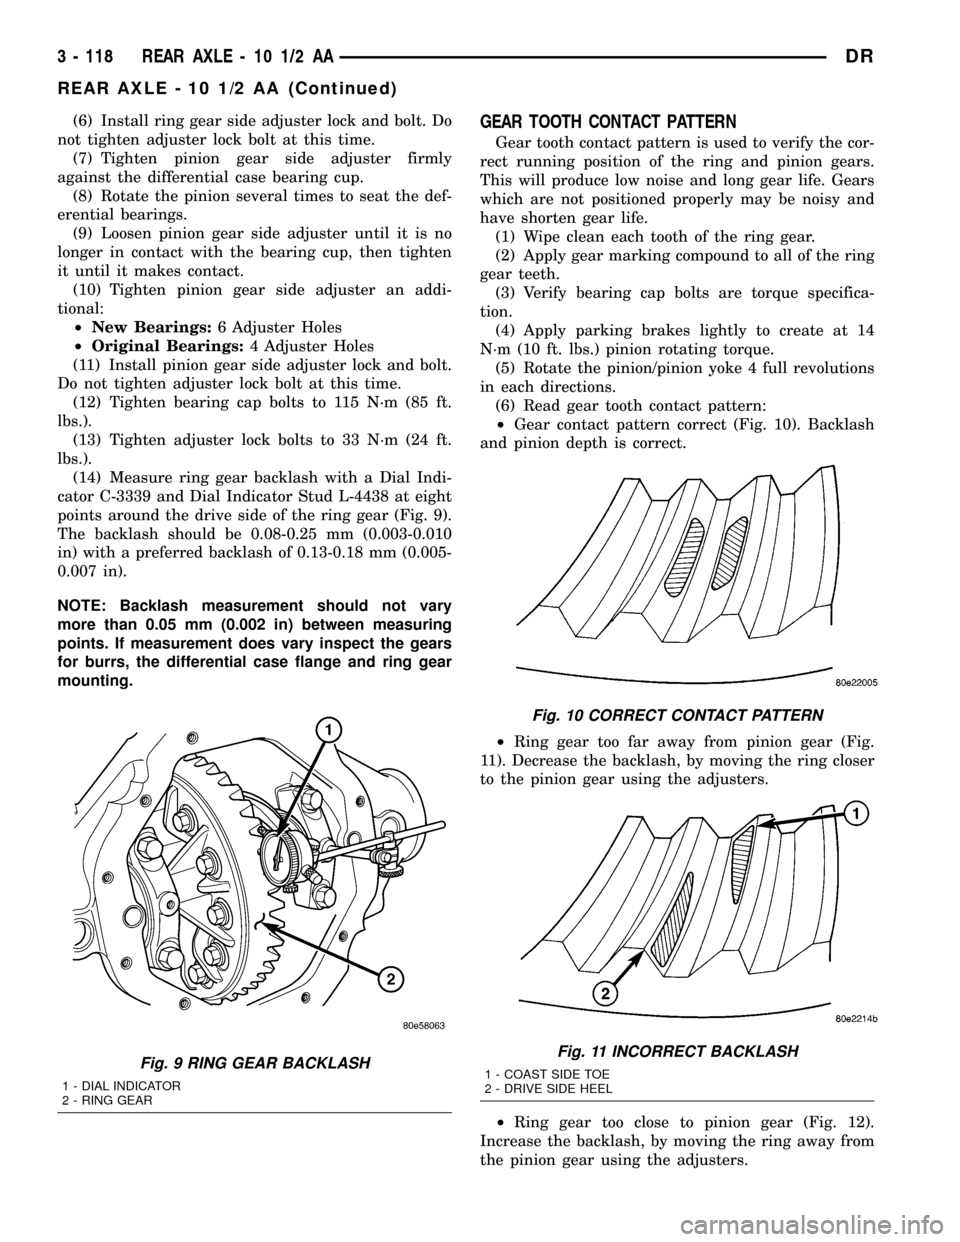
(14) Measure ring gear backlash with a Dial Indi-
cator C-3339 and Dial Indicator Stud L-4438 at eight
points around the drive side of the ring gear (Fig. 9).
The backlash should be 0.08-0.25 mm (0.003-0.010
in) with a preferred backlash of 0.13-0.18 mm (0.005-
0.007 in).
NOTE: Backlash measurement should not vary
more than 0.05 mm (0.002 in) between measuring
points. If measurement does vary inspect the gears
for burrs, the differential case flange and ring gear
mounting.GEAR TOOTH CONTACT PATTERN
Gear tooth contact pattern is used to verify the cor-
rect running position of the ring and pinion gears.
This will produce low noise and long gear life. Gears
which are not positioned properly may be noisy and
have shorten gear life.
(1) Wipe clean each tooth of the ring gear.
(2) Apply gear marking compound to all of the ring
gear teeth.
(3) Verify bearing cap bolts are torque specifica-
tion.
(4) Apply parking brakes lightly to create at 14
N´m (10 ft. lbs.) pinion rotating torque.
(5) Rotate the pinion/pinion yoke 4 full revolutions
in each directions.
(6) Read gear tooth contact pattern:
²Gear contact pattern correct (Fig. 10). Backlash
and pinion depth is correct.
²Ring gear too far away from pinion gear (Fig.
11). Decrease the backlash, by moving the ring closer
to the pinion gear using the adjusters.
²Ring gear too close to pinion gear (Fig. 12).
Increase the backlash, by moving the ring away from
the pinion gear using the adjusters.
Fig. 9 RING GEAR BACKLASH
1 - DIAL INDICATOR
2 - RING GEAR
Fig. 10 CORRECT CONTACT PATTERN
Fig. 11 INCORRECT BACKLASH
1 - COAST SIDE TOE
2 - DRIVE SIDE HEEL
3 - 118 REAR AXLE - 10 1/2 AADR
REAR AXLE - 10 1/2 AA (Continued)
Page 200 of 2627

²Ring gear too far away from pinion gear (Fig.
13). Decrease the backlash, by moving the ring closer
to the pinion gear using the adjusters.
²Ring gear too close to pinion gear (Fig. 14).
Increase the backlash, by moving the ring away from
the pinion gear using the adjusters.
²Pinion gear is set too low (Fig. 15). Increase the
pinion gear height, by increasing the pinion depth
shim thickness.
²Pinion gear is set too high (Fig. 16). Decrease
the pinion depth, by decreasing the pinion depth
shim thickness.
Fig. 12 INCORRECT BACKLASH
1 - DRIVE SIDE TOE
2 - COAST SIDE HEEL
Fig. 13 INCORRECT BACKLASH
1 - DRIVE SIDE HEEL
2 - COAST SIDE HEEL
Fig. 14 INCORRECT BACKLASH
1 - DRIVE SIDE TOE
2 - COAST SIDE TOE
Fig. 15 LOW PINION HEIGHT
Fig. 16 HIGH PINION HEIGHT
DRREAR AXLE - 10 1/2 AA 3 - 119
REAR AXLE - 10 1/2 AA (Continued)
Page 221 of 2627

REAR AXLE - 11 1/2 AA
TABLE OF CONTENTS
page page
REAR AXLE - 11 1/2 AA
DIAGNOSIS AND TESTING...............140
REMOVAL............................143
INSTALLATION........................144
ADJUSTMENTS.......................144
SPECIFICATIONS......................148
SPECIAL TOOLS.......................148
AXLE SHAFTS
REMOVAL............................152
INSTALLATION........................152
AXLE BEARINGS
REMOVAL............................152
INSTALLATION........................153
PINION SEAL
REMOVAL............................153
INSTALLATION........................154
DIFFERENTIAL
REMOVAL............................155DISASSEMBLY........................155
ASSEMBLY...........................156
INSTALLATION........................157
DIFFERENTIAL TRAC-RITE
DESCRIPTION........................158
OPERATION..........................158
DISASSEMBLY........................158
CLEANING...........................160
INSPECTION.........................160
ASSEMBLY...........................161
DIFFERENTIAL CASE BEARINGS
REMOVAL............................161
INSTALLATION........................161
PINION GEAR/RING GEAR/TONE RING
REMOVAL............................162
INSTALLATION........................164
REAR AXLE - 11 1/2 AA
DIAGNOSIS AND TESTING
GEAR NOISE
Axle gear noise can be caused by insufficient lubri-
cant, incorrect backlash, incorrect pinion depth, tooth
contact, worn/damaged gears, or the carrier housing
not having the proper offset and squareness.
Gear noise usually happens at a specific speed
range. The noise can also occur during a specific type
of driving condition. These conditions are accelera-
tion, deceleration, coast, or constant load.
When road testing, first warm-up the axle fluid by
driving the vehicle at least 5 miles and then acceler-
ate the vehicle to the speed range where the noise is
the greatest. Shift out-of-gear and coast through the
peak-noise range. If the noise stops or changes
greatly check for:
²Insufficient lubricant.
²Incorrect ring gear backlash.
²Gear damage.
Differential side gears and pinions can be checked
by turning the vehicle. The side gears are loaded dur-
ing turns. They usually do not cause noise during
straight-ahead driving when the gears are unloaded.
A worn pinion shaft can also cause a snapping or a
knocking noise.
BEARING NOISE
The axle shaft, differential and pinion bearings can
all produce noise when worn or damaged. Bearing
noise can be either a whining, or a growling sound.
Pinion bearingshave a constant-pitch noise. This
noise changes only with vehicle speed. Pinion bearing
noise will be higher pitched because it rotates at a
faster rate. Drive the vehicle and load the differen-
tial. If bearing noise occurs, the rear pinion bearing
is the source of the noise. If the bearing noise is
heard during a coast, the front pinion bearing is the
source.
Differential bearingsusually produce a low pitch
noise. Differential bearing noise is similar to pinion
bearing noise. The pitch of differential bearing noise
is also constant and varies only with vehicle speed.
Axle shaft bearingsproduce noise and vibration
when worn or damaged. The noise generally changes
when the bearings are loaded. Road test the vehicle.
Turn the vehicle sharply to the left and to the right.
This will load the bearings and change the noise
level. Where axle bearing damage is slight, the noise
is usually not noticeable at speeds above 30 mph.
LOW SPEED KNOCK
Low speed knock is generally caused by:
²Worn U-joint(s).
²Worn side gear thrust washers.
²Worn pinion shaft bore.
3 - 140 REAR AXLE - 11 1/2 AADR
Page 226 of 2627

DIFFERENTIAL CASE BEARING PRELOAD AND
GEAR BACKLASH
Backlash is adjusted by moving the adjusters in
and out or both. By moving the adjusters the case/
ring gear will move closer or further away from the
pinion. In most cases this adjustment can be used to
achieve the correct gear tooth pattern and set the
case bearing preload.
(1) Remove adjuster lock bolts and adjuster locks
(Fig. 7).
(2) Loosen the differential bearing caps.
(3) Slide differential case toward the pinion gear
until the gears make contact/zero backlash. If zerobacklash cannot be obtained, turn the pinion side
adjuster until zero backlash is obtained.
(4) Holding the differential case toward the pinion
gear, turn bearing adjusters with Spanner Wrench
8883 (Fig. 8) until they make contact with the differ-
ential bearings/cups.
(5) Back off the ring gear side adjuster 4 holes, to
obtain initial ring gear backlash.
Fig. 5 GAUGE TOOLS IN HOUSING
1 - ARBOR DISC
2 - PINION BLOCK
3 - ARBOR
4 - PINION HEIGHT BLOCK
Fig. 6 PINION GEAR DEPTH MEASUREMENT
1 - ARBOR
2 - SCOOTER BLOCK
3 - DIAL INDICATOR
Fig. 7 ADJUSTER LOCK BOLT
1 - DIFFERENTIAL CASE
2 - ADJUSTER LOCK
3 - ADJUSTER LOCK BOLT
4 - BEARING CAP BOLT
Fig. 8 ADJUSTER SPANNER WRENCH
1 - WRENCH
2 - DIFFERENTIAL
DRREAR AXLE - 11 1/2 AA 3 - 145
REAR AXLE - 11 1/2 AA (Continued)
Page 227 of 2627

(6) Install ring gear side adjuster lock and bolt. Do
not tighten adjuster lock bolt at this time.
(7) Tighten pinion gear side adjuster firmly
against the differential case bearing cup.
(8) Rotate the pinion several times to seat the def-
erential bearings.
(9) Loosen pinion gear side adjuster until it is no
longer in contact with the bearing cup, then tighten
it until it makes contact.
(10) Tighten pinion gear side adjuster an addi-
tional:
²New Bearings:6 Adjuster Holes
²Original Bearings:4 Adjuster Holes
(11) Install pinion gear side adjuster lock and bolt.
Do not tighten adjuster lock bolt at this time.
(12) Tighten bearing cap bolts to 115 N´m (85 ft.
lbs.).
(13) Tighten adjuster lock bolts to 33 N´m (24 ft.
lbs.).
(14) Measure ring gear backlash with a Dial Indi-
cator C-3339 and Dial Indicator Stud L-4438 at eight
points around the drive side of the ring gear (Fig. 9).
The backlash should be 0.08-0.25 mm (0.003-0.010
in) with a preferred backlash of 0.13-0.18 mm (0.005-
0.007 in).
NOTE: Backlash measurement should not vary
more than 0.05 mm (0.002 in) between measuring
points. If measurement does vary inspect the gears
for burrs, the differential case flange and ring gear
mounting.GEAR TOOTH CONTACT PATTERN
Gear tooth contact pattern is used to verify the cor-
rect running position of the ring and pinion gears.
This will produce low noise and long gear life. Gears
which are not positioned properly may be noisy and
have shorten gear life.
(1) Wipe clean each tooth of the ring gear.
(2) Apply gear marking compound to all of the ring
gear teeth.
(3) Verify bearing cap bolts are torque specifica-
tion.
(4) Apply parking brakes lightly to create at 14
N´m (10 ft. lbs.) pinion rotating torque.
(5) Rotate the pinion/pinion yoke 4 full revolutions
in each directions.
(6) Read gear tooth contact pattern:
²Gear contact pattern correct (Fig. 10). Backlash
and pinion depth is correct.
²Ring gear too far away from pinion gear (Fig.
11). Decrease backlash, by moving the ring closer to
the pinion gear using the adjusters.
²Ring gear too close to pinion gear (Fig. 12).
Increase backlash, by moving the ring away from the
pinion gear using the adjusters.
Fig. 9 RING GEAR BACKLASH
1 - DIAL INDICATOR
2 - RING GEAR
Fig. 10 CORRECT CONTACT PATTERN
Fig. 11 INCORRECT BACKLASH
1 - COAST SIDE TOE
2 - DRIVE SIDE HEEL
3 - 146 REAR AXLE - 11 1/2 AADR
REAR AXLE - 11 1/2 AA (Continued)
Page 228 of 2627
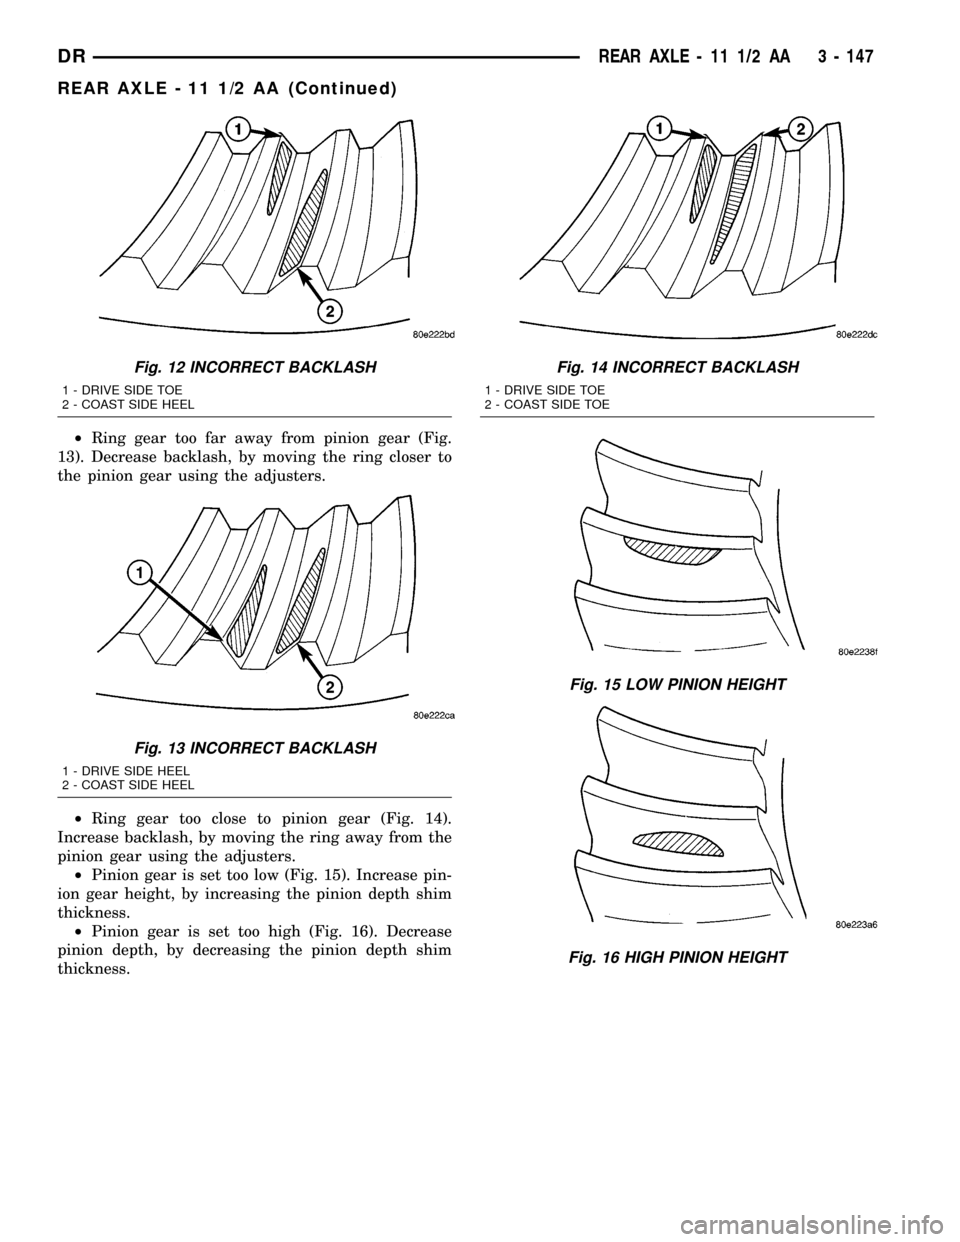
²Ring gear too far away from pinion gear (Fig.
13). Decrease backlash, by moving the ring closer to
the pinion gear using the adjusters.
²Ring gear too close to pinion gear (Fig. 14).
Increase backlash, by moving the ring away from the
pinion gear using the adjusters.
²Pinion gear is set too low (Fig. 15). Increase pin-
ion gear height, by increasing the pinion depth shim
thickness.
²Pinion gear is set too high (Fig. 16). Decrease
pinion depth, by decreasing the pinion depth shim
thickness.
Fig. 12 INCORRECT BACKLASH
1 - DRIVE SIDE TOE
2 - COAST SIDE HEEL
Fig. 13 INCORRECT BACKLASH
1 - DRIVE SIDE HEEL
2 - COAST SIDE HEEL
Fig. 14 INCORRECT BACKLASH
1 - DRIVE SIDE TOE
2 - COAST SIDE TOE
Fig. 15 LOW PINION HEIGHT
Fig. 16 HIGH PINION HEIGHT
DRREAR AXLE - 11 1/2 AA 3 - 147
REAR AXLE - 11 1/2 AA (Continued)