DODGE RAM 2002 Service Repair Manual
Manufacturer: DODGE, Model Year: 2002, Model line: RAM, Model: DODGE RAM 2002Pages: 2255, PDF Size: 62.07 MB
Page 1951 of 2255
FRONT OUTPUT SHAFT SEAL
REMOVAL
(1) Shift transfer case into NEUTRAL.
(2) Raise vehicle.
(3) Remove front propeller shaft. (Refer to 3 - DIF-
FERENTIAL & DRIVELINE/PROPELLER SHAFT/
PROPELLER SHAFT - REMOVAL)
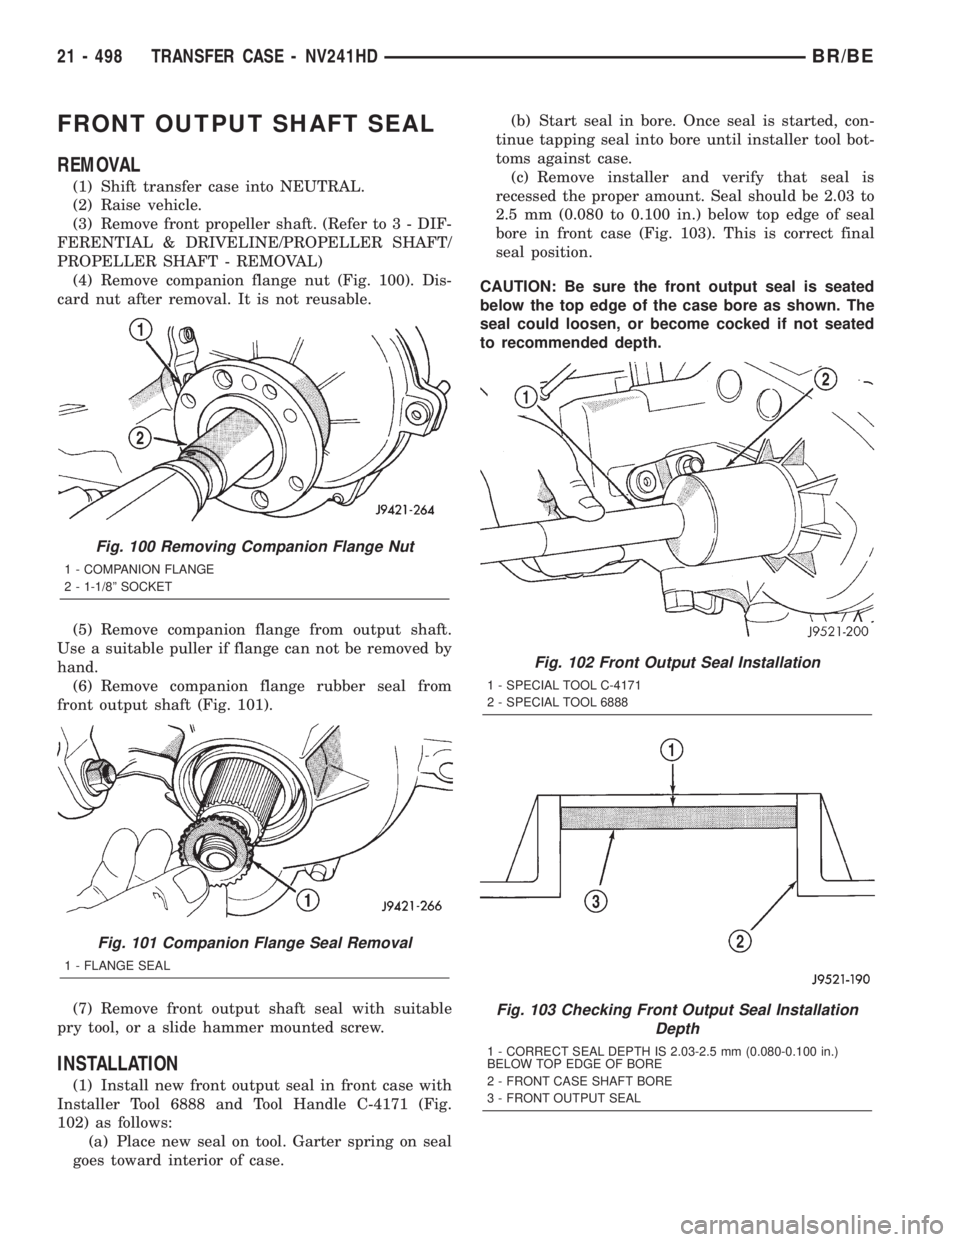
(4) Remove companion flange nut (Fig. 100). Dis-
card nut after removal. It is not reusable.
(5) Remove companion flange from output shaft.
Use a suitable puller if flange can not be removed by
hand.
(6) Remove companion flange rubber seal from
front output shaft (Fig. 101).
(7) Remove front output shaft seal with suitable
pry tool, or a slide hammer mounted screw.
INSTALLATION
(1) Install new front output seal in front case with
Installer Tool 6888 and Tool Handle C-4171 (Fig.
102) as follows:
(a) Place new seal on tool. Garter spring on seal
goes toward interior of case.(b) Start seal in bore. Once seal is started, con-
tinue tapping seal into bore until installer tool bot-
toms against case.
(c) Remove installer and verify that seal is
recessed the proper amount. Seal should be 2.03 to
2.5 mm (0.080 to 0.100 in.) below top edge of seal
bore in front case (Fig. 103). This is correct final
seal position.
CAUTION: Be sure the front output seal is seated
below the top edge of the case bore as shown. The
seal could loosen, or become cocked if not seated
to recommended depth.
Fig. 100 Removing Companion Flange Nut
1 - COMPANION FLANGE
2 - 1-1/8º SOCKET
Fig. 101 Companion Flange Seal Removal
1 - FLANGE SEAL
Fig. 102 Front Output Seal Installation
1 - SPECIAL TOOL C-4171
2 - SPECIAL TOOL 6888
Fig. 103 Checking Front Output Seal Installation
Depth
1 - CORRECT SEAL DEPTH IS 2.03-2.5 mm (0.080-0.100 in.)
BELOW TOP EDGE OF BORE
2 - FRONT CASE SHAFT BORE
3 - FRONT OUTPUT SEAL
21 - 498 TRANSFER CASE - NV241HDBR/BE
Page 1952 of 2255
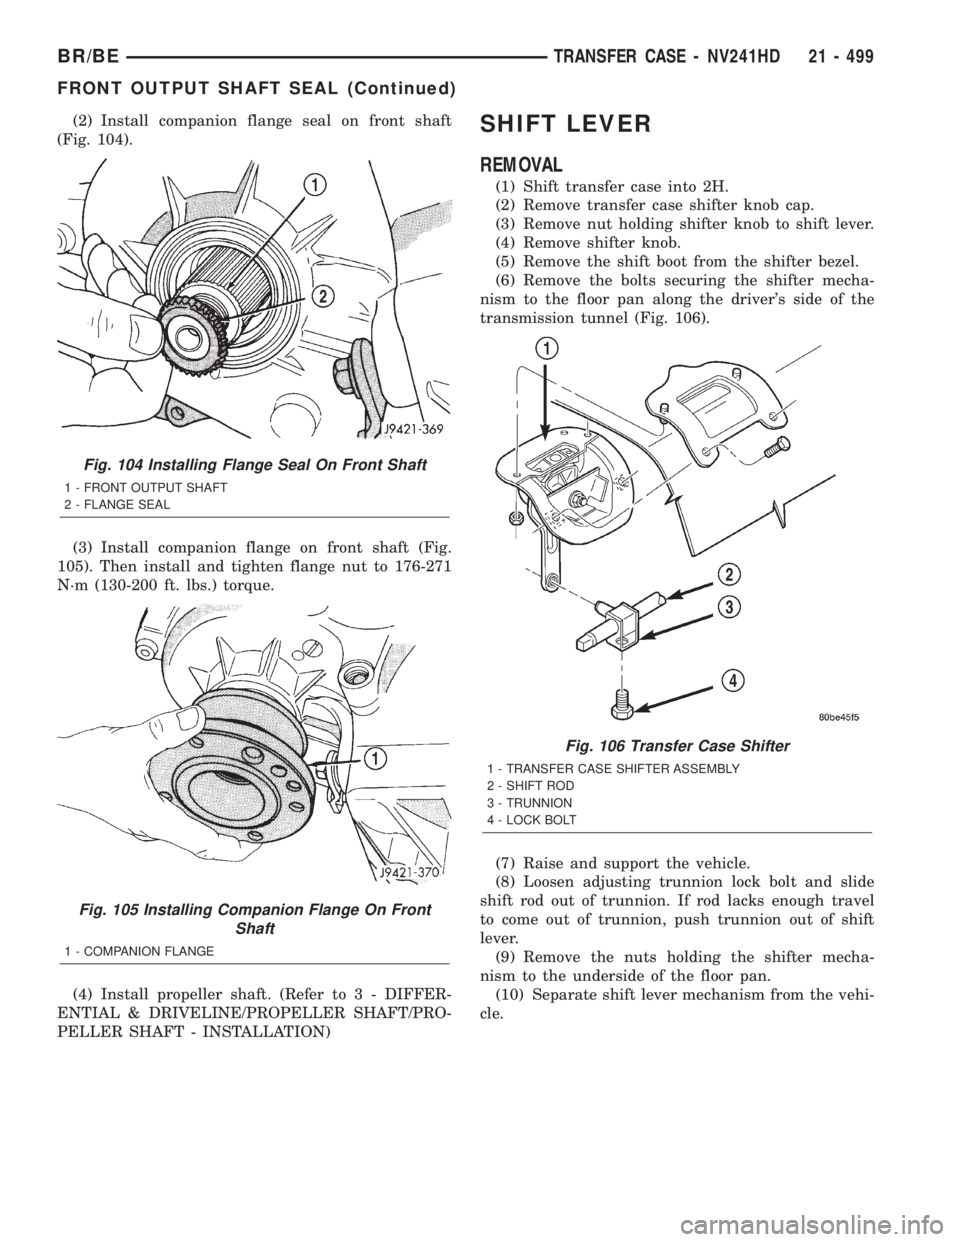
(2) Install companion flange seal on front shaft
(Fig. 104).
(3) Install companion flange on front shaft (Fig.
105). Then install and tighten flange nut to 176-271
N´m (130-200 ft. lbs.) torque.
(4) Install propeller shaft. (Refer to 3 - DIFFER-
ENTIAL & DRIVELINE/PROPELLER SHAFT/PRO-
PELLER SHAFT - INSTALLATION)SHIFT LEVER
REMOVAL
(1) Shift transfer case into 2H.
(2) Remove transfer case shifter knob cap.
(3) Remove nut holding shifter knob to shift lever.
(4) Remove shifter knob.
(5) Remove the shift boot from the shifter bezel.
(6) Remove the bolts securing the shifter mecha-
nism to the floor pan along the driver's side of the
transmission tunnel (Fig. 106).
(7) Raise and support the vehicle.
(8) Loosen adjusting trunnion lock bolt and slide
shift rod out of trunnion. If rod lacks enough travel
to come out of trunnion, push trunnion out of shift
lever.
(9) Remove the nuts holding the shifter mecha-
nism to the underside of the floor pan.
(10) Separate shift lever mechanism from the vehi-
cle.
Fig. 104 Installing Flange Seal On Front Shaft
1 - FRONT OUTPUT SHAFT
2 - FLANGE SEAL
Fig. 105 Installing Companion Flange On Front
Shaft
1 - COMPANION FLANGE
Fig. 106 Transfer Case Shifter
1 - TRANSFER CASE SHIFTER ASSEMBLY
2 - SHIFT ROD
3 - TRUNNION
4 - LOCK BOLT
BR/BETRANSFER CASE - NV241HD 21 - 499
FRONT OUTPUT SHAFT SEAL (Continued)
Page 1953 of 2255
INSTALLATION
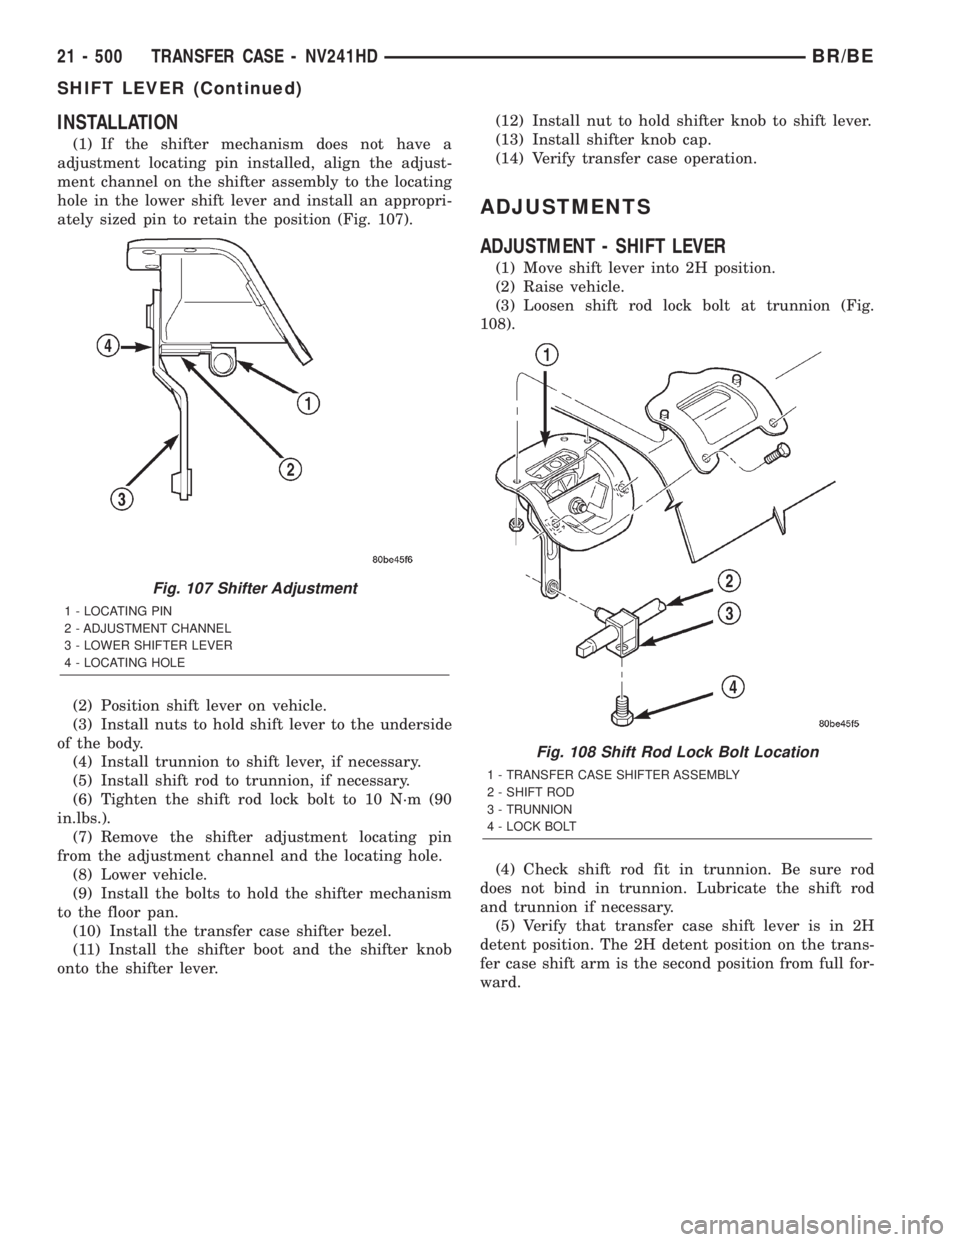
(1) If the shifter mechanism does not have a
adjustment locating pin installed, align the adjust-
ment channel on the shifter assembly to the locating
hole in the lower shift lever and install an appropri-
ately sized pin to retain the position (Fig. 107).
(2) Position shift lever on vehicle.
(3) Install nuts to hold shift lever to the underside
of the body.
(4) Install trunnion to shift lever, if necessary.
(5) Install shift rod to trunnion, if necessary.
(6) Tighten the shift rod lock bolt to 10 N´m (90
in.lbs.).
(7) Remove the shifter adjustment locating pin
from the adjustment channel and the locating hole.
(8) Lower vehicle.
(9) Install the bolts to hold the shifter mechanism
to the floor pan.
(10) Install the transfer case shifter bezel.
(11) Install the shifter boot and the shifter knob
onto the shifter lever.(12) Install nut to hold shifter knob to shift lever.
(13) Install shifter knob cap.
(14) Verify transfer case operation.
ADJUSTMENTS
ADJUSTMENT - SHIFT LEVER
(1) Move shift lever into 2H position.
(2) Raise vehicle.
(3) Loosen shift rod lock bolt at trunnion (Fig.
108).
(4) Check shift rod fit in trunnion. Be sure rod
does not bind in trunnion. Lubricate the shift rod
and trunnion if necessary.
(5) Verify that transfer case shift lever is in 2H
detent position. The 2H detent position on the trans-
fer case shift arm is the second position from full for-
ward.
Fig. 107 Shifter Adjustment
1 - LOCATING PIN
2 - ADJUSTMENT CHANNEL
3 - LOWER SHIFTER LEVER
4 - LOCATING HOLE
Fig. 108 Shift Rod Lock Bolt Location
1 - TRANSFER CASE SHIFTER ASSEMBLY
2 - SHIFT ROD
3 - TRUNNION
4 - LOCK BOLT
21 - 500 TRANSFER CASE - NV241HDBR/BE
SHIFT LEVER (Continued)
Page 1954 of 2255
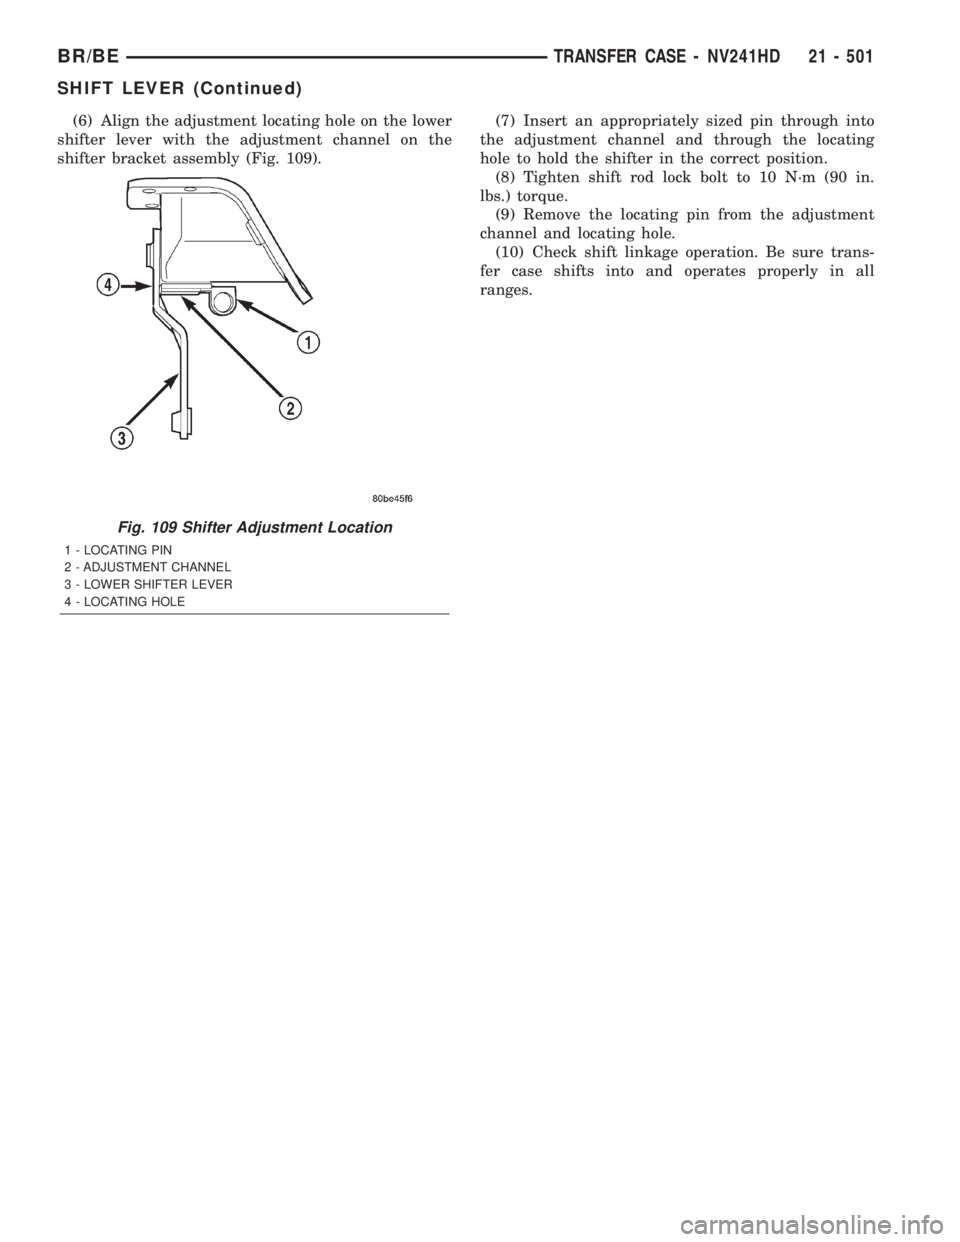
(6) Align the adjustment locating hole on the lower
shifter lever with the adjustment channel on the
shifter bracket assembly (Fig. 109).(7) Insert an appropriately sized pin through into
the adjustment channel and through the locating
hole to hold the shifter in the correct position.
(8) Tighten shift rod lock bolt to 10 N´m (90 in.
lbs.) torque.
(9) Remove the locating pin from the adjustment
channel and locating hole.
(10) Check shift linkage operation. Be sure trans-
fer case shifts into and operates properly in all
ranges.
Fig. 109 Shifter Adjustment Location
1 - LOCATING PIN
2 - ADJUSTMENT CHANNEL
3 - LOWER SHIFTER LEVER
4 - LOCATING HOLE
BR/BETRANSFER CASE - NV241HD 21 - 501
SHIFT LEVER (Continued)
Page 1955 of 2255

Page 1956 of 2255
TIRES/WHEELS
TABLE OF CONTENTS
page page
TIRES/WHEELS
DIAGNOSIS AND TESTING - TIRE AND
WHEEL RUNOUT......................1
STANDARD PROCEDURE
STANDARD PROCEDURE -
TIRE ROTATION.......................2
STANDARD PROCEDURE - MATCH
MOUNTING...........................3
STANDARD PROCEDURE - TIRE AND
WHEEL BALANCE......................4
TIRES
DESCRIPTION
DESCRIPTION - SPARE TIRE - TEMPORARY...6
DESCRIPTION - TIRES..................6
DESCRIPTION - RADIAL-PLY TIRES........6
DESCRIPTION - TIRE PRESSURE FOR
HIGH SPEEDS.........................7
DESCRIPTION - REPLACEMENT TIRES.....7
DESCRIPTION - TIRE INFLATION
PRESSURES..........................7
DIAGNOSIS AND TESTING
DIAGNOSIS AND TESTING - PRESSURE
GAUGES.............................8
DIAGNOSIS AND TESTING - TREAD WEAR
INDICATORS..........................8
DIAGNOSIS AND TESTING - TIRE WEAR
PATTERNS...........................8DIAGNOSIS AND TESTING - TIRE NOISE
OR VIBRATION........................9
STANDARD PROCEDURE - REPAIRING
LEAKS...............................9
SPECIFICATIONS
TIRE REVOLUTIONS PER MILE...........9
SPARE TIRE
DESCRIPTION.........................10
WHEELS
DESCRIPTION.........................10
OPERATION...........................10
DIAGNOSIS AND TESTING
WHEEL INSPECTION..................11
STANDARD PROCEDURE - DUAL REAR
WHEEL INSTALLATION.................11
SPECIFICATIONS
TORQUE CHART......................11
STUDS
REMOVAL.............................12
INSTALLATION.........................12
WHEEL COVER
REMOVAL.............................12
INSTALLATION
INSTALLATION - REAR.................12
INSTALLATION - FRONT................12
TIRES/WHEELS
DIAGNOSIS AND TESTING - TIRE AND WHEEL
RUNOUT
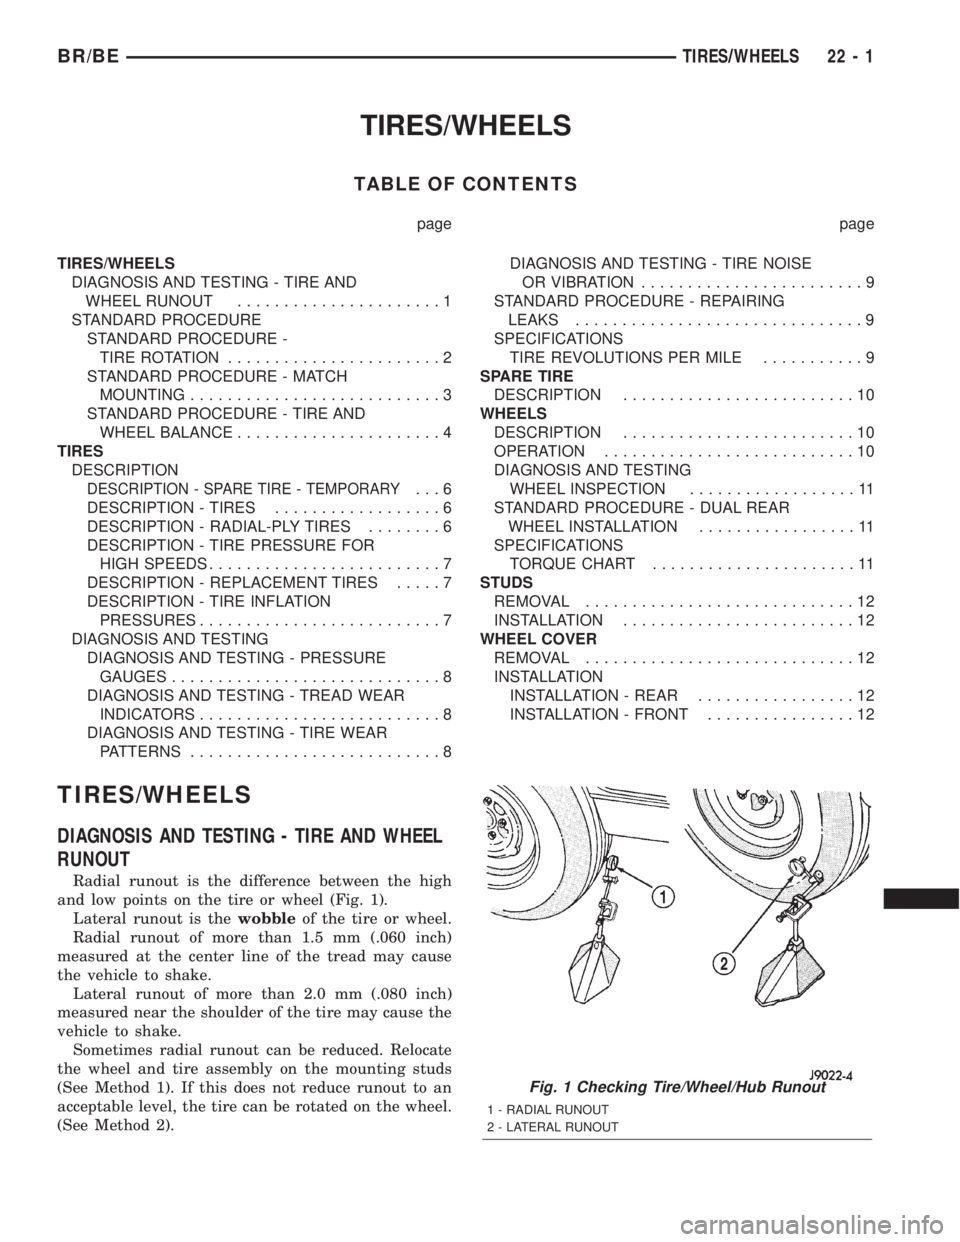
Radial runout is the difference between the high
and low points on the tire or wheel (Fig. 1).
Lateral runout is thewobbleof the tire or wheel.
Radial runout of more than 1.5 mm (.060 inch)
measured at the center line of the tread may cause
the vehicle to shake.
Lateral runout of more than 2.0 mm (.080 inch)
measured near the shoulder of the tire may cause the
vehicle to shake.
Sometimes radial runout can be reduced. Relocate
the wheel and tire assembly on the mounting studs
(See Method 1). If this does not reduce runout to an
acceptable level, the tire can be rotated on the wheel.
(See Method 2).
Fig. 1 Checking Tire/Wheel/Hub Runout
1 - RADIAL RUNOUT
2 - LATERAL RUNOUT
BR/BETIRES/WHEELS 22 - 1
Page 1957 of 2255

METHOD 1 (RELOCATE WHEEL ON HUB)
(1) Drive vehicle a short distance to eliminate tire
flat spotting from a parked position.
(2) Check wheel bearings and adjust if adjustable
or replace if necessary.
(3) Check the wheel mounting surface.
(4) Relocate wheel on the mounting, two studs
over from the original position.
(5) Tighten wheel nuts until all are properly
torqued, to eliminate brake distortion.
(6) Check radial runout. If still excessive, mark
tire sidewall, wheel, and stud at point of maximum
runout and proceed to Method 2.
METHOD 2 (RELOCATE TIRE ON WHEEL)
NOTE: Rotating the tire on wheel is particularly
effective when there is runout in both tire and
wheel.
(1) Remove tire from wheel and mount wheel on
service dynamic balance machine.
(2) Check wheel radial runout (Fig. 2) and lateral
runout (Fig. 3).
²STEEL WHEELS: Radial runout 0.040 in., Lat-
eral runout 0.045 in. (maximum)
²ALUMINUM WHEELS: Radial runout 0.030 in.,
Lateral runout 0.035 in. (maximum)
(3)
If point of greatest wheel lateral runout is near
original chalk mark, remount tire 180 degrees. Recheck
runout, Refer to match mounting procedure.
STANDARD PROCEDURE
STANDARD PROCEDURE - TIRE ROTATION
Tires on the front and rear axles operate at differ-
ent loads and perform different steering, driving, and
braking functions. For these reasons, the tires wear
at unequal rates. They may also develop irregular
wear patterns. These effects can be reduced by rotat-
ing the tires according to the maintenance schedule
in the Owners Manual. This will improve tread life,
traction and maintain a smooth quiet ride.
The recommended method of tire rotation is (Fig.
4). Other methods can be used, but may not provide
the same tire longevity benefits.
Dual wheel vehicles require a different tire rota-
tion pattern. Refer to (Fig. 5) for the proper tire rota-
tion with dual wheels.
Fig. 2 Radial Runout
1 - MOUNTING CONE
2 - SPINDLE SHAFT
3 - WING NUT
4 - PLASTIC CUP
5 - DIAL INDICATOR
6 - WHEEL
7 - DIAL INDICATOR
Fig. 3 Lateral Runout
1 - MOUNTING CONE
2 - SPINDLE SHAFT
3 - WING NUT
4 - PLASTIC CUP
5 - DIAL INDICATOR
6 - WHEEL
7 - DIAL INDICATOR
Fig. 4 Tire Rotation Pattern
22 - 2 TIRES/WHEELSBR/BE
TIRES/WHEELS (Continued)
Page 1958 of 2255
STANDARD PROCEDURE - MATCH MOUNTING
Wheels and tires are match mounted at the factory.
This means that the high spot of the tire is matched
to the low spot on the wheel rim. Each are marked
with a bright colored temporary label on the out-
board surface for alignment. The wheel is also
marked permanently on the inside of the rim in the
tire well. This permanent mark may be a paint dot
or line, a permanent label or a stamped impression
such as an X. An optional location mark is a small
spherical indentation on the vertical face of the out-
board flange on some non styled base steel wheels.
The tire must be removed to locate the permanent
mark on the inside of the wheel.
Before dismounting a tire from its wheel, a refer-
ence mark should be placed on the tire at the valve
stem location. This reference will ensure that it is
remounted in the original position on the wheel.
(1) Remove the tire and wheel assembly from the
vehicle and mount on a service dynamic balance
machine.
(2) Measure the total runout on the center of the
tire tread rib with a dial indicator. Record the indi-
cator reading. Mark the tire to indicate the high spot.
Place a mark on the tire at the valve stem location
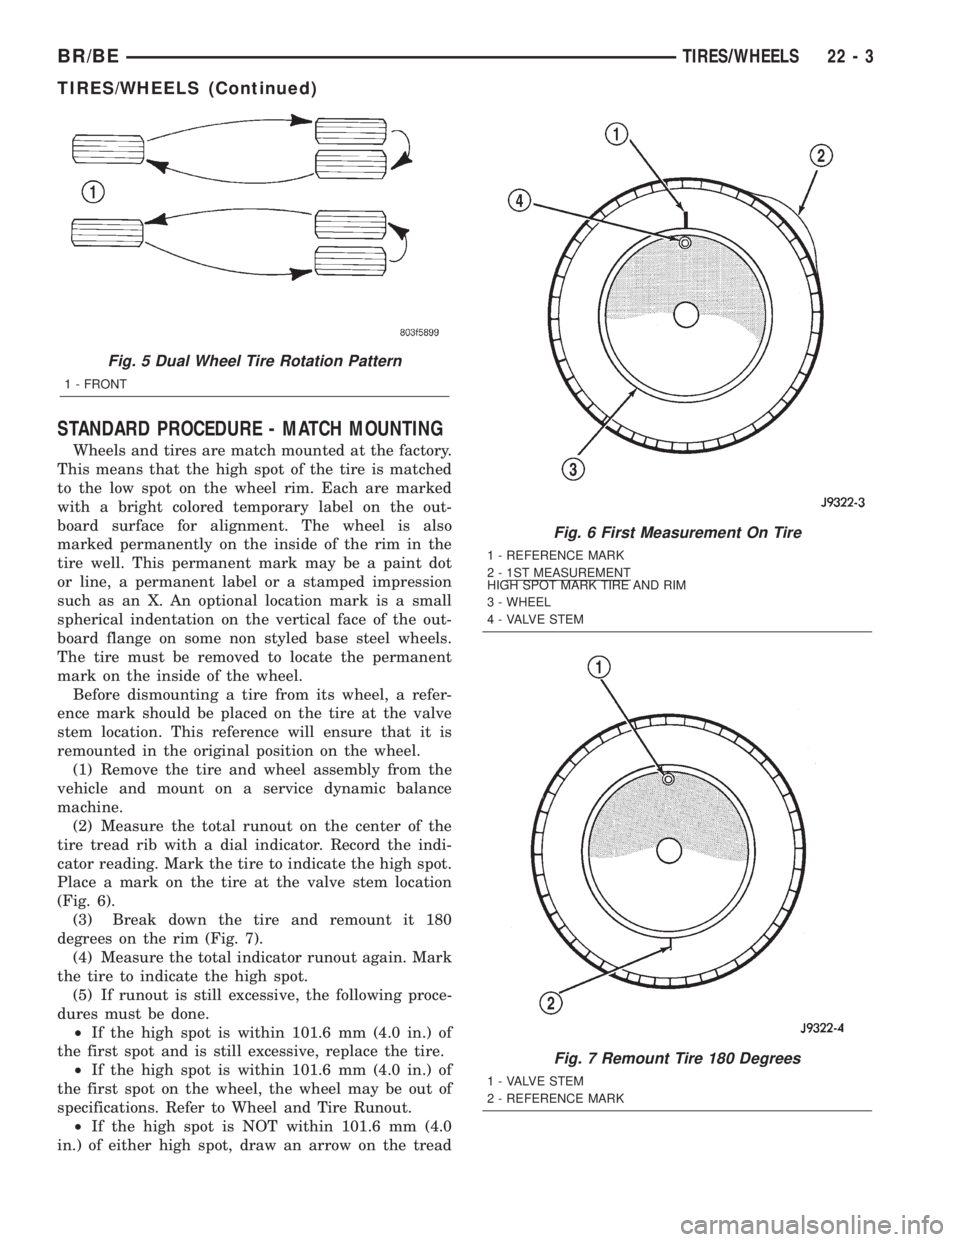
(Fig. 6).
(3) Break down the tire and remount it 180
degrees on the rim (Fig. 7).
(4) Measure the total indicator runout again. Mark
the tire to indicate the high spot.
(5) If runout is still excessive, the following proce-
dures must be done.
²If the high spot is within 101.6 mm (4.0 in.) of
the first spot and is still excessive, replace the tire.
²If the high spot is within 101.6 mm (4.0 in.) of
the first spot on the wheel, the wheel may be out of
specifications. Refer to Wheel and Tire Runout.
²If the high spot is NOT within 101.6 mm (4.0
in.) of either high spot, draw an arrow on the tread
Fig. 5 Dual Wheel Tire Rotation Pattern
1 - FRONT
Fig. 6 First Measurement On Tire
1 - REFERENCE MARK
2 - 1ST MEASUREMENT
HIGH SPOT MARK TIRE AND RIM
3 - WHEEL
4 - VALVE STEM
Fig. 7 Remount Tire 180 Degrees
1 - VALVE STEM
2 - REFERENCE MARK
BR/BETIRES/WHEELS 22 - 3
TIRES/WHEELS (Continued)
Page 1959 of 2255
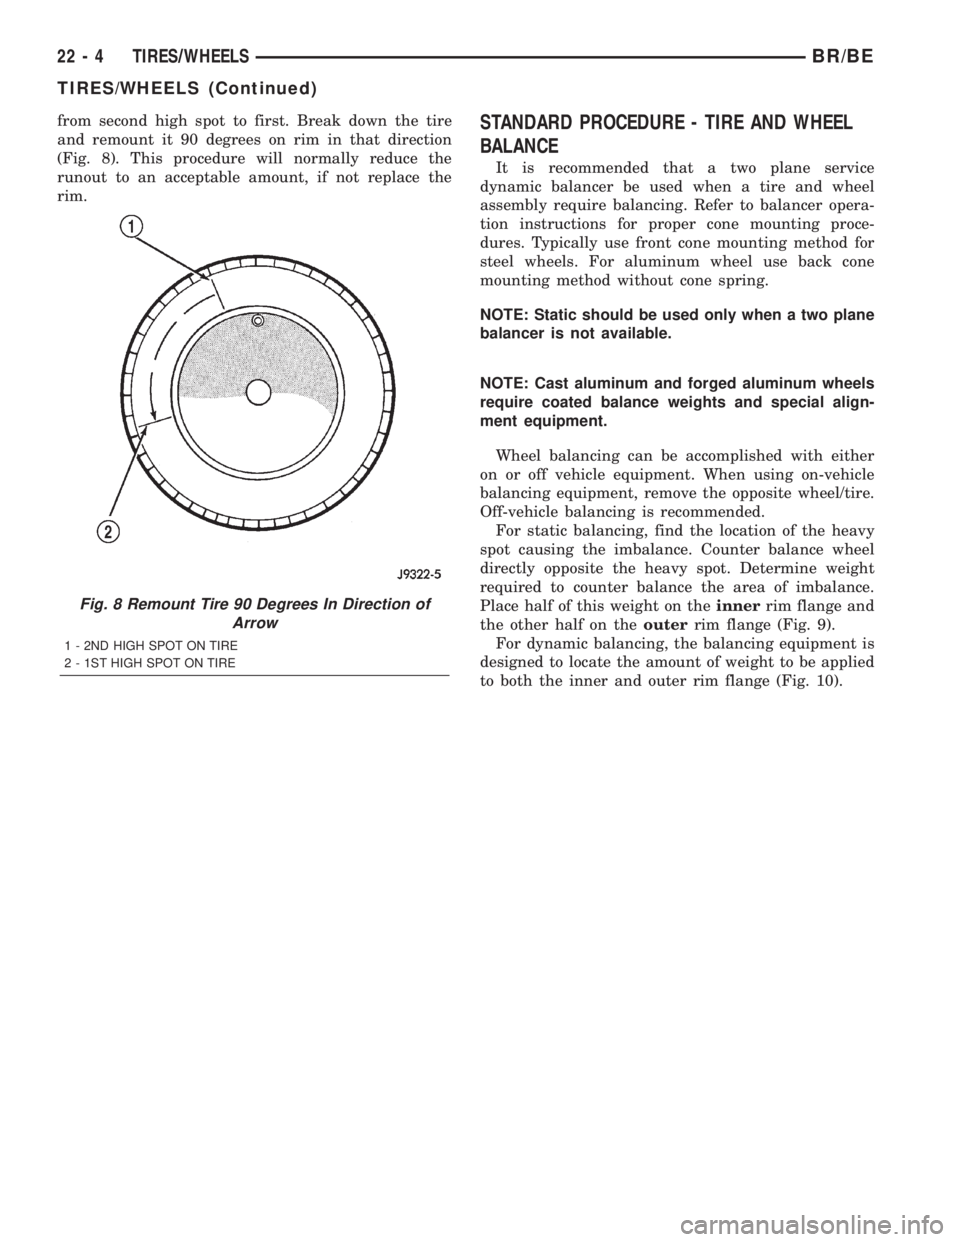
from second high spot to first. Break down the tire
and remount it 90 degrees on rim in that direction
(Fig. 8). This procedure will normally reduce the
runout to an acceptable amount, if not replace the
rim.STANDARD PROCEDURE - TIRE AND WHEEL
BALANCE
It is recommended that a two plane service
dynamic balancer be used when a tire and wheel
assembly require balancing. Refer to balancer opera-
tion instructions for proper cone mounting proce-
dures. Typically use front cone mounting method for
steel wheels. For aluminum wheel use back cone
mounting method without cone spring.
NOTE: Static should be used only when a two plane
balancer is not available.
NOTE: Cast aluminum and forged aluminum wheels
require coated balance weights and special align-
ment equipment.
Wheel balancing can be accomplished with either
on or off vehicle equipment. When using on-vehicle
balancing equipment, remove the opposite wheel/tire.
Off-vehicle balancing is recommended.
For static balancing, find the location of the heavy
spot causing the imbalance. Counter balance wheel
directly opposite the heavy spot. Determine weight
required to counter balance the area of imbalance.
Place half of this weight on theinnerrim flange and
the other half on theouterrim flange (Fig. 9).
For dynamic balancing, the balancing equipment is
designed to locate the amount of weight to be applied
to both the inner and outer rim flange (Fig. 10).
Fig. 8 Remount Tire 90 Degrees In Direction of
Arrow
1 - 2ND HIGH SPOT ON TIRE
2 - 1ST HIGH SPOT ON TIRE
22 - 4 TIRES/WHEELSBR/BE
TIRES/WHEELS (Continued)
Page 1960 of 2255
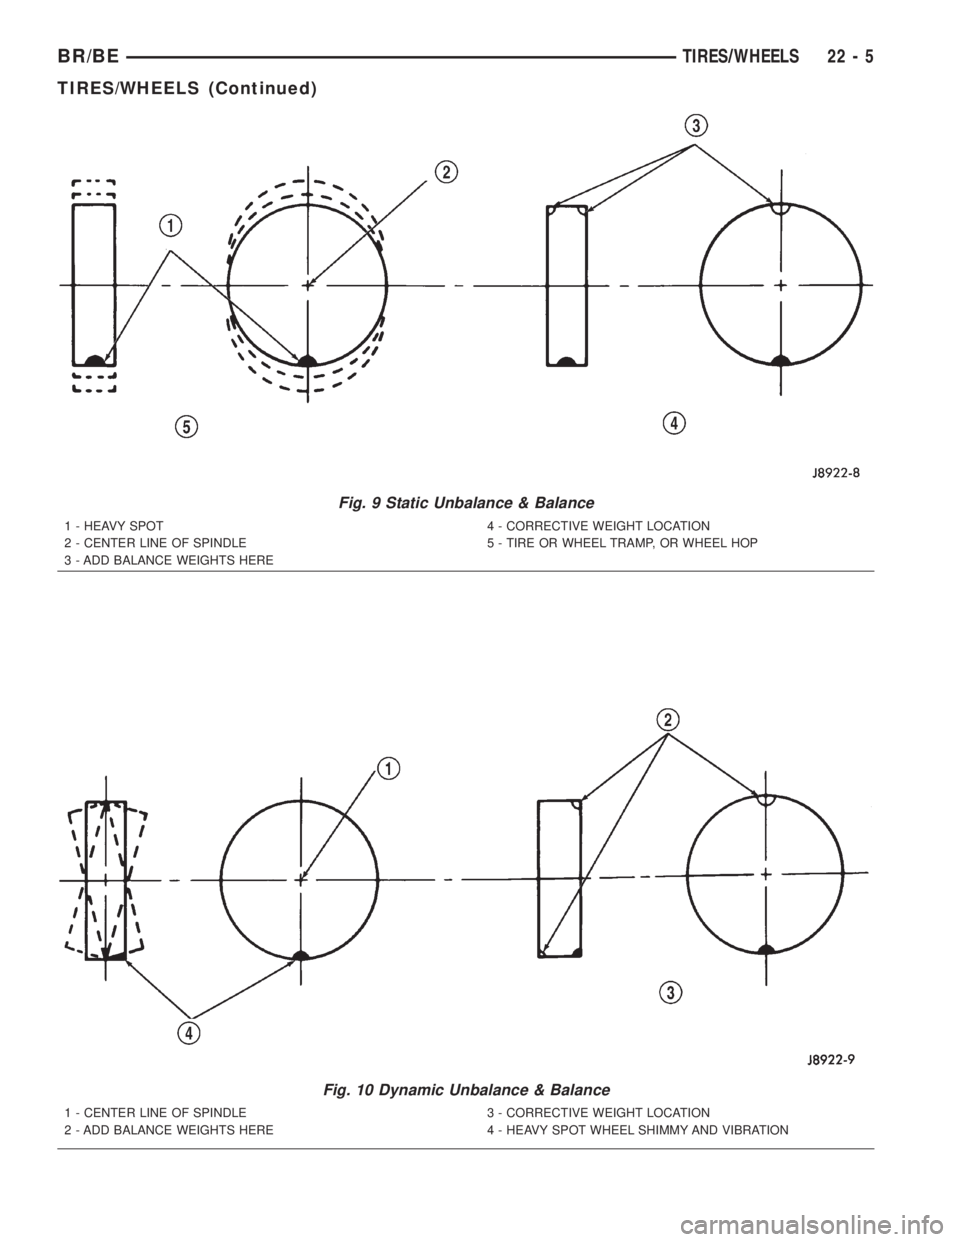
Fig. 9 Static Unbalance & Balance
1 - HEAVY SPOT
2 - CENTER LINE OF SPINDLE
3 - ADD BALANCE WEIGHTS HERE4 - CORRECTIVE WEIGHT LOCATION
5 - TIRE OR WHEEL TRAMP, OR WHEEL HOP
Fig. 10 Dynamic Unbalance & Balance
1 - CENTER LINE OF SPINDLE
2 - ADD BALANCE WEIGHTS HERE3 - CORRECTIVE WEIGHT LOCATION
4 - HEAVY SPOT WHEEL SHIMMY AND VIBRATION
BR/BETIRES/WHEELS 22 - 5
TIRES/WHEELS (Continued)