DODGE TOWN AND COUNTRY 2001 Service Manual
Manufacturer: DODGE, Model Year: 2001, Model line: TOWN AND COUNTRY, Model: DODGE TOWN AND COUNTRY 2001Pages: 2321, PDF Size: 68.09 MB
Page 121 of 2321
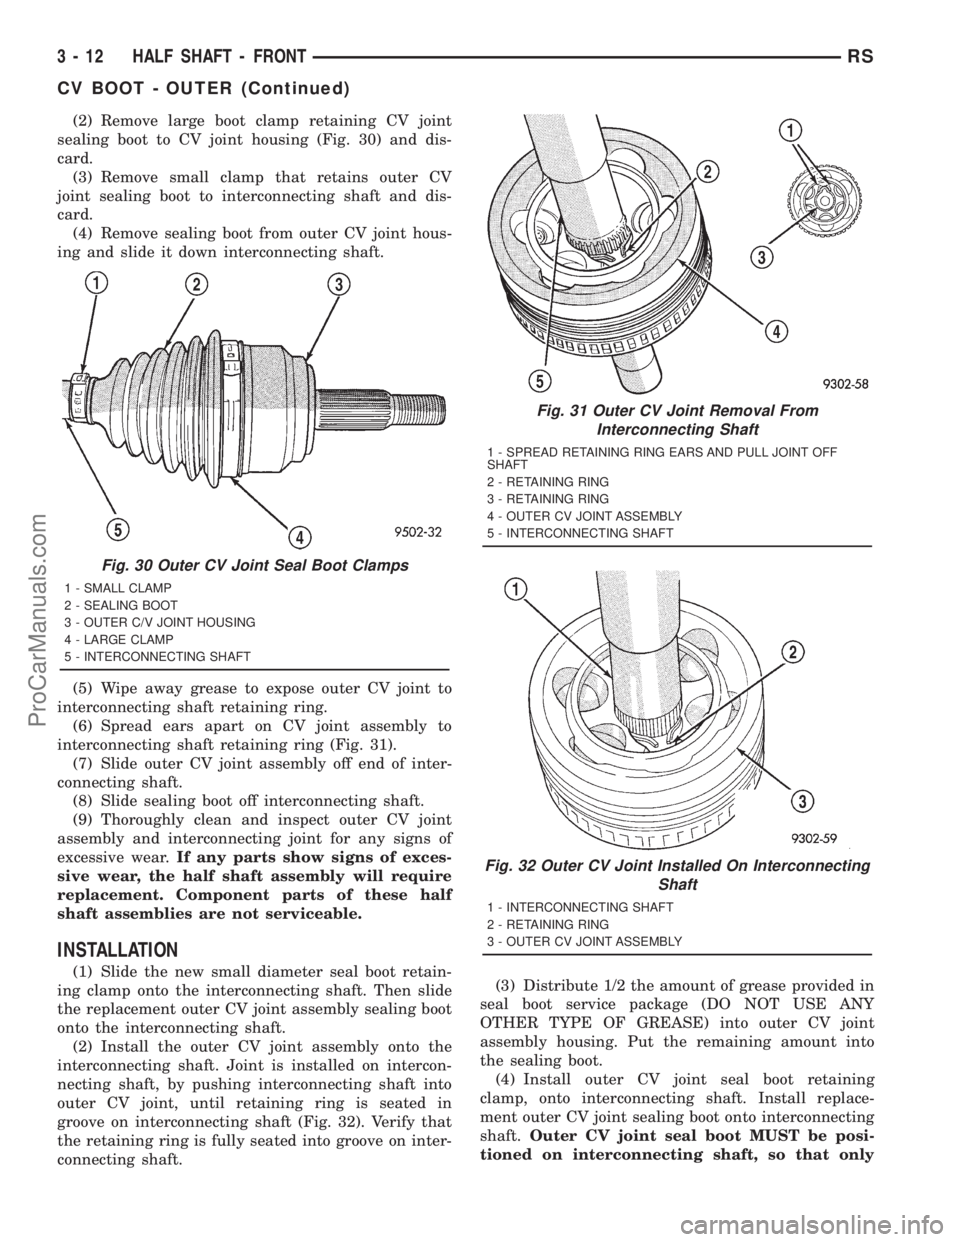
(2) Remove large boot clamp retaining CV joint
sealing boot to CV joint housing (Fig. 30) and dis-
card.
(3) Remove small clamp that retains outer CV
joint sealing boot to interconnecting shaft and dis-
card.
(4) Remove sealing boot from outer CV joint hous-
ing and slide it down interconnecting shaft.
(5) Wipe away grease to expose outer CV joint to
interconnecting shaft retaining ring.
(6) Spread ears apart on CV joint assembly to
interconnecting shaft retaining ring (Fig. 31).
(7) Slide outer CV joint assembly off end of inter-
connecting shaft.
(8) Slide sealing boot off interconnecting shaft.
(9) Thoroughly clean and inspect outer CV joint
assembly and interconnecting joint for any signs of
excessive wear.If any parts show signs of exces-
sive wear, the half shaft assembly will require
replacement. Component parts of these half
shaft assemblies are not serviceable.
INSTALLATION
(1) Slide the new small diameter seal boot retain-
ing clamp onto the interconnecting shaft. Then slide
the replacement outer CV joint assembly sealing boot
onto the interconnecting shaft.
(2) Install the outer CV joint assembly onto the
interconnecting shaft. Joint is installed on intercon-
necting shaft, by pushing interconnecting shaft into
outer CV joint, until retaining ring is seated in
groove on interconnecting shaft (Fig. 32). Verify that
the retaining ring is fully seated into groove on inter-
connecting shaft.(3) Distribute 1/2 the amount of grease provided in
seal boot service package (DO NOT USE ANY
OTHER TYPE OF GREASE) into outer CV joint
assembly housing. Put the remaining amount into
the sealing boot.
(4) Install outer CV joint seal boot retaining
clamp, onto interconnecting shaft. Install replace-
ment outer CV joint sealing boot onto interconnecting
shaft.Outer CV joint seal boot MUST be posi-
tioned on interconnecting shaft, so that only
Fig. 30 Outer CV Joint Seal Boot Clamps
1 - SMALL CLAMP
2 - SEALING BOOT
3 - OUTER C/V JOINT HOUSING
4 - LARGE CLAMP
5 - INTERCONNECTING SHAFT
Fig. 31 Outer CV Joint Removal From
Interconnecting Shaft
1 - SPREAD RETAINING RING EARS AND PULL JOINT OFF
SHAFT
2 - RETAINING RING
3 - RETAINING RING
4 - OUTER CV JOINT ASSEMBLY
5 - INTERCONNECTING SHAFT
Fig. 32 Outer CV Joint Installed On Interconnecting
Shaft
1 - INTERCONNECTING SHAFT
2 - RETAINING RING
3 - OUTER CV JOINT ASSEMBLY
3 - 12 HALF SHAFT - FRONTRS
CV BOOT - OUTER (Continued)
ProCarManuals.com
Page 122 of 2321
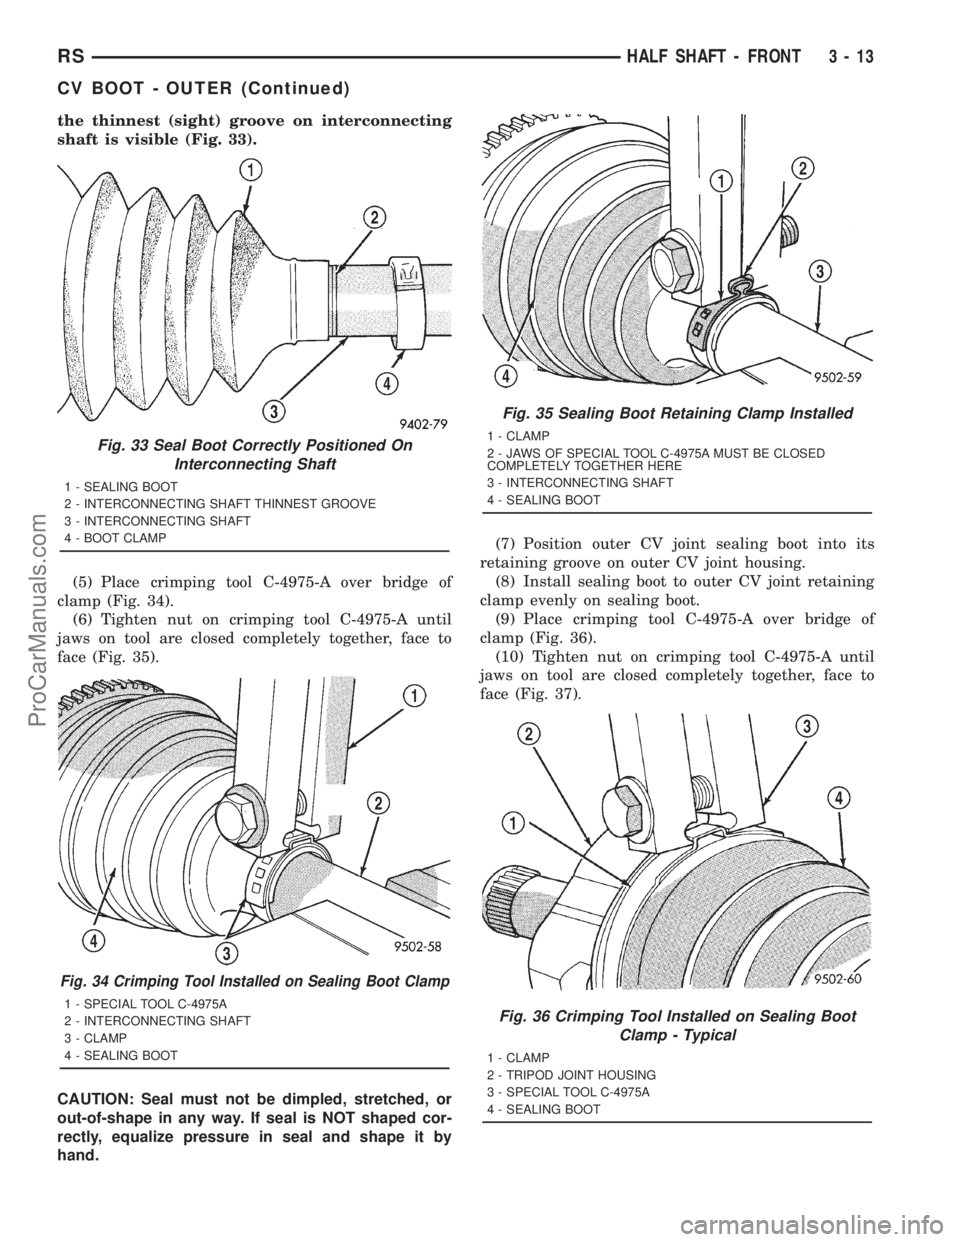
the thinnest (sight) groove on interconnecting
shaft is visible (Fig. 33).
(5) Place crimping tool C-4975-A over bridge of
clamp (Fig. 34).
(6) Tighten nut on crimping tool C-4975-A until
jaws on tool are closed completely together, face to
face (Fig. 35).
CAUTION: Seal must not be dimpled, stretched, or
out-of-shape in any way. If seal is NOT shaped cor-
rectly, equalize pressure in seal and shape it by
hand.(7) Position outer CV joint sealing boot into its
retaining groove on outer CV joint housing.
(8) Install sealing boot to outer CV joint retaining
clamp evenly on sealing boot.
(9) Place crimping tool C-4975-A over bridge of
clamp (Fig. 36).
(10) Tighten nut on crimping tool C-4975-A until
jaws on tool are closed completely together, face to
face (Fig. 37).
Fig. 33 Seal Boot Correctly Positioned On
Interconnecting Shaft
1 - SEALING BOOT
2 - INTERCONNECTING SHAFT THINNEST GROOVE
3 - INTERCONNECTING SHAFT
4 - BOOT CLAMP
Fig. 34 Crimping Tool Installed on Sealing Boot Clamp
1 - SPECIAL TOOL C-4975A
2 - INTERCONNECTING SHAFT
3 - CLAMP
4 - SEALING BOOT
Fig. 35 Sealing Boot Retaining Clamp Installed
1 - CLAMP
2 - JAWS OF SPECIAL TOOL C-4975A MUST BE CLOSED
COMPLETELY TOGETHER HERE
3 - INTERCONNECTING SHAFT
4 - SEALING BOOT
Fig. 36 Crimping Tool Installed on Sealing Boot
Clamp - Typical
1 - CLAMP
2 - TRIPOD JOINT HOUSING
3 - SPECIAL TOOL C-4975A
4 - SEALING BOOT
RSHALF SHAFT - FRONT3-13
CV BOOT - OUTER (Continued)
ProCarManuals.com
Page 123 of 2321
(11) Install the half shaft requiring boot replace-
ment back on the vehicle. (Refer to 3 - DIFFEREN-
TIAL & DRIVELINE/HALF SHAFT -
INSTALLATION)
OUTER CV JOINT BEARING
SHIELD
REMOVAL
(1) Clamp half shaft in a vise by the interconnect-
ing shaft.
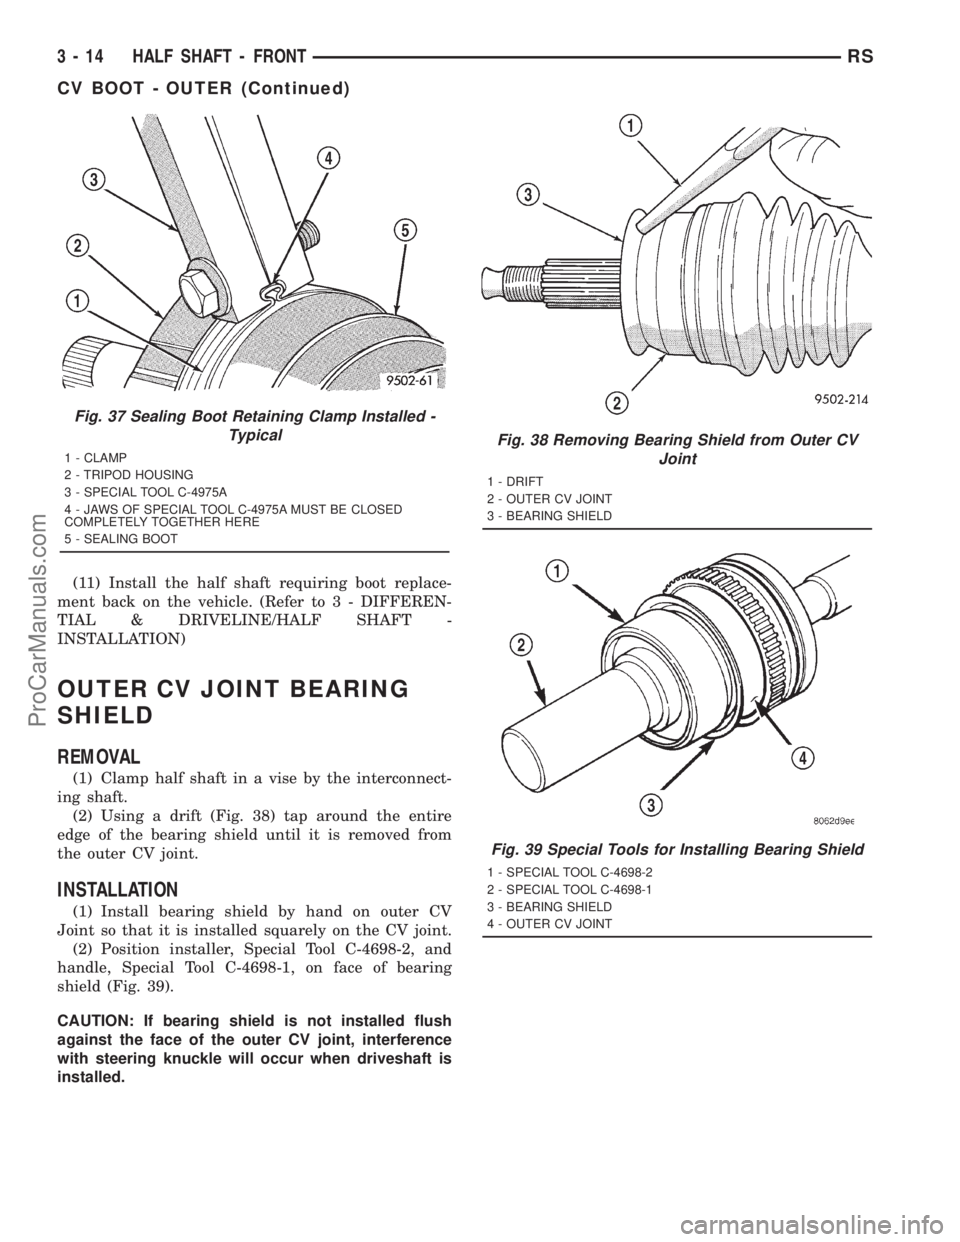
(2) Using a drift (Fig. 38) tap around the entire
edge of the bearing shield until it is removed from
the outer CV joint.
INSTALLATION
(1) Install bearing shield by hand on outer CV
Joint so that it is installed squarely on the CV joint.
(2) Position installer, Special Tool C-4698-2, and
handle, Special Tool C-4698-1, on face of bearing
shield (Fig. 39).
CAUTION: If bearing shield is not installed flush
against the face of the outer CV joint, interference
with steering knuckle will occur when driveshaft is
installed.
Fig. 37 Sealing Boot Retaining Clamp Installed -
Typical
1 - CLAMP
2 - TRIPOD HOUSING
3 - SPECIAL TOOL C-4975A
4 - JAWS OF SPECIAL TOOL C-4975A MUST BE CLOSED
COMPLETELY TOGETHER HERE
5 - SEALING BOOT
Fig. 38 Removing Bearing Shield from Outer CV
Joint
1 - DRIFT
2 - OUTER CV JOINT
3 - BEARING SHIELD
Fig. 39 Special Tools for Installing Bearing Shield
1 - SPECIAL TOOL C-4698-2
2 - SPECIAL TOOL C-4698-1
3 - BEARING SHIELD
4 - OUTER CV JOINT
3 - 14 HALF SHAFT - FRONTRS
CV BOOT - OUTER (Continued)
ProCarManuals.com
Page 124 of 2321
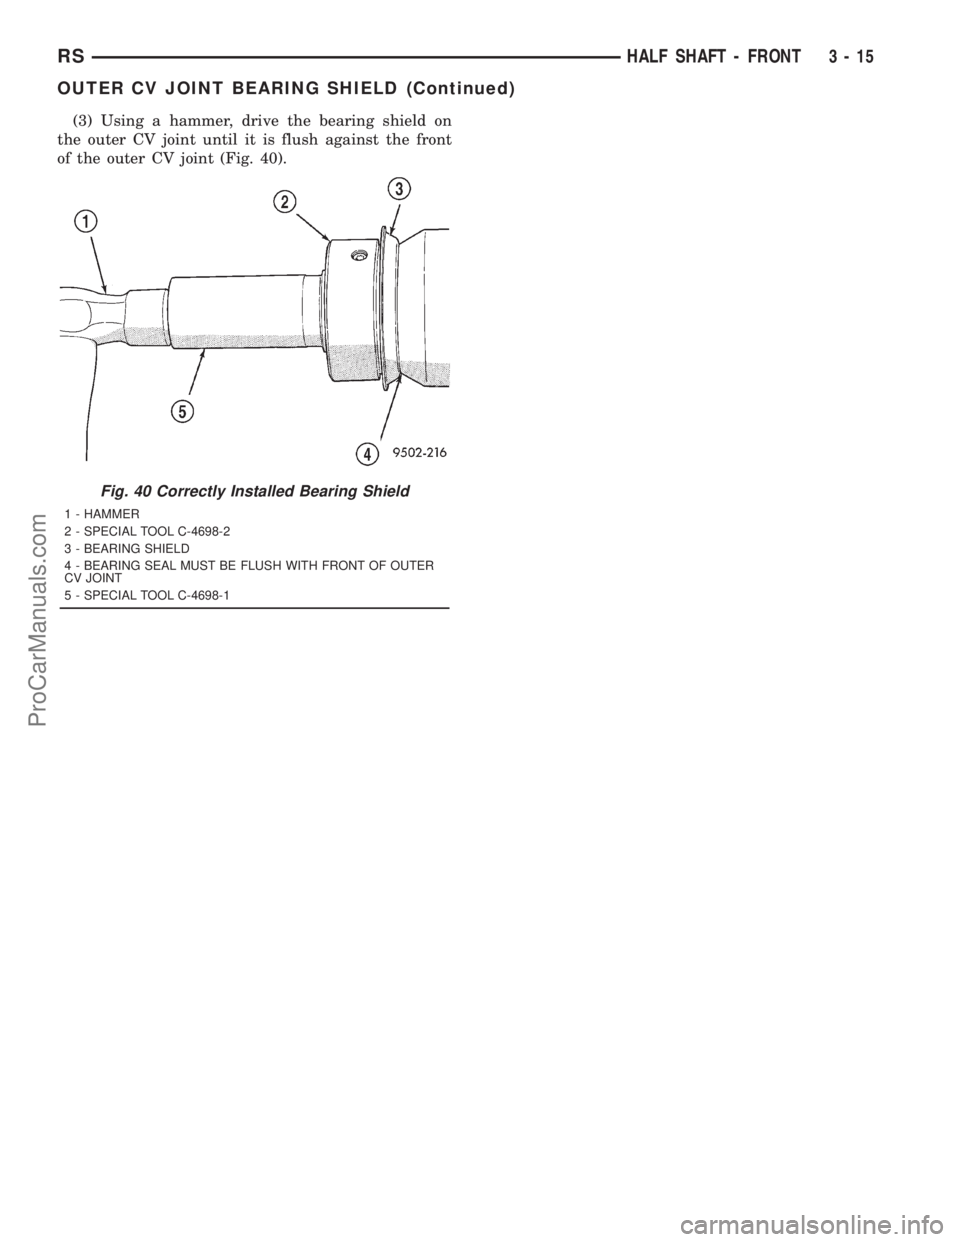
(3) Using a hammer, drive the bearing shield on
the outer CV joint until it is flush against the front
of the outer CV joint (Fig. 40).
Fig. 40 Correctly Installed Bearing Shield
1 - HAMMER
2 - SPECIAL TOOL C-4698-2
3 - BEARING SHIELD
4 - BEARING SEAL MUST BE FLUSH WITH FRONT OF OUTER
CV JOINT
5 - SPECIAL TOOL C-4698-1
RSHALF SHAFT - FRONT3-15
OUTER CV JOINT BEARING SHIELD (Continued)
ProCarManuals.com
Page 125 of 2321
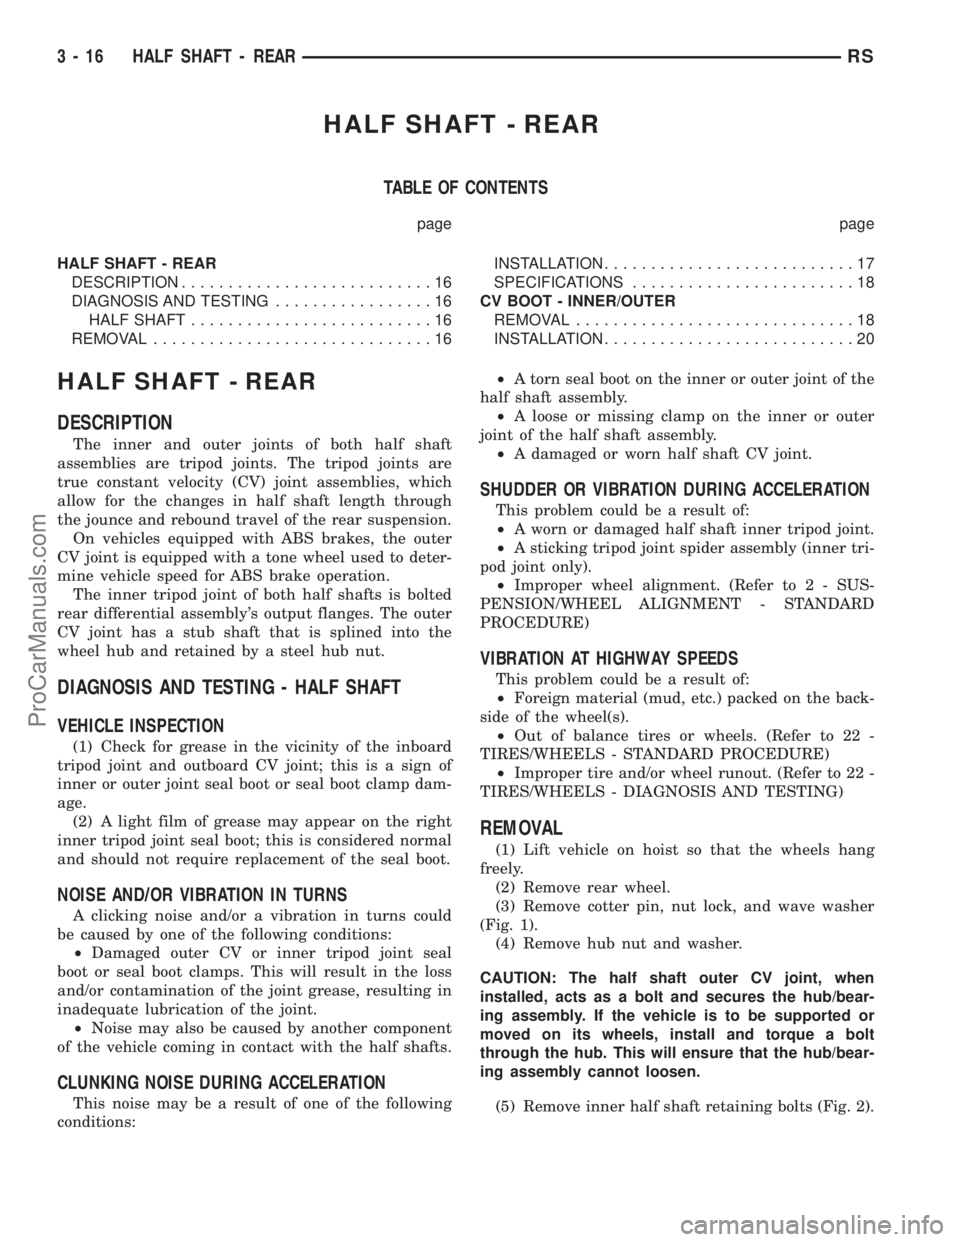
HALF SHAFT - REAR
TABLE OF CONTENTS
page page
HALF SHAFT - REAR
DESCRIPTION...........................16
DIAGNOSIS AND TESTING.................16
HALF SHAFT..........................16
REMOVAL..............................16INSTALLATION...........................17
SPECIFICATIONS........................18
CV BOOT - INNER/OUTER
REMOVAL..............................18
INSTALLATION...........................20
HALF SHAFT - REAR
DESCRIPTION
The inner and outer joints of both half shaft
assemblies are tripod joints. The tripod joints are
true constant velocity (CV) joint assemblies, which
allow for the changes in half shaft length through
the jounce and rebound travel of the rear suspension.
On vehicles equipped with ABS brakes, the outer
CV joint is equipped with a tone wheel used to deter-
mine vehicle speed for ABS brake operation.
The inner tripod joint of both half shafts is bolted
rear differential assembly's output flanges. The outer
CV joint has a stub shaft that is splined into the
wheel hub and retained by a steel hub nut.
DIAGNOSIS AND TESTING - HALF SHAFT
VEHICLE INSPECTION
(1) Check for grease in the vicinity of the inboard
tripod joint and outboard CV joint; this is a sign of
inner or outer joint seal boot or seal boot clamp dam-
age.
(2) A light film of grease may appear on the right
inner tripod joint seal boot; this is considered normal
and should not require replacement of the seal boot.
NOISE AND/OR VIBRATION IN TURNS
A clicking noise and/or a vibration in turns could
be caused by one of the following conditions:
²Damaged outer CV or inner tripod joint seal
boot or seal boot clamps. This will result in the loss
and/or contamination of the joint grease, resulting in
inadequate lubrication of the joint.
²Noise may also be caused by another component
of the vehicle coming in contact with the half shafts.
CLUNKING NOISE DURING ACCELERATION
This noise may be a result of one of the following
conditions:²A torn seal boot on the inner or outer joint of the
half shaft assembly.
²A loose or missing clamp on the inner or outer
joint of the half shaft assembly.
²A damaged or worn half shaft CV joint.
SHUDDER OR VIBRATION DURING ACCELERATION
This problem could be a result of:
²A worn or damaged half shaft inner tripod joint.
²A sticking tripod joint spider assembly (inner tri-
pod joint only).
²Improper wheel alignment. (Refer to 2 - SUS-
PENSION/WHEEL ALIGNMENT - STANDARD
PROCEDURE)
VIBRATION AT HIGHWAY SPEEDS
This problem could be a result of:
²Foreign material (mud, etc.) packed on the back-
side of the wheel(s).
²Out of balance tires or wheels. (Refer to 22 -
TIRES/WHEELS - STANDARD PROCEDURE)
²Improper tire and/or wheel runout. (Refer to 22 -
TIRES/WHEELS - DIAGNOSIS AND TESTING)
REMOVAL
(1) Lift vehicle on hoist so that the wheels hang
freely.
(2) Remove rear wheel.
(3) Remove cotter pin, nut lock, and wave washer
(Fig. 1).
(4) Remove hub nut and washer.
CAUTION: The half shaft outer CV joint, when
installed, acts as a bolt and secures the hub/bear-
ing assembly. If the vehicle is to be supported or
moved on its wheels, install and torque a bolt
through the hub. This will ensure that the hub/bear-
ing assembly cannot loosen.
(5) Remove inner half shaft retaining bolts (Fig. 2).
3 - 16 HALF SHAFT - REARRS
ProCarManuals.com
Page 126 of 2321
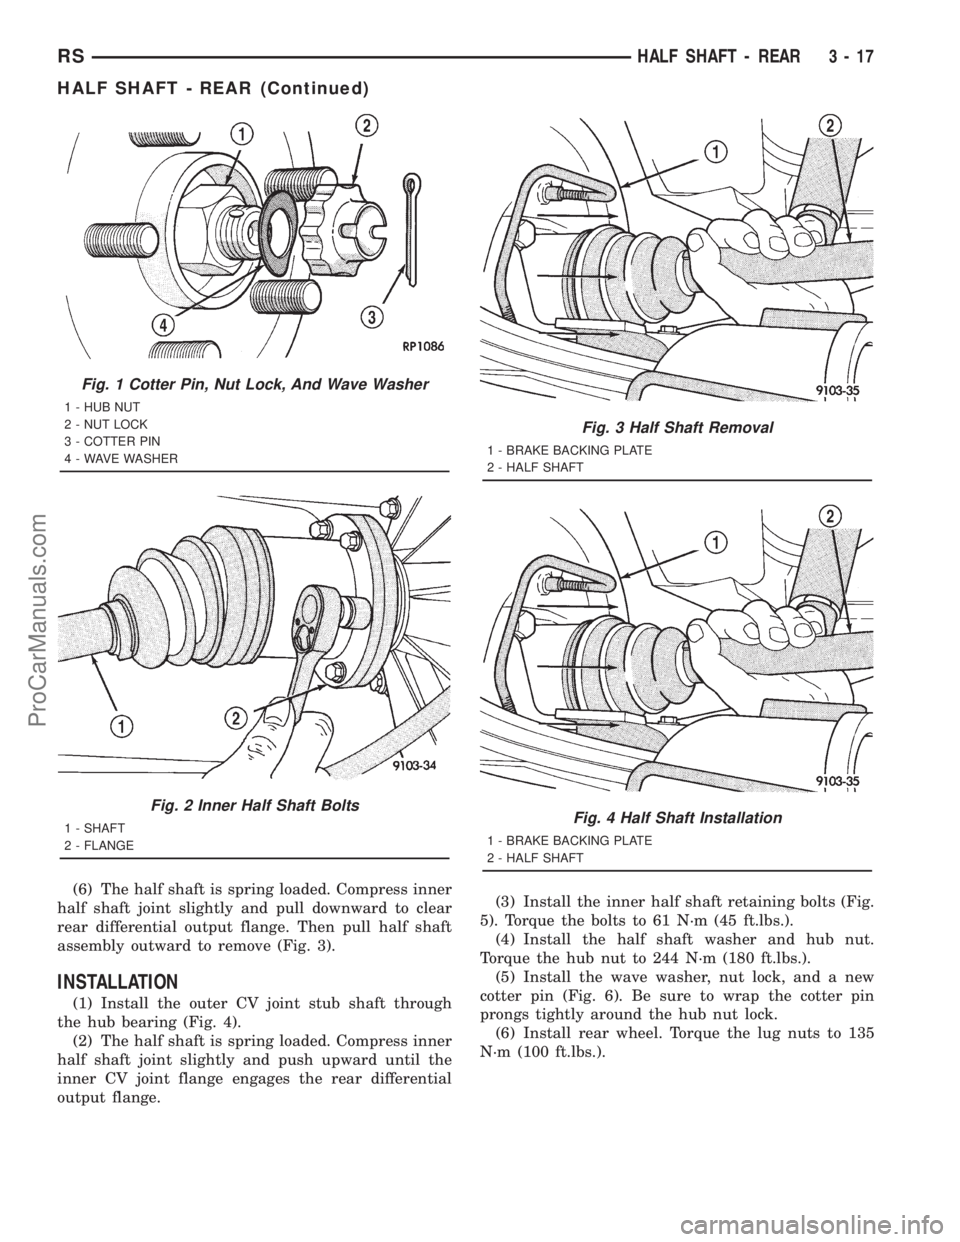
(6) The half shaft is spring loaded. Compress inner
half shaft joint slightly and pull downward to clear
rear differential output flange. Then pull half shaft
assembly outward to remove (Fig. 3).
INSTALLATION
(1) Install the outer CV joint stub shaft through
the hub bearing (Fig. 4).
(2) The half shaft is spring loaded. Compress inner
half shaft joint slightly and push upward until the
inner CV joint flange engages the rear differential
output flange.(3) Install the inner half shaft retaining bolts (Fig.
5). Torque the bolts to 61 N´m (45 ft.lbs.).
(4) Install the half shaft washer and hub nut.
Torque the hub nut to 244 N´m (180 ft.lbs.).
(5) Install the wave washer, nut lock, and a new
cotter pin (Fig. 6). Be sure to wrap the cotter pin
prongs tightly around the hub nut lock.
(6) Install rear wheel. Torque the lug nuts to 135
N´m (100 ft.lbs.).
Fig. 1 Cotter Pin, Nut Lock, And Wave Washer
1 - HUB NUT
2 - NUT LOCK
3 - COTTER PIN
4 - WAVE WASHER
Fig. 2 Inner Half Shaft Bolts
1 - SHAFT
2 - FLANGE
Fig. 3 Half Shaft Removal
1 - BRAKE BACKING PLATE
2 - HALF SHAFT
Fig. 4 Half Shaft Installation
1 - BRAKE BACKING PLATE
2 - HALF SHAFT
RSHALF SHAFT - REAR3-17
HALF SHAFT - REAR (Continued)
ProCarManuals.com
Page 127 of 2321
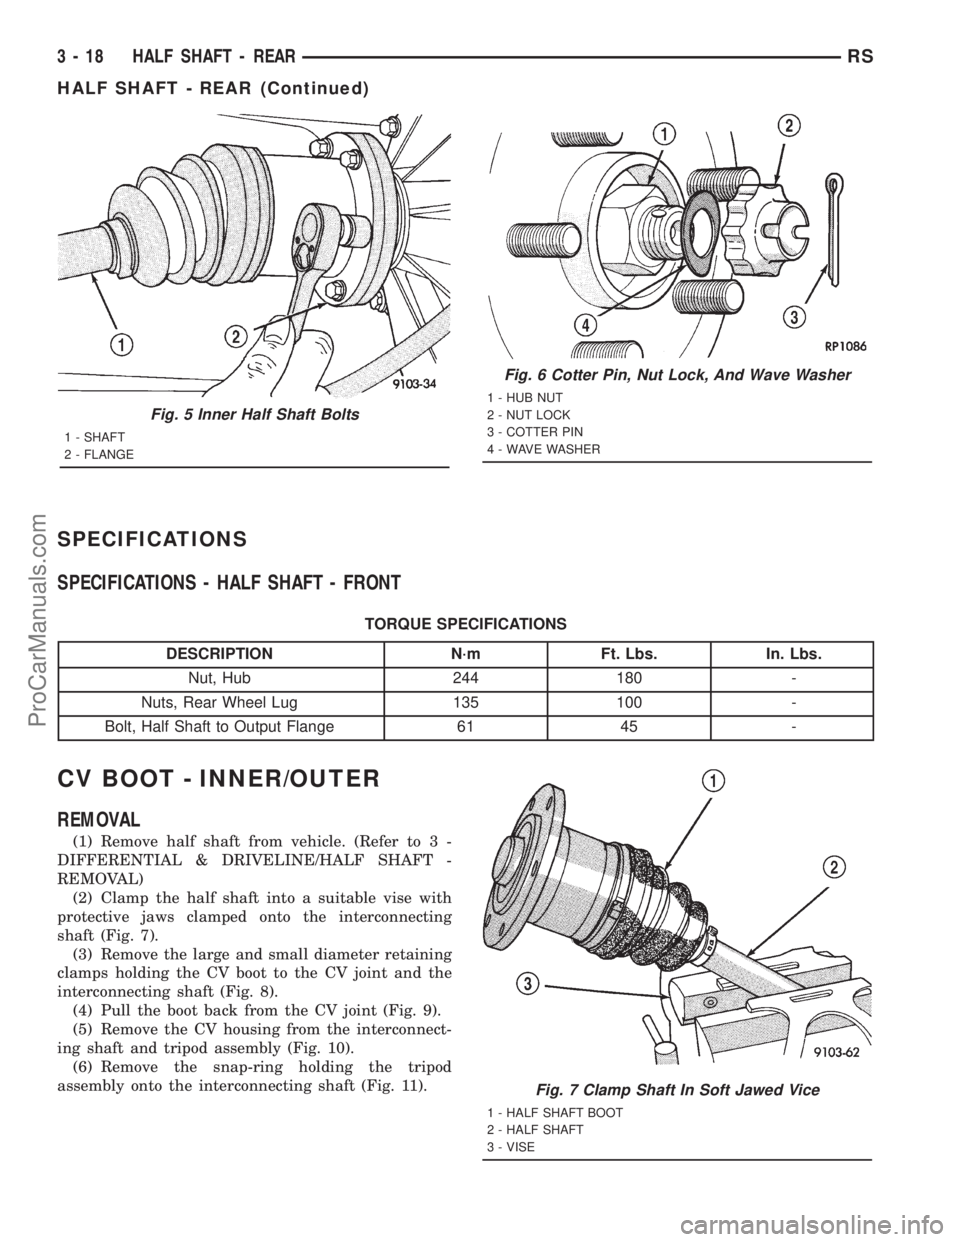
SPECIFICATIONS
SPECIFICATIONS - HALF SHAFT - FRONT
TORQUE SPECIFICATIONS
DESCRIPTION N´m Ft. Lbs. In. Lbs.
Nut, Hub 244 180 -
Nuts, Rear Wheel Lug 135 100 -
Bolt, Half Shaft to Output Flange 61 45 -
CV BOOT - INNER/OUTER
REMOVAL
(1) Remove half shaft from vehicle. (Refer to 3 -
DIFFERENTIAL & DRIVELINE/HALF SHAFT -
REMOVAL)
(2) Clamp the half shaft into a suitable vise with
protective jaws clamped onto the interconnecting
shaft (Fig. 7).
(3) Remove the large and small diameter retaining
clamps holding the CV boot to the CV joint and the
interconnecting shaft (Fig. 8).
(4) Pull the boot back from the CV joint (Fig. 9).
(5) Remove the CV housing from the interconnect-
ing shaft and tripod assembly (Fig. 10).
(6) Remove the snap-ring holding the tripod
assembly onto the interconnecting shaft (Fig. 11).
Fig. 5 Inner Half Shaft Bolts
1 - SHAFT
2 - FLANGE
Fig. 6 Cotter Pin, Nut Lock, And Wave Washer
1 - HUB NUT
2 - NUT LOCK
3 - COTTER PIN
4 - WAVE WASHER
Fig. 7 Clamp Shaft In Soft Jawed Vice
1 - HALF SHAFT BOOT
2 - HALF SHAFT
3 - VISE
3 - 18 HALF SHAFT - REARRS
HALF SHAFT - REAR (Continued)
ProCarManuals.com
Page 128 of 2321
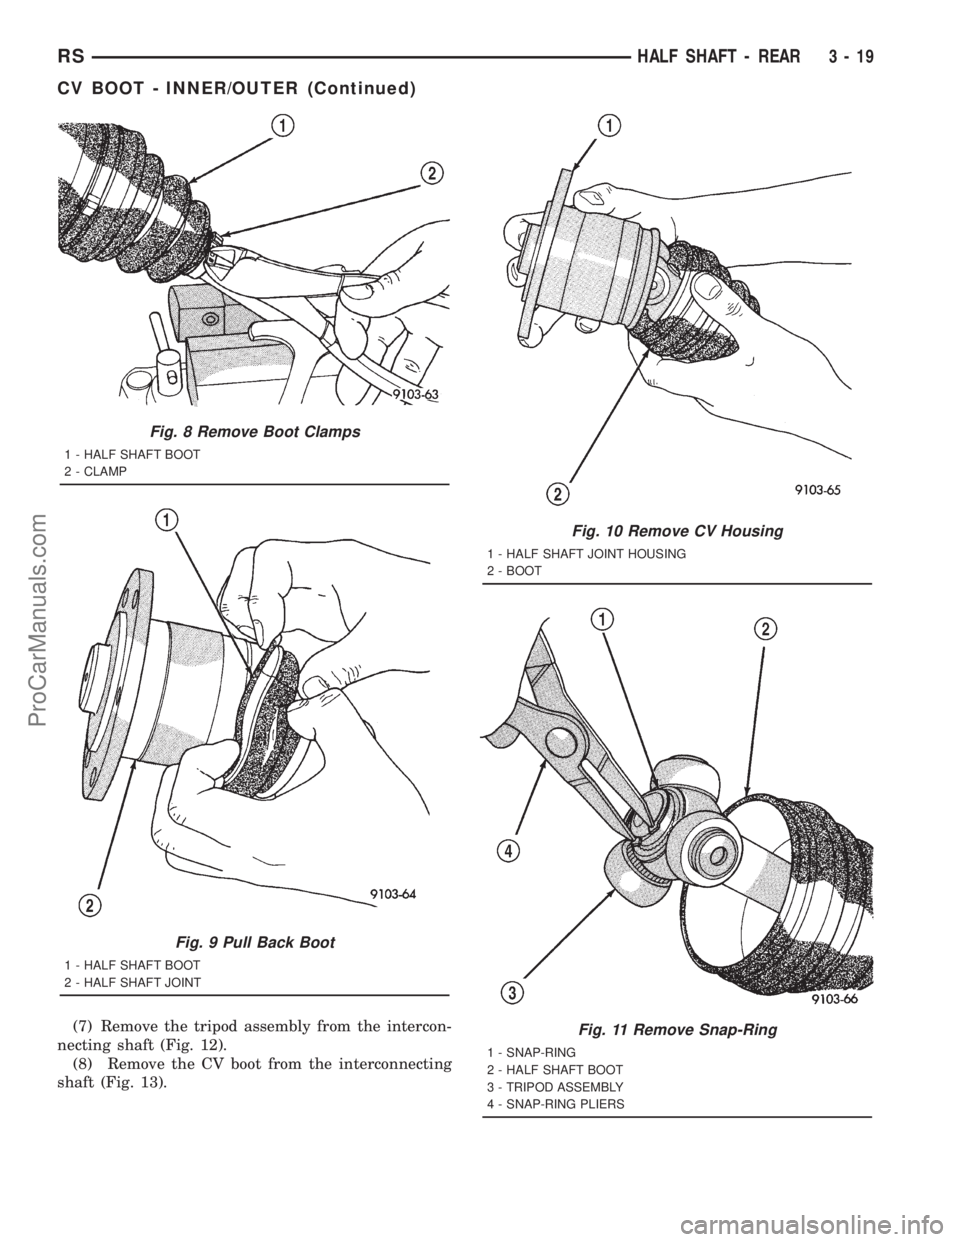
(7) Remove the tripod assembly from the intercon-
necting shaft (Fig. 12).
(8) Remove the CV boot from the interconnecting
shaft (Fig. 13).
Fig. 8 Remove Boot Clamps
1 - HALF SHAFT BOOT
2 - CLAMP
Fig. 9 Pull Back Boot
1 - HALF SHAFT BOOT
2 - HALF SHAFT JOINT
Fig. 10 Remove CV Housing
1 - HALF SHAFT JOINT HOUSING
2 - BOOT
Fig. 11 Remove Snap-Ring
1 - SNAP-RING
2 - HALF SHAFT BOOT
3 - TRIPOD ASSEMBLY
4 - SNAP-RING PLIERS
RSHALF SHAFT - REAR3-19
CV BOOT - INNER/OUTER (Continued)
ProCarManuals.com
Page 129 of 2321
INSTALLATION
(1) Clean the interconnecting shaft and inner CV
joint of any residual grease and dirt.
(2) Slide the new small diameter retaining clamp
onto the interconnecting shaft.
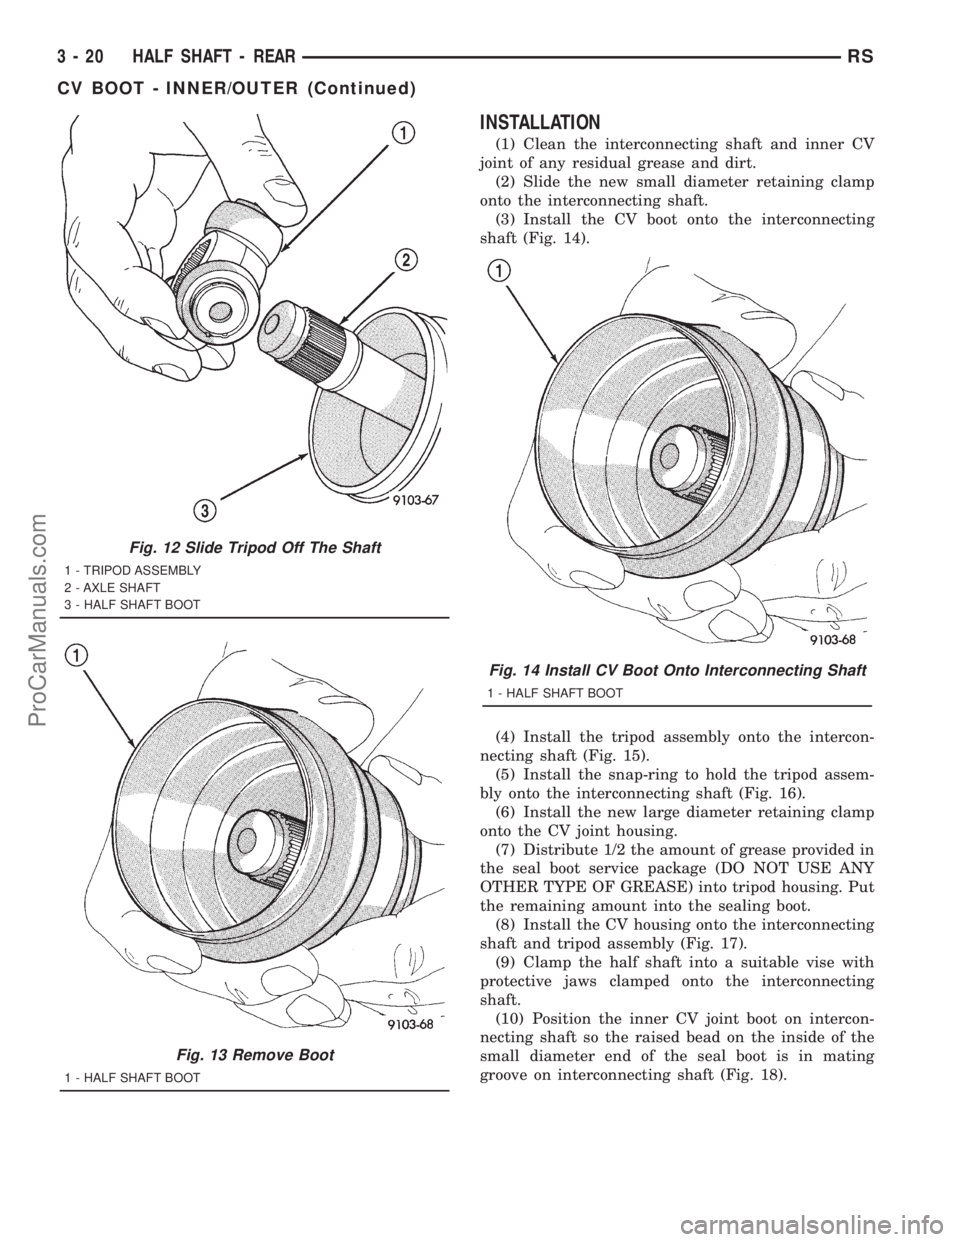
(3) Install the CV boot onto the interconnecting
shaft (Fig. 14).
(4) Install the tripod assembly onto the intercon-
necting shaft (Fig. 15).
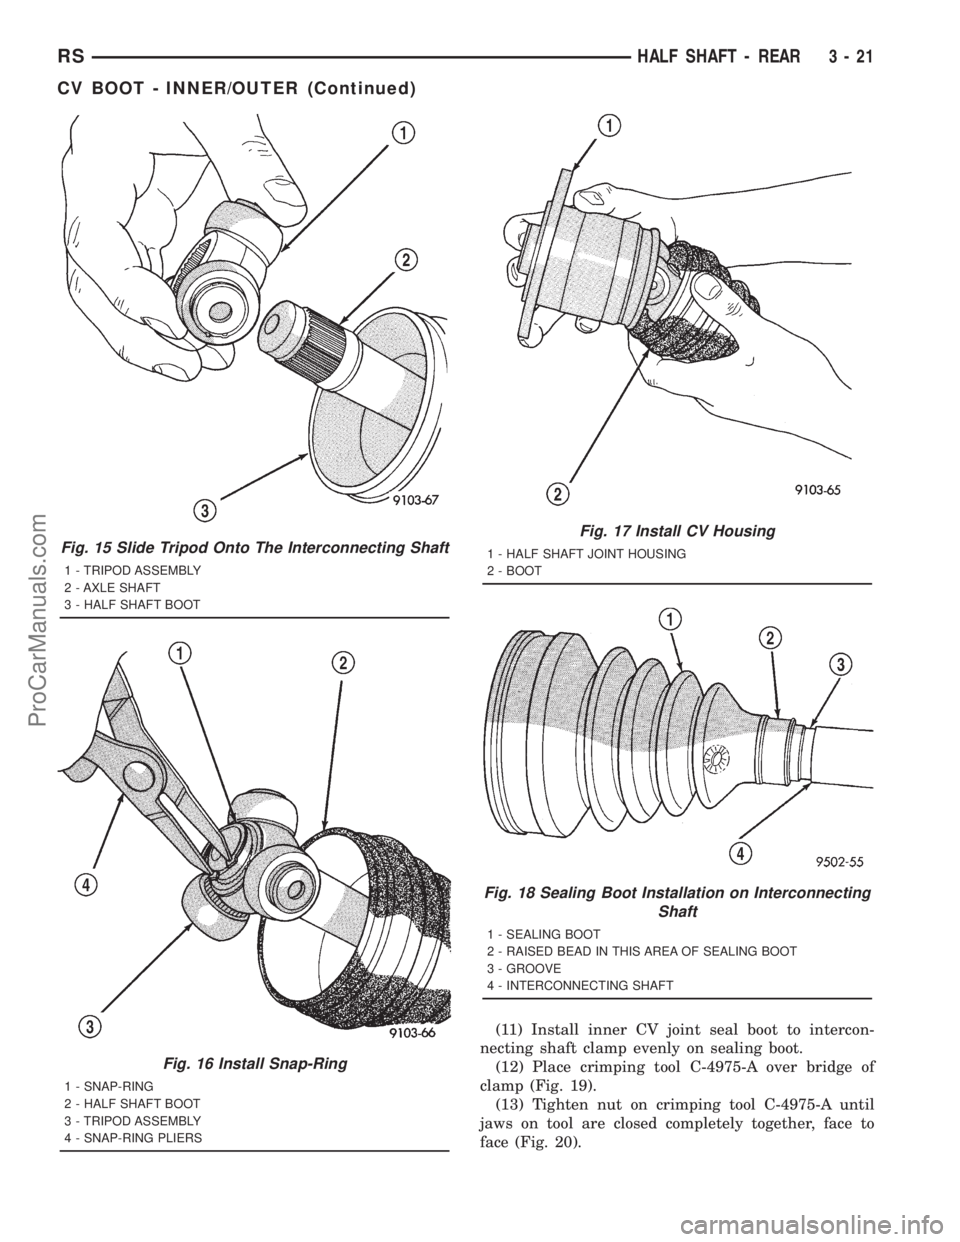
(5) Install the snap-ring to hold the tripod assem-
bly onto the interconnecting shaft (Fig. 16).
(6) Install the new large diameter retaining clamp
onto the CV joint housing.
(7) Distribute 1/2 the amount of grease provided in
the seal boot service package (DO NOT USE ANY
OTHER TYPE OF GREASE) into tripod housing. Put
the remaining amount into the sealing boot.
(8) Install the CV housing onto the interconnecting
shaft and tripod assembly (Fig. 17).
(9) Clamp the half shaft into a suitable vise with
protective jaws clamped onto the interconnecting
shaft.
(10) Position the inner CV joint boot on intercon-
necting shaft so the raised bead on the inside of the
small diameter end of the seal boot is in mating
groove on interconnecting shaft (Fig. 18).
Fig. 12 Slide Tripod Off The Shaft
1 - TRIPOD ASSEMBLY
2 - AXLE SHAFT
3 - HALF SHAFT BOOT
Fig. 13 Remove Boot
1 - HALF SHAFT BOOT
Fig. 14 Install CV Boot Onto Interconnecting Shaft
1 - HALF SHAFT BOOT
3 - 20 HALF SHAFT - REARRS
CV BOOT - INNER/OUTER (Continued)
ProCarManuals.com
Page 130 of 2321
(11) Install inner CV joint seal boot to intercon-
necting shaft clamp evenly on sealing boot.
(12) Place crimping tool C-4975-A over bridge of
clamp (Fig. 19).
(13) Tighten nut on crimping tool C-4975-A until
jaws on tool are closed completely together, face to
face (Fig. 20).
Fig. 15 Slide Tripod Onto The Interconnecting Shaft
1 - TRIPOD ASSEMBLY
2 - AXLE SHAFT
3 - HALF SHAFT BOOT
Fig. 16 Install Snap-Ring
1 - SNAP-RING
2 - HALF SHAFT BOOT
3 - TRIPOD ASSEMBLY
4 - SNAP-RING PLIERS
Fig. 17 Install CV Housing
1 - HALF SHAFT JOINT HOUSING
2 - BOOT
Fig. 18 Sealing Boot Installation on Interconnecting
Shaft
1 - SEALING BOOT
2 - RAISED BEAD IN THIS AREA OF SEALING BOOT
3 - GROOVE
4 - INTERCONNECTING SHAFT
RSHALF SHAFT - REAR3-21
CV BOOT - INNER/OUTER (Continued)
ProCarManuals.com