width DODGE TRUCK 1993 Service Owner's Manual
[x] Cancel search | Manufacturer: DODGE, Model Year: 1993, Model line: TRUCK, Model: DODGE TRUCK 1993Pages: 1502, PDF Size: 80.97 MB
Page 708 of 1502
— 5.9L
ENGINE
9 - 103
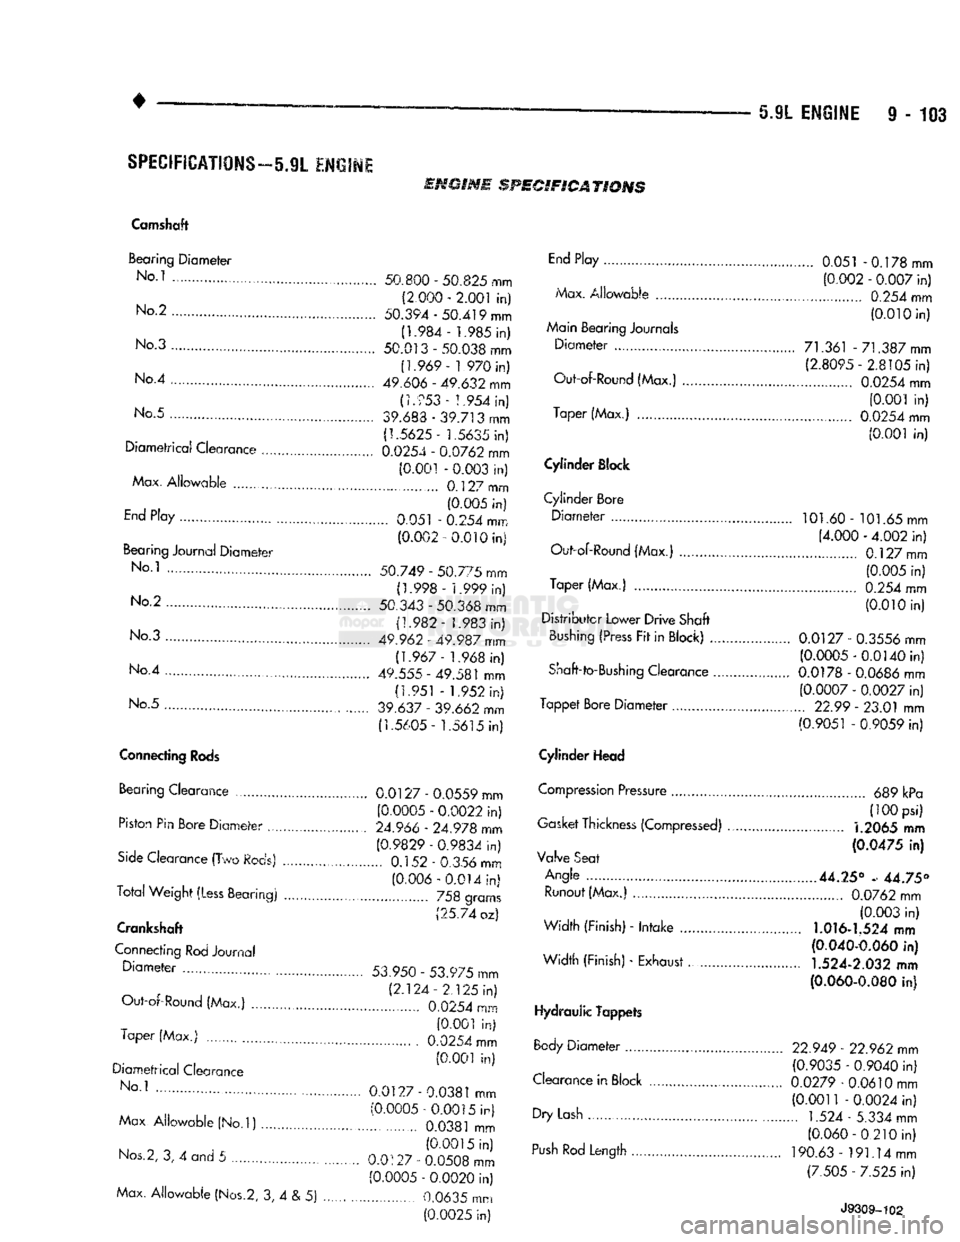
SPECIFICATIONS—5.9L
ENGINE
EmmmE
SPECIFICATIONS
Camshaft
Bearing
Diameter
No i 50.800 - 50.825 mm "" (2.000 - 2.001 in)
No2
50.394-50.419 mm
' (1.984- 1.985 in)
No 3 50.013 - 50.038 mm
(1.969- 1 970 in)
No
4 49.606 - 49.632 mm
(1.953 - 1.954 in)
No
5 ................ 39.683 -39.713 mm
(1.5625-
1.5635 in)
Diametrical
Clearance 0.0254 - 0.0762 mm
(0.001 - 0.003 in)
Max.
Allowable
. 0.127 mm (0.005 in)
End
p|ay 0.051 - 0.254 mm
(0.002-0.010 in)
Bearinq
Journal
Diameter
No i 50.749 - 50.775 mm (1.998- 1.999 in)
No
2 50.343 - 50.368 mm
(1.982-
1.983 in)
No
3 . .............. 49.962 - 49.987 mm (1.967- 1.968 in)
No
4 . 49.555-49.581 mm
(1.951
- 1 952 in)
No
5 39.637 - 39.662 mm
(1.5605-
1.5615 in)
Connecting
Rods
Bearing Clearance 0.0127 - 0.0559 mm (0.0005 - 0.0022 in)
Piston Pin Bore
Diameter
24.966 - 24.978 mm
(0.9829 - 0.9834 in)
Side
Clearance (Two
Rods)
......................... 0.152 - 0.356 mm
(0.006-0.014 in)
Total
Weight
(Less
Bearing) . ... • 758 grams
(25.74 oz)
Crankshaft
Connecting
Rod
Journal
Diameter
. 53.950 - 53.975 mm (2.124 - 2.125 in)
Out-of-Round (Max.) 0.0254 mm
(0.001 in)
Taper (Max.) ... 0.0254 mm
(0.001 in)
Diametrical
Clearance
No
1
... ........ 0.0127 - 0.0381 mm (0.0005-0.0015 in)
Max
Allowable
(No.l)
- 0.0381 mm
(0.0015 in)
Nos.2,
3, 4 and 5 0.0127 - 0.0508 mm
(0.0005 - 0.0020 in)
Max.
Allowable
(Nos.2,
3, 4 & 5) ...... - 0.0635 mm (0.0025 in)
End
Play 0.051 -0.178 mm
(0.002 - 0.007 in)
Max.
Allowable
0.254 mm
(0.010 in)
Main Bearing Journals
Diameter
71.361 - 71.387 mm
(2.8095-
2.8105 in)
Out-of-Round (Max.) 0.0254 mm
(0.001 in)
Taper (Max.) .., 0.0254 mm
(0.001 in)
Cylinder Block
Cylinder
Bore
Diameter
, 101.60 - 101.65 mm (4.000 - 4.002 in)
Out-of-Round (Max.) ........... 0.127 mm
(0.005 in)
Taper (Max.) 0.254 mm
(0.010 in)
Distributor
Lower
Drive
Shaft
Bushing (Press Fit in Block) 0.0127 - 0.3556 mm (0.0005-0.0140 in)
Shaft-to-Bushing Clearance 0.0178 - 0.0686 mm (0.0007 - 0,0027 in)
Tappet
Bore
Diameter
.............. 22.99 - 23.01 mm (0.9051 - 0.9059 in)
Cylinder Head
Compression Pressure 689 kPa (100 psi)
Gasket Thickness (Compressed)
1.2065
mm
(0.0475 In)
Valve Seat
Angle .
44.25°
- 44.75° Runout (Max.) ....................... 0.0762 mm (0.003 in)
Width
(Finish) -
Intake
1.016-1.524
mm (0,040-0.060 in)
Width
(Finish) - Exhaust
1.524-2.032
mm
(0.060-0.080
in)
Hydraulic Tappets
Body
Diameter
22.949 - 22.962 mm (0.9035 - 0.9040 in)
Clearance in Block 0.0279 - 0.0610 mm
(0.0011 - 0.0024 in)
Dry
Lash
. 1.524 - 5.334 mm
(0.060-0210 in)
Push
Rod
Length
190.63 - 191.14mm
(7.505 - 7.525 in)
J9309-102
Page 709 of 1502
9 - 104 5.9L ENGINE
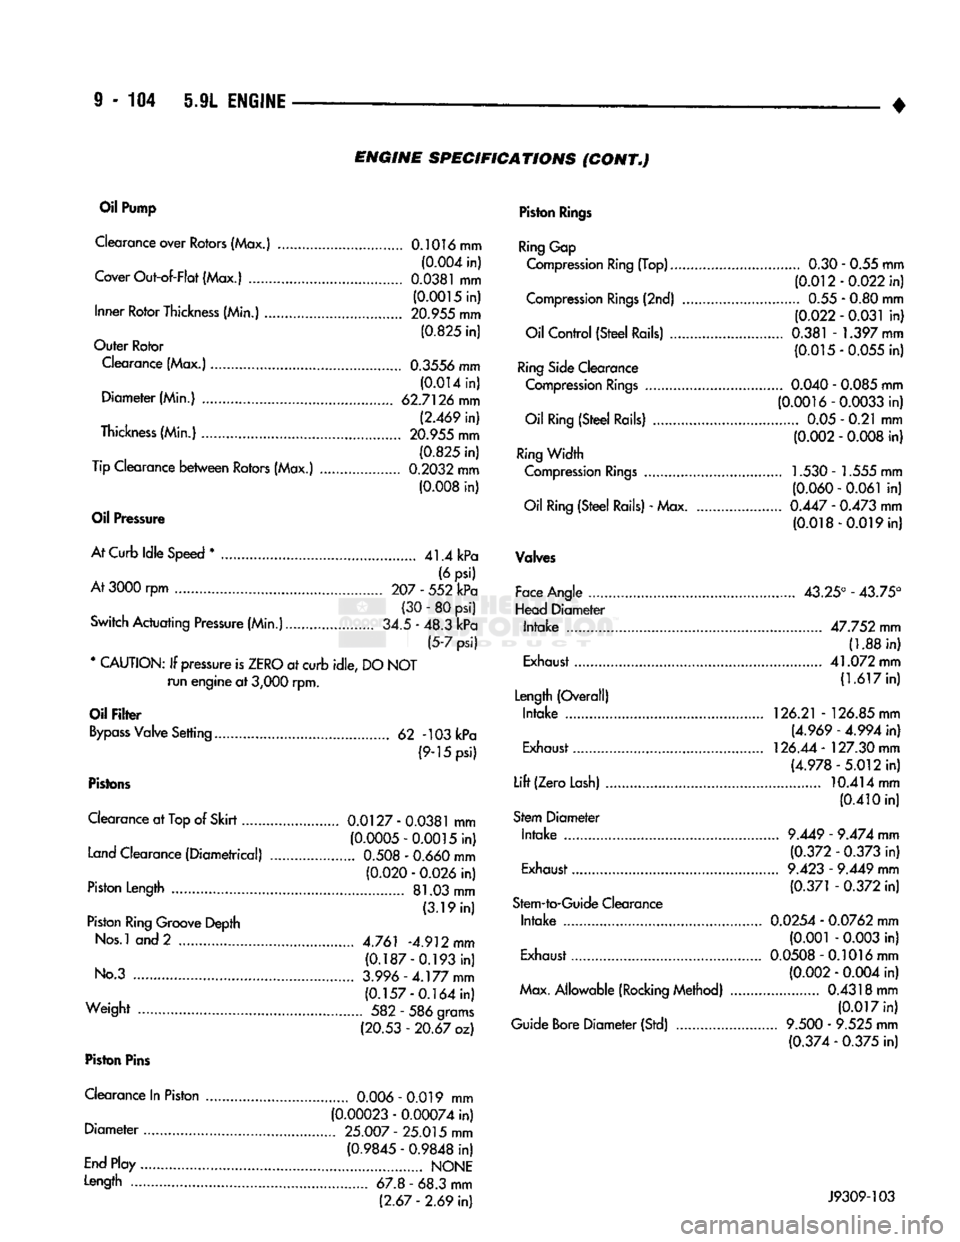
• ENGINE
SPECIFICATIONS
(CONT„)
Oil
Pump
Clearance over Rotors (Max.) 0.1016 mm (0.004 in)
Cover Out-of-Flat (Max.)
0.0381
mm (0.0015 in)
Inner Rotor Thickness (Min.) 20.955 mm
(0.825 in)
Outer Rotor
Clearance (Max.) 0.3556 mm (0.014 in)
Diameter (Min.) 62.7126 mm (2.469 in)
Thickness (Min.) 20.955 mm (0.825 in)
Tip Clearance between Rotors (Max.) 0.2032 mm (0.008 in)
Oil
Pressure
At Curb Idle Speed
*
41.4 kPa (6 psi)
At
3000 rpm 207 - 552 kPa (30 - 80 psi)
Switch Actuating Pressure (Min.) 34.5 - 48.3 kPa (5-7 psi)
* CAUTION: If pressure is ZERO at curb idle, DO NOT run engine at
3,000
rpm.
Oil
Filter
Bypass Valve Setting 62 -103 kPa (9-15 psi)
Pistons
Clearance at
Top
of Skirt 0.0127
-
0.0381
mm (0.0005-0.0015 in)
Land Clearance (Diametrical)
0.508
-
0.660
mm (0.020 -
0.026
in)
Piston Length 81.03 mm (3.19 in)
Piston Ring Groove Depth
Nos.l and 2 4.761 -4.912 mm (0.187-0.193 in)
No.3 3.996-4.177
mm
(0.157-0.164 in)
Weight 582 - 586 grams (20.53 - 20.67 oz)
Piston
Pins
Clearance In Piston
0.006
- 0.019 mm (0.00023 - 0.00074 in)
Diameter 25.007
-
25.015 mm
(0.9845 - 0.9848 in)
End Play NONE
Length 67.8 - 68.3 mm (2.67
-
2.69 in)
Piston
Rings
Ring Gap
Compression Ring (Top) 0.30 - 0.55 mm (0.012-0.022 in)
Compression Rings (2nd) 0.55 - 0.80 mm (0.022 - 0.031 in)
Oil Control (Steel Rails) 0.381 - 1.397 mm (0.015-0.055 in)
Ring Side Clearance Compression Rings
0.040
-
0.085
mm (0.0016-0.0033 in)
Oil Ring (Steel Rails) 0.05 - 0.21 mm (0.002 -
0.008
in)
Ring Width Compression Rings 1.530 - 1.555 mm (0.060 - 0.061 in)
Oil Ring (Steel Rails) - Max
0.447
-
0.473
mm (0.018-0.019 in)
Valves
Face Angle 43.25° - 43.75°
Head Diameter Intake 47.752 mm (1.88 in)
Exhaust 41.072 mm
(1.617 in)
Length (Overall) Intake 126.21 - 126.85 mm
(4.969 - 4.994 in)
Exhaust 126.44 - 127.30 mm
(4.978-5.012 in)
Lift (Zero Lash) 10.414 mm
(0.410 in)
Stem Diameter Intake
9.449
-
9.474
mm
(0.372 -
0.373
in)
Exhaust
9.423
-
9.449
mm
(0.371 -
0.372
in)
Stem-to-Guide Clearance Intake 0.0254 - 0.0762 mm (0.001 -
0.003
in)
Exhaust 0.0508-0.1016 mm
(0.002 -
0.004
in)
Max. Allowable (Rocking Method) 0.4318 mm (0.017 in)
Guide Bore Diameter (Std)
9.500
-
9.525
mm (0.374 -
0.375
in) J9309-103
Page 724 of 1502
•
5.9L (DIESEL) ENGINE
9 - 119
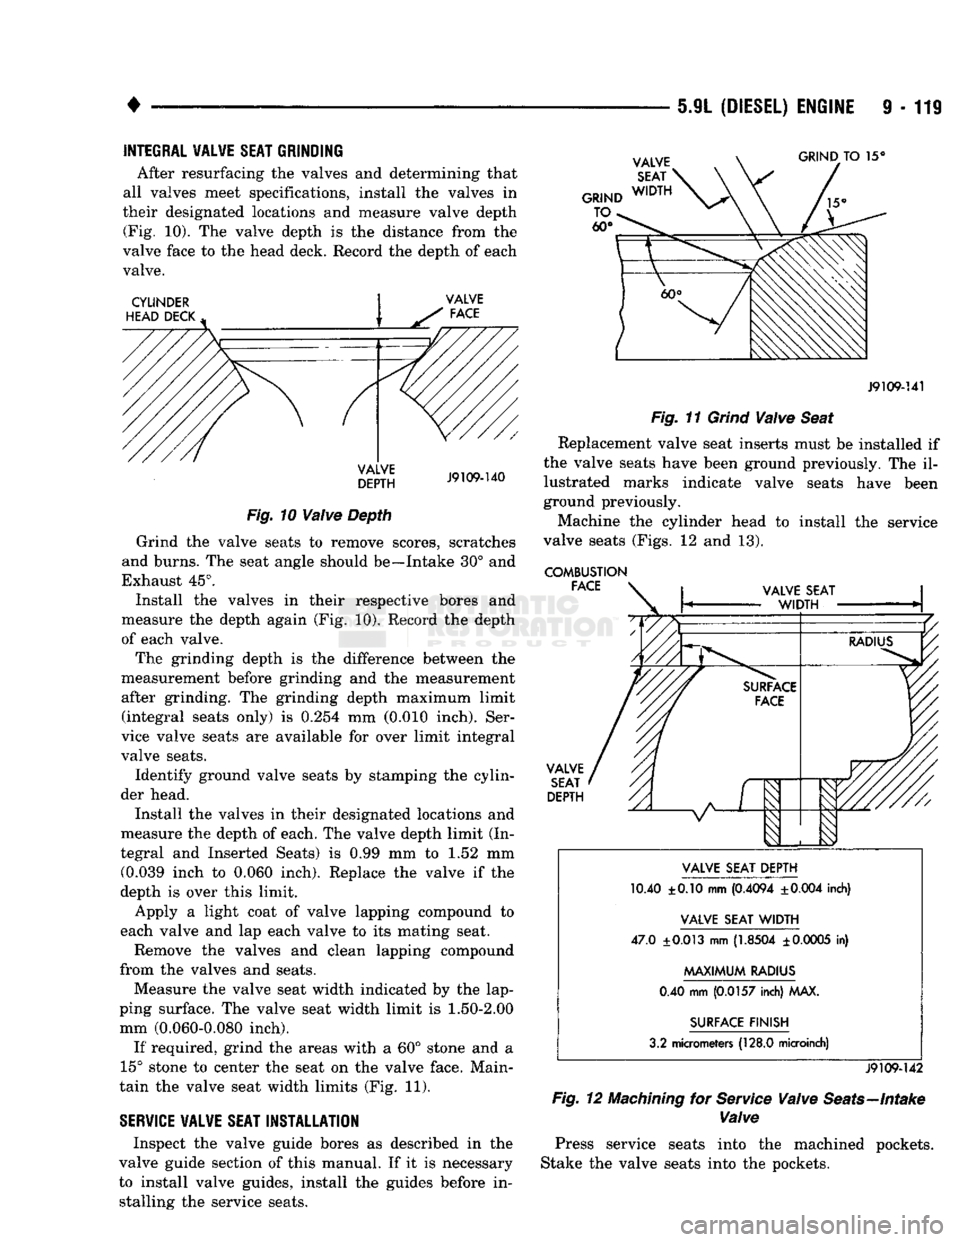
INTEGRAL VALWE SEAT GRINDING
After resurfacing the valves and determining that
all valves meet specifications, install the valves in
their designated locations and measure valve depth (Fig. 10). The valve depth is the distance from the
valve face to the head deck. Record the depth of each valve.
CYLINDER
HEAD DECK GRIND
TO 15°
VALVE
DEPTH
J9109-140
Fig.
10
Valve
Depth
Grind the valve seats to remove scores, scratches
and burns. The seat angle should be—Intake 30° and
Exhaust 45°. Install the valves in their respective bores and
measure the depth again (Fig. 10). Record the depth
of each valve.
The grinding depth is the difference between the
measurement before grinding and the measurement after grinding. The grinding depth maximum limit (integral seats only) is 0.254 mm (0.010 inch). Ser
vice valve seats are available for over limit integral
valve seats.
Identify ground valve seats by stamping the cylin
der head.
Install the valves in their designated locations and
measure the depth of each. The valve depth limit (In
tegral and Inserted Seats) is 0.99 mm to 1.52 mm (0.039 inch to 0.060 inch). Replace the valve if the
depth is over this limit.
Apply a light coat of valve lapping compound to
each valve and lap each valve to its mating seat.
Remove the valves and clean lapping compound
from the valves and seats.
Measure the valve seat width indicated by the lap
ping surface. The valve seat width limit is
1.50-2.00
mm (0.060-0.080 inch).
If required, grind the areas with a 60° stone and a
15° stone to center the seat on the valve face. Main
tain the valve seat width limits (Fig. 11).
SERVICE
VALVE
SEAT
INSTALLATION
Inspect the valve guide bores as described in the
valve guide section of this manual. If it is necessary
to install valve guides, install the guides before in stalling the service seats.
J9109-141
Fig.
11
Grind
Valve
Seat
Replacement valve seat inserts must be installed if
the valve seats have been ground previously. The il lustrated marks indicate valve seats have been
ground previously.
Machine the cylinder head to install the service
valve seats (Figs. 12 and 13).
COMBUSTION FACE VALVE
SEAT
DEPTH VALVE SEAT DEPTH
10.40 ±0.10 mm
(0.4094
±0.004
inch)
VALVE SEAT
WIDTH
47.0
±0.013
mm
(1.8504
±
0.0005
in)
MAXIMUM
RADIUS
0.40 mm
(0.0157
inch) MAX.
SURFACE FINISH
3.2 micrometers
(128.0
microinch)
J9109-142
Fig.
12
Machining
for
Service
Valve
Seats—Intake
Valve
Press service seats into the machined pockets.
Stake the valve seats into the pockets.
Page 725 of 1502
9
- 120 5.9L
(DIESEL)
ENGINE
•
COMBUSTION
FACE
VALVE
SEAT
DEPTH
'///
A
I
V
1
VALVE
SEAT
DEPTH
10.20 ±0.10 mm
(0.4015
±0.004
inch)
VALVE
SEAT
WIDTH
43.65
±0.013
mm
(1.7185
±0.0005
in)
MAXIMUM
RADIUS
0.40 mm
(0.0157
inch) MAX.
SURFACE
FINISH
3.2 micrometers
(128.0
microinch)
J9109-143
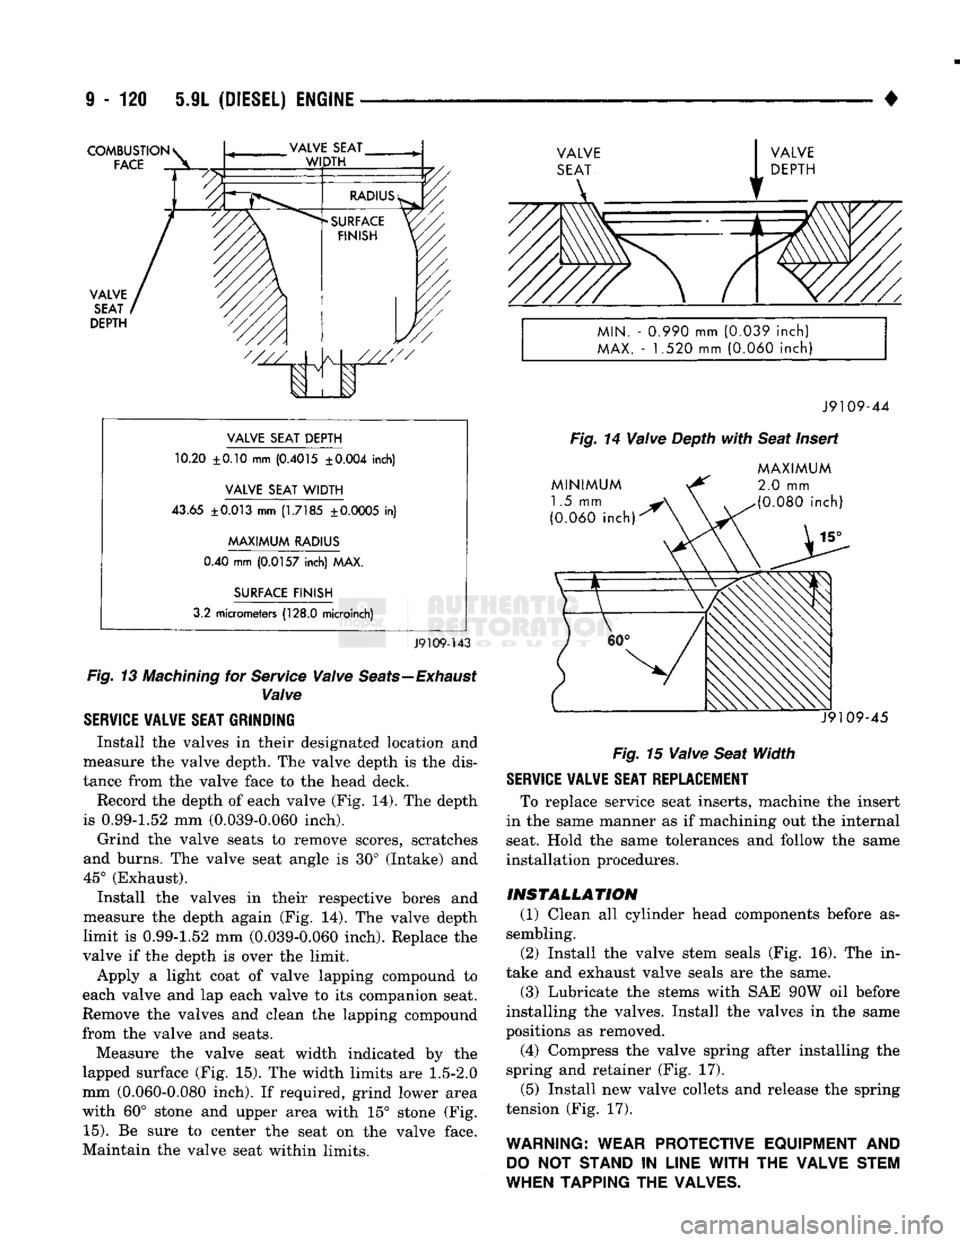
Fig.
13
Machining
for
Service
Valve
Seats—Exhaust
Valve
SERVICE VALVE SEAT GRINDING
Install the valves in their designated location and
measure the valve depth. The valve depth is the dis
tance from the valve face to the head deck. Record the depth of each valve (Fig. 14). The depth
is 0.99-1.52 mm (0.039-0.060 inch).
Grind the valve seats to remove scores, scratches
and burns. The valve seat angle is 30° (Intake) and
45° (Exhaust). Install the valves in their respective bores and
measure the depth again (Fig. 14). The valve depth
limit is 0.99-1.52 mm (0.039-0.060 inch). Replace the
valve if the depth is over the limit.
Apply a light coat of valve lapping compound to
each valve and lap each valve to its companion seat.
Remove the valves and clean the lapping compound
from the valve and seats.
Measure the valve seat width indicated by the
lapped surface (Fig. 15). The width limits are
1.5-2.0
mm (0.060-0.080 inch). If required, grind lower area
with 60° stone and upper area with 15° stone (Fig.
15).
Be sure to center the seat on the valve face.
Maintain the valve seat within limits.
MIN.
-
0.990
mm
(0.039
inch)
MAX.
- 1.520 mm
(0.060
inch)
J9109-44
Fig.
14
Valve
Depth
with
Seat
Insert
MINIMUM
1.5 mm
(0.060
inch)
MAXIMUM
2.0
mm
(0.080
inch)
J9109-45
Fig.
15
Valve
Seat
Width
SERVICE VALVE SEAT REPLACEMENT
To replace service seat inserts, machine the insert
in the same manner as if machining out the internal
seat. Hold the same tolerances and follow the same
installation procedures.
INSTALLATION
(1) Clean all cylinder head components before as
sembling.
(2) Install the valve stem seals (Fig. 16). The in
take and exhaust valve seals are the same.
(3) Lubricate the stems with SAE 90W oil before
installing the valves. Install the valves in the same
positions as removed.
(4) Compress the valve spring after installing the
spring and retainer (Fig. 17).
(5) Install new valve collets and release the spring
tension (Fig. 17).
WARNING: WEAR PROTECTIVE EQUIPMENT
AND
DO
NOT
STAND
IN
LINE
WITH
THE VALVE STEM
WHEN TAPPING THE VALVES.
Page 744 of 1502
•
5.9L
(DIESEL) ENGINE 9 - 139
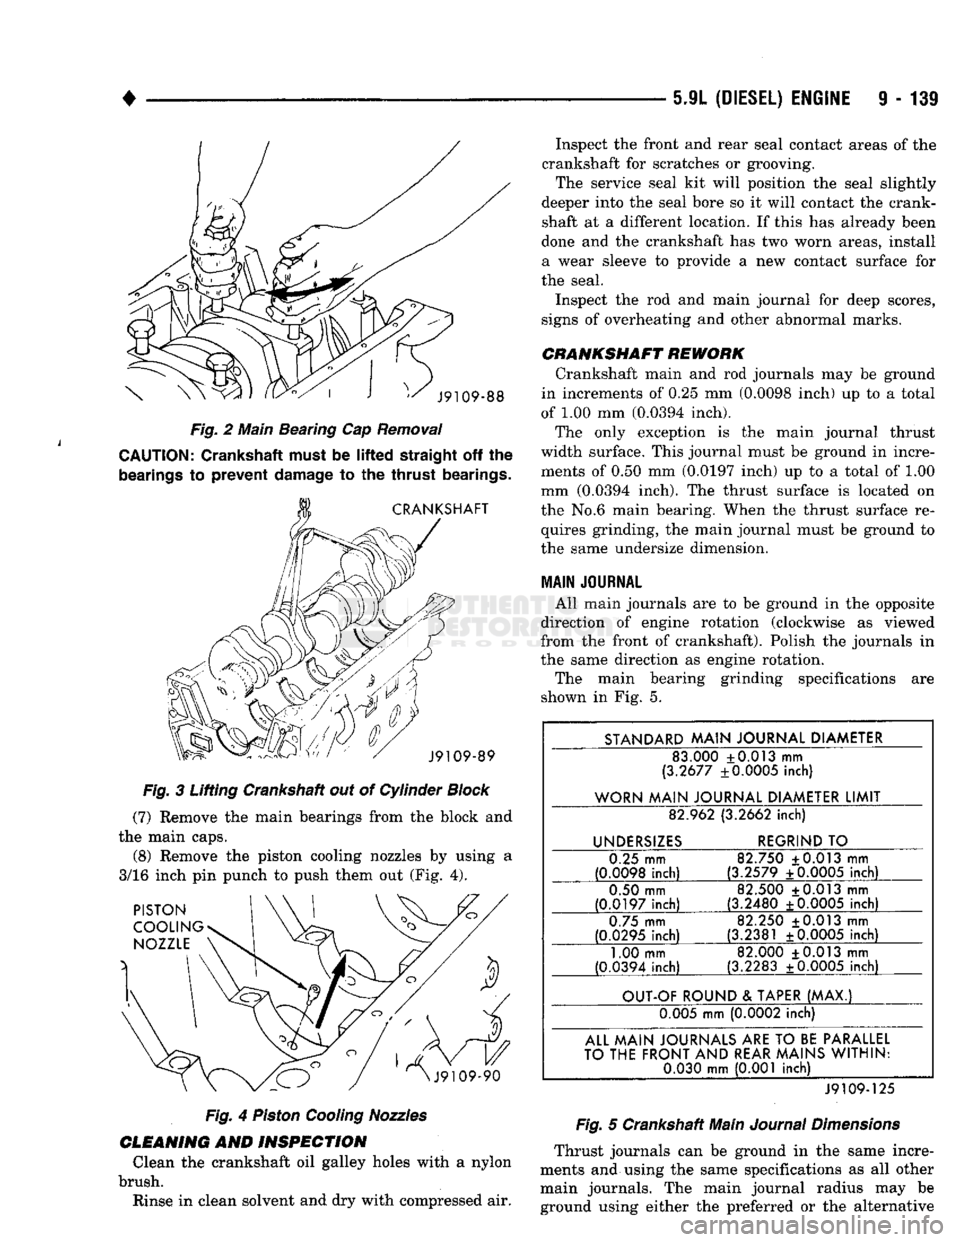
Fig.
2 Main Beating Cap
Removal
CAUTION:
Crankshaft must be
lifted
straight
off the
bearings
to
prevent
damage
to the
thrust
bearings.
Fig.
3 Lifting Crankshaft out of Cylinder
Block
(7)
Remove the main bearings from the block and
the main caps. (8) Remove the piston cooling nozzles by using a
3/16 inch pin punch to push them out (Fig. 4).
Fig.
4
Piston
Cooling
Nozzles
CLEANING
AND
INSPECTION
Clean the crankshaft oil galley holes with a nylon
brush. Rinse in clean solvent and dry with compressed air. Inspect the front and rear seal contact areas of the
crankshaft for scratches or grooving. The service seal kit will position the seal slightly
deeper into the seal bore so it will contact the crank
shaft at a different location. If this has already been
done and the crankshaft has two worn areas, install
a wear sleeve to provide a new contact surface for
the seal.
Inspect the rod and main journal for deep scores,
signs of overheating and other abnormal marks.
CRANKSHAFT
REWORK
Crankshaft main and rod journals may be ground
in increments of 0.25 mm (0.0098 inch) up to a total
of 1.00 mm (0.0394 inch). The only exception is the main journal thrust
width surface. This journal must be ground in incre ments of 0.50 mm (0.0197 inch) up to a total of 1.00
mm (0.0394 inch). The thrust surface is located on
the No.6 main bearing. When the thrust surface re quires grinding, the main journal must be ground to
the same undersize dimension.
MAIN
JOURNAL
All main journals are to be ground in the opposite
direction of engine rotation (clockwise as viewed
from the front of crankshaft). Polish the journals in
the same direction as engine rotation.
The main bearing grinding specifications are
shown in Fig. 5.
STANDARD
MAIN
JOURNAL
DIAMETER
83.000 +0.013 mm
(3.2677 ±0.0005 inch)
WORN
MAIN
JOURNAL
DIAMETER
LIMIT
82.962 (3.2662
inch)
UNDERSIZES
REGRIND
TO
0.25 mm
(0.0098
inch)
82.750 ±0.013 mm
(3.2579 ±0.0005
inch)
0.50 mm
(0.0197
inch)
82.500 +0.013 mm
(3.2480 +0.0005
inch)
0.75 mm
(0.0295
inch)
82.250 +0.013 mm
(3.2381 ±0.0005
inch)
1.00 mm
(0.0394 inch) 82.000 +0.013 mm
(3.2283 ±0.0005 inch)
OUT-OF
ROUND
&
TAPER
(MAX.)
0.005 mm (0.0002 inch)
ALL
MAIN
JOURNALS
ARE
TO
BE
PARALLEL
TO
THE
FRONT
AND
REAR
MAINS
WITHIN:
0.030
mm
(0.001 inch)
J9109-125
Fig.
5 Crankshaft Main
Journal
Dimensions
Thrust journals can be ground in the same incre
ments and using the same specifications as all other main journals. The main journal radius may be ground using either the preferred or the alternative
Page 745 of 1502
9
- 140 5.9L
(DIESEL)
ENGINE
• procedure providing
the
thrust surface width
is not
being ground.
The
preferred procedure must
be
used
when
the
main bearing thrust width surface
is
ground. When
the
thrust surface width requires
grinding,
the
main journal must
be
ground
to the
same undersize dimension
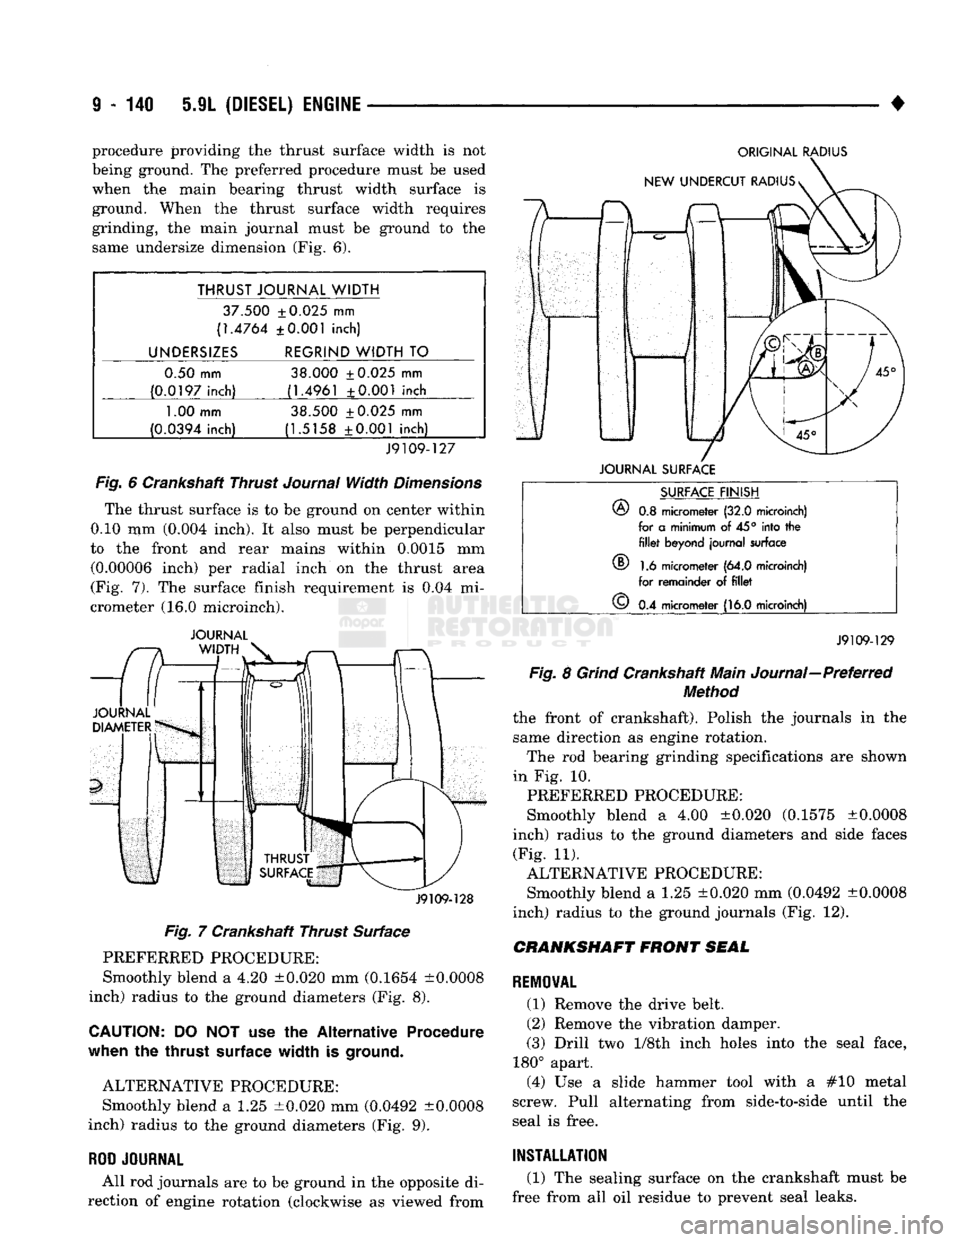
(Fig. 6).
THRUST JOURNAL WIDTH
37.500 ±0.025
mm
(1.4764 ±0.001 inch)
UNDERSIZES REGRIND WIDTH
TO
0.50 mm 38.000 ±0.025
mm
(0.0197 inch) (1.4961 ±0.001 inch
1.00
mm 38.500 ±0.025
mm
(0.0394 inch) (1.5158 ±0.001 inch)
J9109-127
Fig.
6
Crankshaft Thrust
Journal
Width
Dimensions
The thrust surface
is to be
ground
on
center within
0.10
mm
(0.004 inch).
It
also must
be
perpendicular
to
the
front
and
rear mains within 0.0015
mm
(0.00006 inch)
per
radial inch
on the
thrust area
(Fig.
7). The
surface finish requirement
is 0.04 mi
crometer
(16.0
microinch).
JOURNAL
J9109-128
Fig.
7
Crankshaft Thrust Surface PREFERRED PROCEDURE:
Smoothly blend
a 4.20
±0.020
mm
(0.1654 ±0.0008
inch) radius
to the
ground diameters
(Fig. 8).
CAUTION:
DO NOT use the
Alternative Procedure
when
the
thrust
surface
width
is
ground.
ALTERNATIVE PROCEDURE: Smoothly blend
a 1.25
±0.020
mm
(0.0492 ±0.0008
inch) radius
to the
ground diameters
(Fig. 9).
ROD
JOURNAL
All
rod
journals
are to be
ground
in the
opposite
di
rection
of
engine rotation (clockwise
as
viewed from
ORIGINAL
RADIUS
JOURNAL
SURFACE
®
SURFACE
FINISH
®
0.8
micrometer
(32.0
microinch)
for
a
minimum
of 45°
into
the fillet
beyond journal surface
1.6
micrometer
(64.0
microinch)
for remainder
of fillet
©
0.4
micrometer
(16.0
microinch)
J9109-129
Fig.
8
Grind
Crankshaft Main Journal—Preferred
Method
the front
of
crankshaft). Polish
the
journals
in the
same direction
as
engine rotation. The
rod
bearing grinding specifications
are
shown
in
Fig. 10.
PREFERRED PROCEDURE:
Smoothly blend
a 4.00
±0.020 (0.1575 ±0.0008
inch) radius
to the
ground diameters
and
side faces (Fig.
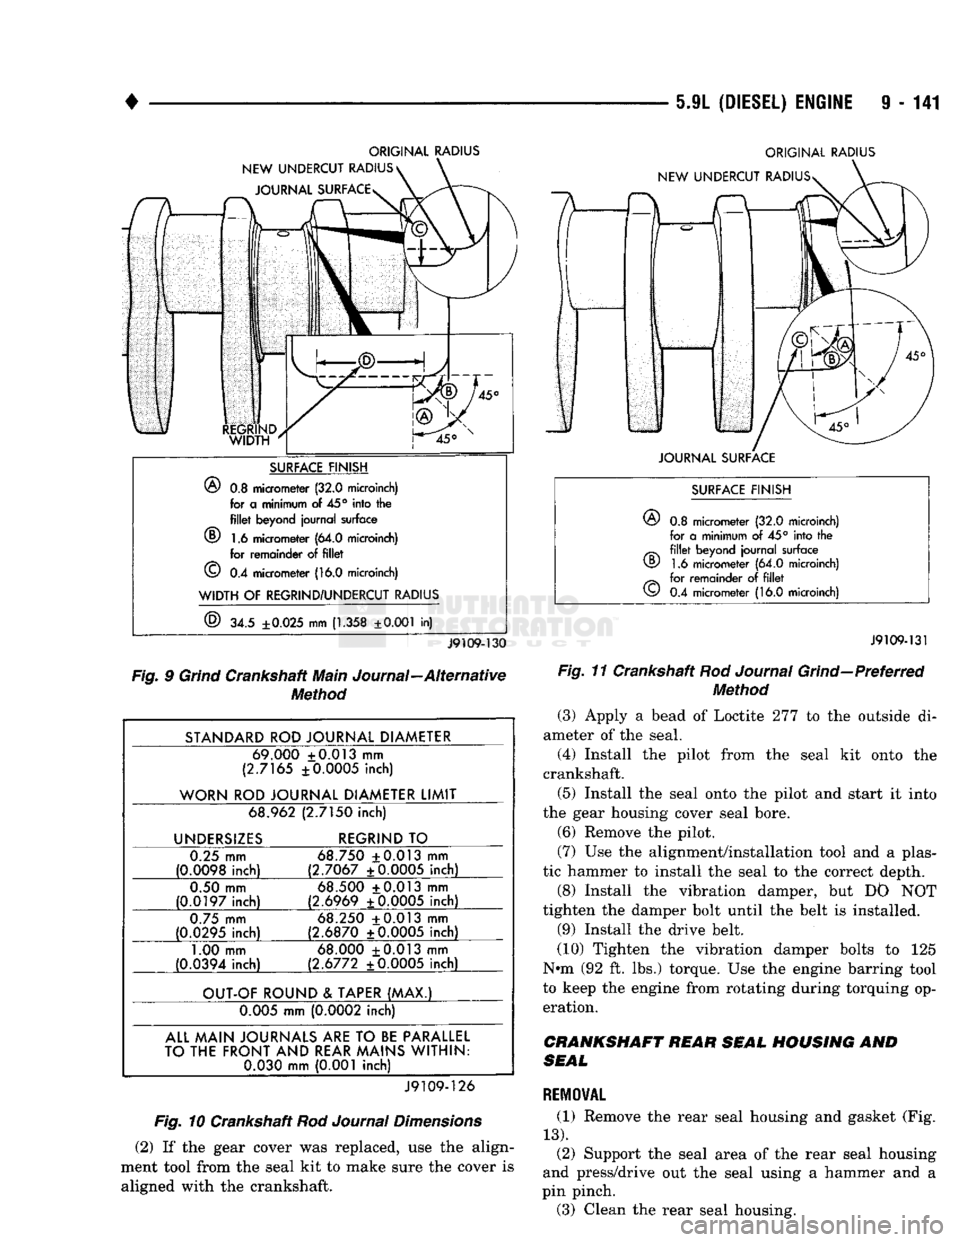
11).
ALTERNATIVE PROCEDURE: Smoothly blend
a 1.25
±0.020
mm
(0.0492 ±0.0008
inch) radius
to the
ground journals
(Fig. 12).
CRANKSHAFT
FRONT
SEAL
REMOVAL
(1) Remove
the
drive belt.
(2) Remove
the
vibration damper.
(3) Drill
two 1/Sth
inch holes into
the
seal face,
180° apart. (4)
Use a
slide hammer tool with
a #10
metal
screw. Pull alternating from side-to-side until
the
seal
is
free.
INSTALLATION
(1)
The
sealing surface
on the
crankshaft must
be
free from
all oil
residue
to
prevent seal leaks.
Page 746 of 1502
5-9L
(DIESEL) ENGINE
9 - 141
ORIGINAL RADIUS
NEW UNDERCUT RADIUS JOURNAL SURFACE ORIGINAL RADIUS
NEW UNDERCUT RADIUSs
SURFACE FINISH
®
0.8 micrometer (32.0 microinch) for a minimum of
45°
into the
fillet
beyond journal surface
(D 1.6 micrometer (64.0 microinch) for remainder of
fillet
©
0.4 micrometer (16.0 microinch)
WIDTH
OF
REGRIND/UNDERCUT RADIUS
®
34.5
±0.025
mm
(1.358
±0.001
in)
JOURNAL SURFACE
J9109-130
Fig. 9 Grind Crankshaft Main Journal—Alternative Method
STANDARD ROD JOURNAL DIAMETER 69.000 +0.013 mm
(2.7165 ±0.0005 inch)
WORN ROD JOURNAL DIAMETER LIMIT 68.962 (2.7150 inch)
UNDERSIZES REGRIND TO
0.25 mm
(0.0098 inch) 68.750 +0.013 mm
(2.7067 ±0.0005 inch)
0.50 mm
(0.0197 inch) 68.500 +0.013 mm
(2.6969 ±0.0005 inch)
0.75 mm
(0.0295 inch) 68.250 +0.013 mm
(2.6870 ±0.0005 inch)
1.00 mm
(0.0394 inch) 68.000 +0.013 mm
(2.6772 ±0.0005 inch)
OUT-OF ROUND & TAPER (MAX.) 0.005 mm (0.0002 inch)
ALL MAIN JOURNALS
ARE
TO
BE
PARALLEL
TO THE FRONT AND REAR MAINS WITHIN: 0.030 mm (0.001 inch)
J9109-126
Fig. 10 Crankshaft Rod Journal Dimensions
(2) If the gear cover was replaced, use the align
ment tool from the seal kit to make sure the cover is aligned with the crankshaft.
SURFACE FINISH
©
0.8 micrometer (32.0 microinch)
for a minimum of 45° into the
fillet
beyond journal surface 1.6 micrometer (64.0 microinch)
for remainder of
fillet
0.4 micrometer (16.0 microinch)
CD
©
J9109-131
Fig. 11 Crankshaft Rod Journal Grind—Preferred Method
(3) Apply a bead of Loctite 277 to the outside di
ameter of the seal.
(4) Install the pilot from the seal kit onto the
crankshaft.
(5) Install the seal onto the pilot and start it into
the gear housing cover seal bore. (6) Remove the pilot.
(7) Use the alignment/installation tool and a plas
tic hammer to install the seal to the correct depth.
(8) Install the vibration damper, but DO NOT
tighten the damper bolt until the belt is installed.
(9) Install the drive belt.
(10) Tighten the vibration damper bolts to 125
Nun (92 ft. lbs.) torque. Use the engine barring tool
to keep the engine from rotating during torquing op eration.
CRANKSHAFT REAR SEAL HOUSING AND
SEAL
REMOVAL
(1) Remove the rear seal housing and gasket (Fig.
13).
(2) Support the seal area of the rear seal housing
and press/drive out the seal using a hammer and a
pin pinch.
(3) Clean the rear seal housing.
Page 747 of 1502
9
- 142 5.9L
(DIESEL)
ENGINE
•
ORIGINAL
RADIUS
SURFACE
FINISH
®
0.3
micrometer
(32.0
microinch)
for a
minimum
of
45° into the
^ fillet
beyond
journal
surface
v§/
1.6
micrometer
(64.0
microinch)
^ for
remainder
of
fillet
v£)
0.4
micrometer
(16.0
microinch)
WIDTH OF REGRIND/UNDERCUT RADIUS
©
34.79
±
0.025
mm
(1.369
±0.001 in)
J9109-132
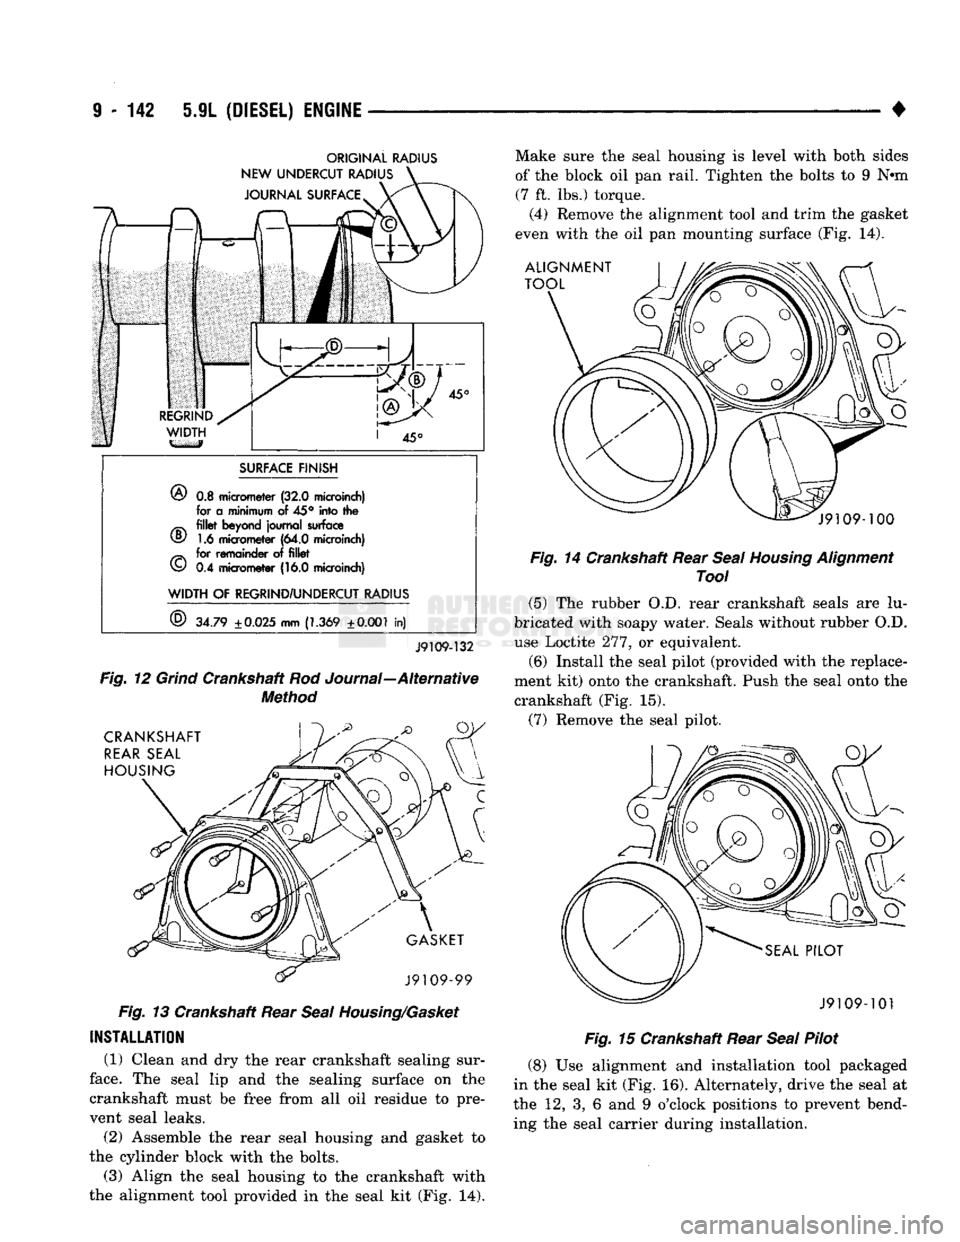
Fig.
12
Grind
Crankshaft Rod Journal—Alternative
Method
Fig.
13 Crankshaft Rear
Seal
Housing/Gasket
INSTALLATION
(1) Clean and dry the rear crankshaft sealing sur
face.
The seal lip and the sealing surface on the
crankshaft must be free from all oil residue to pre vent seal leaks.
(2) Assemble the rear seal housing and gasket to
the cylinder block with the bolts.
(3) Align the seal housing to the crankshaft with
the alignment tool provided in the seal kit (Fig. 14). Make sure the seal housing is level with both sides
of the block oil pan rail. Tighten the bolts to 9 N*m
(7 ft. lbs.) torque.
(4) Remove the alignment tool and trim the gasket
even with the oil pan mounting surface (Fig. 14).
Fig.
14 Crankshaft Rear
Seal
Housing
Alignment
Tool
(5) The rubber O.D. rear crankshaft seals are lu
bricated with soapy water. Seals without rubber O.D. use Loctite 277, or equivalent.
(6) Install the seal pilot (provided with the replace
ment kit) onto the crankshaft. Push the seal onto the
crankshaft (Fig. 15).
(7) Remove the seal pilot.
Fig.
15 Crankshaft Rear
Seal
Pilot
(8) Use alignment and installation tool packaged
in the seal kit (Fig. 16). Alternately, drive the seal at
the 12, 3, 6 and 9 o'clock positions to prevent bend ing the seal carrier during installation.
Page 754 of 1502
• 5.9L
(DIESEL) ENGINE
9 - 151
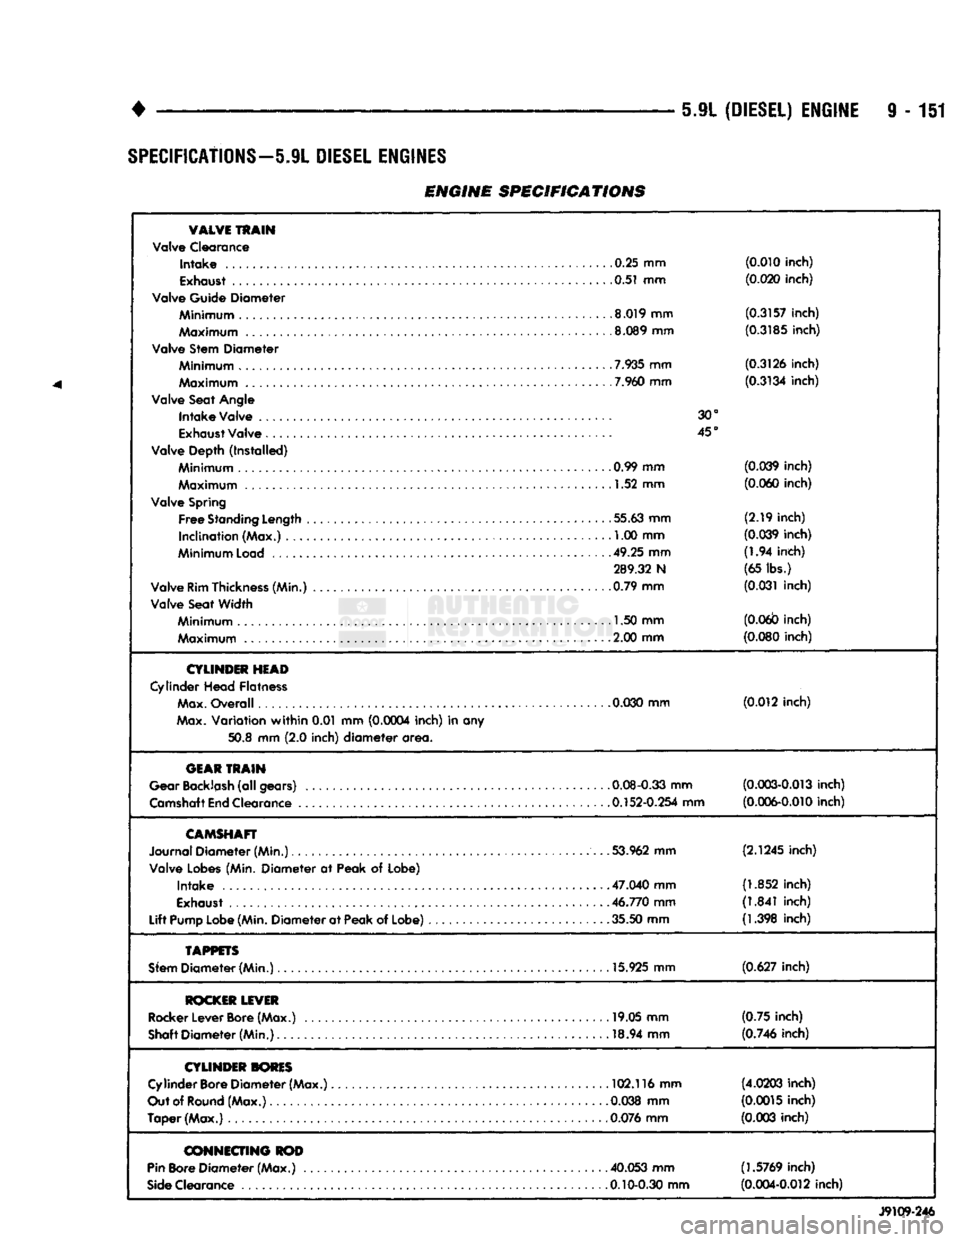
SPECIFICATIONS—5.9L DIESEL ENGINES
ENGINE SPECIFICATIONS
VALVE
TRAIN
Valve Clearance
Intake
.0.25 mm
(0.010 inch)
0.51 mm (0.020 inch)
Valve Guide Diameter
Minimum
8.019 mm
(0.3157 inch)
Maximum
.8.089 mm
(0.3185 inch)
Valve Stem Diameter
7.935
mm (0.3126 inch)
Maximum
7.960
mm
(0.3134 inch)
Valve Seat
Angle
Intake
Valve 30°
Exhaust
Valve 45°
Valve Depth (Installed)
Minimum
. .......... 0.99 mm (0.039 inch)
Maximum
1.52 mm
(0.060 inch)
Valve
Spring
Free
Standing
Length
55.63 mm
(2.19
inch)
Inclination (Max.) , 1.00 mm
(0.039 inch)
Minimum
Load
49.25 mm
(1.94
inch)
289.32 N (65 lbs.)
Valve
Rim
Thickness
(Min.) 0.79 mm
(0.031 inch)
Valve Seat Width
Minimum
1.50 mm
(0.06b inch)
Maximum
. 2.00 mm
(0.080 inch)
CYLINDER
HEAD
Cylinder
Head Flatness
Max.
Overall
0.030
mm (0.012 inch)
Max.
Variation
within
0.01 mm (0.0004 inch) in any
50.8
mm
(2.0
inch)
diameter
area.
GEAR
TRAIN
Gear
Backlash
(all gears) 0.08-0.33 mm
(0.003-0.013 inch)
Camshaft
End
Clearance 0.152-0.254 mm
(0.006-0.010 inch)
CAMSHAFT
Journal Diameter (Min.) 53.962 mm
(2.1245 inch)
Valve
Lobes
(Min. Diameter at Peak of Lobe)
Intake
.... 47.040 mm
(1.852 inch)
Exhaust
46.770 mm
(1.841 inch)
Lift
Pump
Lobe
(Min.
Diameter at
Peak
of Lobe) 35.50 mm
(1.398 inch)
TAPPETS
Sfem
Diameter (Min.) 15.925 mm
(0.627 inch)
ROCKER
LEVER
Rocker
Lever
Bore
(Max.) 19.05 mm
(0.75
inch)
Shaft
Diameter (Min.) 18.94 mm
(0.746 inch)
CYLINDER
TORES
Cylinder
Bore
Diameter (Max.) 102.116 mm
(4.0203 inch)
Out
of
Round
(Max.) . .0.038 mm
(0.0015 inch)
Taper (Max.)
0.076
mm
(0.003 inch)
CONNECTING
ROD
Pin
Bore
Diameter (Max.) . 40.053 mm (1.5769 inch)
Side
Clearance 0.10-0.30 mm
(0.004-0.012 inch)
J9109-246
Page 812 of 1502
FRAME
AND
BUMPERS
13 - 25
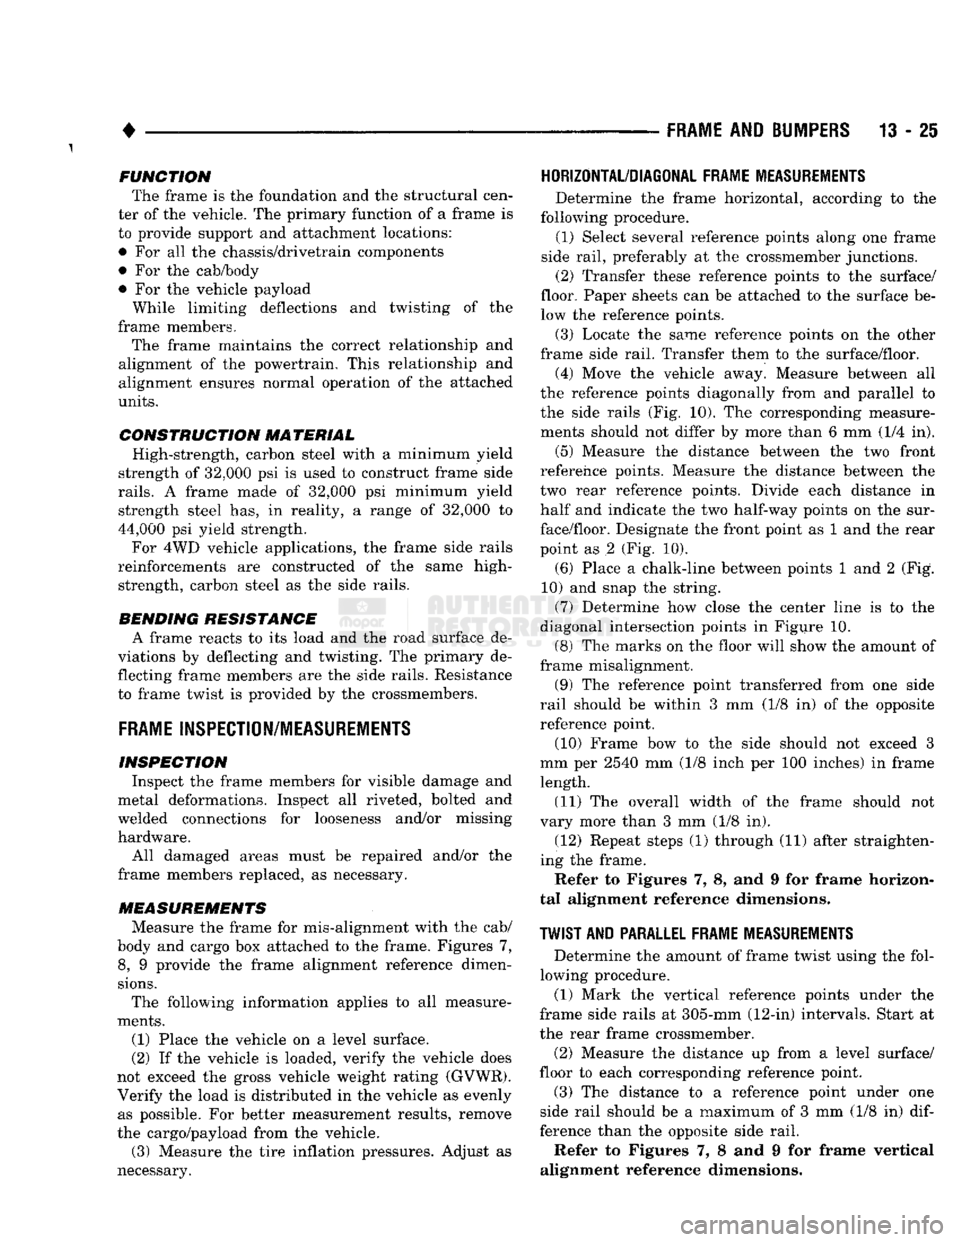
FUNCTION
The frame is the foundation and the structural cen
ter of the vehicle. The primary function of a frame is
to provide support and attachment locations: • For all the chassis/drivetrain components
• For the cab/body
• For the vehicle payload While limiting deflections and twisting of the
frame members. The frame maintains the correct relationship and
alignment of the powertrain. This relationship and
alignment ensures normal operation of the attached
units.
CONSTRUCTION MATERIAL High-strength, carbon steel with a minimum yield
strength of 32,000 psi is used to construct frame side
rails.
A frame made of 32,000 psi minimum yield
strength steel has, in reality, a range of 32,000 to
44,000 psi yield strength.
For 4WD vehicle applications, the frame side rails
reinforcements are constructed of the same high- strength, carbon steel as the side rails.
BENDING RESISTANCE A frame reacts to its load and the road surface de
viations by deflecting and twisting. The primary de
flecting frame members are the side rails. Resistance
to frame twist is provided by the crossmembers.
FRAME
INSPECTION/MEASUREMENTS
INSPECTION Inspect the frame members for visible damage and
metal deformations. Inspect all riveted, bolted and
welded connections for looseness and/or missing hardware. All damaged areas must be repaired and/or the
frame members replaced, as necessary.
MEASUREMENTS Measure the frame for mis-alignment with the cab/
body and cargo box attached to the frame. Figures 7, 8, 9 provide the frame alignment reference dimen
sions.
The following information applies to all measure
ments.
(1) Place the vehicle on a level surface.
(2) If the vehicle is loaded, verify the vehicle does
not exceed the gross vehicle weight rating (GVWR).
Verify the load is distributed in the vehicle as evenly as possible. For better measurement results, remove
the cargo/payload from the vehicle.
(3) Measure the tire inflation pressures. Adjust as
necessary.
HORIZONTAL/DIAGONAL
FRAME MEASUREMENTS
Determine the frame horizontal, according to the
following procedure.
(1) Select several reference points along one frame
side rail, preferably at the crossmember junctions.
(2) Transfer these reference points to the surface/
floor. Paper sheets can be attached to the surface be low the reference points.
(3) Locate the same reference points on the other
frame side rail. Transfer them to the surface/floor.
(4) Move the vehicle away. Measure between all
the reference points diagonally from and parallel to
the side rails (Fig. 10). The corresponding measure ments should not differ by more than 6 mm (1/4 in).
(5)
Measure the distance between the two front
reference points. Measure the distance between the
two rear reference points. Divide each distance in
half and indicate the two half-way points on the sur
face/floor. Designate the front point as 1 and the rear
point as 2 (Fig. 10).
(6) Place a chalk-line between points 1 and 2 (Fig.
10) and snap the string.
(7) Determine how close the center line is to the
diagonal intersection points in Figure 10.
(8) The marks on the floor will show the amount of
frame misalignment.
(9) The reference point transferred from one side
rail should be within 3 mm (1/8 in) of the opposite
reference point.
(10) Frame bow to the side should not exceed 3
mm per 2540 mm (1/8 inch per 100 inches) in frame
length.
(11) The overall width of the frame should not
vary more than 3 mm (1/8 in). (12) Repeat steps (1) through (11) after straighten
ing the frame.
Refer to Figures 7, 8, and 9 for frame horizon
tal alignment reference dimensions.
TWIST
AND PARALLEL FRAME MEASUREMENTS
Determine the amount of frame twist using the fol
lowing procedure.
(1) Mark the vertical reference points under the
frame side rails at 305-mm (12-in) intervals. Start at
the rear frame crossmember.
(2) Measure the distance up from a level surface/
floor to each corresponding reference point. (3) The distance to a reference point under one
side rail should be a maximum of 3 mm (1/8 in)
dif
ference than the opposite side rail.
Refer to Figures 7, 8 and 9 for frame vertical
alignment reference dimensions.