width DODGE TRUCK 1993 Service User Guide
[x] Cancel search | Manufacturer: DODGE, Model Year: 1993, Model line: TRUCK, Model: DODGE TRUCK 1993Pages: 1502, PDF Size: 80.97 MB
Page 612 of 1502
•
ENGINES
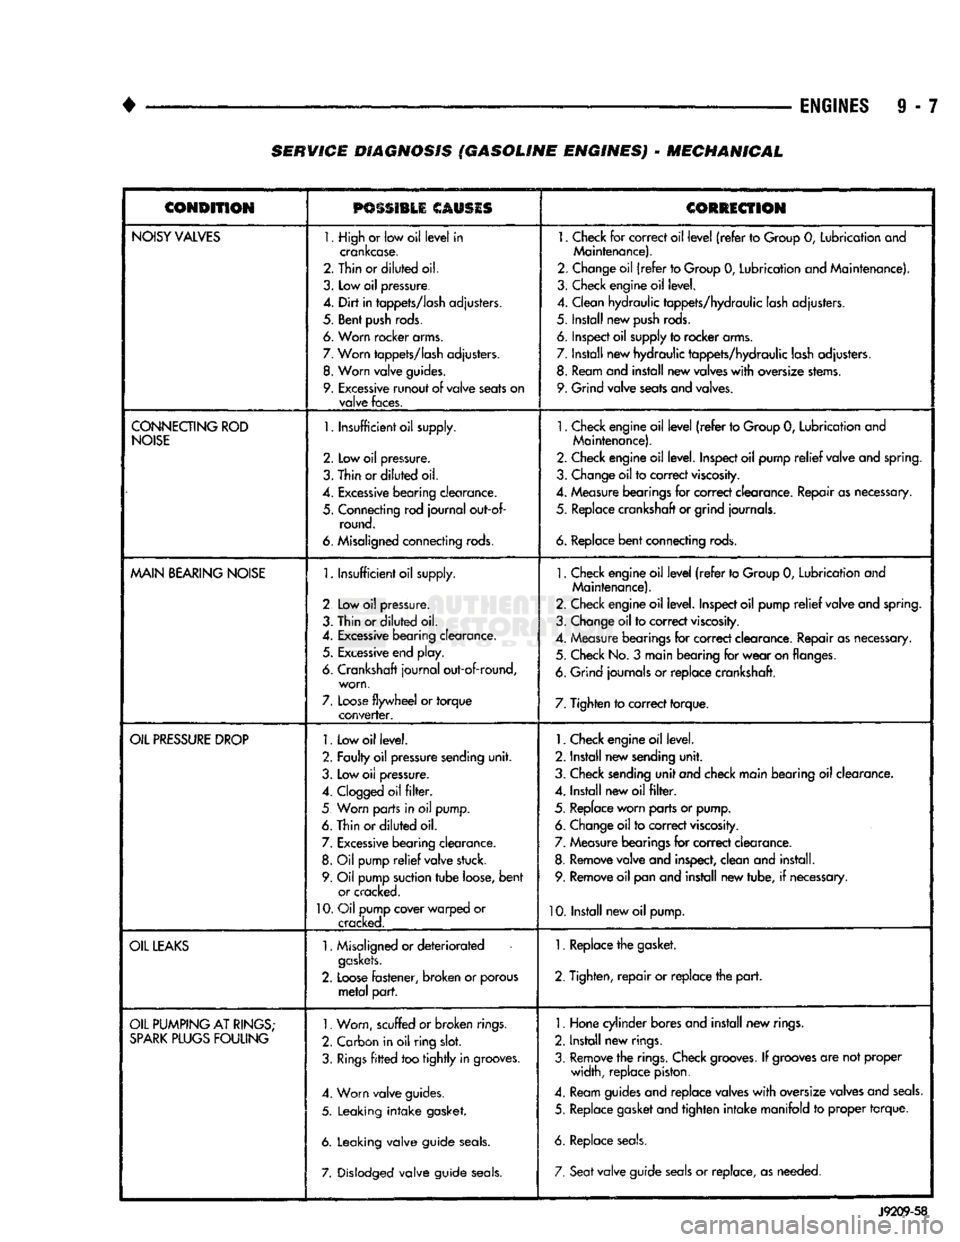
9 - 7 SERVICE DIAGNOSIS (GASOLINE ENGINES) - MECHANICAL
CONDITION
PSSSI1LI
CAUSIS
CORRECTION
NOISY
VALVES
1. High
or
low oil
level
in
crankcase.
2. Thin or
diluted
oil.
3.
Low
oil
pressure.
4.
Dirt
in
tappets/lash
adjusters.
5. Bent
push
rods.
6. Worn rocker arms.
7.
Worn
tappets/lash
adjusters.
8.
Worn
valve
guides.
9.
Excessive
runout
of
valve
seats
on
valve
faces.
1.
Check
for
correct oil
level
(refer
to
Group
0,
Lubrication and
Maintenance).
2. Change oil
(refer
to Group
0,
Lubrication and Maintenance).
3. Check engine oil level.
4. Clean hydraulic tappets/hydraulic lash adjusters.
5. Install new
push
rods.
6. Inspect oil supply to rocker arms.
7. Install new hydraulic tappets/hydraulic lash adjusters. 8. Ream and install new valves
with
oversize stems.
9. Grind valve seats and valves.
CONNECTING
ROD
NOISE
1.
Insufficient oil supply.
2.
Low oil
pressure.
3.
Thin
or
diluted
oil.
4.
Excessive
bearing
clearance.
5. Connecting rod
journal
out-of- round.
6. Misaligned connecting rods.
1.
Check engine oil
level
(refer
to Group
0,
Lubrication and
Maintenance).
2. Check engine oil level. Inspect oil pump
relief
valve and spring.
3. Change oil to correct
viscosity.
4. Measure bearings for correct clearance. Repair as necessary, 5. Replace crankshaft or grind journals.
6.
Replace
bent
connecting rods.
MAIN
BEARING
NOISE
1.
Insufficient oil supply.
2 Low
oil
pressure.
3. Thin or
diluted
oil.
4.
Excessive
bearing clearance. 5.
Excessive
end play.
6. Crankshaft
journal
out-of-round, worn,
7.
Loose
flywheel
or
torque
converter.
1.
Check engine oil
level
(refer
to Group
0,
Lubrication and
Maintenance).
2. Check engine oil level. Inspect oil pump
relief
valve and spring.
3. Change oil to correct
viscosity.
4. Measure bearings for correct clearance. Repair as necessary. 5. Check No.
3
main bearing for
wear
on flanges.
6. Grind journals
or
replace crankshaft.
7. Tighten to correct torque.
OIL
PRESSURE
DROP
1.
Low oil level.
2. Faulty oil pressure sending
unit.
3. Low
oil
pressure.
4.
Clogged
oil
filter.
5 Worn parts in
oil
pump.
6. Thin or
diluted
oil.
7.
Excessive
bearing clearance. 8.
Oil
pump
relief
valve stuck.
9. Oil pump suction
tube
loose,
bent
or cracked.
10.
Oil pump cover warped
or
cracked.
1.
Check engine oil level.
2. Install new sending
unit.
3. Check sending
unit
and check main bearing oil clearance.
4. Install new oil
filter.
5. Replace worn parts or pump. 6. Change oil to correct
viscosity.
7. Measure bearings for correct clearance.
8. Remove valve and inspect, clean and install. 9. Remove oil pan and install new tube,
if
necessary.
10. Install new oil pump.
OIL
LEAKS
1.
Misaligned or
deteriorated
gaskets.
2.
Loose
fastener, broken
or
porous
metal
part.
1. Replace the gasket.
2. Tighten,
repair
or replace the
part.
OIL
PUMPING
AT
RINGS;
SPARK
PLUGS
FOULING
1.
Worn, scuffed
or broken
rings.
2. Carbon in oil ring
slot.
3.
Rings
fitted
too
tightly
in grooves.
4. Worn valve guides.
5. Leaking
intake
gasket.
6. Leaking valve guide
seals.
7. Dislodged valve guide
seals.
1.
Hone cylinder bores and install new rings.
2. Install new rings.
3. Remove the rings. Check
grooves.
If
grooves
are not proper width, replace piston.
4. Ream guides and replace valves
with
oversize valves and
seals.
5. Replace gasket and tighten
intake
manifold
to
proper torque.
6. Replace
seals.
7. Seat
valve guide
seals
or
replace, as needed.
J9209-58
Page 631 of 1502
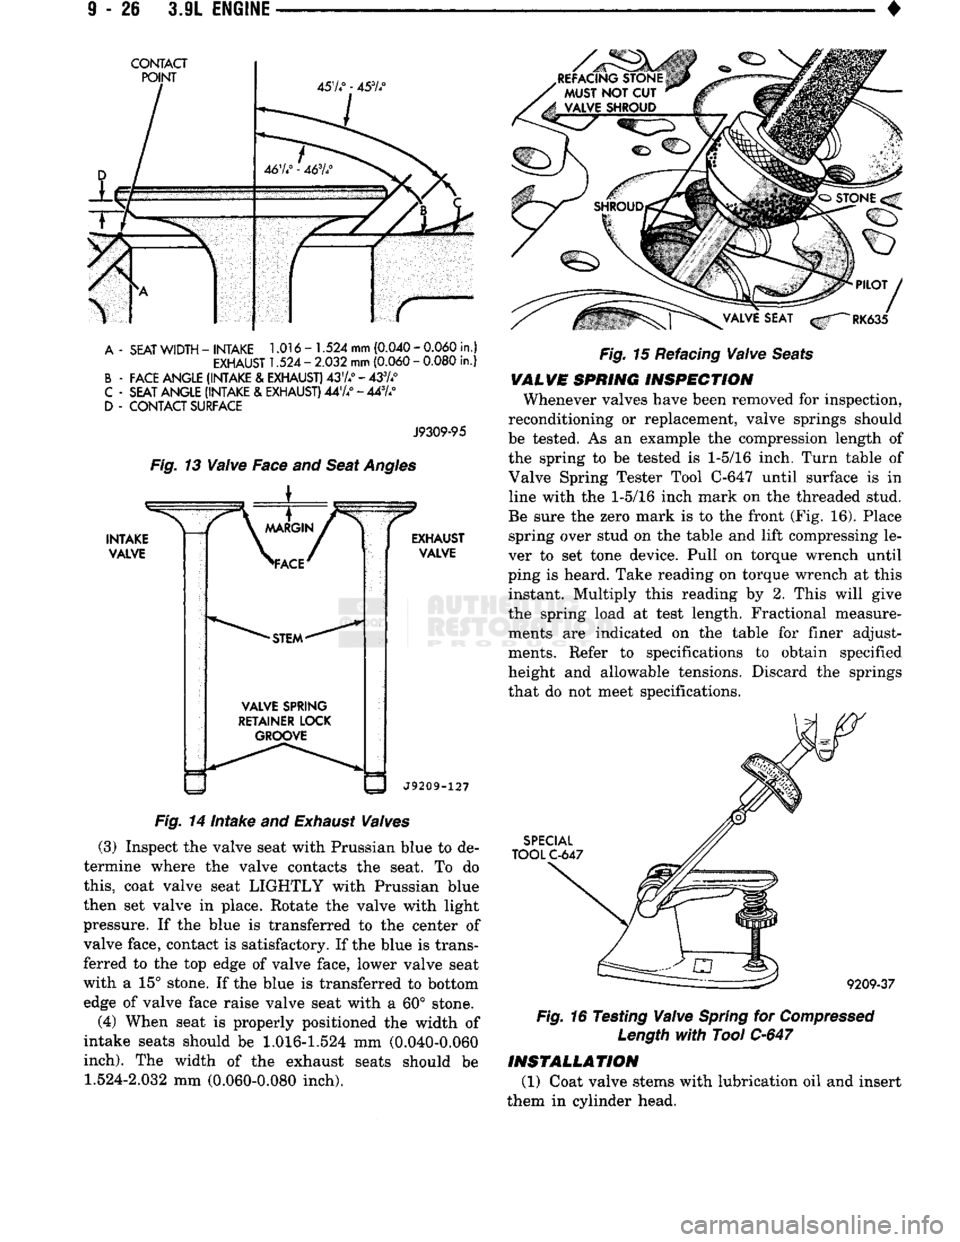
A
-
SEAT
WIDTH
-
INTAKE
1.016
-
1.524
mm
(0.040
-
0.060
in.)
EXHAUST
1.524
-
2.032
mm
(0.060
-
0.080
in.)
B
-
FACE
ANGLE
(INTAKE
& EXHAUST)
4374°
-
433A°
C
-
SEAT
ANGLE
(INTAKE
& EXHAUST)
4474°
-
44%°
D
-
CONTACT SURFACE
J9309-95
Fig.
13
Valve
Face and
Seat
Angles
i
INTAKE
VALVE
\
MARGIN
/ "
>FACE'
•STEM"
VALVE SPRING
RETAINER LOCK GROOVE EXHAUST
VALVE
J9209-127
Fig.
14 Intake and
Exhaust
Valves
(3) Inspect
the
valve seat with Prussian blue
to de
termine where
the
valve contacts
the
seat.
To do
this,
coat valve seat LIGHTLY with Prussian blue
then
set
valve
in
place. Rotate
the
valve with light
pressure.
If the
blue
is
transferred
to the
center
of
valve face, contact
is
satisfactory.
If
the blue
is
trans
ferred
to the top
edge
of
valve face, lower valve seat
with
a 15°
stone.
If
the blue
is
transferred
to
bottom edge
of
valve face raise valve seat with
a 60°
stone.
(4)
When seat
is
properly positioned
the
width
of
intake seats should
be 1.016-1.524 mm (0.040-0.060
inch).
The
width
of the
exhaust seats should
be 1.524-2.032 mm (0.060-0.080
inch).
Fig.
15 Refacing
Valve
Seats
VALVE
SPRING
INSPECTION
Whenever valves have been removed
for
inspection,
reconditioning
or
replacement, valve springs should
be tested.
As an
example
the
compression length
of
the spring
to be
tested
is 1-5/16
inch. Turn table
of
Valve Spring Tester Tool
C-647
until surface
is in
line with
the 1-5/16
inch mark
on the
threaded stud.
Be sure
the
zero mark
is to the
front (Fig.
16).
Place spring over stud
on the
table
and
lift compressing
le
ver
to set
tone device. Pull
on
torque wrench until
ping
is
heard. Take reading
on
torque wrench
at
this instant. Multiply this reading
by 2.
This will give
the spring load
at
test length. Fractional measure ments
are
indicated
on the
table
for
finer adjustments. Refer
to
specifications
to
obtain specified
height
and
allowable tensions. Discard
the
springs
that
do not
meet specifications.
SPECIAL
TOOL
C-647
9209-37
Fig.
16 Testing
Valve
Spring
for
Compressed
Length
with
Tool
C-647
INSTALLATION
(1)
Coat valve stems with lubrication
oil and
insert
them
in
cylinder head.
Page 648 of 1502
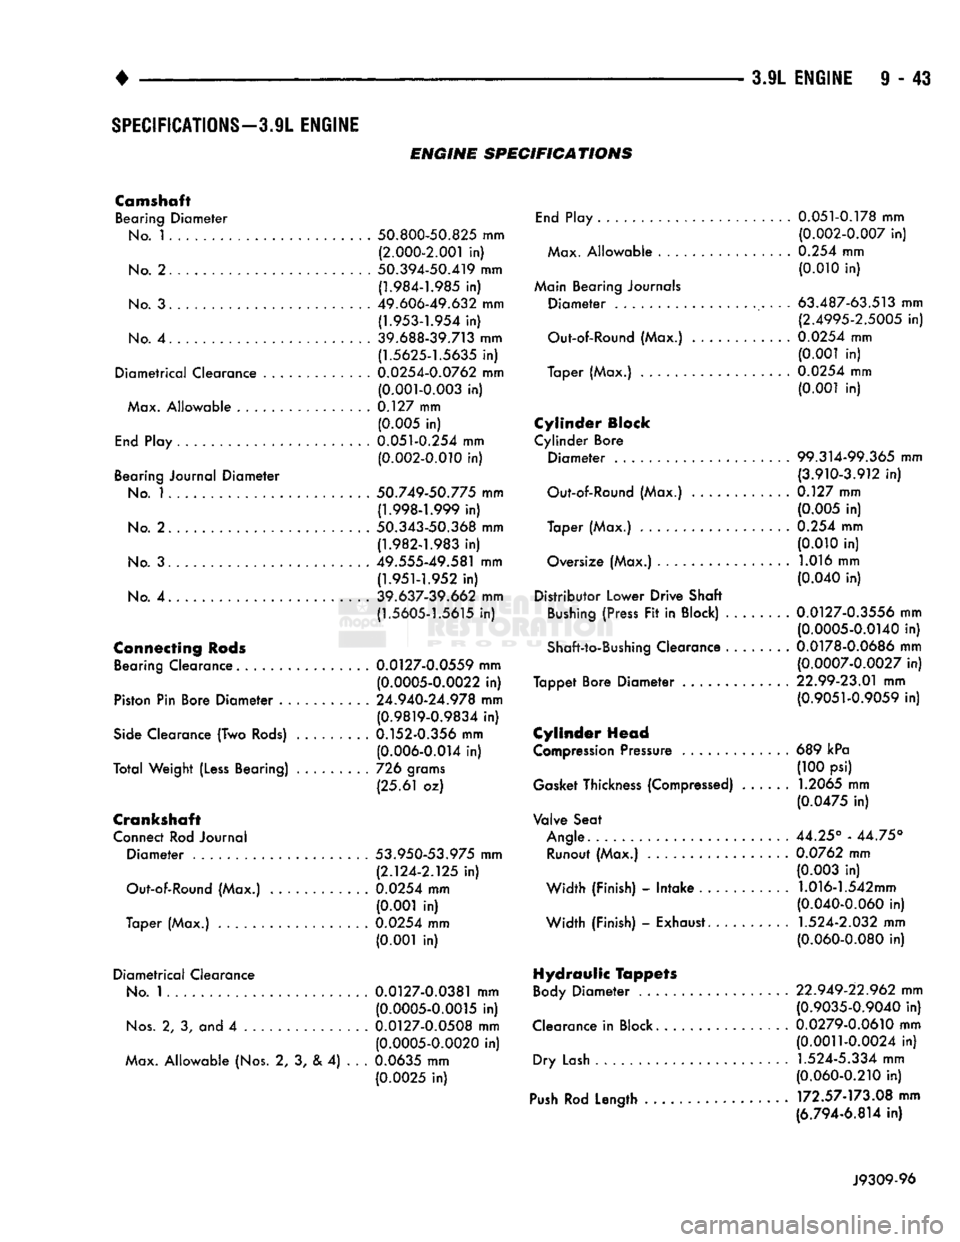
SPECIFICATIONS—3.9L
ENGINE
ENGINE
SPECIFICATIONS
Camshaft Bearing
Diameter
No.
1 50.800-50.825 mm
(2.000-2.001
in)
No.
2... 50.394-50.419 mm (1.984-1.985 in)
No.
3 49.606-49.632 mm (1.953-1.954 in)
No.
4 39.688-39.713 mm (1.5625-1.5635 in)
Diametrical
Clearance 0.0254-0.0762 mm (0.001-0.003 in)
Max. Allowable 0.127 mm (0.005 in)
End
Play 0.051-0.254 mm (0.002-0.010 in)
Bearing Journal
Diameter
No.
1.... 50.749-50.775 mm (1.998-1.999 in)
No.
2 50.343-50.368 mm
(1.982-1.983
in)
No.
3 49.555-49.581 mm
(1.951-1.952
in)
No.
4 .... 39.637-39.662 mm (1.5605-1.5615 in)
Connecting
Rods
Bearing Clearance 0.0127-0.0559 mm (0.0005-0.0022 in)
Piston Pin Bore
Diameter
24.940-24.978 mm (0.9819-0.9834 in)
Side
Clearance (Two
Rods)
0.152-0.356 mm (0.006-0.014 in)
Total
Weight
(Less
Bearing) 726 grams
(25.61 oz)
Crankshaft
Connect Rod Journal
Diameter
53.950-53.975 mm
(2.124-2.125 in)
Out-of-Round (Max.) . 0.0254 mm (0.001 in)
Taper (Max.) 0.0254 mm (0.001 in)
Diametrical
Clearance
No.
1 0.0127-0.0381 mm (0.0005-0.0015 in)
Nos.
2, 3, and 4 0.0127-0.0508 mm (0.0005-0.0020 in)
Max. Allowable (Nos. 2, 3, & 4) . . . 0.0635 mm
(0.0025 in)
End
Play 0.051-0.178 mm
(0.002-0.007 in)
Max. Allowable . 0.254 mm (0.010 in)
Main Bearing Journals
Diameter
63.487-63.513 mm (2.4995-2.5005 in)
Out-of-Round (Max.) . 0.0254 mm (0.001 in)
Taper (Max.) 0.0254 mm (0.001 in)
Cylinder Block
Cylinder Bore
Diameter
. 99.314-99.365 mm (3.910-3.912 in)
Out-of-Round (Max.) 0.127 mm (0.005 in)
Taper (Max.) . 0.254 mm (0.010 in)
Oversize (Max.) . 1.016 mm (0.040 in)
Distributor Lower Drive Shaft
Bushing
(Press Fit in Block) .... 0.0127-0.3556 mm (0.0005-0.0140 in)
Shaft-to-Bushing Clearance 0.0178-0.0686 mm (0.0007-0.0027 in)
Tappet Bore
Diameter
22.99-23.01 mm (0.9051-0.9059 in)
Cylinder Head
Compression
Pressure 689 kPa (100 psi)
Gasket Thickness (Compressed) 1.2065 mm (0.0475 in)
Valve Seat
Angle
44.25° - 44.75° Runout (Max.) 0.0762 mm (0.003 in)
Width (Finish) -
Intake
1.016-1.542mm (0.040-0.060 in)
Width (Finish) - Exhaust. 1.524-2.032 mm (0.060-0.080 in)
Hydraulic Tappets
Body
Diameter
. . 22.949-22.962 mm
(0.9035-0.9040 in)
Clearance in Block. . 0.0279-0.0610 mm (0.0011-0.0024 in)
Dry
Lash
1.524-5.334 mm (0.060-0.210 in)
Push
Rod Length 172.57-173.08 mm (6.794-6.814 in)
J9309-96
Page 649 of 1502
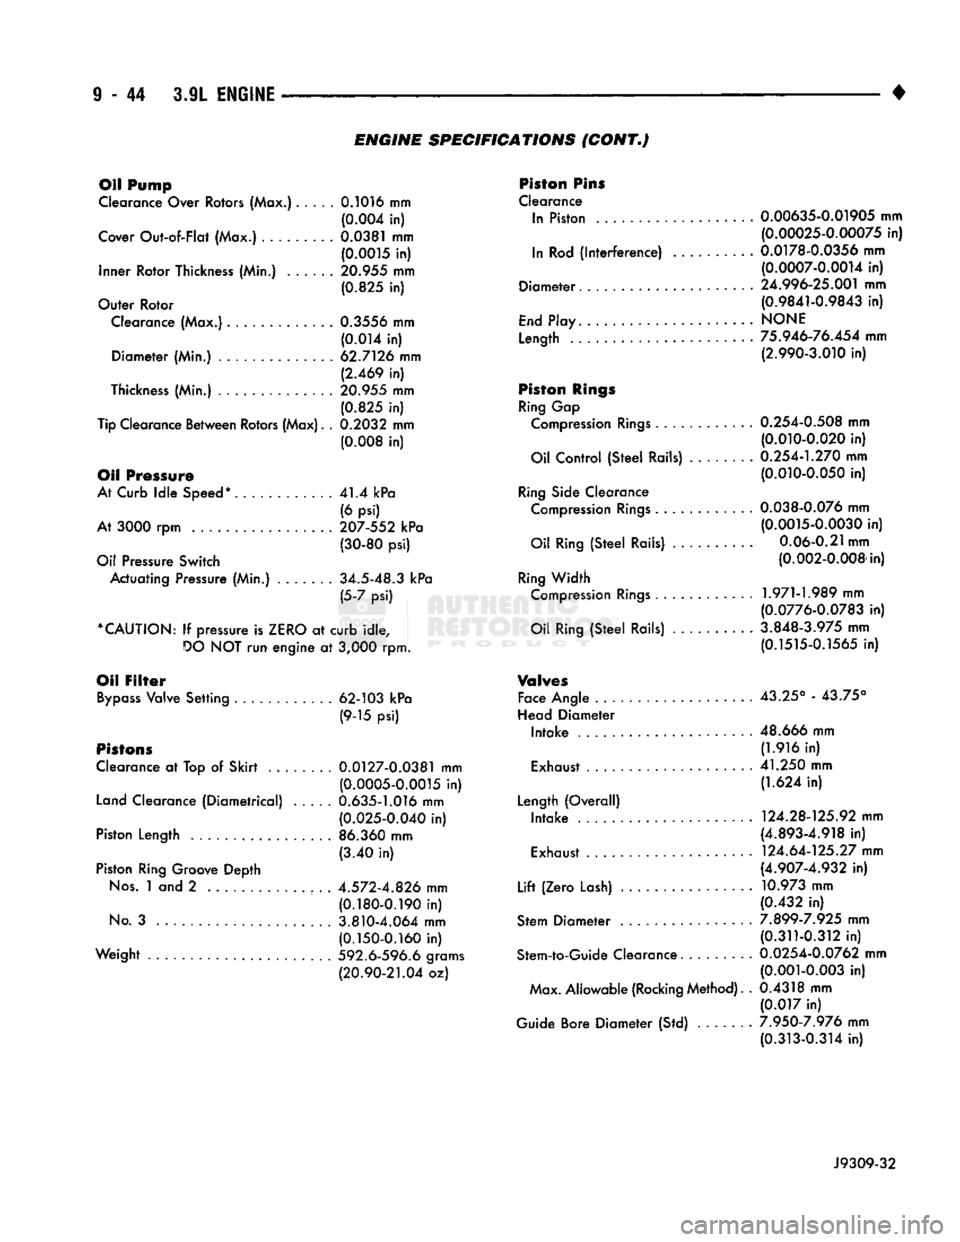
ENGINE SPECIFICATIONS (CONT.f
Oil
Pump
Clearance
Over
Rotors
(Max.).....
0.1016
mm (0.004 in)
Cover
Out-of-Flat
(Max.)
0.0381 mm (0.0015 in)
Inner
Rotor
Thickness
(Min.) ...... 20.955 mm (0.825 in)
Outer
Rotor
Clearance
(Max.)
0.3556 mm (0.014 in)
Diameter
(Min.) 62.7126 mm (2.469 in)
Thickness
(Min.) . . ........ 20.955 mm
(0.825 in)
Tip
Clearance
Between
Rotors
(Max).
. 0.2032 mm
(0.008 in)
Oil
Pressure
At
Curb
Idle
Speed*
41.4 kPa
(6 psi)
At
3000 rpm 207-552 kPa
(30-80 psi)
Oil
Pressure
Switch
Actuating
Pressure
(Min.) ... 34.5-48.3 kPa (5-7 psi)
*CAUTION:
If
pressure
is
ZERO
at
curb
idle,
DO
NOT run
engine
at
3,000
rpm.
Oil
Filter
Bypass
Valve
Setting
. 62-103 kPa (9-15 psi)
Pistons
Clearance
at
Top
of
Skirt
0.0127-0.0381 mm
(0.0005-0.0015 in)
Land
Clearance
(Diametrical) 0.635-1.016 mm (0.025-0.040 in)
Piston
Length
86.360 mm (3.40 in)
Piston
Ring
Groove
Depth
Nos.
1 and 2 4.572-4.826 mm (0.180-0.190 in)
No.
3 3.810-4.064 mm (0.150-0.160 in)
Weight
592.6-596.6
grams
(20.90-21.04
oz)
Piston
Pins
Clearance
In
Piston
0.00635-0.01905 mm (0.00025-0.00075 in)
In
Rod
(Interference) 0.0178-0.0356 mm (0.0007-0.0014 in)
Diameter.
24.996-25.001 mm (0.9841-0.9843 in)
End
Play..
NONE
Length
75.946-76.454 mm (2.990-3.010 in)
Piston
Rings
Ring
Gap
Compression
Rings
0.254-0.508 mm (0.010-0.020 in)
Oil
Control
(Steel
Rails)
0.254-1.270 mm (0.010-0.050 in)
Ring
Side
Clearance
Compression
Rings
0.038-0.076 mm
(0.0015-0.0030 in)
Oil
Ring
(Steel
Rails)
0.06-0.21
mm
(0.002-0.008 in)
Ring
Width
Compression
Rings
1.971-1.989 mm
(0.0776-0.0783 in)
Oil
Ring
(Steel
Rails)
3.848-3.975 mm (0.1515-0.1565 in)
Valves
Face
Angle
43.25° - 43.75°
Head
Diameter
Intake
48.666 mm (1.916 in)
Exhaust
41.250 mm (1.624 in)
Length
(Overall)
Intake
124.28-125.92 mm (4.893-4.918 in)
Exhaust
124.64-125.27 mm (4.907-4.932 in)
Lift
(Zero
Lash)
10.973 mm (0.432 in)
Stem
Diameter 7.899-7.925 mm (0.311-0.312 in)
Stem-to-Guide
Clearance
0.0254-0.0762 mm
(0.001-0.003 in)
Max.
Allowable
(Rocking
Method).
. 0.4318 mm (0.017 in)
Guide
Bore
Diameter (Std) 7.950-7.976 mm (0.313-0.314 in)
J9309-32
Page 660 of 1502
•
5.2L
ENGINE
I - 55
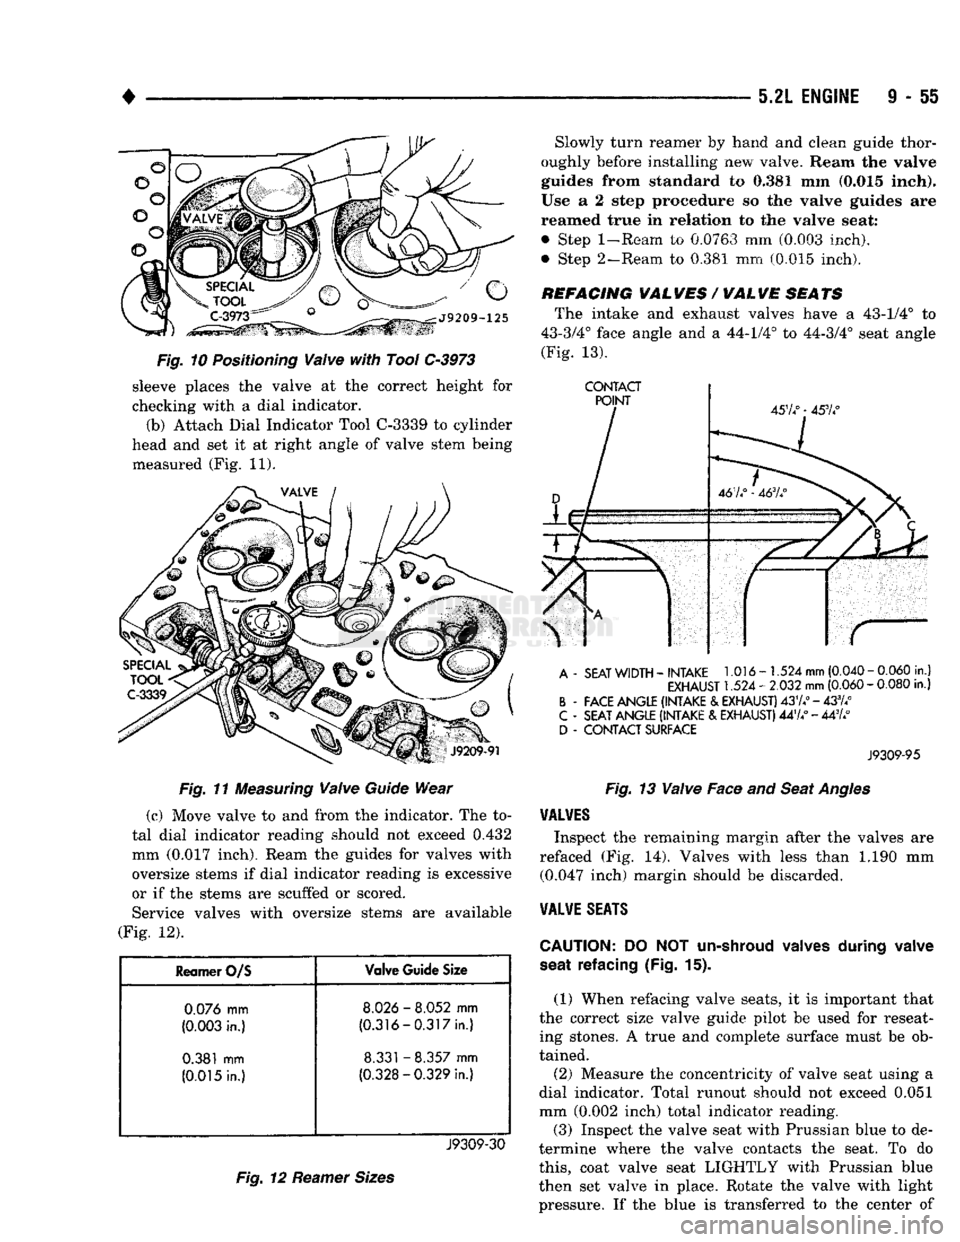
Fig. 10 Positioning Valve with Tool C-3973 sleeve places the valve at the correct height for
checking with a dial indicator.
(b) Attach Dial Indicator Tool C-3339 to cylinder
head and set it at right angle of valve stem being measured (Fig. 11).
Fig. 11 Measuring Valve Guide Wear
(c) Move valve to and from the indicator. The to
tal dial indicator reading should not exceed
0.432
mm
(0.017
inch). Ream the guides for valves with
oversize stems if dial indicator reading is excessive
or if the stems are scuffed or scored. Service valves with oversize stems are available
(Fig. 12).
Reamer
O/S
Valve
Guide
Size
0.076
mm
8.026
-
8.052
mm
(0.003
in.)
(0.316-0.317in.)
0.381
mm
8.331
-
8.357
mm
(0.015
In.)
(0.328-0.329
In.)
J9309-30
Fig. 12 Reamer Sizes
Slowly turn reamer
by
hand
and
clean guide thor
oughly before installing
new
valve. Ream
the valve
guides from standard
to 0,381 mm
(0.015 Inch).
Use
a 2
step procedure
so the
valve guides
are
reamed true
in
relation
to the
valve seat:
• Step
1-Ream
to 0.0763 mm (0.003 inch),
• Step 2—Ream, to 0.381 mm (0.015 inch).
REFACING
VAL
WES
/
WAL
WE
SEATS
The intake and exhaust valves have a 43-1/4° to
43-3/4° face angle and a 44-1/4° to 44-3/4° seat angle
(Fig.
13).
CONTACT
A
-
SEAT
WIDTH
-
INTAKE
1.016-1.524
mm
(0.040
-
0.060
in.)
EXHAUST
1.524 -
2.032
mm
(0.060
-
0.080
in.)
B
-
FACE ANGLE (INTAKE
&
EXHAUST)
437.°
-433//
C
-
SEAT ANGLE (INTAKE
&
EXHAUST)
447/ - 447/
D
-
CONTACT SURFACE
J9309-95
Fig. 13 Valve Face and Seat Angles
VALVES
Inspect the remaining margin after the valves are
refaced (Fig. 14). Valves with less than 1.190 mm (0.047 inch) margin should be discarded.
VALVE
SEATS
CAUTION:
DO NOT
un-shroud valves
during
valve
seat
refacing (Fig.
15).
(1) When refacing valve seats, it is important that
the correct size valve guide pilot be used for reseat ing stones. A true and complete surface must be ob
tained.
(2) Measure the concentricity of valve seat using a
dial indicator. Total runout should not exceed 0.051
mm (0.002 inch) total indicator reading. (3) Inspect the valve seat with Prussian blue to de
termine where the valve contacts the seat. To do
this,
coat valve seat LIGHTLY with Prussian blue
then set valve in place. Rotate the valve with light
pressure. If the blue is transferred to the center of
Page 661 of 1502
9
- 56 5.2L
ENGINE
•
VALVE
SPRING
RETAINER LOCK GROOVE
EXHAUST
VALVE
J9209-127 the spring load at test length. Fractional measure
ments are indicated on the table for finer adjust
ments. Refer to specifications to obtain specified
height and allowable tensions. Discard the springs
that do not meet specifications.
SPECIAL
TOOL
C-647
Fig.
14 Intake and
Exhaust
Valves
Fig.
15 Refacing
Valve
Seats
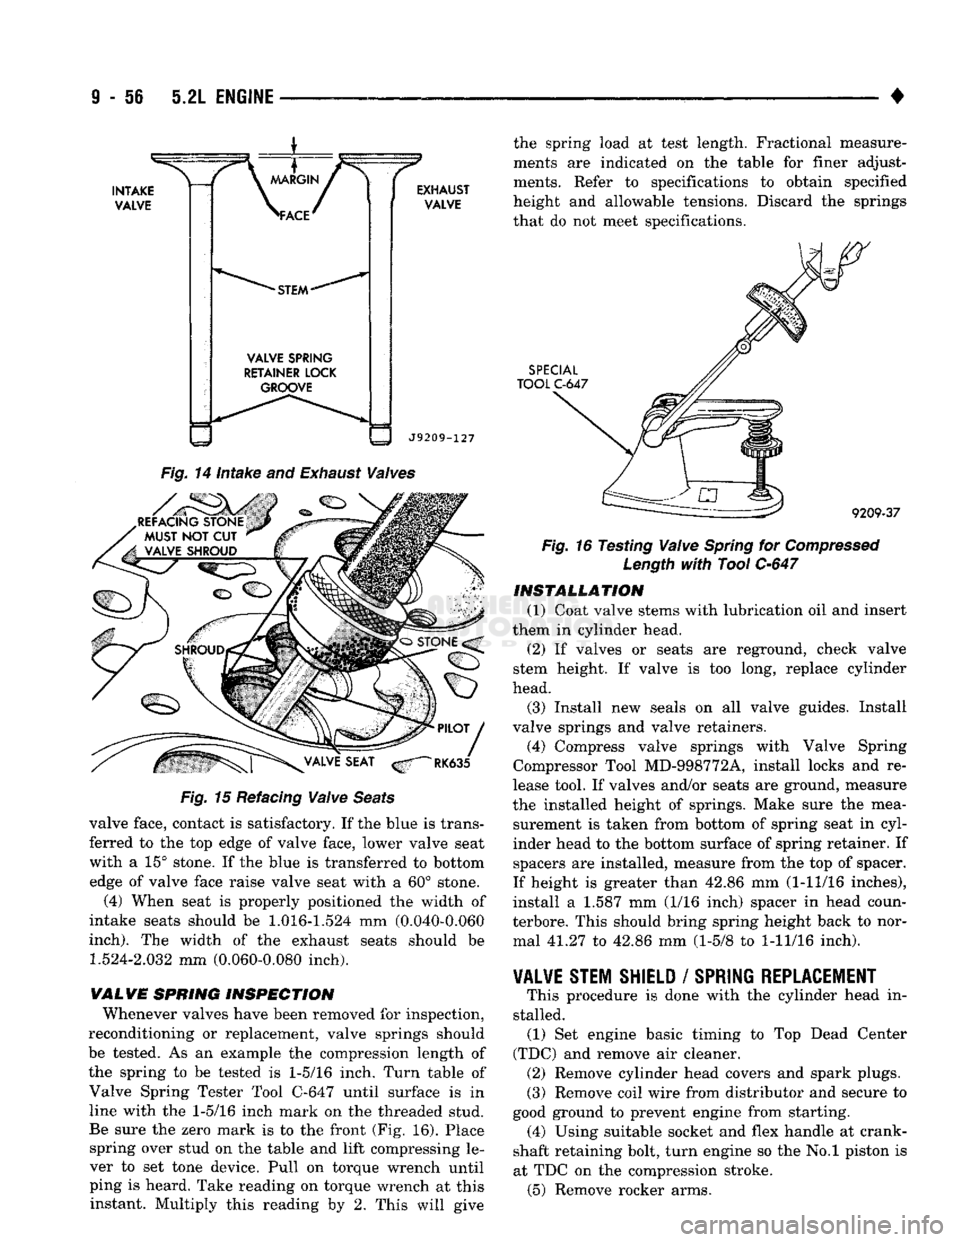
valve face, contact is satisfactory. If the blue is trans
ferred to the top edge of valve face, lower valve seat
with a 15° stone. If the blue is transferred to bottom edge of valve face raise valve seat with a 60° stone.
(4) When seat is properly positioned the width of
intake seats should be
1.016-1.524
mm (0.040-0.060
inch).
The width of the exhaust seats should be
1.524-2.032
mm (0.060-0.080 inch).
WALVE SPRING INSPECTION Whenever valves have been removed for inspection,
reconditioning or replacement, valve springs should
be tested. As an example the compression length of
the spring to be tested is
1-5/16
inch. Turn table of Valve Spring Tester Tool C-647 until surface is in line with the
1-5/16
inch mark on the threaded stud.
Be sure the zero mark is to the front (Fig. 16). Place spring over stud on the table and lift compressing le
ver to set tone device. Pull on torque wrench until ping is heard. Take reading on torque wrench at this instant. Multiply this reading by 2. This will give ^
9209-37
Fig.
16 Testing
Valve
Spring
for
Compressed
Length
with
Tool
C-647
INSTALLATION
(1) Coat valve stems with lubrication oil and insert
them in cylinder head.
(2) If valves or seats are reground, check valve
stem height. If valve is too long, replace cylinder
head.
(3) Install new seals on all valve guides. Install
valve springs and valve retainers.
(4) Compress valve springs with Valve Spring
Compressor Tool MD-998772A, install locks and re
lease tool. If valves and/or seats are ground, measure
the installed height of springs. Make sure the mea surement is taken from bottom of spring seat in cyl
inder head to the bottom surface of spring retainer. If spacers are installed, measure from the top of spacer.
If height is greater than 42.86 mm (1-11/16 inches),
install a 1.587 mm (1/16 inch) spacer in head coun-
terbore. This should bring spring height back to nor mal 41.27 to 42.86 mm (1-5/8 to
1-11/16
inch).
VALVE STEM SHIELD
/
SPRING REPLACEMENT
# This procedure is done with the cylinder head in
stalled. (1) Set engine basic timing to Top Dead Center
(TDC) and remove air cleaner. (2) Remove cylinder head covers and spark plugs.
(3) Remove coil wire from distributor and secure to
good ground to prevent engine from starting. (4) Using suitable socket and flex handle at crank
shaft retaining bolt, turn engine so the No.l piston is
at TDC on the compression stroke. (5) Remove rocker arms.
Page 678 of 1502
SPECIFICATIONS—5.2L
ENGINE
ENGINE SPECIFICATIONS
Camshaft
Bearing Diameter
No.
1....................... . 50.800-50.825 mm (2.000-2.001 in)
No.
2... 50.394-50.419 mm (1.984-1.985 in)
No.
3. . 50.013-50.038 mm
(1.969-1.970
in)
No.
4...........
......... 49.606-49.632 mm (1.953-1.954 in)
No.
5 39.688-39.713 mm
(1.5625-1.5635 in)
Diametrical Clearance 0.0254-0.0762 mm (0.001-0.003 in)
Max. Allowable 0.127 mm (0.005 in)
End Play. . .... 0.051-0.254 mm (0.002-0.010 in)
Bearing Journal Diameter
No.
1....................... . 50.749-50.775 mm (1.998-1.999 in)
No.
2 50.343-50.368 mm
(1.982-1.983
in)
No.
3... 49.962-49.987 mm (1.967-1.968 in)
No.
4. ......... .......... 49.555-49.581 mm (1.951-1.952 in)
No.
5 39.637-39.662 mm
(1.5605-1.5615 in)
Connecting
Rods
Bearing Clearance 0.0127-0.0559 mm (0.0005-0.0022 in)
Piston Pin Bore Diameter . 24.966-24.978 mm (0.9829-0.9834 in)
Side Clearance (Two Rods) ......... 0.152-0.356 mm (0.006-0.014 in)
Total Weight (Less Bearing) ......... 726 grams (25.61 oz)
Crankshaft
Connect Rod Journal Diameter ....... 53.950-53.975 mm (2.124-2.125 in)
Out-of-Round (Max.) ............ 0.0254 mm (0.001 in)
Taper (Max.) .... ...... 0.0254 mm (0.001 in)
Diametrical Clearance
No.
1 0.0127-0.0381 mm (0.0005-0.0015 in)
Nos.
2, 3, 4 and 5 ............. 0.0127-0.0508 mm (0.0005-0.0020 in)
Max. Allowable (Nos. 2, 3,4&5) 0.0635 mm (0.0025 in) End Play 0.051-0.178 mm
(0.002-0.007 in)
Max. Allowable 0.254 mm (0.010 in)
Main Bearing Journals Diameter ..................... 63.487-63.513 mm (2.4995-2.5005 in)
Out-of-Round (Max.) 0.0254 mm (0.001 in)
Taper (Max.) 0.0254 mm (0.001 in)
Cylinder
Block
Cylinder Bore Diameter 99.314-99.365 mm (3.910-3.912 in)
Out-of-Round (Max.) ............ 0.127 mm (0.005 in)
Taper (Max.) 0.254 mm (0.010 in)
Oversize (Max.) ................ 1.016 mm (0.040 in)
Distributor Lower Drive Shaft Bushing (Press Fit in Block) 0.0127-0.3556 mm (0.0005-0.0140 in)
Shaft-to-Bushing Clearance ........ 0.0178-0.0686 mm (0.0007-0.0027 in)
Tappet Bore Diameter ......... 22.99-23.01 mm (0.9051-0.9059 in)
Cylinder
Head
Compression Pressure 689 kPa (100 psi)
Gasket Thickness (Compressed) ......
1.2065
mm (0.0475 in)
Valve Seat Angle. .... 44.25° - 44.75° Runout (Max.) .......... ... 0.0762 mm (0.003 in)
Width (Finish) - Intake
1.016-1.524
mm
(0.040-0.060 in)
Width (Finish) - Exhaust. .........
1.524-2.032
mm (0.060-0.080 in)
Hydraulic
Tappets Body Diameter 22.949-22.962 mm (0.9035-0.9040 in)
Clearance in Block . 0.0279-0.0610 mm (0.0011-0.0024 in)
Dry
Lash
1.524-5.334
mm (0.060-0.210 in)
Push Rod Length ............. 172.57-173.08 mm (6.794-6.814 in)
J9309-97
Page 679 of 1502
ENGINE
SPECIFICATIONS
(CONT*)
Oil Pump
Clearance Over Rotors (Max.)..... 0.1016 mm (0.004 in)
Cover
Out-of-Flat
(Max.).. ... 0.0381 mm (0.0015 in)
Inner
Rotor
Thickness (Min.) 20.955 mm (0.825 in)
Outer
Rotor
Clearance (Max.)............. 0.3556 mm
(0.014 in)
Diameter
(Min.) 62.7126 mm (2.469 in)
Thickness (Min.) 20.955 mm
(0.825 in)
Tip Clearance
Between
Rotors (Max). . 0.2032 mm
(0.008 in)
Oil Pressure
At Curb
Idle
Speed*
41.4 kPa
(6 psi)
At 3000 rpm 207-552 kPa (30-80 psi)
Oil Pressure
Switch
Actuating
Pressure (Min.) . 34.5-48.3 kPa (5-7 psi)
*CAUTION:
If pressure is
ZERO
at
curb
idle,
DO
NOT run
engine
at 3,000 rpm.
Oil
Filter
Bypass
Valve
Setting
............
62-103 kPa
(9-15 psi)
Pistons
Clearance at Top of
Skirt
.... 0.0127-0.0381 mm (0.0005-0.0015 in)
Land Clearance
(Diametrical)
..... 0.635-1.016 mm (0.025-0.040 in)
Piston
Length
.................
86.360 mm
(3.40 in)
Piston Ring Groove
Depth
Nos.
1 and 2 4.572-4.826 mm (0.180-0.190 in)
No.
3 3.810-4.064 mm (0.150-0.160 in)
Weight
592.6-596.6 grams
(20.90-21.04 oz) Piston Pins
Clearance In Piston . 0.00635-0.01905 mm (0.00025-0.00075 in)
In Rod
(interference)
..........
0.0178-0.0356 mm (0.0007-0.0014 in)
Diameter.
24.996-25.001 mm (0.9841-0.9843 in)
End
Play
NONE
Length
75.946-76.454 mm (2.990-3.010 in)
Piston
Rings
Ring Gap Compression
Rings
. 0.254-0.508 mm (0.010-0.020 in)
Oil
Control
(Steel
Rails) . 0.254-1.270 mm (0.010-0.050 in)
Ring Side Clearance Compression
Rings
0.038-0.076 mm (0.0015-0.0030 in)
Oil Ring
(Steel
Rails)
..........
0.06-0.21 mm (0.002-0.008 in)
Ring
Width
Compression
Rings
1.971-1.989 mm (0.0776-0.0783 in)
Oil Ring
(Steel
Rails) 3.848-3.975 mm (0.1515-0.1565 in)
V®hr©s
Face Angle 43.25° - 43.75°
Head
Diameter
Intake
.....................
48.666 mm (1.916 in)
Exhaust 41.250 mm (1.624 in)
Length
(Overall)
Intake
. 124.28-125.92 mm (4.893-4.918 in)
Exhaust . 124.64-125.27 mm (4.907-4.932 in)
Lift
(Zero
Lash) 10.973 mm (0.432 in)
Stem
Diameter
7.899-7.925 mm (0.311-0.312 in)
Stem-to-Guide
Clearance......... 0.0254-0.0762 mm (0.001-0.003 in)
Max.
Allowable
(Rocking Method). . 0.4318 mm
(0.017 in)
Guide Bore
Diameter
(Std) 7.950-7.976 mm (0.313-0.314 in)
J9309-32
Page 690 of 1502
•
5.9L
ENGINE
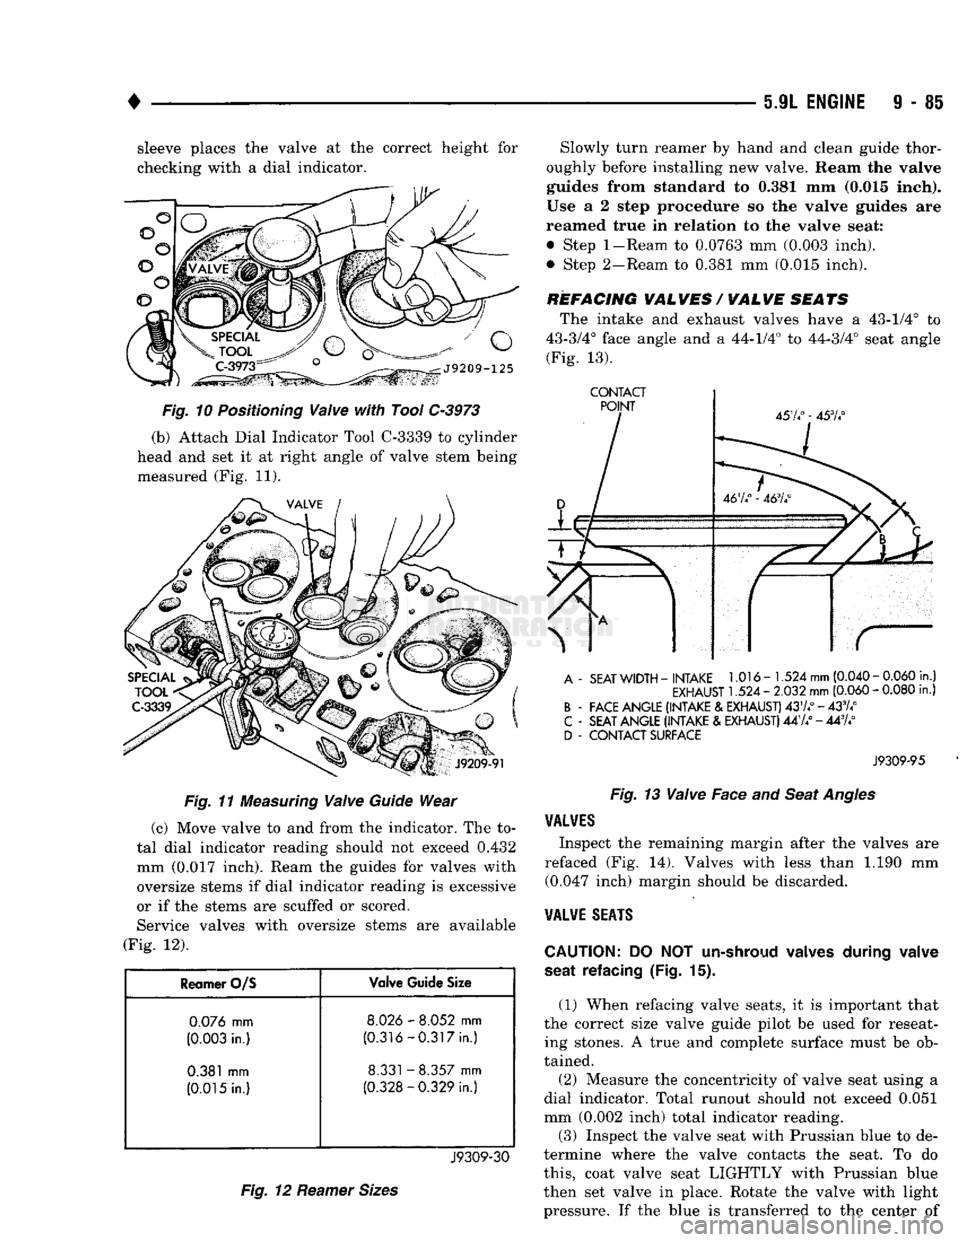
9 - 85 sleeve places the valve at the correct height for
checking with a dial indicator.
Fig.
11
Measuring
Valve
Guide
Wear
(c) Move valve to and from the indicator. The to
tal dial indicator reading should not exceed 0.432
mm (0.017 inch). Ream the guides for valves with
oversize stems if dial indicator reading is excessive
or if the stems are scuffed or scored. Service valves with oversize stems are available
(Fig. 12).
Reamer O/S Valve Guide Size
0.076
mm
8.026
-
8.052
mm
(0.003
in.)
(0.316-0.317
in.)
0.381
mm
8.331
-
8.357
mm
(0.015
in.)
(0.328-0.329
in.)
J9309-30
Fig.
12
Reamer
Sizes
Slowly turn reamer by hand and clean guide thor
oughly before installing new valve. Ream the valve
guides from standard to 0.381 mm (0.015 inch).
Use a 2 step procedure so the valve guides are
reamed true in relation to the valve seat:
• Step
1-Ream
to 0.0763 mm (0.003 inch).
• Step 2-Ream to 0.381 mm (0.015 inch).
REFACING VALVES / VALVE SEATS The intake and exhaust valves have a 43-1/4° to
43-3/4° face angle and a 44-1/4° to 44-3/4° seat angle (Fig. 13).
CONTACT
A
-
SEAT
WIDTH
-
INTAKE
1.016-1.524
mm
(0.040
-
0.060
in.)
EXHAUST
1.524 -
2.032
mm
(0.060
-
0.080
in.)
B
-
FACE ANGLE (INTAKE
&
EXHAUST)
4374°-433/4°
C
-
SEAT ANGLE (INTAKE
&
EXHAUST)
447/ - 443A°
D
-
CONTACT SURFACE
J9309-95
Fig.
13
Valve
Face and
Seat
Angles
VALVES
Inspect the remaining margin after the valves are
refaced (Fig. 14). Valves with less than 1.190 mm (0.047 inch) margin should be discarded.
VALVE
SEATS
CAUTION:
DO NOT
un-shroud valves during valve
seat refacing
(Fig. 15).
(1) When refacing valve seats, it is important that
the correct size valve guide pilot be used for reseat ing stones. A true and complete surface must be ob
tained.
(2) Measure the concentricity of valve seat using a
dial indicator. Total runout should not exceed 0.051
mm (0.002 inch) total indicator reading.
(3)
Inspect the valve seat with Prussian blue to de
termine where the valve contacts the seat. To do
this,
coat valve seat LIGHTLY with Prussian blue
then set valve in place. Rotate the valve with light pressure. If the blue is transferred to the center of
Page 691 of 1502
9
• 86 5.9L
ENGINE
•
INTAKE
VALVE
\
MARGIN
/ >
\ACE^
*
STEM
*
VALVE
SPRING
RETAINER
LOCK
GROOVE EXHAUST
VALVE
J9209-127
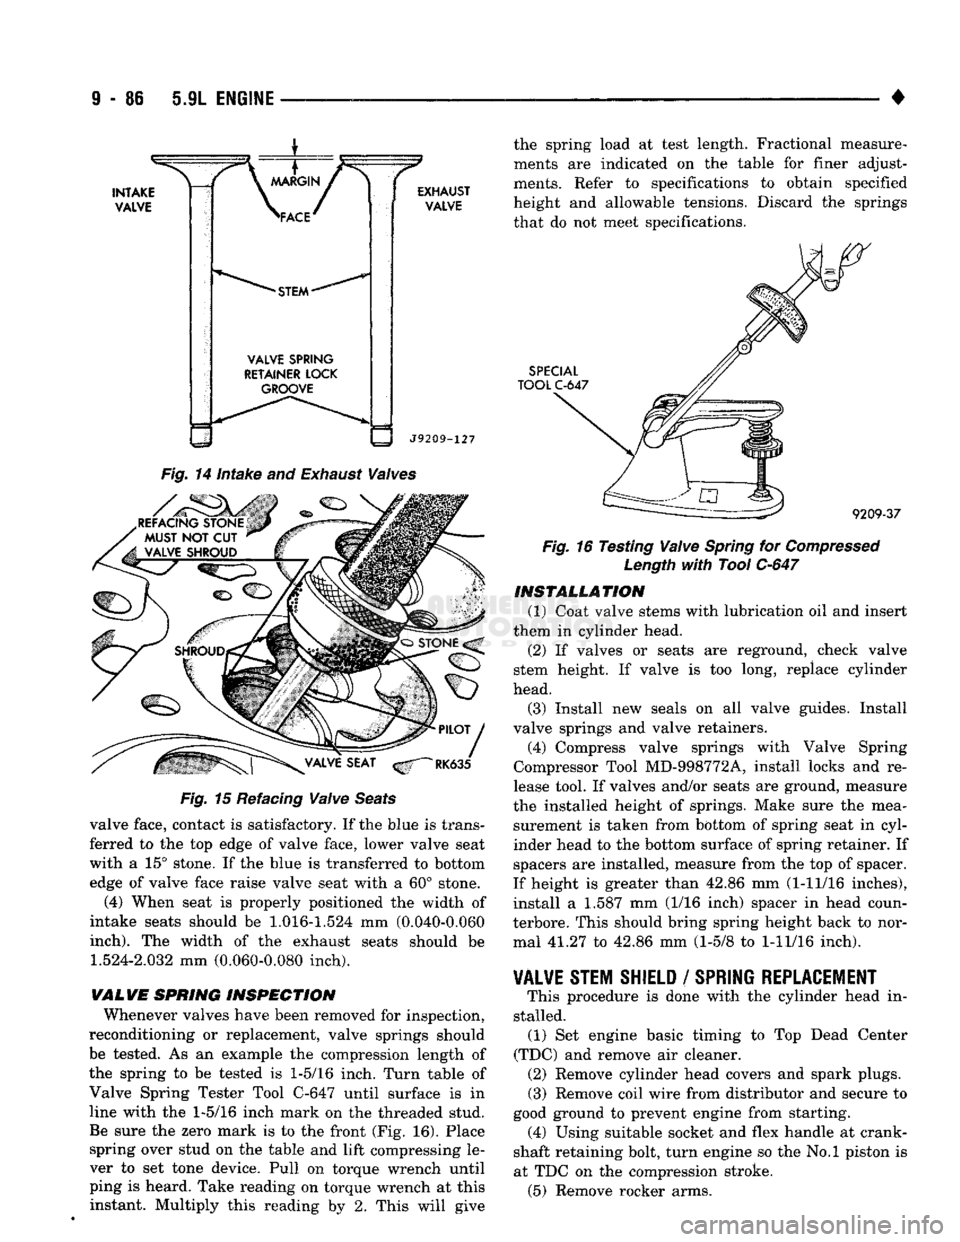
Fig.
14
intake
and
Exhaust
Waives
REFACING STONE MUST
NOT CUT
VALVE SHROUD Fig.
15 Refacing
Waive
Seats
valve face, contact is satisfactory. If the blue is trans ferred to the top edge of valve face, lower valve seat
with a 15° stone. If the blue is transferred to bottom edge of valve face raise valve seat with a 60° stone.
(4) When seat is properly positioned the width of
intake seats should be
1.016-1.524
mm (0.040-0.060
inch).
The width of the exhaust seats should be
1.524-2.032
mm (0.060-0.080 inch).
VALVE
SPRING
INSPECTION
Whenever valves have been removed for inspection,
reconditioning or replacement, valve springs should be tested. As an example the compression length of
the spring to be tested is
1-5/16
inch. Turn table of
Valve Spring Tester Tool C-647 until surface is in
line with the
1-5/16
inch mark on the threaded stud. Be sure the zero mark is to the front (Fig. 16). Place spring over stud on the table and lift compressing le
ver to set tone device. Pull on torque wrench until
ping is heard. Take reading on torque wrench at this instant. Multiply this reading by 2. This will give the spring load at test length. Fractional measure
ments are indicated on the table for finer adjust
ments. Refer to specifications to obtain specified
height and allowable tensions. Discard the springs that do not meet specifications.
SPECIAL
TOOL
C-647
9209-37
Fig.
16 Testing
Waive
Spring
for
Compressed
Length
with
Tool
C-647
INSTALLATION
(1) Coat valve stems with lubrication oil and insert
them in cylinder head.
(2) If valves or seats are reground, check valve
stem height. If valve is too long, replace cylinder
head.
(3) Install new seals on all valve guides. Install
valve springs and valve retainers.
(4) Compress valve springs with Valve Spring
Compressor Tool MD-998772A, install locks and re
lease tool. If valves and/or seats are ground, measure
the installed height of springs. Make sure the mea surement is taken from bottom of spring seat in cyl
inder head to the bottom surface of spring retainer. If
spacers are installed, measure from the top of spacer.
If height is greater than 42.86 mm (1-11/16 inches),
install a 1.587 mm (1/16 inch) spacer in head coun-
terbore. This should bring spring height back to nor mal 41.27 to 42.86 mm (1-5/8 to
1-11/16
inch).
¥AL¥E
STEM SHIELD
/
SPRING REPLACEMENT
This procedure is done with the cylinder head in
stalled. (1) Set engine basic timing to Top Dead Center
(TDC) and remove air cleaner. (2) Remove cylinder head covers and spark plugs. (3) Remove coil wire from distributor and secure to
good ground to prevent engine from starting. (4) Using suitable socket and flex handle at crank
shaft retaining bolt, turn engine so the No.l piston is
at TDC on the compression stroke. (5) Remove rocker arms.