Top FIAT 500 1959 1.G Owner's Manual
[x] Cancel search | Manufacturer: FIAT, Model Year: 1959, Model line: 500, Model: FIAT 500 1959 1.GPages: 128, PDF Size: 9.01 MB
Page 58 of 128
CHAPTER 6
GEARBOX AND DIFFERENTIAL UNIT
6:1
6:2
6:3
6:4
6:5
6:6Description
Removal of gearbox/differential unit
Dismantling — gearbox
Reassembly — gearbox
Dismantling — differential and final drive
Reassembly— differential and final drive6:7
6:8
6:9
6:10
6:11
6:12Final drive gear set adjustment
Replacement of gearbox/differential unit
Swing axle shafts and slip joints
Gear shift control mechanism
Modifications
Fault diagnosis
6 :1 Description
The gearbox and differential unit are housed in an
aluminium alloy casing made up of t w o parts which split
at the differential centre line. The output drive is trans-
mitted by means of t w o half axle drive shafts coupled
through wheel shafts and slip joints to the rear wheels (see
FIG 6 : 1)
The gearbox provides four forward-speeds and a reverse,
the fourth-speed being considered as an overdrive. All
gears except first and reverse gears, which are straight
toothed sliding gears, are in constant mesh and have heli-
cal teeth. No synchromesh is provided, gear engagement
being completed by sliding shifter sleeves of the dog
clutch type. The first-speed gear slides on the outside of
the third and fourth shifter sleeve, whilst the reverse gear
train moves on a fixed shaft. The clutch shaft is integral
with the third, top and combined and first and second gear
pinions, whilst the second gear pinion is splined at the
front end. An internal splined
coupling sleeve joins the
clutch shaft and the input shaft and transmits the power
from the engine to the gearbox. The mainshaft and
differential drive pinion are combined together and besides
carrying the constant mesh gears and the sliding first gear
pinion, it also has attached the sliding sleeves and hubs.
F50065 The speedometer drive pinion is located at the front end.
The gearbox/differential casing is attached to the engine
by six studs which locate in the crankcase. The front of the
unit rests upon the rubber mounted support which is
secured to the body floor.
The complete unit comprises three detachable parts
made up as follows:
1 The support for the connection of the gearbox to the
engine which also acts as part of the differential front
end and clutch/flywheel housing at rear.
2 A central body which is divided into two compartments.
The front compartment contains first, third, fourth and
reverse gears w i t h the primary shaft, layshaft and reverse
shaft as well as the necessary gear selection striker rods
and forks. The rear of this compartment also forms a half
cover for the differential unit.
3 The gearbox casing cover, which contains the second-
speed gears together with the relative fork, gear
selection rod and speedometer drive gears.
The central part of the casing is provided with a top
inspection cover. The primary shaft is coupled to the clutch
shaft through an internally splined sleeve and t w o pins
which are retained by rings. The primary shaft together
with the first, third and fourth driving gears form a cluster.
Page 77 of 128
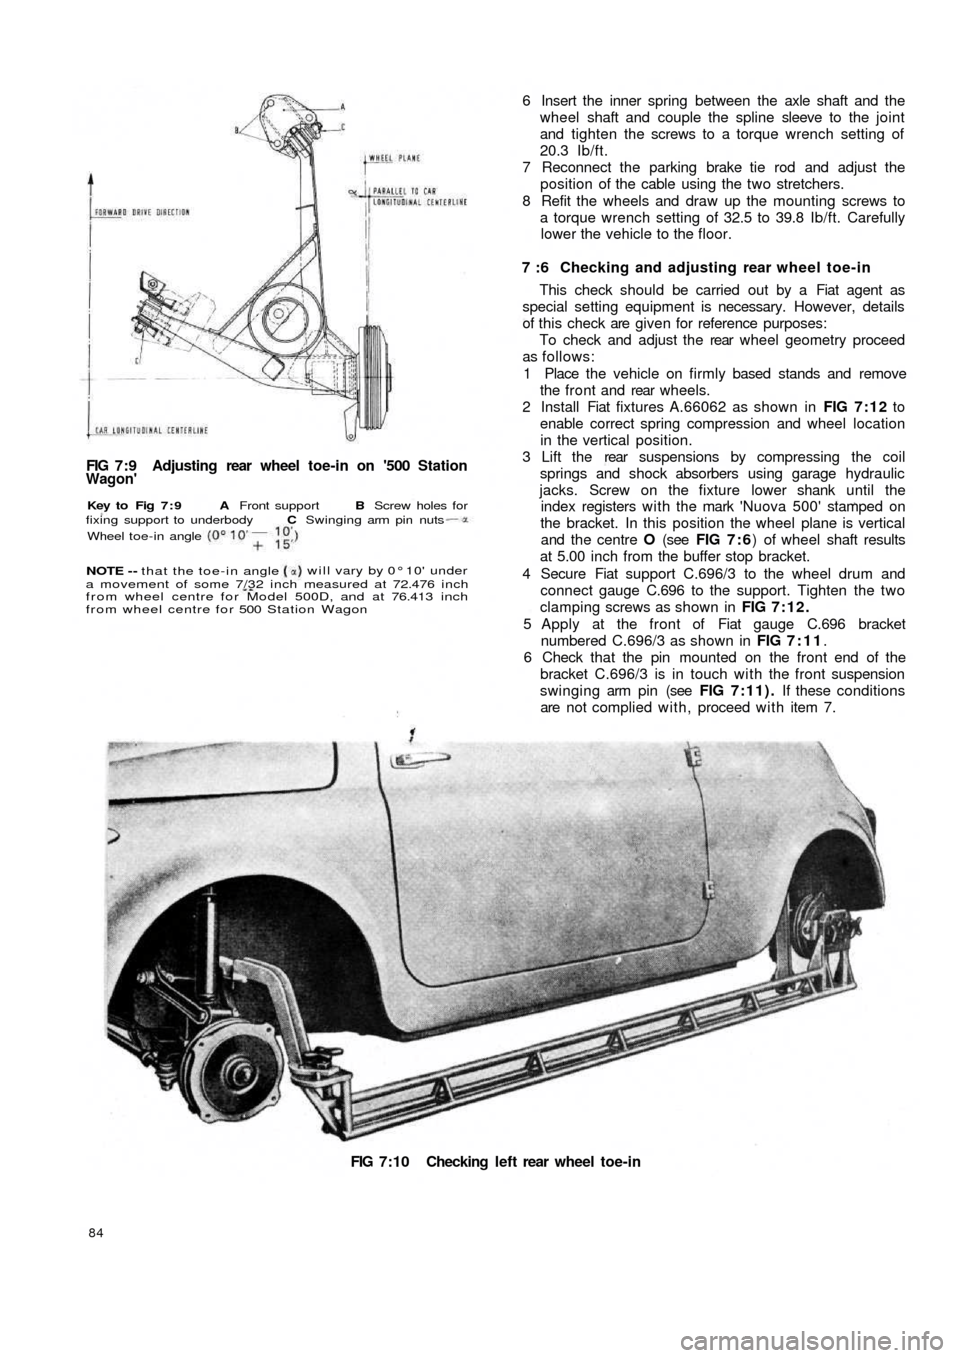
FIG 7:9 Adjusting rear wheel toe-in on '500 StationWagon'
FIG 7:10 Checking left rear wheel toe-in
84
6 Insert the inner spring between the axle shaft and the
wheel shaft and couple the spline sleeve to the joint
and tighten the screws to a torque wrench setting of
20.3 Ib/ft.
7 Reconnect the parking brake tie rod and adjust the
position of the cable using the two stretchers.
8 Refit the wheels and draw up the mounting screws to
a torque wrench setting of 32.5 to 39.8 Ib/ft. Carefully
lower the vehicle to the floor.
7 :6 Checking and adjusting rear wheel toe-in
This check should be carried out by a Fiat agent as
special setting equipment is necessary. However, details
of this check are given for reference purposes:
To check and adjust the rear wheel geometry proceed
as follows:
1 Place the vehicle on firmly based stands and remove
the front and rear wheels.
2 Install Fiat fixtures A.66062 as shown in FIG 7:12 to
enable correct spring compression and wheel location
in the vertical position.
3 Lift the rear suspensions by compressing the coil
springs and shock absorbers using garage hydraulic
jacks. Screw on the fixture lower shank until the
index registers with the mark 'Nuova 500' stamped on
the bracket. In this position the wheel plane is vertical
and the centre O (see FIG 7 : 6) of wheel shaft results
at 5.00 inch from the buffer stop bracket.
4 Secure Fiat support C.696/3 to the wheel drum and
connect gauge C.696 to the support. Tighten the two
clamping screws as shown in FIG 7:12.
5 Apply at the front of Fiat gauge C.696 bracket
numbered C.696/3 as shown in FIG 7:11.
6 Check that the pin mounted on the front end of the
bracket C.696/3 is in touch with the front suspension
swinging arm pin (see FIG 7:11). If these conditions
are not complied with, proceed with item 7.
Wheel toe-in angle
will vary by 0° 10' under
a movement of some 7/32 inch measured at 72.476 inch
from wheel centre for Model 500D, and at 76.413 inch
from wheel centre for 500 Station Wagon NOTE - - that the toe-in angle
Key to Fig 7 : 9 A Front support B Screw holes for
fixing support to underbody C Swinging arm pin nuts
Page 80 of 128
CHAPTER 8
FRONT SUSPENSION AND HUBS
8:1
8:2
8:3
8:4
8:5
8:6Description
Front suspension removal and dismantling
Leaf spring
Swinging arms
Kingpin housing
Steering knuckle and wheel hub
8:1 Description
The independent front suspension assembly fitted to
the 'new 500' range comprises a transverse leaf spring
which is anchored to the body through two rubber
mountings and kingpins through 'estendblocks' as
shown in FIG 8:1. The leaf spring also acts as an anti-
roll bar which gives normal spring reaction even when the
front road wheels encounter a rough road surface.
Special polyethylene insulating strips are fitted
between the five springs leaves which are all clamped
together by t w o rubber cushioned clamps.
Upper movement of the kingpins in the swinging arm
is obtained by 'estendblocks'. The half arms are anchored
to the body as shown in FIG 8 : 3 and pivot on their pins
through rubber bushes. Double acting hydraulic shock
absorbers are fitted to the kingpin housings at the lower
end and anchored at the top to the vehicle body. Two
rubber buffers are secured to brackets mounted onto the
body to limit the spring oscillations. The spring centre
bolt is also fitted with a rubber pad.
8 : 2 Front suspension removal and
dismantling
To remove the front suspension assembly proceed as
follows:
F50087
1 Remove the hub caps and carefully slacken the road
wheel retaining bolts. Using a garage hydraulic jack
raise the front of the vehicle and place on firmly
based stands. Remove the road wheels.
2 Disconnect the steering linkages from the pitman arm,
the drag link and the steering knuckle arms.
3 Remove the shock absorber upper mounting nut from
the body, lift away the half rubber bush and push d o w n
the outer cylinder.
4 Blank off the brake fluid reservoir outlet by inserting
a suitable wooden peg through the reservoir filler
opening and disconnect the brake hydraulic lines at
the wheel cylinders.
5 Fit Fiat crossbeam Arr.2072 under the leaf spring
and support this, using a garage hydraulic jack.
6 Remove the self-locking nut securing the leaf spring
to the kingpin housing and ease o u t the spring
mounting bolt taking care not to damage the thread.
Also remove the nuts securing the swinging arm pin
to studs on the body and remove the swinging arm
assembly. Carefully lift out the adjusting shims and
spacers from the studs making a careful note of the
number of the shims and their locations.
7 Remove the nuts securing the leaf spring elastic
mounting to the body (see FIG 8 : 4) , and lower the 8:7
8:8
8:9
8:10
8:11Hydraulic damper
Front suspension assembly and
installation
Steering geometry
Modifications
Fault diagnosis
Page 86 of 128
8 : 7 Hydraulic damper:
Description:
The front and rear shock absorbers are of the telescopic
double acting type. Their dampening action takes place
directly on the suspension without the use of any
intermediate linkage. The shock absorber comprises a
cylindrical body formed by to coaxial tubes 14 and 15
(see FIG 8:11), the inner tube acting as the working
cylinder and the outer one as a casing. The fluid reservoir
being located between the two sections. A third outer
cylinder 13 shields the rod 2 from any road dirt.
On the top the cylinder body is enclosed by a bush 1 1 ,
oil seals 5 and 9 and a housing 4. The rod 2 slides through
the seals 5, the upper end is fixed into the vehicle body
floor and its lower end carries the piston 22 on which
rebound 26 and inlet valves 21 are arranged.
The bottom of the shock absorber is closed by a plug
35 with a threaded shank 36 for the shock absorber to be
mounted onto the suspension unit. The cylinder 15 and
carrier plug 32 is mounted with a compensation valve
30 and a compression valve 33. The piston is provided
with two rows of orifices. The internal row is blanked
underneath by the rebound valve which operates
downwards. The external row is blanked by the inlet
valve which opens upwards. Hydraulic shock absorbers
fitted since March 1959 are provided w i t h a vapour
pocket bleeder from the cylinder exterior. The bleeder
device comprises a capillary
hole 12 interconnecting the
inner cylinder 15 with the upper chamber 10 and also a
passage tube 16 from the upper chamber to the fluid
reservoir. Any vapour pockets in the pressure cylinder
are excluded past the capillary hole 12 into the chamber
10 from which they flow downwards during shock
absorber operation through the passage 16 in a light
fluid stream and up to the top of the reservoir with the
reservoir fluid.
Dismantling and inspection:
Normally during service if a shock absorber becomes
weak in operation then a new unit should be fitted.
Should however, it be necessary for the original unit to
be overhauled proceed as follows:
1 Thoroughly clean the outer casing in petrol and blow
dry using a compressed air jet.
2 Firmly clamp the lower shank of the shock absorber
in a vice and telescope upwards the outer casing and
using Fiat wrench A.56024 unscrew the upper
threaded ring 3 (see FIG 8:11).
3 Remove the shock absorber from the vice and carefully
remove the inner cylinder 15 using a screwdriver
inserted in the cylinder bottom chamfer and remove
the lower plug 32 which carries the compression and
compensation valves.
4 Push the rod i n t o the cylinder 15 and clamp the upper
shank in a vice. Unscrew the plug 29, and carefully
remove the piston 22 together with the inlet and
rebound valves. Withdraw the rod 2 from the cylinder
15 and remove the seal gasket, the housing, and
threaded ring. Thoroughly wash all parts in petrol and
carefully blow dry using a c
ompressed air jet. The
following parts should be inspected as follows.
Check that the inlet, rebound and compensation valve
discs are not deformed or show signs of cracking.
F50093 Inspect the surfaces of the piston, the seal ring and the
compression valve to ensure that they are smooth and
hydraulic fluid tight. Check that the rebound and
compression valve springs and upper seal gasket
springs are not broken or weak. Carefully inspect the
t w o seal gaskets for damage or wear and it is recom-
mended that they are renewed upon reassembly.
Check that the rod and the cylinders show no sign of
deformation and that the air pocket evacuating
passage is not blocked. Also check that the capillary
hole 12 is not blocked. Any parts which show signs
of wear or damage must be renewed.
Reassembly:
Reassembly of the shock absorber is the reverse
procedure to dismantling. Special care must be taken
when refilling the shock absorber w i t h Fiat SA1 oil
otherwise its operating characteristics will be altered.
The hydraulic fluid capacity for the front shock
absorbers is .112 imperial quarts.
The hydraulic capacity for the rear shock absorbers is
.088 imperial quarts. Only Fiat—SA1 oil must be
used.
To insert the components into the shock absorber
body proceed as follows:
1 Mount the piston on the rod, and insert the piston and
rod assembly into the cylinder 15 (see FIG 8:11).
2 Push the piston against the bush 11 and then very
carefully pour the correct amount of hydraulic fluid
up to about j inch from the edge.
3 Press f i t t h e plug 32 and pour the remaining fluid into
the casing 14.
4 Insert the cylinder 15 into the casing 14 and tighten
the upper threaded ring 3.
8 :8 Front suspension assembly and installation
1 Attach Fiat fixture A.66061 to the springs as shown
in FIG 8:12 and load it using the centre screw on the
fixture until the index 'Nuova 500' appears below
the crossbeam lower edge. It is in this position the
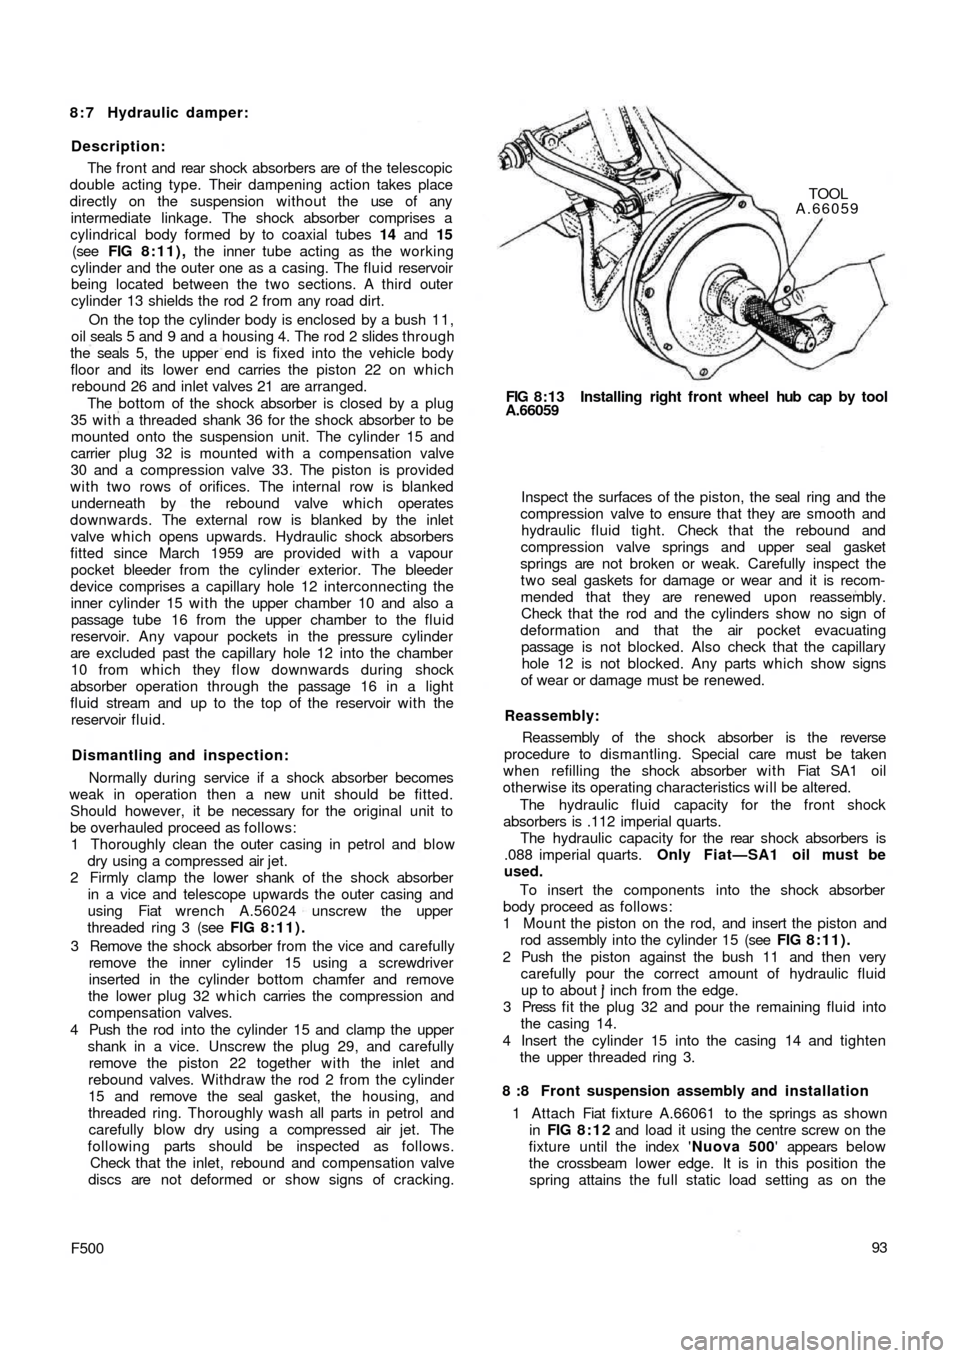
spring attains the full static load setting as on the FIG 8:13 Installing right front wheel hub cap by tool
A.66059TOOL
A.66059
Page 97 of 128
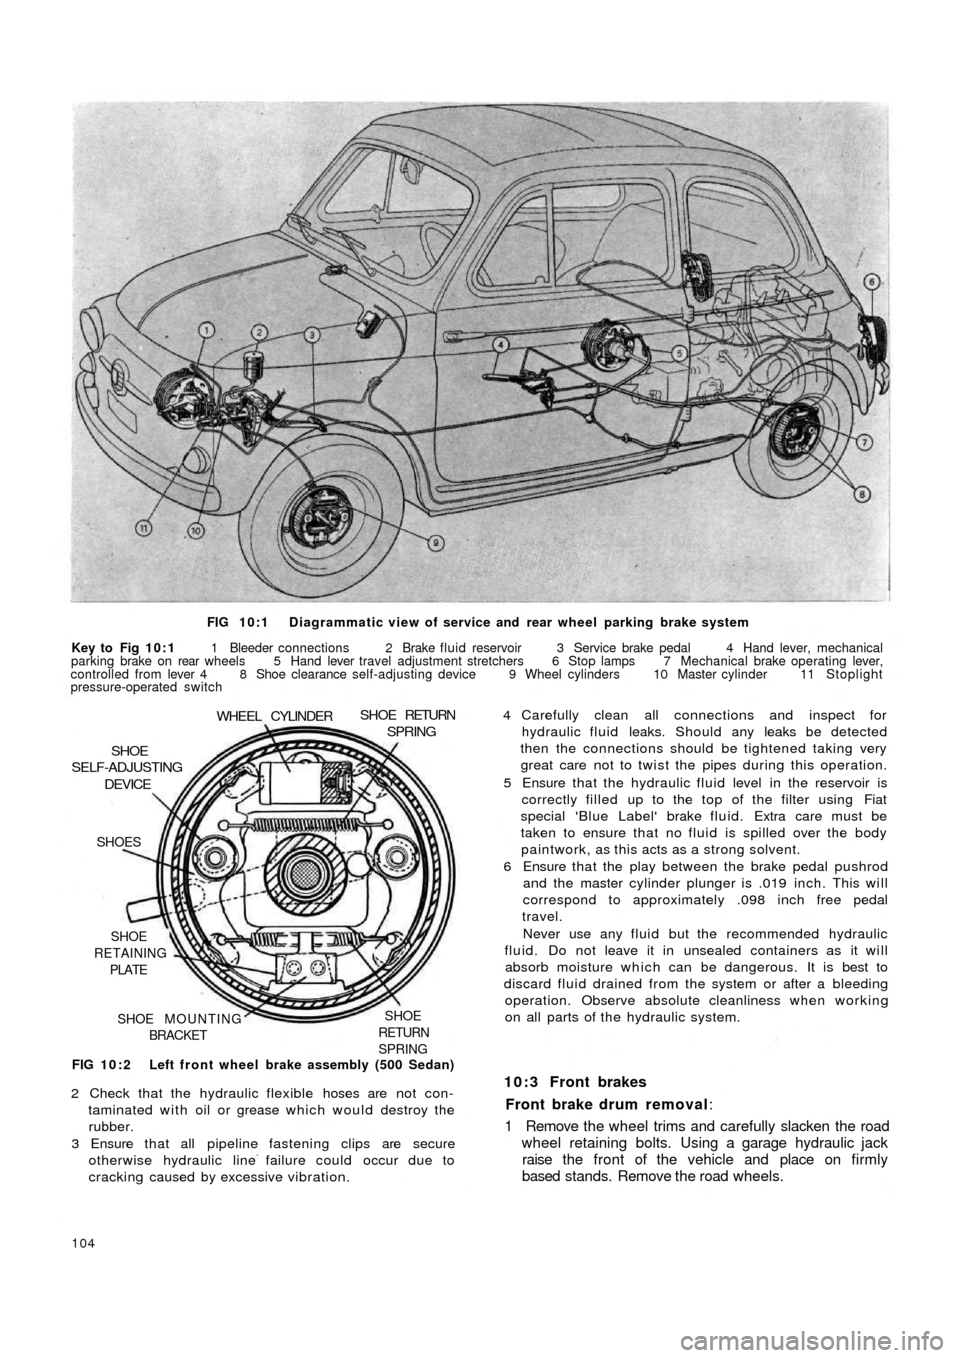
FIG 10:1 Diagrammatic view of service and rear wheel parking brake system
Key to Fig 10:1 1 Bleeder connections 2 Brake fluid reservoir 3 Service brake pedal 4 Hand lever, mechanical
parking brake on rear wheels 5 Hand lever travel adjustment stretchers 6 Stop lamps 7 Mechanical brake operating lever,
controlled from lever 4 8 Shoe clearance self-adjusting device 9 Wheel cylinders 10 Master cylinder 11 Stoplight
pressure-operated switch
FIG 10:2 Left front wheel brake assembly (500 Sedan)
SHOE
RETURN
SPRINGSHOE MOUNTING
BRACKET SHOE
RETAINING
PLATE SHOES
DEVICESHOE
SELF-ADJUSTING
WHEEL CYLINDERSHOE RETURNSPRING
2 Check that the hydraulic flexible hoses are not con-
taminated with oil or grease which would destroy the
rubber.
3 Ensure that all pipeline fastening clips are secure
otherwise hydraulic line failure could occur due to
cracking caused by excessive vibration.
104
4 Carefully clean all connections and inspect for
hydraulic fluid leaks. Should any leaks be detected
then the connections should be tightened taking very
great care not to twist the pipes during this operation.
5 Ensure that the hydraulic fluid level in the reservoir is
correctly filled up to the top of the filter using Fiat
special 'Blue Label' brake fluid. Extra care must be
taken to ensure that no fluid is spilled over the body
paintwork, as this acts as a strong solvent.
6 Ensure that the play between the brake pedal pushrod
and the master cylinder plunger is .019 inch. This will
correspond to approximately .098 inch free pedal
travel.
Never use any fluid but the recommended hydraulic
fluid. Do not leave it in unsealed containers as it will
absorb moisture which can be dangerous. It is best to
discard fluid drained from the system or after a bleeding
operation. Observe absolute cleanliness when working
on all parts of the hydraulic system.
10:3 Front brakes
Front brake drum removal:
1 Remove the wheel trims and carefully slacken the road
wheel retaining bolts. Using a garage hydraulic jack
raise the front of the vehicle and place on firmly
based stands. Remove the road wheels.
Page 99 of 128
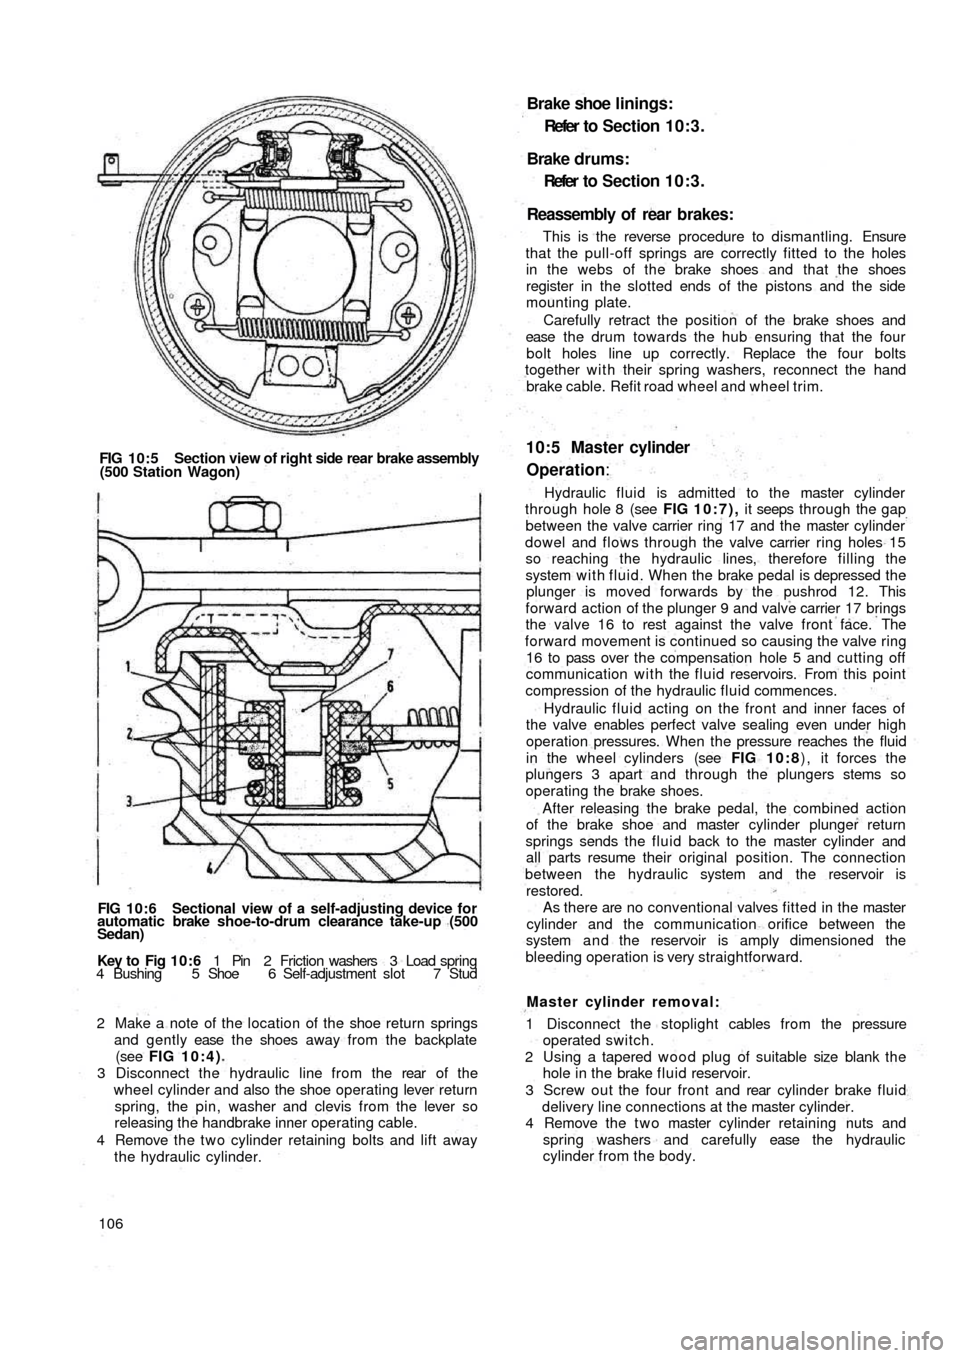
FIG 10:5 Section view of right side rear brake assembly
(500 Station Wagon)
FIG 10:6 Sectional view of a self-adjusting device for
automatic brake shoe-to-drum clearance take-up (500
Sedan)
Key to Fig 1 0 : 6 1 Pin 2 Friction washers 3 Load spring
4 Bushing 5 Shoe 6 Self-adjustment slot 7 Stud
2 Make a note of the location of the shoe return springs
and gently ease t h e shoes away from the backplate
(see FIG 10:4)
3 Disconnect the hydraulic line from the rear of t h e
wheel cylinder and also the shoe operating lever return
spring, the pin, washer and clevis from the lever so
releasing the handbrake inner operating cable.
4 Remove the t w o cylinder retaining bolts and lift away
the hydraulic cylinder.
106
Brake shoe linings:
Refer t o Section 10:3.
Brake drums:
Refer to Section 10:3.
Reassembly of rear brakes:
This is the reverse procedure to dismantling. Ensure
that the pull-off springs are correctly fitted to the holes
in the webs of the brake shoes and that the shoes
register in the slotted ends of the pistons and the side
mounting plate.
Carefully retract the position of the brake shoes and
ease t h e d r u m towards the hub ensuring that the four
bolt holes line up correctly. Replace the four bolts
together with their spring washers, reconnect the hand
brake cable. Refit road wheel and wheel trim.
10:5 Master cylinder
Operation:
Hydraulic fluid is admitted to the master cylinder
through hole 8 (see FIG 10:7), it seeps through the gap
between the valve carrier ring 17 and the master cylinder
dowel and flows through the valve carrier ring holes 15
so reaching the hydraulic lines, therefore filling the
system w i t h fluid. When the brake pedal is depressed the
plunger is moved forwards by the pushrod 12. This
forward action of the plunger 9 and valve carrier 17 brings
the valve 16 to rest against the valve front face. The
forward movement is continued so causing the valve ring
16 to pass over the compensation hole 5 and cutting off
communication with the fluid reservoirs. From this point
compression of the hydraulic fluid commences.
Hydraulic fluid acting on the front and inner faces of
the valve enables perfect valve sealing even under high
operation pressures. When the pressure reaches the fluid
in the wheel cylinders (see FIG 10:8) , it forces the
plungers 3 apart and through the plungers stems so
operating the brake shoes.
After releasing the brake pedal, the combined action
of the brake shoe and master cylinder plunger return
springs sends the fluid back to the master cylinder and
all parts resume their original position. The connection
between the hydraulic
system and the reservoir is
restored.
As there are no conventional valves fitted in the master
cylinder and the communication orifice between the
system a n d the reservoir is amply dimensioned the
bleeding operation is very straightforward.
Master cylinder removal:
1 Disconnect the stoplight cables from the pressure
operated switch.
2 Using a tapered w o o d plug of suitable size blank t h e
hole in the brake f l u i d reservoir.
3 Screw out the four front and rear cylinder brake fluid
delivery line connections at the master cylinder.
4 Remove the t w o master cylinder retaining nuts and
spring washers and carefully ease the hydraulic
cylinder from the body.
Page 100 of 128
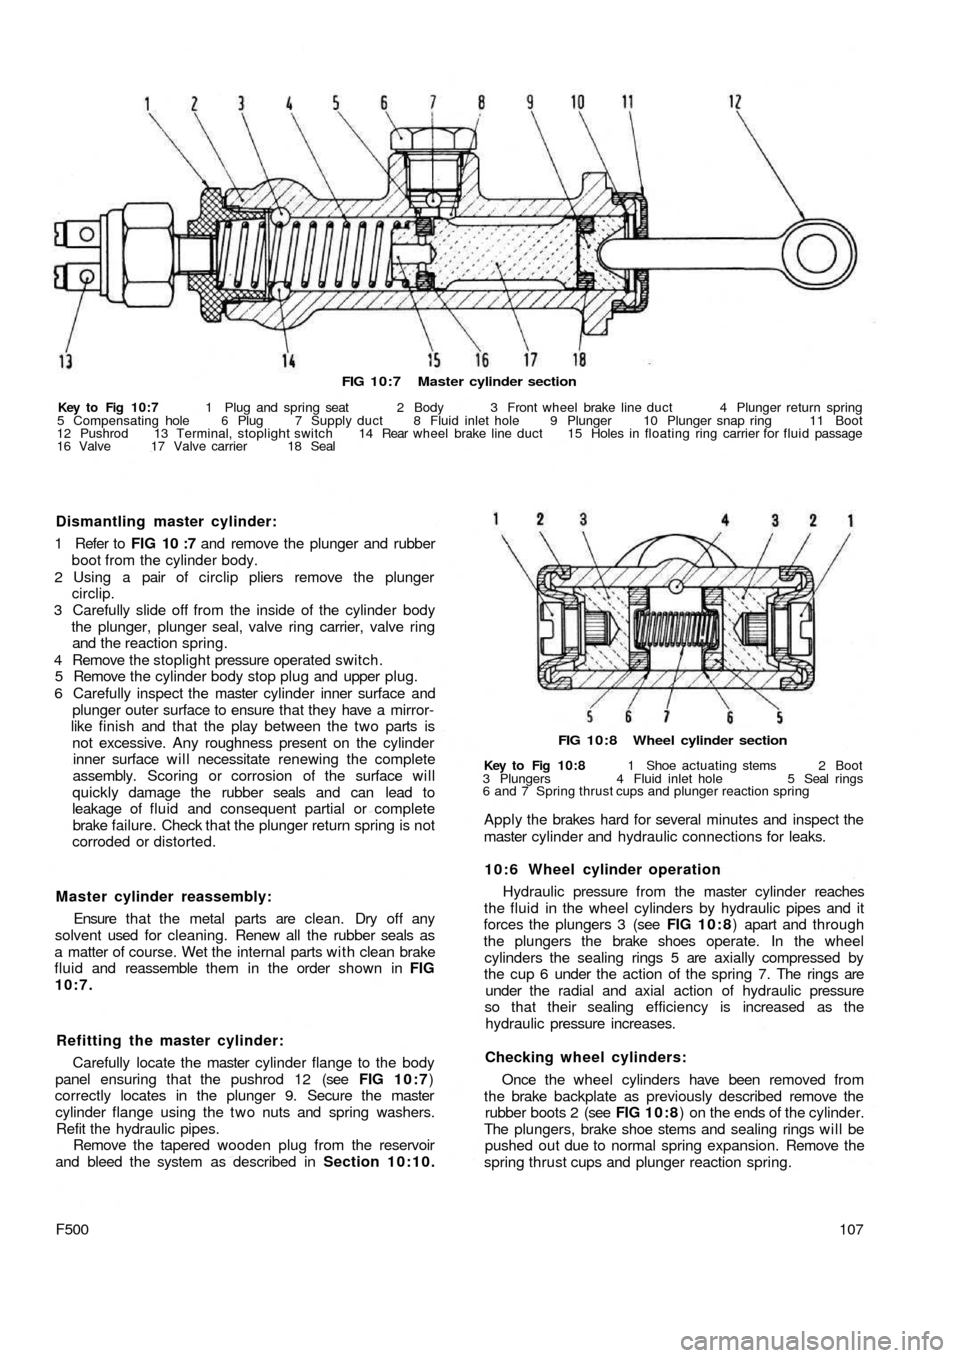
FIG 10:7 Master cylinder section
Key to Fig 10:7 1 Plug and spring seat 2 Body 3 Front wheel brake line duct 4 Plunger return spring
5 Compensating hole 6 Plug 7 Supply duct 8 Fluid inlet hole 9 Plunger 10 Plunger snap ring 11 Boot
12 Pushrod 13 Terminal, stoplight switch 14 Rear wheel brake line duct 15 Holes in floating ring carrier for fluid passage
16 Valve 17 Valve carrier 18 Seal
FIG 10:8 Wheel cylinder section
Key to Fig 10:8 1 Shoe actuating stems 2 Boot
3 Plungers 4 Fluid inlet hole 5 Seal rings
6 and 7 Spring thrust cups and plunger reaction spring
Apply the brakes hard for several minutes and inspect the
master cylinder and hydraulic connections for leaks.
10:6 Wheel cylinder operation
Hydraulic pressure from the master cylinder reaches
the fluid in the wheel cylinders by hydraulic pipes and it
forces the plungers 3 (see FIG 1 0 : 8) apart and through
the plungers the brake shoes operate. In the wheel
cylinders the sealing rings 5 are axially compressed by
the cup 6 under the action of the spring 7. The rings are
under the radial and axial action of hydraulic pressure
so that their sealing efficiency is increased as the
hydraulic pressure increases.
Checking wheel cylinders:
Once the wheel cylinders have been removed from
the brake backplate as previously described remove the
rubber boots 2 (see FIG 10:8) on the ends of the cylinder.
The plungers, brake shoe stems and sealing rings will be
pushed out due to normal spring expansion. Remove the
spring thrust cups and plunger reaction spring.
107F500
Master cylinder reassembly:
Ensure that the metal parts are clean. Dry off any
solvent used for cleaning. Renew all the rubber seals as
a matter of course. Wet the internal parts w i t h clean brake
fluid and reassemble them in the order shown in FIG
10:7.
Refitting the master cylinder:
Carefully locate the master cylinder flange to the body
panel ensuring that the pushrod 12 (see FIG 10:7)
correctly locates in the plunger 9. Secure the master
cylinder flange using the t w o nuts and spring washers.
Refit the hydraulic pipes.
Remove the tapered wooden plug from the reservoir
and bleed the system as described in Section 10:10. Dismantling master cylinder:
1 Refer to FIG 10 :7 and remove the plunger and rubber
boot from the cylinder body.
2 Using a pair of circlip pliers remove the plunger
circlip.
3 Carefully slide off from the inside of the cylinder body
the plunger, plunger seal, valve ring carrier, valve ring
and the reaction spring.
4 Remove the stoplight pressure operated switch.
5 Remove the cylinder body stop plug and upper plug.
6 Carefully inspect the master cylinder inner surface and
plunger outer surface to ensure that they have a mirror-
like finish and that the play between the two parts is
not excessive. Any roughness present on the cylinder
inner surface will necessitate renewing the complete
assembly. Scoring or corrosion of the surface will
quickly damage the rubber seals and can lead to
leakage of fluid and consequent partial or complete
brake failure. Check that the plunger return spring is not
corroded or distorted.
Page 102 of 128
10:9 Brake fluid reservoir
The reservoir is located in the front compartment to the
side of the fuel tank as shown in FIG 10:9. Should it be
necessary to detach the fluid outlet line from the reservoir
the outlet hole must be blanked off using a tapered
wooden peg of suitable length so that the cap may be
replaced to prevent the ingress of foreign matter into
the reservoir and the absorbtion of moisture, oil or petrol
vapours which would alter the properties of the hydraulic
fluid.
A special filter is fitted into the top of the reservoir
through which all fluid used for topping-up the reservoir
must pass to ensure utmost inner cleanliness of the
hydraulic system.
10:10 Bleeding the system
This is not a routine maintenance operation and is only
necessary if air has entered the hydraulic system because
parts have been dismantled or because the f l u i d level in
the reservoir has dropped so low that air has been drawn
into the main feed pipe to the master cylinders.
1 Fill the reservoir w i t h Fiat 'Blue Label' hydraulic fluid.
During the bleeding operation fluid will be used and
constant topping-up of the supply reservoir will be
needed. If this is not done it is possible for air to enter
the master cylinder main feed pipe which will nullify
the operation and necessitate a fresh start.
2 Attach a length of rubber or plastic tubing to the
bleeder screw on the rear wheel cylinder furthermost
from the master cylinder. Immerse the free end of the
tube in a small volume of hydraulic brake fluid in a
clean jar.
3 Open the bleed screw one turn and get a second
operator to press down slowly on the brake pedal. After
a full stroke let the pedal return without assistance,
pause a moment and repeat the d o w n stroke. At first
there will be air bubbles issuing from the bleed tube,
but when fluid alone is ejected, hold the pedal firmly
down on the floor panel and tighten the bleed screw.
Repeat this operation on the other rear brake and then
repeat the operation on the two front brakes.
4 On completion, top-up the fluid in the reservoir to the
correct level. Discard all dirty fluid. If fluid is perfectly
clean, let it stand for twenty four hours to become
clear of air bubbles before using it again.
10:11 Hand parking brake
Normally with the new 500 Sedan model automatic
brake adjusting device, adjustment of the rear brakes
will take up excessive handbrake travel.
If there is excessive travel on the handbrake of the
Sedan model at any time, or in the case of Station Wagon
model even after the rear brakes have been manually
adjusted, suspect worn brake shoe linings or stretched
handbrake cables. Examine the linings and fit replace-
ment shoes if necessary. Check the action of the hand
parking brake again and if there is still too much travel
before the brakes are applied it is permissible to take up as
follows:
1 It is essential to ensure that the rear shoes are correctly
adjusted as described in Section 10:2.
2 Apply the hand parking brake lever until the pawl
engages with the ratchet at the second notch.
F500
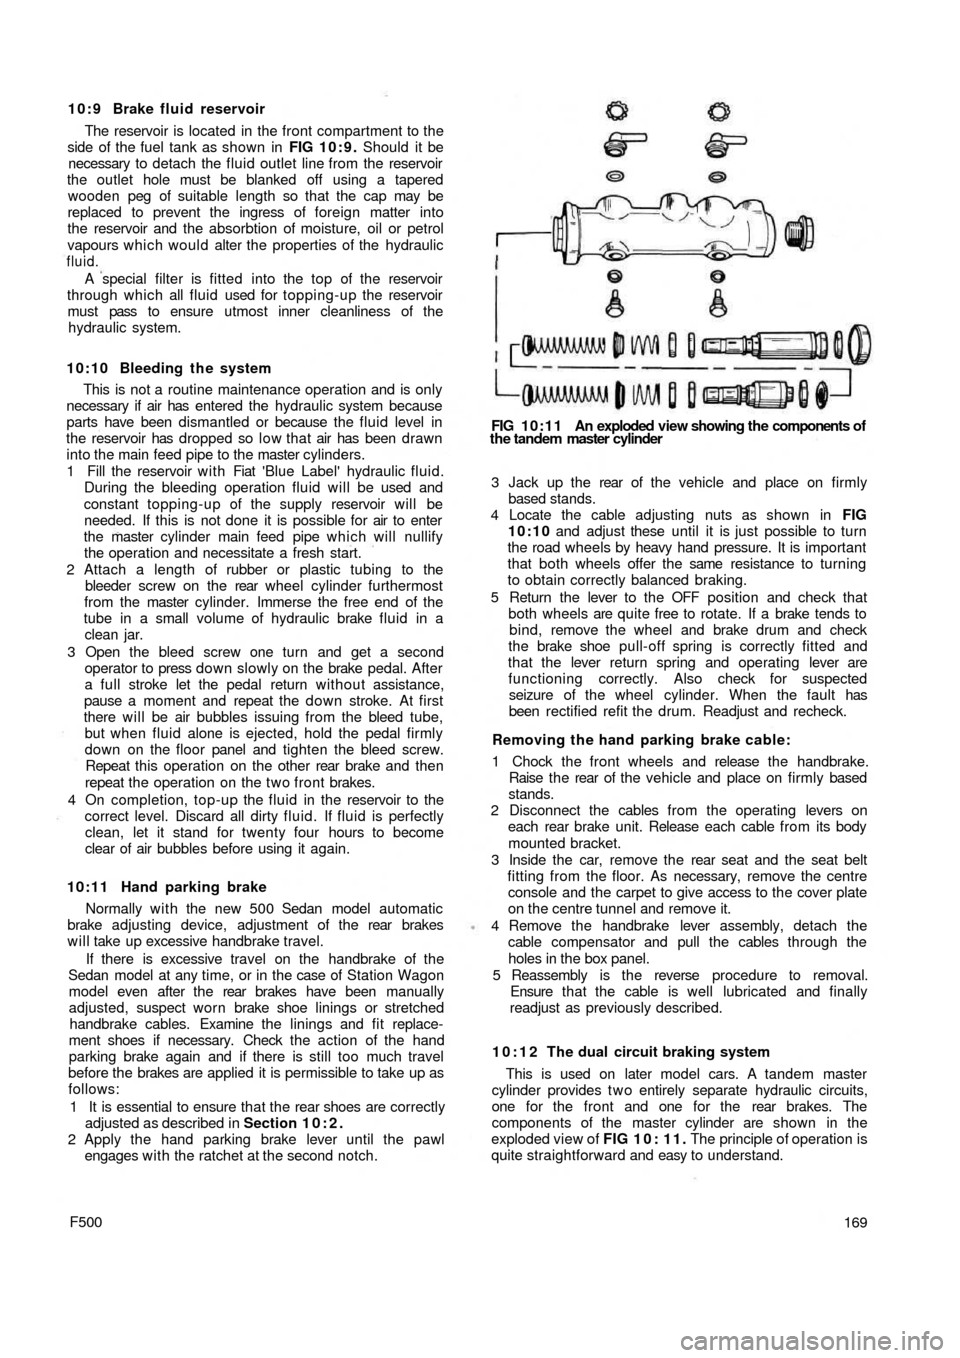
FIG 10:11 An exploded view showing the components of
the tandem master cylinder
3 Jack up the rear of t h e vehicle and place on firmly
based stands.
4 Locate the cable adjusting nuts as shown in FIG
10:10 and adjust these until it is just possible to turn
the road wheels by heavy hand pressure. It is important
that both wheels offer the same resistance to turning
to obtain correctly balanced braking.
5 Return the lever to the OFF position and check that
both wheels are quite free to rotate. If a brake tends to
bind, remove the wheel and brake drum and check
the brake shoe pull-off spring is correctly fitted and
that the lever return spring and operating lever are
functioning correctly. Also check for suspected
seizure of the wheel cylinder. When the fault has
been rectified refit the drum. Readjust and recheck.
Removing the hand parking brake cable:
1 Chock the front wheels and release the handbrake.
Raise t h e rear of the vehicle and place on firmly based
stands.
2 Disconnect the cables from the operating levers on
each rear brake unit. Release each cable from its body
mounted bracket.
3 Inside the car, remove the rear seat and the seat belt
fitting from the floor. As necessary, remove the centre
console and the carpet to give access to the cover plate
on the centre tunnel and remove it.
4 Remove the handbrake lever assembly, detach the
cable compensator and pull the cables through the
holes in the box panel.
5 Reassembly is the reverse procedure to removal.
Ensure t h a t the cable is well lubricated and finally
readjust as previously described.
10:12 The dual circuit braking system
This is used on later model cars. A tandem master
cylinder provides t w o entirely separate hydraulic circuits,
one for the front and one for the rear brakes. The
components of the master cylinder are shown in the
exploded view of FIG 1 0 : 1 1 . The principle of operation is
quite straightforward and easy to understand.
169
Page 104 of 128
CHAPTER 11
THE ELECTRICAL EQUIPMENT
11:1 Description
11:2 Battery
11:3 The generator
11:4 The starter
11:5 The control box
1 1 : 6 Fuses
1 1 : 7 Flasher unit
11:1 Description
All models covered by this manual have 12 volts
electrical systems in which the negative battery terminal
is earthed. There are three units in the regulator box to
control the charging circuit; a cut-out, a current regulator
and a voltage regulator. These are adjustable but it must
be stressed that accurate moving coil meters are required
when checking or altering the settings. Cheap and
unreliable instruments will make accurate adjustments
impossible.
There are wiring diagrams in Technical Data at the end
of this manual to enable those with electrical experience
to trace and correct wiring faults.
For t h e U.K. Market the headlamps are of the double
filament dipping renewable bulb type with adjustments
for individual beam settings.
The battery is located in the front compartment
forward of the petrol tank and the fuses to the rear o f the
petrol tank.
Detailed instructions for servicing the electrical equip-
ment will be found in this chapter, but it must be pointed
out that it is not sensible to try to repair that which is
seriously defective, electrically or mechanically. Such
equipment should be replaced by new units which can
be obtained on an exchange basis.
F500111
11 :8 Windscreen wipers
1 1 : 9 The lighting system
11:10 Panel and warning lights
11:11 The horn
11:12 Lighting and flasher switch
1 1 : 1 3 Fault diagnosis
11.2 The battery
This of the 12-volt lead/acid type and has to meet
heavy demands for current particularly in the winter. To
maintain the performance of the battery at its maximum
it is essential to carry out the following operations.
Keep the top of the battery and surrounding parts dry
and clean, as dampness can cause leakage between the
securing clamps and the battery terminals. Clean off any
corrosion from the metal parts of the battery mounting
with diluted ammonia and paint them with an anti-
sulphuric paint. If the terminal posts are corroded,
remove the cables and clean w i t h diluted ammonia.
Smear the posts w i t h petroleum jelly before remaking the
connections and fit the terminals securely. High electrical
resistance due to corrosion at the terminal posts is often
responsible for lack of sufficient current to operate the
starter motor.
Ensure t h a t the filler plugs are in good condition and
show no signs of cracks. This may cause leakage of
electrolyte and consequent corrosion. Test the condition
of the cells after topping-up the electrolyte level with
distilled water to just above the tops of the separators as
shown in FIG 11 :2 . Never add neat acid. If it is
necessary to make a new electrolyte due to loss by
spillage add sulphuric acid to the
distilled water.
It is highly dangerous to add water to acid.
Page 107 of 128
1
791011 8 234
11
10
16,15
14 13
1265
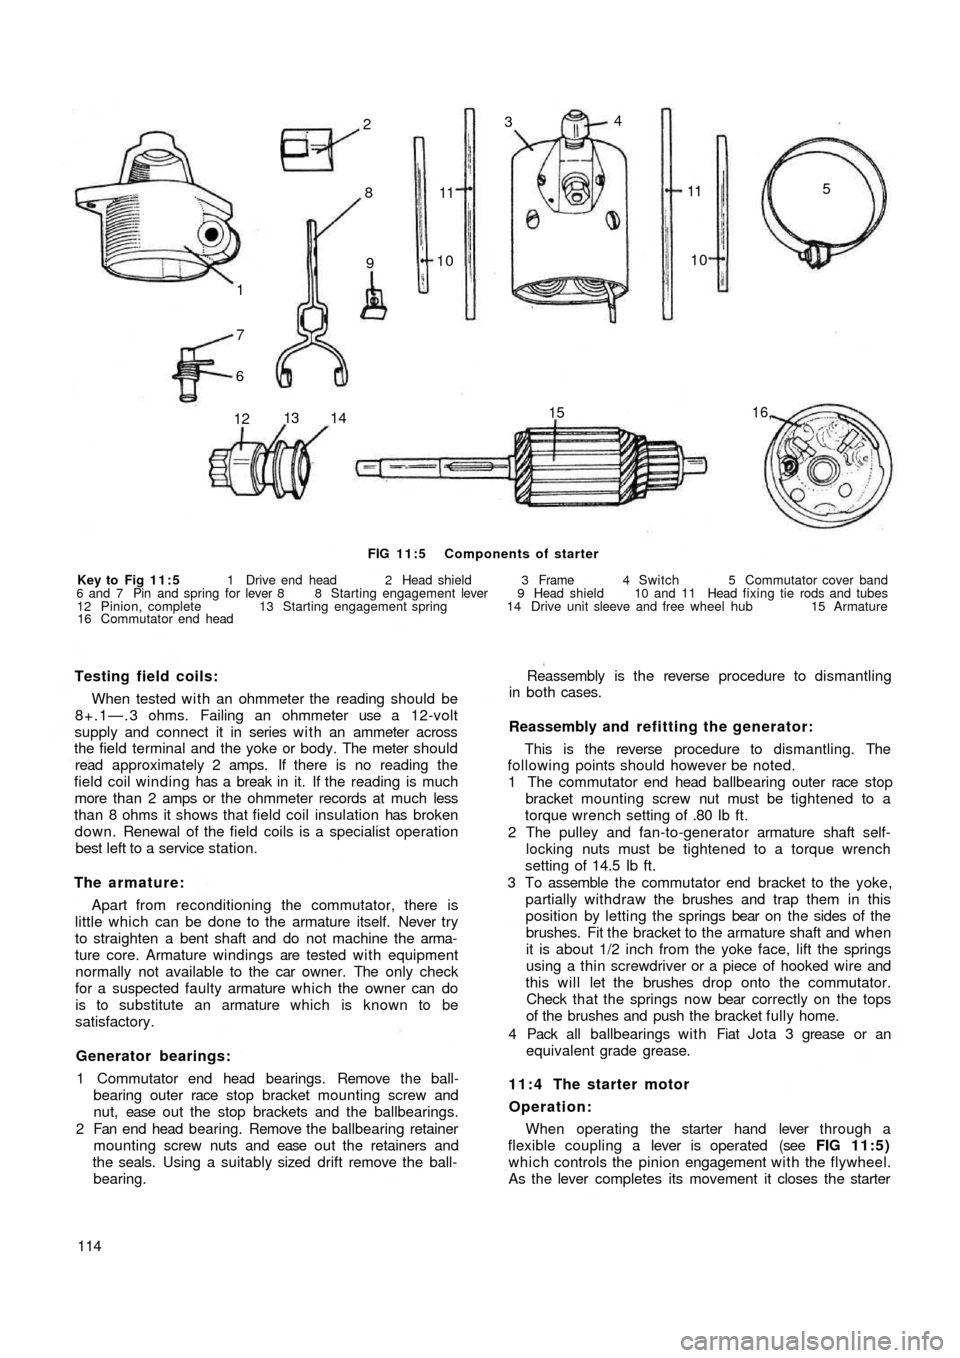
FIG 11:5 Components of starter
Key to Fig 11:5 1 Drive end head 2 Head shield 3 Frame 4 Switch 5 Commutator cover band
6 and 7 Pin and spring for lever 8 8 Starting engagement lever 9 Head shield 10 and 11 Head fixing tie rods and tubes
12 Pinion, complete 13 Starting engagement spring 14 Drive unit sleeve and free wheel hub 15 Armature
16 Commutator end head
Testing field coils:
When tested w i t h an ohmmeter the reading should be
8+.1—.3 ohms. Failing an ohmmeter use a 12-volt
supply and connect it in series w i t h an ammeter across
the field terminal and the yoke or body. The meter should
read approximately 2 amps. If there is no reading the
field coil winding has a break in it. If the reading is much
more than 2 amps or the ohmmeter records at much less
than 8 ohms it shows that field coil insulation has broken
down. Renewal of the field coils is a specialist operation
best left to a service station.
The armature:
Apart from reconditioning the commutator, there is
little which can be done to the armature itself. Never try
to straighten a bent shaft and do not machine the arma-
ture core. Armature windings are tested w i t h equipment
normally not available to the car owner. The only check
for a suspected faulty armature which the owner can do
is to substitute an armature which is known to be
satisfactory.
Generator bearings:
1 Commutator end head bearings. Remove the ball-
bearing outer race stop bracket mounting screw and
nut, ease o u t t h e stop brackets and the ballbearings.
2 Fan end head bearing. Remove the ballbearing retainer
mounting screw nuts and ease o u t t h e retainers and
the seals. Using a suitably sized drift remove the ball-
bearing.
114Reassembly is the reverse procedure to dismantling
in both cases.
Reassembly and refitting the generator:
This is the reverse procedure to dismantling. The
following points should however be noted.
1 The commutator end head ballbearing outer race stop
bracket mounting screw nut must be tightened to a
torque wrench setting of .80 Ib ft.
2 The pulley and fan-to-generator armature shaft self-
locking nuts must be tightened to a torque wrench
setting of 14.5 Ib ft.
3 To assemble the commutator end bracket to the yoke,
partially withdraw the brushes and trap them in this
position by letting the springs bear on the sides of the
brushes. Fit the bracket to the armature shaft and when
it is about 1/2 inch from the yoke face, lift the springs
using a thin screwdriver or a piece of hooked wire and
this will let the brushes drop onto the commutator.
Check that the springs now bear correctly on the tops
of the brushes and push the bracket fully home.
4 Pack all ballbearings with Fiat Jota 3 grease or an
equivalent grade grease.
11:4 The starter motor
Operation:
When operating the starter hand lever through a
flexible coupling a lever is operated (see FIG 11:5)
which controls the pinion engagement with the flywheel.
As the lever completes its movement it closes the starter