air FIAT 500E 2016 2.G Owner's Manual
[x] Cancel search | Manufacturer: FIAT, Model Year: 2016, Model line: 500E, Model: FIAT 500E 2016 2.GPages: 132, PDF Size: 4.59 MB
Page 75 of 132
Voice Command Tips
•Speaking complete names (i.e.Call John Doe vs.Call John) will result in greater system
accuracy.
•You can “link” commands together for faster results.Say “Call John Doe, mobile,” for
example.
•If you are listening to available voice command options, you do not have to listen to
the entire list.When you hear the command that you need, push the
button
on the steering wheel, wait for the beep and say your command.
Changing The Volume
•Start a dialogue by pushing the Phone button, then say a command for example
- "Help".
•Use the radio VOLUME/MUTE rotary knob to adjust the volume to a comfortable
level while the Uconnect system is speaking.
NOTE:
The volume setting for Uconnect is different than the audio system.
NOTE:
To access help, push the Uconnect Phone button
on the steering wheel and say
"help." Push the Uconnect Phone Pickup button
or the VR buttonand say "can-
cel" or push the Uconnect phone Hangup button
to cancel the help session.
Incoming Text Messages
After pairing your Uconnect system with a Bluetooth enabled mobile device with the
Message Access Profile (MAP), the Uconnect system can announce a new incoming text
message and read it to you over the vehicle’s audio system.
NOTE:
Only incoming text messages received during the current ignition cycle can be viewed/
read.
To enable incoming text messaging:
iPhone
1.Press the settings button on the mobile phone.
2.Select Bluetooth.
•Ensure Bluetooth is enabled, and the mobile phone is paired to the Uconnect system.
3.Select
located under DEVICES next to Uconnect.
ELECTRONICS
73
Page 77 of 132
Voice Text Reply (Not Compatible With iPhone)
NOTE:
Voice texting reply and voice texting features require a compatible mobile device enabled
with Bluetooth Message Access Profile (MAP).iPhone, and some other smartphones, may
not entirely support Bluetooth MAP.Visit UconnectPhone.com for the latest system and
device compatibility.
•Due to the extremely large number of mobile phone manufacturers, your mobile de-
vice may not be listed.For further assistance, contact Uconnect Customer Care @
1-877-855-8400 for U.S.residents or, 1-800-465-2001 (English) / 1-800-387-9983
(French) for Canadian residents.
Once your Uconnect system is paired with a compatible mobile device, the system can
announce a new incoming text message, and read it to your over the vehicle audio sys-
tem.You can reply to the message using Voice Recognition by selecting, or saying, one of
the 18 pre-defined messages.
Here’s How:
1.Push the Uconnect Phone button
and wait for the beep, then say “reply.”
Uconnect will give the following prompt: “Please say the message you would like to
send.”
2.Wait for the beep and say one of the pre-defined messages.(If you are not sure, you
can say “help”).Uconnect will then read the pre-defined messages allowed.
3.As soon as you hear the message you would like to send, you can interrupt the list of
prompts by pushing the Uconnect phone button and saying the phrase.Uconnect will
confirm the message by reading it back to you.
4.Push the Phone button and say “Send.”
PRE-DEFINED VOICE TEXT REPLY RESPONSES
Ye s.Stuck in Traffic.See you later.
No.Start without me.I’ll be Late.
Okay.Where are you?
I will be <5, 10, 15,...etc.>
minutes late.
Call me.Are you there yet?
I’ll call you later.I need directions.
See you in <5, 10, 15,...etc.>
of minutes.
I’m on my way.
Can’t talk right now.
I’m lost.Thanks.
NOTE:
To make the SMS voice reading function available, the SMS notification option on phone
must be enabled; this option is usually available on the phone, in the Bluetooth connec-
tions menu for a device registered as Uconnect.After enabling this function on the mo-
bile phone, it must be disconnected and reconnected with the Uconnect system in order
to make it effective.
ELECTRONICS
75
Page 78 of 132
Helpful Tips And Common Questions To Improve Bluetooth Performance
With Your Uconnect System
Mobile Phone won’t reconnect to system after pairing:
•Set mobile phone to auto-connect or trusted device in mobile phone Bluetooth set-
tings (Blackberry devices).
•Perform a factory reset on your mobile phone.Refer to your mobile phone manufac-
turer or cellular provider for instructions.
•Many mobile phones do not automatically reconnect after being restarted (hard re-
boot).Your mobile phone can still be connected manually.Close all applications that
may be operating (refer to mobile phone manufacturer’s instructions), and follow “Pair-
ing (Wirelessly Connecting) Your Mobile Phone To The Uconnect System”.
Mobile Phone won’t pair to system:
•Perform a hard reset in the mobile phone by removing the battery (if removable —
see your mobile phone’s owner manual).
•Delete pairing history in mobile phone and Uconnect system; usually found in phone’s
Bluetooth connection settings.
•Verify you are selecting “Uconnect” in the discovered Bluetooth devices on your mo-
bile phone.
•If your vehicle system generates a pin code the default is 0000.
Mobile Phonebook didn’t download:
•Check “Do not ask again,” then accept the “phonebook download” request on your
mobile phone.
•Up to 2,000 contact names with six numbers per contact will transfer to the
Uconnect 5.0/5.0N system phonebook.
Text messaging won’t work:
•Check “Do not ask again,” then accept the “connect to your messages” request on
your mobile phone.
•Verify that your mobile phone has the Bluetooth feature (Message Access Profile).
Can’t make a conference call:
•CDMA (Code-Division Multiple Access) carriers do not support conference calling.
Refer to your mobile phone user’s manual for further information.
Making calls while connected to AUX:
•Plugging in your mobile phone to AUX while connected to Bluetooth will disable
Hands-Free Calling.Do not make calls while your mobile phone is plugged into the
AUX jack.
ELECTRONICS
76
Page 86 of 132
– 12 Volt Charging System Light
This light shows the status of the 12 Volt electrical charging system.If the charging system
light remains on, it means that the vehicle is experiencing a problem with the charging
system.
It is recommended that you do not continue driving if the charging system light is on.
Have the vehicle serviced immediately.
– Anti-Lock Brake (ABS) Light
This light monitors the Anti-Lock Brake System (ABS).
If the light is not on during startup, stays on, or turns on while driving we recommend
you contact the nearest authorized dealer and have the vehicle serviced immediately.
– Air Bag Warning Light
If the light is not on during startup, stays on, or turns on while driving have the vehicle
serviced by an authorized dealer immediately.
– Seat Belt Reminder Light
When the ignition switch is first turned to the ON/RUN position, this light will turn on
for four to eight seconds as a bulb check.During the bulb check, if the driver's seat belt
is unbuckled, a chime will sound.After the bulb check or when driving, if the driver or
front passenger seat belt remains unbuckled, the Seat Belt Indicator Light will flash or
remain on continuously.Refer to “Seat Belt Systems” in “Things To Know Before Starting”
in your Owner’s Manual on the DVD for further information.
– Power Steering System Warning
This light is used to manage the electrical warning of the EPS (Electric Power Steering
System).When the ignition is turned to the ON/RUN position, the warning light will illu-
minate momentarily.If the warning light stays on, cycle the ignition to the OFF position
and back to ON/RUN.If the warning light stays on, contact your authorized dealer.
If the warning light switches on while driving, you may not have steering assistance.Al-
though it will still be possible to steer the car, the effort needed to operate the steering
wheel could be increased: contact an authorized dealer as soon as possible.
– Service Propulsion System Warning Light
The Service Propulsion System Warning Light will illuminate if there is a malfunction de-
tected with the Propulsion System.If the light comes on or remains on while driving, see
your authorized dealer.
WHAT TO DO IN EMERGENCIES
84
Page 87 of 132
– Brake Warning Light
This light monitors various brake functions, including brake fluid level and parking brake
application.If the brake light turns on, it may indicate that the parking brake is applied,
that the brake fluid level is low, or that there is a problem with the brake system master
cylinder reservoir.
If the light remains on when the parking brake has been disengaged, and the fluid level is
at the full mark on the master cylinder reservoir, it indicates a possible brake hydraulic
system malfunction or that a problem with the Brake Booster has been detected by the
Anti-Lock Brake System (ABS)/Electronic Stability Control (ESC) system.In this case, the
light will remain on until the condition has been corrected.If the problem is related to
the brake booster, the ABS pump will run when applying the brake, and a brake pedal
pulsation may be felt during each stop.
The dual brake system provides a reserve braking capacity in the event of a failure to a
portion of the hydraulic system.A leak in either half of the dual brake system is indicated
by the Brake Warning Light, which will turn on when the brake fluid level in the master
cylinder has dropped below a specified level.The light will remain on until the cause is
corrected.
Vehicles equipped with the Anti-Lock Brake System (ABS) are also equipped with Elec-
tronic Brake Force Distribution (EBD).In the event of an EBD failure, the Brake Warning
Light will turn on along with the ABS Light.Immediate repair to the ABS system is re-
quired.
Operation of the Brake Warning Light can be checked by turning the ignition switch from
the OFF position to the ON/RUN position.The light should illuminate for approximately
two seconds.The light should then turn off unless the parking brake is applied or a brake
fault is detected.If the light does not illuminate, have the light inspected by an authorized
dealer.
The light also will turn on when the parking brake is applied with the ignition switch in
the ON/RUN position.
NOTE:
This light shows only that the parking brake is applied.It does not show the degree of
brake application.
WARNING!
Driving a vehicle with the red brake light on is dangerous.Part of the brake system
may have failed.It will take longer to stop the vehicle.You could have a collision.Have
the vehicle checked immediately.
WHAT TO DO IN EMERGENCIES
85
Page 88 of 132
– Tire Pressure Monitoring System (TPMS) Light
Each tire, including the spare (if provided), should be checked monthly when cold and
inflated to the inflation pressure recommended by the vehicle manufacturer on the ve-
hicle placard or tire inflation pressure label.(If your vehicle has tires of a different size
than the size indicated on the vehicle placard or tire inflation pressure label, you should
determine the proper tire inflation pressure for those tires.)
As an added safety feature, your vehicle has been equipped with a Tire Pressure Monitor-
ing System (TPMS) that illuminates a low tire pressure telltale when one or more of your
tires is significantly under-inflated.Accordingly, when the low tire pressure telltale illumi-
nates, you should stop and check your tires as soon as possible, and inflate them to the
proper pressure.Driving on a significantly under-inflated tire causes the tire to overheat
and can lead to tire failure.Under-inflation also increases high voltage battery consump-
tion and tire tread life, and may affect the vehicle’s handling and stopping ability.
IF THE LIGHT STARTS FLASHING INDICATING A LOW TIRE PRESSURE, ADJUST
THE AIR PRESSURE IN THE LOW TIRE TO THE AIR PRESSURE SHOWN ON THE
VEHICLE PLACARD OR TIRE INFLATION PRESSURE LABEL LOCATED ON THE
DRIVER'S DOOR.
NOTE:
After inflation, the vehicle may need to be driven for 20 minutes before the flashing light
will turn off.
Please note that the TPMS is not a substitute for proper tire maintenance, and it is the
driver’s responsibility to maintain correct tire pressure, even if under-inflation has not
reached the level to trigger illumination of the TPMS low tire pressure telltale.
Your vehicle has also been equipped with a TPMS malfunction indicator to indicate when
the system is not operating properly.The TPMS malfunction indicator is combined with
the low tire pressure telltale.When the system detects a malfunction, the telltale will
flash for approximately one minute and then remain continuously illuminated.This se-
quence will continue upon subsequent vehicle start-ups as long as the malfunction exists.
When the malfunction indicator is illuminated, the system may not be able to detect or
signal low tire pressure as intended.TPMS malfunctions may occur for a variety of rea-
sons, including the installation of replacement or alternate tires or wheels on the vehicle
that prevent the TPMS from functioning properly.Always check the TPMS malfunction
telltale after replacing one or more tires or wheels on your vehicle, to ensure that the
replacement or alternate tires and wheels allow the TPMS to continue to function prop-
erly.
WHAT TO DO IN EMERGENCIES
86
Page 89 of 132
NOTE:
Tire pressures change by approximately 1 psi (7 kPa) per 12° F (7° C) of air tempera-
ture change.Keep this in mind when checking tire pressure inside a garage, especially in
the Winter.Example: If garage temperature is 68°F (20°C) and the outside temperature
is 32°F (0°C), then the cold tire inflation pressure should be increased by 3 psi (21 kPa),
which equals 1 psi (7 kPa) for every 12°F (7°C) for this outside temperature condition.
CAUTION!
The TPMS has been optimized for the original equipment tires and wheels.TPMS pres-
sures and warning have been established for the tire size equipped on your vehicle.
Undesirable system operation or sensor damage may result when using replacement
equipment that is not of the same size, type, and/or style.Aftermarket wheels can cause
sensor damage.Do not use tire sealant from a can, or balance beads if your vehicle is
equipped with a TPMS, as damage to the sensors may result.
– Electronic Stability Control (ESC) Activation / Malfunction Indicator Light
The “ESC Activation/Malfunction Indicator Light” in the instrument cluster will come on
for four seconds when the ignition switch is turned to the ON/RUN position.If the “ESC
Activation/Malfunction Indicator Light” comes on continuously with the engine running, a
malfunction has been detected in the ESC system.If this light remains on, see your au-
thorized dealer as soon as possible to have the problem diagnosed and corrected.
NOTE:
•The “ESC Off Indicator Light” and the “ESC Activation/Malfunction Indicator Light”
come on momentarily each time the ignition switch is turned to ON/RUN.
•Each time the ignition is turned to ON/RUN, the ESC system will be ON even if it
was turned off previously.
•ESC Activation/Malfunction Light can blink during a ESC or TC intervention.
WHAT TO DO IN EMERGENCIES
87
Page 92 of 132
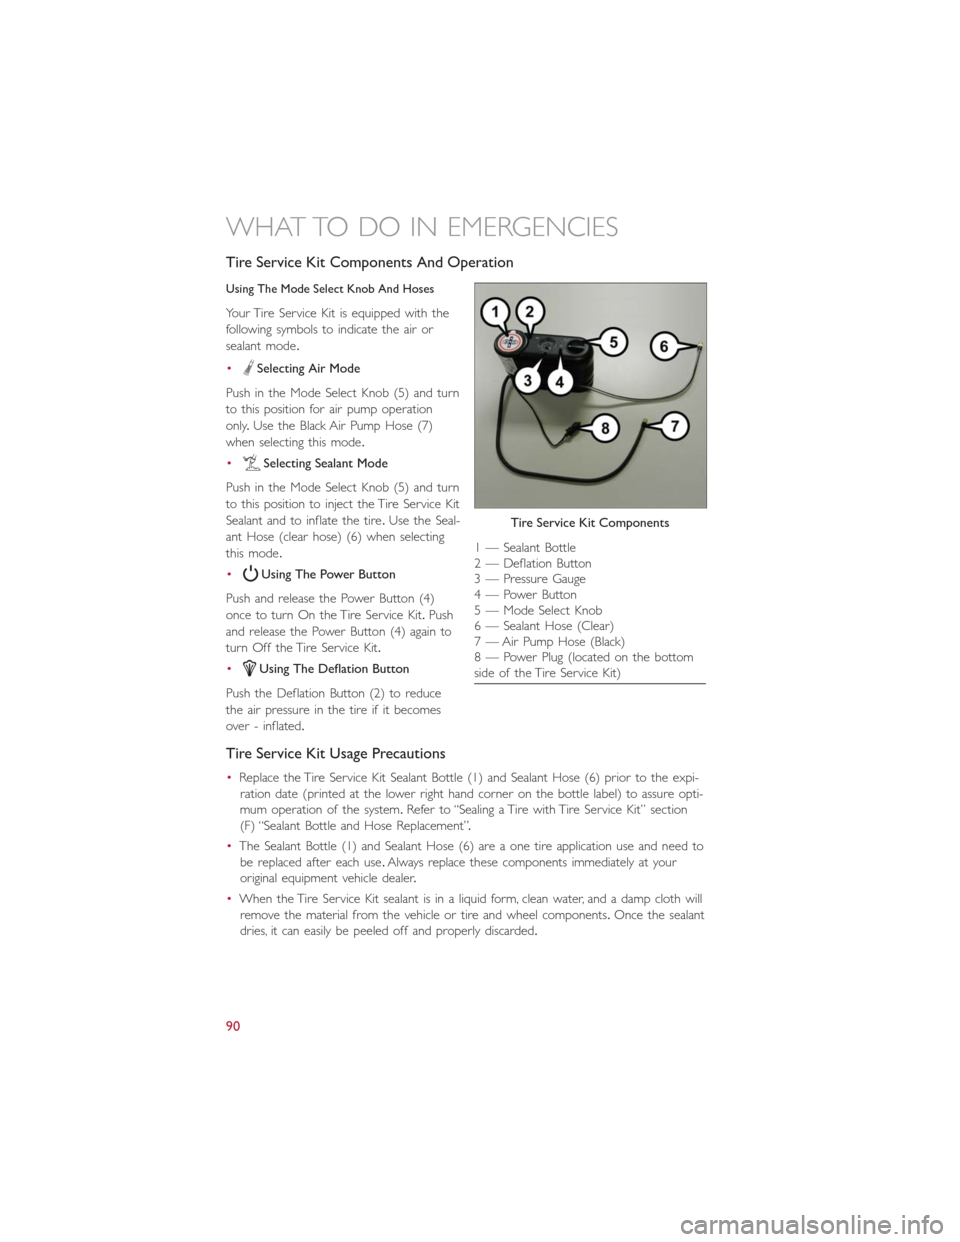
Tire Service Kit Components And Operation
Using The Mode Select Knob And Hoses
Your Tire Service Kit is equipped with the
following symbols to indicate the air or
sealant mode.
•
Selecting Air Mode
Push in the Mode Select Knob (5) and turn
to this position for air pump operation
only.Use the Black Air Pump Hose (7)
when selecting this mode.
•
Selecting Sealant Mode
Push in the Mode Select Knob (5) and turn
to this position to inject the Tire Service Kit
Sealant and to inflate the tire.Use the Seal-
ant Hose (clear hose) (6) when selecting
this mode.
•
Using The Power Button
Push and release the Power Button (4)
once to turn On the Tire Service Kit.Push
and release the Power Button (4) again to
turn Off the Tire Service Kit.
•
Using The Deflation Button
Push the Deflation Button (2) to reduce
the air pressure in the tire if it becomes
over - inflated.
Tire Service Kit Usage Precautions
•Replace the Tire Service Kit Sealant Bottle (1) and Sealant Hose (6) prior to the expi-
ration date (printed at the lower right hand corner on the bottle label) to assure opti-
mum operation of the system.Refer to “Sealing a Tire with Tire Service Kit” section
(F) “Sealant Bottle and Hose Replacement”.
•The Sealant Bottle (1) and Sealant Hose (6) are a one tire application use and need to
be replaced after each use.Always replace these components immediately at your
original equipment vehicle dealer.
•When the Tire Service Kit sealant is in a liquid form, clean water, and a damp cloth will
remove the material from the vehicle or tire and wheel components.Once the sealant
dries, it can easily be peeled off and properly discarded.
Tire Service Kit Components
1 — Sealant Bottle
2 — Deflation Button
3 — Pressure Gauge
4 — Power Button
5 — Mode Select Knob
6 — Sealant Hose (Clear)
7 — Air Pump Hose (Black)
8 — Power Plug (located on the bottom
side of the Tire Service Kit)
WHAT TO DO IN EMERGENCIES
90
Page 93 of 132
•For optimum performance, make sure the valve stem on the wheel is free of debris
before connecting the Tire Service Kit.
•You can use the Tire Service Kit air pump to inflate bicycle tires.The kit also comes
with two needles, located in the Accessory Storage Compartment (on the bottom of
the air pump) for inflating sport balls, rafts, or similar inflatable items.However, use
only the Air Pump Hose (7) and make sure the Mode Select Knob (5) is in the Air
Mode when inflating such items to avoid injecting sealant into them.The Tire Service
Kit Sealant is only intended to seal punctures less than 1/4 inch (6 mm) diameter in
the tread of your vehicle.
•Do not lift or carry the Tire Service Kit by the hoses.
WARNING!
•Do not attempt to seal a tire on the side of the vehicle closest to traffic.Pull far
enough off the road to avoid the danger of being hit when using the Tire Service
Kit.
•Do not use Tire Service Kit or drive the vehicle under the following circumstances:
•If the puncture in the tire tread is approximately 1/4 inch (6 mm) or larger.
•If the tire has any sidewall damage.
•If the tire has any damage from driving with extremely low tire pressure.
•If the tire has any damage from driving on a flat tire.
•If the wheel has any damage.
•If you are unsure of the condition of the tire or the wheel.
•Keep Tire Service Kit away from open flames or heat source.
•A loose Tire Service Kit thrown forward in a collision or hard stop could endanger
the occupants of the vehicle.Always stow the Tire Service Kit in the place pro-
vided.Failure to follow these warnings can result in injuries that are serious or
fatal to you, your passengers, and others around you.
•Take care not to allow the contents of Tire Service Kit to come in contact with
hair, eyes, or clothing.Tire Service Kit sealant is harmful if inhaled, swallowed, or
absorbed through the skin.It causes skin, eye, and respiratory irritation.Flush im-
mediately with plenty of water if there is any contact with eyes or skin.Change
clothing as soon as possible, if there is any contact with clothing.
•Tire Service Kit Sealant solution contains latex.In case of an allergic reaction or
rash, consult a physician immediately.Keep Tire Service Kit out of reach of chil-
dren.If swallowed, rinse mouth immediately with plenty of water and drink plenty
of water.Do not induce vomiting! Consult a physician immediately.
WHAT TO DO IN EMERGENCIES
91
Page 94 of 132
Sealing A Tire With Tire Service Kit
(A) Whenever You Stop To Use Tire Service Kit:
1.Pull over to a safe location and turn on the vehicle’s Hazard Warning flashers.
2.Verify that the valve stem (on the wheel with the deflated tire) is in a position that is
near to the ground.This will allow the Tire Service Kit Hoses (6) and (7) to reach the
valve stem and keep the Tire Service Kit flat on the ground.This will provide the best
positioning of the kit when injecting the sealant into the deflated tire and running the
air pump.Move the vehicle as necessary to place the valve stem in this position be-
fore proceeding.
3.Place the transmission in PARK (auto transmission) or in Gear (manual transmission)
and place the ignition in the OFF position.
4.Set the parking brake.
(B) Setting Up To Use Tire Service Kit:
1.Push in the Mode Select Knob (5) and turn to the Sealant Mode position.
2.Uncoil the Sealant Hose (6) and then remove the cap from the fitting at the end of
the hose.
3.Place the Tire Service Kit flat on the ground next to the deflated tire.
4.Remove the cap from the valve stem and then screw the fitting at the end of the
Sealant Hose (6) onto the valve stem.
5.Uncoil the Power Plug (8) and insert the plug into the vehicle’s 12 Volt power outlet.
NOTE:
Do not remove foreign objects (e.g., screws or nails) from the tire.
(C) Injecting Tire Service Kit Sealant Into The Deflated Tire:
•Always start the engine before turning ON the Tire Service Kit.
NOTE:
Manual transmission vehicles must have the parking brake engaged and the gear selector
in NEUTRAL.
•After pushing the Power Button (4), the sealant (white fluid) will flow from the Sealant
Bottle (1) through the Sealant Hose (6) and into the tire.
NOTE:
Sealant may leak out through the puncture in the tire.
WHAT TO DO IN EMERGENCIES
92