FIAT 500L LIVING 2014 2.G Owners Manual
Manufacturer: FIAT, Model Year: 2014, Model line: 500L LIVING, Model: FIAT 500L LIVING 2014 2.GPages: 420, PDF Size: 9.77 MB
Page 221 of 420
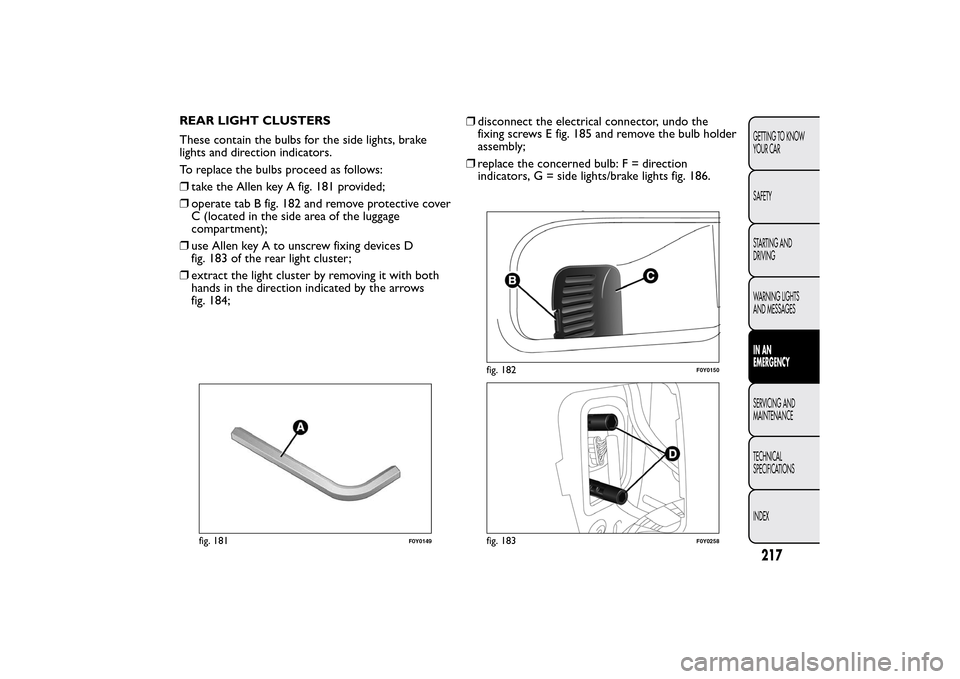
REAR LIGHT CLUSTERS
These contain the bulbs for the side lights, brake
lights and direction indicators.
To replace the bulbs proceed as follows:
❒take the Allen key A fig. 181 provided;
❒operate tab B fig. 182 and remove protective cover
C (located in the side area of the luggage
compartment);
❒use Allen key A to unscrew fixing devices D
fig. 183 of the rear light cluster;
❒extract the light cluster by removing it with both
hands in the direction indicated by the arrows
fig. 184;❒disconnect the electrical connector, undo the
fixing screws E fig. 185 and remove the bulb holder
assembly;
❒replace the concerned bulb: F = direction
indicators, G = side lights/brake lights fig. 186.
fig. 181
F0Y0149
fig. 182
F0Y0150
fig. 183
F0Y0258
217GETTING TO KNOW
YOUR CAR
SAFETY
STARTING AND
DRIVING
WARNING LIGHTS
AND MESSAGESIN AN
EMERGENCYSERVICING AND
MAINTENANCE
TECHNICAL
SPECIFICATIONS
INDEX
Page 222 of 420
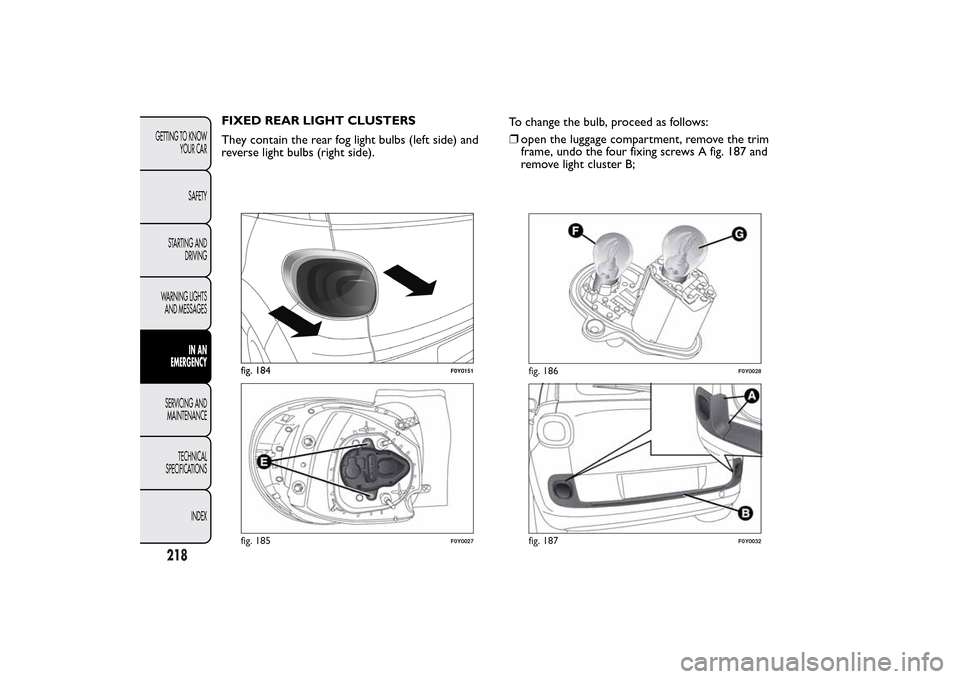
FIXED REAR LIGHT CLUSTERS
They contain the rear fog light bulbs (left side) and
reverse light bulbs (right side).To change the bulb, proceed as follows:
❒open the luggage compartment, remove the trim
frame, undo the four fixing screws A fig. 187 and
remove light cluster B;
fig. 184
F0Y0151
fig. 185
F0Y0027
fig. 186
F0Y0028
fig. 187
F0Y0032
218GETTING TO KNOW
YOUR CAR
SAFETY
STARTING AND
DRIVING
WARNING LIGHTS
AND MESSAGES
IN AN
EMERGENCY
SERVICING AND
MAINTENANCE
TECHNICAL
SPECIFICATIONS
INDEX
Page 223 of 420
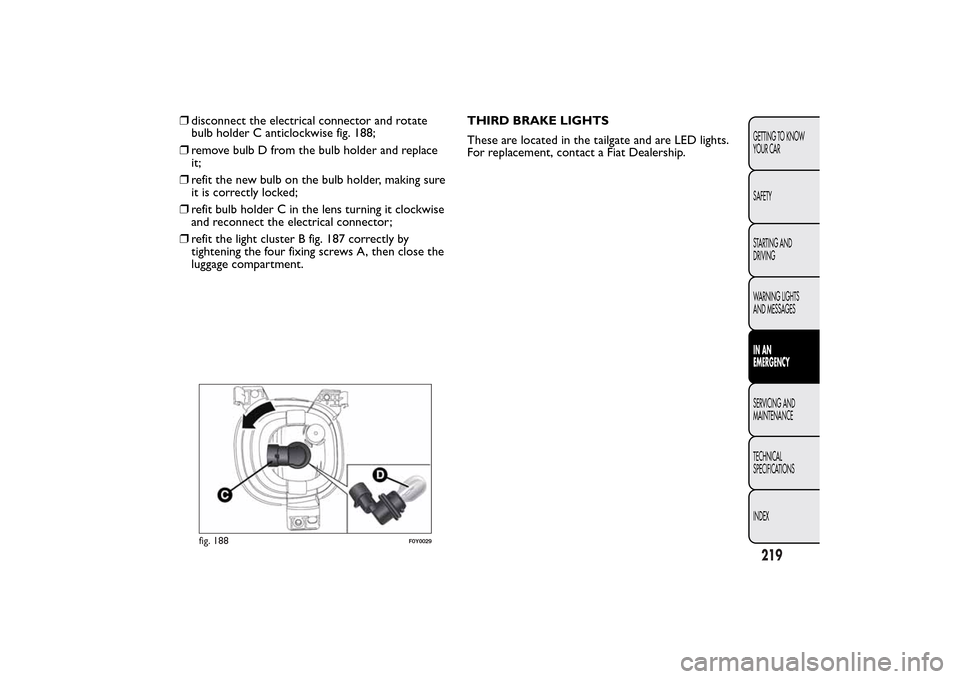
❒disconnect the electrical connector and rotate
bulb holder C anticlockwise fig. 188;
❒remove bulb D from the bulb holder and replace
it;
❒refit the new bulb on the bulb holder, making sure
it is correctly locked;
❒refit bulb holder C in the lens turning it clockwise
and reconnect the electrical connector;
❒refit the light cluster B fig. 187 correctly by
tightening the four fixing screws A, then close the
luggage compartment.THIRD BRAKE LIGHTS
These are located in the tailgate and are LED lights.
For replacement, contact a Fiat Dealership.
fig. 188
F0Y0029
219GETTING TO KNOW
YOUR CAR
SAFETY
STARTING AND
DRIVING
WARNING LIGHTS
AND MESSAGESIN AN
EMERGENCYSERVICING AND
MAINTENANCE
TECHNICAL
SPECIFICATIONS
INDEX
Page 224 of 420
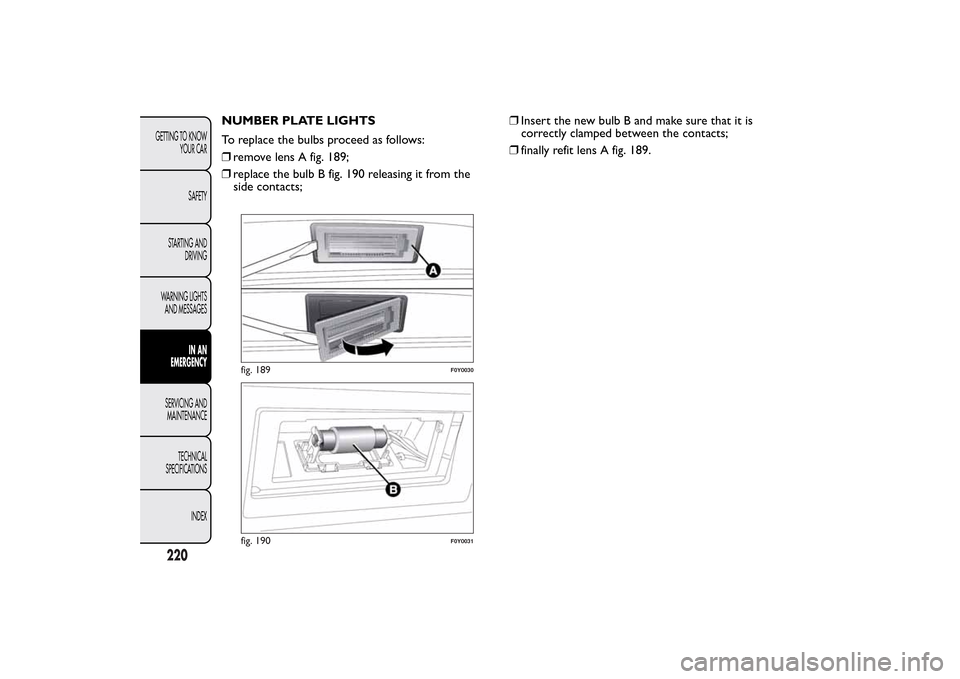
NUMBER PLATE LIGHTS
To replace the bulbs proceed as follows:
❒remove lens A fig. 189;
❒replace the bulb B fig. 190 releasing it from the
side contacts;❒Insert the new bulb B and make sure that it is
correctly clamped between the contacts;
❒finally refit lens A fig. 189.
fig. 189
F0Y0030
fig. 190
F0Y0031
220GETTING TO KNOW
YOUR CAR
SAFETY
STARTING AND
DRIVING
WARNING LIGHTS
AND MESSAGES
IN AN
EMERGENCY
SERVICING AND
MAINTENANCE
TECHNICAL
SPECIFICATIONS
INDEX
Page 225 of 420
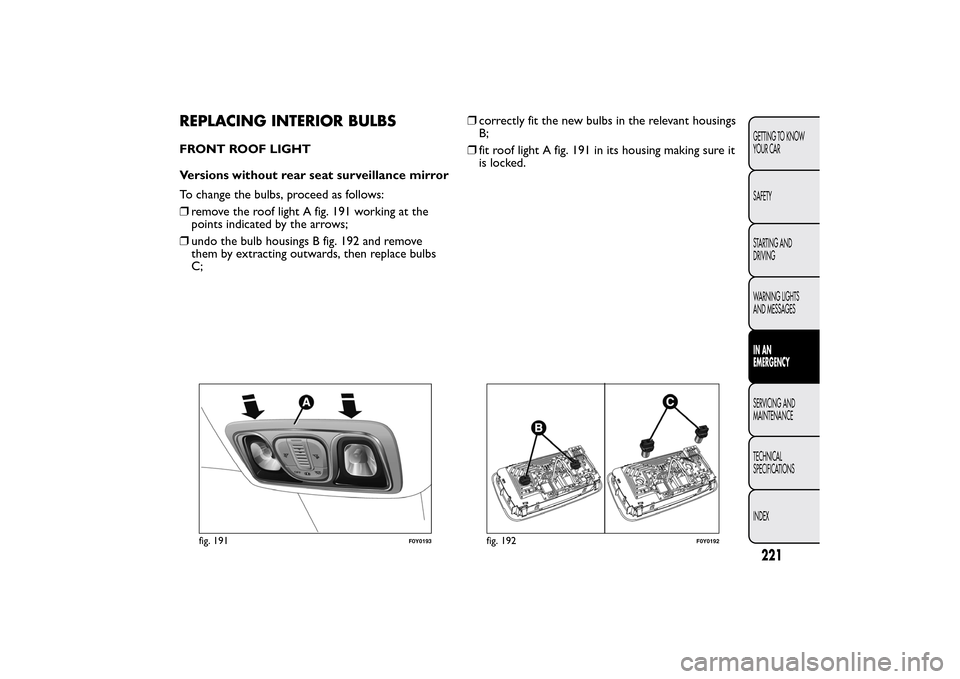
REPLACING INTERIOR BULBSFRONT ROOF LIGHT
Versions without rear seat surveillance mirror
To change the bulbs, proceed as follows:
❒remove the roof light A fig. 191 working at the
points indicated by the arrows;
❒undo the bulb housings B fig. 192 and remove
them by extracting outwards, then replace bulbs
C;❒correctly fit the new bulbs in the relevant housings
B;
❒fit roof light A fig. 191 in its housing making sure it
is locked.
fig. 191
F0Y0193
fig. 192
F0Y0192
221GETTING TO KNOW
YOUR CAR
SAFETY
STARTING AND
DRIVING
WARNING LIGHTS
AND MESSAGESIN AN
EMERGENCYSERVICING AND
MAINTENANCE
TECHNICAL
SPECIFICATIONS
INDEX
Page 226 of 420
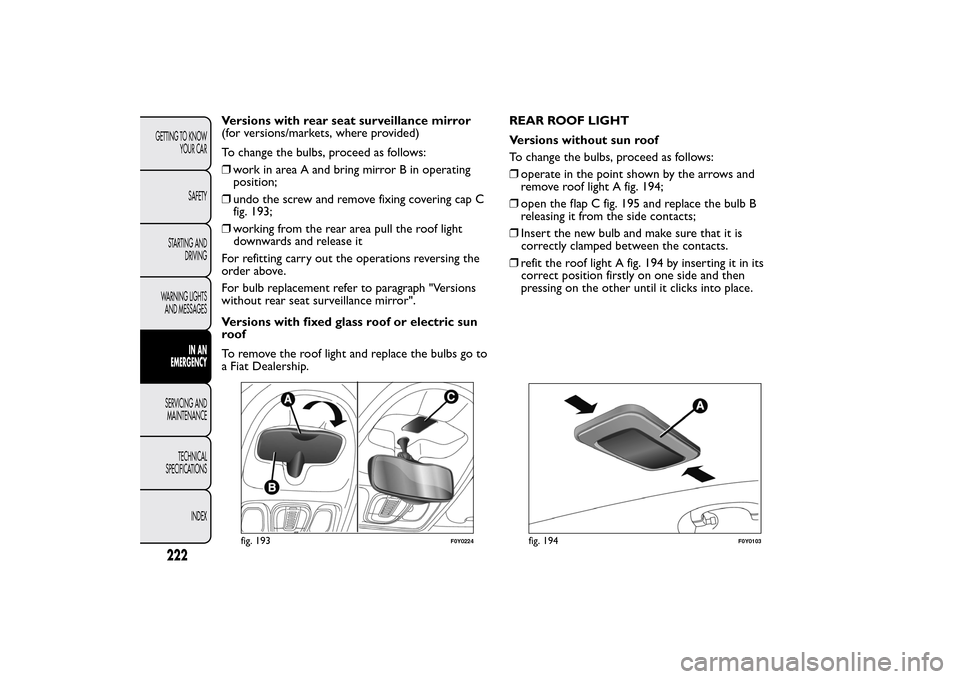
Versions with rear seat surveillance mirror
(for versions/markets, where provided)
To change the bulbs, proceed as follows:
❒work in area A and bring mirror B in operating
position;
❒undo the screw and remove fixing covering cap C
fig. 193;
❒working from the rear area pull the roof light
downwards and release it
For refitting carry out the operations reversing the
order above.
For bulb replacement refer to paragraph "Versions
without rear seat surveillance mirror".
Versions with fixed glass roof or electric sun
roof
To remove the roof light and replace the bulbs go to
a Fiat Dealership.REAR ROOF LIGHT
Versions without sun roof
To change the bulbs, proceed as follows:
❒operate in the point shown by the arrows and
remove roof light A fig. 194;
❒open the flap C fig. 195 and replace the bulb B
releasing it from the side contacts;
❒Insert the new bulb and make sure that it is
correctly clamped between the contacts.
❒refit the roof light A fig. 194 by inserting it in its
correct position firstly on one side and then
pressing on the other until it clicks into place.
fig. 193
F0Y0224
fig. 194
F0Y0103
222GETTING TO KNOW
YOUR CAR
SAFETY
STARTING AND
DRIVING
WARNING LIGHTS
AND MESSAGES
IN AN
EMERGENCY
SERVICING AND
MAINTENANCE
TECHNICAL
SPECIFICATIONS
INDEX
Page 227 of 420
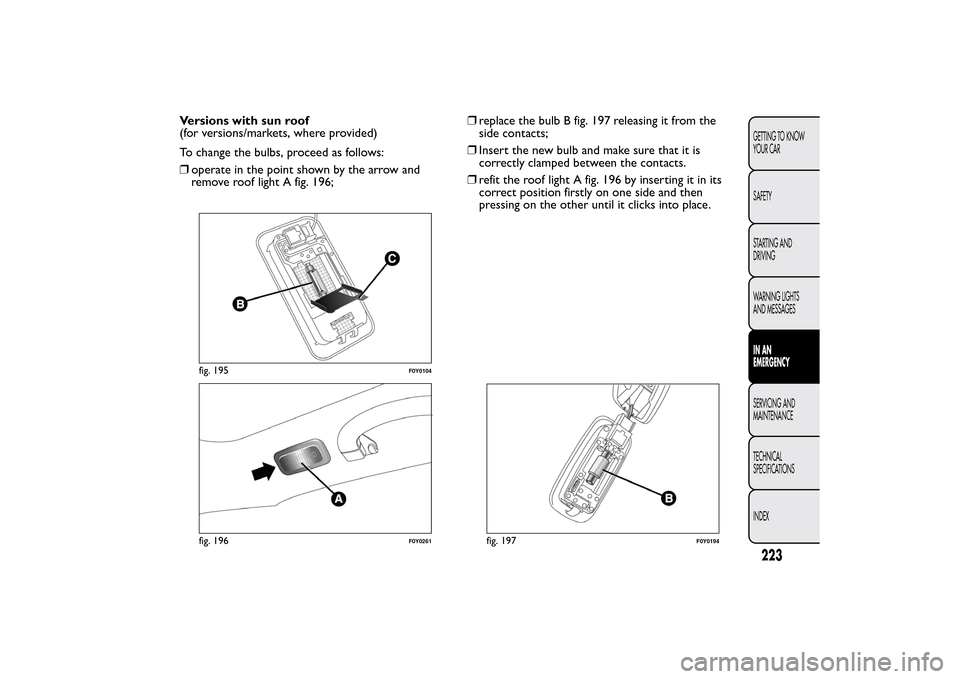
Versions with sun roof
(for versions/markets, where provided)
To change the bulbs, proceed as follows:
❒operate in the point shown by the arrow and
remove roof light A fig. 196;❒replace the bulb B fig. 197 releasing it from the
side contacts;
❒Insert the new bulb and make sure that it is
correctly clamped between the contacts.
❒refit the roof light A fig. 196 by inserting it in its
correct position firstly on one side and then
pressing on the other until it clicks into place.
fig. 195
F0Y0104
fig. 196
F0Y0261
fig. 197
F0Y0194
223GETTING TO KNOW
YOUR CAR
SAFETY
STARTING AND
DRIVING
WARNING LIGHTS
AND MESSAGESIN AN
EMERGENCYSERVICING AND
MAINTENANCE
TECHNICAL
SPECIFICATIONS
INDEX
Page 228 of 420
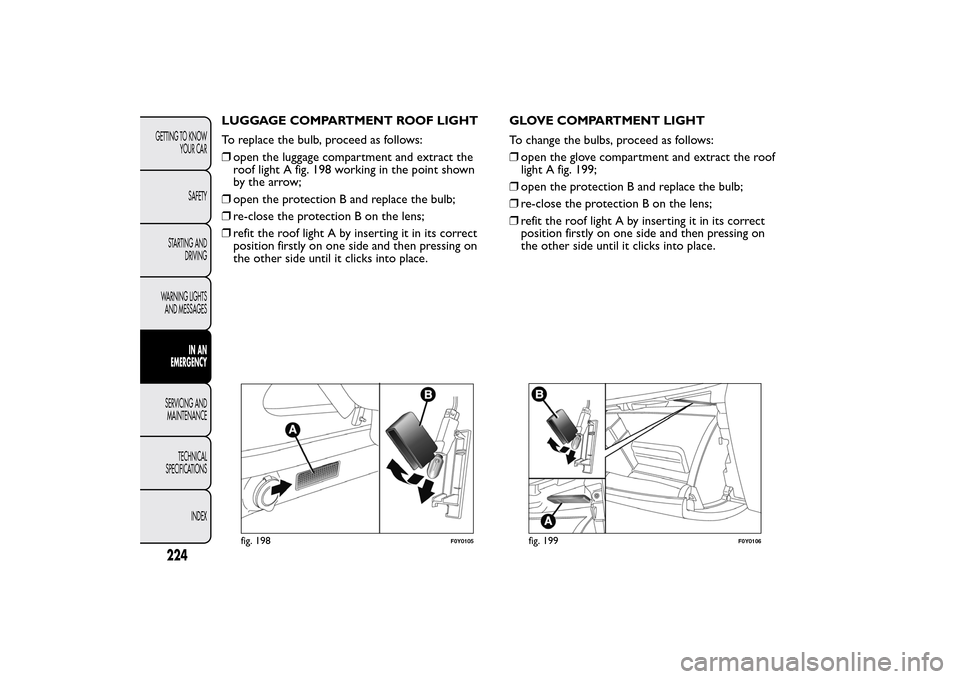
LUGGAGE COMPARTMENT ROOF LIGHT
To replace the bulb, proceed as follows:
❒open the luggage compartment and extract the
roof light A fig. 198 working in the point shown
by the arrow;
❒open the protection B and replace the bulb;
❒re-close the protection B on the lens;
❒refit the roof light A by inserting it in its correct
position firstly on one side and then pressing on
the other side until it clicks into place.GLOVE COMPARTMENT LIGHT
To change the bulbs, proceed as follows:
❒open the glove compartment and extract the roof
light A fig. 199;
❒open the protection B and replace the bulb;
❒re-close the protection B on the lens;
❒refit the roof light A by inserting it in its correct
position firstly on one side and then pressing on
the other side until it clicks into place.
fig. 198
F0Y0105
fig. 199
F0Y0106
224GETTING TO KNOW
YOUR CAR
SAFETY
STARTING AND
DRIVING
WARNING LIGHTS
AND MESSAGES
IN AN
EMERGENCY
SERVICING AND
MAINTENANCE
TECHNICAL
SPECIFICATIONS
INDEX
Page 229 of 420
REPLACING FUSESGENERAL INFORMATION
Fuses protect the electrical system: they intervene
(blow) in the event of a failure or improper
intervention on the system.
When a device does not work, check the condition
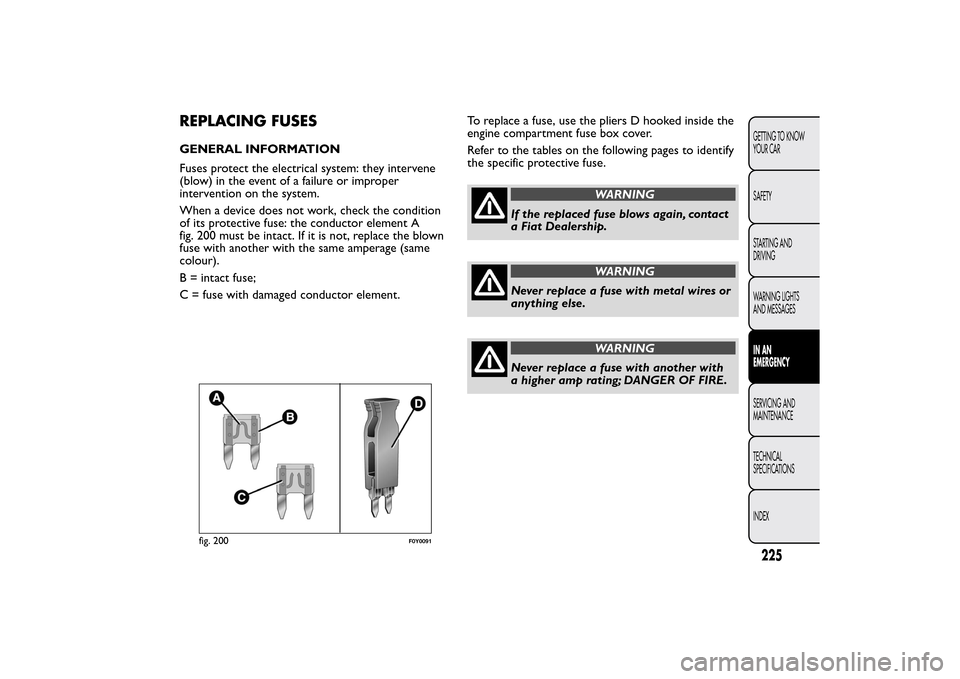
of its protective fuse: the conductor element A
fig. 200 must be intact. If it is not, replace the blown
fuse with another with the same amperage (same
colour).
B = intact fuse;
C = fuse with damaged conductor element.To replace a fuse, use the pliers D hooked inside the
engine compartment fuse box cover.
Refer to the tables on the following pages to identify
the specific protective fuse.
WARNING
If the replaced fuse blows again, contact
a Fiat Dealership.
WARNING
Never replace a fuse with metal wires or
anything else.
WARNING
Never replace a fuse with another with
a higher amp rating; DANGER OF FIRE.
fig. 200
F0Y0091
225GETTING TO KNOW
YOUR CAR
SAFETY
STARTING AND
DRIVING
WARNING LIGHTS
AND MESSAGESIN AN
EMERGENCYSERVICING AND
MAINTENANCE
TECHNICAL
SPECIFICATIONS
INDEX
Page 230 of 420
WARNING
If a general fuse (MEGA-FUSE,
MIDI-FUSE, MAXI-FUSE) blows contact
a Fiat Dealership.
WARNING
Before replacing a fuse, make sure that
the ignition key has been removed
and that all the other services are switched off
and/or disengaged.
WARNING
If a general protection fuse for safety
systems (airbag system, braking system),
power unit systems (engine system, transmission
system) or steering system is triggered, contact
a Fiat Dealership.
226GETTING TO KNOW
YOUR CAR
SAFETY
STARTING AND
DRIVING
WARNING LIGHTS
AND MESSAGES
IN AN
EMERGENCY
SERVICING AND
MAINTENANCE
TECHNICAL
SPECIFICATIONS
INDEX