FIAT 500L LIVING 2014 2.G Owners Manual
Manufacturer: FIAT, Model Year: 2014, Model line: 500L LIVING, Model: FIAT 500L LIVING 2014 2.GPages: 420, PDF Size: 9.77 MB
Page 211 of 420
WARNING
If the pressure has fallen below 1.8 bar,
do not drive any further: the automatic
tyre quick repair kit cannot guarantee the
correct hold because the tyre is too damaged.
Contact a Fiat Dealership.
❒if a pressure value of at least 1.8 bar is detected,
restore the correct pressure (with the engine
running and the handbrake engaged), resume
driving and drive with great care to the nearest
Fiat Dealership.
WARNING
Inform the dealership that the tyre has
been repaired using the tyre quick
repair kit . Give the instruction booklet to the
personnel charged with handling the treated
tyre.
207GETTING TO KNOW
YOUR CAR
SAFETY
STARTING AND
DRIVING
WARNING LIGHTS
AND MESSAGESIN AN
EMERGENCYSERVICING AND
MAINTENANCE
TECHNICAL
SPECIFICATIONS
INDEX
Page 212 of 420
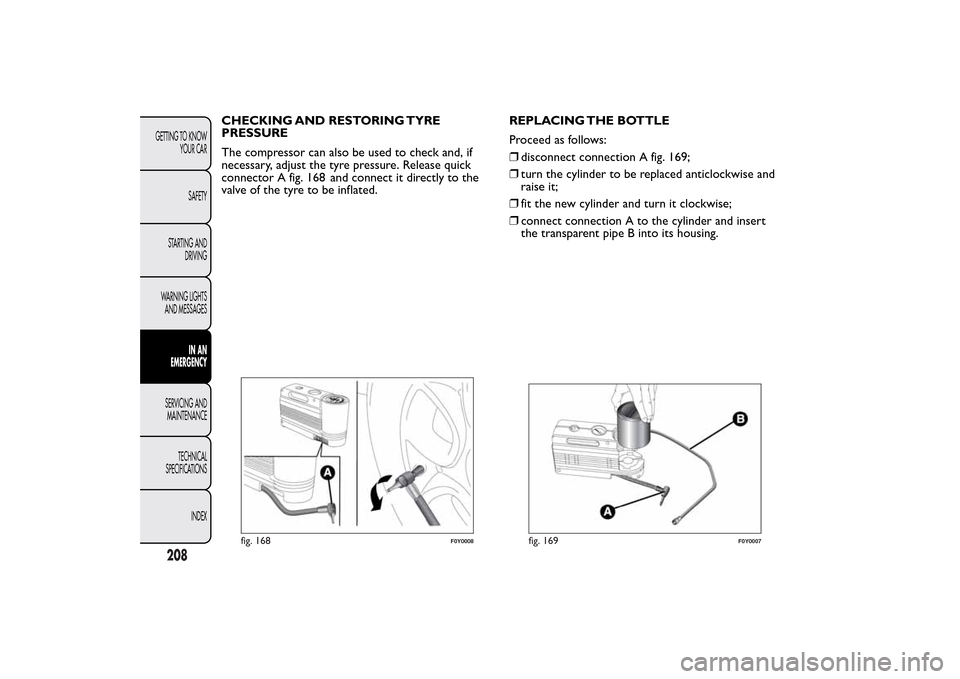
CHECKING AND RESTORING TYRE
PRESSURE
The compressor can also be used to check and, if
necessary, adjust the tyre pressure. Release quick
connector A fig. 16 and connect it directly to the
valve of the tyre to be inflated.REPLACING THE BOTTLE
Proceed as follows:
❒disconnect connection A fig. 169;
❒turn the cylinder to be replaced anticlockwise and
raise it;
❒fit the new cylinder and turn it clockwise;
❒connect connection A to the cylinder and insert
the transparent pipe B into its housing.
fig. 168
F0Y0008
fig. 169
F0Y0007
208GETTING TO KNOW
YOUR CAR
SAFETY
STARTING AND
DRIVING
WARNING LIGHTS
AND MESSAGES
IN AN
EMERGENCY
SERVICING AND
MAINTENANCE
TECHNICAL
SPECIFICATIONS
INDEX
8
Page 213 of 420
CHANGING A BULBGENERAL INSTRUCTIONS
❒Before changing a bulb check the contacts for
oxidation;
❒burnt bulbs must be replaced by others of the
same type and power;
❒after replacing a headlight bulb, always check the
correct alignment of the light beam;
❒when a light is not working, check that the
corresponding fuse is intact before changing a bulb.
For the location of fuses, refer to the paragraph
“If a fuse blows” in this section;
WARNING
Modifications or repairs to the electric
system that are not carried out properly
or do not take the system technical
specifications into account can cause
malfunctions leading to the risk of fire.
WARNING
Halogen bulbs contain pressurised gas,
in the case of breakage they may burst
causing glass fragments to be projected
outwards.
Halogen bulbs must be handled holding
the metal part only.Touching the
transparent part of the bulb with your
fingers may reduce the intensity of the emitted
light and even reduce the lifespan of the bulb. In
the event of accidental contact , wipe the bulb
with a cloth moistened with alcohol and let the
bulb dry.Where possible, it is advisable to have
bulbs changed at a Fiat Dealership.The
correct operation and direction of the
external lights are absolutely essential for the
safety of the car and of compliance with the law.
IMPORTANT When the weather is cold or damp
or after heavy rain or washing, the surface of
headlights or rear lights, may steam up and/or form
drops of condensation on the inside. This is a natural
phenomenon due to the difference in temperature
and humidity between the inside and the outside
of the glass which does not indicate a fault and does
not compromise the normal operation of lighting
devices. The mist disappears quickly when the lights
are turned on, starting from the centre of the
diffuser, extending progressively towards the edges.
209GETTING TO KNOW
YOUR CAR
SAFETY
STARTING AND
DRIVING
WARNING LIGHTS
AND MESSAGESIN AN
EMERGENCYSERVICING AND
MAINTENANCE
TECHNICAL
SPECIFICATIONS
INDEX
Page 214 of 420
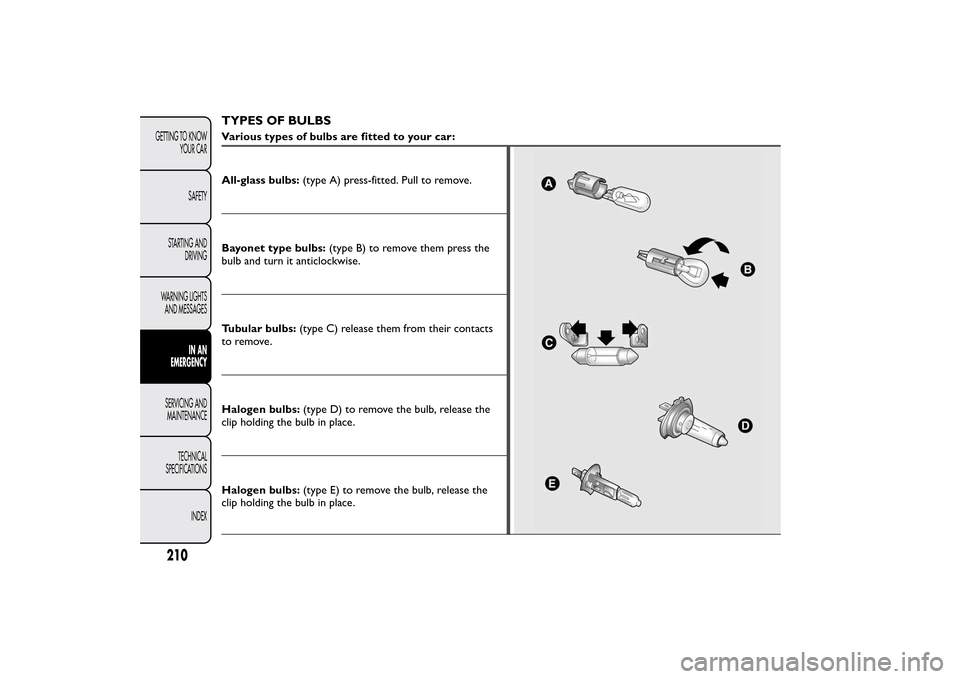
TYPES OF BULBSVarious types of bulbs are fitted to your car:
All-glass bulbs:(type A) press-fitted. Pull to remove.Bayonet type bulbs:(type B) to remove them press the
bulb and turn it anticlockwise.
Tubular bulbs:(type C) release them from their contacts
to remove.
Halogen bulbs:(type D) to remove the bulb, release the
clip holding the bulb in place.
Halogen bulbs:(type E) to remove the bulb, release the
clip holding the bulb in place.
210GETTING TO KNOW
YOUR CAR
SAFETY
STARTING AND
DRIVING
WARNING LIGHTS
AND MESSAGES
IN AN
EMERGENCY
SERVICING AND
MAINTENANCE
TECHNICAL
SPECIFICATIONS
INDEX
Page 215 of 420
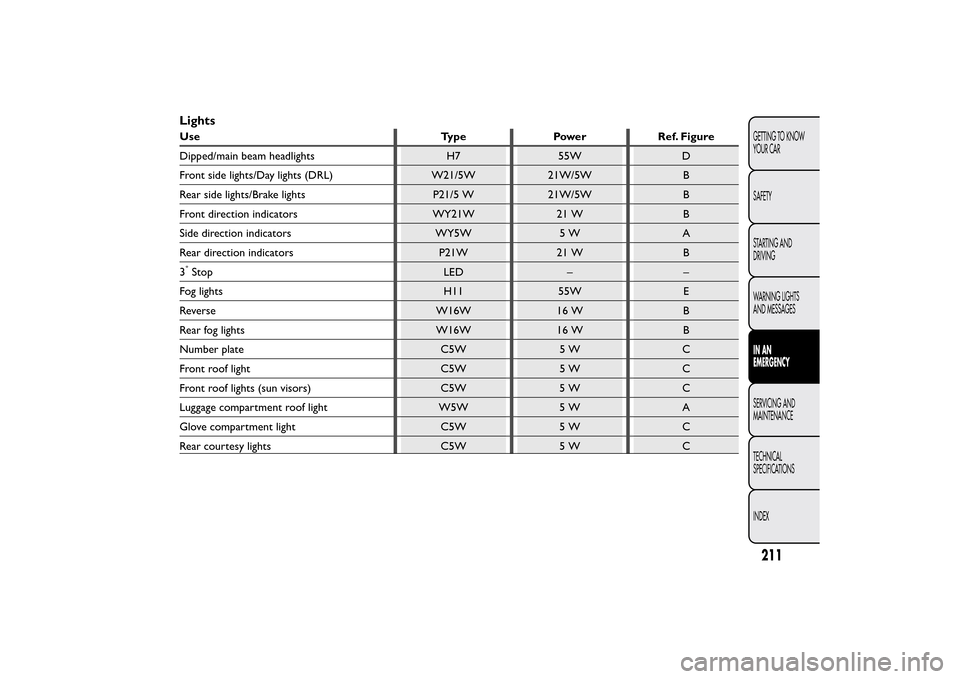
LightsUse Type Power Ref. Figure
Dipped/main beam headlights H7 55W D
Front side lights/Day lights (DRL) W21/5W 21W/5W B
Rear side lights/Brake lights P21/5 W 21W/5W B
Front direction indicators WY21W 21 W B
Side direction indicators WY5W 5 W A
Rear direction indicators P21W 21 W B
3°Stop LED – –
Fog lights H11 55W E
Reverse W16W 16 W B
Rear fog lights W16W 16 W B
Number plate C5W 5 W C
Front roof light C5W 5 W C
Front roof lights (sun visors) C5W 5 W C
Luggage compartment roof light W5W 5 W A
Glove compartment light C5W 5 W C
Rear courtesy lights C5W 5 W C
211GETTING TO KNOW
YOUR CAR
SAFETY
STARTING AND
DRIVING
WARNING LIGHTS
AND MESSAGESIN AN
EMERGENCYSERVICING AND
MAINTENANCE
TECHNICAL
SPECIFICATIONS
INDEX
Page 216 of 420
REPLACING EXTERIOR BULBSFor the type of bulb and power rating, see “Changing
a bulb" paragraph.
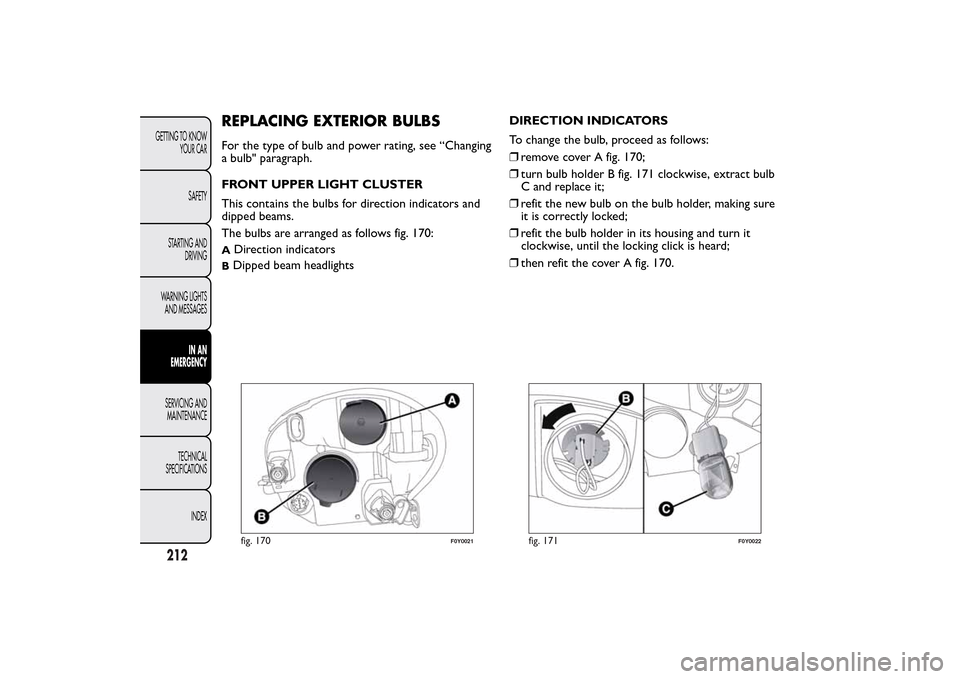
FRONT UPPER LIGHT CLUSTER
This contains the bulbs for direction indicators and
dipped beams.
The bulbs are arranged as follows fig. 170:A
Direction indicators
BDipped beam headlightsDIRECTION INDICATORS
To change the bulb, proceed as follows:
❒remove cover A fig. 170;
❒turn bulb holder B fig. 171 clockwise, extract bulb
C and replace it;
❒refit the new bulb on the bulb holder, making sure
it is correctly locked;
❒refit the bulb holder in its housing and turn it
clockwise, until the locking click is heard;
❒then refit the cover A fig. 170.fig. 170
F0Y0021
fig. 171
F0Y0022
212GETTING TO KNOW
YOUR CAR
SAFETY
STARTING AND
DRIVING
WARNING LIGHTS
AND MESSAGES
IN AN
EMERGENCY
SERVICING AND
MAINTENANCE
TECHNICAL
SPECIFICATIONS
INDEX
Page 217 of 420
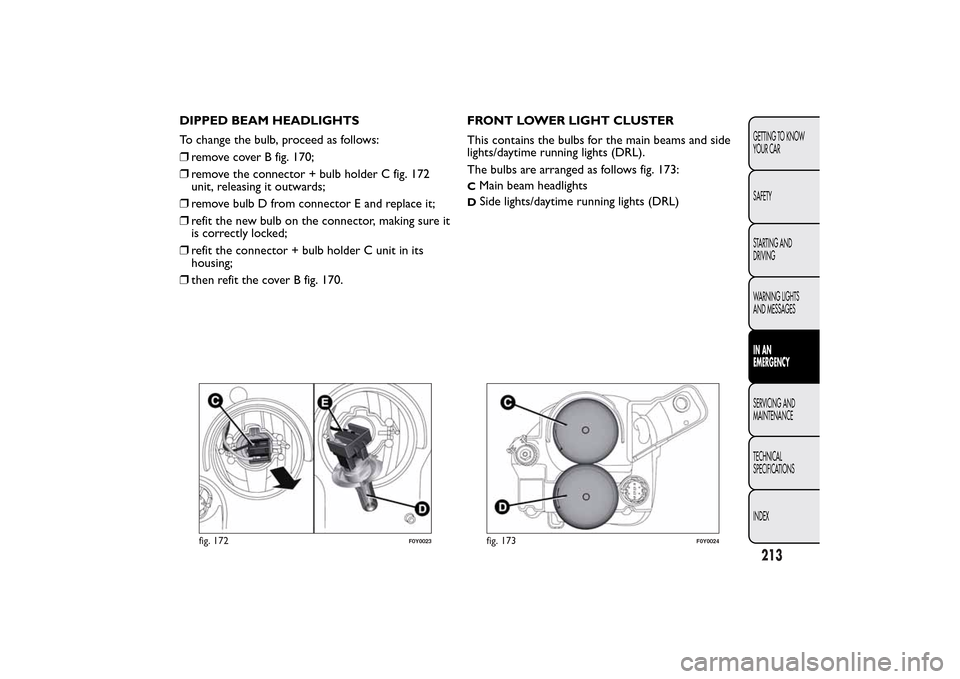
DIPPED BEAM HEADLIGHTS
To change the bulb, proceed as follows:
❒remove cover B fig. 170;
❒remove the connector + bulb holder C fig. 172
unit, releasing it outwards;
❒remove bulb D from connector E and replace it;
❒refit the new bulb on the connector, making sure it
is correctly locked;
❒refit the connector + bulb holder C unit in its
housing;
❒then refit the cover B fig. 170.FRONT LOWER LIGHT CLUSTER
This contains the bulbs for the main beams and side
lights/daytime running lights (DRL).
The bulbs are arranged as follows fig. 173:
C
Main beam headlights
D
Side lights/daytime running lights (DRL)
fig. 172
F0Y0023
fig. 173
F0Y0024
213GETTING TO KNOW
YOUR CAR
SAFETY
STARTING AND
DRIVING
WARNING LIGHTS
AND MESSAGESIN AN
EMERGENCYSERVICING AND
MAINTENANCE
TECHNICAL
SPECIFICATIONS
INDEX
Page 218 of 420
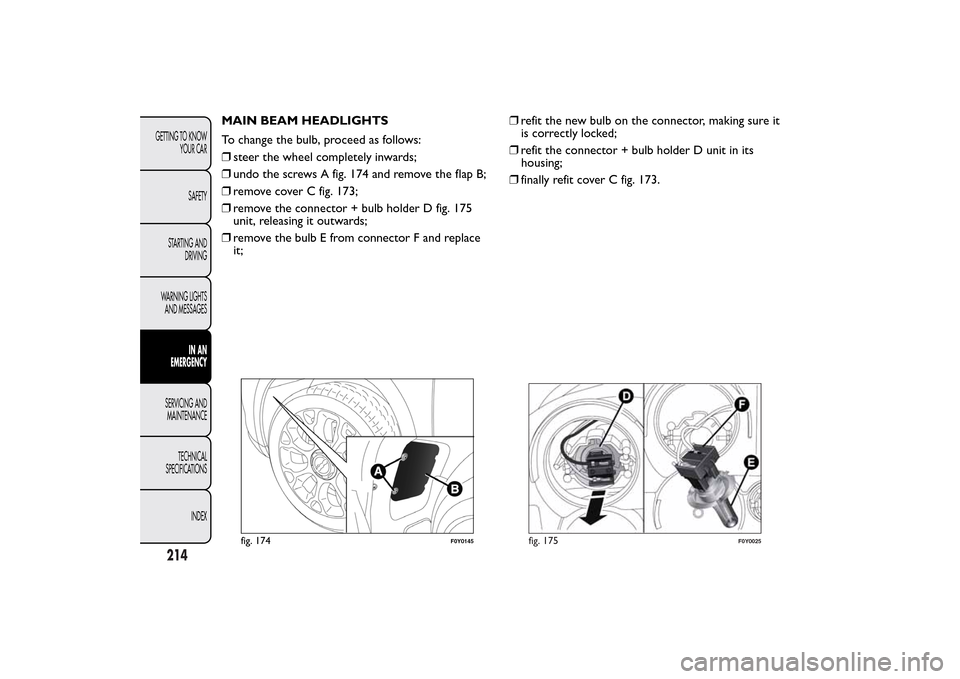
MAIN BEAM HEADLIGHTS
To change the bulb, proceed as follows:
❒steer the wheel completely inwards;
❒undo the screws A fig. 174 and remove the flap B;
❒remove cover C fig. 173;
❒remove the connector + bulb holder D fig. 175
unit, releasing it outwards;
❒remove the bulb E from connector F and replace
it;❒refit the new bulb on the connector, making sure it
is correctly locked;
❒refit the connector + bulb holder D unit in its
housing;
❒finally refit cover C fig. 173.
fig. 174
F0Y0145
fig. 175
F0Y0025
214GETTING TO KNOW
YOUR CAR
SAFETY
STARTING AND
DRIVING
WARNING LIGHTS
AND MESSAGES
IN AN
EMERGENCY
SERVICING AND
MAINTENANCE
TECHNICAL
SPECIFICATIONS
INDEX
Page 219 of 420
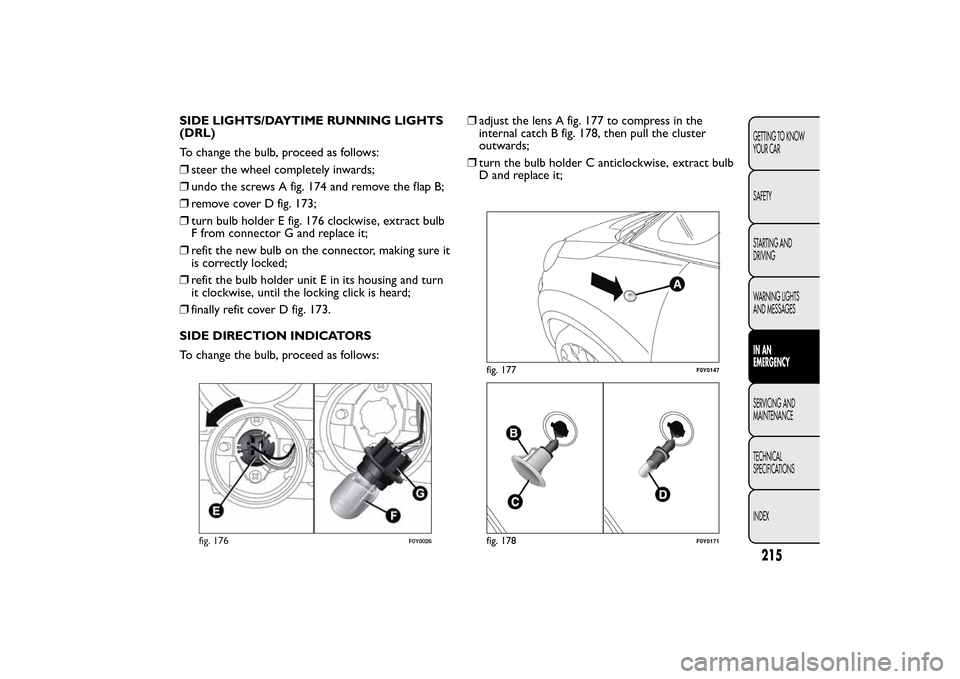
SIDE LIGHTS/DAYTIME RUNNING LIGHTS
(DRL)
To change the bulb, proceed as follows:
❒steer the wheel completely inwards;
❒undo the screws A fig. 174 and remove the flap B;
❒remove cover D fig. 173;
❒turn bulb holder E fig. 176 clockwise, extract bulb
F from connector G and replace it;
❒refit the new bulb on the connector, making sure it
is correctly locked;
❒refit the bulb holder unit E in its housing and turn
it clockwise, until the locking click is heard;
❒finally refit cover D fig. 173.
SIDE DIRECTION INDICATORS
To change the bulb, proceed as follows:❒adjust the lens A fig. 177 to compress in the
internal catch B fig. 178, then pull the cluster
outwards;
❒turn the bulb holder C anticlockwise, extract bulb
D and replace it;
fig. 176
F0Y0026
fig. 177
F0Y0147
fig. 178
F0Y0171
215GETTING TO KNOW
YOUR CAR
SAFETY
STARTING AND
DRIVING
WARNING LIGHTS
AND MESSAGESIN AN
EMERGENCYSERVICING AND
MAINTENANCE
TECHNICAL
SPECIFICATIONS
INDEX
Page 220 of 420
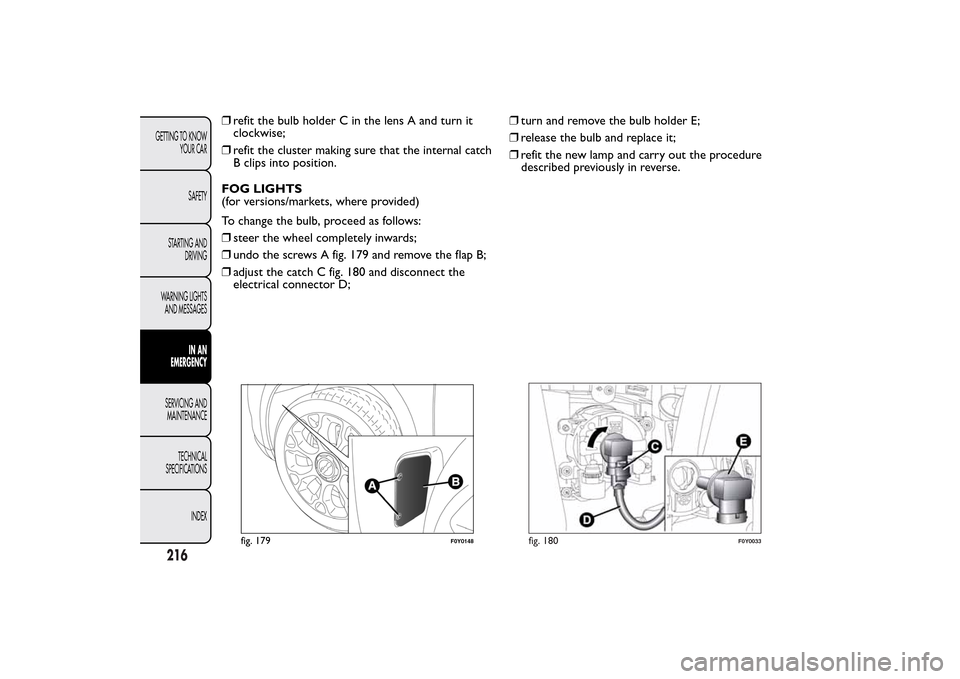
❒refit the bulb holder C in the lens A and turn it
clockwise;
❒refit the cluster making sure that the internal catch
B clips into position.
FOG LIGHTS
(for versions/markets, where provided)
To change the bulb, proceed as follows:
❒steer the wheel completely inwards;
❒undo the screws A fig. 179 and remove the flap B;
❒adjust the catch C fig. 180 and disconnect the
electrical connector D;❒turn and remove the bulb holder E;
❒release the bulb and replace it;
❒refit the new lamp and carry out the procedure
described previously in reverse.
fig. 179
F0Y0148
fig. 180
F0Y0033
216GETTING TO KNOW
YOUR CAR
SAFETY
STARTING AND
DRIVING
WARNING LIGHTS
AND MESSAGES
IN AN
EMERGENCY
SERVICING AND
MAINTENANCE
TECHNICAL
SPECIFICATIONS
INDEX