FIAT 500L LIVING 2014 2.G Manual PDF
Manufacturer: FIAT, Model Year: 2014, Model line: 500L LIVING, Model: FIAT 500L LIVING 2014 2.GPages: 420, PDF Size: 9.77 MB
Page 71 of 420
Deactivation
Move the stalk ring nut away from the position
or turn the ignition key to STOP.
If the ignition key is turned to the STOP position
leaving the ring nut A in position
, no wiping
cycle is performed at the next startup (ignition key
to the MAR-ON position) even in case of rain.
This prevents unwanted activation of the rain sensor
when the engine is started (i.e. when the windscreen
is being washed by hand or the wipers are stuck to
the windscreen by ice).
To restore automatic operation of the rain sensor,
turn ring nut A from
position to
position and
then turn the ring nut back to theposition.
When the rain sensor is reactivated using any of the
manoeuvres described above, reactivation is
indicated by a single stroke of the windscreen wipers,
regardless of the condition of the windscreen.
In the event of malfunction of the rain sensor whilst
it is active, the windscreen wiper operates
intermittently at a speed consistent with the
sensitivity setting of the rain sensor, regardless of
whether there is rain on the glass (on some versions
sensor failure is indicated on the display).
The sensor continues to operate and it is possible to
set the windscreen wiper to continuous mode (1
st
or 2
nd
speed). The failure indication remains for
as long as the sensor is active.The rain sensor is able to recognise, and
automatically adjust itself in the presence of the
following conditions:
❒presence of dirt on the controlled surface (salt,
dirt, etc.);
❒presence of streaks of water caused by the worn
window wiper blades;
❒difference between day and night.
Do not activate the rain sensor when
washing the car in an automatic car wash.Make sure the device is switched off if
there is ice on the windscreen.
WARNING
Make sure the device is switched off
whenever the windscreen must be
cleaned.
67GETTING TO
KNOW YOUR CARSAFETY
STARTING AND
DRIVING
WARNING LIGHTS
AND MESSAGES
IN AN EMERGENCY
SERVICING AND
MAINTENANCE
TECHNICAL
SPECIFICATIONS
INDEX
Page 72 of 420
REAR WINDOW WASHER/ WIPER
It can be operated only with the ignition key turned
to MAR.
Activation
Turn the ring nut B fig. 46 from
to
to operate
the rear window wiper as follows:
❒in intermittent mode when the windscreen wiper
is not operating;
❒in synchronous mode (at half the speed of the
windscreen wiper) when the windscreen wiper
is operating;
❒in continuous mode with reverse engaged.
With the windscreen wiper on and reverse gear
engaged, rear window wiping will be continuous in
the same way.
Pushing the stalk towards the dashboard (unstable
position) the rear window washer jet will activate.
Keep the stalk pushed for more than half a second to
activate the rear window wiper as well. Releasing
the stalk will activate the smart washing function, as
described for the windscreen wiper.
Deactivation
The function stops when the stalk is released.
Do not use the rear window wiper to
removelayersofsnoworice.In
such conditions, the wiper may be
subjected to excessive stress and the motor
protection, which prevents operation for a few
seconds, may intervene. If operation is not
restored, contact a Fiat Dealership.
68GETTING TO
KNOW YOUR CAR
SAFETY
STARTING AND
DRIVING
WARNING LIGHTS
AND MESSAGES
IN AN EMERGENCY
SERVICING AND
MAINTENANCE
TECHNICAL
SPECIFICATIONS
INDEX
Page 73 of 420
CRUISE CONTROL(for versions/markets, where provided)
This is an electronically controlled driving assistance
device that allows the desired car speed to be
maintained, without having to press the accelerator
pedal.
This device can be used at a speed above 30 km/h on
long stretches of dry, straight roads with few
variations (e.g. motorways).
The use of this device on extra-urban roads with
traffic is not therefore recommended. Do not use
the device in town.
ACTIVATING THE DEVICE
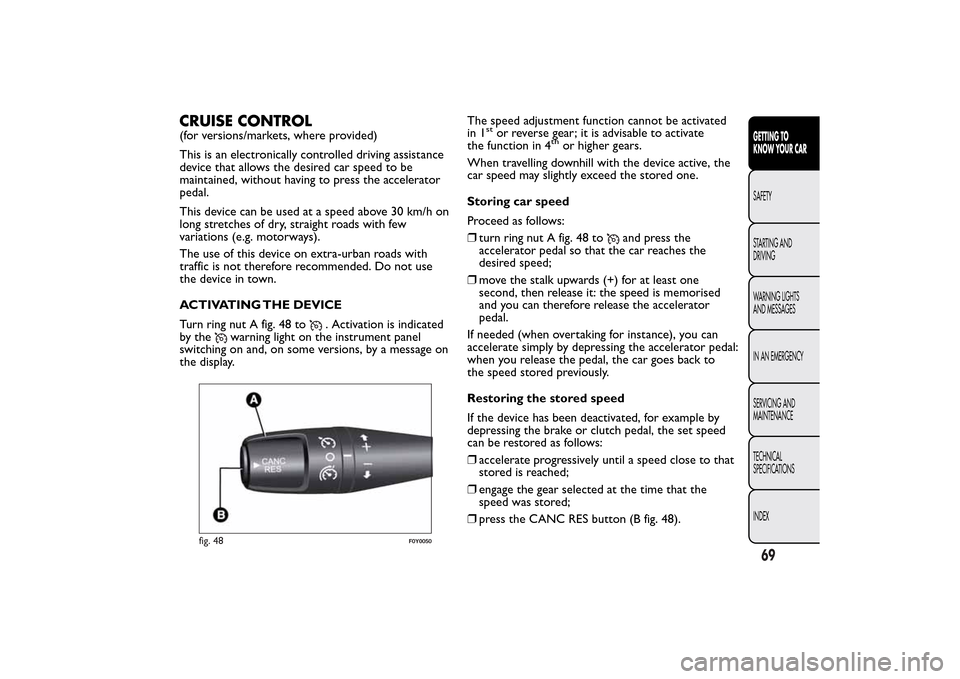
Turn ring nut A fig. 48 to
. Activation is indicated
by the
warning light on the instrument panel
switching on and, on some versions, by a message on
the display.The speed adjustment function cannot be activated
in 1
stor reverse gear; it is advisable to activate
the function in 4
th
or higher gears.
When travelling downhill with the device active, the
car speed may slightly exceed the stored one.
Storing car speed
Proceed as follows:
❒turn ring nut A fig. 48 to
and press the
accelerator pedal so that the car reaches the
desired speed;
❒move the stalk upwards (+) for at least one
second, then release it: the speed is memorised
and you can therefore release the accelerator
pedal.
If needed (when overtaking for instance), you can
accelerate simply by depressing the accelerator pedal:
when you release the pedal, the car goes back to
the speed stored previously.
Restoring the stored speed
If the device has been deactivated, for example by
depressing the brake or clutch pedal, the set speed
can be restored as follows:
❒accelerate progressively until a speed close to that
stored is reached;
❒engage the gear selected at the time that the
speed was stored;
❒press the CANC RES button (B fig. 48).
fig. 48
F0Y0050
69GETTING TO
KNOW YOUR CARSAFETY
STARTING AND
DRIVING
WARNING LIGHTS
AND MESSAGES
IN AN EMERGENCY
SERVICING AND
MAINTENANCE
TECHNICAL
SPECIFICATIONS
INDEX
Page 74 of 420
INCREASING THE STORED SPEED
This can be carried out in two ways:
❒by pressing the accelerator and storing the new
speed reached
or
❒by moving the stalk upwards (+) until the new
speed, which will be stored automatically, is
reached.
Each movement of the stalk corresponds to an
increase in speed of about 1 km/h, while keeping the
stalk held upwards will continuously increase the
speed.
REDUCING THE STORED SPEED
This can be carried out in two ways:
❒by deactivating the device and then storing the
new speed
or
❒by moving the lever downwards (–) until the new
speed, which will automatically remain stored, is
reached.
Each movement of the lever corresponds to a
reduction in speed of about 1 km/h, while keeping
the stalk held downwards will decrease the speed
continuously.DEACTIVATING THE DEVICE
The device can be deactivated by the driver in the
following ways:
❒turning ring nut A toO;
❒by stopping the engine
❒by pressing the brake pedal, the clutch or the
accelerator; in this last case the system is not
completely deactivated but gives priority to the
acceleration request. The device still remains
active, without the need to press the CANC RES
button to return to the previous condition once
acceleration is concluded.
70GETTING TO
KNOW YOUR CAR
SAFETY
STARTING AND
DRIVING
WARNING LIGHTS
AND MESSAGES
IN AN EMERGENCY
SERVICING AND
MAINTENANCE
TECHNICAL
SPECIFICATIONS
INDEX
Page 75 of 420
Automatic deactivation
The device deactivates automatically in the following
cases:
❒intervention of the ABS or ESC systems;
❒with the car speed below the set limit
❒in the event of system failure.
WARNING
When travelling with the device active,
never move the gear lever to neutral.
WARNING
In the event of device faults or failures,
turn knob A toOand contact a Fiat
Dealership.
SPEED LIMITER
This device allows the speed of the car to be limited
to values which can be set by the driver.
The maximum speed can be set both with car
stationary and in motion. The minimum speed that
can be set is 30 km/h.
When the device is active, the car speed depends on
the pressure at the accelerator pedal, until the
programmed speed limit is reached (see "Speed limit
programming" paragraph).If necessary (in the event of overtaking for example),
the programmed speed limit can be exceeded by
fully depressing the accelerator pedal.
By gradually reducing the pressure on the accelerator
pedal, the function will be reactivated as soon as
the car speed drops below the programmed speed.
Activating the device
To activate the device, turn ring nut A fig. 48 to
.
Activation of the device is indicated by the
warning light on the instrument panel switching
on and, on some versions, by a message on the
display plus last programmed speed value.
Speed limit programming
The speed limit can be programmed without
necessarily activating the device.
To store a speed value higher than that displayed,
move stalk A upwards (+). Each movement of the
stalk corresponds to an increase in speed of about 1
km/h, while keeping the stalk held upwards will
increase the speed with an increment of 5 km/h.
To store a value lower than that displayed, move
stalk A downwards (–). Each movement of the stalk
corresponds to a decrease in speed of about 1
km/h, while keeping the stalk held downwards a
decrease of 5 km/h is obtained.
71GETTING TO
KNOW YOUR CARSAFETY
STARTING AND
DRIVING
WARNING LIGHTS
AND MESSAGES
IN AN EMERGENCY
SERVICING AND
MAINTENANCE
TECHNICAL
SPECIFICATIONS
INDEX
Page 76 of 420
Activating/deactivating the device
Press the CANC RES button to activate/deactivate
the device.
The activation of the device is indicated by the
warning light on the instrument panel switching
on.
The deactivation of the function is instead indicated
by the
symbol on the display.
Exceeding the programmed speed
By fully depressing the accelerator pedal, the
programmed speed can be exceeded even with the
device active.
In this case the device is deactivated temporarily and
the set speed flashes on the display.
Reducing the speed below the programmed value
reactivates the device automatically.Flashing of programmed speed
The programmed speed flashes in the following
cases:
❒when the accelerator pedal has been fully
depressed and the car speed has exceeded
programmed speed;
❒when the device cannot reduce the speed of the
car due to the gradient of the road;
❒in the event of sharp acceleration.
Deactivating the device
To deactivate the device, turn ring nut A toO.
The deactivation of the device is indicated by the
warning light switching off on the instrument
panel and, on some versions, by a message andsymbol on the display.
Automatic deactivation of device
The device deactivates automatically in the event of
fault in the system.
72GETTING TO
KNOW YOUR CAR
SAFETY
STARTING AND
DRIVING
WARNING LIGHTS
AND MESSAGES
IN AN EMERGENCY
SERVICING AND
MAINTENANCE
TECHNICAL
SPECIFICATIONS
INDEX
IMPORTANT A jerk and increased load is perceived
when the accelerator pedal end of travel is reached.
This, to signal to the driver that the speed control
system is being deactivating.
IMPORTANT With the device deactivated, the car
maximum speed is reached before the end of travel
with a jerk and the load hardening. The jerk is also
present with the device deactivated.
Page 77 of 420
ROOF LIGHTSFRONT ROOF LIGHT
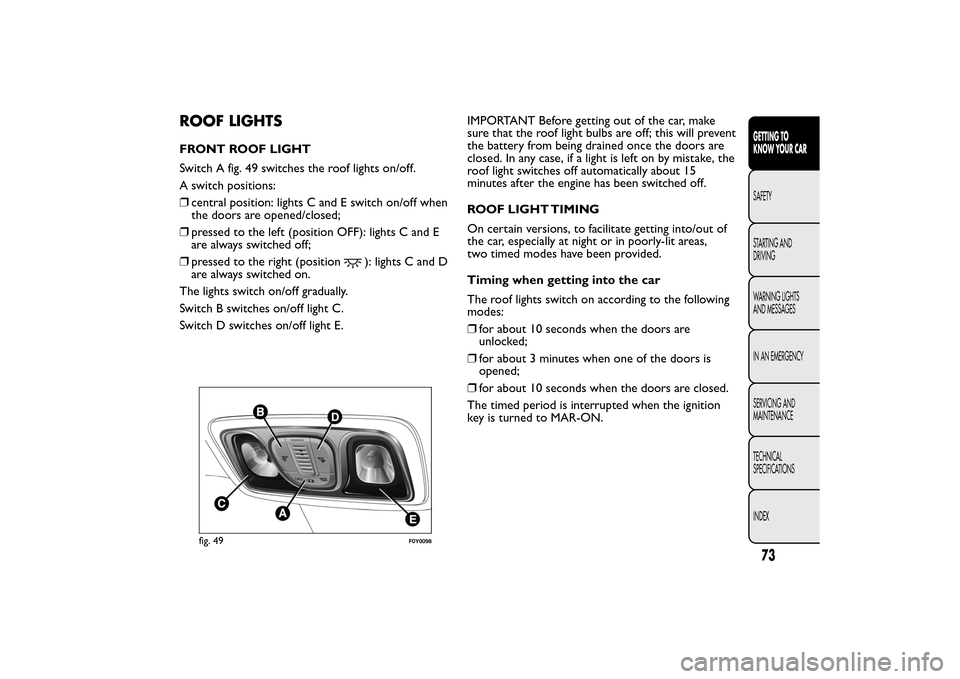
Switch A fig. 49 switches the roof lights on/off.
A switch positions:
❒central position: lights C and E switch on/off when
the doors are opened/closed;
❒pressed to the left (position OFF): lights C and E
are always switched off;
❒pressed to the right (position
): lights C and D
are always switched on.
The lights switch on/off gradually.
Switch B switches on/off light C.
Switch D switches on/off light E.IMPORTANT Before getting out of the car, make
sure that the roof light bulbs are off; this will prevent
the battery from being drained once the doors are
closed. In any case, if a light is left on by mistake, the
roof light switches off automatically about 15
minutes after the engine has been switched off.
ROOF LIGHT TIMING
On certain versions, to facilitate getting into/out of
the car, especially at night or in poorly-lit areas,
two timed modes have been provided.
Timing when getting into the car
The roof lights switch on according to the following
modes:
❒for about 10 seconds when the doors are
unlocked;
❒for about 3 minutes when one of the doors is
opened;
❒for about 10 seconds when the doors are closed.
The timed period is interrupted when the ignition
key is turned to MAR-ON.
fig. 49
F0Y0098
73GETTING TO
KNOW YOUR CARSAFETY
STARTING AND
DRIVING
WARNING LIGHTS
AND MESSAGES
IN AN EMERGENCY
SERVICING AND
MAINTENANCE
TECHNICAL
SPECIFICATIONS
INDEX
Page 78 of 420
The lights switch off in three ways:
❒when all doors are closed, the 3-minute timer will
stop and a 10-second one will start. This timer will
stop when the key is turned to MAR-ON;
❒when doors are locked (either with remote
control or with key on driver side door), the roof
light switches off;
❒the interior lights are switched off in any case after
15 minutes to preserve battery charge.
Timing when getting out of the car
After removing the key from the ignition switch, the
roof lights switch on as follows:
❒if the ignition key is removed within 3 minutes
from the engine stopping, the roof lights switch on
for 10 seconds;
❒for about 3 minutes when one of the doors is
opened;
❒for about 10 seconds when one of the doors is
closed.
The timing stops automatically when the doors are
locked.REAR ROOF LIGHT
Versions without sun roof (or glazed roof )
Press the cover A fig. 50 to switch the light on/off.
The light will stay on for a few seconds after the
doors are closed and will then switch off
automatically.
The light switches off in any case when the ignition
key is turned to MAR-ON.
The light switches off automatically after a few
minutes if a door is left open. To switch it on again, if
necessary, open another door or close and reopen
the same door or press the cover A.
fig. 50
F0Y0101
74GETTING TO
KNOW YOUR CAR
SAFETY
STARTING AND
DRIVING
WARNING LIGHTS
AND MESSAGES
IN AN EMERGENCY
SERVICING AND
MAINTENANCE
TECHNICAL
SPECIFICATIONS
INDEX
Page 79 of 420
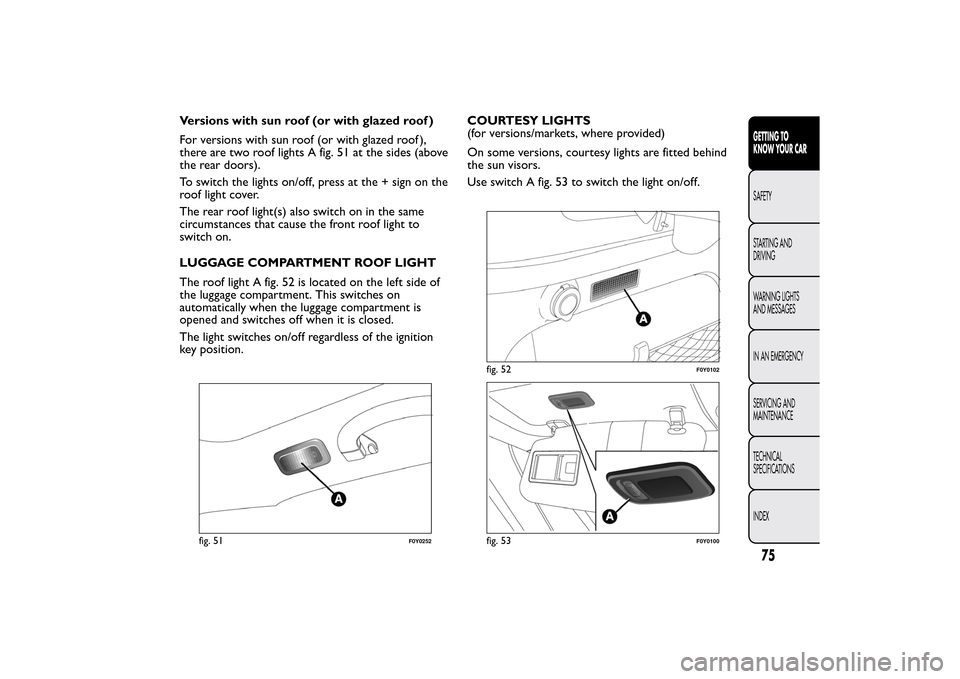
Versions with sun roof (or with glazed roof )
For versions with sun roof (or with glazed roof ),
there are two roof lights A fig. 51 at the sides (above
the rear doors).
To switch the lights on/off, press at the + sign on the
roof light cover.
The rear roof light(s) also switch on in the same
circumstances that cause the front roof light to
switch on.
LUGGAGE COMPARTMENT ROOF LIGHT
The roof light A fig. 52 is located on the left side of
the luggage compartment. This switches on
automatically when the luggage compartment is
opened and switches off when it is closed.
The light switches on/off regardless of the ignition
key position.COURTESY LIGHTS
(for versions/markets, where provided)
On some versions, courtesy lights are fitted behind
the sun visors.
Use switch A fig. 53 to switch the light on/off.
fig. 51
F0Y0252
fig. 52
F0Y0102
fig. 53
F0Y0100
75GETTING TO
KNOW YOUR CARSAFETY
STARTING AND
DRIVING
WARNING LIGHTS
AND MESSAGES
IN AN EMERGENCY
SERVICING AND
MAINTENANCE
TECHNICAL
SPECIFICATIONS
INDEX
Page 80 of 420
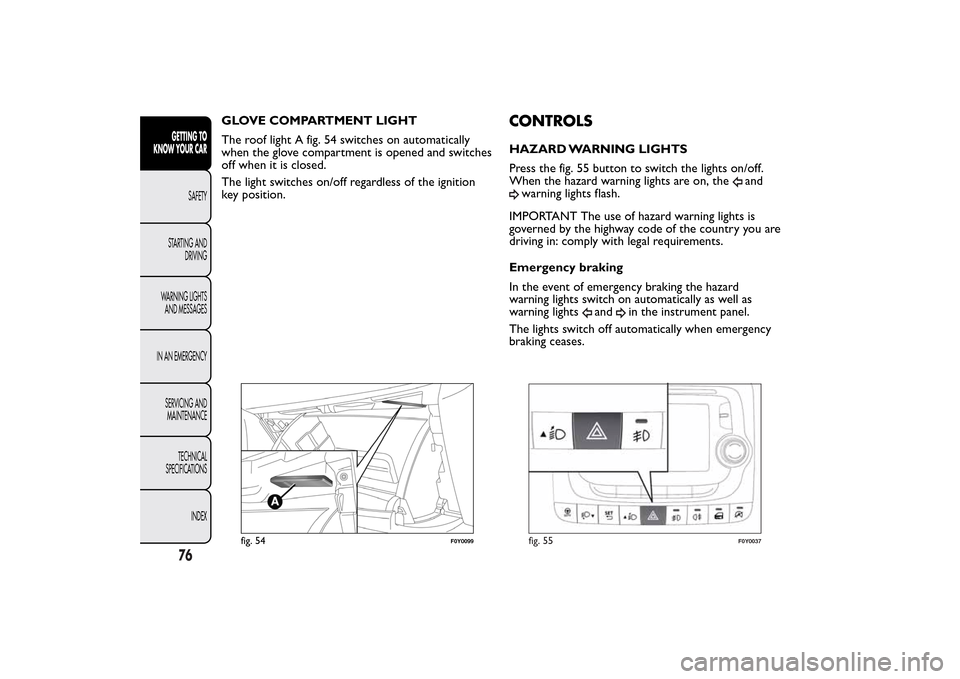
GLOVE COMPARTMENT LIGHT
The roof light A fig. 54 switches on automatically
when the glove compartment is opened and switches
off when it is closed.
The light switches on/off regardless of the ignition
key position.
CONTROLSHAZARD WARNING LIGHTS
Press the fig. 55 button to switch the lights on/off.
When the hazard warning lights are on, the
and
warning lights flash.
IMPORTANT The use of hazard warning lights is
governed by the highway code of the country you are
driving in: comply with legal requirements.
Emergency braking
In the event of emergency braking the hazard
warning lights switch on automatically as well as
warning lights
and
in the instrument panel.
The lights switch off automatically when emergency
braking ceases.
fig. 54
F0Y0099
fig. 55
F0Y0037
76GETTING TO
KNOW YOUR CAR
SAFETY
STARTING AND
DRIVING
WARNING LIGHTS
AND MESSAGES
IN AN EMERGENCY
SERVICING AND
MAINTENANCE
TECHNICAL
SPECIFICATIONS
INDEX