change time FIAT 500X 2022 Owners Manual
[x] Cancel search | Manufacturer: FIAT, Model Year: 2022, Model line: 500X, Model: FIAT 500X 2022Pages: 312, PDF Size: 13.26 MB
Page 4 of 312
2
INTRODUCTION
SYMBOLS KEY ...........................................................8
ROLLOVER WARNING ............................................. 8
VEHICLE MODIFICATIONS/ALTERATIONS .............9
SYMBOL GLOSSARY.................................................9
GETTING TO KNOW YOUR VEHICLE
KEYS ....................................................................... 14 Key Fob .............................................................14
SENTRY KEY ........................................................... 17
IGNITION SWITCH .................................................. 17
Keyless Enter ‘n Go™ Ignition .........................17
REMOTE START — IF EQUIPPED .......................... 18
How To Use Remote Start ................................19
To Exit Remote Start Mode ..............................19
Remote Start Front Defrost Activation —
If Equipped........................................................20
Remote Start Comfort Systems —
If Equipped .......................................................20
Remote Start Windshield Wiper De–Icer
And Rear Defrost Activation — If Equipped.....20
Remote Start Cancel Message —
If Equipped........................................................20
VEHICLE SECURITY SYSTEM — IF EQUIPPED ..... 21
To Arm The System .........................................21
To Disarm The System ....................................21
Disabling ...........................................................21 DOORS .....................................................................22
Manual Door Locks ..........................................22
Power Door Locks ............................................22
Keyless Enter ‘n Go™ — Passive Entry
(If Equipped) .....................................................23
Automatic Door Locks — If Equipped .............24
Child-Protection Door Lock System —
Rear Doors ........................................................24
STEERING WHEEL ..................................................25
Manual Tilt/Telescoping Steering Column .....25
SEATS ......................................................................26
Manual Adjustment (Front Seats) ...................26
Manual Adjustment (Rear Seats) ....................27
Power Adjustment Front Seats —
If Equipped........................................................28
Heated Seats — If Equipped ...........................29
Head Restraints ..............................................30
UCONNECT VOICE RECOGNITION .........................32
Introducing Voice Recognition.........................32
Get Started .......................................................32
Basic Voice Commands ...................................32
Additional Information .....................................32
MIRRORS ...............................................................33
Inside Rearview Mirror .....................................33
Illuminated Vanity Mirrors —
If Equipped .......................................................33
Outside Mirrors ................................................34
Power Mirrors ...................................................34
Folding Mirror ...................................................34
Power Folding Mirrors — If Equipped ..............35
Heated Mirrors — If Equipped..........................35 EXTERIOR LIGHTS.................................................. 36
Headlight Switch ............................................. 36
Daytime Running Lights (DRLs) —
If Equipped ...................................................... 36
High Beams ...................................................... 36
Automatic High Beam Headlamp Control —
If Equipped .......................................................37
Flash-To-Pass ................................................... 37
Automatic Headlights — If Equipped .............. 37
Parking Lights ................................................... 37
Headlight Time Delay ...................................... 37
Front Fog Lights — If Equipped .......................38
Turn Signals...................................................... 38
Lane Change Assist ......................................... 38
Courtesy Lights/Approaching Lights ............... 38
INTERIOR LIGHTS ................................................. 38
Front Courtesy Light......................................... 38
Cargo Area Lights ............................................. 40
WINDSHIELD WIPERS AND WASHERS .............. 40
Windshield Wiper Operation ........................... 40
Rain Sensing Wipers — If Equipped ................41
Rear Window Wiper/Washer ........................... 42
Windshield Wiper De-Icer — If Equipped ........ 42
CLIMATE CONTROLS ............................................ 43
Automatic Climate Control Descriptions And
Functions .......................................................... 43
Manual Climate Control Descriptions And
Functions .......................................................... 46
Automatic Temperature Control (ATC) ........... 48
Climate Voice Recognition............................... 48
Operating Tips .................................................48
22_FD_OM_EN_USC_t.book Page 2
Page 9 of 312
7
INTRODUCTION
Dear Customer,
Congratulations on the purchase of your new FIAT® vehicle. Be assured that it represents precision workmanship, distinctive styling, and high quality. This
Owner's Manual has been prepared with the assistance of service and engineering specialists to acquaint you with the operation and maintenance of your
vehicle. It is supplemented by customer-oriented documents. Within this information, you will find a description of the services that FCA US LLC offers to its
customers as well as the details of the terms and conditions for maintaining its validity. Please take the time to read all of these publications carefully before
driving your vehicle for the first time. Following the instructions, recommendations, tips, and important warnings in this manual will help ensure safe and
enjoyable operation of your vehicle.
This Owner's Manual describes all versions of this vehicle. Options and equipment dedicated to specific markets or versions are not expressly indicated in the
text. Therefore, you should only consider the information that is related to the trim level, engine, and version that you have purchased. Any content introduced
throughout the Owner's Information, which may or may not be applicable to your vehicle, will be identified with the wording “If Equipped”. All data contained in
this publication are intended to help you use your vehicle in the best possible way. FCA US LLC aims at a constant improvement of the vehicles produced. For
this reason, it reserves the right to make changes to the model described for technical and/or commercial reasons. For further information, contact an authorized
dealer.
When it comes to service, remember that authorized dealers know your vehicle best, have factory-trained technicians, genuine Mopar® parts, and care about
your satisfaction.1
22_FD_OM_EN_USC_t.book Page 7
Page 22 of 312
20GETTING TO KNOW YOUR VEHICLE
message “Remote Start Active — Push Start
Button” will display in the instrument cluster
display until you push the START/STOP ignition
button.
To avoid unintentional shutdowns, the system
will disable for two seconds after receiving a
valid Remote Start request.
REMOTE START FRONT DEFROST
A
CTIVATION — IF EQUIPPED
When Remote Start is active, and the outside
ambient temperature is 40°F (4.5°C) or below, the
system will automatically activate front defrost for
15 minutes or less. The timing is dependent on the
ambient temperature. Once the timer expires, the
system will automatically adjust the settings
depending on ambient conditions. See “Remote
Start Comfort Systems — If Equipped” in the next
section for detailed operation.
REMOTE START COMFORT SYSTEMS —
I
F EQUIPPED
When Remote Start is activated, the front and rear
defrost will automatically turn on in cold weather.
The heated steering wheel and driver heated seat
feature will turn on if selected in the comfort menu
screen within Uconnect Settings Úpage 123. The
vehicle will adjust the climate control settings
depending on the outside ambient temperature. Automatic Temperature Control (ATC) —
If Equipped
The climate controls will be automatically adjusted
to the optimal temperature and mode settings
depending on the outside ambient temperature.
This will occur until the ignition is placed in the ON/
RUN position where the climate controls will
resume their previous settings.
Manual Temperature Control (MTC) — If Equipped
In ambient temperatures at 40°F (4.5°C) or
below, the climate settings will default to
maximum heat, with fresh air entering the
cabin. If the front defrost timer expires, the
vehicle will enter Mix Mode.
In ambient temperatures from 40°F (4.5°C) to
78°F (26°C), the climate settings will be based
on the last settings selected by the driver.
In ambient temperatures at 78°F (26°C) or
above, the climate settings will default to MAX
A/C, Bi-Level Mode, with Recirculation on.
For more information on ATC, MTC, and climate
control settings, see Ú page 43.
NOTE:These features will stay on through the duration of
Remote Start until the ignition is placed in the ON/
RUN position. The climate control settings will
change if manually adjusted by the driver while the
vehicle is in Remote Start mode, and exit auto -matic override. This includes the OFF button on the
climate controls, which will turn the system off.
REMOTE START WINDSHIELD WIPER
D
E–ICER AND REAR DEFROST
A
CTIVATION — IF EQUIPPED
When Remote Start is active and the outside
ambient temperature is less than 40°F (4.4°C),
the Windshield Wiper De-Icer will activate. Exiting
Remote Start will resume its previous operation. If
the Windshield Wiper De-Icer was active, the timer
and operation will continue.
REMOTE START CANCEL MESSAGE —
I
F EQUIPPED
The following messages will display in the
instrument cluster if the vehicle fails to remote
start or exits Remote Start prematurely:
Remote Start Cancelled — Door Open
Remote Start Cancelled — Hood Open
Remote Start Cancelled — Fuel Low
Remote Start Cancelled — Liftgate Open
Remote Start Cancelled — Too Cold
Remote Start Cancelled — Time Expired
Remote Start Disabled — Start Vehicle To Reset
The message will stay active until the ignition is
placed in the ON/RUN position.
22_FD_OM_EN_USC_t.book Page 20
Page 31 of 312
GETTING TO KNOW YOUR VEHICLE29
(Continued)
Adjusting The Seat Up Or Down
The height of the seats can be adjusted up or down
by using the power seat switch. The seat will move
in the direction of the switch. Release the switch
when the desired position is reached.
Tilting The Seat Up Or Down
The angle of the seat cushion can be adjusted up
or down using the power seat switch. The front of
the seat cushion will move in the direction of the
switch. Release the switch when the desired
position has been reached.
Reclining The Seatback
Push the seat recliner switch forward or rearward.
The seatback will move in the direction of the
switch. Release the switch when the desired
position has been reached.
Power Lumbar — If Equipped
Vehicles equipped with power driver or passenger
seats may also be equipped with power lumbar.
The power lumbar switch is located on the
outboard side of the power seat. Push the switch
forward to increase the lumbar support. Push the
switch rearward to decrease the lumbar support.
Pushing upward or downward on the switch will
raise and lower the position of the support.
HEATED SEATS — IF EQUIPPED
The heated seat switches are located on
the instrument panel.
You can choose between two heating levels:
Push the heated seat button once to turn the HI
setting on.
Push the heated seat button a second time to
turn the LO setting on.
Push the heated seat button a third time to turn
the heating elements off.
If the HI-level setting is selected, the system will
automatically switch to LO-level after
approximately 145 minutes of continuous
operation. At that time, the display will change
from HI to LO, indicating the change. The LO-level
setting will turn off automatically after
approximately 60 minutes.
NOTE:
The timing may vary based on environmental
temperature.
The engine must be running for the heated
seats to operate.
For information on use with the Remote Start
system, see Ú page 20.
WARNING!
Adjusting a seat while driving may be
dangerous. Moving a seat while driving could
result in loss of control which could cause a
collision and serious injury or death.
Seats should be adjusted before fastening the
seat belts and while the vehicle is parked.
Serious injury or death could result from a
poorly adjusted seat belt.
Do not ride with the seatback reclined so that
the shoulder belt is no longer resting against
your chest. In a collision you could slide under
the seat belt, which could result in serious
injury or death.
CAUTION!
Do not place any article under a power seat or
impede its ability to move as it may cause
damage to the seat controls. Seat travel may
become limited if movement is stopped by an
obstruction in the seat’s path.
WARNING!
2
22_FD_OM_EN_USC_t.book Page 29
Page 39 of 312
GETTING TO KNOW YOUR VEHICLE37
AUTOMATIC HIGH BEAM HEADLAMP
C
ONTROL — IF EQUIPPED
The Automatic High Beam Headlamp Control
system provides increased forward lighting at night
by automating high beam control through the use
of a digital camera mounted on the windshield.
This camera detects vehicle specific light and
automatically switches from high beams to low
beams until the approaching vehicle is out of view.
NOTE:
The Automatic High Beam Headlamp Control
can be turned on or off through Uconnect
Settings Ú page 123.
Broken, muddy, or obstructed headlights and
taillights of vehicles in the field of view will
cause headlights to remain on longer (closer to
the vehicle). Also, dirt, film, and other obstruc -
tions on the windshield or camera lens will
cause the system to function improperly.
FLASH-TO-PASS
You can signal another vehicle with your headlights
by lightly pulling the multifunction lever toward you.
This will cause the high beam headlights to turn on,
and remain on, until the lever is released.
AUTOMATIC HEADLIGHTS — IF EQUIPPED
This system automatically turns the headlights on
or off according to ambient light levels. To turn the
system on, rotate the headlight switch clockwise to
the last detent (AUTO position) for automatic
headlight operation. To turn the automatic system
off, move the headlight switch out of the AUTO
position.
NOTE:The ignition must be in the ON/RUN or START
position before the headlights will come on in the
automatic mode.
Light Sensor
The light sensor is equipped with an infrared LED,
located on the windshield. It detects changes in
light intensity outside the vehicle, based on the
sensitivity of light set by using the menu on the
display or on the Uconnect system.
The higher the sensitivity, the lesser the amount of
external light required for controlling the lighting.
PARKING LIGHTS
Rotate the headlight switch to the first position to
turn on the parking lights. The parking light
indicator in the cluster will illuminate.
HEADLIGHT TIME DELAY
This feature provides the safety of headlight
illumination for up to 90 seconds when leaving
your vehicle in an unlit area.
The time delay of the headlights is programmable
between 0, 30, 60 and 90 seconds within
Uconnect Settings Ú page 123.
Headlight Delay Activation
To activate the delay feature, place the ignition in
the OFF position while the headlights are still on.
Then, turn off the headlights within two minutes.
The delay interval begins when the headlight
switch is turned off.
Headlight Delay Deactivation
The feature is disabled by turning on the
headlights, the parking lights or by placing the
ignition in the ON/RUN position.
If you shut off the lights before the ignition is
turned on, they will turn off in the normal manner.
NOTE:The lights must be turned off within two minutes of
placing the ignition in the OFF position to activate
this feature.
2
22_FD_OM_EN_USC_t.book Page 37
Page 40 of 312
38GETTING TO KNOW YOUR VEHICLE
FRONT FOG LIGHTS — IF EQUIPPED
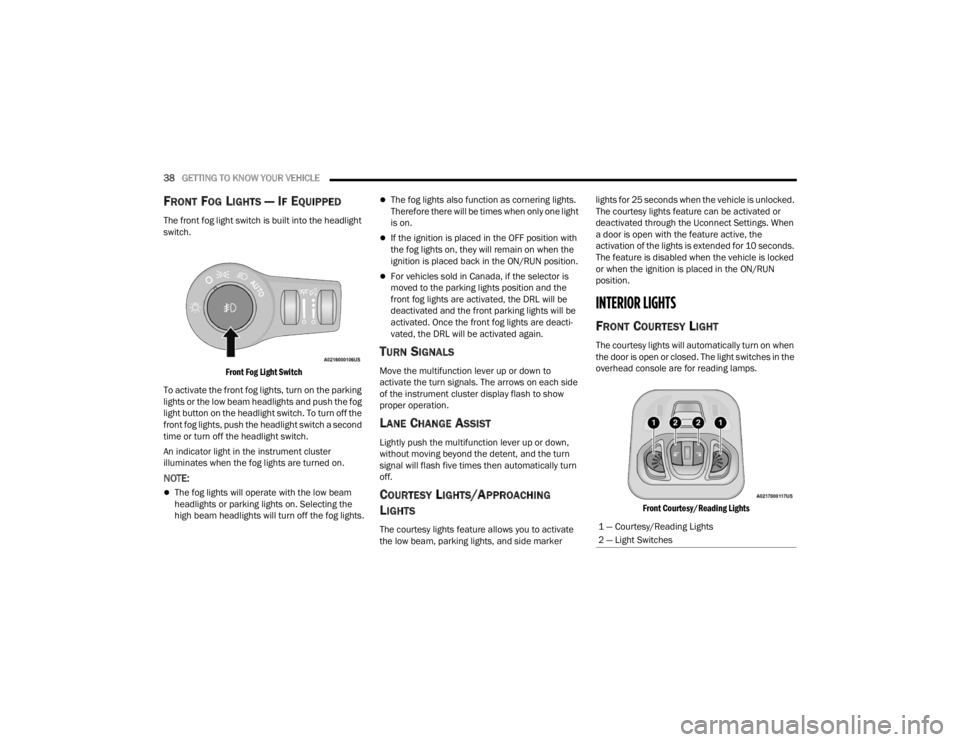
The front fog light switch is built into the headlight
switch.
Front Fog Light Switch
To activate the front fog lights, turn on the parking
lights or the low beam headlights and push the fog
light button on the headlight switch. To turn off the
front fog lights, push the headlight switch a second
time or turn off the headlight switch.
An indicator light in the instrument cluster
illuminates when the fog lights are turned on.
NOTE:
The fog lights will operate with the low beam
headlights or parking lights on. Selecting the
high beam headlights will turn off the fog lights.
The fog lights also function as cornering lights.
Therefore there will be times when only one light
is on.
If the ignition is placed in the OFF position with
the fog lights on, they will remain on when the
ignition is placed back in the ON/RUN position.
For vehicles sold in Canada, if the selector is
moved to the parking lights position and the
front fog lights are activated, the DRL will be
deactivated and the front parking lights will be
activated. Once the front fog lights are deacti -
vated, the DRL will be activated again.
TURN SIGNALS
Move the multifunction lever up or down to
activate the turn signals. The arrows on each side
of the instrument cluster display flash to show
proper operation.
LANE CHANGE ASSIST
Lightly push the multifunction lever up or down,
without moving beyond the detent, and the turn
signal will flash five times then automatically turn
off.
COURTESY LIGHTS/APPROACHING
L
IGHTS
The courtesy lights feature allows you to activate
the low beam, parking lights, and side marker lights for 25 seconds when the vehicle is unlocked.
The courtesy lights feature can be activated or
deactivated through the Uconnect Settings. When
a door is open with the feature active, the
activation of the lights is extended for 10 seconds.
The feature is disabled when the vehicle is locked
or when the ignition is placed in the ON/RUN
position.
INTERIOR LIGHTS
FRONT COURTESY LIGHT
The courtesy lights will automatically turn on when
the door is open or closed. The light switches in the
overhead console are for reading lamps.
Front Courtesy/Reading Lights
1 — Courtesy/Reading Lights
2 — Light Switches
22_FD_OM_EN_USC_t.book Page 38
Page 54 of 312
52GETTING TO KNOW YOUR VEHICLE
POWER OUTLETS
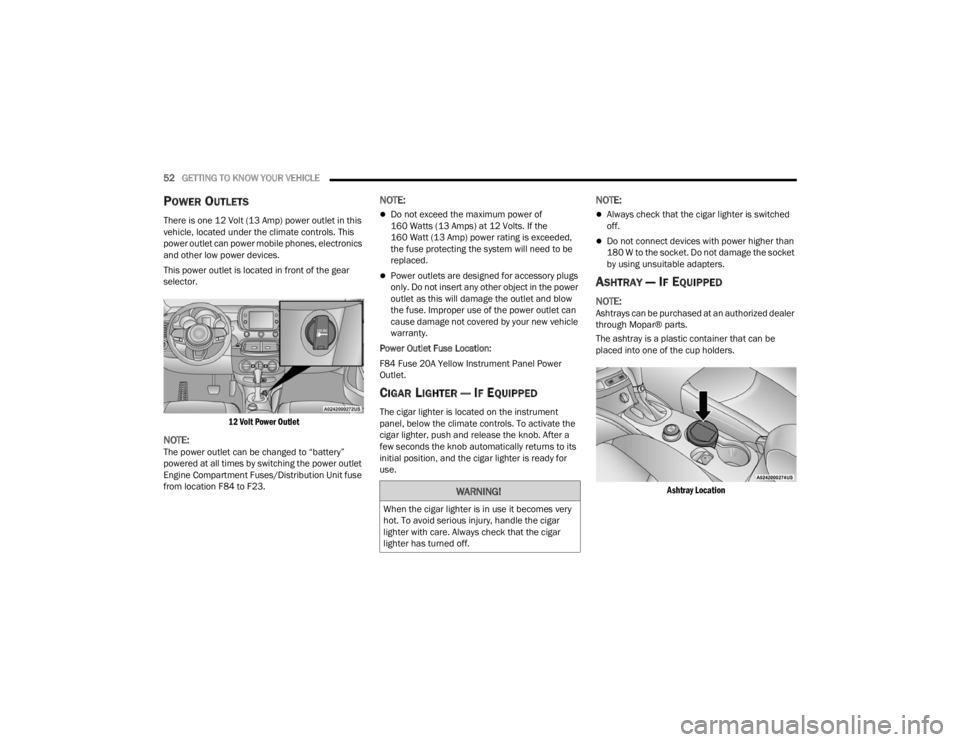
There is one 12 Volt (13 Amp) power outlet in this
vehicle, located under the climate controls. This
power outlet can power mobile phones, electronics
and other low power devices.
This power outlet is located in front of the gear
selector.
12 Volt Power Outlet
NOTE:The power outlet can be changed to “battery”
powered at all times by switching the power outlet
Engine Compartment Fuses/Distribution Unit fuse
from location F84 to F23.
NOTE:
Do not exceed the maximum power of
160 Watts (13 Amps) at 12 Volts. If the
160 Watt (13 Amp) power rating is exceeded,
the fuse protecting the system will need to be
replaced.
Power outlets are designed for accessory plugs
only. Do not insert any other object in the power
outlet as this will damage the outlet and blow
the fuse. Improper use of the power outlet can
cause damage not covered by your new vehicle
warranty.
Power Outlet Fuse Location:
F84 Fuse 20A Yellow Instrument Panel Power
Outlet.
CIGAR LIGHTER — IF EQUIPPED
The cigar lighter is located on the instrument
panel, below the climate controls. To activate the
cigar lighter, push and release the knob. After a
few seconds the knob automatically returns to its
initial position, and the cigar lighter is ready for
use.
NOTE:
Always check that the cigar lighter is switched
off.
Do not connect devices with power higher than
180 W to the socket. Do not damage the socket
by using unsuitable adapters.
ASHTRAY — IF EQUIPPED
NOTE:Ashtrays can be purchased at an authorized dealer
through Mopar® parts.
The ashtray is a plastic container that can be
placed into one of the cup holders.
Ashtray Location
WARNING!
When the cigar lighter is in use it becomes very
hot. To avoid serious injury, handle the cigar
lighter with care. Always check that the cigar
lighter has turned off.
22_FD_OM_EN_USC_t.book Page 52
Page 67 of 312

GETTING TO KNOW YOUR INSTRUMENT PANEL65
The instrument cluster display features a driver
interactive display that is located in the instrument
cluster. Pushing the controls on the left side of the
steering wheel allows the driver to select vehicle
information and Personal Settings.
Push the back/left arrow button to access
the information screens or submenu screens of
a main menu item.
Push the up arrow button to scroll upward
through the main menus and submenus
(Speedometer, Trip, Drive Mode Selector,
Vehicle Info, Driver Assist, Audio, Phone, Naviga -
tion, Messages, Settings).
Push the right arrow button to access the
information screens or submenu screens of a
main menu item.
Push the down arrow button to scroll down -
ward through the main menu and submenus
(Speedometer, Trip, Drive Mode Selector,
Vehicle Info, Driver Assist, Audio, Phone, Naviga -
tion, Messages, Settings).
Push the OK button to access/select the infor -
mation screens or submenu screens of a main
menu item. Push and hold the OK button for two
seconds to reset displayed/selected features
that can be reset.
ENGINE OIL CHANGE RESET —
I
F EQUIPPED
Your vehicle may be equipped with an engine oil
change indicator system. The “Change Engine Oil”
message will display in the instrument cluster
display. The engine oil change indicator system is
duty cycle based, which means the engine oil
change interval may fluctuate, dependent upon
your personal driving style.
Unless reset, this message will continue to display
each time you turn the ignition switch to the ON/
RUN position. To reset the oil change indicator
system (after performing the scheduled
maintenance), refer to the following procedure.
1. Turn the ignition switch to the ON position (do
not start the engine).
2. Fully push the accelerator pedal slowly, three times, within 10 seconds.
3. Turn the ignition switch to the OFF position.
NOTE:If the indicator message illuminates when you start
the vehicle, the oil change indicator system did not
reset. If necessary, repeat this procedure.
INSTRUMENT CLUSTER DISPLAY MAIN
M
ENU
The Main Menu is composed of several options
that can be selected using the control buttons
above.
NOTE:
The display mode of the menu items varies
depending on the type of display.
For some items, a submenu is provided.
In the Uconnect system, some items on the
menu are not shown on the instrument cluster
display Ú page 64.
Instrument Cluster Display Menu/
Submenu Items
The Menu is composed of the following items:
Speedometer
Trip
Instantaneous Info
Trip A
Trip B
Drive Mode Selector — If Equipped
Auto Mode
Sport Mode
All Weather Mode
3
22_FD_OM_EN_USC_t.book Page 65
Page 68 of 312
66GETTING TO KNOW YOUR INSTRUMENT PANEL
Vehicle Info
Tire Pressure
Oil Temperature
Battery Voltage
Driver Assist
Lane Departure Warning
Adaptive Cruise Control
Stop/Start — If Equipped
Audio
Phone
Navigation
Messages
Settings
Display
Units
Clock and Date
Security
Safety & Assistance
Lights
Doors & Locks
Engine OFF Procedure — If Equipped
Speedometer
View and change the speedometer scale from mph
to km/h (km/h to mph).
Trip
This instrument cluster display menu item allows
you to view and select information about the "Trip
Computer”:
Instantaneous info
View the distance to empty (miles or km).
View the instantaneous consumption (mpg,
or l/100km or km/l).
Trip A
View Trip A distance (miles or km).
View travel time A (hours/minutes/
seconds).
View average consumption A (mpg, or
l/100km or km/l).
View average speed A (mph or km/h).
Trip B
View Trip B distance (miles or km).
View travel time B (hours/minutes/
seconds).
View average consumption B (mpg, or
l/100km or km/l).
View average speed B (mph or km/h).
Drive Mode Selector
This instrument cluster display menu/submenu
items allows you to view and select information
about the "Drive Mode".
Vehicle Info
Push and release the up or down arrow
button until "Vehicle Info" is highlighted in the
instrument cluster display. Push and release the
right arrow button and Coolant Temp will be
displayed. Push the right or left arrow button
to scroll through the following information displays:
Tire pressure
View the information relating to the Tire
Pressure Monitoring System (TPMS) (if
equipped).
Oil Temperature
View the engine oil temperature.
Battery Voltage
View the voltage value (state of charge) of
the battery.
22_FD_OM_EN_USC_t.book Page 66
Page 69 of 312
GETTING TO KNOW YOUR INSTRUMENT PANEL67
Driver Assist
This menu item allows you to change the settings
(Notice LaneSense and Intensity LaneSense)
relating to the LaneSense system (if equipped):
Notice LaneSense
By selecting this function, you can select the
“readiness” of LaneSense, choosing between
the options "Near," "Medium," or "Far."
Intensity LaneSense
Using this function, you can select the force
applied to the steering wheel to keep the car in
the roadway through the electrical drive system
due to LaneSense.
Stop/Start – If Equipped
Automatically stops the engine during a vehicle
stop under the right conditions to reduce fuel
consumption.
Push and release the up or down arrow
button until the Stop/Start menu title is displayed
in the instrument cluster. This menu shows
messages related to Stop/Start. Only one message
can be viewed at a time until the condition is
cleared.
When the Stop/Start is engaged (and the engine is
off), the associated hardware indicator light is
turned on. When the Stop/Start button on the central stack is pushed, a Stop/Start status
message will appear in the instrument cluster
display.
Audio
This menu item allows you to view the instrument
cluster display and the information present on the
display of the Uconnect system.
The information displayed is:
“Radio (AM or FM)”: view Radio Station Name (if
equipped), frequency, and graphical icon.
MP3: title display or song number playing.
USB: title display or song number playing.
Ipod: display the song title and graphic element.
Bluetooth®: displays the song title and a
graphic element.
SAT: displays the station name and a graphic
element.
APP: displays strings and a graphic element.
Phone
This menu displays the current status of a phone
connected to the vehicle via Bluetooth®.
If no phone is connected, the menu will not
function when the
OK button is pushed. Otherwise,
if a phone is connected, push the OK button to
enter the menu. The following items will display:
Recent calls: displays a list of the last 10 calls.
SMS reader: displays the last 10 text messages
and if they are read or unread.
Favorite numbers: displays a maximum of six
favorite numbers.
Navigation
If activated, this menu item will display navigation
status and directions.
Messages (Stored)
This menu item allows you to display the
information messages/malfunction stored.
The background color of the display varies
according to the priorities of the failure:
Failed Messages with low priority display in
yellow.
Failed Messages with high priority display in red.
Settings
This menu item allows you to change the settings
for the following:
Display
Units
Clock and Date
Security
Safety and Assistance
3
22_FD_OM_EN_USC_t.book Page 67