FIAT BRAVO 2013 2.G Owners Manual
Manufacturer: FIAT, Model Year: 2013, Model line: BRAVO, Model: FIAT BRAVO 2013 2.GPages: 299, PDF Size: 5.86 MB
Page 201 of 299
REPLACING EXTERIOR BULBSFor the type of bulb and power rating, see
“Changing a bulb" paragraph.
FRONT LIGHT CLUSTERS
The front light clusters contain side lights, dipped
headlights, main beam headlights and direction
indicator bulbs.
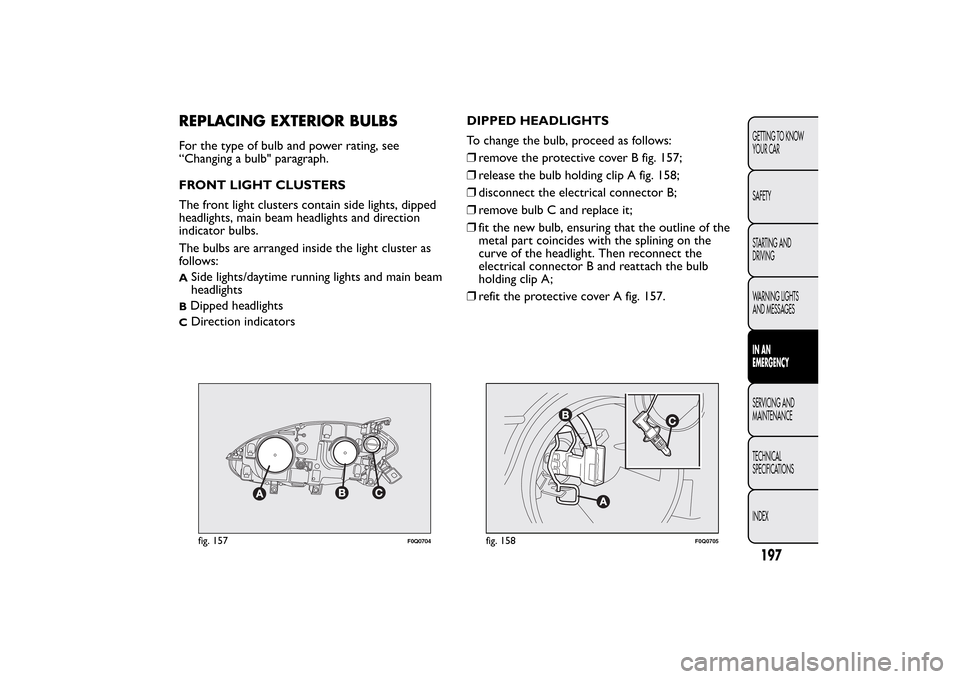
The bulbs are arranged inside the light cluster as
follows:A
Side lights/daytime running lights and main beam
headlights
BDipped headlightsC
Direction indicatorsDIPPED HEADLIGHTS
To change the bulb, proceed as follows:
❒remove the protective cover B fig. 157;
❒release the bulb holding clip A fig. 158;
❒disconnect the electrical connector B;
❒remove bulb C and replace it;
❒fit the new bulb, ensuring that the outline of the
metal part coincides with the splining on the
curve of the headlight. Then reconnect the
electrical connector B and reattach the bulb
holding clip A;
❒refit the protective cover A fig. 157.fig. 157
F0Q0704
fig. 158
F0Q0705
197GETTING TO KNOW
YOUR CAR
SAFETY
STARTING AND
DRIVING
WARNING LIGHTS
AND MESSAGESIN AN
EMERGENCYSERVICING AND
MAINTENANCE
TECHNICAL
SPECIFICATIONS
INDEX
Page 202 of 299
WARNING
Due to the high power supply voltage,
gas discharge bulbs (Bi-Xenon) should
only be replaced by specialised personnel:
danger of death! Contact a Fiat Dealership.
SIDE LIGHTS
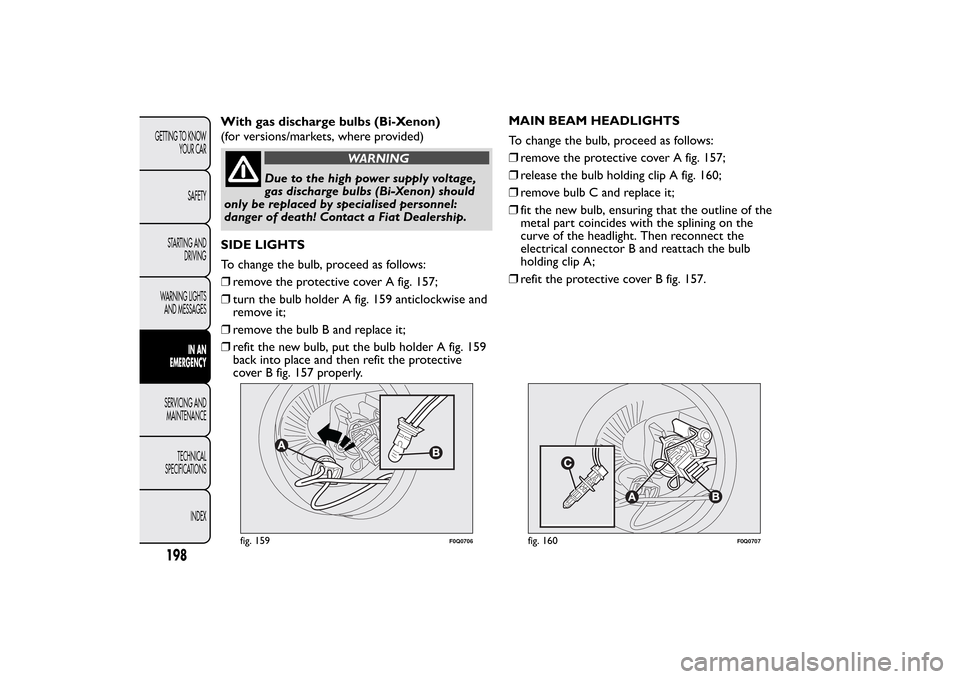
To change the bulb, proceed as follows:
❒remove the protective cover A fig. 157;
❒turn the bulb holder A fig. 159 anticlockwise and
remove it;
❒remove the bulb B and replace it;
❒refit the new bulb, put the bulb holder A fig. 159
back into place and then refit the protective
cover B fig. 157 properly.MAIN BEAM HEADLIGHTS
To change the bulb, proceed as follows:
❒remove the protective cover A fig. 157;
❒release the bulb holding clip A fig. 160;
❒remove bulb C and replace it;
❒fit the new bulb, ensuring that the outline of the
metal part coincides with the splining on the
curve of the headlight. Then reconnect the
electrical connector B and reattach the bulb
holding clip A;
❒refit the protective cover B fig. 157.
fig. 159
F0Q0706
fig. 160
F0Q0707
198GETTING TO KNOW
YOUR CAR
SAFETY
STARTING AND
DRIVING
WARNING LIGHTS
AND MESSAGES
IN AN
EMERGENCY
SERVICING AND
MAINTENANCE
TECHNICAL
SPECIFICATIONS
INDEX
With gas discharge bulbs (Bi-Xenon)
(for versions/markets, where provided)
Page 203 of 299
DIRECTION INDICATORS
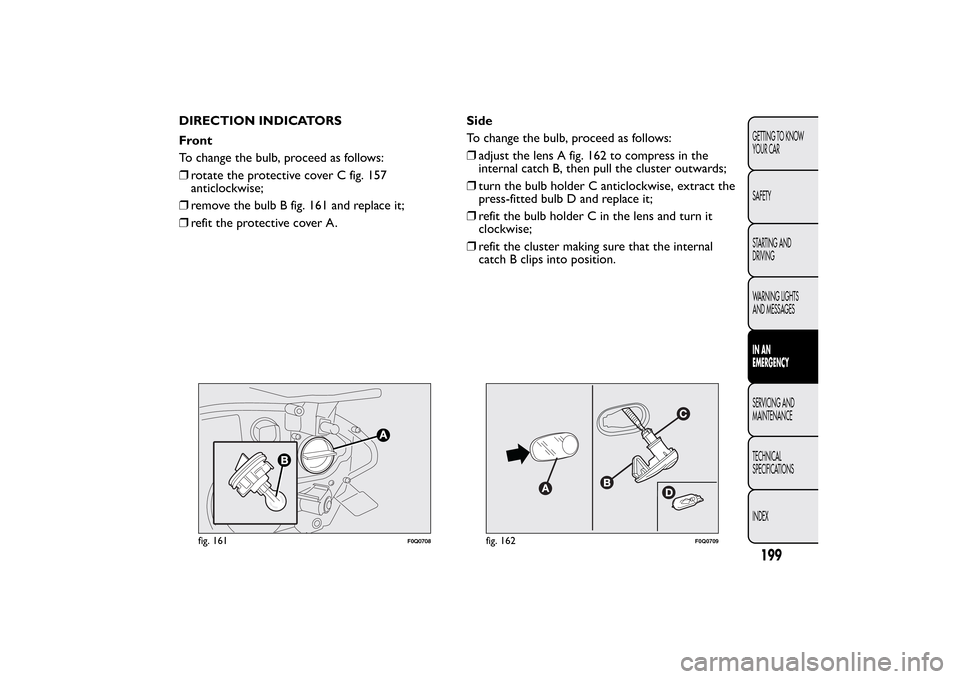
Front
To change the bulb, proceed as follows:
❒rotate the protective cover C fig. 157
anticlockwise;
❒remove the bulb B fig. 161 and replace it;
❒refit the protective cover A.Side
To change the bulb, proceed as follows:
❒adjust the lens A fig. 162 to compress in the
internal catch B, then pull the cluster outwards;
❒turn the bulb holder C anticlockwise, extract the
press-fitted bulb D and replace it;
❒refit the bulb holder C in the lens and turn it
clockwise;
❒refit the cluster making sure that the internal
catch B clips into position.
fig. 161
F0Q0708
fig. 162
F0Q0709
199GETTING TO KNOW
YOUR CAR
SAFETY
STARTING AND
DRIVING
WARNING LIGHTS
AND MESSAGESIN AN
EMERGENCYSERVICING AND
MAINTENANCE
TECHNICAL
SPECIFICATIONS
INDEX
Page 204 of 299
FOG LIGHTS
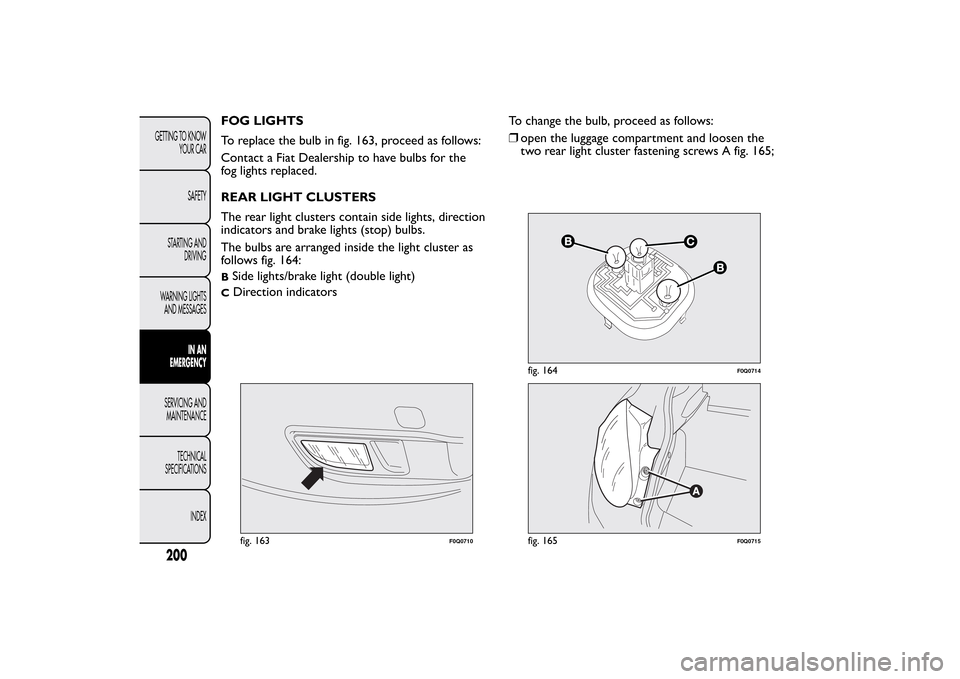
To replace the bulb in fig. 163, proceed as follows:
Contact a Fiat Dealership to have bulbs for the
fog lights replaced.
REAR LIGHT CLUSTERS
The rear light clusters contain side lights, direction
indicators and brake lights (stop) bulbs.
The bulbs are arranged inside the light cluster as
follows fig. 164:BSide lights/brake light (double light)C
Direction indicatorsTo change the bulb, proceed as follows:
❒open the luggage compartment and loosen the
two rear light cluster fastening screws A fig. 165;fig. 163
F0Q0710
fig. 164
F0Q0714
fig. 165
F0Q0715
200GETTING TO KNOW
YOUR CAR
SAFETY
STARTING AND
DRIVING
WARNING LIGHTS
AND MESSAGES
IN AN
EMERGENCY
SERVICING AND
MAINTENANCE
TECHNICAL
SPECIFICATIONS
INDEX
Page 205 of 299
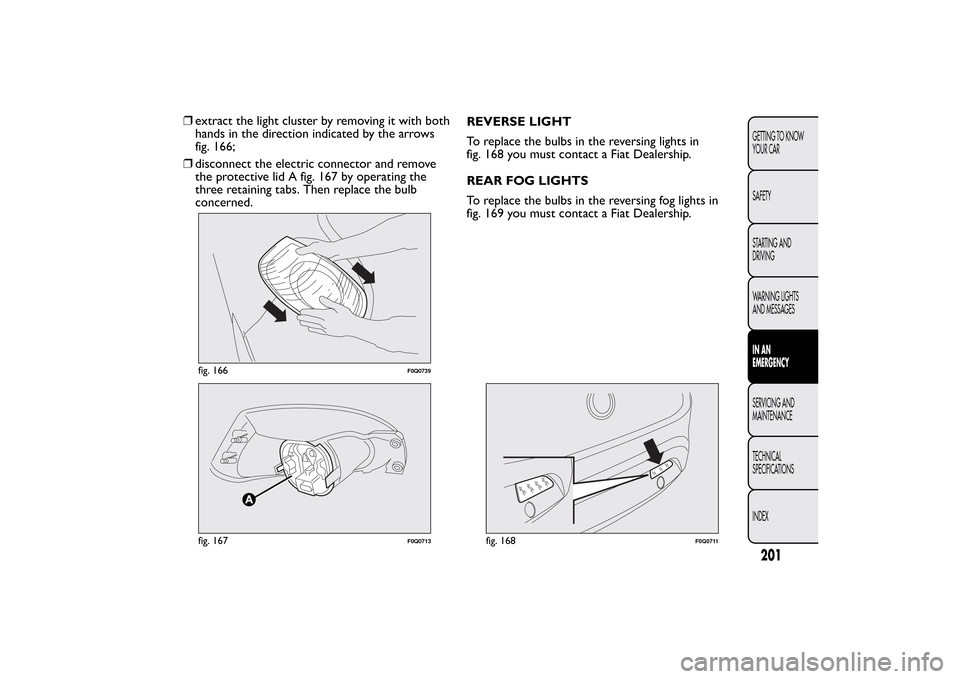
❒extract the light cluster by removing it with both
hands in the direction indicated by the arrows
fig. 166;
❒disconnect the electric connector and remove
the protective lid A fig. 167 by operating the
three retaining tabs. Then replace the bulb
concerned.REVERSE LIGHT
To replace the bulbs in the reversing lights in
fig. 168 you must contact a Fiat Dealership.
REAR FOG LIGHTS
To replace the bulbs in the reversing fog lights in
fig. 169 you must contact a Fiat Dealership.
fig. 166
F0Q0739
fig. 167
F0Q0713
fig. 168
F0Q0711
201GETTING TO KNOW
YOUR CAR
SAFETY
STARTING AND
DRIVING
WARNING LIGHTS
AND MESSAGESIN AN
EMERGENCYSERVICING AND
MAINTENANCE
TECHNICAL
SPECIFICATIONS
INDEX
Page 206 of 299
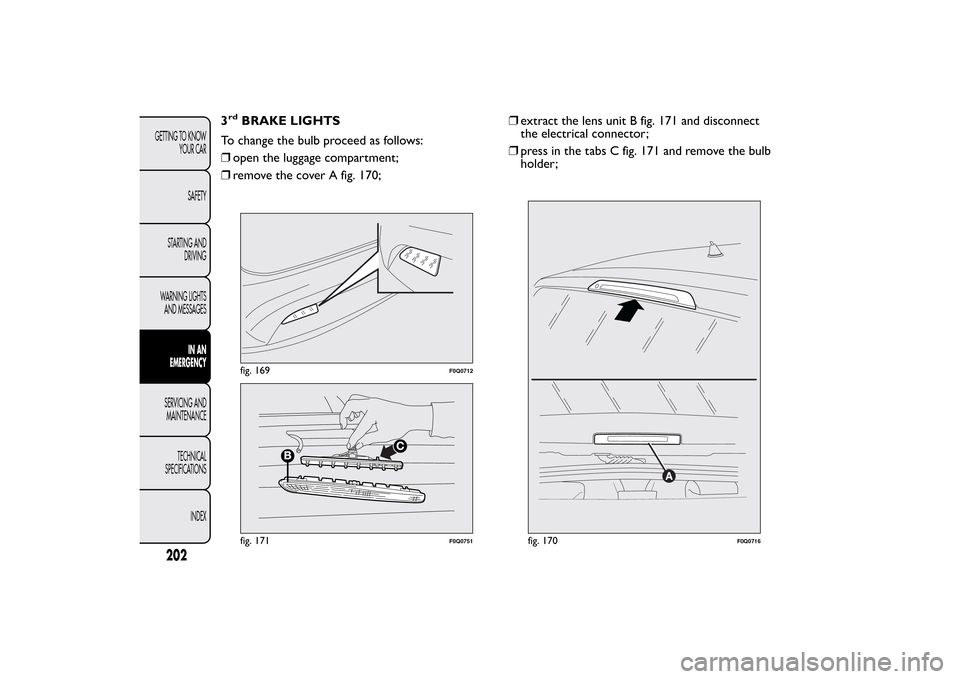
3rd
BRAKE LIGHTS
To change the bulb proceed as follows:
❒open the luggage compartment;
❒remove the cover A fig. 170;❒extract the lens unit B fig. 171 and disconnect
the electrical connector;
❒press in the tabs C fig. 171 and remove the bulb
holder;fig. 169
F0Q0712
fig. 171
F0Q0751
fig. 170
F0Q0716
202GETTING TO KNOW
YOUR CAR
SAFETY
STARTING AND
DRIVING
WARNING LIGHTS
AND MESSAGES
IN AN
EMERGENCY
SERVICING AND
MAINTENANCE
TECHNICAL
SPECIFICATIONS
INDEX
Page 207 of 299
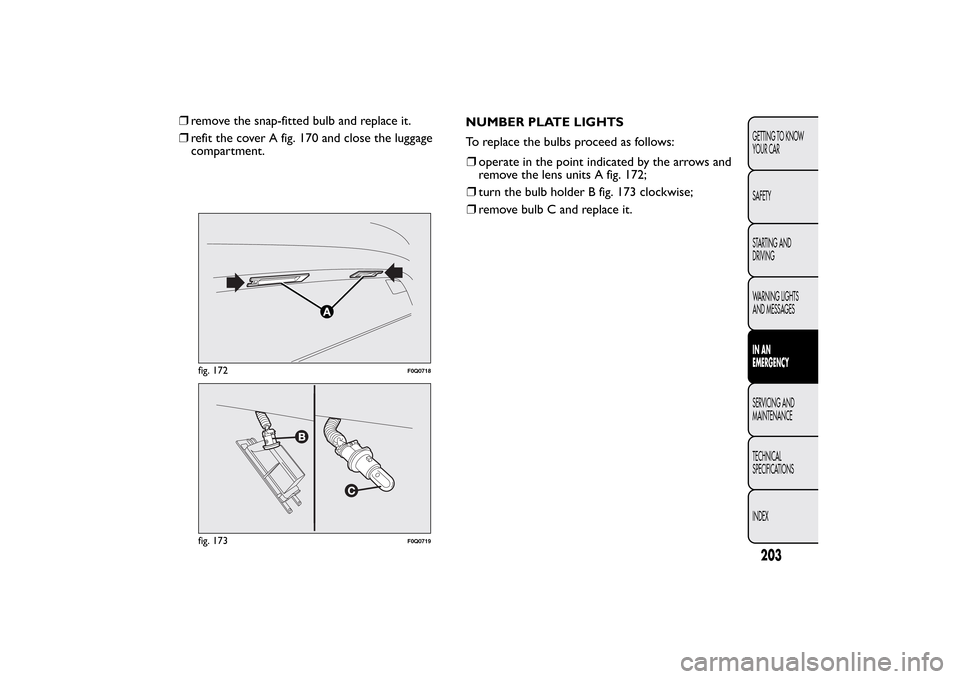
❒remove the snap-fitted bulb and replace it.
❒refit the cover A fig. 170 and close the luggage
compartment.NUMBER PLATE LIGHTS
To replace the bulbs proceed as follows:
❒operate in the point indicated by the arrows and
remove the lens units A fig. 172;
❒turn the bulb holder B fig. 173 clockwise;
❒remove bulb C and replace it.
fig. 172
F0Q0718
fig. 173
F0Q0719
203GETTING TO KNOW
YOUR CAR
SAFETY
STARTING AND
DRIVING
WARNING LIGHTS
AND MESSAGESIN AN
EMERGENCYSERVICING AND
MAINTENANCE
TECHNICAL
SPECIFICATIONS
INDEX
Page 208 of 299
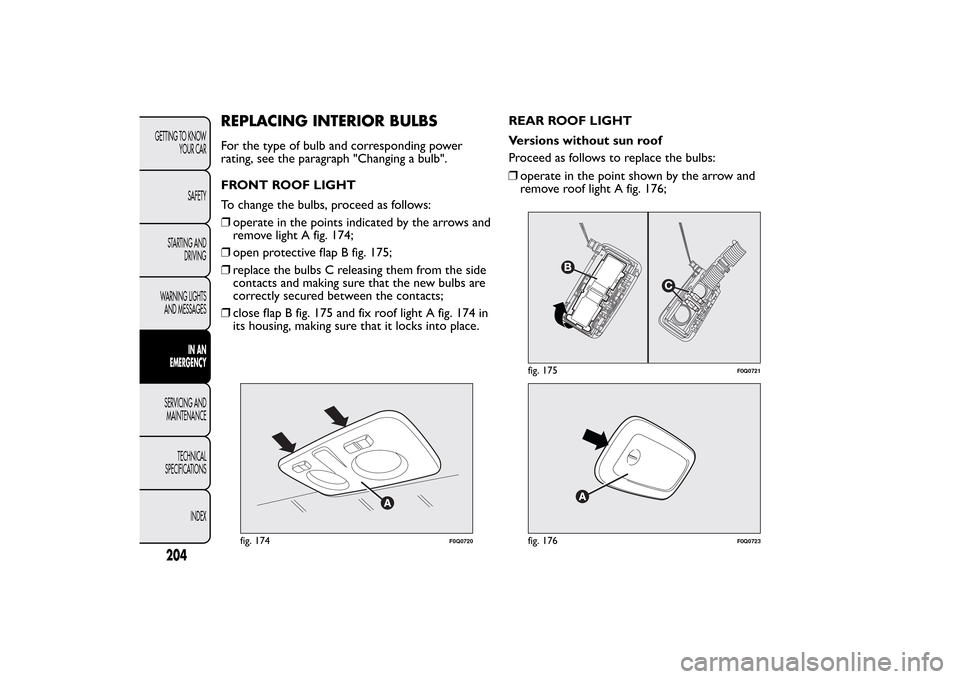
REPLACING INTERIOR BULBSFor the type of bulb and corresponding power
rating, see the paragraph "Changing a bulb".
FRONT ROOF LIGHT
To change the bulbs, proceed as follows:
❒operate in the points indicated by the arrows and
remove light A fig. 174;
❒open protective flap B fig. 175;
❒replace the bulbs C releasing them from the side
contacts and making sure that the new bulbs are
correctly secured between the contacts;
❒close flap B fig. 175 and fix roof light A fig. 174 in
its housing, making sure that it locks into place.REAR ROOF LIGHT
Versions without sun roof
Proceed as follows to replace the bulbs:
fig. 174
F0Q0720
fig. 175
F0Q0721
fig. 176
F0Q0723
204GETTING TO KNOW
YOUR CAR
SAFETY
STARTING AND
DRIVING
WARNING LIGHTS
AND MESSAGES
IN AN
EMERGENCY
SERVICING AND
MAINTENANCE
TECHNICAL
SPECIFICATIONS
INDEX
❒operate in the point shown by the arrow and
remove roof light A fig. 176;
Page 209 of 299
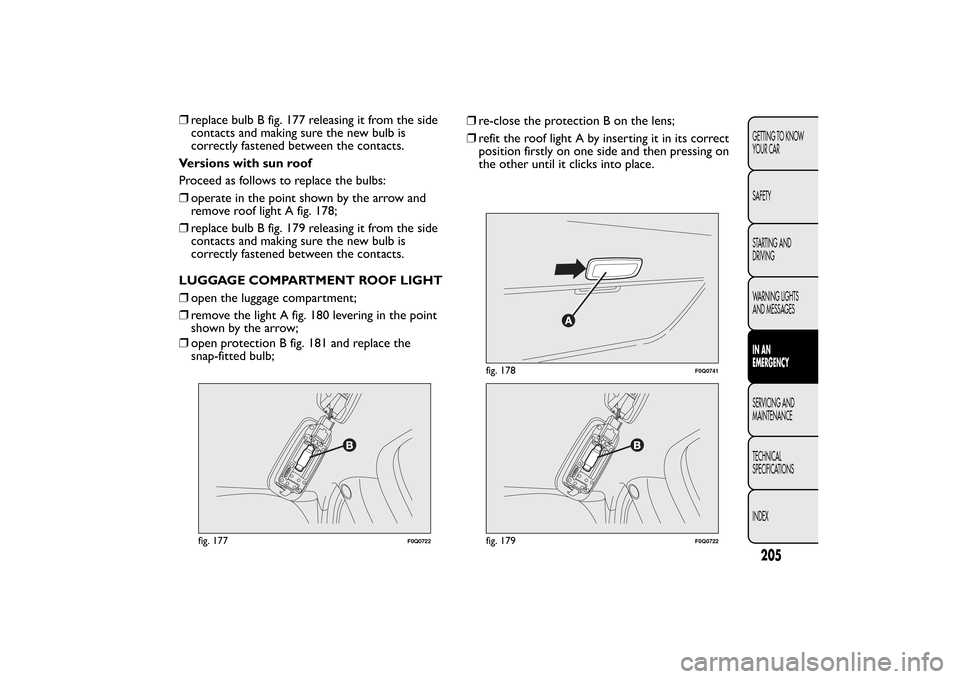
❒replace bulb B fig. 177 releasing it from the side
contacts and making sure the new bulb is
correctly fastened between the contacts.
Versions with sun roof
Proceed as follows to replace the bulbs:
❒operate in the point shown by the arrow and
remove roof light A fig. 178;
❒replace bulb B fig. 179 releasing it from the side
contacts and making sure the new bulb is
correctly fastened between the contacts.
LUGGAGE COMPARTMENT ROOF LIGHT
❒open the luggage compartment;
❒remove the light A fig. 180 levering in the point
shown by the arrow;
❒open protection B fig. 181 and replace the
snap-fitted bulb;❒re-close the protection B on the lens;
❒refit the roof light A by inserting it in its correct
position firstly on one side and then pressing on
the other until it clicks into place.
fig. 177
F0Q0722
fig. 178
F0Q0741
fig. 179
F0Q0722
205GETTING TO KNOW
YOUR CAR
SAFETY
STARTING AND
DRIVING
WARNING LIGHTS
AND MESSAGESIN AN
EMERGENCYSERVICING AND
MAINTENANCE
TECHNICAL
SPECIFICATIONS
INDEX
Page 210 of 299
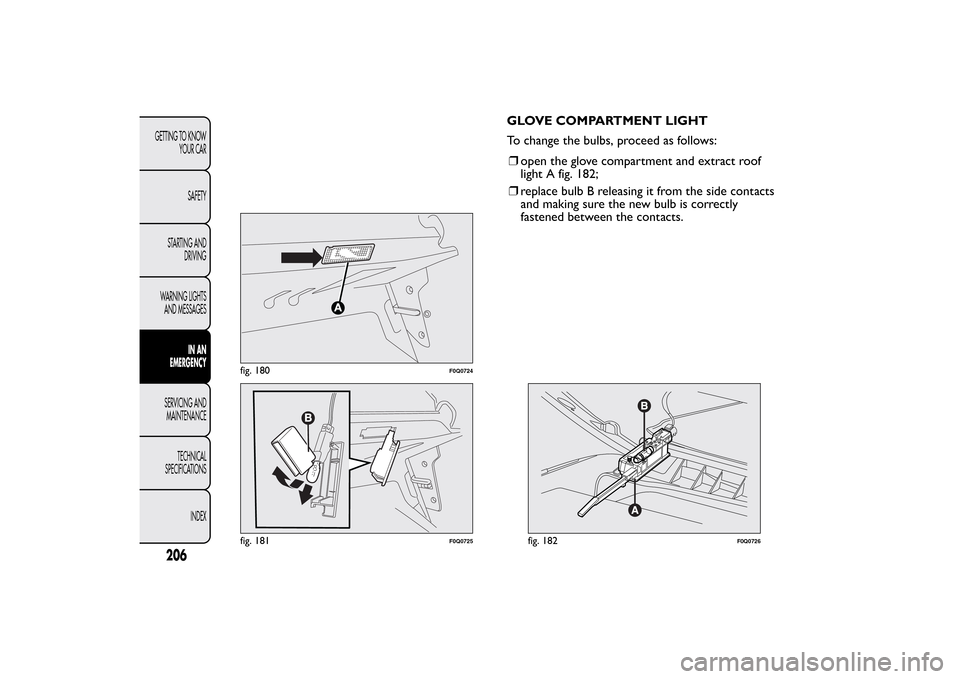
GLOVE COMPARTMENT LIGHT
To change the bulbs, proceed as follows:
❒open the glove compartment and extract roof
light A fig. 182;
❒replace bulb B releasing it from the side contacts
and making sure the new bulb is correctly
fastened between the contacts.
fig. 180
F0Q0724
fig. 181
F0Q0725
fig. 182
F0Q0726
206GETTING TO KNOW
YOUR CAR
SAFETY
STARTING AND
DRIVING
WARNING LIGHTS
AND MESSAGES
IN AN
EMERGENCY
SERVICING AND
MAINTENANCE
TECHNICAL
SPECIFICATIONS
INDEX