wheel FIAT DUCATO 2006 Owner handbook (in English)
[x] Cancel search | Manufacturer: FIAT, Model Year: 2006, Model line: DUCATO, Model: FIAT DUCATO 2006Pages: 238, PDF Size: 3.29 MB
Page 5 of 238
4
SAFETY
DEVICES
CORRECT USE
OF THE
VEHICLE
WARNING
LIGHTS AND
MESSAGES
IN AN
EMERGENCY
VEHICLE
MAINTENANCE
TECHNICAL
SPECIFICATIONS
INDEX
DASHBOARD
AND CONTROLSDASHBOARD ........................................................................ 5
SYMBOLS ................................................................................. 6
THE FIAT CODE SYSTEM ................................................... 6
THE KEYS ................................................................................ 8
IGNITION DEVICE ................................................................ 13
INSTRUMENT PANEL ......................................................... 14
INSTRUMENTS ....................................................................... 15
DIGITAL DISPLAY ................................................................ 18
MULTIFUNCTION DISPLAY ............................................. 24
TRIP COMPUTER ................................................................. 33
FRONT SEATS ....................................................................... 35
HEAD RESTRAINTS .............................................................. 38
STEERING WHEEL ............................................................... 39
REARVIEW MIRRORS ........................................................... 40
HEATING AND VENTILATION ....................................... 42
MANUAL CLIMATE CONTROL SYSTEM .................... 46
SUPPLEMENTARY HEATER .............................................. 51
SELF-STANDING SUPPLEMENTARY HEATER............. 52
EXTERNAL LIGHTS .............................................................. 58
WINDOW WASHING......................................................... 61CRUISE CONTROL ............................................................. 63
CEILING LIGHTS .................................................................. 65
CONTROLS ........................................................................... 66
POWER SUPPLY AND FUEL CUT-OFF SWITCH....... 68
INTERIOR FITTINGS ............................................................ 69
MULTIMETER .......................................................................... 73
DOORS .................................................................................... 74
POWER WINDOWS/WINDOW WINDERS .............. 79
BONNET .................................................................................. 80
ROOF RACK/SKI RACK ..................................................... 82
HEADLIGHTS .......................................................................... 83
ABS SYSTEM ........................................................................... 84
ESP SYSTEM ............................................................................ 85
EOBD SYSTEM ....................................................................... 88
PARKING SENSORS ............................................................ 89
SOUND SYSTEM .................................................................... 92
ACCESSORIES PURCHASED BY THE OWNER .......... 93
AT THE FILLING STATION .............................................. 94
PROTECTING THE ENVIRONMENT ............................. 95
D D
A A
S S
H H
B B
O O
A A
R R
D D
A A
N N
D D
C C
O O
N N
T T
R R
O O
L L
S S
Page 6 of 238
5
SAFETY
DEVICES
CORRECT USE
OF THE
VEHICLE
WARNING
LIGHTS AND
MESSAGES
IN AN
EMERGENCY
VEHICLE
MAINTENANCE
TECHNICAL
SPECIFICATIONS
INDEX
DASHBOARD
AND CONTROLS
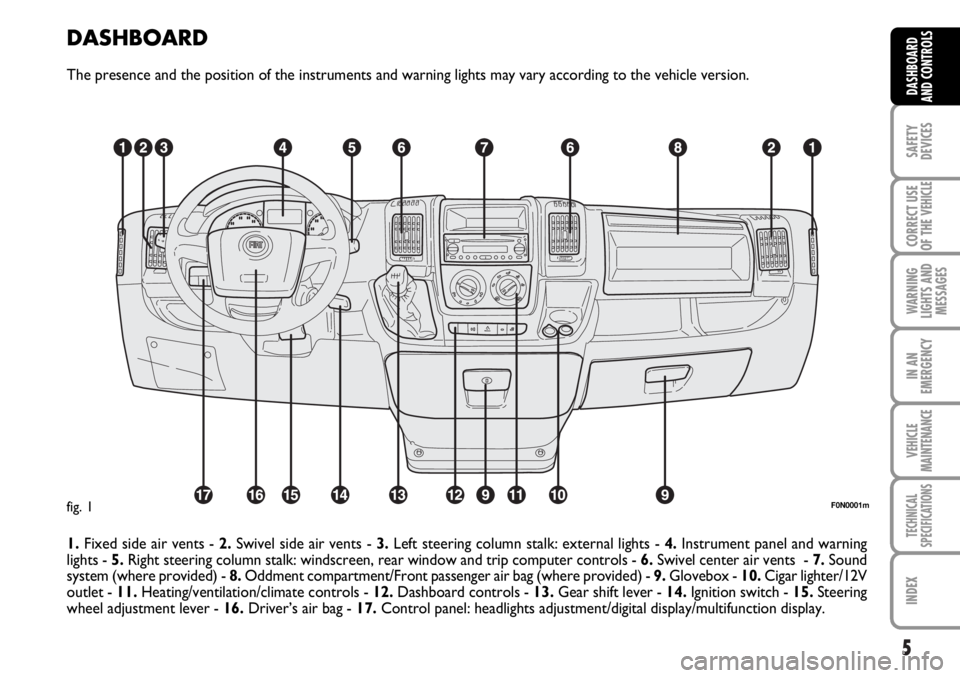
DASHBOARD
The presence and the position of the instruments and warning lights may vary according to the vehicle version.
1.Fixed side air vents - 2.Swivel side air vents - 3.Left steering column stalk: external lights - 4.Instrument panel and warning
lights - 5.Right steering column stalk: windscreen, rear window and trip computer controls - 6.Swivel center air vents - 7.Sound
system (where provided) - 8.Oddment compartment/Front passenger air bag (where provided) - 9.Glovebox - 10.Cigar lighter/12V
outlet - 11.Heating/ventilation/climate controls - 12.Dashboard controls - 13.Gear shift lever - 14.Ignition switch - 15. Steering
wheel adjustment lever - 16.Driver’s air bag - 17.Control panel: headlights adjustment/digital display/multifunction display.
F0N0001mfig. 1
Page 14 of 238
13
SAFETY
DEVICES
CORRECT USE
OF THE
VEHICLE
WARNING
LIGHTS AND
MESSAGES
IN AN
EMERGENCY
VEHICLE
MAINTENANCE
TECHNICAL
SPECIFICATIONS
INDEX
DASHBOARD
AND CONTROLS
IGNITION
DEVICE
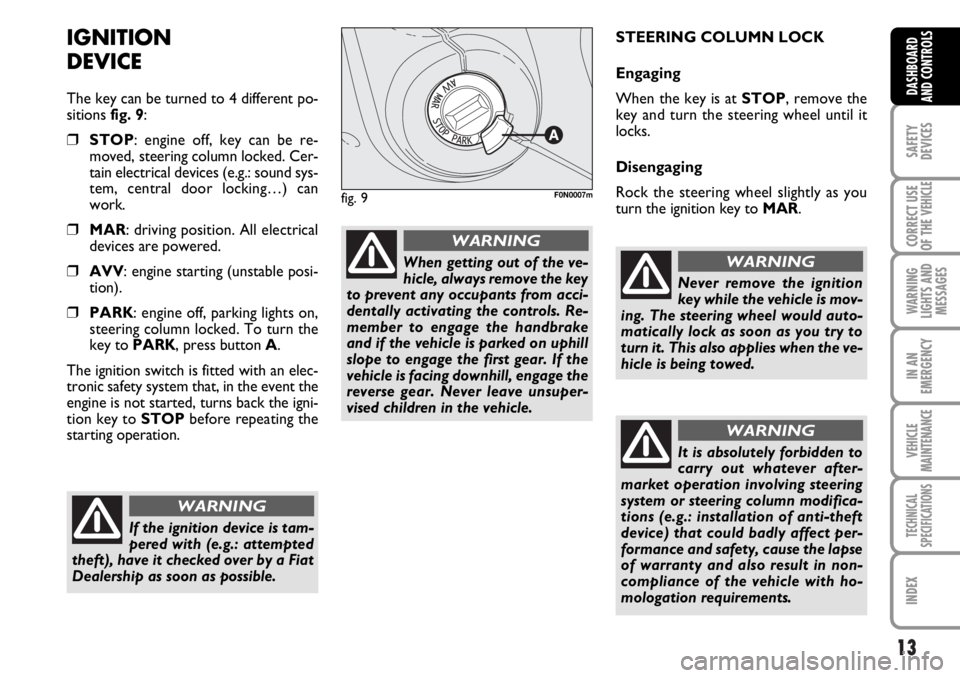
The key can be turned to 4 different po-
sitions fig. 9:
❒STOP: engine off, key can be re-
moved, steering column locked. Cer-
tain electrical devices (e.g.: sound sys-
tem, central door locking…) can
work.
❒MAR: driving position. All electrical
devices are powered.
❒AVV: engine starting (unstable posi-
tion).
❒PARK: engine off, parking lights on,
steering column locked. To turn the
key to PARK, press button A.
The ignition switch is fitted with an elec-
tronic safety system that, in the event the
engine is not started, turns back the igni-
tion key to STOPbefore repeating the
starting operation.STEERING COLUMN LOCK
Engaging
When the key is at STOP, remove the
key and turn the steering wheel until it
locks.
Disengaging
Rock the steering wheel slightly as you
turn the ignition key to MAR.
If the ignition device is tam-
pered with (e.g.: attempted
theft), have it checked over by a Fiat
Dealership as soon as possible.
WARNING
When getting out of the ve-
hicle, always remove the key
to prevent any occupants from acci-
dentally activating the controls. Re-
member to engage the handbrake
and if the vehicle is parked on uphill
slope to engage the first gear. If the
vehicle is facing downhill, engage the
reverse gear. Never leave unsuper-
vised children in the vehicle.
WARNING
fig. 9F0N0007m
Never remove the ignition
key while the vehicle is mov-
ing. The steering wheel would auto-
matically lock as soon as you try to
turn it. This also applies when the ve-
hicle is being towed.
WARNING
It is absolutely forbidden to
carry out whatever after-
market operation involving steering
system or steering column modifica-
tions (e.g.: installation of anti-theft
device) that could badly affect per-
formance and safety, cause the lapse
of warranty and also result in non-
compliance of the vehicle with ho-
mologation requirements.
WARNING
Page 36 of 238
35
SAFETY
DEVICES
CORRECT USE
OF THE
VEHICLE
WARNING
LIGHTS AND
MESSAGES
IN AN
EMERGENCY
VEHICLE
MAINTENANCE
TECHNICAL
SPECIFICATIONS
INDEX
DASHBOARD
AND CONTROLS
Fabric upholstery of your Fiat
Ducato is purpose-made to
withstand common wear re-
sulting from normal use of the
vehicle. It is however absolutely neces-
sary to prevent hard and/or prolonged
scratching/scraping caused by clothing
accessories like metallic buckles, studs,
“Velcro” fixings, etc. that stressing lo-
cally the fabric could break yarns and
damage the upholstery as a conse-
quence.
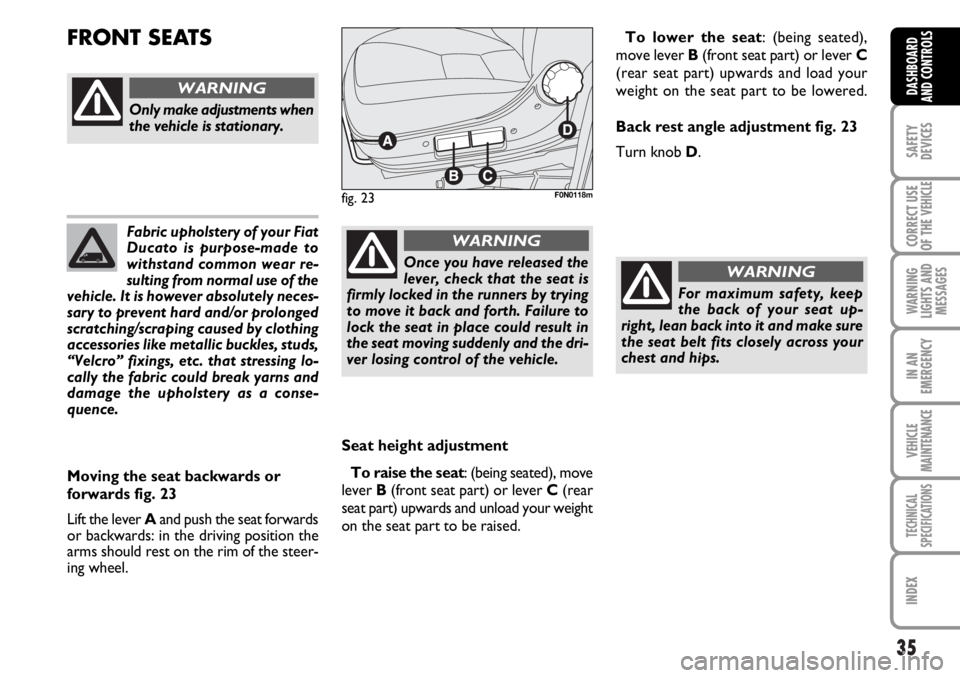
Seat height adjustment
To raise the seat: (being seated), move
lever B (front seat part) or lever C (rear
seat part) upwards and unload your weight
on the seat part to be raised.
FRONT SEATS
fig. 23F0N0118m
Only make adjustments when
the vehicle is stationary.
WARNING
Moving the seat backwards or
forwards fig. 23
Lift the lever Aand push the seat forwards
or backwards: in the driving position the
arms should rest on the rim of the steer-
ing wheel.
Once you have released the
lever, check that the seat is
firmly locked in the runners by trying
to move it back and forth. Failure to
lock the seat in place could result in
the seat moving suddenly and the dri-
ver losing control of the vehicle.
WARNING
For maximum safety, keep
the back of your seat up-
right, lean back into it and make sure
the seat belt fits closely across your
chest and hips.
WARNING
To lower the seat: (being seated),
move lever B(front seat part) or lever C
(rear seat part) upwards and load your
weight on the seat part to be lowered.
Back rest angle adjustment fig. 23
Turn knob D.
Page 37 of 238
36
SAFETY
DEVICES
CORRECT USE
OF THE
VEHICLE
WARNING
LIGHTS AND
MESSAGES
IN AN
EMERGENCY
VEHICLE
MAINTENANCE
TECHNICAL
SPECIFICATIONS
INDEX
DASHBOARD
AND CONTROLS
fig. 24F0N0147m
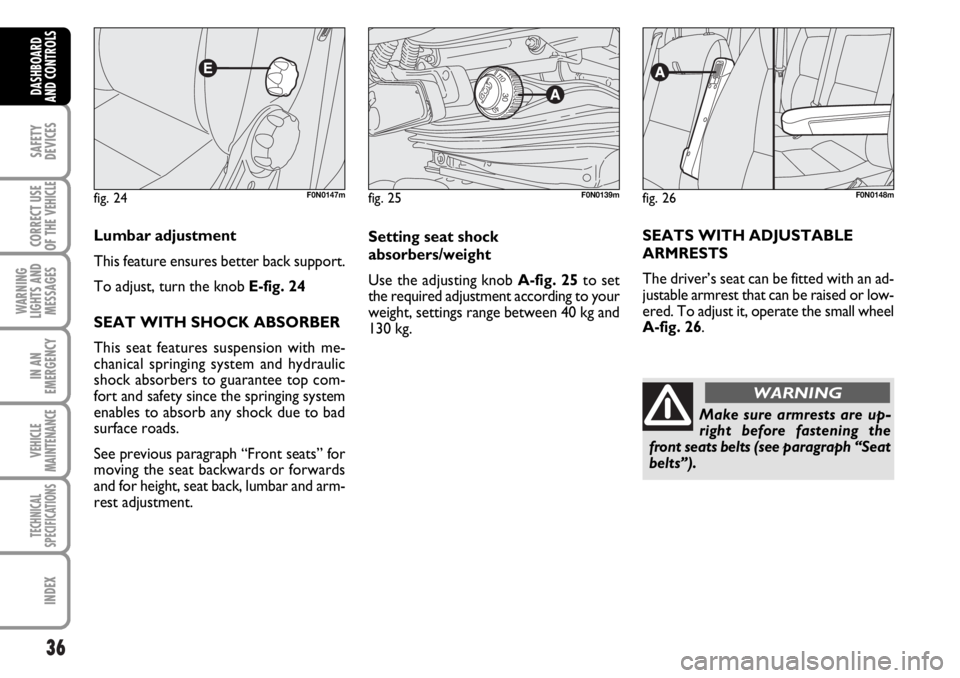
Lumbar adjustment
This feature ensures better back support.
To adjust, turn the knob E-fig. 24
SEAT WITH SHOCK ABSORBER
This seat features suspension with me-
chanical springing system and hydraulic
shock absorbers to guarantee top com-
fort and safety since the springing system
enables to absorb any shock due to bad
surface roads.
See previous paragraph “Front seats” for
moving the seat backwards or forwards
and for height, seat back, lumbar and arm-
rest adjustment.
fig. 25F0N0139m
Setting seat shock
absorbers/weight
Use the adjusting knob A-fig. 25to set
the required adjustment according to your
weight, settings range between 40 kg and
130 kg.
Make sure armrests are up-
right before fastening the
front seats belts (see paragraph “Seat
belts”). SEATS WITH ADJUSTABLE
ARMRESTS
The driver’s seat can be fitted with an ad-
justable armrest that can be raised or low-
ered. To adjust it, operate the small wheel
A-fig. 26.
fig. 26F0N0148m
WARNING
Page 40 of 238
39
SAFETY
DEVICES
CORRECT USE
OF THE
VEHICLE
WARNING
LIGHTS AND
MESSAGES
IN AN
EMERGENCY
VEHICLE
MAINTENANCE
TECHNICAL
SPECIFICATIONS
INDEX
DASHBOARD
AND CONTROLS
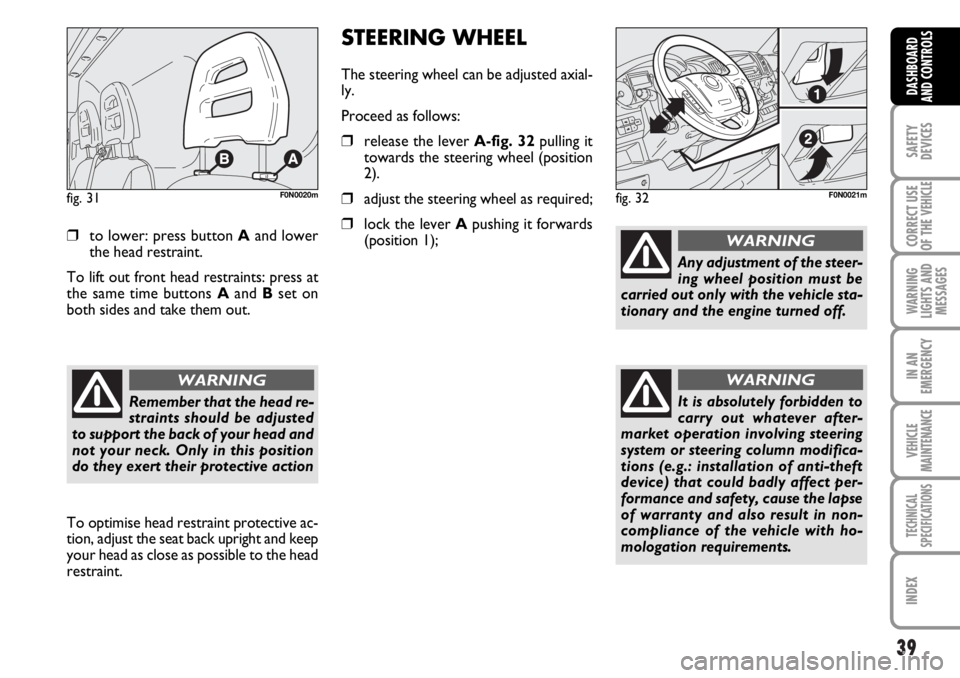
❒to lower: press button Aand lower
the head restraint.
To lift out front head restraints: press at
the same time buttons Aand Bset on
both sides and take them out.
fig. 31F0N0020m
To optimise head restraint protective ac-
tion, adjust the seat back upright and keep
your head as close as possible to the head
restraint.
Remember that the head re-
straints should be adjusted
to support the back of your head and
not your neck. Only in this position
do they exert their protective action
WARNING
STEERING WHEEL
The steering wheel can be adjusted axial-
ly.
Proceed as follows:
❒release the lever A-fig. 32pulling it
towards the steering wheel (position
2).
❒adjust the steering wheel as required;
❒lock the lever Apushing it forwards
(position 1);
fig. 32F0N0021m
Any adjustment of the steer-
ing wheel position must be
carried out only with the vehicle sta-
tionary and the engine turned off.
WARNING
It is absolutely forbidden to
carry out whatever after-
market operation involving steering
system or steering column modifica-
tions (e.g.: installation of anti-theft
device) that could badly affect per-
formance and safety, cause the lapse
of warranty and also result in non-
compliance of the vehicle with ho-
mologation requirements.
WARNING
Page 60 of 238
59
SAFETY
DEVICES
CORRECT USE
OF THE
VEHICLE
WARNING
LIGHTS AND
MESSAGES
IN AN
EMERGENCY
VEHICLE
MAINTENANCE
TECHNICAL
SPECIFICATIONS
INDEX
DASHBOARD
AND CONTROLS
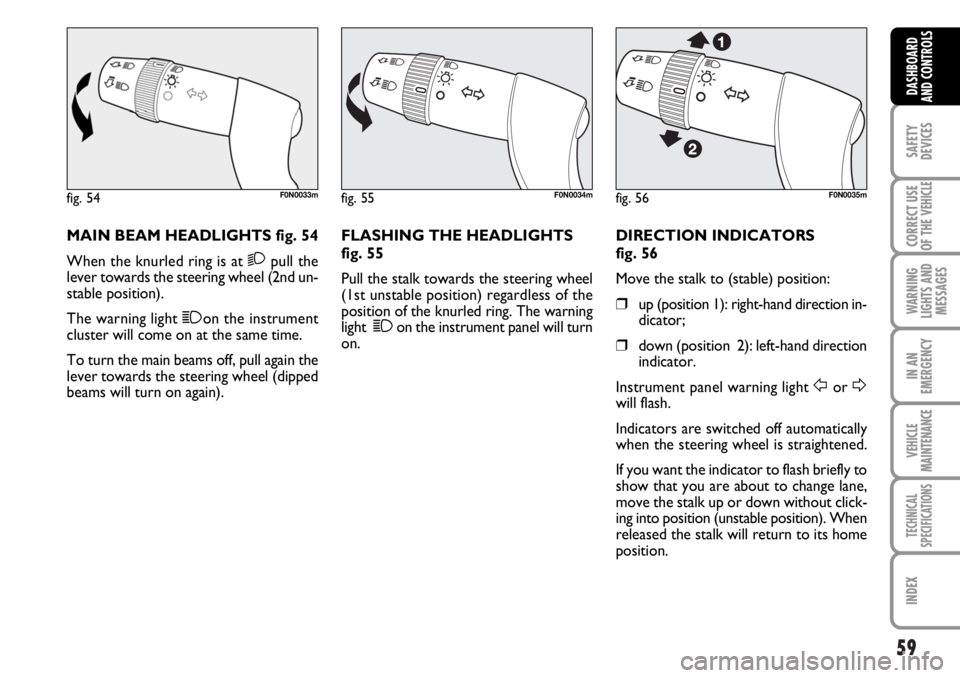
MAIN BEAM HEADLIGHTS fig. 54
When the knurled ring is at
2pull the
lever towards the steering wheel (2nd un-
stable position).
The warning light 1on the instrument
cluster will come on at the same time.
To turn the main beams off, pull again the
lever towards the steering wheel (dipped
beams will turn on again).FLASHING THE HEADLIGHTS
fig. 55
Pull the stalk towards the steering wheel
(1st unstable position) regardless of the
position of the knurled ring. The warning
light 1on the instrument panel will turn
on.DIRECTION INDICATORS
fig. 56
Move the stalk to (stable) position:
❒up (position 1): right-hand direction in-
dicator;
❒down (position 2): left-hand direction
indicator.
Instrument panel warning light
ForDwill flash.
Indicators are switched off automatically
when the steering wheel is straightened.
If you want the indicator to flash briefly to
show that you are about to change lane,
move the stalk up or down without click-
ing into position (unstable position). When
released the stalk will return to its home
position.
fig. 54F0N0033mfig. 55F0N0034mfig. 56F0N0035m
Page 61 of 238
60
SAFETY
DEVICES
CORRECT USE
OF THE
VEHICLE
WARNING
LIGHTS AND
MESSAGES
IN AN
EMERGENCY
VEHICLE
MAINTENANCE
TECHNICAL
SPECIFICATIONS
INDEX
DASHBOARD
AND CONTROLS
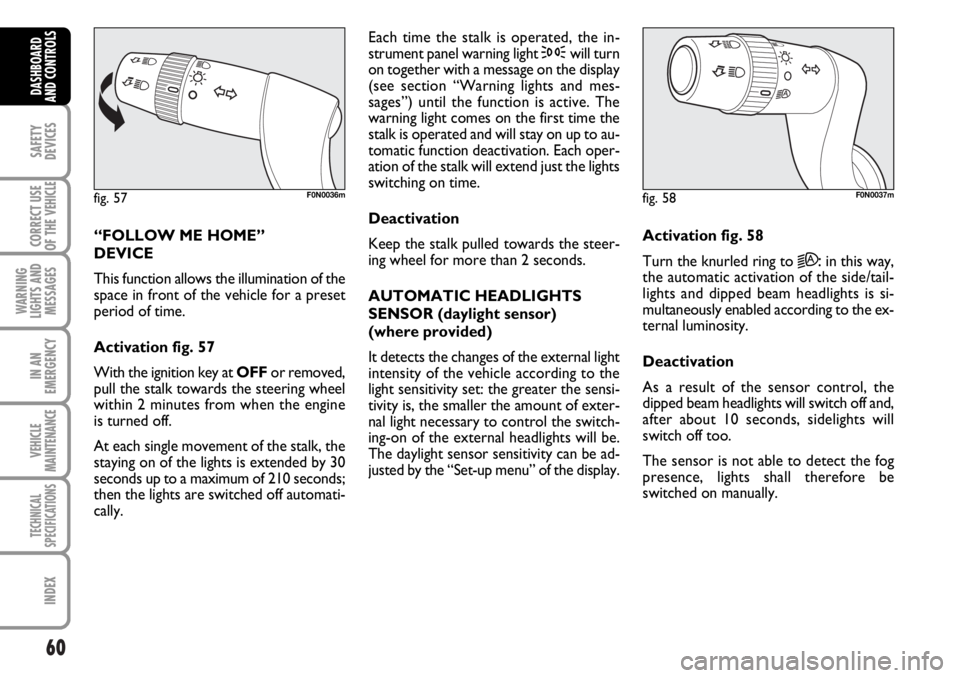
“FOLLOW ME HOME”
DEVICE
This function allows the illumination of the
space in front of the vehicle for a preset
period of time.
Activation fig. 57
With the ignition key at OFFor removed,
pull the stalk towards the steering wheel
within 2 minutes from when the engine
is turned off.
At each single movement of the stalk, the
staying on of the lights is extended by 30
seconds up to a maximum of 210 seconds;
then the lights are switched off automati-
cally. Each time the stalk is operated, the in-
strument panel warning light 3will turn
on together with a message on the display
(see section “Warning lights and mes-
sages”) until the function is active. The
warning light comes on the first time the
stalk is operated and will stay on up to au-
tomatic function deactivation. Each oper-
ation of the stalk will extend just the lights
switching on time.
Deactivation
Keep the stalk pulled towards the steer-
ing wheel for more than 2 seconds.
AUTOMATIC HEADLIGHTS
SENSOR (daylight sensor)
(where provided)
It detects the changes of the external light
intensity of the vehicle according to the
light sensitivity set: the greater the sensi-
tivity is, the smaller the amount of exter-
nal light necessary to control the switch-
ing-on of the external headlights will be.
The daylight sensor sensitivity can be ad-
justed by the “Set-up menu” of the display.Activation fig. 58
Turn the knurled ring to
2A:in this way,
the automatic activation of the side/tail-
lights and dipped beam headlights is si-
multaneously enabled according to the ex-
ternal luminosity.
Deactivation
As a result of the sensor control, the
dipped beam headlights will switch off and,
after about 10 seconds, sidelights will
switch off too.
The sensor is not able to detect the fog
presence, lights shall therefore be
switched on manually.
fig. 57F0N0036mfig. 58F0N0037m
Page 62 of 238
61
SAFETY
DEVICES
CORRECT USE
OF THE
VEHICLE
WARNING
LIGHTS AND
MESSAGES
IN AN
EMERGENCY
VEHICLE
MAINTENANCE
TECHNICAL
SPECIFICATIONS
INDEX
DASHBOARD
AND CONTROLS
WINDOW WASHING
WINDSCREEN WASHER/
WIPER
This device can only work when the igni-
tion key is at ON.
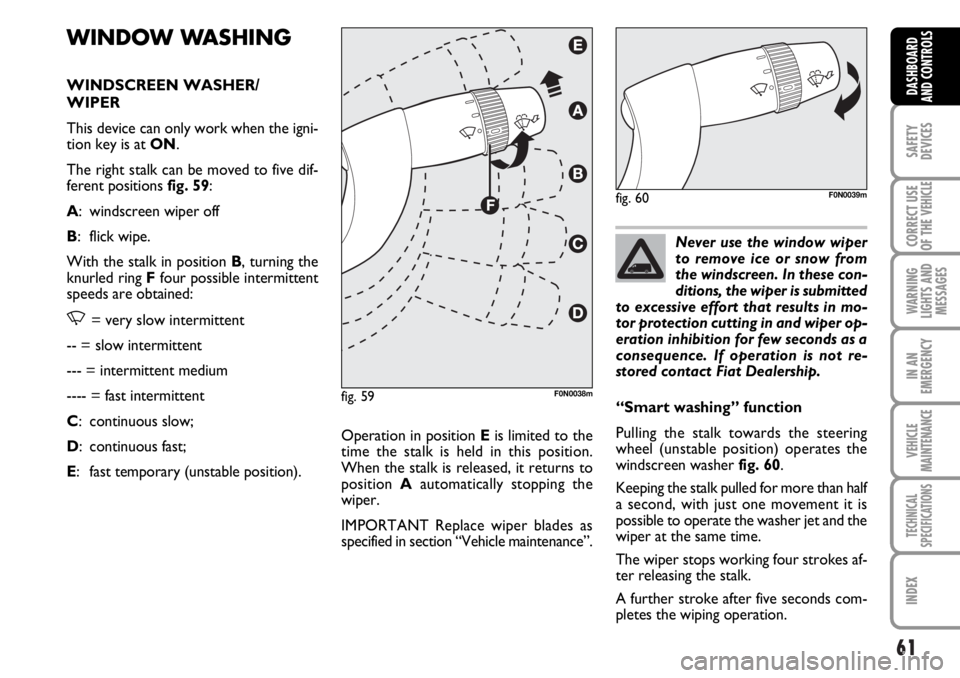
The right stalk can be moved to five dif-
ferent positions fig. 59:
A: windscreen wiper off
B: flick wipe.
With the stalk in position B, turning the
knurled ring Ffour possible intermittent
speeds are obtained:
,= very slow intermittent
-- = slow intermittent
--- = intermittent medium
---- = fast intermittent
C: continuous slow;
D: continuous fast;
E: fast temporary (unstable position).Operation in position Eis limited to the
time the stalk is held in this position.
When the stalk is released, it returns to
position Aautomatically stopping the
wiper.
IMPORTANT Replace wiper blades as
specified in section “Vehicle maintenance”.Never use the window wiper
to remove ice or snow from
the windscreen. In these con-
ditions, the wiper is submitted
to excessive effort that results in mo-
tor protection cutting in and wiper op-
eration inhibition for few seconds as a
consequence. If operation is not re-
stored contact Fiat Dealership.
“Smart washing” function
Pulling the stalk towards the steering
wheel (unstable position) operates the
windscreen washer fig. 60.
Keeping the stalk pulled for more than half
a second, with just one movement it is
possible to operate the washer jet and the
wiper at the same time.
The wiper stops working four strokes af-
ter releasing the stalk.
A further stroke after five seconds com-
pletes the wiping operation.
fig. 59F0N0038m
fig. 60F0N0039m
Page 83 of 238
Distribute the load evenly
and when driving, bear in
mind the increased sensitivity of the
vehicle to side wind.
82
SAFETY
DEVICES
CORRECT USE
OF THE
VEHICLE
WARNING
LIGHTS AND
MESSAGES
IN AN
EMERGENCY
VEHICLE
MAINTENANCE
TECHNICAL
SPECIFICATIONS
INDEX
DASHBOARD
AND CONTROLS
ROOF RACK/SKI RACK
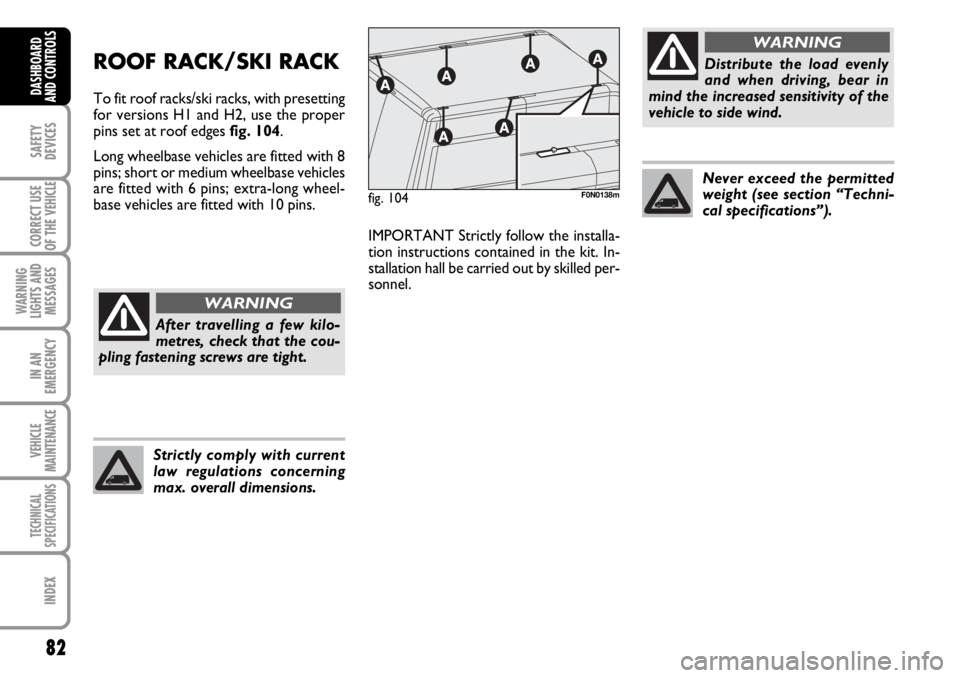
To fit roof racks/ski racks, with presetting
for versions H1 and H2, use the proper
pins set at roof edges fig. 104.
Long wheelbase vehicles are fitted with 8
pins; short or medium wheelbase vehicles
are fitted with 6 pins; extra-long wheel-
base vehicles are fitted with 10 pins.
After travelling a few kilo-
metres, check that the cou-
pling fastening screws are tight.
WARNING
Strictly comply with current
law regulations concerning
max. overall dimensions.
Never exceed the permitted
weight (see section “Techni-
cal specifications”).
IMPORTANT Strictly follow the installa-
tion instructions contained in the kit. In-
stallation hall be carried out by skilled per-
sonnel.
fig. 104F0N0138m
WARNING