Headlight FIAT DUCATO 2010 Owner handbook (in English)
[x] Cancel search | Manufacturer: FIAT, Model Year: 2010, Model line: DUCATO, Model: FIAT DUCATO 2010Pages: 286, PDF Size: 12.53 MB
Page 154 of 286
153
KNOWING
YOUR CAR
SAFETY
STARTING
AND
DRIVING
WARNING
LIGHTS AND
MESSAGES
IN AN
EMERGENCY
MAINTENANCE
AND CARE
TECHNICAL
SPECIFICATIONS
INDEX
Unnecessary actions
Avoid accelerating when starting at traffic lights or
before switching off the engine. The latter action, like
doubling the clutch, is unnecessary and causes increase
of consumption and pollution.
Gear selection
Use a higher gear as soon as traffic and road conditions
allow. Using a low gear for faster acceleration will increase
consumption. In the same way improper use of a high gear
increases consumption, emissions an engine wear.
Max. speed
Fuel consumption considerably increases with speed.
Keep your speed as even as possible, avoiding unnecessary
braking and acceleration, which cause excessive fuel
consumption and increased emissions.
Acceleration
Accelerating violently will greatly affect consumption and
emissions: acceleration should therefore be gradual and
should not exceed the maximum torque. Electric devices
Use electric devices only for the amount of time
needed. Rear heated window, additional headlights,
windscreen wipers and heater fan need a considerable
amount of energy, therefore increasing the requirement
of current increases fuel consumption (up to +25% in
the urban cycle).
Climate control system
The climate control system is an additional load which
greatly affects the engine leading to higher consumption
(on average up to +20%). When the temperature
outside the car permits it, use the air vents where
possible.
Devices for aerodynamic control
The use of non-certified devices for aerodynamic
control may adversely affect air drag and consumption
levels.
DRIVING STYLE
Starting
Do not warm the engine with the vehicle at a standstill or
at idle or high speed: under these conditions the engine
warms up much more slowly, increasing consumption and
emissions. It is therefore advisable to move off
immediately, slowly, avoiding high speeds. This way the
engine will warm faster.
147-160 DUCATO LUM EN 7ed 6/21/10 2:13 PM Page 153
Page 172 of 286

171
KNOWING
YOUR CAR
SAFETY
STARTING
AND
DRIVING
WARNING
LIGHTS AND
MESSAGES
IN AN
EMERGENCY
MAINTENANCE
AND CARE
TECHNICAL
SPECIFICATIONS
INDEX
CRUISE CONTROL
(where provided) (green)
When the key is turned to the MAR-ON
position the warning light comes on but should
go out after a few seconds.
The warning light is lit up on the display by rotating the
Cruise Control selector wheel to ON. On certain
versions the dedicated message is displayed.
Ü
RIGHT-HAND DIRECTION
INDICATOR (green – blinking)
The warning light turns on when the direction
indicator control lever is moved upwards or,
together with the left indicator, when the hazard light
button is pressed.
D
MAIN BEAM HEADLIGHTS (blue)
The warning light comes on when the main
beams are turned on.
1
ASR system (where provided)
(amber)
Turning the ignition key to MAR-ON the
warning light on the dial turns on, but it should
go off after a few seconds. the LED on the ASR button
comes on when the system is turned off.
The warning light flashes when the ASR cuts in to notify
the driver that the system is adapting to the road
surface grip conditions.
Activation of the warning light together with the
message shown on the display and a buzzer also indicate
ASR system failure. Contact a Fiat Dealership as soon as
possible in this case.
The messages shown on the display appear when the
ASR function is activated/deactivated manually (see
“ASR System” in the section on “Dashboard and
controls”).
In versions with an ASR system only, when it is turned
off (ASR OFF) the warning light stays on.
V
POWER STEERING FAILURE (red)
Turning the ignition key to MAR-ON the
warning light on the dial turns on, but it should
go off after a few seconds.
If the warning light stays on together with the message
shown on the display and a buzzer, the power steering
is ineffective and the effort on the steering wheel
increases significantly even though the vehicle can be
steered. Contact a Fiat Dealership.
g
161-172 DUCATO LUM EN 7ed 6/21/10 2:14 PM Page 171
Page 186 of 286
185
KNOWING
YOUR CAR
SAFETY
STARTING
AND
DRIVING
WARNING
LIGHTS AND
MESSAGES
IN AN
EMERGENCY
MAINTENANCE
AND CARE
TECHNICAL
SPECIFICATIONS
INDEX
B
F0N0830mfig. 182
F0N0829mfig. 183
CHANGING A BULB
GENERAL INSTRUCTIONS
❒When a light is not working, check that the
corresponding fuse is intact before changing a bulb.
For the location of fuses, refer to the paragraph
“If a fuse blows” in this section;
❒before changing a bulb check the contacts for
oxidation;
❒burnt bulbs must be replaced by others of the same
type and power;
❒always check the height of the headlight beam after
changing a bulb for safety reasons. CYLINDER REPLACEMENT PROCEDURE
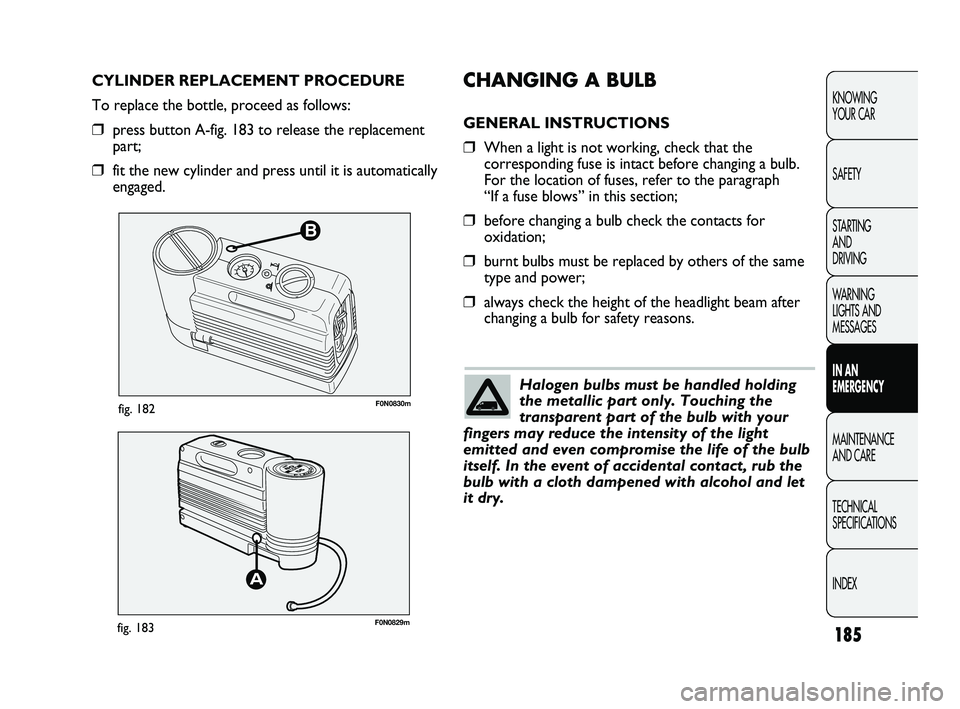
To replace the bottle, proceed as follows:
❒press button A-fig. 183 to release the replacement
part;
❒fit the new cylinder and press until it is automatically
engaged.
Halogen bulbs must be handled holding
the metallic part only. Touching the
transparent part of the bulb with your
fingers may reduce the intensity of the light
emitted and even compromise the life of the bulb
itself. In the event of accidental contact, rub the
bulb with a cloth dampened with alcohol and let
it dry.
173-206 DUCATO LUM EN 8ed 27-10-2010 15:45 Pagina 185
Page 187 of 286
186
KNOWING
YOUR CAR
SAFETY
STARTING
AND
DRIVING
WARNING
LIGHTS AND
MESSAGES
IN AN
EMERGENCY
MAINTENANCE
AND CARE
TECHNICAL
SPECIFICATIONS
INDEX
F0N0078mfig. 184
Changes or repairs to the electrical
system (electric control units) carried
out incorrectly and without due consideration
for the technical specifications of the system
can lead to malfunctioning and generate a fire
hazard.
WARNING
Halogen lamps contain gas under
pressure. Their breaking can cause
scattering of glass fragments.
WARNING
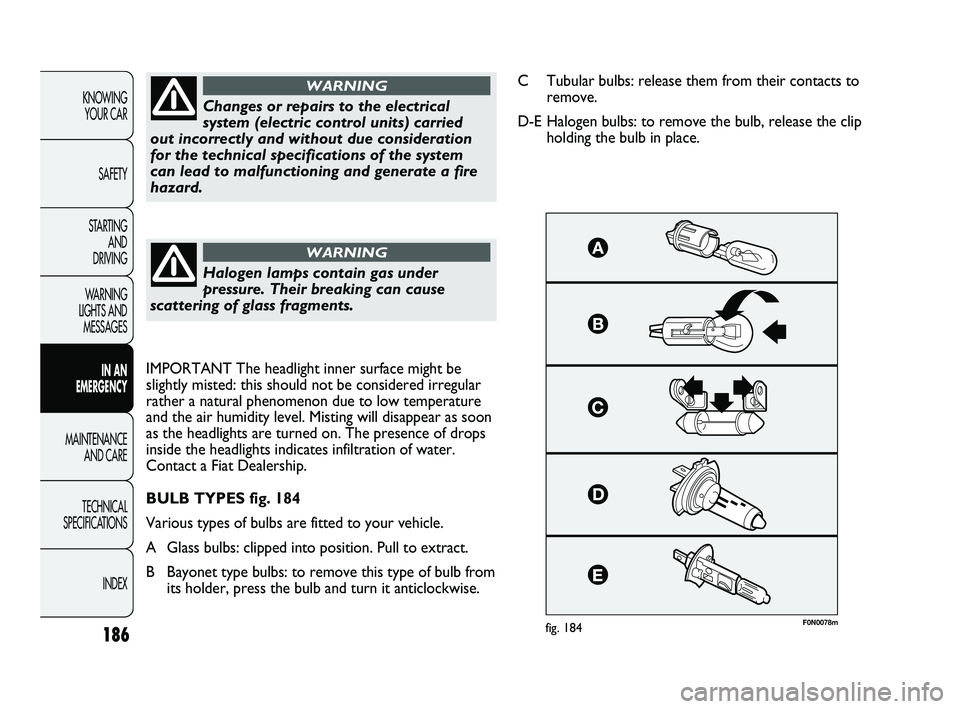
C Tubular bulbs: release them from their contacts to
remove.
D-E Halogen bulbs: to remove the bulb, release the clip
holding the bulb in place.
IMPORTANT The headlight inner surface might be
slightly misted: this should not be considered irregular
rather a natural phenomenon due to low temperature
and the air humidity level. Misting will disappear as soon
as the headlights are turned on. The presence of drops
inside the headlights indicates infiltration of water.
Contact a Fiat Dealership.
BULB TYPES fig. 184
Various types of bulbs are fitted to your vehicle.
A Glass bulbs: clipped into position. Pull to extract.
B Bayonet type bulbs: to remove this type of bulb from
its holder, press the bulb and turn it anticlockwise.
173-206 DUCATO LUM EN 8ed 27-10-2010 15:45 Pagina 186
Page 189 of 286
188
KNOWING
YOUR CAR
SAFETY
STARTING
AND
DRIVING
WARNING
LIGHTS AND
MESSAGES
IN AN
EMERGENCY
MAINTENANCE
AND CARE
TECHNICAL
SPECIFICATIONS
INDEX
F0N0079mfig. 185F0N0080mfig. 186
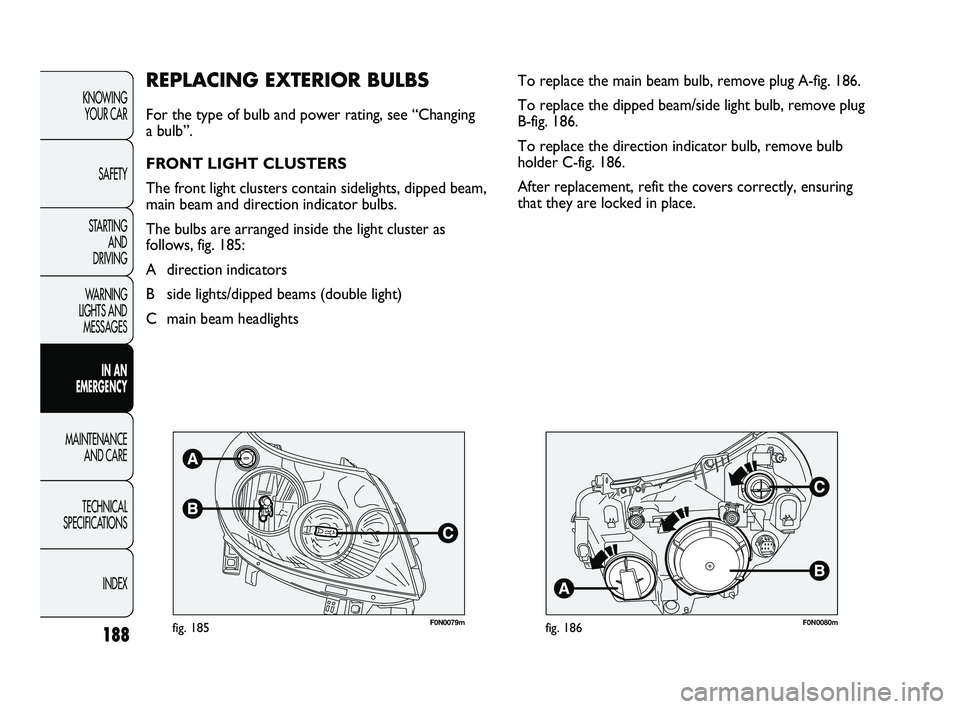
To replace the main beam bulb, remove plug A-fig. 186.
To replace the dipped beam/side light bulb, remove plug
B-fig. 186.
To replace the direction indicator bulb, remove bulb
holder C-fig. 186.
After replacement, refit the covers correctly, ensuring
that they are locked in place.REPLACING EXTERIOR BULBS
For the type of bulb and power rating, see “Changing
a bulb”.
FRONT LIGHT CLUSTERS
The front light clusters contain sidelights, dipped beam,
main beam and direction indicator bulbs.
The bulbs are arranged inside the light cluster as
follows, fig. 185:
A direction indicators
B side lights/dipped beams (double light)
C main beam headlights
173-206 DUCATO LUM EN 8ed 27-10-2010 15:45 Pagina 188
Page 190 of 286
189
KNOWING
YOUR CAR
SAFETY
STARTING
AND
DRIVING
WARNING
LIGHTS AND
MESSAGES
IN AN
EMERGENCY
MAINTENANCE
AND CARE
TECHNICAL
SPECIFICATIONS
INDEX
F0N0082mfig. 187F0N0083mfig. 188
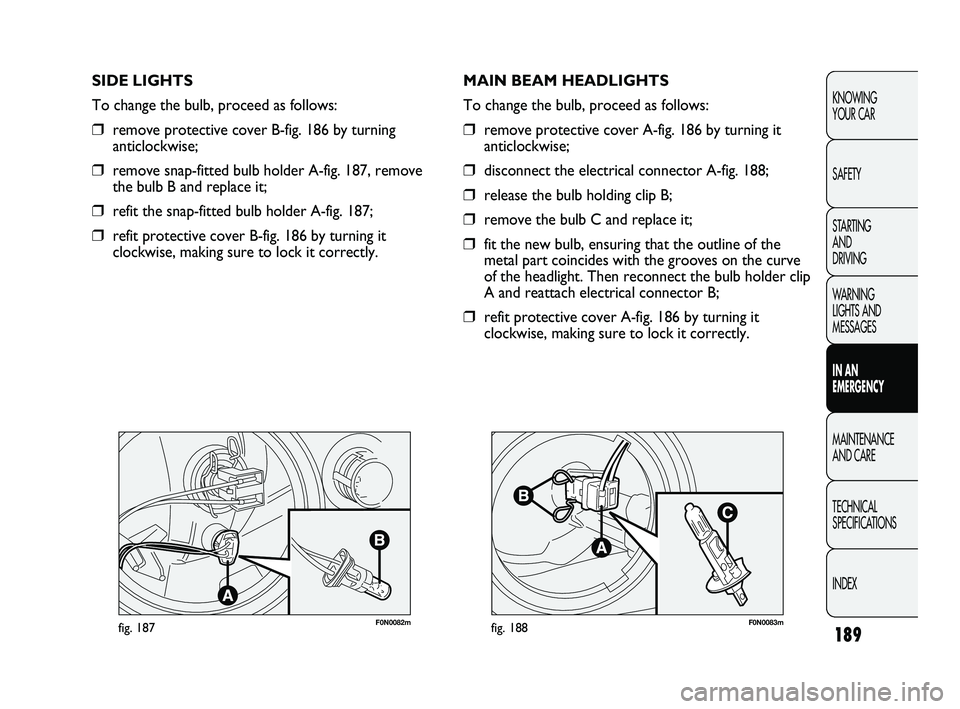
MAIN BEAM HEADLIGHTS
To change the bulb, proceed as follows:
❒remove protective cover A-fig. 186 by turning it
anticlockwise;
❒disconnect the electrical connector A-fig. 188;
❒release the bulb holding clip B;
❒remove the bulb C and replace it;
❒fit the new bulb, ensuring that the outline of the
metal part coincides with the grooves on the curve
of the headlight. Then reconnect the bulb holder clip
A and reattach electrical connector B;
❒refit protective cover A-fig. 186 by turning it
clockwise, making sure to lock it correctly. SIDE LIGHTS
To change the bulb, proceed as follows:
❒remove protective cover B-fig. 186 by turning
anticlockwise;
❒remove snap-fitted bulb holder A-fig. 187, remove
the bulb B and replace it;
❒refit the snap-fitted bulb holder A-fig. 187;
❒refit protective cover B-fig. 186 by turning it
clockwise, making sure to lock it correctly.
173-206 DUCATO LUM EN 8ed 27-10-2010 15:45 Pagina 189
Page 191 of 286
190
KNOWING
YOUR CAR
SAFETY
STARTING
AND
DRIVING
WARNING
LIGHTS AND
MESSAGES
IN AN
EMERGENCY
MAINTENANCE
AND CARE
TECHNICAL
SPECIFICATIONS
INDEX
F0N0081mfig. 189
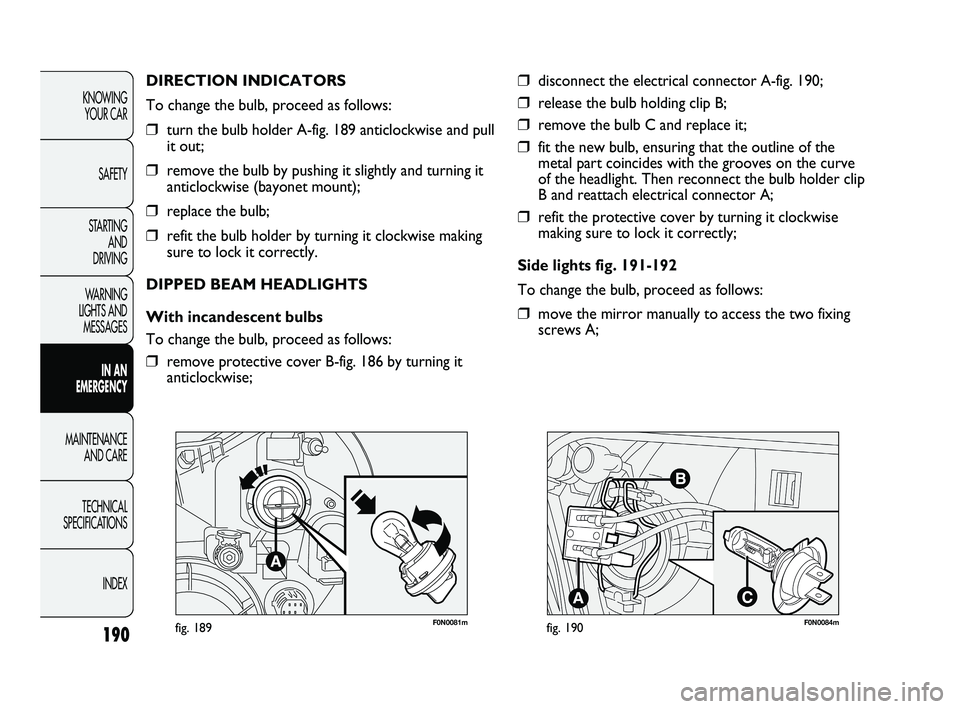
DIRECTION INDICATORS
To change the bulb, proceed as follows:
❒turn the bulb holder A-fig. 189 anticlockwise and pull
it out;
❒remove the bulb by pushing it slightly and turning it
anticlockwise (bayonet mount);
❒replace the bulb;
❒refit the bulb holder by turning it clockwise making
sure to lock it correctly.
DIPPED BEAM HEADLIGHTS
With incandescent bulbs
To change the bulb, proceed as follows:
❒remove protective cover B-fig. 186 by turning it
anticlockwise;
❒disconnect the electrical connector A-fig. 190;
❒release the bulb holding clip B;
❒remove the bulb C and replace it;
❒fit the new bulb, ensuring that the outline of the
metal part coincides with the grooves on the curve
of the headlight. Then reconnect the bulb holder clip
B and reattach electrical connector A;
❒refit the protective cover by turning it clockwise
making sure to lock it correctly;
Side lights fig. 191-192
To change the bulb, proceed as follows:
❒move the mirror manually to access the two fixing
screws A;
F0N0084mfig. 190
173-206 DUCATO LUM EN 8ed 27-10-2010 15:45 Pagina 190
Page 192 of 286
191
KNOWING
YOUR CAR
SAFETY
STARTING
AND
DRIVING
WARNING
LIGHTS AND
MESSAGES
IN AN
EMERGENCY
MAINTENANCE
AND CARE
TECHNICAL
SPECIFICATIONS
INDEX
F0N0169mfig. 191
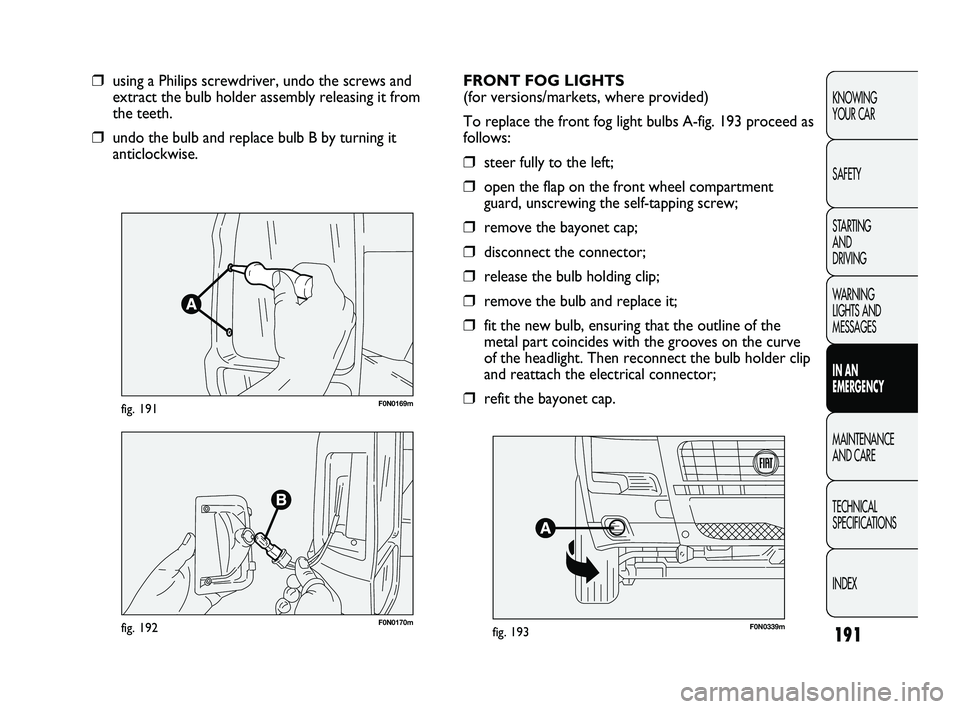
❒using a Philips screwdriver, undo the screws and
extract the bulb holder assembly releasing it from
the teeth.
❒undo the bulb and replace bulb B by turning it
anticlockwise.
F0N0170mfig. 192
FRONT FOG LIGHTS
(for versions/markets, where provided)
To replace the front fog light bulbs A-fig. 193 proceed as
follows:
❒steer fully to the left;
❒open the flap on the front wheel compartment
guard, unscrewing the self-tapping screw;
❒remove the bayonet cap;
❒disconnect the connector;
❒release the bulb holding clip;
❒remove the bulb and replace it;
❒fit the new bulb, ensuring that the outline of the
metal part coincides with the grooves on the curve
of the headlight. Then reconnect the bulb holder clip
and reattach the electrical connector;
❒refit the bayonet cap.
F0N0339mfig. 193
173-206 DUCATO LUM EN 8ed 27-10-2010 15:45 Pagina 191
Page 202 of 286
201
KNOWING
YOUR CAR
SAFETY
STARTING
AND
DRIVING
WARNING
LIGHTS AND
MESSAGES
IN AN
EMERGENCY
MAINTENANCE
AND CARE
TECHNICAL
SPECIFICATIONS
INDEX
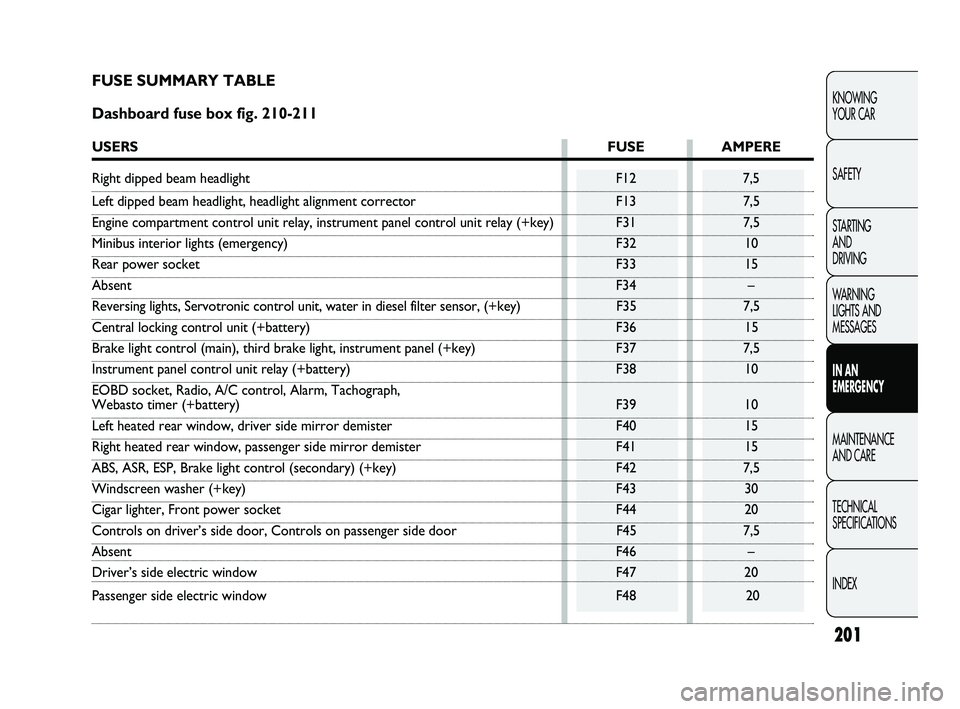
FUSE SUMMARY TABLE
Dashboard fuse box fig. 210-211
USERSFUSE AMPERE
Right dipped beam headlight F12 7,5
Left dipped beam headlight, headlight alignment corrector F13 7,5
Engine compartment control unit relay, instrument panel control unit relay (+key) F31 7,5
Minibus interior lights (emergency) F32 10
Rear power socket F33 15
AbsentF34 –
Reversing lights, Servotronic control unit, water in diesel filter sensor, (+key) F35 7,5
Central locking control unit (+battery) F36 15
Brake light control (main), third brake light, instrument panel (+key) F37 7,5
Instrument panel control unit relay (+battery) F38 10
EOBD socket, Radio, A/C control, Alarm, Tachograph,
Webasto timer (+battery) F39 10
Left heated rear window, driver side mirror demister F40 15
Right heated rear window, passenger side mirror demister F41 15
ABS, ASR, ESP, Brake light control (secondary) (+key) F42 7,5
Windscreen washer (+key) F43 30
Cigar lighter, Front power socket F44 20
Controls on driver’s side door, Controls on passenger side door F45 7,5
AbsentF46 –
Driver’s side electric window F47 20
Passenger side electric window F48 20
173-206 DUCATO LUM EN 8ed 27-10-2010 15:45 Pagina 201
Page 209 of 286
●● ● ● ●
●● ● ● ●
●● ● ● ●
●● ● ● ●
●● ● ● ●
●● ● ● ●
●●
●● ● ● ●
●● ● ● ●
●● ● ● ●
●● ● ● ●
208
KNOWING
YOUR CAR
SAFETY
STARTING
AND
DRIVING
WARNING
LIGHTS AND
MESSAGES
IN AN
EMERGENCY
MAINTENANCE
AND CARE
TECHNICAL
SPECIFICATIONS
INDEX
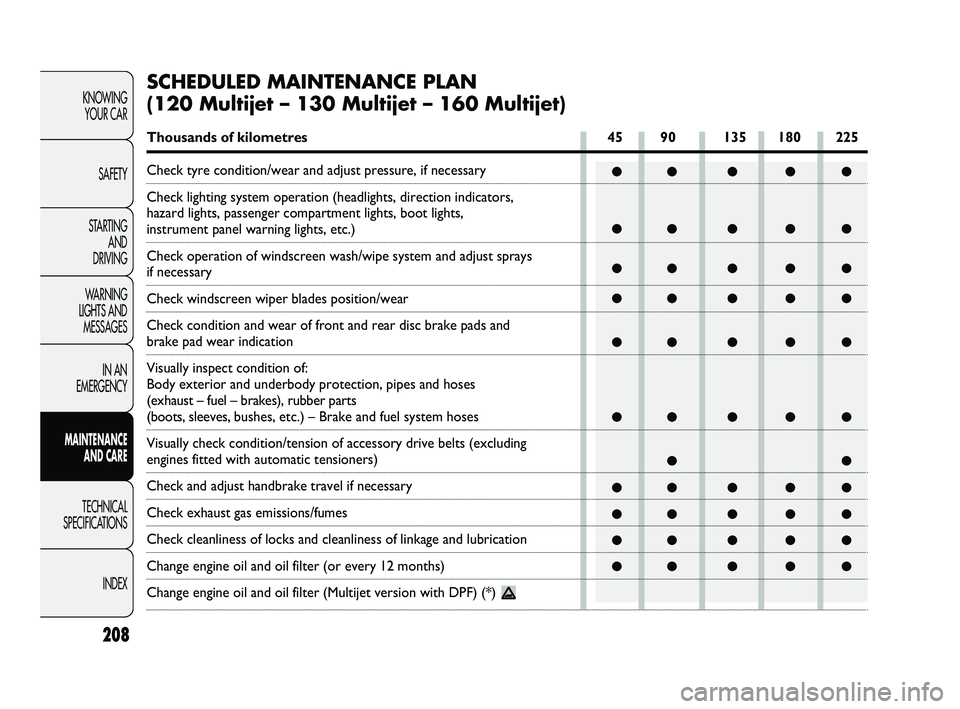
SCHEDULED MAINTENANCE PLAN
(120 Multijet – 130 Multijet – 160 Multijet)
Thousands of kilometres 45 90 135 180 225
Check tyre condition/wear and adjust pressure, if necessary
Check lighting system operation (headlights, direction indicators,
hazard lights, passenger compartment lights, boot lights,
instrument panel warning lights, etc.)
Check operation of windscreen wash/wipe system and adjust sprays
if necessary
Check windscreen wiper blades position/wear
Check condition and wear of front and rear disc brake pads and
brake pad wear indication
Visually inspect condition of:
Body exterior and underbody protection, pipes and hoses
(exhaust – fuel – brakes), rubber parts
(boots, sleeves, bushes, etc.) – Brake and fuel system hoses
Visually check condition/tension of accessory drive belts (excluding
engines fitted with automatic tensioners)
Check and adjust handbrake travel if necessary
Check exhaust gas emissions/fumes
Check cleanliness of locks and cleanliness of linkage and lubrication
Change engine oil and oil filter (or every 12 months)
Change engine oil and oil filter (Multijet version with DPF) (*)
207-230 DUCATO LUM EN 7ed 6/21/10 2:17 PM Page 208